
.NET (1327)
Children categories
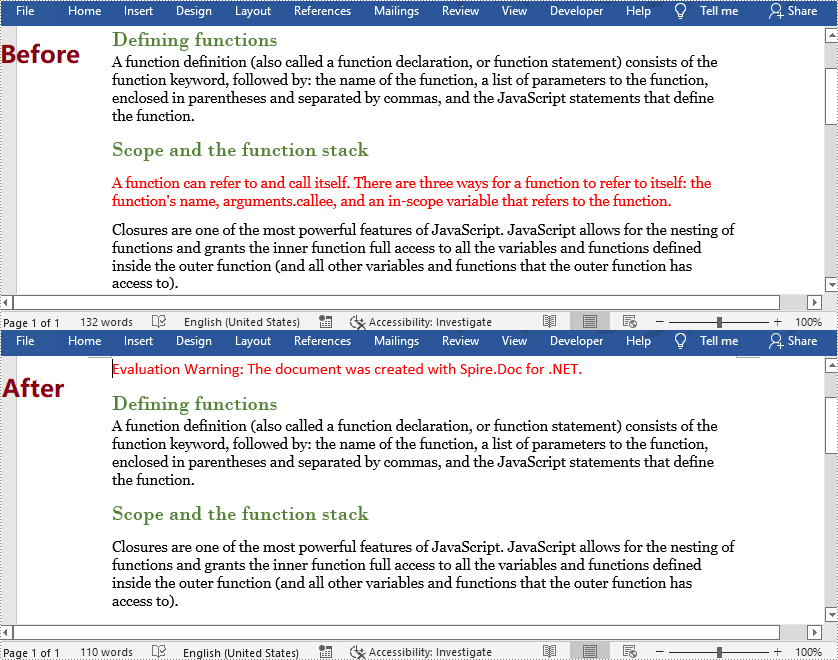
When processing a Word document, you may need to remove some paragraphs. For example, after you copied contents from the Internet with a lot of redundant paragraphs to your document, you need to delete the extra paragraphs and keep only those that are useful. The deletion can be easily achieved by Spire.Doc for .NET by programming with no need for other software. This article will show you the detailed steps of removing paragraphs in a Word document using Spire.Doc for .NET.
Install Spire.Doc for .NET
To begin with, you need to add the DLL files included in the Spire.Doc for.NET package as references in your .NET project. The DLL files can be either downloaded from this link or installed via NuGet.
PM> Install-Package Spire.Doc
Delete a Specific Paragraph in a Word Document
Spire.Doc for .NET provides a method RemoveAt() under ParagraphCollection to remove paragraphs.
The detailed steps of removing a specific paragraph are as follows:
- Create an object of Document class.
- Load a Word document using Document.LoadFromFile() method.
- Get the first section using Document.Section[] property.
- Remove the 4th paragraph using Section.Paragraphs.RemoveAt() method.
- Save the document using Document.SaveToFile() method.
- C#
- VB.NET
using System;
using Spire.Doc;

namespace RemoveParagraphs
{
    internal class Program
    {
        static void Main(string[] args)
        {
            //Create an object of Document class
            Document document = new Document();

            //Load a Word document
            document.LoadFromFile("Sample.docx");

            //Get the first section
            Section section = document.Sections[0];

            //Remove the first paragraph in the section
            section.Paragraphs.RemoveAt(3);

            //Save the document
            document.SaveToFile("RemoveParagraphs.docx", FileFormat.Docx2013);
        }
    }
}
Delete All Paragraphs in a Word Document
To remove all paragraphs, you can use the method Clear() under ParagraphCollection provided by Spire.Doc for .NET.
The detailed steps are as follows:
- Create an object of Document class.
- Load a Word Document using Document.LoadFromFile() method.
- Loop through all sections, and remove all paragraphs in each section using Section.Paragraphs.Clear() method.
- Save the document using Document.SaveToFile() method.
- C#
- VB.NET
using System;
using Spire.Doc;

namespace RemoveAllParagraphs
{
    internal class Program
    {
        static void Main(string[] args)
        {
            //Create an object of Document class
            Document document = new Document();

            //Load a Word document
            document.LoadFromFile("Sample.docx");

            //Loop through all sections
            foreach (Section section in document.Sections)
            {
                //Remove all paragraphs in the section
                section.Paragraphs.Clear();
            }

            //Save the document
            document.SaveToFile("RemoveAllParagraphs.docx", FileFormat.Docx2013);
        }
    }
}

Apply for a Temporary License
If you'd like to remove the evaluation message from the generated documents, or to get rid of the function limitations, please request a 30-day trial license for yourself.
Grouping and ungrouping in PowerPoint are two useful features when working with shapes. Grouping allows you to join multiple shapes together so you can move, format, resize, and rotate them at once as if they were a single shape. Ungrouping lets you break the connection between grouped shapes so you can work on them individually again. In this article, you will learn how to use Spire.Presentation for .NET to group or ungroup shapes in PowerPoint in C# and VB.NET.
Install Spire.Presentation for .NET
To begin with, you need to add the DLL files included in the Spire.Presentation for.NET package as references in your .NET project. The DLL files can be either downloaded from this link or installed via NuGet.
PM> Install-Package Spire.Presentation
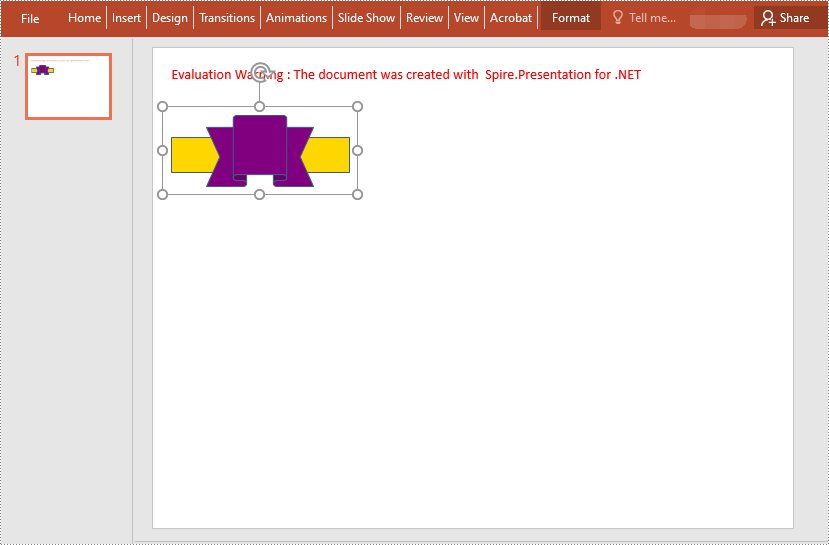
Group Shapes in PowerPoint in C# and VB.NET
Spire.Presentation for .NET provides the ISlide.GroupShapes(ArrayList shapeList) method to group two or more shapes on a specific slide. The following are the detailed steps:
- Initialize an instance of the Presentation class.
- Get the first slide by its index through Presentation.Slides[0] property.
- Add two shapes to the slide using ISlide.Shapes.AppendShape() method.
- Initialize an instance of the ArrayList class.
- Add the two shapes to the ArrayList.
- Group the two shapes in the ArrayList using ISlide.GroupShapes(ArrayList shapeList) method.
- Save the result document using Presentation.SaveToFile() method.
- C#
- VB.NET
using Spire.Presentation;
using Spire.Presentation.Drawing;
using System.Collections;
using System.Drawing;

namespace GroupShapes
{
    internal class Program
    {
        static void Main(string[] args)
        {
            //Initialize an instance of the Presentation class
            Presentation ppt = new Presentation();
            //Get the first slide
            ISlide slide = ppt.Slides[0];

            //Add two shapes to the slide
            IShape rectangle = slide.Shapes.AppendShape(ShapeType.Rectangle, new RectangleF(20, 100, 200, 40));
            rectangle.Fill.FillType = FillFormatType.Solid;
            rectangle.Fill.SolidColor.KnownColor = KnownColors.Gold;
            rectangle.Line.Width = 0.1f;
            IShape ribbon = slide.Shapes.AppendShape(ShapeType.Ribbon2, new RectangleF(60, 75, 120, 80));
            ribbon.Fill.FillType = FillFormatType.Solid;
            ribbon.Fill.SolidColor.KnownColor = KnownColors.Purple;
            ribbon.Line.Width = 0.1f;

            //Initialize an instance of the ArrayList class
            ArrayList list = new ArrayList();
            //Add the two shapes to the ArrayList
            list.Add(rectangle);
            list.Add(ribbon);

            //Group the two shapes
            slide.GroupShapes(list);

            //Save the result document
            ppt.SaveToFile("GroupShapes.pptx", FileFormat.Pptx2010);
            ppt.Dispose();
        }
    }
}
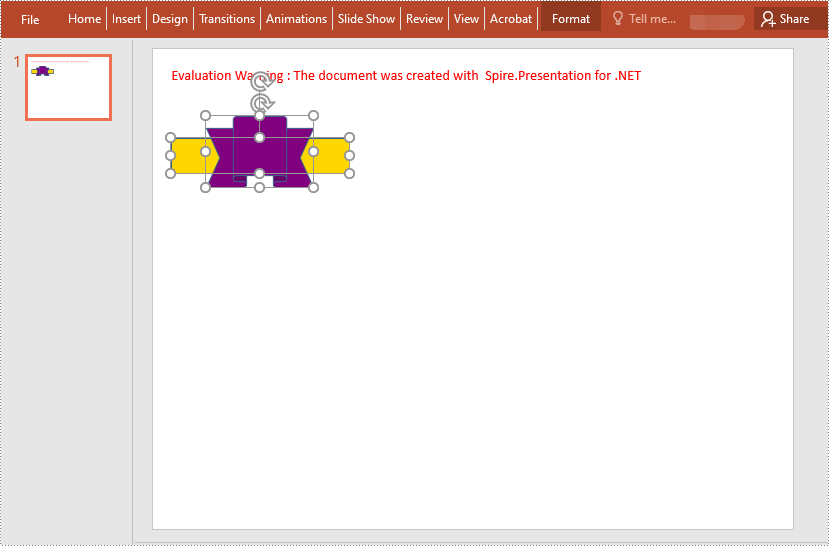
Ungroup Shapes in PowerPoint in C# and VB.NET
To ungroup the grouped shapes in a PowerPoint document, you need to iterate through all slides in the document and all shapes on each slide, find the grouped shapes and then ungroup them using ISlide.Ungroup(GroupShape) method. The following are the detailed steps:
- Initialize an instance of the Presentation class.
- Load the PowerPoint document using Presentation.LoadFromFile() method.
- Iterate through all slides in the document.
- Iterate through all shapes on each slide.
- Check if the current shape is of GroupShape type. If the result is true, ungroup it using ISlide.Ungroup(GroupShape) method.
- Save the result document using Presentation.SaveToFile() method.
- C#
- VB.NET
using Spire.Presentation;
using Spire.Presentation.Drawing;
using System.Collections;
using System.Drawing;

namespace UngroupShapes
{
    internal class Program
    {
        static void Main(string[] args)
        {
            //Initialize an instance of the Presentation class
            Presentation ppt = new Presentation();
            //Load the PowerPoint document
            ppt.LoadFromFile("GroupShapes.pptx");

            //Iterate through all slides in the document
            for (int i = 0; i < ppt.Slides.Count; i++)
            {
                ISlide slide = ppt.Slides[i];
                //Iterate through all shapes on each slide
                for (int j = 0; j < slide.Shapes.Count; j++)
                {
                    IShape shape = slide.Shapes[j];
                    //Detect if the shape is a grouped shape
                    if (shape is GroupShape)
                    {
                        GroupShape groupShape = shape as GroupShape;
                        //Ungroup the grouped shape
                        slide.Ungroup(groupShape);
                    }
                }
            }

            //Save the result document
            ppt.SaveToFile("UngroupShapes.pptx", FileFormat.Pptx2013);
            ppt.Dispose();
        }
    }
}
Apply for a Temporary License
If you'd like to remove the evaluation message from the generated documents, or to get rid of the function limitations, please request a 30-day trial license for yourself.
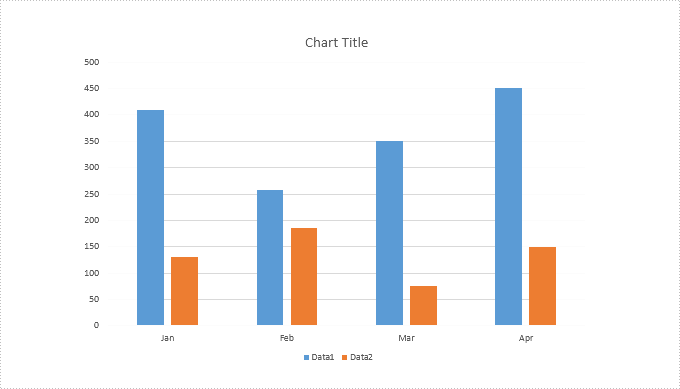
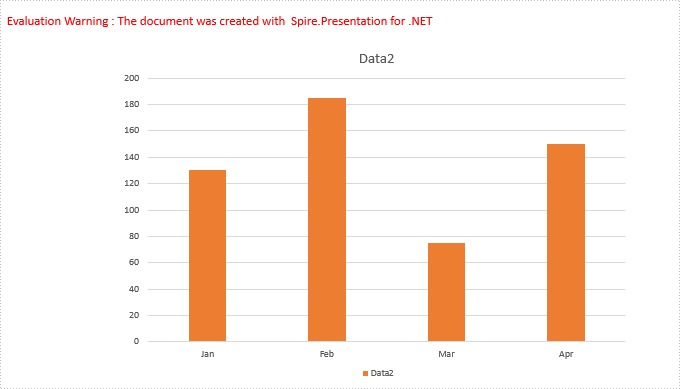
Spire.Presentation provides a property "IsHidden" to enable developers to hide or show a specific series of a chart. This article demonstrates how we can accomplish this function using Spire.Presentation and C#.
Below is the screenshot of the original chart:
Detail steps:
Step 1: Instantiate a Presentation object and load the PowerPoint file.
Presentation ppt = new Presentation();
ppt.LoadFromFile("Input.pptx");
Step 2: Get the first slide.
ISlide slide = ppt.Slides[0];
Step 3: Get the first chart.
IChart chart = slide.Shapes[0] as IChart;
Step 4: Hide the first series of the chart.
//Hide the first series of the chart
chart.Series[0].IsHidden = true;

//Show the first series of the chart
//chart.Series[0].IsHidden = false;
Step 5: Save the file.
ppt.SaveToFile("Output.pptx", FileFormat.Pptx2013);
Screenshot after hiding the first series:
using Spire.Presentation;
using Spire.Presentation.Charts;

namespace Hide_Chart_Series_in_PPT
{
    class Program
    {
        static void Main(string[] args)
        {
            //Instantiate a Presentation object
            Presentation ppt = new Presentation();
            //Load the PowerPoint file
            ppt.LoadFromFile("Input.pptx");

            //Get the first slide
            ISlide slide = ppt.Slides[0];

            //Get the first chart
            IChart chart = slide.Shapes[0] as IChart;

            //Hide the first series of the chart
            chart.Series[0].IsHidden = true;

            //Show the first series of the chart
            //chart.Series[0].IsHidden = false;

            //Save the file
            ppt.SaveToFile("Output.pptx", FileFormat.Pptx2013);
        }
    }
}
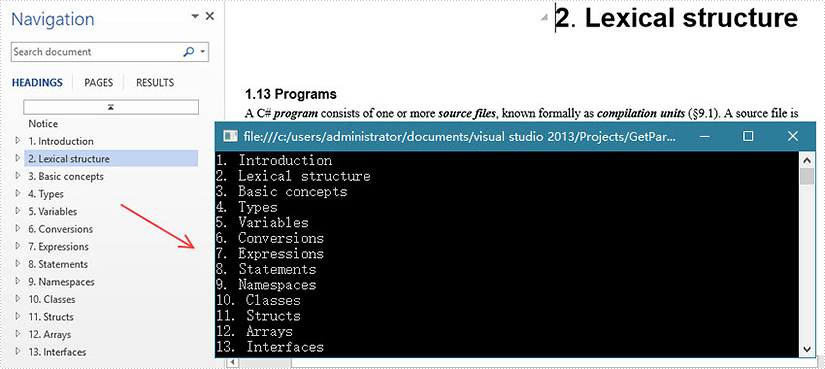
By using Spire.Doc, you can not only retrieve the style names of all paragraphs in a Word document, but also get the paragraphs with a specific style name. This is useful especially when you need to get the text in Title, Heading 1, Subtitle, etc.
| Paragraph Style Names in Word | Paragraph Style Names in Spire.Doc |
| Title | Title |
| Heading 1 | Heading1 |
| Heading 2 | Heading2 |
| Heading 3 | Heading3 |
| Heading 4 | Heading3 |
| Subtitle | Subtitle |
Step 1: Load a sample Word file when initializing the Document object.
Document doc = new Document("sample.docx");
Step 2: Traverse the sections and paragraphs in the document and determine if the paragraph style name is "Heading1", if so, write the paragraph text on screen.
foreach (Section section in doc.Sections)
{
    foreach (Paragraph paragraph in section.Paragraphs)
    {
        if (paragraph.StyleName == "Heading1")
        {
            Console.WriteLine(paragraph.Text);
        }
    }
}
Output:
Full Code:
using Spire.Doc;
using Spire.Doc.Documents;
using System;
namespace GetParagh
{
 class Program
    {

     static void Main(string[] args)
     {
         Document doc = new Document("sample.docx");
         foreach (Section section in doc.Sections)
         {
             foreach (Paragraph paragraph in section.Paragraphs)
             {
                 if (paragraph.StyleName == "Heading1")
                 {
                     Console.WriteLine(paragraph.Text);
                 }
             }
         }
     }

    }
}
Imports Spire.Doc
Imports Spire.Doc.Documents
Namespace GetParagh
	Class Program

		Private Shared Sub Main(args As String())
			Dim doc As New Document("sample.docx")
			For Each section As Section In doc.Sections
				For Each paragraph As Paragraph In section.Paragraphs
					If paragraph.StyleName = "Heading1" Then
						Console.WriteLine(paragraph.Text)
					End If
				Next
			Next
		End Sub

	End Class
End Namespace
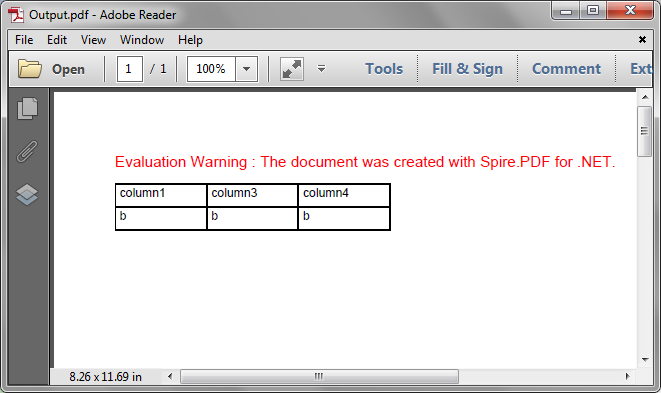
Spire.PDF supports to delete rows or columns from a PDF grid before drawing it onto a PDF page. This article demonstrates the detail steps of how to delete a row and a column from a PDF grid using Spire.PDF.
Detail steps:
Step 1: Create a PDF document and add a page to it.
PdfDocument doc = new PdfDocument();
PdfPageBase page = doc.Pages.Add();
Step 2: Create a PDF grid.
PdfGrid grid = new PdfGrid();
//Set cell padding
grid.Style.CellPadding = new PdfPaddings(3, 3, 1, 1);
Step 3: Add 3 rows and 4 columns to the grid.
PdfGridRow row1 = grid.Rows.Add();
PdfGridRow row2 = grid.Rows.Add();
PdfGridRow row3 = grid.Rows.Add();

grid.Columns.Add(4);
Step 4: Set columns' width.
foreach (PdfGridColumn column in grid.Columns)
{
    column.Width = 60f;
}
Step 5: Add values to grid cells.
for (int i = 0; i < grid.Columns.Count; i++)
{
    row1.Cells[i].Value = String.Format("column{0}", i + 1);
    row2.Cells[i].Value = "a";
    row3.Cells[i].Value = "b";
}
Step 6: Delete the second row and the second column from the grid.
grid.Rows.RemoveAt(1);

grid.Columns.RemoveAt(1);
Step 7: Draw the grid onto the page and save the file.
grid.Draw(page, new PointF(0, 20));

doc.SaveToFile("Output.pdf");
Output:
Full code:
using System;
using System.Drawing;
using Spire.Pdf;
using Spire.Pdf.Grid;

namespace Delete_Row_and_Column_from_PDFGrid
{
    class Program
    {
        static void Main(string[] args)
        {
            //Create a PDF document
            PdfDocument doc = new PdfDocument();

            //Add a page
            PdfPageBase page = doc.Pages.Add();

            //Create a PDF grid
            PdfGrid grid = new PdfGrid();

            //Set cell padding
            grid.Style.CellPadding = new PdfPaddings(3, 3, 1, 1);

            //Add 3 rows and 4 columns to the grid
            PdfGridRow row1 = grid.Rows.Add();
            PdfGridRow row2 = grid.Rows.Add();
            PdfGridRow row3 = grid.Rows.Add();
            grid.Columns.Add(4);

            //Set columns’ width
            foreach (PdfGridColumn column in grid.Columns)
            {
                column.Width = 60f;
            }

            //Add values to grid cells
            for (int i = 0; i < grid.Columns.Count; i++)
            {
                row1.Cells[i].Value = String.Format("column{0}", i + 1);
                row2.Cells[i].Value = "a";
                row3.Cells[i].Value = "b";
            }

            //Delete the second row
            grid.Rows.RemoveAt(1);

            //Delete the second column
            grid.Columns.RemoveAt(1);

            //Draw the grid to the page
            grid.Draw(page, new PointF(0, 20));

            //Save the file
            doc.SaveToFile("Output.pdf");
        }
    }
}
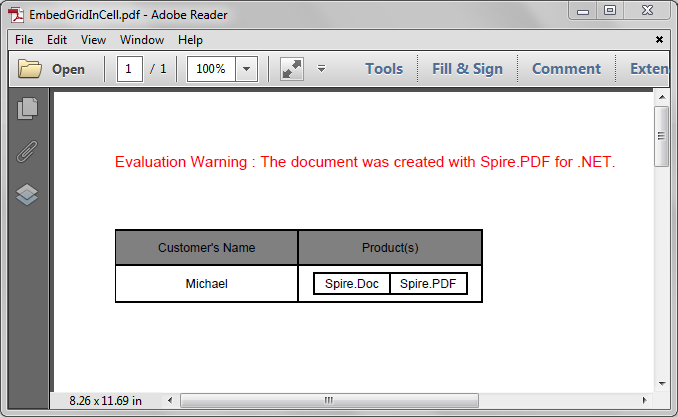
Spire.PDF supports to embed image and grid into a grid cell. We've introduced how to embed an image into a grid cell in the article - How to Insert an Image to PDF Grid Cell in C#, this article is going to show you how to embed a grid into a grid cell in PDF using Spire.PDF.
Detail steps:
Step 1: Create a PDF document and add a page to it.
PdfDocument pdf = new PdfDocument();
PdfPageBase page = pdf.Pages.Add();
Step 2: Create a PDF grid.
//Create a grid
PdfGrid grid = new PdfGrid();

//Add two rows
PdfGridRow row1 = grid.Rows.Add();
PdfGridRow row2 = grid.Rows.Add();

//Set the Top and Bottom cell padding
grid.Style.CellPadding.Top = 5f;
grid.Style.CellPadding.Bottom = 5f;

//Add two columns
grid.Columns.Add(2);

//Set columns' width
grid.Columns[0].Width = 120f;
grid.Columns[1].Width = 120f;
Step 3: Create another PDF grid to embed.
//Create another grid
PdfGrid embedGrid = new PdfGrid();

//Add a row
PdfGridRow newRow = embedGrid.Rows.Add();

//Add two columns
embedGrid.Columns.Add(2);

//Set columns' width
embedGrid.Columns[0].Width = 50f;
embedGrid.Columns[1].Width = 50f;
Step 4: Assign values to the cells of the embed grid and the grid, and set formatting.
//Create a PDFStringFormat instance
PdfStringFormat stringFormat = new PdfStringFormat(PdfTextAlignment.Center, PdfVerticalAlignment.Middle);

//Assign values to the cells of the embedGrid and set formatting
newRow.Cells[0].Value = "Spire.Doc";
newRow.Cells[0].StringFormat = stringFormat;
newRow.Cells[1].Value = "Spire.PDF";
newRow.Cells[1].StringFormat = stringFormat;

//Assign values to the cells of the grid and set formatting
row1.Cells[0].Value = "Customer's Name";
row1.Cells[0].StringFormat = stringFormat;
row1.Cells[0].Style.BackgroundBrush = PdfBrushes.Gray;
row1.Cells[1].Value = "Product(s)";
row1.Cells[1].StringFormat = stringFormat;
row1.Cells[1].Style.BackgroundBrush = PdfBrushes.Gray;
row2.Cells[0].Value = "Michael";
row2.Cells[0].StringFormat = stringFormat;
//Assign the embedGrid to a cell of the grid
row2.Cells[1].Value = embedGrid;
row2.Cells[1].StringFormat = stringFormat;
Step 5: Draw the grid to the new added page.
grid.Draw(page, new PointF(0f, 50f));
Step 6: Save the document.
pdf.SaveToFile("EmbedGridInCell.pdf");
Screenshot:
Full code:
using Spire.Pdf.Grid;
using Spire.Pdf;
using System.Drawing;
using Spire.Pdf.Graphics;

namespace Embed_a_Grid_in_a_Grid_Cell_in_PDF
{
    class Program
    {
        static void Main(string[] args)
        {
            //Create a pdf document
            PdfDocument pdf = new PdfDocument();

            //Add a page
            PdfPageBase page = pdf.Pages.Add();

            //Create a pdf grid
            PdfGrid grid = new PdfGrid();

            //Add two rows
            PdfGridRow row1 = grid.Rows.Add();
            PdfGridRow row2 = grid.Rows.Add();

            //Set Top and Bottom cell padding of the grid
            grid.Style.CellPadding.Top = 5f;
            grid.Style.CellPadding.Bottom = 5f;

            //Add two columns
            grid.Columns.Add(2);

            //Set the columns’ width
            grid.Columns[0].Width = 120f;
            grid.Columns[1].Width = 120f;


            //Create another grid to embed
            PdfGrid embedGrid = new PdfGrid();

            //Add a row
            PdfGridRow newRow = embedGrid.Rows.Add();

            //Add two columns
            embedGrid.Columns.Add(2);

            //Set the columns’ width
            embedGrid.Columns[0].Width = 50f;
            embedGrid.Columns[1].Width = 50f;

            //Create a PDFStringFormat instance
            PdfStringFormat stringFormat = new PdfStringFormat(PdfTextAlignment.Center, PdfVerticalAlignment.Middle);

            //Assign values to the cells of the embedGrid and set formatting
            newRow.Cells[0].Value = "Spire.Doc";
            newRow.Cells[0].StringFormat = stringFormat;
            newRow.Cells[1].Value = "Spire.PDF";
            newRow.Cells[1].StringFormat = stringFormat;

            //Assign values to the cells of the grid and set formatting
            row1.Cells[0].Value = "Customer's Name";
            row1.Cells[0].StringFormat = stringFormat;
            row1.Cells[0].Style.BackgroundBrush = PdfBrushes.Gray;
            row1.Cells[1].Value = "Product(s)";
            row1.Cells[1].StringFormat = stringFormat;
            row1.Cells[1].Style.BackgroundBrush = PdfBrushes.Gray;
            row2.Cells[0].Value = "Michael";
            row2.Cells[0].StringFormat = stringFormat;
            //Assign the embedGrid to the cell of the grid
            row2.Cells[1].Value = embedGrid;
            row2.Cells[1].StringFormat = stringFormat;

            //Draw the grid to the new added page
            grid.Draw(page, new PointF(0f, 50f));

            //Save the pdf document
            pdf.SaveToFile("EmbedGridInCell.pdf");
        }
    }
}
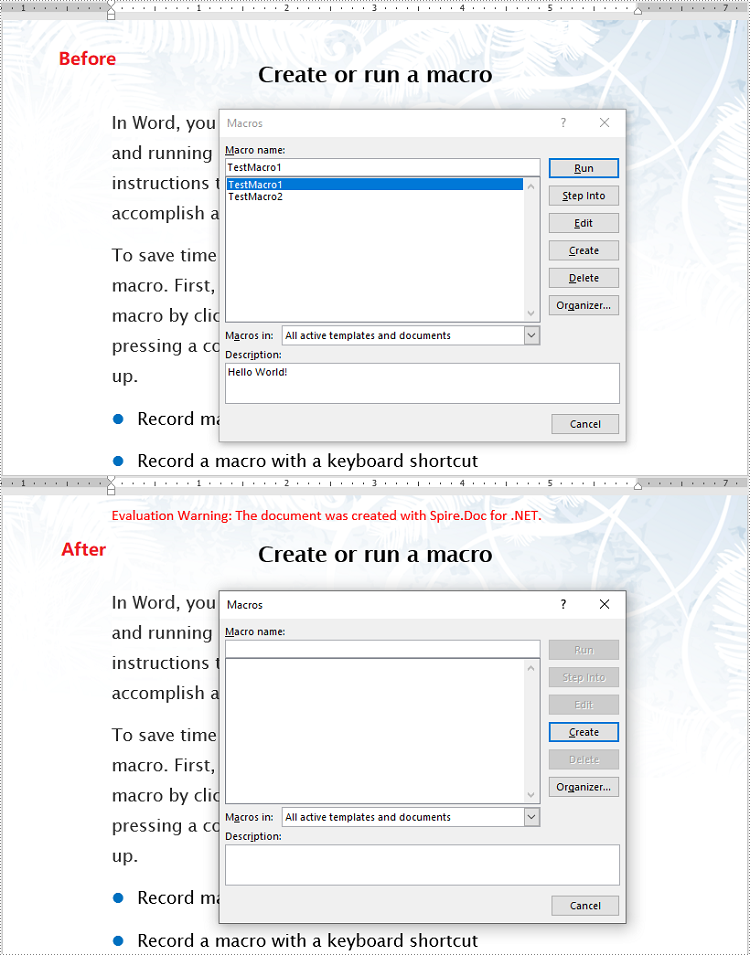
VBA (Visual Basic for Applications) macros are small programs that can be embedded within Microsoft Word documents to automate repetitive tasks, add interactivity to documents, and perform other useful functions. While macros can be beneficial in many situations, they can also pose a security risk if the code is malicious or contains malware. By removing VBA macros from Word documents, you can reduce the risk of security breaches and malware infections. In this article, you will learn how to detect and remove VBA macros from Word documents in C# and VB.NET using Spire.Doc for .NET library.
Install Spire.Doc for .NET
To begin with, you need to add the DLL files included in the Spire.Doc for .NET package as references in your .NET project. The DLL files can be either downloaded from this link or installed via NuGet.
PM> Install-Package Spire.Doc
Detect and Remove VBA Macros from Word Documents in C# and VB.NET
You can use the Document.IsContainMacro property to detect whether a Word document contains VBA macros. If any macros are detected, you can use the Document.ClearMacros() method to easily remove them from the document.
The following steps show how to detect and remove VBA macros from a Word document using Spire.Doc for .NET:
- Initialize an instance of the Document class.
- Load a Word document using the Document.LoadFromFile(string fileName) method.
- Detect if the document contains VBA macros using the Document.IsContainMacro property.
- If any macros are detected, remove them from the document using Document.ClearMacros() method.
- Save the result document using Document.SaveToFile(string fileName, FileFormat fileFormat) method.
- C#
- VB.NET
using Spire.Doc;

namespace RemoveVBAMacros
{
    internal class Program
    {
        static void Main(string[] args)
        {
            //Initialize an instance of the Document class
            Document document = new Document();
            //Load a Word document
            document.LoadFromFile("Input.docm");

            //Detect if the document contains macros
            if (document.IsContainMacro)
            {
                //Remove the macros from the document
                document.ClearMacros();
            }

            //Save the result document
            document.SaveToFile("RemoveMacros.docm", FileFormat.Docm);
            document.Close();
        }
    }
}
Apply for a Temporary License
If you'd like to remove the evaluation message from the generated documents, or to get rid of the function limitations, please request a 30-day trial license for yourself.
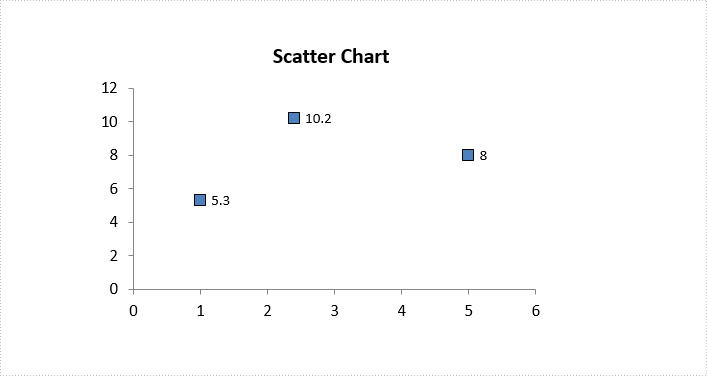
Vary the Colors of Same-series Data Markers in a Chart in C#, VB.NET
2018-06-12 06:38:00 Written by KoohjiIf you have a line, (xy) scatter, or radar chart, you can change the look of the data markers to make them easier to distinguish. In this article, you will learn how to set different colors for different data markers, by using Spire.Presentation with C# and VB.NET.
Step 1: Load a sample PowerPoint file.
Presentation ppt = new Presentation();
ppt.LoadFromFile("ScatterChart.pptx");
Step 2: Get the chart from the presentation.
IChart chart = ppt.Slides[0].Shapes[0] as IChart;
Step 3: Create a ChartDataPoint object and specify the index.
ChartDataPoint dataPoint = new ChartDataPoint(chart.Series[0]);
dataPoint.Index = 0;
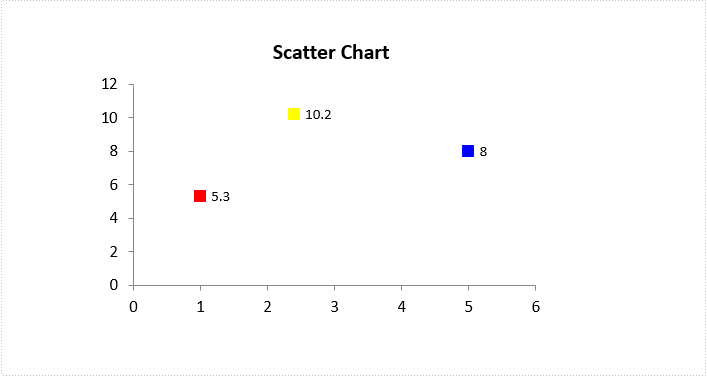
Step 4: Set the fill color of the data marker.
dataPoint.MarkerFill.Fill.FillType = FillFormatType.Solid;
dataPoint.MarkerFill.Fill.SolidColor.Color = Color.Red;
Step 5: Set the line color of the data marker.
dataPoint.MarkerFill.Line.FillType = FillFormatType.Solid;
dataPoint.MarkerFill.Line.SolidFillColor.Color = Color.Red;
Step 6: Add the data point to the point collection of a series.
chart.Series[0].DataPoints.Add(dataPoint);
Step 7: Save to file.
ppt.SaveToFile("result.pptx", FileFormat.Pptx2010);
Source File:
Result:
Full Code:
Presentation ppt = new Presentation();
ppt.LoadFromFile("ScatterChart.pptx");
IChart chart = ppt.Slides[0].Shapes[0] as IChart;

ChartDataPoint dataPoint = new ChartDataPoint(chart.Series[0]);
dataPoint.Index = 0;
dataPoint.MarkerFill.Fill.FillType = FillFormatType.Solid;
dataPoint.MarkerFill.Fill.SolidColor.Color = Color.Red;
dataPoint.MarkerFill.Line.FillType = FillFormatType.Solid;
dataPoint.MarkerFill.Line.SolidFillColor.Color = Color.Red;
chart.Series[0].DataPoints.Add(dataPoint);

dataPoint = new ChartDataPoint(chart.Series[0]);
dataPoint.Index = 1;
dataPoint.MarkerFill.Fill.FillType = FillFormatType.Solid;
dataPoint.MarkerFill.Fill.SolidColor.Color = Color.Yellow;
dataPoint.MarkerFill.Line.FillType = FillFormatType.Solid;
dataPoint.MarkerFill.Line.SolidFillColor.Color = Color.Yellow;
chart.Series[0].DataPoints.Add(dataPoint);

dataPoint = new ChartDataPoint(chart.Series[0]);
dataPoint.Index = 2;
dataPoint.MarkerFill.Fill.FillType = FillFormatType.Solid;
dataPoint.MarkerFill.Fill.SolidColor.Color = Color.Blue;
dataPoint.MarkerFill.Line.FillType = FillFormatType.Solid;
dataPoint.MarkerFill.Line.SolidFillColor.Color = Color.Blue;
chart.Series[0].DataPoints.Add(dataPoint);

ppt.SaveToFile("result.pptx", FileFormat.Pptx2010);
using Spire.Presentation;
using Spire.Presentation.Charts;
using Spire.Presentation.Drawing;
using System.Drawing;

namespace VaryColor
{
    class Program
    {
        static void Main(string[] args)
        {
            Presentation ppt = new Presentation();
            ppt.LoadFromFile("ScatterChart.pptx");
            IChart chart = ppt.Slides[0].Shapes[0] as IChart;

            ChartDataPoint dataPoint = new ChartDataPoint(chart.Series[0]);
            dataPoint.Index = 0;
            dataPoint.MarkerFill.Fill.FillType = FillFormatType.Solid;
            dataPoint.MarkerFill.Fill.SolidColor.Color = Color.Red;
            dataPoint.MarkerFill.Line.FillType = FillFormatType.Solid;
            dataPoint.MarkerFill.Line.SolidFillColor.Color = Color.Red;
            chart.Series[0].DataPoints.Add(dataPoint);

            dataPoint = new ChartDataPoint(chart.Series[0]);
            dataPoint.Index = 1;
            dataPoint.MarkerFill.Fill.FillType = FillFormatType.Solid;
            dataPoint.MarkerFill.Fill.SolidColor.Color = Color.Yellow;
            dataPoint.MarkerFill.Line.FillType = FillFormatType.Solid;
            dataPoint.MarkerFill.Line.SolidFillColor.Color = Color.Yellow;
            chart.Series[0].DataPoints.Add(dataPoint);

            dataPoint = new ChartDataPoint(chart.Series[0]);
            dataPoint.Index = 2;
            dataPoint.MarkerFill.Fill.FillType = FillFormatType.Solid;
            dataPoint.MarkerFill.Fill.SolidColor.Color = Color.Blue;
            dataPoint.MarkerFill.Line.FillType = FillFormatType.Solid;
            dataPoint.MarkerFill.Line.SolidFillColor.Color = Color.Blue;
            chart.Series[0].DataPoints.Add(dataPoint);

            ppt.SaveToFile("result.pptx", FileFormat.Pptx2010);
        }
    }
}
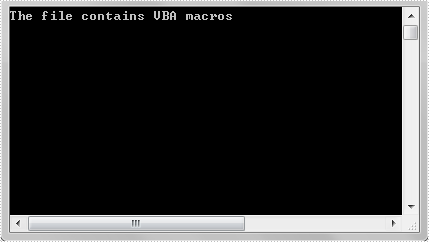
At some point, programmers may need to determine if an Excel file contains VBA macros. This article is going to show you how to programmatically determine if an Excel file contains VBA macros in C# and VB.NET using Spire.XLS.
Detail steps:
Step 1: Instantiate a Workbook object and load the Excel file.
Workbook workbook = new Workbook();
workbook.LoadFromFile("Macro.xlsm");
Step 2: Determine if the Excel file contains VBA macros.
bool hasMacros = false;
hasMacros = workbook.HasMacros;
if (hasMacros)
{
    Console.WriteLine("The file contains VBA macros");
}

else
{
    Console.WriteLine("The file doesn't contain VBA macros");
}
Screenshot:
Full code:
using System;
using Spire.Xls;

namespace Determine_if_Excel_file_contains_macros
{
    class Program
    {
        static void Main(string[] args)
        {
            //Instantiate a Workbook object
            Workbook workbook = new Workbook();
            //Load the Excel file
            workbook.LoadFromFile("Macro.xlsm");

            bool hasMacros = false;

            //Determine if the Excel file contains VBA macros
            hasMacros = workbook.HasMacros;

            if (hasMacros)
            {
                Console.WriteLine("The file contains VBA macros");
            }

            else
            {
                Console.WriteLine("The file doesn't contain VBA macros");
            }

            Console.ReadKey();
        }
    }
}
Imports System
Imports Spire.Xls

Namespace Determine_if_Excel_file_contains_macros
    Class Program
        Private Shared Sub Main(ByVal args As String())
            Dim workbook As Workbook = New Workbook()
            workbook.LoadFromFile("Macro.xlsm")
            Dim hasMacros As Boolean = False
            hasMacros = workbook.HasMacros

            If hasMacros Then
                Console.WriteLine("The file contains VBA macros")
            Else
                Console.WriteLine("The file doesn't contain VBA macros")
            End If

            Console.ReadKey()
        End Sub
    End Class
End Namespace
Adding footers to a PDF document is a useful way to provide additional information and context to the content within the document. Footers typically appear at the bottom of each page and can include elements such as page numbers, dates, copyright information, or any other relevant details. By incorporating footers, you can enhance the professionalism and organization of your PDF files, making them more informative and easier to navigate for readers. In this article, you will learn how to add a footer to an existing PDF document in C# and VB.NET using Spire.PDF for .NET.
Install Spire.PDF for .NET
To begin with, you need to add the DLLs included in the Spire.PDF for.NET package as references in your .NET project. The DLL files can be either downloaded from this link or installed via NuGet.
PM> Install-Package Spire.PDF
Background Knowledge
When an existing PDF document is manipulated by Spire.PDF for .NET, the origin of the coordinate system is located at the top left corner of the page, with the x-axis extending to the right and the y-axis extending downward. Adding a footer to a page means adding content, such as text, images, automatic fields and shapes, to a specified location in the bottom blank area of the page.
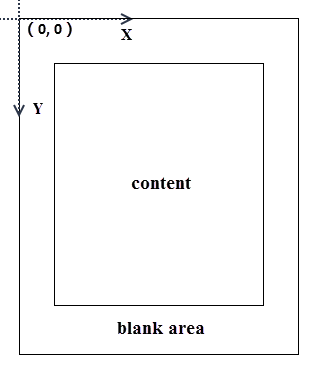
If the blank area is not large enough to accommodate the content you want to add, you can consider increasing the PDF page margins.
Add a Footer to an Existing PDF Document in C#, VB.NET
Spire.PDF for .NET offers the PdfCanvas.DrawString() method, PdfCanvas.DrawImage() method, PdfCanvas.DrawLine() method and its similar methods, allowing users to draw text, images and shapes on a PDF page at the specified location. To add dynamic data to the footer, such as page numbers, sections, dates, you need to use the automatic fields. Spire.PDF for .NET provides the PdfPageNumberField class, PdfPageCountField calss, PdfSectionNumberField class etc. to achieve the addition of dynamic information.
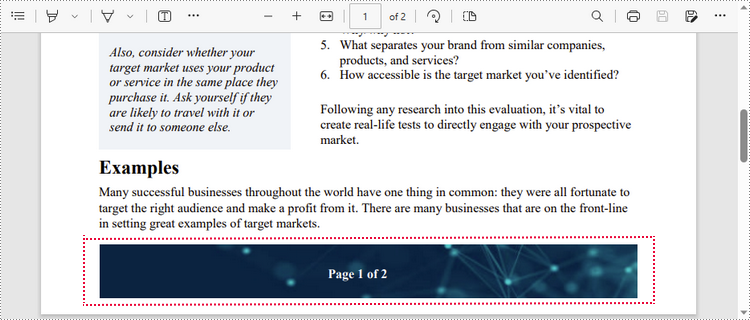
The following are the steps to add a footer consisting of an image and page number to a PDF document using Spire.PDF for .NET.
- Create a PdfDocument object.
- Load a PDF document using PdfDocument.LoadFromFile() method.
- Load an image using PdfImage.FromFile() method.
- Draw the image on the bottom blank area of a page using PdfPageBase.Canvas.DrawImage() method.
- Create a PdfPageNumberField object, a PdfPageCountField object, and combine them in a PdfCompositefield object to return the string "Page X of Y".
- Draw page number on the bottom blank area of a page using PdfCompositeField.Draw() method.
- Save the document to another PDF file using PdfDocument.SaveToFile() method.
- C#
- VB.NET
using Spire.Pdf;
using Spire.Pdf.AutomaticFields;
using Spire.Pdf.Graphics;
using System.Drawing;

namespace AddHeaderToExistingPdf
{
    class Program
    {
        static void Main(string[] args)
        {
            //Create a PdfDocument object
            PdfDocument doc = new PdfDocument();

            //Load a PDF file
            doc.LoadFromFile("C:\\Users\\Administrator\\Desktop\\sample.pdf");

            //Load an image
            PdfImage footerImage = PdfImage.FromFile("C:\\Users\\Administrator\\Desktop\\bg.jpg");

            //Create a true type font
            PdfTrueTypeFont font = new PdfTrueTypeFont(new Font("Times New Roman", 12f, FontStyle.Bold), true);

            //Create a brush
            PdfBrush brush = PdfBrushes.White;

            //Create a page number field
            PdfPageNumberField pageNumberField = new PdfPageNumberField();

            //Create a page count field
            PdfPageCountField pageCountField = new PdfPageCountField();

            //Create a composite field to combine page count field and page number field in a single string
            PdfCompositeField compositeField = new PdfCompositeField(font, brush, "Page {0} of {1}", pageNumberField, pageCountField);

            //Get the text size
            SizeF fontSize = font.MeasureString(compositeField.Text);

            //Get the page size
            SizeF pageSize = doc.Pages[0].Size;

            //Set the position of the composite field
            compositeField.Location = new Point((int)(pageSize.Width - fontSize.Width) / 2, (int)pageSize.Height - 45);

            //Loop through the pages in the document
            for (int i = 0; i < doc.Pages.Count; i++)
            {
                //Get a specific page
                PdfPageBase page = doc.Pages[i];

                //Draw the image on the bottom blank area
                page.Canvas.DrawImage(footerImage, 55, pageSize.Height - 65, pageSize.Width - 110, 50);

                //Draw the composite field on the bottom blank area
                compositeField.Draw(page.Canvas);
            }

            //Save to file
            doc.SaveToFile("AddFooter.pdf");
            doc.Dispose();
        }
    }
}
Apply for a Temporary License
If you'd like to remove the evaluation message from the generated documents, or to get rid of the function limitations, please request a 30-day trial license for yourself.
