
.NET (1327)
Children categories
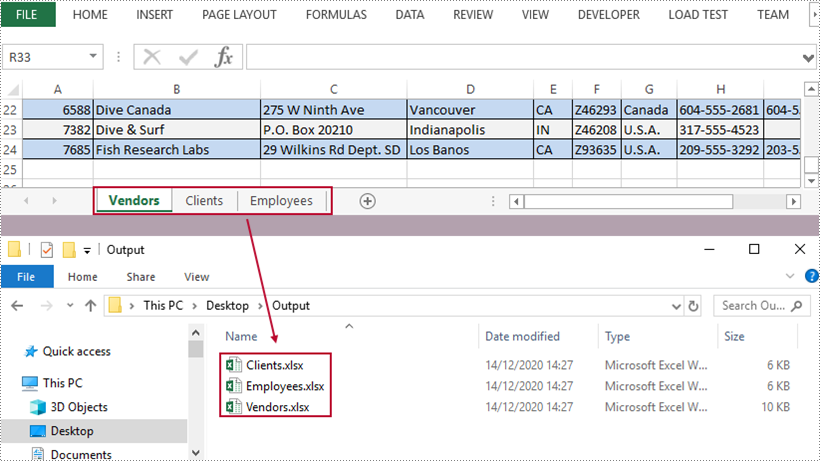
A workbook containing multiple worksheets helps to centrally manage relevant information, but sometimes we have to split the worksheets into separate Excel files so that individual worksheets can be distributed without disclosing other information. In this article, you will learn how to split Excel worksheets into separate workbooks in C# and VB.NET using Spire.XLS for .NET.
Install Spire.XLS for .NET
To begin with, you need to add the DLL files included in the Spire.XLS for .NET package as references in your .NET project. The DLL files can be either downloaded from this link or installed via NuGet.
PM> Install-Package Spire.XLS
Split Excel Sheets into Separate Files
The following are the main steps to split Excel sheets into separate workbooks using Spire.XLS for .NET.
- Create a Workbook object
- Load a sample Excel file using Workbook.LoadFromFile() method.
- Declare a new Workbook variable, which is used to create new Excel workbooks.
- Loop through the worksheets in the source document.
- Initialize the Workbook object, and add the copy of a specific worksheet of source document into it.
- Save the workbook to an Excel file using Workbook.SaveToFile() method.
- C#
- VB.NET
using Spire.Xls;
using System;

namespace SplitWorksheets
{
    class Program
    {
        static void Main(string[] args)
        {
            //Create a Workbook object
            Workbook wb = new Workbook();

            //Load an Excel document
            wb.LoadFromFile("C:\\Users\\Administrator\\Desktop\\data.xlsx");

            //Declare a new Workbook variable
            Workbook newWb;

            //Declare a String variable
            String sheetName;

            //Specify the folder path which is used to store the generated Excel files
            String folderPath = "C:\\Users\\Administrator\\Desktop\\Output\\";

            //Loop through the worksheets in the source file
            for (int i = 0; i < wb.Worksheets.Count; i++)
            {

                //Initialize the Workbook object
                newWb = new Workbook();

                //Remove the default sheets
                newWb.Worksheets.Clear();

                //Add the specific worksheet of the source document to the new workbook
                newWb.Worksheets.AddCopy(wb.Worksheets[i]);

                //Get the worksheet name
                sheetName = wb.Worksheets[i].Name;

                //Save the new workbook to the specified folder
                newWb.SaveToFile(folderPath + sheetName + ".xlsx", ExcelVersion.Version2013);
            }
        }
    }
}
Apply for a Temporary License
If you'd like to remove the evaluation message from the generated documents, or to get rid of the function limitations, please request a 30-day trial license for yourself.
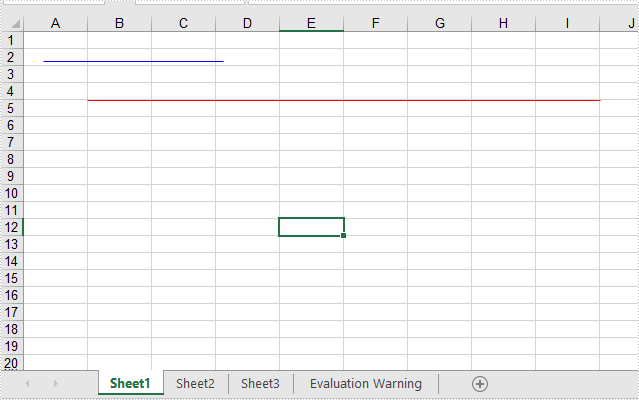
This article will show you how to add lines to Excel worksheets through two points. We could set the point’s location via relative location and Absolute location in pixels.
using Spire.Xls;
using Spire.Xls.Core.Spreadsheet.Shapes;
using System.Drawing;

namespace Word
{
    class Program
    {
        static void Main(string[] args)

        {
            //Initiate a Workbook object and get the first worksheet
            Workbook workbook = new Workbook();
            Worksheet worksheet = workbook.Worksheets[0];
            //Add a line with relative location
            XlsLineShape line = worksheet.TypedLines.AddLine() as XlsLineShape;

            //set the column index of the starting point
            line.LeftColumn = 2;
            line.LeftColumnOffset = 2;
            line.TopRow = 5;
            line.TopRowOffset = 10;

            //set the column index of the end point
            line.RightColumn = 10;
            line.RightColumnOffset = 10;
            line.BottomRow =5;
            line.BottomRowOffset = 10;

            //Set the color
            line.Color = Color.Red;


            //Add a line with Absolute location in pixels
            XlsLineShape line1 = worksheet.TypedLines.AddLine() as XlsLineShape;
            //Set the start point and end point
            line1.StartPoint = new Point(20, 30);
            line1.EndPoint = new Point(200, 30);

            //Set the color
            line1.Color = Color.Blue;

            workbook.SaveToFile("Addlines.xlsx", ExcelVersion.Version2013);
            workbook.Dispose();
        }
    }
 }
Imports Spire.Xls
Imports Spire.Xls.Core.Spreadsheet.Shapes
Imports System.Drawing

Namespace Word

    Class Program

        Private Shared Sub Main(ByVal args() As String)
            'Initiate a Workbook object and get the first worksheet
            Dim workbook As Workbook = New Workbook
            Dim worksheet As Worksheet = workbook.Worksheets(0)
            'Add a line with relative location
            Dim line As XlsLineShape = CType(worksheet.TypedLines.AddLine,XlsLineShape)
            'set the column index of the starting point
            line.LeftColumn = 2
            line.LeftColumnOffset = 2
            line.TopRow = 5
            line.TopRowOffset = 10
            'set the column index of the end point
            line.RightColumn = 10
            line.RightColumnOffset = 10
            line.BottomRow = 5
            line.BottomRowOffset = 10
            'Set the color
            line.Color = Color.Red
            'Add a line with Absolute location in pixels
            Dim line1 As XlsLineShape = CType(worksheet.TypedLines.AddLine,XlsLineShape)
            'Set the start point and end point
            line1.StartPoint = New Point(20, 30)
            line1.EndPoint = New Point(200, 30)
            'Set the color
            line1.Color = Color.Blue
            workbook.SaveToFile("Addlines.xlsx", ExcelVersion.Version2013)
            workbook.Dispose
        End Sub
    End Class
End Namespace
Effective screenshot:
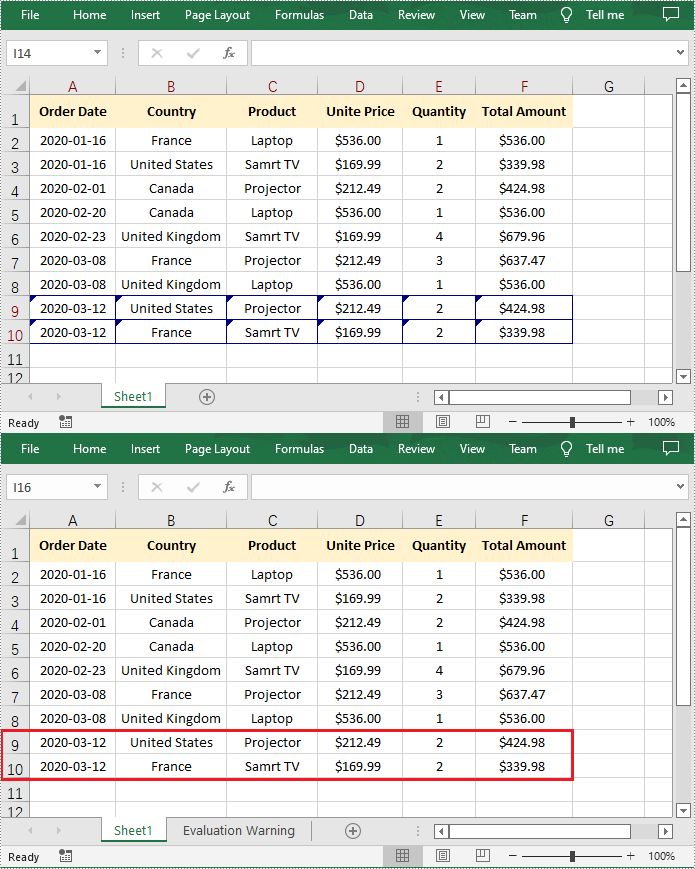
When sending an Excel document to others for review, it is recommended to turn on the Track Changes to ensure that all changes made to the worksheet or workbook are recorded. For the altered cells in Excel, each one will be highlighted with a blue triangle in the upper left corner of the cell. You can then view the changes and decide whether to accept or reject them. This article will demonstrate how to programmatically accept or reject all tracked changes in an Excel workbook using Spire.XLS for .NET.
Install Spire.XLS for .NET
To begin with, you need to add the DLL files included in the Spire.XLS for .NET package as references in your .NET project. The DLL files can be either downloaded from this link or installed via NuGet.
PM> Install-Package Spire.XLS
Accept All Tracked Changes in a Workbook
To accept tracked changes in a workbook, you'll first need to determine whether the workbook has tracked changes using Workbook.HasTrackedChanges property. If yes, you can then accept all changes at once using Workbook.AcceptAllTrackedChanges() method. The following are the steps to accept all tracked changes in an Excel workbook.
- Create a Workbook object.
- Load a sample Excel document using Workbook.LoadFromFile() method.
- Determine if the workbook has tracked changes using Workbook.HasTrackedChanges property.
- Accept all tracked changes in the workbook using Workbook.AcceptAllTrackedChanges() method.
- Save the result document using Workbook.SaveToFile() method.
- C#
- VB.NET
using Spire.Xls;

namespace AcceptTrackedChanges
{
    class Program
    {
        static void Main(string[] args)
        {
            //Create a Workbook object
            Workbook workbook = new Workbook();

            //Load a sample Excel document
            workbook.LoadFromFile("Sample.xlsx");

            //Determine if the workbook has tracked changes
            if (workbook.HasTrackedChanges)
            {

                //Accept all tracked changes in the workbook
                workbook.AcceptAllTrackedChanges();
            }

            //Save the result document
            workbook.SaveToFile("AcceptChanges.xlsx", FileFormat.Version2013);
        }
    }
}
Reject All Tracked Changes in a Workbook
If the tracked changes have been proven to exist in a workbook, Spire.XLS for .NET also provides the Workbook.RejectAllTrackedChanges() method to reject all tracked changes at once. The detailed steps are as follows.
- Create a Workbook object.
- Load a sample Excel document using Workbook.LoadFromFile() method.
- Determine if the workbook has tracked changes using Workbook.HasTrackedChanges property.
- Reject all tracked changes in the workbook using Workbook.RejectAllTrackedChanges() method.
- Save the result document using Workbook.SaveToFile() method.
- C#
- VB.NET
using Spire.Xls;

namespace AcceptTrackedChanges
{
    class Program
    {
        static void Main(string[] args)
        {
            //Create a Workbook object
            Workbook workbook = new Workbook();

            //Load a sample Excel document
            workbook.LoadFromFile("Sample.xlsx");

            //Determine if the workbook has tracked changes
            if (workbook.HasTrackedChanges)
            {

                //Reject all tracked changes in the workbook
                workbook.RejectAllTrackedChanges();
            }

            //Save the result document
            workbook.SaveToFile("RejectChanges.xlsx", FileFormat.Version2013);
        }
    }
}
Apply for a Temporary License
If you'd like to remove the evaluation message from the generated documents, or to get rid of the function limitations, please request a 30-day trial license for yourself.
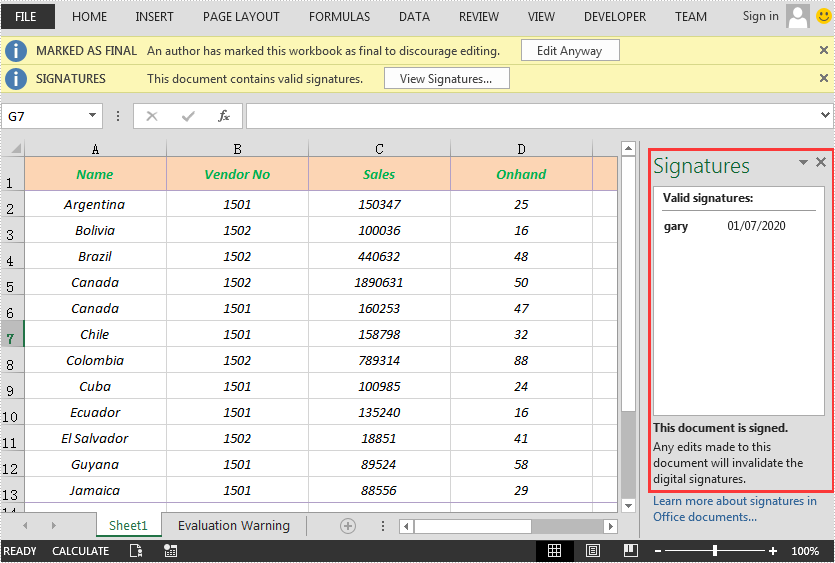
A digital signature is a type of electronic signature that can be used to verify the authenticity and integrity of digital documents. It can help recipients identify where the digital documents originate from and whether they have been changed by a third party after they were signed. In this article, we will demonstrate how to add or delete digital signatures in Excel in C# and VB.NET using Spire.XLS for .NET.
- Add a Digital Signature to Excel in C# and VB.NET
- Delete All Digital Signatures from Excel in C# and VB.NET
Install Spire.XLS for .NET
To begin with, you need to add the DLL files included in the Spire.XLS for .NET package as references in your .NET project. The DLL files can be either downloaded from this link or installed via NuGet.
PM> Install-Package Spire.XLS
Add a Digital Signature to Excel in C# and VB.NET
You can add a digital signature to protect the integrity of an Excel file. Once the digital signature is added, the file becomes read-only to discourage further editing. If someone makes changes to the file, the digital signature will become invalid immediately.
Spire.XLS for .NET provides the AddDigitalSignature method of Workbook class to add digital signatures to an Excel file. The detailed steps are as follows:
- Initialize an instance of the Workbook class.
- Load an Excel file using Workbook.LoadFromFile() method.
- Initialize an instance of the X509Certificate2 class with the specified certificate (.pfx) file path and the password of the .pfx file.
- Initialize an instance of the DateTime class.
- Add a digital signature to the file using Workbook.AddDigitalSignature(X509Certificate2, string, DateTime) method.
- Save the result file using Workbook.SaveToFile() method.
- C#
- VB.NET
using Spire.Xls;
using Spire.Xls.Core.MergeSpreadsheet.Interfaces;
using System;
using System.Security.Cryptography.X509Certificates;

namespace AddSignatureInExcel
{
    class Program
    {
        static void Main(string[] args)
        {
            //Create a Workbook instance
            Workbook workbook = new Workbook();

            //Load an Excel file
            workbook.LoadFromFile("Sample.xlsx");

            //Add digital signature to the file
            X509Certificate2 cert = new X509Certificate2("gary.pfx", "e-iceblue");

            // Define the path to the certificate file
            string certificatePath = "gary.pfx";

            DateTime certtime = new DateTime(2020, 7, 1, 7, 10, 36);

            // Add a digital signature to the workbook using the certificate
            IDigitalSignatures signature = workbook.AddDigitalSignature(certificatePath, "e-iceblue", "Signed by Gary Zhang", certtime);

            //Save the result file
            workbook.SaveToFile("AddDigitalSignature.xlsx", FileFormat.Version2013);
        }
    }
}
Delete All Digital Signatures from Excel in C# and VB.NET
Spire.XLS for .NET provides the RemoveAllDigitalSignatures method of Workbook class for developers to remove digital signatures from an Excel file. The detailed steps are as follows:
- Initialize an instance of the Workbook class.
- Load an Excel file using Workbook.LoadFromFile() method.
- Remove all digital signatures from the file using Workbook.RemoveAllDigitalSignatures() method.
- Save the result file using Workbook.SaveToFile() method.
- C#
- VB.NET
using Spire.Xls;

namespace DeleteSignatureInExcel
{
    class Program
    {
        static void Main(string[] args)
        {
            //Create a Workbook instance
            Workbook workbook = new Workbook();
            //Load an Excel file
            workbook.LoadFromFile("AddDigitalSignature.xlsx");

            //Remove all the digital signatures in the file
            workbook.RemoveAllDigitalSignatures();

            //Save the result file
            workbook.SaveToFile("RemoveDigitalSignature.xlsx", FileFormat.Version2013);
        }
    }
}
Apply for a Temporary License
If you'd like to remove the evaluation message from the generated documents, or to get rid of the function limitations, please request a 30-day trial license for yourself.
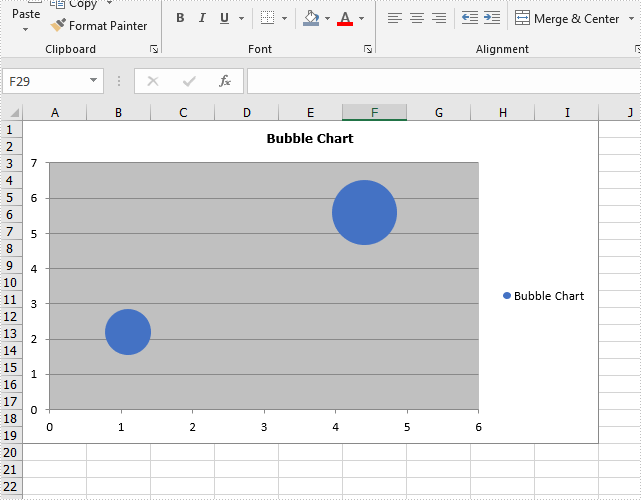
This article will show you how to use Spire.XLS for .NET to create a bubble chart in Excel in C# and VB.NET.
using Spire.Xls;

namespace BubbleChart
{
    class Program
    {
        static void Main(string[] args)

        {
            //Create a new workbook
            Workbook workbook = new Workbook();

            //Add a worksheet and set name
            workbook.CreateEmptySheets(1);
            Worksheet sheet = workbook.Worksheets[0];
            sheet.Name = "Chart data";
            //Initialize chart and set its type
            Chart chart = sheet.Charts.Add(ExcelChartType.Bubble);

            //Set the position of the chart in the worksheet
            chart.LeftColumn = 1;
            chart.RightColumn = 10;
            chart.TopRow = 1;
            chart.BottomRow = 20;

            //Set title for the chart and values
            Spire.Xls.Charts.ChartSerie cs1 = chart.Series.Add("Bubble Chart");
            cs1.EnteredDirectlyValues = new object[] { 2.2, 5.6 };
            cs1.EnteredDirectlyCategoryLabels = new object[] { 1.1, 4.4 };
            cs1.EnteredDirectlyBubbles = new object[] { 3, 6 };

            //Save the document to file
            workbook.SaveToFile("Output.xlsx", ExcelVersion.Version2010);
        }
    }

}
Imports Spire.Xls

Namespace BubbleChart

    Class Program

        Private Shared Sub Main(ByVal args() As String)
            'Create a new workbook
            Dim workbook As Workbook = New Workbook
            'Add a worksheet and set name
            workbook.CreateEmptySheets(1)
            Dim sheet As Worksheet = workbook.Worksheets(0)
            sheet.Name = "Chart data"
            'Initialize chart and set its type
            Dim chart As Chart = sheet.Charts.Add(ExcelChartType.Bubble)
            'Set the position of the chart in the worksheet
            chart.LeftColumn = 1
            chart.RightColumn = 10
            chart.TopRow = 1
            chart.BottomRow = 20
            'Set title for the chart and values
            Dim cs1 As Spire.Xls.Charts.ChartSerie = chart.Series.Add("Bubble Chart")
            cs1.EnteredDirectlyValues = New Object() {2.2, 5.6}
            cs1.EnteredDirectlyCategoryLabels = New Object() {1.1, 4.4}
            cs1.EnteredDirectlyBubbles = New Object() {3, 6}
            'Save the document to file
            workbook.SaveToFile("Output.xlsx", ExcelVersion.Version2010)
        End Sub
    End Class
End Namespace
Effective screenshot of Excel Bubble chart:
This article demonstrates how to add hyperlinks to SmartArt Nodes in a PowerPoint document in C# and VB.NET using Spire.Presentation for .NET.
using Spire.Presentation;
using Spire.Presentation.Diagrams;

namespace SmartArt
{
    class Program
    {
        static void Main(string[] args)
        {
            //Create a Presentation instance
            Presentation ppt = new Presentation();
            //Load the PowerPoint document
            ppt.LoadFromFile("SmartArt.pptx");

            //Get the first slide
            ISlide slide = ppt.Slides[0];

            //Get the SmartArt
            ISmartArt smartArt = slide.Shapes[0] as ISmartArt;

            //Add hyperlink to the first node of the SmartArt to link to a web page
            smartArt.Nodes[0].Click = new ClickHyperlink("https://www.e-iceblue.com");
            //Add hyperlink to the first node of the SmartArt to link to a specific slide
            smartArt.Nodes[1].Click = new ClickHyperlink(ppt.Slides[1]);

            //Save the result document
            ppt.SaveToFile("Result.pptx", FileFormat.Pptx2013);
        }
    }
}
Imports Spire.Presentation
Imports Spire.Presentation.Diagrams

Namespace SmartArt
    Class Program
        Private Shared Sub Main(ByVal args As String())
            Dim ppt As Presentation = New Presentation()
            ppt.LoadFromFile("SmartArt.pptx")
            Dim slide As ISlide = ppt.Slides(0)
            Dim smartArt As ISmartArt = TryCast(slide.Shapes(0), ISmartArt)
            smartArt.Nodes(0).Click = New ClickHyperlink("https://www.e-iceblue.com")
            smartArt.Nodes(1).Click = New ClickHyperlink(ppt.Slides(1))
            ppt.SaveToFile("Result.pptx", FileFormat.Pptx2013)
        End Sub
    End Class
End Namespace
Output:
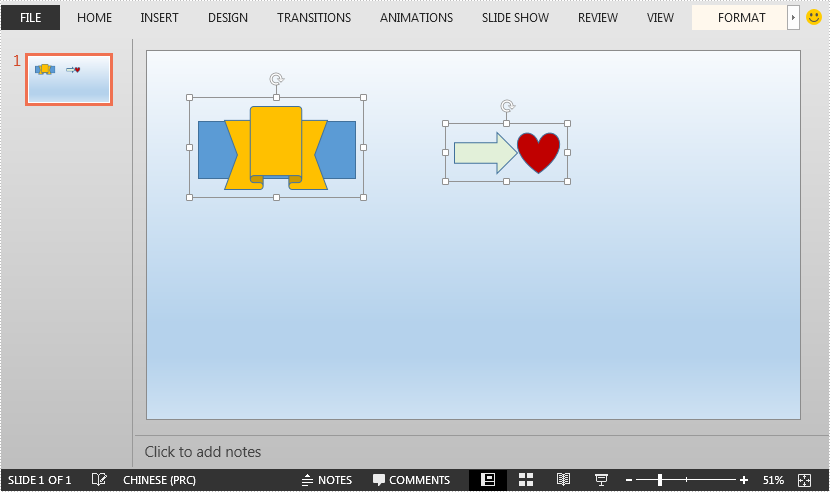
This article demonstrates how to ungroup grouped shapes in a PowerPoint document using Spire.Presentation for .NET.
The input PowerPoint document:
using Spire.Presentation;

namespace UngroupShapes
{
    class Program
    {
        static void Main(string[] args)
        {
            //Create a Presentation instance
            Presentation ppt = new Presentation();
            //Load the PowerPoint document
            ppt.LoadFromFile("Sample.pptx");

            //Get the first slide
            ISlide slide = ppt.Slides[0];

            //Loop through the shapes in the slide
            for(int i = 0; i< slide.Shapes.Count;i++)
            {
                IShape shape = slide.Shapes[i];
                //Detect if the shape is a grouped shape
                if (shape is GroupShape)
                {
                    GroupShape groupShape = shape as GroupShape;
                    //Ungroup the grouped shape
                    slide.Ungroup(groupShape);
                }
            }

            //Save the resultant document
            ppt.SaveToFile("UngroupShapes.pptx", FileFormat.Pptx2013);
        }
    }
}
Imports Spire.Presentation

Namespace UngroupShapes
    Class Program
        Private Shared Sub Main(ByVal args As String())
            Dim ppt As Presentation = New Presentation()
            ppt.LoadFromFile("Sample.pptx")
            Dim slide As ISlide = ppt.Slides(0)

            For i As Integer = 0 To slide.Shapes.Count - 1
                Dim shape As IShape = slide.Shapes(i)

                If TypeOf shape Is GroupShape Then
                    Dim groupShape As GroupShape = TryCast(shape, GroupShape)
                    slide.Ungroup(groupShape)
                End If
            Next

            ppt.SaveToFile("UngroupShapes.pptx", FileFormat.Pptx2013)
        End Sub
    End Class
End Namespace
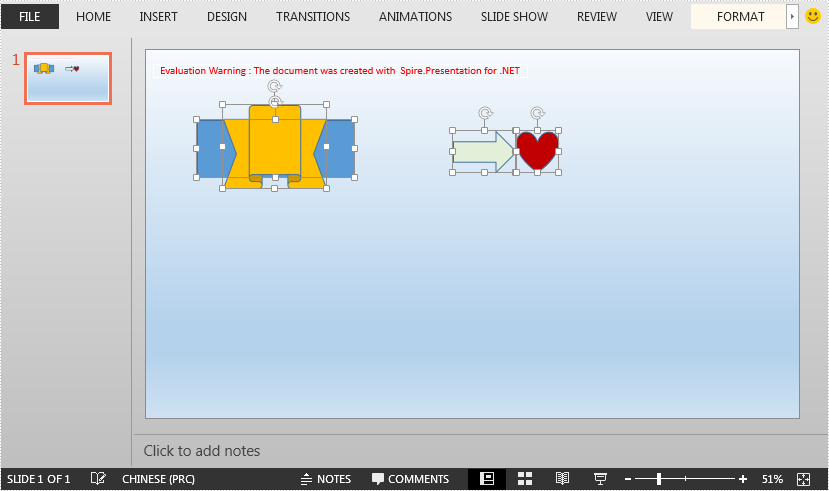
The output PowerPoint document after ungrouping shapes:
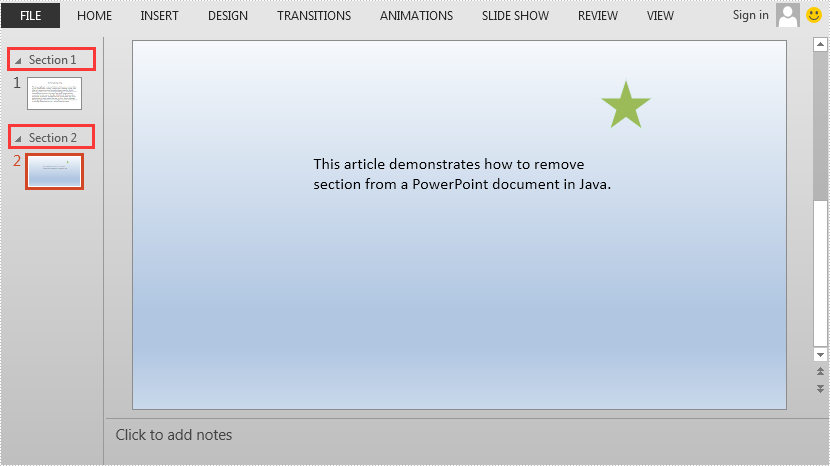
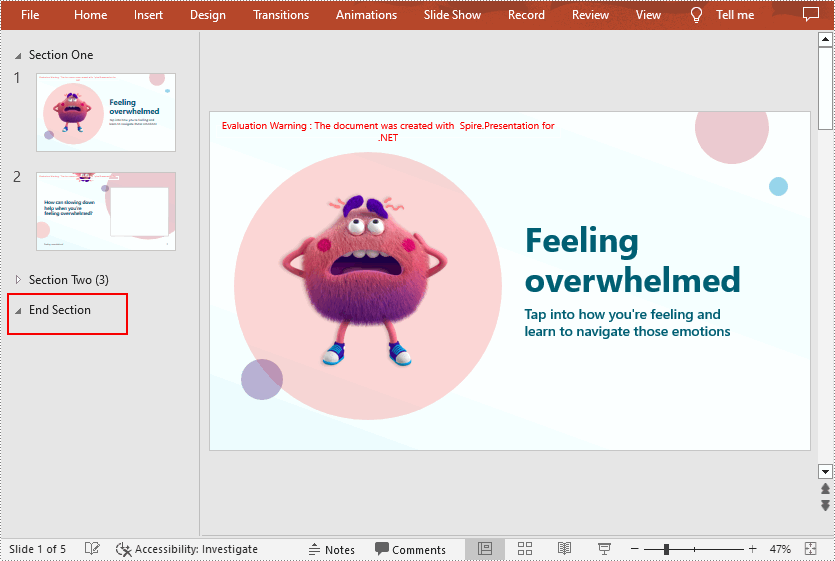
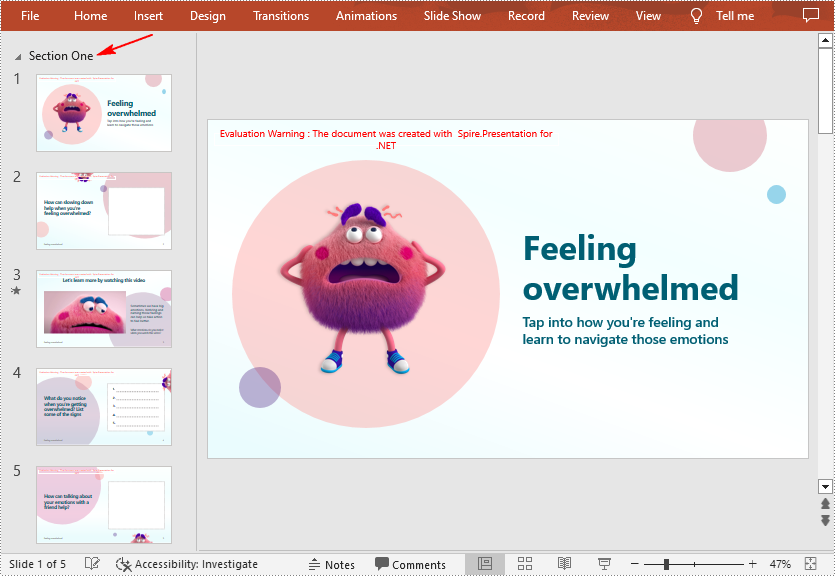
This article demonstrates how to remove a specific section or all the sections but keep the slide(s) in the section(s) in PowerPoint by using Spire.Presentation for .NET.
Below is the screenshot of the input PowerPoint document which contains two sections:
//Create a Presentation instance
Presentation ppt = new Presentation();
//Load a PowerPoint document
ppt.LoadFromFile("AddSection.pptx");

//Remove the second section
ppt.SectionList.RemoveAt(1);

//Remove all the sections
//ppt.SectionList.RemoveAll();

//Save the result document
ppt.SaveToFile("RemoveSection.pptx", FileFormat.Pptx2013);
'Create a Presentation instance
Dim ppt As Presentation = New Presentation
'Load a PowerPoint document
ppt.LoadFromFile("AddSection.pptx")
'Remove the second section
ppt.SectionList.RemoveAt(1)
'Remove all the sections
'ppt.SectionList.RemoveAll()
'Save the result document
ppt.SaveToFile("RemoveSection.pptx", FileFormat.Pptx2013)
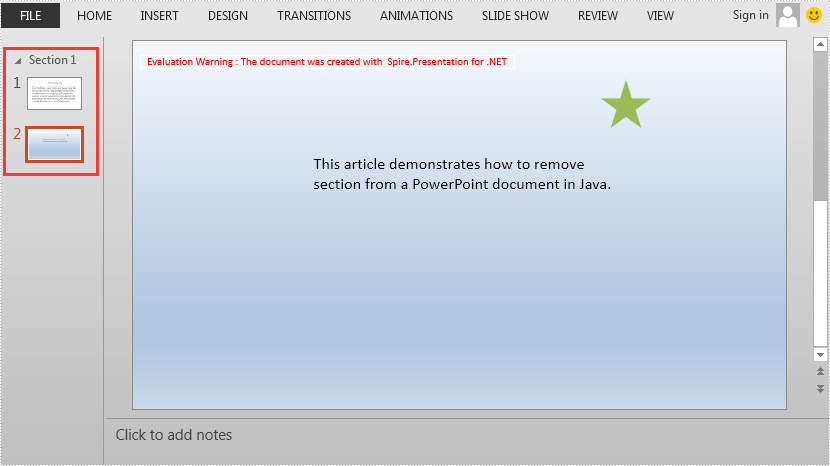
The output PowerPoint document after removing the second section:
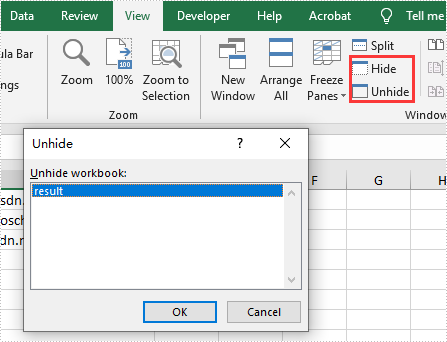
We have demonstrated how to use Spire.XLS for .NET to hide/show Excel worksheets. From Spire.XLS v 10.9.0, it starts to support hide the current window of Excel workbook by setting the property of workbook.IsHideWindow.
using Spire.Xls;

namespace HideWindow
{
    class Program
    {
        static void Main(string[] args)
        {
            //Load Sample Document
            Workbook workbook = new Workbook();
            workbook.LoadFromFile("Sample.xlsx");

            //Hide Excel Window
            workbook.IsHideWindow = true;

             //Save the document to file
            workbook.SaveToFile("result.xlsx", ExcelVersion.Version2013);
        }
    }

}
Imports Spire.Xls

Namespace HideWindow

    Class Program

        Private Shared Sub Main(ByVal args() As String)
            'Load Sample Document
            Dim workbook As Workbook = New Workbook
            workbook.LoadFromFile("Sample.xlsx")
            'Hide Excel Window
            workbook.IsHideWindow = true
            'Save the document to file
            workbook.SaveToFile("result.xlsx", ExcelVersion.Version2013)
        End Sub
    End Class
End Namespace
Sections in PowerPoint is a feature that allows you to organize slides into different groups/segments for easy management. Adding sections with unique names can help keep track of specific groups of slides, or can also help outline the topics of a PowerPoint presentation. In this article, you will learn how to programmatically add or remove sections in a PowerPoint document using Spire.Presentation for .NET.
- Add a Section at the End of a PowerPoint Document in C# and VB.NET
- Insert a Section Before a Specified Section in PowerPoint in C# and VB.NET
- Add a Section Before a Specified Slide in PowerPoint in C# and VB.NET
- Remove a Section from a PowerPoint Document in C# and VB.NET
Install Spire.Presentation for .NET
To begin with, you need to add the DLL files included in the Spire.Presentation for.NET package as references in your .NET project. The DLL files can be either downloaded from this link or installed via NuGet.
PM> Install-Package Spire.Presentation
Add a Section at the End of a PowerPoint Document in C# and VB.NET
Spire.Presentation for .NET provides the Presentation.SectionList.Append(string sectionName) method to append a section with section name at the end of a PowerPoint document. The detailed steps are as follows.
- Initialize an instance of Presentation class.
- Load a PowerPoint document using Presentation.LoadFromFile() method.
- Append a section at the end of the document using Presentation.SectionList.Append(string sectionName) method.
- Save the result document using Presentation.SaveToFile() method.
- C#
- VB.NET
using Spire.Presentation;

namespace AppendSectionAtEnd
{
    class Program
    {
        static void Main(string[] args)
        {
            //Create a Presentation instance
            Presentation ppt = new Presentation();

            //Load a sample PowerPoint document
            ppt.LoadFromFile("Test.pptx");

            //Add a section at the end of the document
            Section section = ppt.SectionList.Append("End Section");

            //Save the result document
            ppt.SaveToFile("AddSectionAtEnd.pptx", FileFormat.Pptx2013);
        }
    }
}
Insert a Section Before a Specified Section in PowerPoint in C# and VB.NET
If you want to insert a section before an existing section to make the document more logical, Spire.Presentation for .NET provides the Presentation.SectionList.Insert(int sectionIndex, string sectionName) method. The following are the steps to insert a section at a specified position by section index.
- Initialize an instance of Presentation class.
- Load a PowerPoint document using Presentation.LoadFromFile() method.
- Insert a new section before the specified section using Presentation.SectionList.Insert(int sectionIndex, string sectionName) method.
- Save the result document using Presentation.SaveToFile() method.
- C#
- VB.NET
using Spire.Presentation;

namespace InsertSectionAtSpecifiedPosition
{
    class Program
    {
        static void Main(string[] args)
        {
            //Create a Presentation instance
            Presentation ppt = new Presentation();

            //Load a sample PowerPoint document
            ppt.LoadFromFile("Test.pptx");

            //Insert a section before the second section
            Section section = ppt.SectionList.Insert(1, "New Section");

            //Save the result document
            ppt.SaveToFile("InsertSectionAtSpecifiedPosition.pptx", FileFormat.Pptx2013);
        }
    }
}

Add a Section Before a Specified Slide in PowerPoint in C# and VB.NET
To divided the existing PowerPoint slides into different sections, you can use the Presentation.SectionList.Add(string sectionName, ISlide slide) method to insert a section before a specified slide. The detailed steps are as follows.
- Initialize an instance of Presentation class.
- Load a PowerPoint document using Presentation.LoadFromFile() method.
- Get a specified slide using Presentation.Slides property.
- Add a section before the specified slide using Presentation.SectionList.Add(string sectionName, ISlide slide) method.
- Save the result document using Presentation.SaveToFile() method.
- C#
- VB.NET
using Spire.Presentation;

namespace AddSectionBeforeSlide
{
    class Program
    {
        static void Main(string[] args)
        {
            //Create a Presentation instance
            Presentation ppt = new Presentation();

            //Load a sample PowerPoint document
            ppt.LoadFromFile("Test.pptx");

            //Get the second slide in the document
            ISlide slide = ppt.Slides[1];

            //Add a section before the second slide
            Section section = ppt.SectionList.Add("New Section", slide);

            //Save the result document
            ppt.SaveToFile("AddSectionBeforeSlide.pptx", FileFormat.Pptx2013);
        }
    }
}

Remove a Section from a PowerPoint Document in C# and VB.NET
If you do not need a particular section, you can simply remove it using Presentation.SectionList.RemoveAt(int index) method. Note that removing a section does not remove the slides in that section. The following are the steps to remove a specified section but keep the slides in it.
- Initialize an instance of Presentation class.
- Load a PowerPoint document using Presentation.LoadFromFile() method.
- Remove a specified section using Presentation.SectionList.RemoveAt(int index) method. Or you can remove all the sections in the document using Presentation.SectionList.RemoveAll() method.
- Save the result document using Presentation.SaveToFile() method.
- C#
- VB.NET
using Spire.Presentation;

namespace RemoveSection
{
    class Program
    {
        static void Main(string[] args)
        {
            //Create a Presentation instance
            Presentation ppt = new Presentation();

            //Load a sample PowerPoint document
            ppt.LoadFromFile("Test.pptx");

            //Remove the second section
            ppt.SectionList.RemoveAt(1);

            //Remove all the sections
            //ppt.SectionList.RemoveAll();

            //Save the result document
            ppt.SaveToFile("RemoveSection.pptx", FileFormat.Pptx2013);
        }
    }
}
Apply for a Temporary License
If you'd like to remove the evaluation message from the generated documents, or to get rid of the function limitations, please request a 30-day trial license for yourself.
