.NET (1327)
Children categories
Hyperlinks can direct readers to a web page, a file, an E-mail address, or other place in the same PowerPoint file. A hyperlink can be added to a text, an image or a shape. In the previous article, we've illustrated how to add hyperlink to text, this article is going to demonstrate how to add hyperlink to an image in PowerPoint using Spire.Presentation.
Detail steps:
Step 1: Initialize an object of Presentation class and Load the PowerPoint file.
Presentation presentation = new Presentation();
presentation.LoadFromFile("Input.pptx");
Step 2: Get the first slide.
ISlide slide = presentation.Slides[0];
Step 3: Add image to slide.
RectangleF rect = new RectangleF(50, 300, 100, 100);
IEmbedImage image = slide.Shapes.AppendEmbedImage(ShapeType.Rectangle, @"logo.png", rect);
Step 4: Add hyperlink to image.
ClickHyperlink hyperlink = new ClickHyperlink("https://www.e-iceblue.com");
image.Click = hyperlink;
Step 5: Save the file.
presentation.SaveToFile("ImageHyperLink.pptx", FileFormat.Pptx2010);
Screenshot:

Full code:
using Spire.Presentation;
using System.Drawing;
namespace InitializeHyperlink
{

    class Program
    {

        static void Main(string[] args)
        {
            //Initialize an object of Presentation class
            Presentation presentation = new Presentation();
            //Load the PowerPoint file
            presentation.LoadFromFile("test.pptx");

            //Get the first slide
            ISlide slide = presentation.Slides[0];

            //Add image to slide
            RectangleF rect = new RectangleF(50, 300, 100, 100);
            IEmbedImage image = slide.Shapes.AppendEmbedImage(ShapeType.Rectangle, @"logo.png", rect);

            //Add hyperlink to image
            ClickHyperlink hyperlink = new ClickHyperlink("https://www.e-iceblue.com");
            image.Click = hyperlink;

            //Save the file
            presentation.SaveToFile("ImageHyperLink.pptx", FileFormat.Pptx2010);

        }
    }
}
C#/VB.NET: Remove Text or Image Watermarks from Word Documents
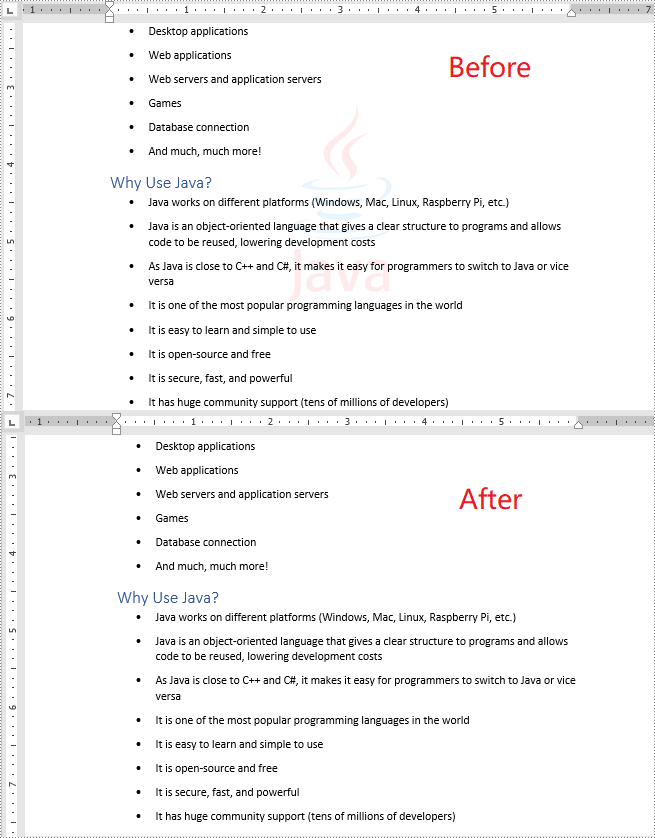
2022-06-24 08:50:00 Written by KoohjiWatermarks can be added to Word documents to inform other people about the documents' ownership or status. Sometimes, you may want to get rid of an existing watermark in a Word document. This article will demonstrate how to remove watermarks from Word documents in C# and VB.NET using Spire.Doc for .NET.
Install Spire.Doc for .NET
To begin with, you need to add the DLL files included in the Spire.Doc for .NET package as references in your .NET project. The DLL files can be either downloaded from this link or installed via NuGet.
PM> Install-Package Spire.Doc
Remove Text or Image Watermarks from Word Documents in C# and VB.NET
You can remove the watermark of a Word document by setting the Document.Watermark property as null.
The following steps show you how to remove the watermark from a Word document:
- Initialize an instance of Document class.
- Load a Word document using Document.LoadFromFile() method.
- Remove the watermark from the document by setting the Document.Watermark property as null.
- Save the result document using Document.SaveToFile() method.
- C#
- VB.NET
using Spire.Doc;

namespace RemoveWatermark
{
    class Program
    {
        static void Main(string[] args)
        {
            //Create a Document instance
            Document doc = new Document();
            //Load a Word document
            doc.LoadFromFile("Sample.docx");

            //Remove the watermark from the document
            doc.Watermark = null;

            //Save the result document
            doc.SaveToFile("RemoveWatermark.docx", FileFormat.Docx2013);
        }
    }
}
Apply for a Temporary License
If you'd like to remove the evaluation message from the generated documents, or to get rid of the function limitations, please request a 30-day trial license for yourself.
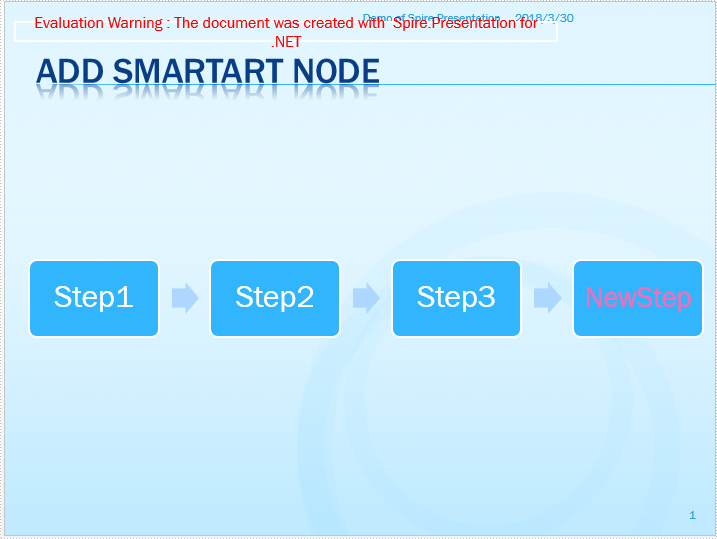
With the help of Spire.Presentation, we can easily add SmartArt shape to the presentation slides. We can add a new node to the existing SmartArt shape to presentation slides and the following code example demonstrates the same.
Step 1: Create a new PowerPoint document and load the sample document from file.
Presentation presentation = new Presentation();
presentation.LoadFromFile("Sample.pptx");
Step 2: Get the SmartArt from the presentation slide.
ISmartArt sa = presentation.Slides[0].Shapes[1] as ISmartArt;
Step 3: Add a node.
ISmartArtNode node = sa.Nodes.AddNode();
Step 4: Add text and set the text style for the node.
node.TextFrame.Text = "NewStep";
node.TextFrame.TextRange.Fill.FillType = Spire.Presentation.Drawing.FillFormatType.Solid;
node.TextFrame.TextRange.Fill.SolidColor.KnownColor = KnownColors.HotPink;
Step 5: Save the document to file.
presentation.SaveToFile("AddNode.pptx", FileFormat.Pptx2010);
Effective screenshot after adding a new node:
Full codes of adding a node to SmartArt:
using Spire.Presentation;
using Spire.Presentation.Diagrams;
namespace AddNote
{

    class Program
    {

        static void Main(string[] args)
        {
            Presentation presentation = new Presentation();
            presentation.LoadFromFile("Sample.pptx");

            ISmartArt sa = presentation.Slides[0].Shapes[1] as ISmartArt;

            ISmartArtNode node = sa.Nodes.AddNode();

            node.TextFrame.Text = "NewStep";
            node.TextFrame.TextRange.Fill.FillType = Spire.Presentation.Drawing.FillFormatType.Solid;
            node.TextFrame.TextRange.Fill.SolidColor.KnownColor = KnownColors.HotPink;

            presentation.SaveToFile("AddNode.pptx", FileFormat.Pptx2010);


        }
    }
}
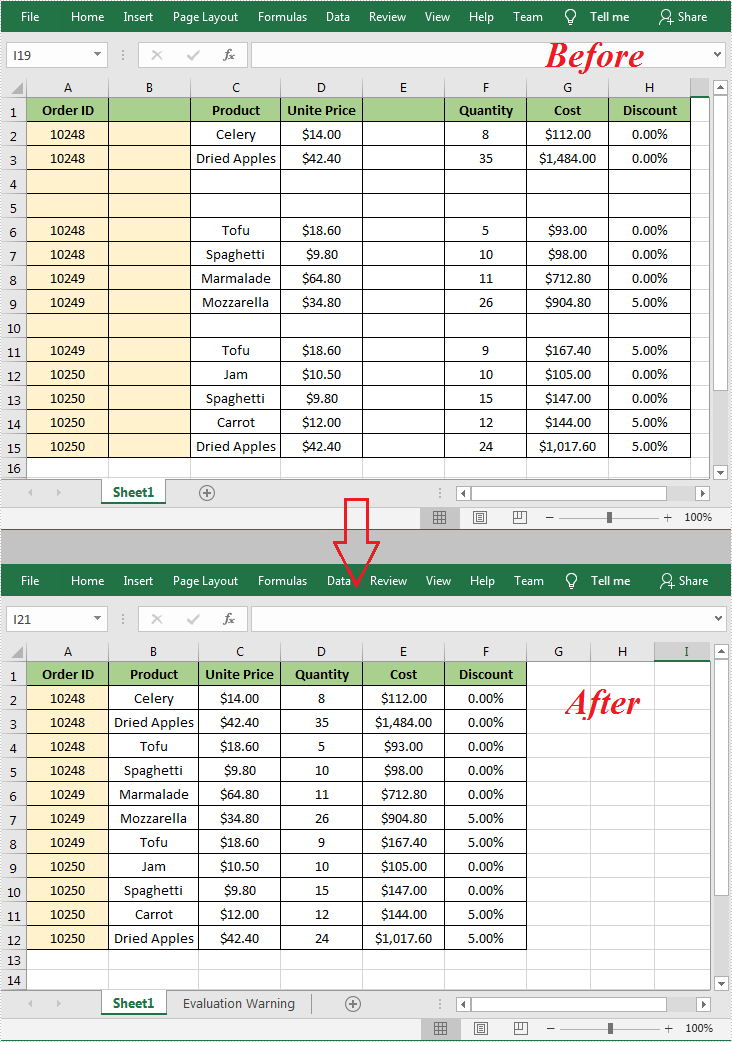
When working with an Excel document, some blank rows or columns may appear due to the modification of data. Although having blank rows or columns in a worksheet isn't necessarily a bad thing, in most cases they are still undesirable. Furthermore, such blank rows or columns may cause errors if formulas are applied. To delete these blank rows or columns, you can simply select and delete them, but if there are a lot of blank rows and columns, deleting them manually is a very time-consuming task. In this article, you will learn how to programmatically delete blank rows and columns in an Excel worksheet using Spire.XLS for .NET.
Install Spire.XLS for .NET
To begin with, you need to add the DLL files included in the Spire.XLS for .NET package as references in your .NET project. The DLL files can be either downloaded from this link or installed via NuGet.
PM> Install-Package Spire.XLS
Delete Blank Rows and Columns in Excel
The detailed steps are as follows.
- Instantiate a Workbook object.
- Load a sample Excel file using Workbook.LoadFromFile() method.
- Get a specified worksheet using Workbook.Worksheets[] property.
- Loop through all used rows in the specified worksheet and determine whether the row is blank using XlsRange.IsBlank property.
- Delete the blank rows using Worksheet.DeleteRow() method.
- Loop through all used columns in the specified worksheet and determine whether the column is blank using XlsRange.IsBlank property.
- Delete the blank columns using Worksheet.DeleteColumn() method.
- Save the result file using Workbook.SaveToFile() method.
- C#
- VB.NET
using System.Linq;
using Spire.Xls;

namespace DeleteBlankRowsAndColumns
{
    class Program
    {
        static void Main(string[] args)
        {
            //Instantiate a Workbook object
            Workbook workbook = new Workbook();

            //Load a sample Excel file
            workbook.LoadFromFile("sample.xlsx");

            //Get the first worksheet
            Worksheet sheet = workbook.Worksheets[0];

            //Delete blanks rows
            for (int i = sheet.Rows.Count() - 1; i >= 0; i--)
            {
                if (sheet.Rows[i].IsBlank)
                {
                    sheet.DeleteRow(i + 1); //Index parameter in DeleteRow method starts from 1
                }
            }

            //Delete blank columns
            for (int j = sheet.Columns.Count() - 1; j >= 0; j--)
            {
                if (sheet.Columns[j].IsBlank)
                {
                    sheet.DeleteColumn(j + 1); //Index parameter in DeleteColumn method starts from 1
                }
            }

            //Save the file
            workbook.SaveToFile("DeleteBlankRowsAndColumns.xlsx", ExcelVersion.Version2013);
        }
    }
}
Apply for a Temporary License
If you'd like to remove the evaluation message from the generated documents, or to get rid of the function limitations, please request a 30-day trial license for yourself.
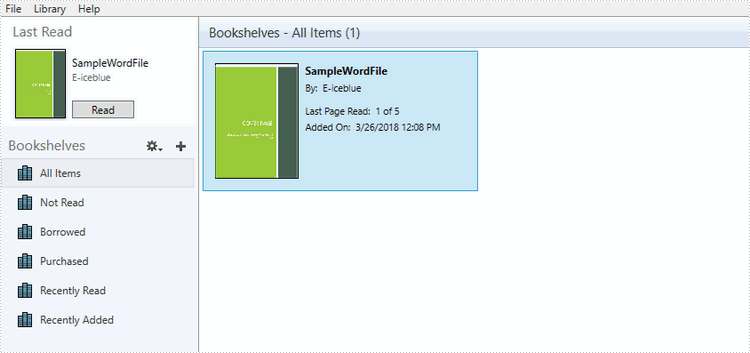
We already have the documentation introducing how to convert Word to EPUB. However, you may want to add a cover image to EPUB when creating an EPUB book from a Word document. The following code snippets will demonstrate the same.
Step 1: Create a Document instance and load a sample Word file.
Document doc = new Document();
doc.LoadFromFile("SampleWordFile.docx");
Step 2: Load a picture to DocPicture object.
DocPicture picture = new DocPicture(doc);
picture.LoadImage(Image.FromFile("CoverImage.jpg"));
Step 3: Add the picture to EPUB as cover image when creating EPUB from the Word document.
doc.SaveToEpub("output.epub", picture);
Output:
Full Code:
using Spire.Doc;
using Spire.Doc.Fields;
using System.Drawing;
namespace DOCTOEPUB
{
    class Program
    {
        static void Main(string[] args)
        {
            Document doc = new Document();
            doc.LoadFromFile("SampleWordFile.docx");

            DocPicture picture = new DocPicture(doc);
            picture.LoadImage(Image.FromFile("CoverImage.jpg"));
            doc.SaveToEpub("output.epub", picture);
        }
     }
}
Imports Spire.Doc
Imports Spire.Doc.Fields
Imports System.Drawing
Namespace DOCTOEPUB
	Class Program
		Private Shared Sub Main(args As String())
			Dim doc As New Document()
			doc.LoadFromFile("SampleWordFile.docx")

			Dim picture As New DocPicture(doc)
			picture.LoadImage(Image.FromFile("CoverImage.jpg"))
			doc.SaveToEpub("output.epub", picture)
		End Sub
	End Class
End Namespace
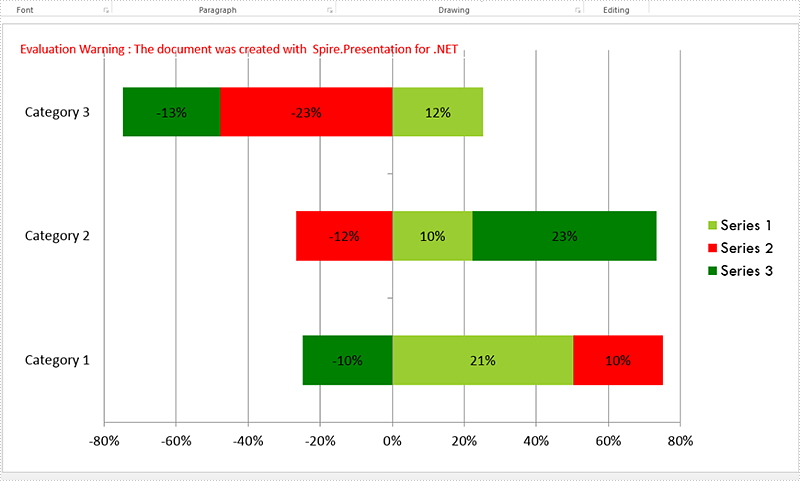
A 100% stacked bar chart is a chart type designed to show the relative percentage of multiple data series in stacked bars, where the total of each stacked bar always equals 100%. This article will demonstrate how to use Spire.Presentation to create 100% stacked bar in PowerPoint in C#.
Step 1: Create a Presentation object.
Presentation presentation = new Presentation();
Step 2: Add a "Bar100PercentStacked" chart to the first slide.
presentation.SlideSize.Type = SlideSizeType.Screen16x9;
SizeF slidesize = presentation.SlideSize.Size;
var slide = presentation.Slides[0];

RectangleF rect = new RectangleF(20, 20, slidesize.Width - 40, slidesize.Height - 40);
IChart chart = slide.Shapes.AppendChart(Spire.Presentation.Charts.ChartType.Bar100PercentStacked, rect);
Step 3: Write data to the chart data.
string[] columnlabels = { "Series 1", "Series 2", "Series 3" };

// Insert the column labels
String[] cols = columnlabels.ToArray();
for (Int32 c = 0; c < cols.Count(); ++c)
    chart.ChartData[0, c + 1].Text = cols[c];

string[] rowlabels = { "Category 1", "Category 2", "Category 3" };

// Insert the row labels
String[] rows = rowlabels.ToArray();
for (Int32 r = 0; r < rows.Count(); ++r)
    chart.ChartData[r + 1, 0].Text = rows[r];

double[,] values = new double[3, 3] { { 20.83233, 10.34323, -10.354667 }, { 10.23456, -12.23456, 23.34456 }, { 12.34345, -23.34343, -13.23232 }};

// Insert the values
double value = 0.0;
for (Int32 r = 0; r < rows.Count(); ++r)
{
    for (Int32 c = 0; c < cols.Count(); ++c)
    {
        value = Math.Round(values[r, c], 2);
        chart.ChartData[r + 1, c + 1].Value = value;
    }
}

chart.Series.SeriesLabel = chart.ChartData[0, 1, 0, columnlabels.Count()];
chart.Categories.CategoryLabels = chart.ChartData[1, 0, rowlabels.Count(), 0];

chart.PrimaryCategoryAxis.Position = AxisPositionType.Left;
chart.SecondaryCategoryAxis.Position = AxisPositionType.Left;
chart.PrimaryCategoryAxis.TickLabelPosition = TickLabelPositionType.TickLabelPositionLow;
Step 4: Set the data, font and format for the series of each column.
for (Int32 c = 0; c < cols.Count(); ++c)
 {
     chart.Series[c].Values = chart.ChartData[1, c + 1, rowlabels.Count(), c + 1];
     chart.Series[c].Fill.FillType = FillFormatType.Solid;
     chart.Series[c].InvertIfNegative = false;

     for (Int32 r = 0; r < rows.Count(); ++r)
     {
         var label = chart.Series[c].DataLabels.Add();
         label.LabelValueVisible = true;
         chart.Series[c].DataLabels[r].HasDataSource = false;
         chart.Series[c].DataLabels[r].NumberFormat = "0#\\%";
         chart.Series[c].DataLabels.TextProperties.Paragraphs[0].DefaultCharacterProperties.FontHeight = 12;
     }
 }
 chart.Series[0].Fill.SolidColor.Color = Color.YellowGreen;
 chart.Series[1].Fill.SolidColor.Color = Color.Red;
 chart.Series[2].Fill.SolidColor.Color = Color.Green;

 TextFont font = new TextFont("Tw Cen MT");
Step 5: Set the font and size for chartlegend.
for (int k = 0; k < chart.ChartLegend.EntryTextProperties.Length; k++)
 {
     chart.ChartLegend.EntryTextProperties[k].LatinFont = font;
     chart.ChartLegend.EntryTextProperties[k].FontHeight = 20;
 }
Step 6: Save the document to file.
presentation.SaveToFile("Sample.pptx", FileFormat.Pptx2010);
Effective screenshot of 100% stacked bar chart:
Full codes:
using Spire.Presentation;
using Spire.Presentation.Charts;
using Spire.Presentation.Drawing;
using System;
using System.Drawing;
using System.Linq;

namespace BarChart
{
    class Program
    {
        static void Main(string[] args)
        {
            Presentation presentation = new Presentation();
            presentation.SlideSize.Type = SlideSizeType.Screen16x9;
            SizeF slidesize = presentation.SlideSize.Size;

            var slide = presentation.Slides[0];

            RectangleF rect = new RectangleF(20, 20, slidesize.Width - 40, slidesize.Height - 40);
            IChart chart = slide.Shapes.AppendChart(Spire.Presentation.Charts.ChartType.Bar100PercentStacked, rect);

            string[] columnlabels = { "Series 1", "Series 2", "Series 3" };

            String[] cols = columnlabels.ToArray();
            for (Int32 c = 0; c < cols.Count(); ++c)
                chart.ChartData[0, c + 1].Text = cols[c];

            string[] rowlabels = { "Category 1", "Category 2", "Category 3" };

            String[] rows = rowlabels.ToArray();
            for (Int32 r = 0; r < rows.Count(); ++r)
                chart.ChartData[r + 1, 0].Text = rows[r];

            double[,] values = new double[3, 3] { { 20.83233, 10.34323, -10.354667 }, { 10.23456, -12.23456, 23.34456 }, { 12.34345, -23.34343, -13.23232 } };

            double value = 0.0;
            for (Int32 r = 0; r < rows.Count(); ++r)
            {
                for (Int32 c = 0; c < cols.Count(); ++c)
                {
                    value = Math.Round(values[r, c], 2);
                    chart.ChartData[r + 1, c + 1].Value = value;
                }
            }

            chart.Series.SeriesLabel = chart.ChartData[0, 1, 0, columnlabels.Count()];
            chart.Categories.CategoryLabels = chart.ChartData[1, 0, rowlabels.Count(), 0];

            chart.PrimaryCategoryAxis.Position = AxisPositionType.Left;
            chart.SecondaryCategoryAxis.Position = AxisPositionType.Left;
            chart.PrimaryCategoryAxis.TickLabelPosition = TickLabelPositionType.TickLabelPositionLow;

            for (Int32 c = 0; c < cols.Count(); ++c)
            {
                chart.Series[c].Values = chart.ChartData[1, c + 1, rowlabels.Count(), c + 1];
                chart.Series[c].Fill.FillType = FillFormatType.Solid;
                chart.Series[c].InvertIfNegative = false;

                for (Int32 r = 0; r < rows.Count(); ++r)
                {
                    var label = chart.Series[c].DataLabels.Add();
                    label.LabelValueVisible = true;
                    chart.Series[c].DataLabels[r].HasDataSource = false;
                    chart.Series[c].DataLabels[r].NumberFormat = "0#\\%";
                    chart.Series[c].DataLabels.TextProperties.Paragraphs[0].DefaultCharacterProperties.FontHeight = 12;
                }
            }
            chart.Series[0].Fill.SolidColor.Color = Color.YellowGreen;
            chart.Series[1].Fill.SolidColor.Color = Color.Red;
            chart.Series[2].Fill.SolidColor.Color = Color.Green;

            TextFont font = new TextFont("Tw Cen MT");

            for (int k = 0; k < chart.ChartLegend.EntryTextProperties.Length; k++)
            {
                chart.ChartLegend.EntryTextProperties[k].LatinFont = font;
                chart.ChartLegend.EntryTextProperties[k].FontHeight = 20;
            }

            presentation.SaveToFile("Sample.pptx", FileFormat.Pptx2010);
        }
    }
}
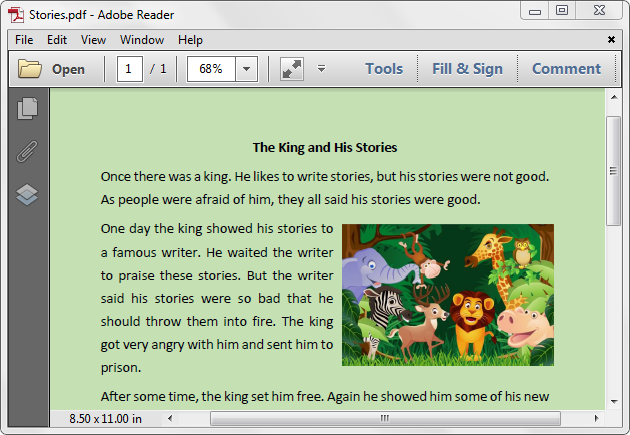
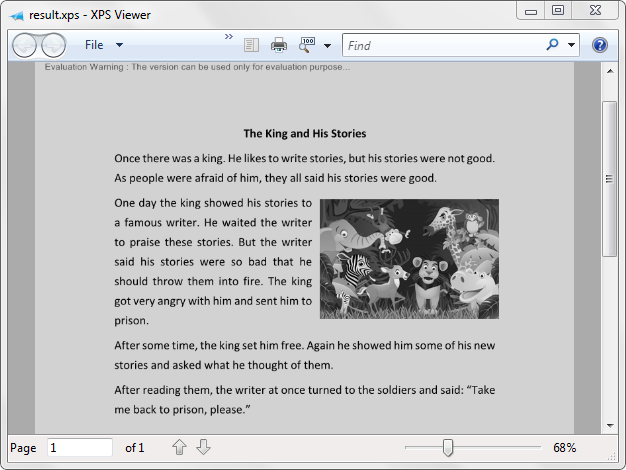
Spire.PDF supports to print a PDF in greyscale. This article is going to show you how to use Spire.PDF to accomplish this function.
Below is the example PDF file we used for demonstration:
Detail steps:
Step 1: Create a PdfDocument instance and load the PDF file.
PdfDocument pdf = new PdfDocument();
pdf.LoadFromFile(@"Stories.pdf");
Step 2: Set the PdfPrintSettings.Color property to false.
pdf.PrintSettings.Color = false;
Step 3: Print the document.
pdf.Print();
Screenshot after printing to xps:
Full code:
using Spire.Pdf;

namespace Print_PDF_in_Black_and_White
{
    class Program
    {
        static void Main(string[] args)
        {
            PdfDocument pdf = new PdfDocument();
            pdf.LoadFromFile(@"Stories.pdf");
            pdf.PrintSettings.Color = false;
            pdf.Print();
        }
    }
}
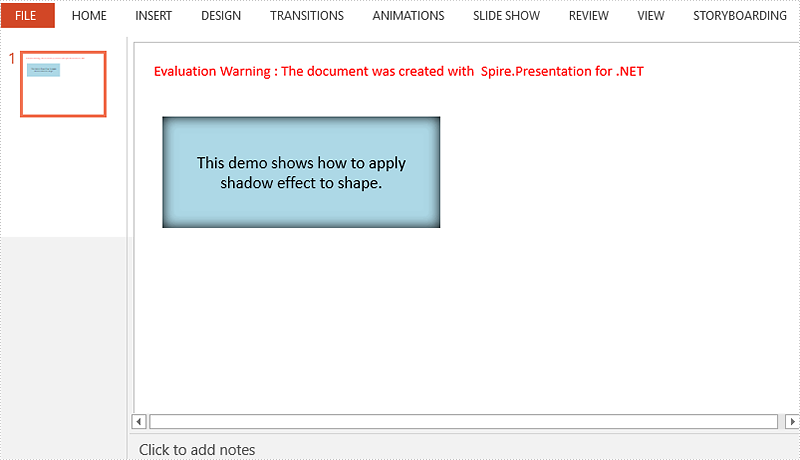
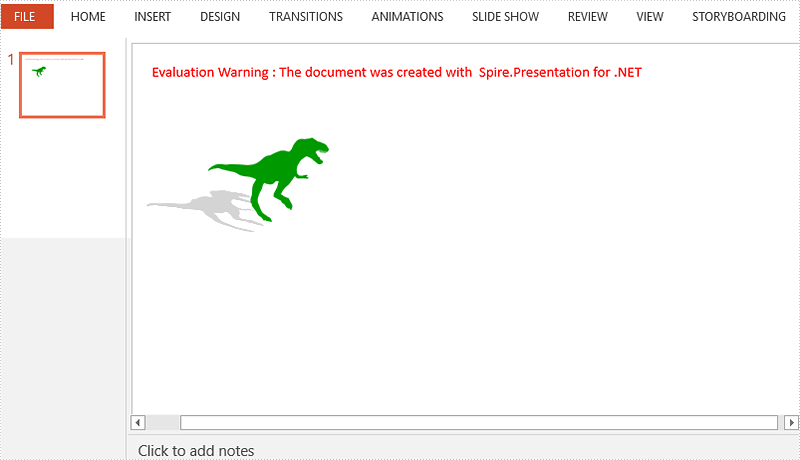
Shadows make your shapes or pictures especially with transparent background pop out of your slide. They make flat 2 dimensional graphics look like 3 dimensional graphics. This article will show you how we can apply shadow effects to shapes and pictures in PowerPoint using Spire.Presentation.
Apply Shadow Effect to Shape
using Spire.Presentation;
using Spire.Presentation.Drawing;
using System.Drawing;

namespace ApplyShadoweffect
{

    class Program
    {

        static void Main(string[] args)
        {
            {
                //Create a Presentation object and get the first slide.
                Presentation ppt = new Presentation();
                ISlide slide = ppt.Slides[0];

                //Add a shape to slide.
                RectangleF rect = new RectangleF(30, 80, 300, 120);
                IAutoShape shape = slide.Shapes.AppendShape(ShapeType.Rectangle, rect);
                shape.Fill.FillType = FillFormatType.Solid;
                shape.Fill.SolidColor.Color = Color.LightBlue;
                shape.Line.FillType = FillFormatType.None;
                shape.TextFrame.Text = "This demo shows how to apply shadow effect to shape.";
                shape.TextFrame.TextRange.Fill.FillType = FillFormatType.Solid;
                shape.TextFrame.TextRange.Fill.SolidColor.Color = Color.Black;

                //Create an inner shadow effect through InnerShadowEffect object.
                InnerShadowEffect innerShadow = new InnerShadowEffect();
                innerShadow.BlurRadius = 20;
                innerShadow.Direction = 0;
                innerShadow.Distance = 0;
                innerShadow.ColorFormat.Color = Color.Black;

                //Apply the shadow effect to shape.
                shape.EffectDag.InnerShadowEffect = innerShadow;

                //Save to file.
                ppt.SaveToFile("ShadowOnShape.pptx", FileFormat.Pptx2010);

            }
        }

    }
}
Apply Shadow Effect to Picture
using Spire.Presentation;
using Spire.Presentation.Drawing;
using System.Drawing;

namespace ApplyShadoweffect
{

    class Program
    {

        static void Main(string[] args)
        {
            {
                //Create a Presentation object and get the first slide.
                Presentation ppt = new Presentation();
                ISlide slide = ppt.Slides[0];

                //Get the picture path.
                string imagePath = "dinosaur.png";
                Image image = Image.FromFile(imagePath);
                float width = (float)image.Width / 3;
                float height = (float)image.Height / 3;

                //Add a shape to slide and fill the shape with picture.
                RectangleF rect = new RectangleF(80, 80, width, height);
                IAutoShape shape = slide.Shapes.AppendShape(ShapeType.Rectangle, rect);
                shape.Fill.FillType = FillFormatType.Picture;
                shape.Fill.PictureFill.Picture.Url = imagePath;
                shape.Fill.PictureFill.FillType = PictureFillType.Stretch;
                shape.Line.FillType = FillFormatType.None;

                //Choose a preset shadow effect.
                PresetShadow presetShadow = new PresetShadow();
                presetShadow.Preset = PresetShadowValue.BackLeftPerspective;
                presetShadow.ColorFormat.Color = Color.LightGray;

                //Apply the shadow effect to shape.
                shape.EffectDag.PresetShadowEffect = presetShadow;

                //Save to file.
                ppt.SaveToFile("ShadowOnPicture.pptx", FileFormat.Pptx2010);

            }
        }

    }
}
Convert the PDF to word, HTML, SVG, XPS and save them to stream
2018-03-13 08:11:24 Written by KoohjiThis article we will demonstrate how to convert the PDF pages to HTML, Word, SVG, XPS, PDF and save them to stream by calling the method PdfDocument.SaveToStream() offered by Spire.PDF. And starts from Spire.PDF version 4.3, it newly supports to convert the defined range of PDF pages and save them to stream.
Save the PDF to stream
Step 1: Create a new PdfDocument instance and load the sample document from file.
PdfDocument pdf = new PdfDocument();
pdf.LoadFromFile("Sample.pdf");
Step 2: Save the document to stream.
MemoryStream ms=new MemoryStream ();
pdf.SaveToStream(ms);
Save the PDF to stream and defined the file format to HTML, Word, SVG, XPS and PDF
Step 1: Create a new PdfDocument instance and load the sample document from file.
PdfDocument pdf = new PdfDocument();
pdf.LoadFromFile("Sample.pdf");
Step 2: Save the document to stream and use FileFormat format to define the format.
MemoryStream ms=new MemoryStream ();
pdf.SaveToStream(ms, FileFormat.HTML);
Convert the defined range of PDF pages to HTML, word, SVG, XPS and save them to stream
Step 1: Create a new PdfDocument instance and load the sample document from file.
PdfDocument pdf = new PdfDocument();
pdf.LoadFromFile("Sample.pdf");
Step 2: Only save some PDF pages to stream by using pdf.SaveToStream(int startIndex, int endIndex, FileFormat format) method; and FileFormat.PDF is not supported.
pdf.SaveToStream(1, 2, FileFormat.SVG);
Full codes of save PDF to stream:
using Spire.Pdf;
using System.IO;


namespace SavePDFToStream
{
    class Program
    {
        static void Main(string[] args)
        {
            PdfDocument pdf = new PdfDocument();

            pdf.LoadFromFile("Sample.pdf");

            MemoryStream ms = new MemoryStream();
            pdf.SaveToStream(ms);
            pdf.SaveToStream(ms, FileFormat.HTML);

            pdf.SaveToStream(1, 2, FileFormat.SVG);
        }
    }
}
Delete Legend and Specific Legend Entries from Excel Chart in C#
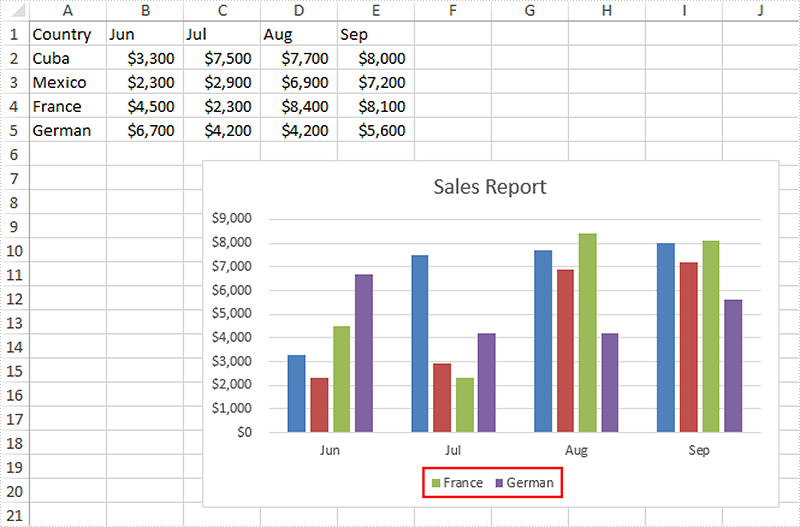
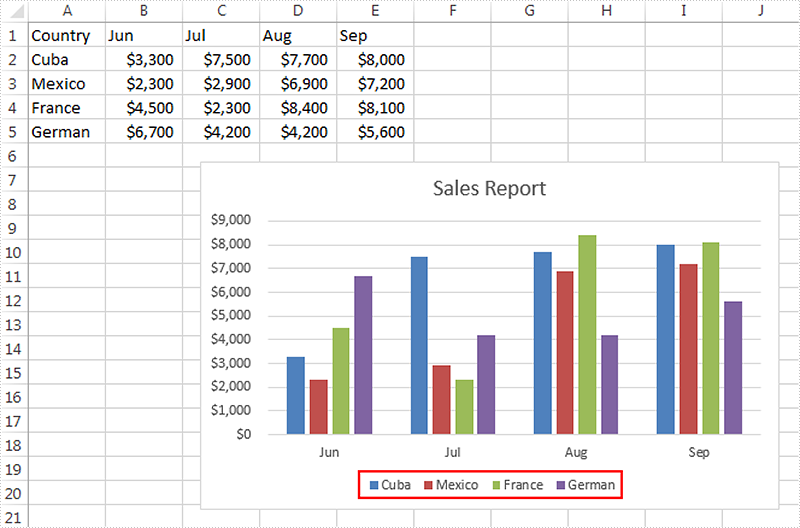
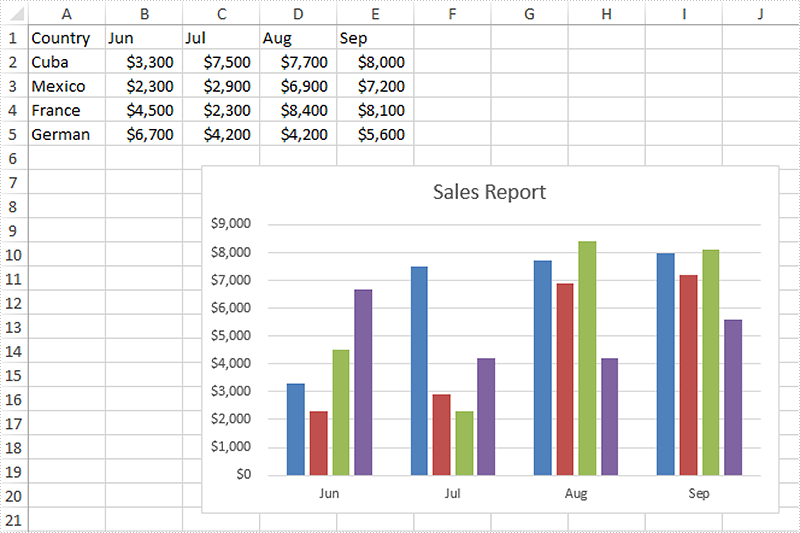
2018-03-12 07:55:52 Written by KoohjiA legend is displayed in the chart area by default. However it can be removed from the chart. With Spire.XLS, we can delete the whole legend as well as specific legend entries from Excel chart. This article is going to demonstrate how we can use Spire.XLS to accomplish this function.
Below screenshot shows the Excel chart we used for demonstration:
Delete the whole legend
using Spire.Xls;
namespace DeleteLegend
{

    class Program
    {

        static void Main(string[] args)
        {
            //Create a Workbook instance
            Workbook workbook = new Workbook();
            //Load the Excel file
            workbook.LoadFromFile("sample.xlsx");

            //Get the first worksheet
            Worksheet sheet = workbook.Worksheets[0];

            //Get the chart
            Chart chart = sheet.Charts[0];

            //Delete legend from the chart
            chart.Legend.Delete();

            //Save the file
            workbook.SaveToFile("DeleteLegend.xlsx", ExcelVersion.Version2013);
        }
    }
}
Screenshot:
Delete specific legend entries
using Spire.Xls;
namespace DeleteLegend
{

    class Program
    {

        static void Main(string[] args)
        {
            //Create a Workbook instance
            Workbook workbook = new Workbook();
            //Load the Excel file
            workbook.LoadFromFile("sample.xlsx");

            //Get the first worksheet
            Worksheet sheet = workbook.Worksheets[0];

            //Get the chart
            Chart chart = sheet.Charts[0];

            //Delete the first and the second legend entries from the chart
            chart.Legend.LegendEntries[0].Delete();
            chart.Legend.LegendEntries[1].Delete();

            //Save the file
            workbook.SaveToFile("DeleteLegendEntries.xlsx", ExcelVersion.Version2013);

        }
    }
}
Screenshot: