
Knowledgebase (2597)
Children categories
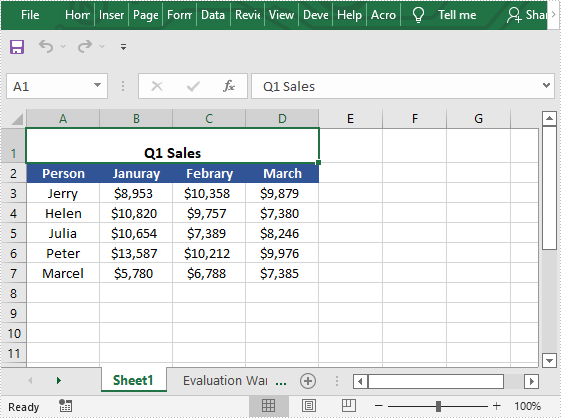
Merging cells means joining two or more separate cells into one large cell, which is useful when you need to create a label that spans multiple columns. In this article, we will demonstrate how to merge or unmerge cells in Excel in C# and VB.NET using Spire.XLS for .NET library.
Install Spire.XLS for .NET
To begin with, you need to add the DLL files included in the Spire.XLS for .NET package as references in your .NET project. The DLL files can be either downloaded from this link or installed via NuGet.
PM> Install-Package Spire.XLS
Merge Cells in Excel in C# and VB.NET
The following are the steps to merge cells in Excel:
- Create a Workbook instance
- Load the Excel file using Workbook.LoadFromFile() method.
- Get the desired worksheet using Workbook.Worksheets[sheetIndex] property.
- Access the specific range of cells and merge them into one using XlsRange.Merge() method.
- Center the text in the merged cell by setting CellRange.Style.HorizontalAlignment property to HorizontalAlignType.Center.
- Save the result file using Workbook.SaveToFile() method.
- C#
- VB.NET
using Spire.Xls;

namespace MergeCells
{
    class Program
    {
        static void Main(string[] args)
        {
            //Create a Workbook instance
            Workbook workbook = new Workbook();
            //Load the Excel file
            workbook.LoadFromFile("Sample.xlsx");

            //Get the first worksheet
            Worksheet sheet = workbook.Worksheets[0];
            //Merge cells A1-D1 into one cell
            CellRange range = sheet.Range["A1:D1"];
            range.Merge();
            //Center the text in the merged cell
            range.Style.HorizontalAlignment = HorizontalAlignType.Center;

            //Save the result file
            workbook.SaveToFile("MergeCells.xlsx", ExcelVersion.Version2013);
        }
    }
}
Unmerge Cells in Excel in C# and VB.NET
The following are the steps to unmerge cells in Excel:
- Create a Workbook instance
- Load the Excel file using Workbook.LoadFromFile() method.
- Get the desired worksheet using Workbook.Worksheets[sheetIndex] property.
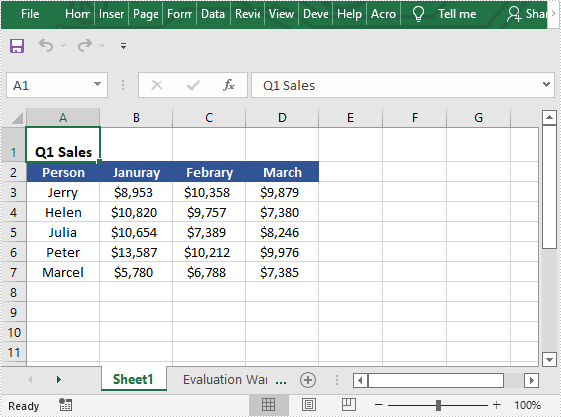
- Access the specific range of cells and unmerge them using XlsRange.UnMerge() method.
- Save the result file using Workbook.SaveToFile() method.
- C#
- VB.NET
using Spire.Xls;

namespace UnmergeCells
{
    class Program
    {
        static void Main(string[] args)
        {

            //Create a Workbook instance
            Workbook workbook = new Workbook();
            //Load the Excel file
            workbook.LoadFromFile("MergeCells.xlsx");

            //Get the first worksheet
            Worksheet sheet = workbook.Worksheets[0];
            //Unmerge cells A1-D1
            CellRange range = sheet.Range["A1:D1"];
            range.UnMerge();

            //Save the result file
            workbook.SaveToFile("UnMergeCells.xlsx", ExcelVersion.Version2013);
        }
    }
}
Apply for a Temporary License
If you'd like to remove the evaluation message from the generated documents, or to get rid of the function limitations, please request a 30-day trial license for yourself.
By using Spire.Doc, developers can create Word document with a table inside (Click to learn how to create table in Word document). But when users create table in Word document, they would not only create table with blank cells. They need set formats or sometimes set table size like column width. This article will show you how to set Word table column width.
Make sure Spire.Doc and Visual Studio are correctly installed on system. Follow the simple steps below to set Word table column width.
Step 1: Create a C# windows form application in Visual Studio. Add Spire.Doc.dll as reference. The default setting of Spire.Doc.dll is placed under "C:\Program Files\e-iceblue\Spire.Doc\Bin". Select assembly Spire.Doc.dll and click OK to add it to the project.
using System;
using Spire.Doc;
using Spire.Doc.Fields;
using Spire.Doc.Documents;

namespace TableWidth
{
    public partial class Form1 : Form
    {
        public Form1()
        {
            InitializeComponent();
        }
        private void button1_Click(object sender, EventArgs e)
        {
        }
    }
}
Imports Spire.Doc
Imports Spire.Doc.Fields
Imports Spire.Doc.Documents

Namespace TableWidth
	Public Partial Class Form1
		Inherits Form
		Public Sub New()
			InitializeComponent()
		End Sub
		Private Sub button1_Click(sender As Object, e As EventArgs)
		End Sub
	End Class
End Namespace
Step 2: Put the word document with table into the project folder. Use the following code to load it into project.
Document doc = new Document();
            doc.LoadFromFile(@"..\..\Table.docx",FileFormat.Docx);
Dim doc As New Document()
doc.LoadFromFile("..\..\Table.docx", FileFormat.Docx)
Step 3: Because Spire.Doc doesn't have a direct method to set column width, we need set the first cell width of in each row.
            for (int i = 0; i < document.Sections[0].Tables[0].Rows.Count; i++)
            {
                document.Sections[0].Tables[0].Rows[i].Cells[0].Width = 20;
            }
For i As Integer = 0 To document.Sections(0).Tables(0).Rows.Count - 1
	document.Sections(0).Tables(0).Rows(i).Cells(0).Width = 20
Next
Step 4: Save and Preview.
document.SaveToFile(@"..\..\Sample.docx",FileFormat.Docx);
document.SaveToFile("..\..\Sample.docx", FileFormat.Docx)
System.Diagnostics.Process.Start("..\..\Test.pdf")
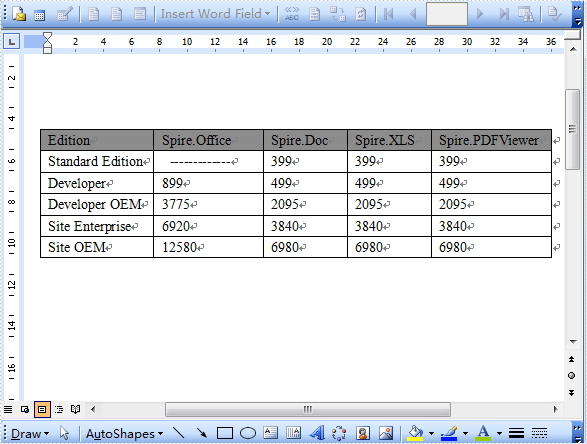
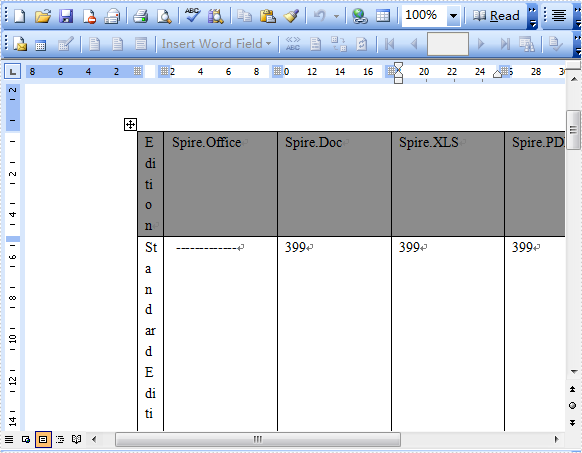
Now, the whole process is finished. Press F5 and click the button to run the project. The generated docx file can be found at the project debug folder. Check the effect.
Before Setting Width:
After Setting Width:
As a professional and powerful Word component, Spire.Doc doesn't need Microsoft Office Word Automation but also allows user to directly operate Word document, format and style and insert content to Word document.Click to learn more feature functions of Spire.Doc
The sample demonstrates how to make PDF overlay effect in Silverlight via Spire.PDF.