Excel users often encounter situations where data is structured in columns but would be more useful in rows, or vice versa. This common data reorganization challenge can transform how you analyze and present information. Whether you're dealing with survey data, financial reports, or any dataset that needs reorientation, learning to convert columns to rows in Excel is an essential skill that can save hours of manual work.
In this comprehensive guide, we'll explore multiple methods for changing columns to rows in Excel, ranging from quick manual techniques to automated solutions using VBA and Python, helping you to transpose data efficiently.
- What Does “Converting Columns to Rows” Mean in Excel?
- Prerequisites Before Transposing
- Method 1: Paste Special Transpose (Quickest for Static Data)
- Method 2: TRANSPOSE Function (Dynamic, Auto-Updating)
- Method 3: Power Query (Best for Large Datasets)
- Method 4: VBA Macro (Automate Batch Transpositions)
- Method 5: Python with Free Spire.XLS (Programmatic Transposition)
- Comparison Table: Choosing the Right Method
- FAQ: Switch Columns and Rows in Excel
What Does “Converting Columns to Rows” Mean in Excel?
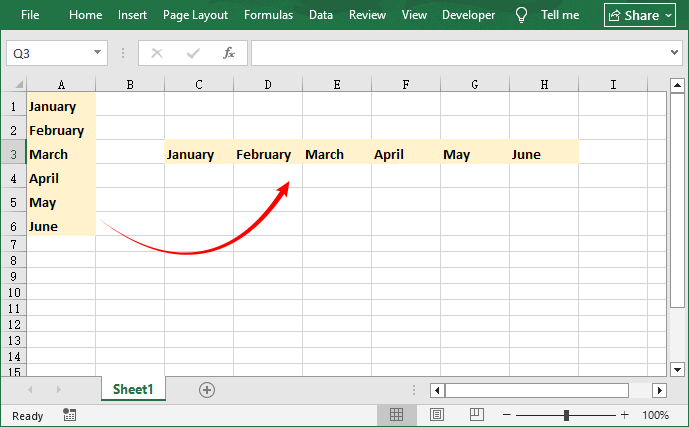
Converting columns to rows (or rows to columns) in Excel is called transposing data. It involves rotating your dataset 90 degrees, so the values that were in vertical columns become horizontal rows. For example, if you have product names in a column and monthly sales in rows, transposing will switch them: product names become rows, and monthly sales become columns—making it easier to analyze trends or create visualizations like charts.
The Excel transpose feature is useful for:
- Restructuring data for pivot tables or reports
- Simplifying data visualization (e.g., switching X and Y axes)
- Organizing messy datasets into a more readable format
- Sharing data with others who prefer a different layout
Prerequisites Before Transposing
To avoid data loss or errors, follow these quick prep steps:
- Backup Your Workbook: Save a copy of your file before transposing—this protects you if something goes wrong.
- Unmerge cells: Merged cells can break transposition. Unmerge any cells in your source data first.
- Clear Target Area: Ensure the area where you’ll paste transposed data is empty—Excel will overwrite existing data without warning.
- Note Your Excel Version: Some methods (like dynamic TRANSPOSE) work best in Excel 365/2021, while older versions (2019-) require alternative array formula steps.
Method 1: Paste Special Transpose (Quickest for Static Data)
The Paste Special Transpose method is the most popular and straightforward way to change an Excel column to row. It’s ideal for one-off tasks where your data won’t change (static data), as it creates a fixed snapshot of your transposed data.
Step-by-Step Guide:
- Select Your Source Data: Click and drag to highlight the columns you want to convert to rows.
- Copy the Data: Right-click and select “Copy” or press “Ctrl+C”. Note: Do not use “Ctrl+X” (Cut)—this will not work for transposition.
- Choose a Target Cell: Click on the cell where you want your transposed rows to start (e.g., C1).
- Paste with Transpose: Right-click and hover over “Paste Special”, then select the “Transpose” option (it looks like a rotated grid).
- Finalize: The data will now be pasted with columns converted to rows. You can delete the original column data if needed.

Pros & Cons:
- ✔ Pros: No formulas required, takes 10 seconds, retains original formatting (colors, fonts, cell styles) and formulas (with adjusted references).
- ✘ Cons: Static (no auto-updates if original data changes); does not work with Excel Tables (convert tables to ranges first).
Method 2: TRANSPOSE Function (Dynamic, Auto-Updating)
For data that updates frequently, the TRANSPOSE function creates a dynamic link between original and transposed data—edits to the source columns reflect instantly in the transposed rows.
Step-by-Step Guide:
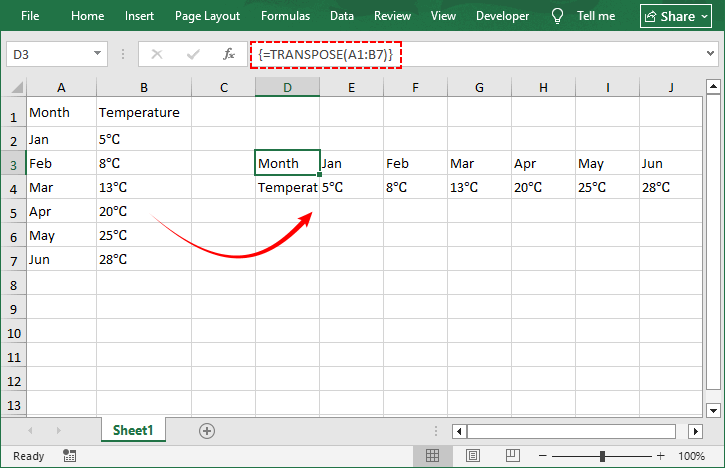
- Select the Target Range: Count the rows/columns of your source data (e.g., 7 columns × 2 rows) and select the opposite orientation (2 columns × 7 rows) in the empty target area.
- Enter the formula: With the range selected, type =TRANSPOSE(
- Select your source data: Click and drag to select the original data range
- Complete as an array formula: Press “Ctrl+Shift+Enter” (Excel 2019 and earlier) or just “Enter” (Excel 365 and later)
- Your data is now dynamically transposed: Changes to the original will reflect in the transposed version
Pros & Cons:
- ✔ Pros: Dynamic updates, no manual rework, works with most data types (text, numbers, dates).
- ✘ Cons: Cannot edit individual cells in the transposed array; #SPILL! error if the target range is not empty.
Method 3: Power Query (Best for Large Datasets)
Power Query (also called Get & Transform) is Excel’s powerful data transformation tool—perfect for transposing large datasets, repeating the same transposition multiple times, or cleaning data before transposing.
Step-by-Step Guide:
- Import Data to Power Query: Select your source columns (e.g., A1:C7), go to “Data” > “From Table/Range” (Excel will create a table if needed)
- Transpose Data: In the Power Query Editor, go to “Transform” > “Transpose”. Your columns will instantly convert to rows
- Load the Transposed Data: Click “Home” > “Close & Load”. Excel will paste the transposed rows into a new worksheet (or your chosen location)

Pros & Cons:
- ✔ Pros: Handles large datasets (1000+ rows/columns) easily, repeatable (refresh with one click if source data changes), preserves data integrity, and cleans data simultaneously.
- ✘ Cons: Slightly steeper learning curve for beginners, overkill for small, one-off transpositions.
Pro Tip: Combining transposition with other data cleaning techniques, such as removing blank rows and adjusting data types (e.g., converting numbers to text), ensures that restructured data is polished and ready for analysis, pivot tables, and sharing.
Method 4: VBA Macro (Automate Batch Transpositions)
If you need to switch data from column to row in Excel automatically (e.g., for multiple sheets or datasets), use a simple VBA macro. This method is ideal for advanced users or those who repeat the same transposition task regularly.
Step-by-Step Guide:
- Open the VBA Editor: Press “Alt+F11” to open.
- Insert a Module: Right-click your workbook in the Project Explorer > Insert > Module.
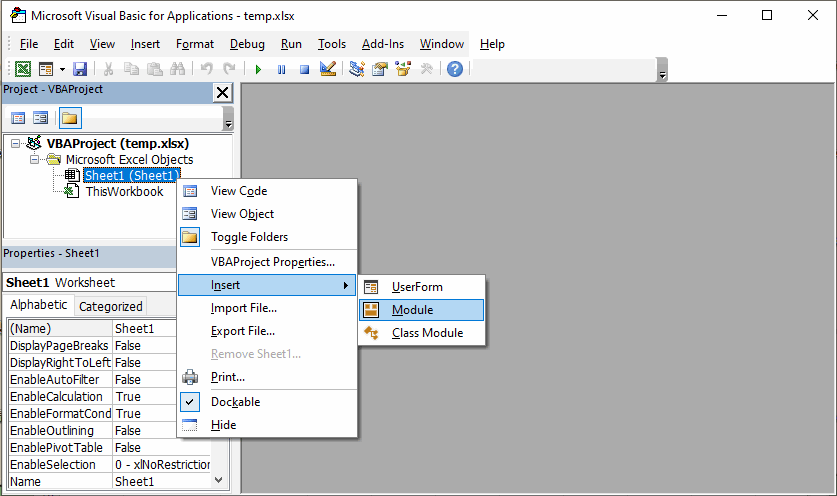
- Paste the VBA Code: Copy and paste the following code into the module (customize ranges as needed):
Sub TransposeColumnsToRows()
    Dim SourceRange As Range
    Dim DestinationCell As Range

    ' Set your source range (adjust as needed)
    Set SourceRange = ThisWorkbook.Sheets("Sheet1").Range("A1:C7")

    ' Set destination cell which is the top-left of where transposed data should go (adjust as needed)
    Set DestinationCell = ThisWorkbook.Sheets("Sheet1").Range("E5")

    ' Transpose the data
    SourceRange.Copy
    DestinationCell.PasteSpecial Paste:=xlPasteAll, Operation:=xlNone, _
                                 SkipBlanks:=False, Transpose:=True

    ' Clear clipboard
    Application.CutCopyMode = False

    MsgBox "Transposition complete!", vbInformation
End Sub
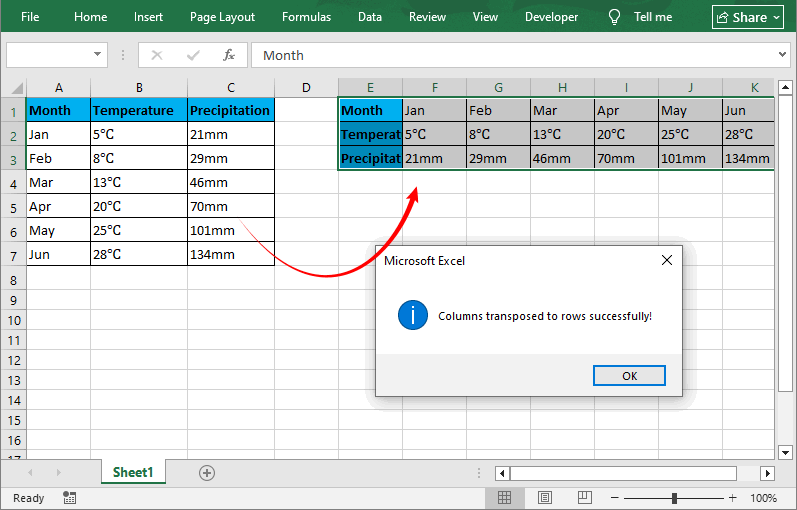
- Run the Macro: Press “F5” or click the "Run" button (green play icon). A prompt will inform you that the columns switch to rows.
Key Macro Features
- Preserves all cell formatting, formulas, and values.
- Reusable: Save the macro in your Personal Macro Workbook for use across all Excel files.
- Customizable: Modify the code to loop through multiple sheets/datasets (batch transposition).
Pros & Cons:
- ✔ Pros: Automates batch tasks, saves time for repeated transpositions, and works with large datasets
- ✘ Cons: Requires basic VBA knowledge to modify, not necessary for simple tasks.
Method 5: Python with Free Spire.XLS (Programmatic Transposition)
For developers and data analysts who need to transpose data without opening Excel (e.g., server automation) or batch-process hundreds of files, the Free Spire.XLS for Python library provides a powerful way for cross-platform (Windows/Mac/Linux) Excel manipulation
Python Transposition Script
Use the script below to transpose a column to a row (customize paths/ranges as needed):
from spire.xls import *
from spire.xls.common import *

# Create Workbook instance
workbook = Workbook()
# Load an Excel file
workbook.LoadFromFile("input.xlsx")

# Get the first worksheet
worksheet = workbook.Worksheets[0]

# Read all non-empty data and corresponding cell styles from Column 1
col_index = 1
column_data = []

max_row = worksheet.LastRow

for row_index in range(1, max_row + 1):
    cell = worksheet.Range[row_index, col_index]
    if cell.Value is None or str(cell.Value).strip() == "":
        continue
    # Store cell value and its style (preserves formatting like font, color, etc.)
    column_data.append((cell.Value, cell.Style))
    row_index += 1

# Write the saved column data (with styles) to Row 3
target_row = 3
for idx, (value, source_style) in enumerate(column_data):
    target_col = idx + 3  # start writing from Column 3
    target_cell = worksheet.Range[target_row, target_col]

    # Assign the original cell value to the target cell
    target_cell.Value = value
    # Copy the original cell's style
    target_cell.Style = source_style

# Save Excel file and free up memory
workbook.SaveToFile("output.xlsx", ExcelVersion.Version2016)
workbook.Dispose()

print(f"Excel column to row conversion completed!")
This code reads all non-empty data (and their associated cell styles) from a specified column, then writes this column data to the target row of the same worksheet.
Pros & Cons
- ✔ Pros: Cross-platform, bulk processing support, preserves formatting, no Excel installation required, scalable for hundreds of files.
- ✘ Cons: Requires basic Python knowledge, free tier has certain limitations, steeper learning curve for non-coders.
Beyond column-to-row transposition, you can also use Spire.XLS for Python to apply formatting, merge cells, sort data, or export to PDF/CSV—all programmatically.
Comparison Table: Choosing the Right Method
| Method | Best For | Dynamic? | Formatting Preserved | Excel Required | Difficulty |
|---|---|---|---|---|---|
| Paste Special | Quick one-off tasks | ✘ | ✔ | Yes | Beginner |
| TRANSPOSE Function | Live-updating reports | ✔ | ✘ (values only) | Yes | Intermediate |
| Power Query | Large or recurring jobs | ✔ (refresh) | ✔ | Yes | Intermediate |
| VBA | Batch automation | ✔ (triggered) | ✔ | Yes | Advanced |
| Python + Spire.XLS | Server-side / bulk | ✔ (rerun script) | ✔ | No | Advanced |
FAQ: Switch Columns and Rows in Excel
Q: Can I transpose multiple sheets at once?
A: Yes! Use Power Query (to combine sheets first) or Python/Spire.XLS (loop through sheets) for batch transposition of similar datasets. VBA can also be modified to loop through multiple sheets.
Q: Will transposing data delete my original columns?
A: No. All five methods create a copy of your data in the new row orientation. Your original columns will remain intact unless you manually delete them.
Q: How do I convert rows to columns?
A: All the same methods work in reverse! The process is identical regardless of direction.
Q: Can I transpose data between different workbooks?
A: Yes. All methods support cross-workbook transposition. For VBA and Python, you'll need to specify workbook paths correctly.
Q: Does the Python method work for .xlsx and .xls files?
A: Yes. Spire.XLS supports both Excel formats (For .xls format, use: ExcelVersion.Version97to2003).
Final Thoughts
Mastering the art of changing columns to rows in Excel unlocks new possibilities for data analysis and presentation. Whether you choose the simplicity of Paste Special, the dynamism of the TRANSPOSE function, the power of Power Query, the automation of VBA, or the programmatic flexibility of Python with Free Spire.XLS, you now have a comprehensive toolkit for any transposition scenario.
Each method has its strengths, and by incorporating these techniques into your data workflow, you'll save time, reduce errors, and gain unprecedented flexibility in how you work with data.