Mastering how to split a cell in Excel is one of the most essential data-cleaning skills for anyone working with spreadsheets. We’ve all been there: pasting data into Excel only to find every piece of information crammed into a single column, turning names, addresses, emails, and product codes into a jumbled mess that’s useless for sorting, filtering, or meaningful analysis.
While Excel doesn't let you physically divide a single cell into two smaller cells within the same column, it provides powerful tools to split the content of a cell across multiple adjacent columns. In this guide, we’ll break down the 5 best methods to split cell data in Excel—from beginner-friendly one-click tools like Flash Fill to automated workflows with Power Query and Python.
You'll learn:
- What Does "Split a Cell" Mean in Excel?
- Method 1: Split Cell with Excel Text to Columns
- Method 2: Split Cell with Flash Fill
- Method 3: Split Cell with Formulas
- Method 4: Split Cell with Power Query
- Method 5: Split Cell with Python
- FAQs: How to Separate a Cell in Excel
By the end, you'll be able to turn messy, unworkable data into analysis-ready spreadsheets in minutes.
What Does "Split a Cell" Mean in Excel?
In Excel, the phrase "split a cell" can be confusing because you cannot physically divide a single cell. Instead, the term refers to two different actions:
- Splitting contents of a cell: Taking the data inside one cell and distributing it across multiple adjacent cells (e.g., separating "John Smith" into "John" in one column and "Smith" in the next).
- Splitting a merged cell: Undoing a merge to restore the original, individual cells.
This guide focuses on the first, more common task: splitting cell data in Excel.
Method 1: Split Cell with Excel Text to Columns
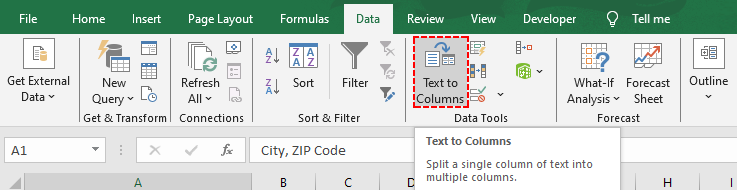
Text to Columns is a built-in Excel tool that allows you to split the text of a cell or column into two or more separate columns. It works for both delimited data (text separated by commas, spaces, or other characters) and fixed-width data (text with consistent spacing). Here’s how to use each:
Option A: Excel Split Cell by Delimiter
This method is perfect for splitting data like CSV files, or lists where items are separated by a consistent symbol.
- Select the cells or column you want to split.
- Go to the Data tab → click Text to Columns (in the Data Tools group).
- In the Text to Columns Wizard:
- Select Delimited → click Next.
- Check the box next to your delimiter (e.g., Comma, Space, or Tab) →click Next.
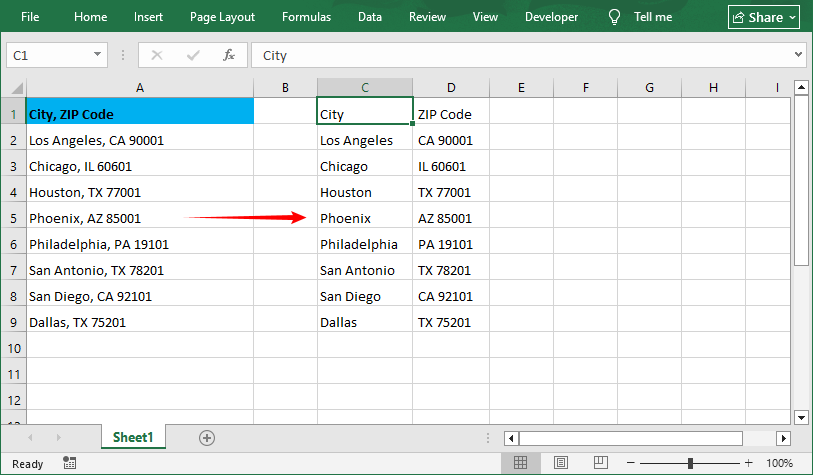
- Choose a Destination (where to place the split data—e.g., $C$1 to start in column C).
- Select column formats (e.g., General for text/numbers, Text for phone numbers)
- Click Finish. Your data is now split into separate columns.
Pro Tip: While selecting the delimiter, you can check multiple delimiters if needed (e.g., comma + space). If your delimiter isn’t listed, select Other and type the character (e.g., a hyphen “-” or pipe “|”).
Option B: Excel Split Text by Fixed-Width
This method is ideal for data aligned with uniform spacing (e.g., product codes, formatted IDs):
- Follow steps 1-2 above (select cells → Data → Text to Columns).
- In the Text to Columns Wizard:
- Select Fixed width → click Next.
- Click to add split lines, drag to adjust positions, or double-click to delete lines → click Next.

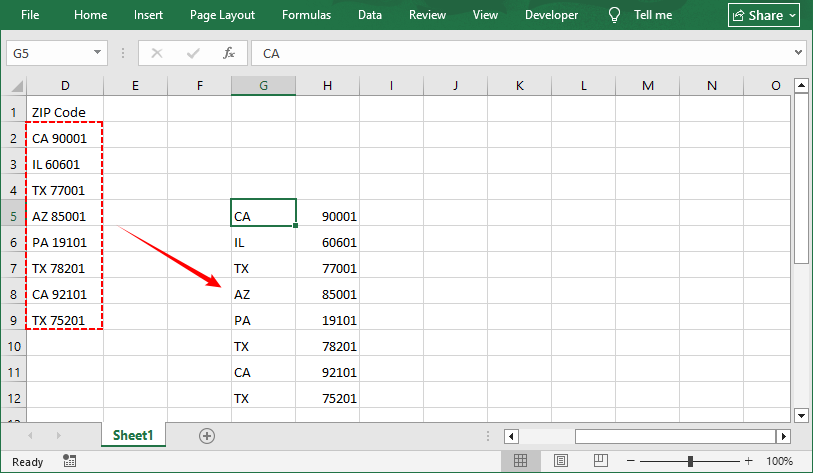
- Choose a destination and column formats → click Finish.
The split data looks like:
Expand: If you have a list inside a cell and want to split cell into multiple rows, you can combine Text to Columns with the Excel Transpose feature.
Method 2: Split Cell with Flash Fill
Flash Fill is Excel’s "magic" tool for simple, one-click splits. It recognizes patterns you define and auto-completes the rest. No menus or formulas, perfect for extracting first names, phone numbers, area codes, or custom patterns.
How to Use Flash Fill for Excel Cell Split
Scenario: Extract first names from a full name list in column A.
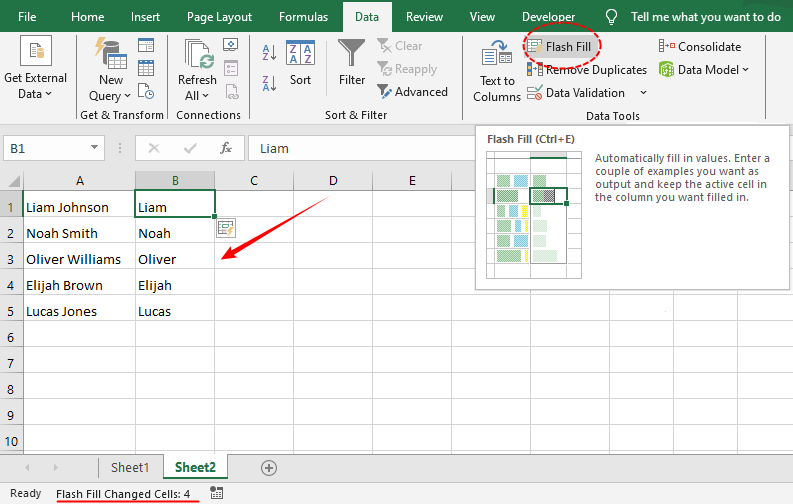
- Type the first split result in the cell next to your data. For example, if cell A1 is “Liam Johnson”, type “Liam” in B1.
- Click on cell B1 (the one with your example).
- Go to the Data tab → click Flash Fill (or use the shortcut Ctrl + E on Windows).
- Excel will automatically fill the rest of the column with the split first names. Repeat for the last names if needed.
Method 3: Split Cell with Formulas
For flexible, dynamic splits (e.g., update the split result automatically when the original data changes), use the split formula in Excel. The most common formulas are LEFT, RIGHT, and TEXTSPLIT (Excel 365/2021+).
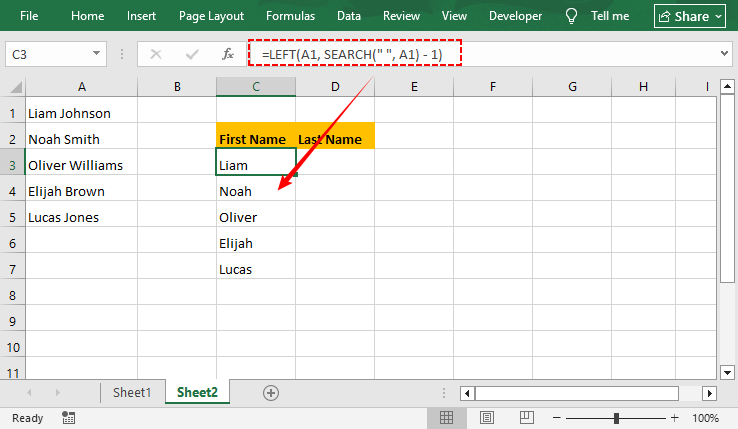
Extract Text Before a Delimiter (LEFT + SEARCH)
Use this formula to split text before a specific character (e.g., a space or comma).
=LEFT(A1, SEARCH(" ", A1) - 1)
- SEARCH(" ", A1): Finds the position number of the first space.
- -1: Removes the space itself, so you get “Liam” instead of “Liam ”.
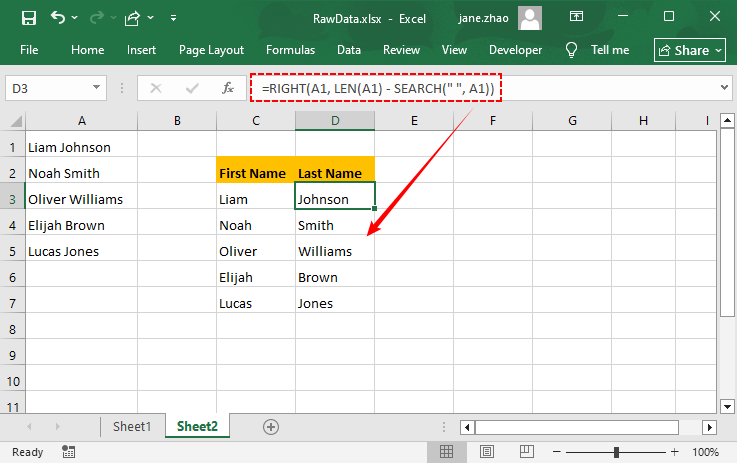
Extract Text After a Delimiter (RIGHT + LEN + SEARCH)
Use this formula to split text after a specific character (right part):
=RIGHT(A1, LEN(A1) - SEARCH(" ", A1))
- LEN(A1): Gets the total length of the text.
- Subtract the position of the space to get the remaining text.
- Note: This formula works only for single-delimiter cases (e.g., one space or comma). It extracts all text after the first delimiter as a single block and cannot handle multiple delimiters.
If you are using Microsoft 365, you can use the TEXTSPLIT formula to split text by a delimiter and spill the results into adjacent cells automatically.
Method 4: Split Cell with Power Query
Power Query is the best tool for bulk data splits or automated refreshes (e.g., importing new data weekly). It keeps your original data intact and lets you refresh split results with one click—critical for data pipelines and regular data cleaning.
Step-by-Step: Excel Split Columns in Power Query
-
Select your data range → go to the Data tab → click From Table/Range (Power Query will open).
-
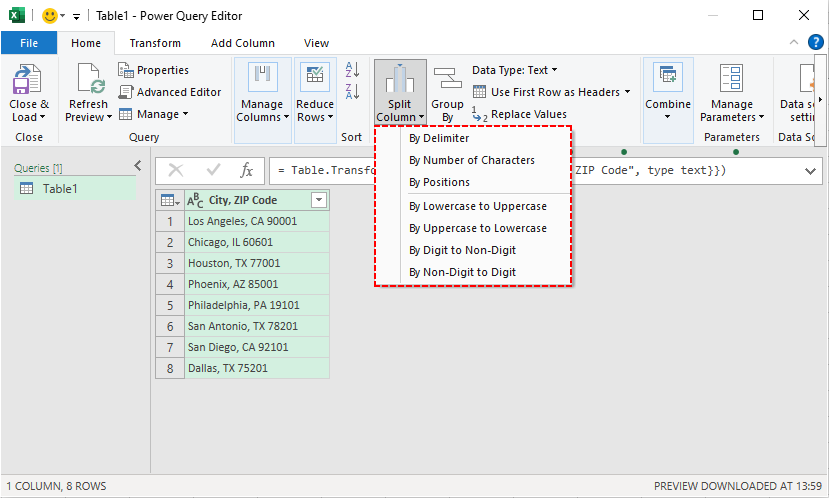
In the Power Query Editor, select the column you want to split.
-
Click the Split Column dropdown and select an option:
- By Delimiter: Split by commas, spaces, or custom characters.
- By Number of Characters: Split fixed-length data.
- By Positions: Split at specific character positions.
- By Lowercase to Uppercase: Splits when a lowercase letter is followed by uppercase (e.g., "AirPlane" → "Air", "Plane").
- By Uppercase to Lowercase: Splits when uppercase is followed by lowercase (e.g., "iPhone" → "i", "Phone").
- By Digit to Non-digit: Splits when a number is followed by text (e.g., "123Shoes" → "123", "Shoes").
- By Non-digit to Digit: Splits when text is followed by a number (e.g., "Shoes123" → "Shoes", "123")
-
Select your split settings → click OK.
-
Click Close & Load to export the split data to a new worksheet.
After splitting and organizing your data, the next step is often deduplication. Find out how to identify and remove duplicates in Excel to ensure your analysis is accurate.
Method 5: Split Cell with Python
For users who need to automate cell splitting at scale or integrate splitting into a Python workflow, the Free Spire.XLS for Python library is a robust, code-based solution. It works across all Excel file formats (.xlsx, .xls) and requires no manual Excel interaction.
Python Code to Separate Cell in Excel
This code splits cell content into adjacent columns. It reads an input Excel file, processes column A, and writes split results to adjacent columns in a new output file:
from spire.xls import *
from spire.xls.common import *

# Create an object of the Workbook class
workbook = Workbook()
# Load the Excel file
workbook.LoadFromFile("Data.xlsx")

# Get the first worksheet in the file
sheet = workbook.Worksheets[0]

# Loop through each row in the worksheet
for i in range(sheet.LastRow):
    # Get the text of the first cell in the current row
    text = sheet.Range[i + 1, 1].Text
    # Split the text by comma
    splitText = text.split(',')
    # Write the split data into individual columns
    for j in range(len(splitText)):
        sheet.Range[i + 1, j + 2].Text = splitText[j]

# Automatically adjust column widths in the worksheet
sheet.AllocatedRange.AutoFitColumns()

# Save the modified Excel file
workbook.SaveToFile("TextToColumns.xlsx", ExcelVersion.Version2016)
workbook.Dispose()
Key Code Explanations:
- Workbook() / LoadFromFile(): Initializes the Excel file handler and loads your source file.
- LastRow: Gets the total number of rows with data (avoids looping empty rows).
- split(','): Splits cell content by commas (change delimiter as needed).
- sheet.Range[i + 1, j + 2].Text: Writes split values starting at column B (index 2) to avoid overwriting original data in columns A.
- SaveToFile(): Exports results to a new file.
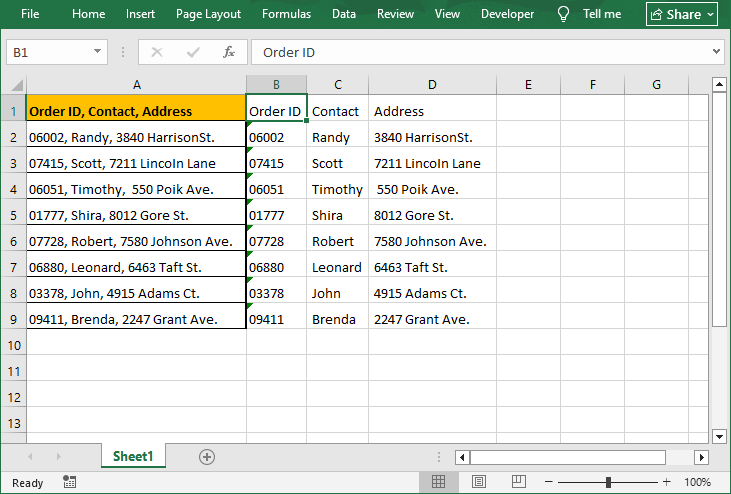
The result of splitting cell text into columns:
After splitting cell content into structured columns, apply data validation to the new columns to ensure consistent data entry (e.g., numeric formats for ZIP codes).
Pro Tips for Dividing a Cell in Excel
- Backup Your Data: Always make a copy of your original data before splitting. Some split actions are difficult to undo.
- Clean Data First: Remove extra spaces or hidden characters before splitting to avoid errors.
- Insert Blank Columns: Add enough blank columns to the right of your data to prevent split results from overwriting existing content.
- Check Your Data Preview: Always look at the data preview in the Text to Columns wizard and Power Query before finishing. This catches delimiter mistakes early.
Final Thoughts
Mastering how to split a cell in Excel is a fundamental skill that transforms messy data into a structured, powerful asset. Whether you're a beginner using Flash Fill/Text to Columns, an advanced analyst building Power Query pipelines, or a tech-savvy user automating bulk Excel cell splitting with Python, you now have a complete toolkit for any data-cleaning challenge.
Start with the method that feels most comfortable and experiment with the more advanced options as your needs grow. With these techniques, you'll save countless hours and unlock the full potential of your data for analysis and decision-making.
FAQs: How to Separate a Cell in Excel
Q1. Can I split a single cell into two smaller cells (not just the content)?
No. Excel does not allow you to physically split a single, unmerged cell into two smaller cells within the same column. The grid structure is fixed.
Q2. Why is Text to Columns greyed out?
The tool is disabled if:
- Your sheet is protected (unprotect via Review → Unprotect Sheet).
- You have merged cells (unmerge via Home → Merge & Center → Unmerge Cells).
- You’re editing a cell (press Enter to exit edit mode).
Q3. How do I split a cell in Google Sheets?
Google Sheets uses the SPLIT function (the equivalent of Excel’s TEXTSPLIT) for most splits:
- Basic split by delimiter: =SPLIT(A1, ",") (split by comma; replace with space/hyphen).
- Split by line breaks: =SPLIT(A1, CHAR(10)).
- Split into rows (not columns): =TRANSPOSE(SPLIT(A1, ",")).
Google Sheets also has a Text to Columns equivalent: select the range → Data → Split text to columns (auto-detects delimiters or lets you choose a custom one).
Q4. Can I automate cell splitting for monthly reports?
Yes. The best options are:
- Power Query: Set up the split once. Each month, paste new data into the source table and click Refresh. This is the easiest and most common approach.
- Python: Write a script and schedule it to run using Windows Task Scheduler or a cron job.