
Java (485)
Multi-column PDFs are commonly used in magazines, newspapers, research articles, etc. With Spire.PDF for Java, you can create multi-column PDFs from code easily. This article will show you how to create a two-column PDF from scratch in Java applications.
Install Spire.PDF for Java
First of all, you need to add the Spire.Pdf.jar file as a dependency in your Java program. The JAR file can be downloaded from this link. If you use Maven, you can easily import the JAR file by adding the following code to your project's pom.xml file.
<repositories>
    <repository>
        <id>com.e-iceblue</id>
        <name>e-iceblue</name>
        <url>https://repo.e-iceblue.com/nexus/content/groups/public/</url>
    </repository>
</repositories>
<dependencies>
    <dependency>
        <groupId>e-iceblue</groupId>
        <artifactId>spire.pdf</artifactId>
        <version>12.7.0</version>
    </dependency>
</dependencies>
Create a Two-Column PDF from Scratch
The detailed steps are as follows:
- Create a PdfDocument object.
- Add a new page in the PDF using PdfDocument.getPages().add() method.
- Add a line and set its format in the PDF using PdfPageBase.getCanvas().drawLine() method.
- Add text in the PDF at two separate rectangle areas using PdfPageBase.getCanvas().drawString() method.
- Save the document to PDF using PdfDocument.saveToFile() method.
- Java
import com.spire.pdf.FileFormat;
import com.spire.pdf.PdfDocument;
import com.spire.pdf.PdfPageBase;
import com.spire.pdf.graphics.*;
import java.awt.*;
import java.awt.geom.Rectangle2D;
public class TwoColumnPDF {
public static void main(String[] args) throws Exception {
//Creates a pdf document
PdfDocument doc = new PdfDocument();
//Add a new page
PdfPageBase page = doc.getPages().add();
//Set location and width
float x = 0;
float y = 15;
float width = 600;
//Create pen
PdfPen pen = new PdfPen(new PdfRGBColor(Color.black), 1f);
//Draw line on the PDF page
page.getCanvas().drawLine(pen, x, y, x + width, y);
//Define paragraph text
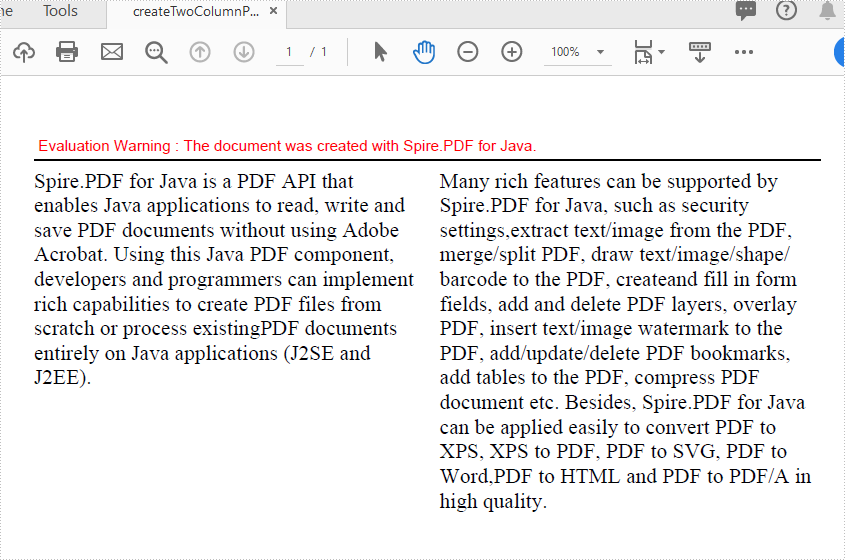
String s1 = "Spire.PDF for Java is a PDF API that enables Java applications to read, write and "
+ "save PDF documents without using Adobe Acrobat. Using this Java PDF component, developers and "
+ "programmers can implement rich capabilities to create PDF files from scratch or process existing"
+ "PDF documents entirely on Java applications (J2SE and J2EE).";
String s2 = "Many rich features can be supported by Spire.PDF for Java, such as security settings,"
+ "extract text/image from the PDF, merge/split PDF, draw text/image/shape/barcode to the PDF, create"
+ "and fill in form fields, add and delete PDF layers, overlay PDF, insert text/image watermark to the "
+ "PDF, add/update/delete PDF bookmarks, add tables to the PDF, compress PDF document etc. Besides, "
+ "Spire.PDF for Java can be applied easily to convert PDF to XPS, XPS to PDF, PDF to SVG, PDF to Word,"
+ "PDF to HTML and PDF to PDF/A in high quality.";
//Get width and height of page
double pageWidth = page.getClientSize().getWidth();
double pageHeight = page.getClientSize().getHeight();
//Create solid brush objects
PdfSolidBrush brush = new PdfSolidBrush(new PdfRGBColor(Color.BLACK));
//Create true type font objects
PdfTrueTypeFont font= new PdfTrueTypeFont(new Font("Times New Roman",Font.PLAIN,14));
//Set the text alignment via PdfStringFormat class
PdfStringFormat format = new PdfStringFormat(PdfTextAlignment.Left);
//Draw text
page.getCanvas().drawString(s1, font, brush, new Rectangle2D.Double(0, 20, pageWidth / 2 - 8f, pageHeight), format);
page.getCanvas().drawString(s2, font, brush, new Rectangle2D.Double(pageWidth / 2 + 8f, 20, pageWidth / 2 - 8f, pageHeight), format);
//Save the document
String output = "output/createTwoColumnPDF.pdf";
doc.saveToFile(output, FileFormat.PDF);
}
}
Apply for a Temporary License
If you'd like to remove the evaluation message from the generated documents, or to get rid of the function limitations, please request a 30-day trial license for yourself.
When opening a password-protected PDF, we must enter the password. But sometimes we need to know whether a PDF is password-protected before opening it. Spire.PDF for Java offers a method PdfDocument.isPasswordProtected() to verify if a PDF document is password protected or not.
Install Spire.PDF for Java
First of all, you need to add the Spire.PDF.jar file as a dependency in your Java program. The JAR file can be downloaded from this link. If you use Maven, you can easily import the JAR file by adding the following code to your project's pom.xml file.
<repositories>
    <repository>
        <id>com.e-iceblue</id>
        <name>e-iceblue</name>
        <url>https://repo.e-iceblue.com/nexus/content/groups/public/</url>
    </repository>
</repositories>
<dependencies>
    <dependency>
        <groupId>e-iceblue</groupId>
        <artifactId>spire.pdf</artifactId>
        <version>12.7.0</version>
    </dependency>
</dependencies>
Detect if a PDF Document is Password Protected or Not
- Get the file path
- Detect whether the PDF is password protected or not by using PdfDocument.isPasswordProtected() method.
- Print results
- Java
import com.spire.pdf.PdfDocument;
public class DetectIfPDFIsPasswordProtected {
public static void main(String[] args) throws Exception {
//Define the file path
String filePath ="Sample.pdf";
//Detect if the PDF document is password protected
boolean isProtected =PdfDocument.isPasswordProtected(filePath);
//Print results
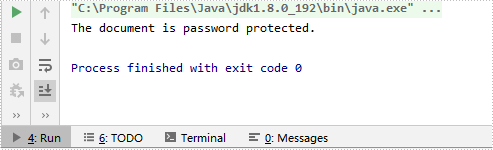
if(isProtected)
{
System.out.println("The document is password protected.");
}
else
{
System.out.println("The document is not password protected.");
}
}
}
Apply for a Temporary License
If you'd like to remove the evaluation message from the generated documents, or to get rid of the function limitations, please request a 30-day trial license for yourself.
In Microsoft Excel, suppose a workbook contains lots of worksheets and you need to count them, you can use the Sheets Function, the Define Name Command or a simple VBA code to achieve it. Within this tutorial, I’ll show you how to programmatically count the number of worksheets in Excel using Spire.XLS for Java.
Install Spire.XLS for Java
First of all, you're required to add the Spire.Xls.jar file as a dependency in your Java program. The JAR file can be downloaded from this link. If you use Maven, you can easily import the JAR file in your application by adding the following code to your project's pom.xml file.
<repositories>
    <repository>
        <id>com.e-iceblue</id>
        <name>e-iceblue</name>
        <url>https://repo.e-iceblue.com/nexus/content/groups/public/</url>
    </repository>
</repositories>
<dependencies>
    <dependency>
        <groupId>e-iceblue</groupId>
        <artifactId>spire.xls</artifactId>
        <version>16.6.5</version>
    </dependency>
</dependencies>
Count the Number of Worksheets in Excel
Spire.XLS for Java supports counting the number of worksheets in Excel using the getCount() method provided by the IWorksheets interface. The following are detailed steps.
- Create a Workbook instance.
- Load a sample Excel document using Workbook.loadFromFile() method.
- Get a collection of worksheets using Workbook.getWorksheets() method and obtain the number of worksheets in the collection using the getCount() method.
- Java
import com.spire.xls.Workbook;
public class CountNumberOfWorsheets {
public static void main(String[] args) {
//Create a Workbook instance
Workbook workbook = new Workbook();
//Load a sample Excel file
workbook.loadFromFile("C:\\Users\\Test1\\Desktop\\Sample.xlsx");
//Get the number of worksheets
int sheetCount=workbook.getWorksheets().getCount();
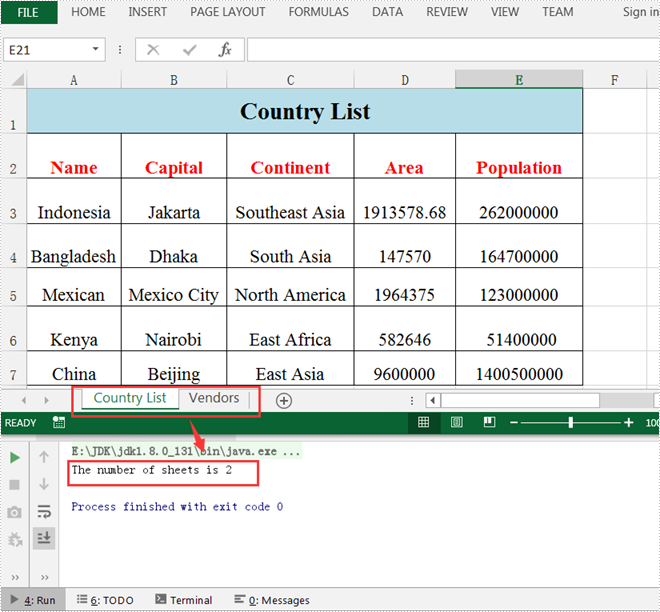
//Output the result
System.out.println("The number of sheets is "+sheetCount);
}
}
Apply for a Temporary License
If you'd like to remove the evaluation message from the generated documents, or to get rid of the function limitations, please request a 30-day trial license for yourself.
