
Spire.XLS for JavaScript (109)
Children categories
When a chart is inserted, Excel determines a scale automatically: the lower and upper bounds of the value axis and its intervals are all derived from the data range. These defaults are adequate in most cases, but they fall short in two situations. First, when the data is concentrated in a narrow band that sits well away from zero, the automatic scale lifts the bottom of the axis to just below the data, so a modest fluctuation is drawn as a near full-height swing and the differences between the columns bear no proportion to the differences between the values. Second, because the tick labels follow the formatting of the source cells, values carrying decimals fill the value axis with fractional digits, which are both harder to read and wider on the page. Axis formatting addresses both: setting the scale and the units keeps the axis from shifting with the data, holds the column heights in proportion to the values, and places every chart on the same measure, choosing the tick marks and the label position controls where the readings fall, rewriting the number format makes the labels easier to compare, and adding titles to both axes tells the reader what each direction represents. Spire.XLS for JavaScript does all of this in the browser on top of WebAssembly, managing input and output files through a virtual file system (VFS), with no backend service required.
This article covers two key features:
For installation and project setup, see Integrating Spire.XLS for JavaScript in a React Project. The examples below assume Spire.XLS is installed and the WebAssembly module has been initialised.
Format the value axis scale
An automatic scale is derived by Excel from the data range, and it is chosen to make the chart look even rather than to make the readings easy to compare. When the data is concentrated in a narrow band that sits well away from zero, that derivation lifts the bottom of the axis to just below the data: with the axis no longer starting at 0, the columns only show their differences from one another, and a modest fluctuation is drawn as a near full-height swing, out of proportion to the values behind it. The tick labels, too, follow the display format of the source cells by default, so data carrying decimals produces a run of fractional values along the value axis, which is both harder to read and wider on the page. Setting the value axis scale by hand addresses both at once: once the scale and the intervals are given by the code, the bottom and top of the axis no longer shift with the data, the column heights stay in proportion to the values, and a set of charts can be measured against the same ruler; once the label format is independent of the source cells, the readings are more even as well. The steps are:
- Load the font and the test data file into the VFS.
- Load the workbook with
workbook.LoadFromFileand get the first worksheet withworkbook.Worksheets.get(0). - Add a column chart with
sheet.Charts.Add, pointchart.DataRangeat the sales column, and assign the month column toserie.CategoryLabels. - On
chart.PrimaryValueAxis, set the scale withMinValueandMaxValue, and the steps of the major and minor divisions withMajorUnitandMinorUnit. - Set the types of the major and minor tick marks with
MajorTickMarkandMinorTickMark, and the position of the tick labels withTickLabelPosition. - Set
NumberFormatto#,##0for the label number format, setIsSourceLinkedtofalseto unlink the format from the source cells, and save the workbook.
The complete code example below shows how to format the value axis scale in React:
function App() {
  const formatValueAxis = async () => {
    // Get the Spire.XLS WASM module
    const xlsModule = window.wasmModule?.spirexls;

    // Check that the module is ready
    if (!xlsModule) {
      alert('Spire.Xls is not ready yet');
      return;
    }

    // Load the font and the sample workbook into the VFS
    await window.spire.FetchFileToVFS('ARIAL.TTF', '/Library/Fonts/', `${process.env.PUBLIC_URL}/font/`);
    const inputFileName = 'ChartAxisData.xlsx';
    await window.spire.FetchFileToVFS(inputFileName, '', `${process.env.PUBLIC_URL}data/`);

    // Load the workbook and get the first worksheet
    const workbook = new xlsModule.Workbook();
    workbook.LoadFromFile({ fileName: inputFileName });
    const sheet = workbook.Worksheets.get(0);

    // Add a column chart whose data range is the sales column
    const chart = sheet.Charts.Add({ chartType: xlsModule.ExcelChartType.ColumnClustered });
    chart.ChartTitle = "Monthly Sales";
    chart.ChartTitleArea.IsBold = true;
    chart.ChartTitleArea.Size = 12;
    chart.DataRange = sheet.Range.get("B1:B9");
    chart.SeriesDataFromRange = false;
    chart.PlotArea.Visible = false;

    // Place the chart on the worksheet
    chart.TopRow = 10;
    chart.BottomRow = 28;
    chart.LeftColumn = 2;
    chart.RightColumn = 10;

    // Take the series and use the month column as its category labels
    const serie = chart.Series.get(0);
    serie.CategoryLabels = sheet.Range.get("A2:A9");

    // Set the value axis bounds: 0 at the bottom, 5000 at the top
    const valueAxis = chart.PrimaryValueAxis;
    valueAxis.MinValue = 0;
    valueAxis.MaxValue = 5000;

    // Set the major unit to 1000 and the minor unit to 500
    valueAxis.MajorUnit = 1000;
    valueAxis.MinorUnit = 500;

    // Major tick marks outside the axis, minor tick marks inside
    valueAxis.MajorTickMark = xlsModule.TickMarkType.TickMarkOutside;
    valueAxis.MinorTickMark = xlsModule.TickMarkType.TickMarkInside;

    // Tick labels sit next to the axis, which the category axis crosses at 0
    valueAxis.TickLabelPosition = xlsModule.TickLabelPositionType.TickLabelPositionNextToAxis;
    valueAxis.CrossesAt = 0;

    // Give the tick labels a thousands separator and drop the decimals
    valueAxis.NumberFormat = "#,##0";

    // Unlink the source format so the tick labels follow NumberFormat
    valueAxis.IsSourceLinked = false;

    // Save the workbook
    const outputFileName = "AxisFormat.xlsx";
    workbook.SaveToFile({ fileName: outputFileName });

    // Dispose of the workbook object to free resources
    workbook.Dispose();

    // Read the result file from the VFS and trigger the download
    const fileArray = window.dotnetRuntime.Module.FS.readFile(outputFileName);
    const blob = new Blob([fileArray], { type: 'application/vnd.openxmlformats-officedocument.spreadsheetml.sheet' });
    const url = URL.createObjectURL(blob);
    const a = document.createElement('a');
    a.href = url;
    a.download = outputFileName;
    a.click();
    URL.revokeObjectURL(url);
  };

  return (
    <div style={{ textAlign: 'center', height: '300px' }}>
      <h1>Value Axis Scale</h1>
      <button onClick={formatValueAxis}>Start</button>
    </div>
  );
}

export default App;
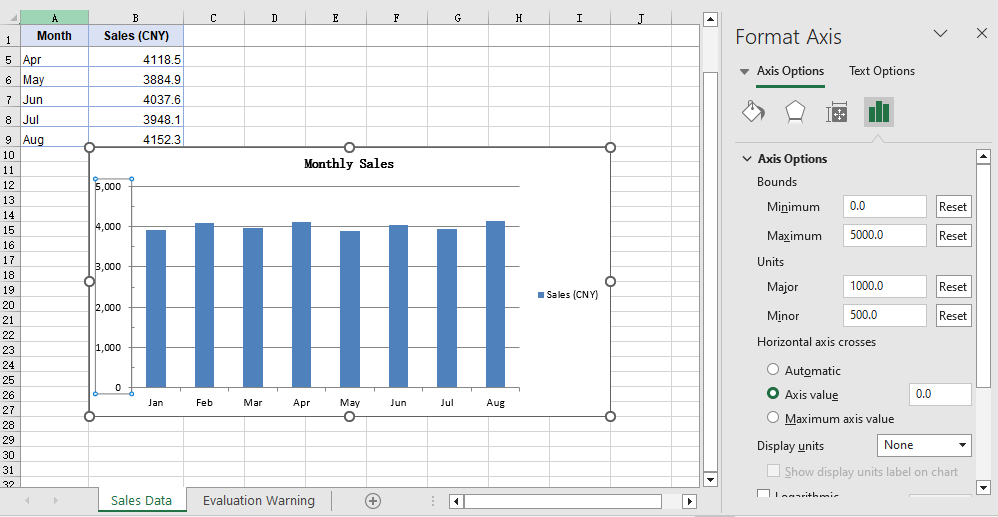
After running, the effect of formatting the value axis scale:
Add axis titles
The axes carry only their own divisions and categories, so the chart itself does not state what each data point represents or what unit the numbers are in; opening the file again after some time, a reader often has to check the chart title first to confirm the subject. Axis titles supply precisely that context: the category axis title states what each data point represents, the value axis title states the unit of the numbers, and together with the chart title they complete the chart so that it can be read without its surrounding context. The size of an axis title can also be adjusted separately, which keeps it distinct from the chart title. The steps are:
- Load the font and the test data file into the VFS.
- Load the workbook with
workbook.LoadFromFileand get the first worksheet withworkbook.Worksheets.get(0). - Add a column chart with
sheet.Charts.Add, pointchart.DataRangeat the sales column, and assign the month column toserie.CategoryLabels. - Assign the title text to
chart.PrimaryCategoryAxis.Titleandchart.PrimaryValueAxis.Titlerespectively. - Set both titles to size 12 through the
Font.Sizeof the two axis objects, and save the workbook.
The complete code example below shows how to add titles to the axes in React:
function App() {
  const setAxisTitle = async () => {
    // Get the Spire.XLS WASM module
    const xlsModule = window.wasmModule?.spirexls;

    // Check that the module is ready
    if (!xlsModule) {
      alert('Spire.Xls is not ready yet');
      return;
    }

    // Load the font and the sample workbook into the VFS
    await window.spire.FetchFileToVFS('ARIAL.TTF', '/Library/Fonts/', `${process.env.PUBLIC_URL}/font/`);
    const inputFileName = 'ChartAxisData.xlsx';
    await window.spire.FetchFileToVFS(inputFileName, '', `${process.env.PUBLIC_URL}data/`);

    // Load the workbook and get the first worksheet
    const workbook = new xlsModule.Workbook();
    workbook.LoadFromFile({ fileName: inputFileName });
    const sheet = workbook.Worksheets.get(0);

    // Add a column chart whose data range is the sales column
    const chart = sheet.Charts.Add({ chartType: xlsModule.ExcelChartType.ColumnClustered });
    chart.ChartTitle = "Monthly Sales";
    chart.ChartTitleArea.IsBold = true;
    chart.ChartTitleArea.Size = 12;
    chart.DataRange = sheet.Range.get("B1:B9");
    chart.SeriesDataFromRange = false;
    chart.PlotArea.Visible = false;

    // Place the chart on the worksheet
    chart.TopRow = 10;
    chart.BottomRow = 28;
    chart.LeftColumn = 2;
    chart.RightColumn = 10;

    // Take the series and use the month column as its category labels
    const serie = chart.Series.get(0);
    serie.CategoryLabels = sheet.Range.get("A2:A9");

    // Give the category axis and the value axis their titles
    chart.PrimaryCategoryAxis.Title = "Month";
    chart.PrimaryValueAxis.Title = "Sales (CNY)";

    // Set both axis titles to size 12
    chart.PrimaryCategoryAxis.Font.Size = 12;
    chart.PrimaryValueAxis.Font.Size = 12;

    // Save the workbook
    const outputFileName = "AxisTitle.xlsx";
    workbook.SaveToFile({ fileName: outputFileName });

    // Dispose of the workbook object to free resources
    workbook.Dispose();

    // Read the result file from the VFS and trigger the download
    const fileArray = window.dotnetRuntime.Module.FS.readFile(outputFileName);
    const blob = new Blob([fileArray], { type: 'application/vnd.openxmlformats-officedocument.spreadsheetml.sheet' });
    const url = URL.createObjectURL(blob);
    const a = document.createElement('a');
    a.href = url;
    a.download = outputFileName;
    a.click();
    URL.revokeObjectURL(url);
  };

  return (
    <div style={{ textAlign: 'center', height: '300px' }}>
      <h1>Axis Titles</h1>
      <button onClick={setAxisTitle}>Start</button>
    </div>
  );
}

export default App;
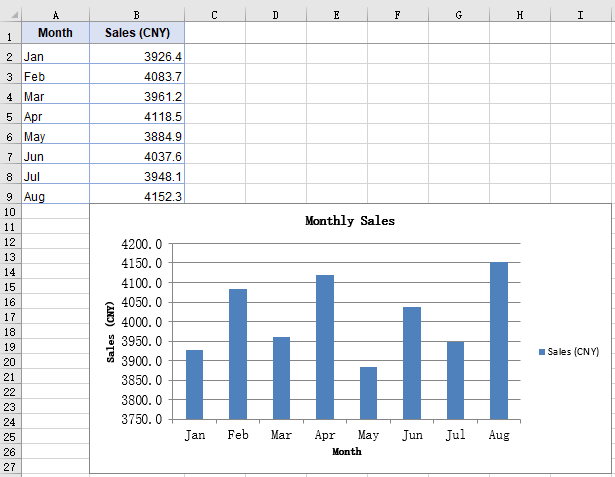
After running, the effect of adding axis titles:
FAQ
MinorUnit is set but no minor tick marks show up
Cause: MinorUnit determines only the interval of the minor divisions — how many steps each major division is split into. Whether those steps are drawn as short strokes is decided by a separate property. MinorTickMark defaults to TickMarkNone, and in that state the interval is in effect but no strokes are drawn.
Fix: Set MinorTickMark at the same time, taking its value from TickMarkType:
const valueAxis = chart.PrimaryValueAxis;
valueAxis.MinorUnit = 500;
valueAxis.MinorTickMark = xlsModule.TickMarkType.TickMarkInside;
CrossesAt is set but the category axis does not move
Cause: CrossesAt determines where the category axis meets the value axis, and the move becomes visible only when it is set to a position on the scale other than the one the category axis already occupies. With the value axis starting at 0, the category axis already sits at the bottom of the axis line, so setting CrossesAt to 0 leaves it in place.
Fix: Set CrossesAt to another position on the value axis scale, 3000 for example, and the category axis moves up to that level:
const valueAxis = chart.PrimaryValueAxis;
valueAxis.MinValue = 0;
valueAxis.MaxValue = 5000;
valueAxis.CrossesAt = 3000;
Get a Free License
Spire.XLS for JavaScript offers a 30-day full-featured free trial license with no functional limitations. Apply here to evaluate before purchasing.
A workbook exported by a reporting system usually carries nothing but the system name as its author, with the title, subject and keywords left blank; teams meanwhile need to attach fields the export does not produce — an export batch, an owner, an approval state — for archiving and searching. None of this takes up a cell: it all lives in the workbook's document properties, which Excel shows under "File > Info > Properties". Spire.XLS for JavaScript writes them in the browser on top of WebAssembly, using a virtual file system (VFS) for input and output files, so no back-end service is needed.
This article covers three feature points:
- Set the summary properties of a workbook
- Add custom properties
- Update the value of a custom property
For installation and project setup, see Integrating Spire.XLS for JavaScript in a React Project. The examples below assume Spire.XLS is installed and the WebAssembly module has been initialised.
Set the summary properties of a workbook
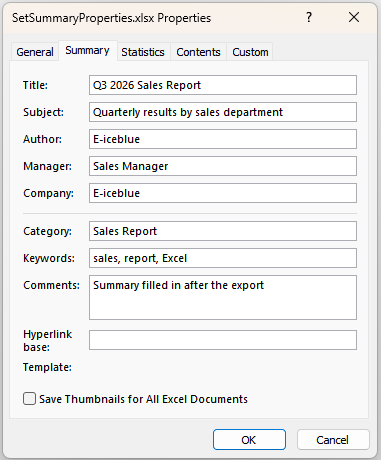
The summary properties are the layer of description Excel shows in File Explorer and under "File > Info", and the first thing a search of the archive picks up. A workbook produced by a program usually has only the system name as its author and leaves the other entries blank; filling them in gives the file a readable context as it moves between people. The text entries take a plain assignment, while the two date entries have to be given a date object. The steps are:
- Load the workbook and take the summary property collection from
workbook.DocumentProperties. - Assign the text entries —
Title,Subject,Author,Keywords,CommentsandCategory— directly. - Assign
CompanyandManagerthe same way; Excel carries these two in its extended properties. - Set
CreatedTimeandLastSaveTimetoDateobjects. - Save the workbook.
Here is a complete code example showing how to set the summary properties of a workbook in React:
function App() {
  const setSummaryProperties = async () => {
    // Get the Spire.XLS WASM module
    const xlsModule = window.wasmModule?.spirexls;

    // Check that the module is ready
    if (!xlsModule) {
      alert('Spire.Xls is not ready yet');
      return;
    }

    // Load the font into the VFS
    await window.spire.FetchFileToVFS('ARIAL.TTF', '/Library/Fonts/', `${process.env.PUBLIC_URL}/font/`);

    // Load the Excel file into the VFS
    const inputFileName = 'WorkbookProperties.xlsx';
    await window.spire.FetchFileToVFS(inputFileName, '', `${process.env.PUBLIC_URL}data/`);

    // Load the workbook
    const workbook = new xlsModule.Workbook();
    workbook.LoadFromFile(inputFileName);

    // Set the text entries of the summary properties
    const summary = workbook.DocumentProperties;
    summary.Title = 'Q3 2026 Sales Report';
    summary.Subject = 'Quarterly results by sales department';
    summary.Author = 'E-iceblue';
    summary.Keywords = 'sales, report, Excel';
    summary.Comments = 'Summary filled in after the export';
    summary.Category = 'Sales Report';

    // Set the entries carried by the extended properties
    summary.Company = 'E-iceblue';
    summary.Manager = 'Sales Manager';

    // Set the document dates; a Date object is required here
    summary.CreatedTime = new Date(2026, 8, 1);
    summary.LastSaveTime = new Date(2026, 8, 20);

    // Save the workbook
    const outputFileName = 'SetSummaryProperties.xlsx';
    workbook.SaveToFile(outputFileName);

    // Release resources
    workbook.Dispose();

    // Read the result file back out of the VFS and download it
    const fileArray = window.dotnetRuntime.Module.FS.readFile(outputFileName);
    const blob = new Blob([fileArray], { type: "application/vnd.openxmlformats-officedocument.spreadsheetml.sheet" });
    const url = URL.createObjectURL(blob);
    const a = document.createElement('a');
    a.href = url;
    a.download = outputFileName;
    a.click();
    URL.revokeObjectURL(url);
  };

  return (
    <div style={{ textAlign: 'center', height: '300px' }}>
      <h1>Set workbook summary properties</h1>
      <button onClick={setSummaryProperties}>Start</button>
    </div>
  );
}

export default App;
The effect of setting the summary properties of a workbook:
Add custom properties
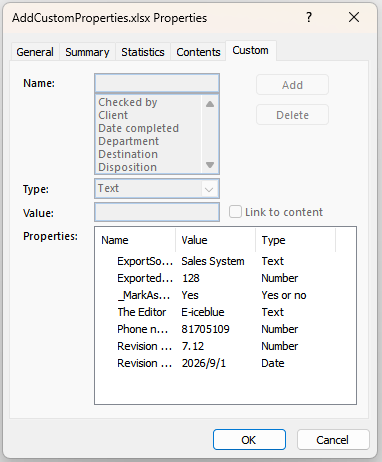
Custom properties carry the business fields the summary properties have no room for, such as an export batch, a contact phone number, a revision number or an approval date. Unlike the summary properties they have no fixed set of entries: the caller decides the name and the type, and Excel accepts text, integer, decimal, boolean and date-and-time values. The steps are:
- Load the workbook and take the custom property collection from
workbook.CustomDocumentProperties. - Call
Addto append a property; the name and the value can be written as a named object such as{ strName, boolValue }, or passed directly as two arguments. - Pick the member that matches the type of the value:
intValuefor an integer,dblValuefor a decimal. - Pass a
Dateobject asdtValuefor a date-and-time value. - Save the workbook.
Here is a complete code example showing how to add custom properties to a workbook in React:
function App() {
  const addCustomProperties = async () => {
    // Get the Spire.XLS WASM module
    const xlsModule = window.wasmModule?.spirexls;

    // Check that the module is ready
    if (!xlsModule) {
      alert('Spire.Xls is not ready yet');
      return;
    }

    // Load the font into the VFS
    await window.spire.FetchFileToVFS('ARIAL.TTF', '/Library/Fonts/', `${process.env.PUBLIC_URL}/font/`);

    // Load the Excel file into the VFS
    const inputFileName = 'WorkbookProperties.xlsx';
    await window.spire.FetchFileToVFS(inputFileName, '', `${process.env.PUBLIC_URL}data/`);

    // Load the workbook
    const workbook = new xlsModule.Workbook();
    workbook.LoadFromFile(inputFileName);

    // Add a boolean property; _MarkAsFinal marks the document as final
    workbook.CustomDocumentProperties.Add({ strName: '_MarkAsFinal', boolValue: true });

    // Add a text property; a name and a value can also be passed directly
    workbook.CustomDocumentProperties.Add('The Editor', 'E-iceblue');

    // Add an integer property
    workbook.CustomDocumentProperties.Add({ strName: 'Phone number', intValue: 81705109 });

    // Add a decimal property
    workbook.CustomDocumentProperties.Add({ strName: 'Revision number', dblValue: 7.12 });

    // Add a date and time property
    workbook.CustomDocumentProperties.Add({ strName: 'Revision date', dtValue: new Date(2026, 8, 1) });

    // Save the workbook
    const outputFileName = 'AddCustomProperties.xlsx';
    workbook.SaveToFile(outputFileName);

    // Release resources
    workbook.Dispose();

    // Read the result file back out of the VFS and download it
    const fileArray = window.dotnetRuntime.Module.FS.readFile(outputFileName);
    const blob = new Blob([fileArray], { type: "application/vnd.openxmlformats-officedocument.spreadsheetml.sheet" });
    const url = URL.createObjectURL(blob);
    const a = document.createElement('a');
    a.href = url;
    a.download = outputFileName;
    a.click();
    URL.revokeObjectURL(url);
  };

  return (
    <div style={{ textAlign: 'center', height: '300px' }}>
      <h1>Add custom properties</h1>
      <button onClick={addCustomProperties}>Start</button>
    </div>
  );
}

export default App;
The effect of adding custom properties:
Update the value of a custom property
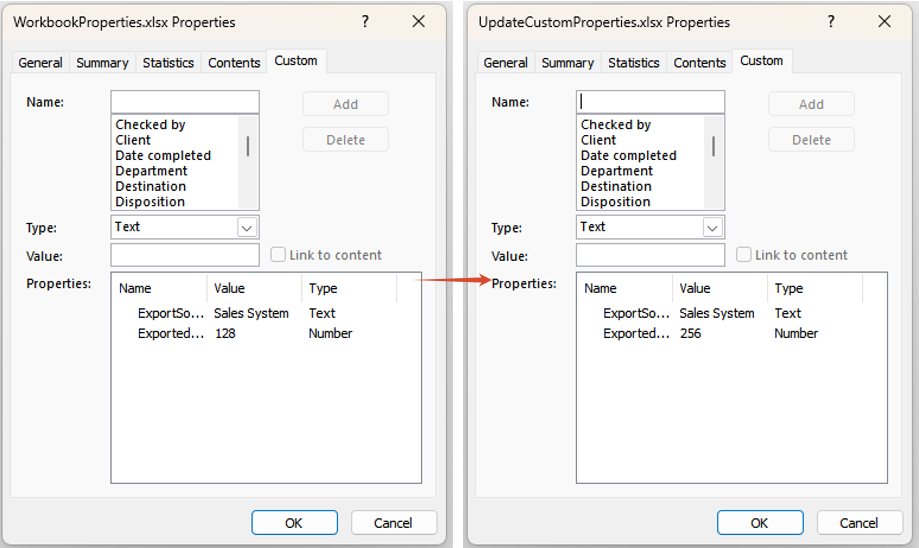
The value of a business field changes with the way it is counted: an export record count, say, has to be rewritten to a new figure once the data is topped up. Custom properties offer no member that assigns a value directly, but Add is keyed on the name — calling it again for a name that already exists does not append a duplicate entry, it replaces the value of the existing one. The steps are:
- Load the workbook and take the custom property collection from
workbook.CustomDocumentProperties. - Call
Addagain, passing the same name as the existing entry together with the new value. - Save the workbook.
Here is a complete code example showing how to update a custom property of a workbook in React:
function App() {
  const updateCustomProperties = async () => {
    // Get the Spire.XLS WASM module
    const xlsModule = window.wasmModule?.spirexls;

    // Check that the module is ready
    if (!xlsModule) {
      alert('Spire.Xls is not ready yet');
      return;
    }

    // Load the font into the VFS
    await window.spire.FetchFileToVFS('ARIAL.TTF', '/Library/Fonts/', `${process.env.PUBLIC_URL}/font/`);

    // Load the Excel file into the VFS
    const inputFileName = 'WorkbookProperties.xlsx';
    await window.spire.FetchFileToVFS(inputFileName, '', `${process.env.PUBLIC_URL}data/`);

    // Load the workbook
    const workbook = new xlsModule.Workbook();
    workbook.LoadFromFile(inputFileName);

    // Rewrite the exported record count; adding an existing name overwrites it
    workbook.CustomDocumentProperties.Add({ strName: 'ExportedRecords', intValue: 256 });

    // Save the workbook
    const outputFileName = 'UpdateCustomProperties.xlsx';
    workbook.SaveToFile(outputFileName);

    // Release resources
    workbook.Dispose();

    // Read the result file back out of the VFS and download it
    const fileArray = window.dotnetRuntime.Module.FS.readFile(outputFileName);
    const blob = new Blob([fileArray], { type: "application/vnd.openxmlformats-officedocument.spreadsheetml.sheet" });
    const url = URL.createObjectURL(blob);
    const a = document.createElement('a');
    a.href = url;
    a.download = outputFileName;
    a.click();
    URL.revokeObjectURL(url);
  };

  return (
    <div style={{ textAlign: 'center', height: '300px' }}>
      <h1>Update the value of a custom property</h1>
      <button onClick={updateCustomProperties}>Start</button>
    </div>
  );
}

export default App;
The effect of updating the value of a custom property:
FAQ
Why does assigning to CreatedTime throw "Assert failed: Value is not a Date"
Cause: CreatedTime and LastSaveTime take a JavaScript Date object and nothing else. A date string such as '2026-09-01', a timestamp number, or a hand-made object that only carries a toISOString() method all fail the type check and throw Assert failed: Value is not a Date.
Solution: build the Date with new Date(...) first, then assign it:
// 1 September 2026; months count from 0, so 8 means September
workbook.DocumentProperties.CreatedTime = new Date(2026, 8, 1);
Why does assigning to the Value of a custom property throw ArgumentNull_Generic
Cause: the Value property only reads. Assigning to it throws ArgumentNull_Generic Arg_ParamName_Name, value, and the original value does not change. Updating an existing property has to go through Add.
Solution: overwrite the original value with a same-name Add:
workbook.CustomDocumentProperties.Add({ strName: 'ExportedRecords', intValue: 256 });
Get a Free License
Spire.XLS for JavaScript offers a 30-day full-featured free trial license with no functional limitations. Apply here to evaluate before purchasing.
Add or Remove Cell Borders in Excel in React with JavaScript
2026-09-29 02:58:28 Written by liu taliaThe real dividers in a spreadsheet are not blank cells but borders: financial reports use lines of different weights to separate the header row from the totals, while data handed to a downstream system has to go out with the frames stripped off. Doing that by hand — selecting each block and opening Format Cells — is slow and hard to repeat. Spire.XLS for JavaScript does the same work in the browser on top of WebAssembly, using a virtual file system (VFS) for input and output files, so no back-end service is needed.
This article covers four feature points:
- Add a border to a selected cell or a cell range
- Add a border to the range that holds the data
- Add left, top, right, bottom and diagonal borders to a cell
- Remove the borders of a cell or a cell range
For installation and project setup, see Integrating Spire.XLS for JavaScript in a React Project. The examples below assume Spire.XLS is installed and the WebAssembly module has been initialised.
Add a border to a selected cell or a cell range
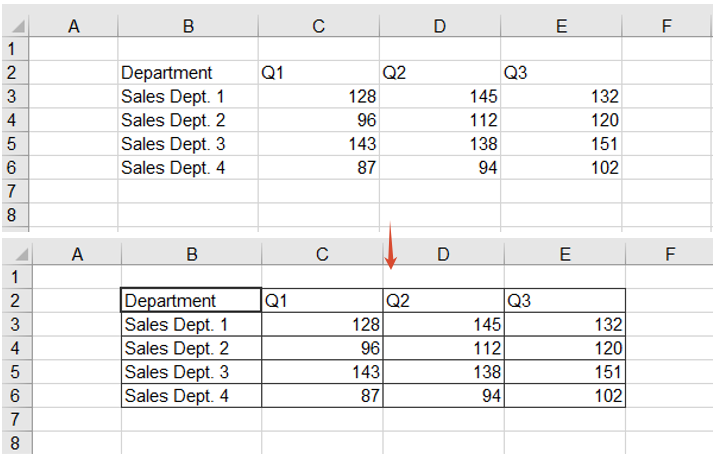
Given a table with no lines at all, the most direct approach is to put the frame back with BorderAround and BorderInside: the first one draws the outline, the second one the grid lines inside the range. Together they frame a whole block of data in one go, and they can also single out one cell — the header cell, say — so that it stands out from a sheet full of identical lines.
The steps are:
- Take the cell range you want to frame with
Range.get, by address - Call
BorderAroundto draw the outline, with the line style taken from theLineStyleTypeenumeration - Call
BorderInsideto add the separators between the cells inside the range - Take the header cell on its own and call
BorderAroundagain on it, this time with a medium line
The line style is passed in object notation, as { borderLine }.
function App() {
  const addBorderToCells = async () => {
    // Get the Spire.XLS WASM module
    const xlsModule = window.wasmModule?.spirexls;

    // Check that the module is ready
    if (!xlsModule) {
      alert('Spire.Xls is not ready yet');
      return;
    }

    // Load the font and the input file into the VFS
    await window.spire.FetchFileToVFS('ARIAL.TTF', '/Library/Fonts/', `${process.env.PUBLIC_URL}/font/`);
    const inputFileName = 'CellBorders.xlsx';
    await window.spire.FetchFileToVFS(inputFileName, '', `${process.env.PUBLIC_URL}data/`);

    // Load the workbook and take the first worksheet
    const workbook = new xlsModule.Workbook();
    workbook.LoadFromFile({ fileName: inputFileName });
    const sheet = workbook.Worksheets.get(0);

    // Take the B2:E6 range, frame it with thin lines and add thin inner lines
    const dataRange = sheet.Range.get('B2:E6');
    dataRange.BorderAround({ borderLine: xlsModule.LineStyleType.Thin });
    dataRange.BorderInside({ borderLine: xlsModule.LineStyleType.Thin });

    // Give the B2 header cell a medium border on all four sides
    sheet.Range.get('B2').BorderAround({ borderLine: xlsModule.LineStyleType.Medium });

    // Save the result file
    const outputFileName = 'AddBorderToCells.xlsx';
    workbook.SaveToFile({ fileName: outputFileName, version: xlsModule.ExcelVersion.Version2010 });

    // Dispose of the workbook object to free resources
    workbook.Dispose();

    // Read the result file back out of the VFS and download it
    const fileArray = window.dotnetRuntime.Module.FS.readFile(outputFileName);
    const blob = new Blob([fileArray], { type: 'application/vnd.openxmlformats-officedocument.spreadsheetml.sheet' });
    const url = URL.createObjectURL(blob);
    const a = document.createElement('a');
    a.href = url;
    a.download = outputFileName;
    a.click();
    URL.revokeObjectURL(url);
  };

  return (
    <div style={{ textAlign: 'center', height: '300px' }}>
      <h1>Add or Remove Cell Borders</h1>
      <button onClick={addBorderToCells}>Add a border to a cell or range</button>
    </div>
  );
}

export default App;
The effect of adding a border to the data range and to the header cell:
Add a border to the range that holds the data
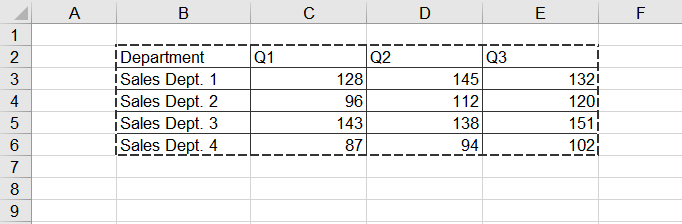
The previous section hard-codes the address B2:E6, which has to be edited as soon as rows or columns are added to the table. The AllocatedRange property returns the allocated range of a worksheet — the rectangle that actually holds the data — so the address maintains itself, and the outline can be given a different style from the header frame to set the table apart from the text around it.
The steps are:
- Get the range that holds the data through
AllocatedRange, with no address to maintain - Call
BorderAroundwith a medium dashed line, so the outline contrasts with the solid frames used elsewhere - Call
BorderInsideto add thin lines inside the range, keeping the rows separated
function App() {
  const addBorderToDataRange = async () => {
    const xlsModule = window.wasmModule?.spirexls;
    if (!xlsModule) {
      alert('Spire.Xls is not ready yet');
      return;
    }

    await window.spire.FetchFileToVFS('ARIAL.TTF', '/Library/Fonts/', `${process.env.PUBLIC_URL}/font/`);
    const inputFileName = 'CellBorders.xlsx';
    await window.spire.FetchFileToVFS(inputFileName, '', `${process.env.PUBLIC_URL}data/`);

    const workbook = new xlsModule.Workbook();
    workbook.LoadFromFile({ fileName: inputFileName });
    const sheet = workbook.Worksheets.get(0);

    // AllocatedRange returns the range that holds the data, so no address is needed
    const dataRange = sheet.AllocatedRange;

    // Give the outline a medium dashed border and the inside thin lines
    dataRange.BorderAround({ borderLine: xlsModule.LineStyleType.MediumDashed });
    dataRange.BorderInside({ borderLine: xlsModule.LineStyleType.Thin });

    const outputFileName = 'AddBorderToDataRange.xlsx';
    workbook.SaveToFile({ fileName: outputFileName, version: xlsModule.ExcelVersion.Version2010 });
    workbook.Dispose();

    const fileArray = window.dotnetRuntime.Module.FS.readFile(outputFileName);
    const blob = new Blob([fileArray], { type: 'application/vnd.openxmlformats-officedocument.spreadsheetml.sheet' });
    const url = URL.createObjectURL(blob);
    const a = document.createElement('a');
    a.href = url;
    a.download = outputFileName;
    a.click();
    URL.revokeObjectURL(url);
  };

  return (
    <div style={{ textAlign: 'center', height: '300px' }}>
      <h1>Add or Remove Cell Borders</h1>
      <button onClick={addBorderToDataRange}>Add a border to the data range</button>
    </div>
  );
}

export default App;
The effect of adding a dashed outline and thin inner lines to the data range:
Add left, top, right, bottom and diagonal borders to a cell
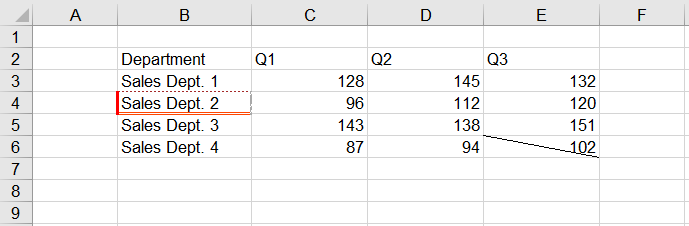
BorderAround gives all four edges the same style, which is not enough when the requirement is "a thick red line on the left and a double line along the bottom". Handling the edges one at a time solves it: Borders.get takes a single edge by its BordersLineType member, and its LineStyle and Color can then be set independently, so every edge can have its own line style and colour. The two diagonal directions are available the same way.
The steps are:
- Take the cell to style with
Range.get - Take the left, top, right and bottom edges through
Borders.get(BordersLineType.EdgeLeft)and its siblings - Set
LineStyleon each edge, using a thick line, a dotted line, a slanted dash-dot line and a double line - Set
Coloron each edge, using red, brown, dark grey and orange red - Take another cell, fetch its diagonal-down edge with
BordersLineType.DiagonalDownand set its line style
function App() {
  const addEdgeBorders = async () => {
    const xlsModule = window.wasmModule?.spirexls;
    if (!xlsModule) {
      alert('Spire.Xls is not ready yet');
      return;
    }

    await window.spire.FetchFileToVFS('ARIAL.TTF', '/Library/Fonts/', `${process.env.PUBLIC_URL}/font/`);
    const inputFileName = 'CellBorders.xlsx';
    await window.spire.FetchFileToVFS(inputFileName, '', `${process.env.PUBLIC_URL}data/`);

    const workbook = new xlsModule.Workbook();
    workbook.LoadFromFile({ fileName: inputFileName });
    const sheet = workbook.Worksheets.get(0);

    // Give each of the four edges of B4 its own line style and colour
    const cell = sheet.Range.get('B4');
    const edgeSpecs = [
      ['EdgeLeft', xlsModule.LineStyleType.Thick, xlsModule.Color.get_Red()],
      ['EdgeTop', xlsModule.LineStyleType.Dotted, xlsModule.Color.get_Brown()],
      ['EdgeRight', xlsModule.LineStyleType.SlantedDashDot, xlsModule.Color.get_DarkGray()],
      ['EdgeBottom', xlsModule.LineStyleType.Double, xlsModule.Color.get_OrangeRed()],
    ];
    for (const [edge, lineStyle, color] of edgeSpecs) {
      const border = cell.Borders.get(xlsModule.BordersLineType[edge]);
      border.LineStyle = lineStyle;
      border.Color = color;
    }

    // Add a diagonal-down border to E6
    const diagonal = sheet.Range.get('E6').Borders.get(xlsModule.BordersLineType.DiagonalDown);
    diagonal.LineStyle = xlsModule.LineStyleType.Thin;

    const outputFileName = 'AddEdgeBorders.xlsx';
    workbook.SaveToFile({ fileName: outputFileName, version: xlsModule.ExcelVersion.Version2010 });
    workbook.Dispose();

    const fileArray = window.dotnetRuntime.Module.FS.readFile(outputFileName);
    const blob = new Blob([fileArray], { type: 'application/vnd.openxmlformats-officedocument.spreadsheetml.sheet' });
    const url = URL.createObjectURL(blob);
    const a = document.createElement('a');
    a.href = url;
    a.download = outputFileName;
    a.click();
    URL.revokeObjectURL(url);
  };

  return (
    <div style={{ textAlign: 'center', height: '300px' }}>
      <h1>Add or Remove Cell Borders</h1>
      <button onClick={addEdgeBorders}>Set the four edges and a diagonal</button>
    </div>
  );
}

export default App;
The effect of styling the four edges of a cell and adding a diagonal line:
Remove the borders of a cell or a cell range
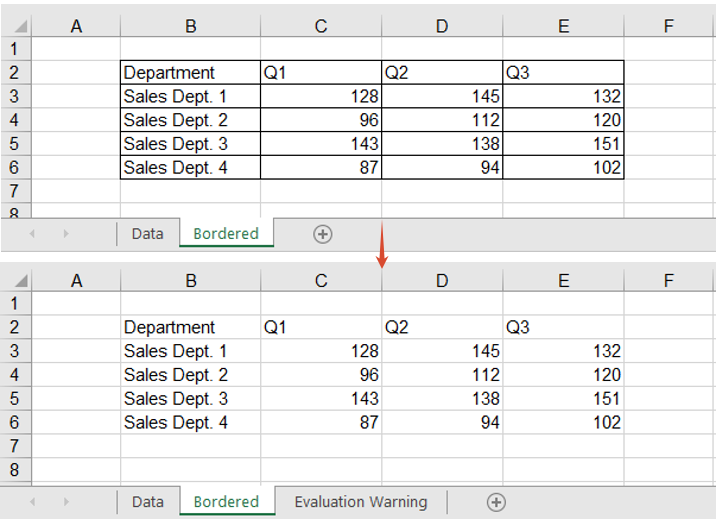
When an internal report goes out to a customer, or its data is fed to a downstream system, borders are often just noise: they make the data look like a finished report, and a parser that walks the sheet region by region can pick them up as content. Removing them is as simple as setting them — assign LineStyleType.None to the range's Borders.LineStyle and every line inside it goes at once.
The steps are:
- Take the worksheet that holds the framed report
- Take the cell range to clean up with
Range.get - Set the range's
Borders.LineStyletoLineStyleType.None, clearing every border inside it
function App() {
  const removeBorders = async () => {
    const xlsModule = window.wasmModule?.spirexls;
    if (!xlsModule) {
      alert('Spire.Xls is not ready yet');
      return;
    }

    await window.spire.FetchFileToVFS('ARIAL.TTF', '/Library/Fonts/', `${process.env.PUBLIC_URL}/font/`);
    const inputFileName = 'CellBorders.xlsx';
    await window.spire.FetchFileToVFS(inputFileName, '', `${process.env.PUBLIC_URL}data/`);

    const workbook = new xlsModule.Workbook();
    workbook.LoadFromFile({ fileName: inputFileName });

    // The second worksheet holds the same report, already framed with borders
    const sheet = workbook.Worksheets.get(1);

    // Set every border in the B2:E6 range to None
    sheet.Range.get('B2:E6').Borders.LineStyle = xlsModule.LineStyleType.None;

    const outputFileName = 'RemoveBorders.xlsx';
    workbook.SaveToFile({ fileName: outputFileName, version: xlsModule.ExcelVersion.Version2010 });
    workbook.Dispose();

    const fileArray = window.dotnetRuntime.Module.FS.readFile(outputFileName);
    const blob = new Blob([fileArray], { type: 'application/vnd.openxmlformats-officedocument.spreadsheetml.sheet' });
    const url = URL.createObjectURL(blob);
    const a = document.createElement('a');
    a.href = url;
    a.download = outputFileName;
    a.click();
    URL.revokeObjectURL(url);
  };

  return (
    <div style={{ textAlign: 'center', height: '300px' }}>
      <h1>Add or Remove Cell Borders</h1>
      <button onClick={removeBorders}>Remove cell borders</button>
    </div>
  );
}

export default App;
The effect of clearing every border inside the range:
FAQ
Setting a top edge on a whole range puts a line above every row
Cause: Borders.get(BordersLineType.EdgeTop) returns the top edge of every cell in the range, not the outline of the range itself. Used on B2:E6 as it stands, every row inside the range gets a top edge of its own, so four extra lines appear in the middle of the table.
Solution: narrow the range to a single row or column, and the edge that comes back sits on the outline. Take the top from the first row, the bottom from the last row, the left from the first column and the right from the last column:
// Top: the first row only
sheet.Range.get('B2:E2').Borders.get(xlsModule.BordersLineType.EdgeTop).LineStyle = xlsModule.LineStyleType.Thin;
// Bottom: the last row only
sheet.Range.get('B6:E6').Borders.get(xlsModule.BordersLineType.EdgeBottom).LineStyle = xlsModule.LineStyleType.Thin;
// Left: the first column only
sheet.Range.get('B2:B6').Borders.get(xlsModule.BordersLineType.EdgeLeft).LineStyle = xlsModule.LineStyleType.Thin;
// Right: the last column only
sheet.Range.get('E2:E6').Borders.get(xlsModule.BordersLineType.EdgeRight).LineStyle = xlsModule.LineStyleType.Thin;
BorderInside throws when it is called on a single cell
Cause: BorderInside means "the separators inside the range", and a single cell has no inside, so passing one throws This method doesn't support for single cell. No result file is written either.
Solution: use BorderAround to frame a single cell, or set its edges one at a time as in the previous section:
sheet.Range.get('B2').BorderAround({ borderLine: xlsModule.LineStyleType.Thin });
Get a Free License
Spire.XLS for JavaScript offers a 30-day full-featured free trial license with no functional limitations. Apply here to evaluate before purchasing.
Contracts, quotations and slide decks are often embedded straight into an Excel workbook: what you see on the sheet is an icon or a thumbnail, while the real document data sits in the xl/embeddings part of the package. Pulling those attachments out for archiving one by one means opening each object and saving a copy by hand.Spire.XLS for JavaScript does the job in the browser through WebAssembly, using a virtual file system (VFS) for the input and the output, with no backend service involved.
This article covers two feature points:
For installation and project configuration, see Integrating Spire.XLS for JavaScript in a React Project. The examples below assume Spire.XLS is installed and the WebAssembly module has finished initializing.
Read the OLE object information of a worksheet
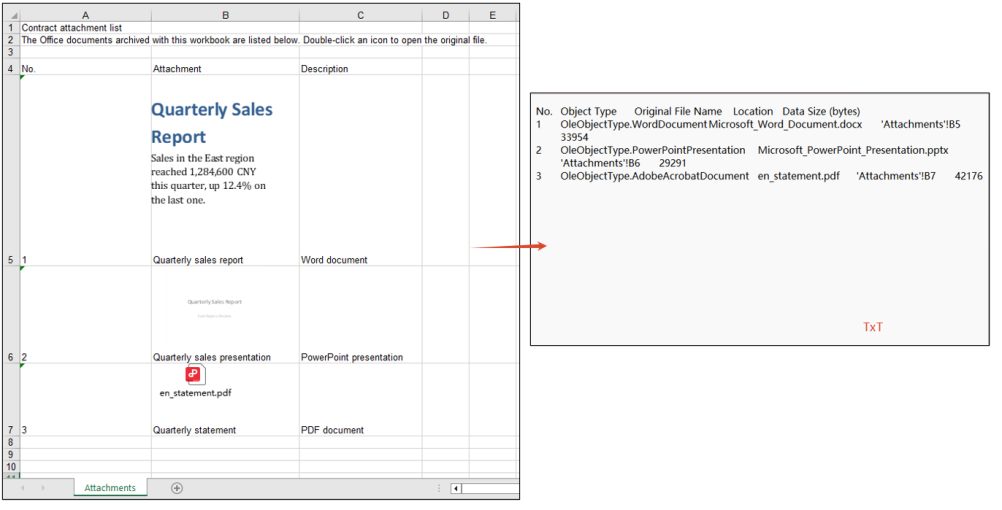
Before extracting anything it helps to know what a workbook actually carries. A listing sets out the kind, original name, cell and size of every embedded object in one place and serves as an attachment register, so archiving or handing the file over does not mean double-clicking each icon in turn.
The steps are:
- Use
HasOleObjectsto check whether the worksheet holds any embedded objects, and stop early if it does not - Walk every object of the worksheet through the
OleObjectscollection - Read four pieces of information off each object:
ObjectType: the kind of object, such asWordDocumentorPowerPointPresentationOleOriginName: the file name the object had before it was embeddedLocation: the cell the object sits on- the length of
OleData: the data size
- Join the four fields into one line per object and write the listing to
ListOleObjects.txt
The example below collects those fields into a plain text listing:
function App() {
  const listOleObjects = async () => {
    // Get the Spire.XLS WASM module
    const xlsModule = window.wasmModule?.spirexls;

    // Check if the module is ready
    if (!xlsModule) {
      alert('Spire.Xls is not ready yet');
      return;
    }

    // Load the font and the input file into VFS
    await window.spire.FetchFileToVFS('simsun.ttc', '/Library/Fonts/', `${process.env.PUBLIC_URL}/font/`);
    const inputFileName = 'OLEObjects.xlsx';
    await window.spire.FetchFileToVFS(inputFileName, '', `${process.env.PUBLIC_URL}data/`);

    // Load the workbook and take the first worksheet
    const workbook = new xlsModule.Workbook();
    workbook.LoadFromFile({ fileName: inputFileName });
    const sheet = workbook.Worksheets.get(0);

    // Check whether the worksheet contains OLE objects
    if (!sheet.HasOleObjects) {
      alert('The worksheet contains no OLE objects.');
      return;
    }

    // Collect the listing as text: a header line, then one tab-separated line per object
    const lines = [['No.', 'Object Type', 'Original File Name', 'Location', 'Data Size (bytes)'].join('\t')];

    // Walk the OLE objects of the worksheet, one line per object
    let index = 1;
    for (const oleObject of sheet.OleObjects) {
      lines.push([
        index,
        String(oleObject.ObjectType),
        String(oleObject.OleOriginName),
        String(oleObject.Location.RangeAddress),
        oleObject.OleData.length,
      ].join('\t'));
      index += 1;
    }

    // Release the workbook object
    workbook.Dispose();

    // Write the listing to a text file in the VFS
    const outputFileName = 'ListOleObjects.txt';
    window.dotnetRuntime.Module.FS.writeFile(outputFileName, lines.join('\n'));

    // Read the result file from VFS and trigger the download
    const fileArray = window.dotnetRuntime.Module.FS.readFile(outputFileName);
    const blob = new Blob([fileArray], { type: 'text/plain;charset=utf-8' });
    const url = URL.createObjectURL(blob);
    const a = document.createElement('a');
    a.href = url;
    a.download = outputFileName;
    a.click();
    URL.revokeObjectURL(url);
  };

  return (
    <div style={{ textAlign: 'center', height: '300px' }}>
      <h1>List OLE Objects</h1>
      <button onClick={listOleObjects}>List OLE objects</button>
    </div>
  );
}

export default App;
The effect of reading the OLE object information:
Extract OLE object payloads by type
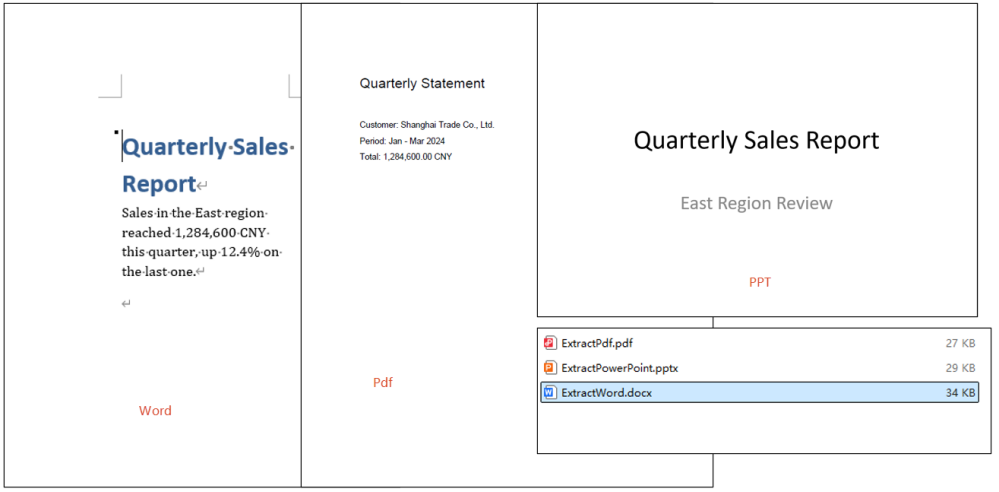
A listing only says what is embedded; archiving the attachment itself means getting the document out. An OLE object carries its payload as a byte array, so writing those bytes out restores the document exactly as it was embedded, with no re-typesetting or format conversion.
The steps are:
- Use
HasOleObjectsto confirm the worksheet holds embedded objects - Walk every object in the
OleObjectscollection and decide the name and MIME type of the output file fromObjectType - Take the raw bytes of the object through
OleData, write them into the virtual file system, read them back and wrap them in a downloadable Blob - Dispose of the workbook once the walk is done, then trigger the downloads one by one
The example below walks every object of the worksheet and writes the Word, PowerPoint and PDF attachments out as .docx, .pptx and .pdf files, offering each one for download:
function App() {
  const extractOleObjects = async () => {
    // Get the Spire.XLS WASM module
    const xlsModule = window.wasmModule?.spirexls;

    // Check if the module is ready
    if (!xlsModule) {
      alert('Spire.Xls is not ready yet');
      return;
    }

    // Load the font and the input file into VFS
    await window.spire.FetchFileToVFS('simsun.ttc', '/Library/Fonts/', `${process.env.PUBLIC_URL}/font/`);
    const inputFileName = 'OLEObjects.xlsx';
    await window.spire.FetchFileToVFS(inputFileName, '', `${process.env.PUBLIC_URL}data/`);

    // Load the workbook and take the first worksheet
    const workbook = new xlsModule.Workbook();
    workbook.LoadFromFile({ fileName: inputFileName });
    const sheet = workbook.Worksheets.get(0);

    // Collect the extracted files so the page can offer them for download
    const results = [];

    // Walk the OLE objects of the worksheet and write each one out in its own format
    if (sheet.HasOleObjects) {
      for (const oleObject of sheet.OleObjects) {
        const type = oleObject.ObjectType;
        let outputFileName = '';
        let mimeType = '';

        // Word document
        if (type === xlsModule.OleObjectType.WordDocument) {
          outputFileName = 'ExtractWord.docx';
          mimeType = 'application/vnd.openxmlformats-officedocument.wordprocessingml.document';
        }
        // PowerPoint presentation: .pptx and .sldx fall under two different enum members
        else if (
          type === xlsModule.OleObjectType.PowerPointPresentation ||
          type === xlsModule.OleObjectType.PowerPointSlide
        ) {
          outputFileName = 'ExtractPowerPoint.pptx';
          mimeType = 'application/vnd.openxmlformats-officedocument.presentationml.presentation';
        }
        // PDF document
        else if (type === xlsModule.OleObjectType.AdobeAcrobatDocument) {
          outputFileName = 'ExtractPdf.pdf';
          mimeType = 'application/pdf';
        }

        // Any other type is left alone
        if (!outputFileName) continue;

        // Write the raw data of the object into the virtual file system
        window.dotnetRuntime.Module.FS.writeFile(outputFileName, oleObject.OleData);
        const fileArray = window.dotnetRuntime.Module.FS.readFile(outputFileName);
        results.push({
          name: outputFileName,
          url: URL.createObjectURL(new Blob([fileArray], { type: mimeType })),
        });
      }
    }

    // Release the workbook object
    workbook.Dispose();

    // Trigger the downloads one by one
    results.forEach(({ name, url }) => {
      const a = document.createElement('a');
      a.href = url;
      a.download = name;
      a.click();
      URL.revokeObjectURL(url);
    });
  };

  return (
    <div style={{ textAlign: 'center', height: '300px' }}>
      <h1>Extract OLE Objects</h1>
      <button onClick={extractOleObjects}>Extract OLE objects by type</button>
    </div>
  );
}

export default App;
The effect of extracting the attachment documents:
FAQ
OleObjectType.PowerPointSlide never matches a PowerPoint attachment
Cause: OleObjectType splits objects by the real format of the embedded file. A .pptx presentation reports PowerPointPresentation; only slideshow formats such as .sldx and .ppt land on PowerPointSlide, so testing for the latter alone misses the vast majority of PowerPoint attachments.
Solution: match both enum members in the branch, for example:
else if (
  type === xlsModule.OleObjectType.PowerPointPresentation ||
  type === xlsModule.OleObjectType.PowerPointSlide
) {
  outputFileName = 'ExtractPowerPoint.pptx';
}
Only the attachments of the first worksheet come out
Cause: OleObjects is a per-worksheet collection. The example takes the first sheet through Worksheets.get(0) and walks the OleObjects of that sheet alone, so objects embedded on any other worksheet are never visited. When the attachments are spread over several sheets, the extraction silently comes up short, with no error to show for it.
Solution: walk the worksheets instead, taking the OleObjects of each one in turn:
for (let i = 0; i < workbook.Worksheets.Count; i++) {
  const worksheet = workbook.Worksheets.get(i);
  for (const oleObject of worksheet.OleObjects) {
    // write the attachment out by type
  }
}
Get a Free License
Spire.XLS for JavaScript offers a 30-day full-featured free trial license with no functional limitations. Apply here to evaluate before purchasing.
Set Excel Print Titles and Print Order in React with JavaScript
2026-09-24 01:22:44 Written by liu taliaWhen a report is generated in the browser, an order detail sheet often runs to several printed pages. With the default print settings, the header and the key columns disappear from the second page onwards, which makes the columns hard to identify and leaves the page numbers out of step with the rest of the report. Spire.XLS for JavaScript handles the page setup directly in the browser through WebAssembly, managing input and output files in a virtual file system (VFS) with no backend service required.
Using an order detail sheet of 18 columns by 60 rows as the sample, this article covers two core feature points:
For installation and project setup, see Integrating Spire.XLS for JavaScript in a React Project. The examples below assume Spire.XLS is installed and the WebAssembly module has been initialized.
Set the print title rows and columns
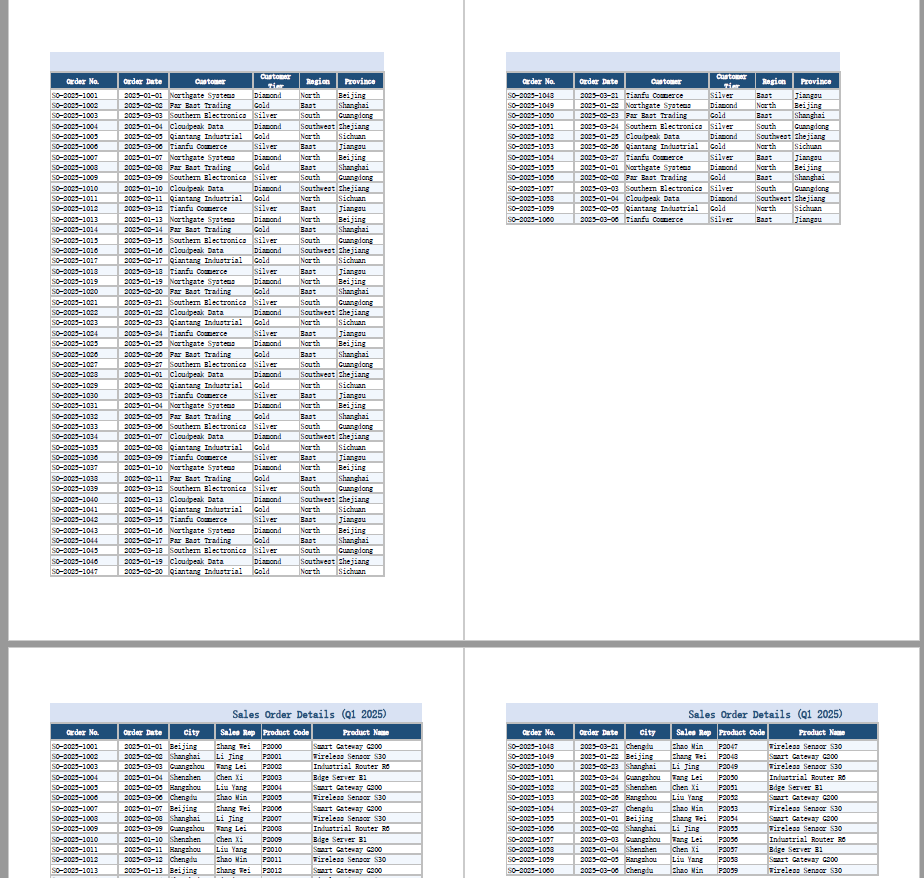
Print titles are what Excel calls the "Rows to repeat at top" and "Columns to repeat at left" options in the Page Setup dialog. Once set, the chosen rows or columns are repeated in the same position on every printed page, so the header is still visible once the table runs onto the second page. Spire.XLS for JavaScript sets them through the PrintTitleRows and PrintTitleColumns properties of PageSetup, which take a row or column reference string. Here is a complete code example showing how to set the print title rows and columns in React:
function App() {
  const setPrintTitles = async () => {
    // Get the Spire.XLS WASM module
    const xlsModule = window.wasmModule?.spirexls;

    // Check if the module is ready
    if (!xlsModule) {
      alert('Spire.Xls is not ready yet');
      return;
    }

    // Load the font and the input file into the VFS
    await window.spire.FetchFileToVFS('ARIAL.TTF', '/Library/Fonts/', `${process.env.PUBLIC_URL}/font/`);
    const inputFileName = 'OrderDetails.xlsx';
    await window.spire.FetchFileToVFS(inputFileName, '', `${process.env.PUBLIC_URL}data/`);

    // Load the workbook and get the first worksheet
    const workbook = new xlsModule.Workbook();
    workbook.LoadFromFile({ fileName: inputFileName });
    const sheet = workbook.Worksheets.get(0);

    // Get the page setup of the worksheet
    const pageSetup = sheet.PageSetup;

    // Use rows 1 and 2 as the print title rows, so they repeat at the top of every page
    pageSetup.PrintTitleRows = '$1:$2';

    // Use columns A and B as the print title columns, so they repeat at the left of every page
    pageSetup.PrintTitleColumns = '$A:$B';

    // Save the workbook
    const outputFileName = 'SetPrintTitles.xlsx';
    workbook.SaveToFile({ fileName: outputFileName, version: xlsModule.ExcelVersion.Version2010 });

    // Dispose of the workbook object to free resources
    workbook.Dispose();

    // Read the result file from the VFS and trigger the download
    const fileArray = window.dotnetRuntime.Module.FS.readFile(outputFileName);
    const blob = new Blob([fileArray], { type: 'application/vnd.openxmlformats-officedocument.spreadsheetml.sheet' });
    const url = URL.createObjectURL(blob);
    const a = document.createElement('a');
    a.href = url;
    a.download = outputFileName;
    a.click();
    URL.revokeObjectURL(url);
  };

  return (
    <div style={{ textAlign: 'center', height: '300px' }}>
      <h1>Set Print Title Rows and Columns</h1>
      <button onClick={setPrintTitles}>Set Print Title Rows and Columns</button>
    </div>
  );
}

export default App;
Print result of the original file
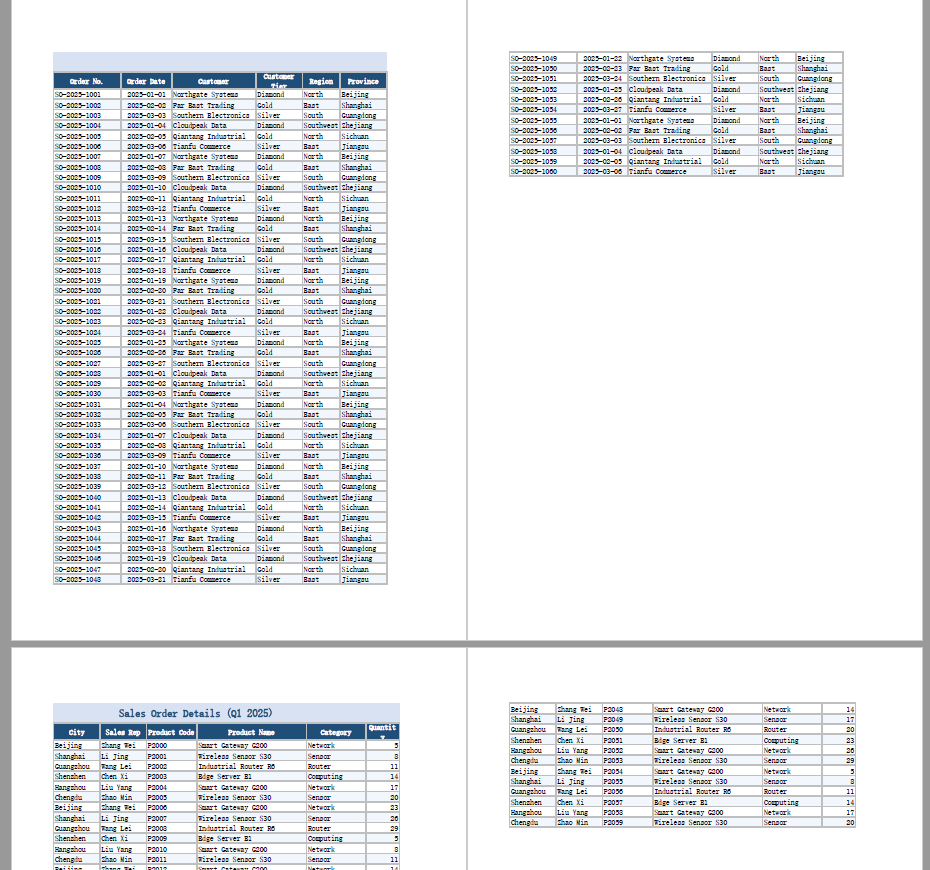
After running, the effect of setting the print title rows and columns:
Set the print order
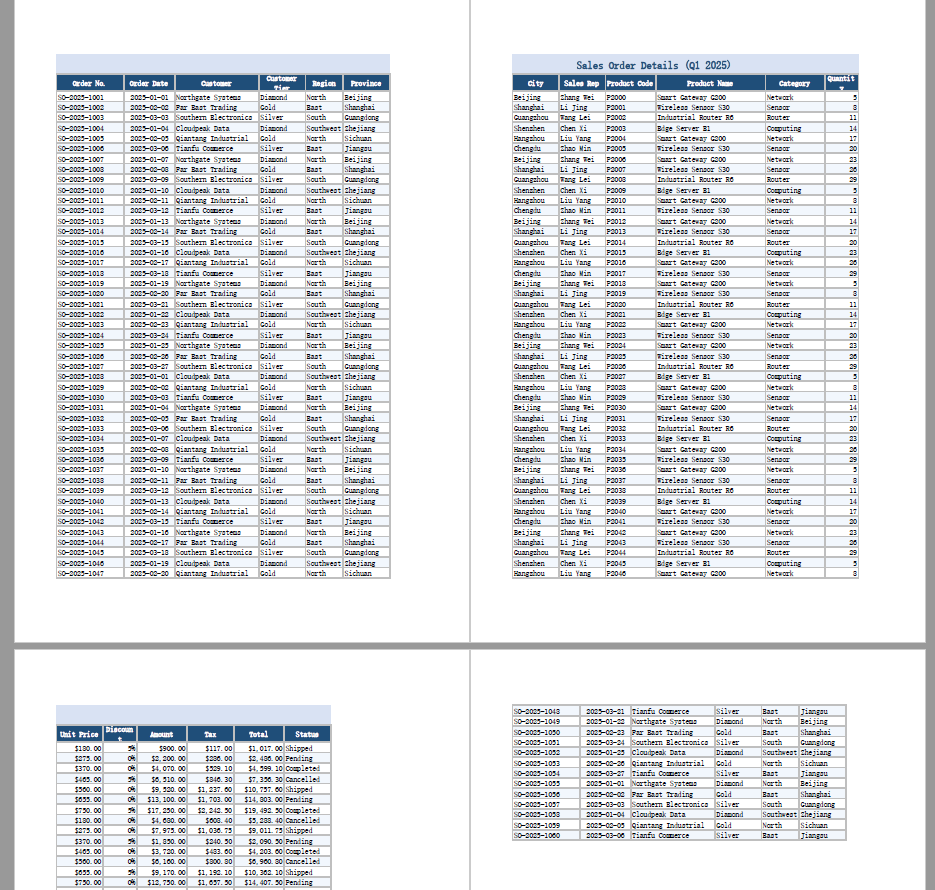
When a worksheet is wider than one page and longer than one page at the same time, Excel has to decide which direction the pages advance in. The default, "down, then over", fills a page vertically before moving to the next block of columns on the right; "over, then down" fills a page horizontally first and then moves down. Spire.XLS for JavaScript switches between the two with the Order property of PageSetup. Here is a complete code example showing how to set the print order of a worksheet in React:
function App() {
  const setPrintOrder = async () => {
    // Get the Spire.XLS WASM module
    const xlsModule = window.wasmModule?.spirexls;

    // Check if the module is ready
    if (!xlsModule) {
      alert('Spire.Xls is not ready yet');
      return;
    }

    // Load the font and the input file into the VFS
    await window.spire.FetchFileToVFS('ARIAL.TTF', '/Library/Fonts/', `${process.env.PUBLIC_URL}/font/`);
    const inputFileName = 'OrderDetails.xlsx';
    await window.spire.FetchFileToVFS(inputFileName, '', `${process.env.PUBLIC_URL}data/`);

    // Load the workbook and get the first worksheet
    const workbook = new xlsModule.Workbook();
    workbook.LoadFromFile({ fileName: inputFileName });
    const sheet = workbook.Worksheets.get(0);

    // Get the page setup of the worksheet
    const pageSetup = sheet.PageSetup;

    // Set the page order to over-then-down: print a column top to bottom, then move right
    pageSetup.Order = xlsModule.OrderType.OverThenDown;

    // Save the workbook
    const outputFileName = 'SetPrintOrder.xlsx';
    workbook.SaveToFile({ fileName: outputFileName, version: xlsModule.ExcelVersion.Version2010 });

    // Dispose of the workbook object to free resources
    workbook.Dispose();

    // Read the result file from the VFS and trigger the download
    const fileArray = window.dotnetRuntime.Module.FS.readFile(outputFileName);
    const blob = new Blob([fileArray], { type: 'application/vnd.openxmlformats-officedocument.spreadsheetml.sheet' });
    const url = URL.createObjectURL(blob);
    const a = document.createElement('a');
    a.href = url;
    a.download = outputFileName;
    a.click();
    URL.revokeObjectURL(url);
  };

  return (
    <div style={{ textAlign: 'center', height: '300px' }}>
      <h1>Set Print Order</h1>
      <button onClick={setPrintOrder}>Set Print Order</button>
    </div>
  );
}

export default App;
After running, the effect of setting the print order to over-then-down:
FAQ
Can I set only the print title rows and not the title columns
Cause: PrintTitleRows and PrintTitleColumns are two independent properties — one controls the rows repeated at the top of each page, the other the columns repeated at the left. Setting only one leaves the other unset: the call is not rejected for the missing half, and no default is filled in.
Solution: Set whichever one you need. To repeat the header rows only, use pageSetup.PrintTitleRows = '$1:$2'.
Does setting the print titles change the data in the worksheet
Cause: Print titles are part of the page setup. They only decide which rows and columns are repeated in the printout; they do not touch cell contents, and they add or remove no rows and columns.
Solution: The data is unaffected. The file measures 62 rows by 18 columns both before and after the setting, with cell-by-cell identical text — the only difference is the print title definition added to the page setup. The worksheet looks exactly the same on screen.
Get a Free License
Spire.XLS for JavaScript offers a 30-day full-featured free trial license with no functional limitations. Apply here to evaluate before purchasing.
When an order detail sheet or a statement is exported for printing, the page setup decides whether the printed copy is actually readable: whether the table comes out with gridlines and row and column headings, how fine the output is, and whether comments travel with it. These switches are scattered across several tabs of the Excel Page Setup dialog, which makes them tedious to tick one by one.Spire.XLS for JavaScript handles the page setup in the browser through WebAssembly, using a virtual file system (VFS) for the input and the output, with no backend service involved.
This article takes an 18-column by 60-row order detail sheet and covers three feature points:
- Set the print quality and draft quality
- Print gridlines and row and column headings
- Set black and white printing, comments and error values
For installation and project configuration, see Integrating Spire.XLS for JavaScript in a React Project. The examples below assume Spire.XLS is installed and the WebAssembly module has finished initializing.
Set the print quality and draft quality
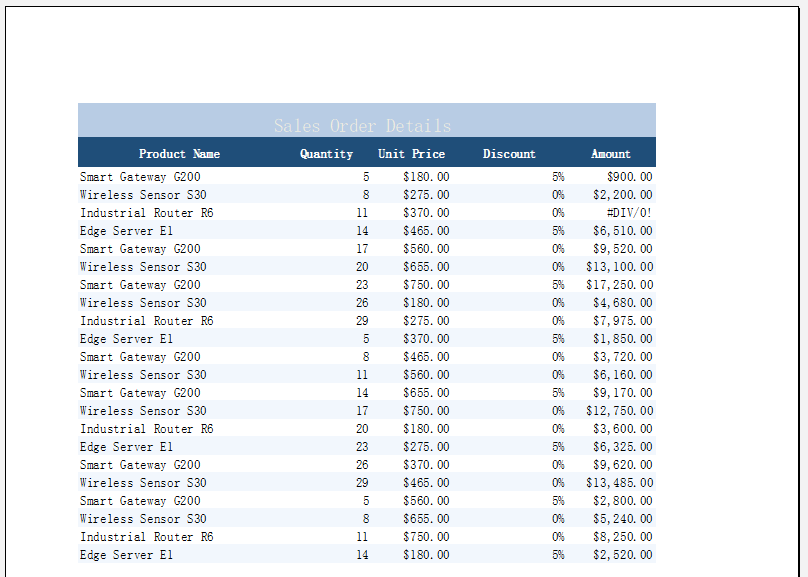
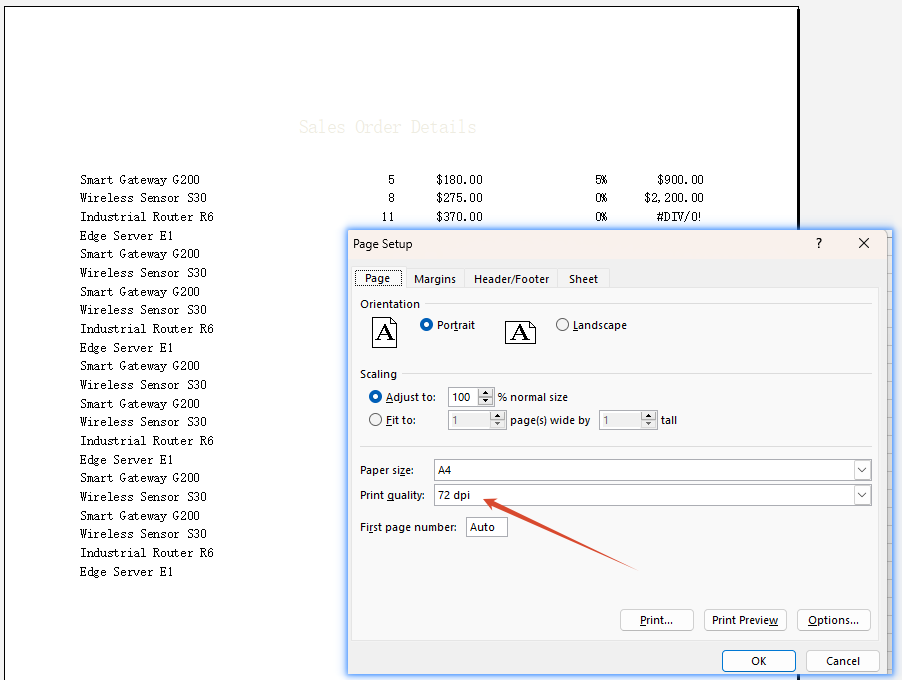
Print quality sets the number of ink dots per inch in the printed output and takes a plain integer in dpi; draft quality lets the printer run faster with less toner, which suits a proof that only circulates internally. Spire.XLS for JavaScript exposes both through the PrintQuality and Draft members of PageSetup:
PrintQuality = 72prints at 72 dpi, a low setting that lets the page come out faster with less consumableDraft = trueturns on draft quality, trading fine detail for speed
The complete example code is as follows:
function App() {
  const setPrintQuality = async () => {
    // Get the Spire.XLS WASM module
    const xlsModule = window.wasmModule?.spirexls;

    // Make sure the module is ready
    if (!xlsModule) {
      alert('Spire.Xls is not ready yet');
      return;
    }

    // Load the font and the input file into the VFS
    await window.spire.FetchFileToVFS('ARIAL.TTF', '/Library/Fonts/', `${process.env.PUBLIC_URL}/font/`);
    const inputFileName = 'OrderDetails.xlsx';
    await window.spire.FetchFileToVFS(inputFileName, '', `${process.env.PUBLIC_URL}data/`);

    // Load the workbook and take its first worksheet
    const workbook = new xlsModule.Workbook();
    workbook.LoadFromFile({ fileName: inputFileName });
    const sheet = workbook.Worksheets.get(0);

    // Get the page setup of the worksheet
    const pageSetup = sheet.PageSetup;

    // Set the print quality to 72 dpi
    pageSetup.PrintQuality = 72;

    // Turn on draft quality: speed matters more than fine detail
    pageSetup.Draft = true;

    // Save the workbook
    const outputFileName = 'SetPrintQuality.xlsx';
    workbook.SaveToFile({ fileName: outputFileName, version: xlsModule.ExcelVersion.Version2010 });

    // Release the workbook to free its resources
    workbook.Dispose();

    // Read the result file back from the VFS to trigger the download
    const fileArray = window.dotnetRuntime.Module.FS.readFile(outputFileName);
    const blob = new Blob([fileArray], { type: 'application/vnd.openxmlformats-officedocument.spreadsheetml.sheet' });
    const url = URL.createObjectURL(blob);
    const a = document.createElement('a');
    a.href = url;
    a.download = outputFileName;
    a.click();
    URL.revokeObjectURL(url);
  };

  return (
    <div style={{ textAlign: 'center', height: '300px' }}>
      <h1>Set print quality and draft quality</h1>
      <button onClick={setPrintQuality}>Set print quality and draft quality</button>
    </div>
  );
}

export default App;
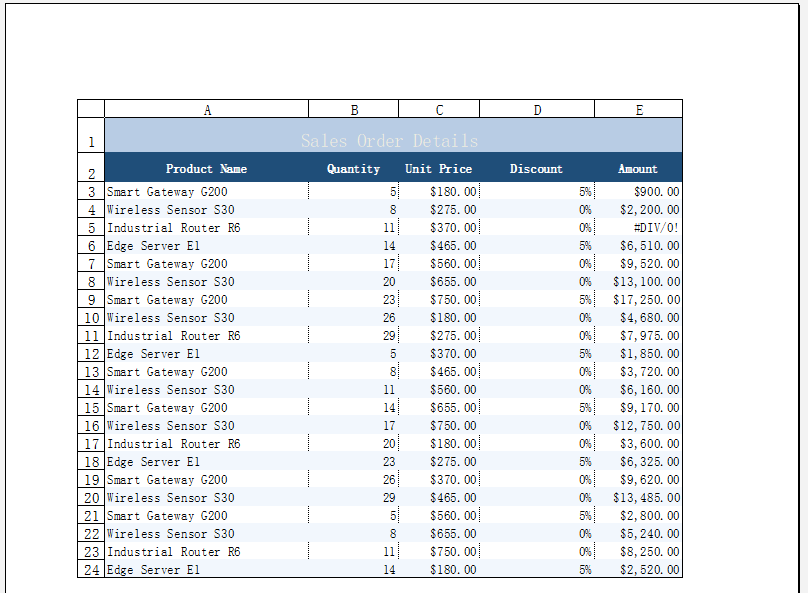
The original file as printed:
The effect of the print quality and draft quality settings:
Print gridlines and row and column headings
The gridlines on screen do not travel with the data when the sheet is printed, so a sheet without borders of its own reaches paper as a field of floating values that is hard to check cell by cell. Row and column headings have the same problem: printing them is what lets a printed copy be discussed in the same C5, D7 terms used in Excel. The two boolean members IsPrintGridlines and IsPrintHeadings control them. The complete example code is as follows:
function App() {
  const setGridlinesAndHeadings = async () => {
    // Get the Spire.XLS WASM module
    const xlsModule = window.wasmModule?.spirexls;

    // Make sure the module is ready
    if (!xlsModule) {
      alert('Spire.Xls is not ready yet');
      return;
    }

    // Load the font and the input file into the VFS
    await window.spire.FetchFileToVFS('ARIAL.TTF', '/Library/Fonts/', `${process.env.PUBLIC_URL}/font/`);
    const inputFileName = 'OrderDetails.xlsx';
    await window.spire.FetchFileToVFS(inputFileName, '', `${process.env.PUBLIC_URL}data/`);

    // Load the workbook and take its first worksheet
    const workbook = new xlsModule.Workbook();
    workbook.LoadFromFile({ fileName: inputFileName });
    const sheet = workbook.Worksheets.get(0);

    // Get the page setup of the worksheet
    const pageSetup = sheet.PageSetup;

    // Print the gridlines along with the data
    pageSetup.IsPrintGridlines = true;

    // Print the row and column headings along with the data
    pageSetup.IsPrintHeadings = true;

    // Save the workbook
    const outputFileName = 'SetGridlinesAndHeadings.xlsx';
    workbook.SaveToFile({ fileName: outputFileName, version: xlsModule.ExcelVersion.Version2010 });

    // Release the workbook to free its resources
    workbook.Dispose();

    // Read the result file back from the VFS to trigger the download
    const fileArray = window.dotnetRuntime.Module.FS.readFile(outputFileName);
    const blob = new Blob([fileArray], { type: 'application/vnd.openxmlformats-officedocument.spreadsheetml.sheet' });
    const url = URL.createObjectURL(blob);
    const a = document.createElement('a');
    a.href = url;
    a.download = outputFileName;
    a.click();
    URL.revokeObjectURL(url);
  };

  return (
    <div style={{ textAlign: 'center', height: '300px' }}>
      <h1>Print gridlines and headings</h1>
      <button onClick={setGridlinesAndHeadings}>Print gridlines and headings</button>
    </div>
  );
}

export default App;
The effect of printing the gridlines and the row and column headings:
Set black and white printing, comments and error values
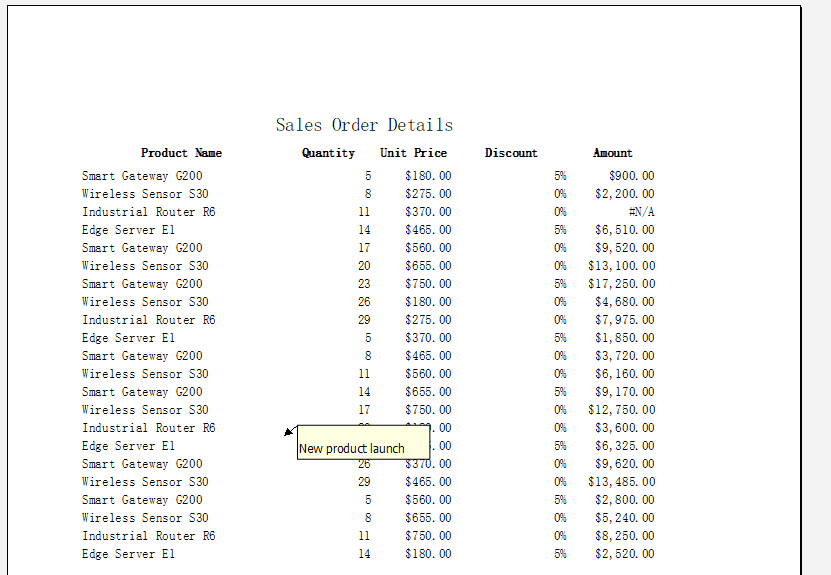
The remaining three output switches also live on PageSetup, and they decide what colour the printed copy comes out in, whether comments travel with the sheet, and how errors are shown. The three members and their values:
BlackAndWhiteset totrueprints in black and white, turning colour content into greyscale, which is especially useful with a mono laser printerPrintCommentsset toInPlaceprints each comment box where it sits on the sheet; the comment has to be shown first — one that is not displayed is not printedPrintErrorsset toNAshows every error value such as#DIV/0!as#N/Aon paper, keeping internal formula errors out of sight
The complete example code is as follows:
function App() {
  const setOtherPrintOptions = async () => {
    // Get the Spire.XLS WASM module
    const xlsModule = window.wasmModule?.spirexls;

    // Make sure the module is ready
    if (!xlsModule) {
      alert('Spire.Xls is not ready yet');
      return;
    }

    // Load the font and the input file into the VFS
    await window.spire.FetchFileToVFS('ARIAL.TTF', '/Library/Fonts/', `${process.env.PUBLIC_URL}/font/`);
    const inputFileName = 'OrderDetails.xlsx';
    await window.spire.FetchFileToVFS(inputFileName, '', `${process.env.PUBLIC_URL}data/`);

    // Load the workbook and take its first worksheet
    const workbook = new xlsModule.Workbook();
    workbook.LoadFromFile({ fileName: inputFileName });
    const sheet = workbook.Worksheets.get(0);

    // Get the page setup of the worksheet
    const pageSetup = sheet.PageSetup;

    // The sample carries one comment, on cell A18
    // Show it first: a comment that is not displayed is not printed
    sheet.Range.get('A18').Comment.Visible = true;

    // Print the worksheet in black and white
    pageSetup.BlackAndWhite = true;

    // Print comments where they appear on the worksheet
    pageSetup.PrintComments = xlsModule.PrintCommentType.InPlace;

    // Print every cell error as #N/A
    pageSetup.PrintErrors = xlsModule.PrintErrorsType.NA;

    // Save the workbook
    const outputFileName = 'SetOtherPrintOptions.xlsx';
    workbook.SaveToFile({ fileName: outputFileName, version: xlsModule.ExcelVersion.Version2010 });

    // Release the workbook to free its resources
    workbook.Dispose();

    // Read the result file back from the VFS to trigger the download
    const fileArray = window.dotnetRuntime.Module.FS.readFile(outputFileName);
    const blob = new Blob([fileArray], { type: 'application/vnd.openxmlformats-officedocument.spreadsheetml.sheet' });
    const url = URL.createObjectURL(blob);
    const a = document.createElement('a');
    a.href = url;
    a.download = outputFileName;
    a.click();
    URL.revokeObjectURL(url);
  };

  return (
    <div style={{ textAlign: 'center', height: '300px' }}>
      <h1>Set black and white, comments and errors</h1>
      <button onClick={setOtherPrintOptions}>Set black and white, comments and errors</button>
    </div>
  );
}

export default App;
The effect of the black and white, comment and error value settings:
FAQ
The sheet still runs to several pages, and lowering the print quality did not help
Cause: print quality and draft quality only decide how fine the output is and how much ink it uses; they do not change the layout of the content, so no setting of theirs moves a page break. Fitting a whole sheet onto one page is a matter of page scaling, which has nothing to do with print quality. Setting both at once is not a conflict — each one simply does its own job.
Solution: use FitToPagesWide and FitToPagesTall to squeeze the worksheet into a given number of pages, where 1 means one page wide and one page tall:
// Scale the worksheet onto one page wide and one page tall
pageSetup.FitToPagesWide = 1;
pageSetup.FitToPagesTall = 1;
Set together with the print quality, both survive:
<pageSetup fitToHeight="1" fitToWidth="1" horizontalDpi="72" verticalDpi="72" orientation="portrait" paperSize="9" />
The worksheet looks exactly the same after setting PrintQuality and Draft
Cause: both act on the printer output only and leave the worksheet's own content and display untouched, so the document looks no different once they are set. That is expected, and does not mean the setting failed to apply.
Solution: the print quality and the draft quality are written into the result file. To confirm they took effect, unzip the result file and look at xl/worksheets/sheet1.xml: the print quality lands on the horizontalDpi and verticalDpi of <pageSetup>, and the draft quality shows up as draft="1" on the same element. This example sets both, giving:
<pageSetup draft="1" horizontalDpi="72" verticalDpi="72" orientation="portrait" paperSize="9" />
Note that what Draft actually does depends on the printer driver — some drivers ignore the switch, and the attribute is written into the file either way.
Get a Free License
Spire.XLS for JavaScript offers a 30-day full-featured free trial license with no functional limitations. Apply here to evaluate before purchasing.
A product list or an order detail table rarely keeps one format per cell. A description note has to be split over several lines, only a few words of a promotion line deserve to stand out, and a stock warning needs to be picked out in red. Doing that by hand means double-clicking every cell, selecting the fragment and adjusting the font one by one, which does not scale past a handful of rows. An HTML string describes exactly this kind of content — one piece of text whose parts are styled differently — and Spire.XLS for JavaScript exposes the HtmlString property, which renders a piece of HTML straight into a cell: line breaks, bold, italic, underline, color and font size all follow the tags, so a batch is one assignment inside a loop. It runs entirely in the browser on WebAssembly, managing input and output files with a virtual file system (VFS) and requiring no backend service.
This article covers two feature points:
For installation and project setup, see Integrating Spire.XLS for JavaScript in a React Project. The examples below assume Spire.XLS is installed and the WebAssembly module has been initialized.
Write HTML text with line breaks into a cell
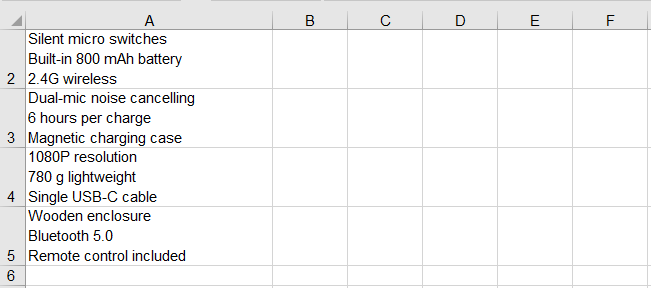
Breaking a line inside a cell normally means pressing Alt+Enter while editing it. When the data comes from a database or a form, that manual step cannot be batched, and the <br> tag in HTML means precisely "break the line here". HtmlString parses <br>, <div> and <p> into line breaks inside the cell, so a single string written into one cell becomes several lines. The steps are as follows:
- Load the font into the VFS.
- Create a workbook, take its first worksheet and widen column A.
- Build an HTML string for each entry, splitting the parts with
<br>. - Write them into the cells of column A with
HtmlString. - Save the workbook.
The complete code example below shows how to write HTML text with line breaks into an Excel cell in React:
function App() {
  const setMultilineText = async () => {
    // Get the Spire.XLS WASM module
    const xlsModule = window.wasmModule?.spirexls;

    // Check that the module is ready
    if (!xlsModule) {
      alert('Spire.Xls is not ready yet');
      return;
    }

    // Load the font into the VFS
    await window.spire.FetchFileToVFS('ARIAL.TTF', '/Library/Fonts/', `${process.env.PUBLIC_URL}/font/`);

    // Create a workbook, take the first worksheet and widen column A so a single line stays on one line
    const workbook = new xlsModule.Workbook();
    const sheet = workbook.Worksheets.get(0);
    sheet.Range.get('A1:A5').ColumnWidth = 30;

    // Each description has three parts, separated by <br> inside the same cell
    const notes = [
      'Bluetooth 5.3 dual pairing<br>30-hour battery<br>USB-C fast charge',
      'Silent micro switches<br>Built-in 800 mAh battery<br>2.4G wireless',
      'Dual-mic noise cancelling<br>6 hours per charge<br>Magnetic charging case',
      '1080P resolution<br>780 g lightweight<br>Single USB-C cable',
      'Wooden enclosure<br>Bluetooth 5.0<br>Remote control included',
    ];

    // Write the HTML strings into column A, three lines inside one cell
    notes.forEach((html, index) => {
      sheet.Range.get(`A${index + 1}`).HtmlString = html;
    });

    // Save the workbook
    const outputFileName = 'MultilineHtmlText.xlsx';
    workbook.SaveToFile({ fileName: outputFileName });

    // Release the resources
    workbook.Dispose();

    // Read the result file out of the VFS and trigger the download
    const fileArray = window.dotnetRuntime.Module.FS.readFile(outputFileName);
    const blob = new Blob([fileArray], { type: 'application/vnd.openxmlformats-officedocument.spreadsheetml.sheet' });
    const url = URL.createObjectURL(blob);
    const a = document.createElement('a');
    a.href = url;
    a.download = outputFileName;
    a.click();
    URL.revokeObjectURL(url);
  };

  return (
    <div style={{ textAlign: 'center', height: '300px' }}>
      <h1>Excel HTML rich text</h1>
      <button onClick={setMultilineText}>Multiline HTML text</button>
    </div>
  );
}

export default App;
After running, the effect of writing HTML text with line breaks into a cell:
Format part of the text in a cell
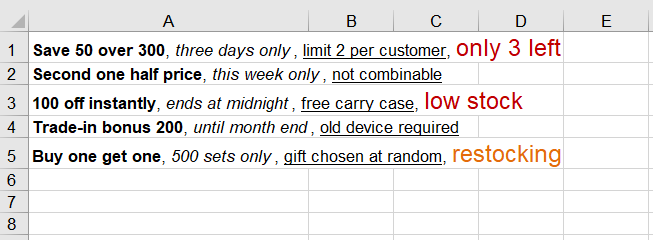
Text inside one cell does not have to share one format. Within a single run of text, only part of it usually needs to stand out, while the rest can stay at the regular weight. HtmlString supports the <b>, <i> and <u> tags, and takes color and font size in a style attribute on a <span>. Every fragment wrapped in a tag becomes its own run of formatting without affecting the others, and the tags themselves never appear in the cell. The steps are as follows:
- As in the previous section, load the font into the VFS, create a workbook, take the first worksheet and widen column A.
- Mark the text to emphasize with
<b>,<i>and<u>, and wrap the text to highlight in<span style="color:#C00000;font-size:14pt">, giving the color as a hexadecimal value and the size in points. - Write the strings into column A; the rest of the text in the same cell keeps its original format.
- Save the workbook.
The complete code example below shows how to format part of the text in an Excel cell in React:
function App() {
  const setPartialFormatting = async () => {
    // Get the Spire.XLS WASM module
    const xlsModule = window.wasmModule?.spirexls;

    // Check that the module is ready
    if (!xlsModule) {
      alert('Spire.Xls is not ready yet');
      return;
    }

    // Load the font into the VFS
    await window.spire.FetchFileToVFS('ARIAL.TTF', '/Library/Fonts/', `${process.env.PUBLIC_URL}/font/`);

    // Create a workbook, take the first worksheet and widen column A so a single line stays on one line
    const workbook = new xlsModule.Workbook();
    const sheet = workbook.Worksheets.get(0);
    sheet.Range.get('A1:A5').ColumnWidth = 30;

    // Each part of a promotion line gets its own <b>, <i>, <u> or styled <span>;
    // bold, italic, underline, color and font size apply only to the wrapped text
    const promotions = [
      '<b>Save 50 over 300</b>, <i>three days only</i>, <u>limit 2 per customer</u>, <span style="color:#C00000;font-size:14pt">only 3 left</span>',
      '<b>Second one half price</b>, <i>this week only</i>, <u>not combinable</u>',
      '<b>100 off instantly</b>, <i>ends at midnight</i>, <u>free carry case</u>, <span style="color:#C00000;font-size:14pt">low stock</span>',
      '<b>Trade-in bonus 200</b>, <i>until month end</i>, <u>old device required</u>',
      '<b>Buy one get one</b>, <i>500 sets only</i>, <u>gift chosen at random</u>, <span style="color:#E36C0A;font-size:14pt">restocking</span>',
    ];

    // Write the HTML strings into column A
    promotions.forEach((html, index) => {
      sheet.Range.get(`A${index + 1}`).HtmlString = html;
    });

    // Save the workbook
    const outputFileName = 'PartialFormattingHtml.xlsx';
    workbook.SaveToFile({ fileName: outputFileName });

    // Release the resources
    workbook.Dispose();

    // Read the result file out of the VFS and trigger the download
    const fileArray = window.dotnetRuntime.Module.FS.readFile(outputFileName);
    const blob = new Blob([fileArray], { type: 'application/vnd.openxmlformats-officedocument.spreadsheetml.sheet' });
    const url = URL.createObjectURL(blob);
    const a = document.createElement('a');
    a.href = url;
    a.download = outputFileName;
    a.click();
    URL.revokeObjectURL(url);
  };

  return (
    <div style={{ textAlign: 'center', height: '300px' }}>
      <h1>Excel HTML rich text</h1>
      <button onClick={setPartialFormatting}>Partial formatting</button>
    </div>
  );
}

export default App;
After running, the effect of formatting part of the text in a cell as bold, italic, underlined, colored or larger:
FAQ
Does the HTML parser swallow runs of spaces?
Cause: A browser collapses consecutive spaces into one when it renders HTML, which makes it easy to assume Spire does the same and to reach for to build any padding.
Solution: It does not. A B is still five spaces when read back out of the cell, and leading spaces survive as well. works too, but ordinary alignment does not need it.
Does writing rich text wipe out the alignment the cell already had?
Cause: HtmlString does change the cell's font properties, so it is fair to wonder whether it resets the alignment set earlier along with them.
Solution: The alignment is untouched. Set Style.HorizontalAlignment first and write the HtmlString afterwards, and the alignment reads back unchanged — setting the format before the content is safe.
const cell = sheet.Range.get('A1');
cell.Style.HorizontalAlignment = xlsModule.HorizontalAlignType.Center;
cell.HtmlString = '<b>Centered</b>';
Get a Free License
Spire.XLS for JavaScript offers a 30-day full-featured free trial license with no functional limitations. Apply here to evaluate before purchasing.
A chart makes the trend behind one set of numbers visible, but it is far less good at showing the trends behind dozens of sets at once. Sparklines are built for exactly that: each one compresses a trend into a single cell, with no axes and no legend, so a whole column of trends can be taken in at a glance. Give every region's quarterly sales figures their own sparkline and you can see which row is climbing and which one turned back long before you could read it out of a column of numbers. Spire.XLS for JavaScript performs this directly in the browser through WebAssembly, managing input and output files with a virtual file system (VFS) and requiring no backend service.
This article covers three feature points:
- Add line sparklines
- Add column sparklines and highlight the high and low points
- Clear sparklines from a worksheet
For installation and project setup, see Integrating Spire.XLS for JavaScript in a React Project. The examples below assume Spire.XLS is installed and the WebAssembly module has been initialized.
Add Line Sparklines
A line sparkline joins a row of values in order into a single thin line, making the rise and fall of the trend immediately readable. It occupies no cell of its own and hides none of the numbers underneath, so a single narrow column can carry the trends of dozens of rows at once, and which one is climbing and which one turned back is there at a glance. A sparkline cannot exist outside a sparkline group, and the group decides the type, colors and marker settings shared by the whole batch. The steps are:
- Load the font and the sample data file into the VFS.
- Load the workbook and get the first worksheet.
- Create a line sparkline group with
SparklineGroups.AddGroup()and set the line weight and marker color. - Get the group's sparkline collection with
Add()and add one sparkline per data row in column F. - Save the workbook.
The following is the complete code example, showing how to add line sparklines to Excel data in React:
function App() {
  const addLineSparkline = async () => {
    // Get the Spire.XLS WASM module
    const xlsModule = window.wasmModule?.spirexls;

    // Check if the module is ready
    if (!xlsModule) {
      alert('Spire.Xls is not ready yet');
      return;
    }

    // Load the font and the sample data file into the VFS
    await window.spire.FetchFileToVFS('ARIAL.TTF', '/Library/Fonts/', `${process.env.PUBLIC_URL}/font/`);
    const inputFileName = 'SparklineData.xlsx';
    await window.spire.FetchFileToVFS(inputFileName, '', `${process.env.PUBLIC_URL}data/`);

    // Load the workbook and get the first worksheet
    const workbook = new xlsModule.Workbook();
    workbook.LoadFromFile({ fileName: inputFileName });
    const sheet = workbook.Worksheets.get(0);

    // Create a line sparkline group on the worksheet
    const sparklineGroup = sheet.SparklineGroups.AddGroup({ sparklineType: xlsModule.SparklineType.Line });

    // Style the line: thicker stroke and visible data point markers
    sparklineGroup.LineWeight = 1.5;
    sparklineGroup.ShowMarkers = true;
    sparklineGroup.MarkersColor = xlsModule.Color.get_Red();

    // Get the sparkline collection of the group
    const sparklines = sparklineGroup.Add();

    // Add one sparkline per data row in column F
    for (let row = 2; row <= 9; row++) {
      sparklines.Add({
        dataRange: sheet.Range.get(`B${row}:E${row}`),
        referenceRange: sheet.Range.get(`F${row}`),
      });
    }

    // Save the workbook
    const outputFileName = 'AddLineSparkline.xlsx';
    workbook.SaveToFile({ fileName: outputFileName });

    // Dispose of the workbook object to free resources
    workbook.Dispose();

    // Read the result file from the VFS and trigger the download
    const fileArray = window.dotnetRuntime.Module.FS.readFile(outputFileName);
    const blob = new Blob([fileArray], { type: 'application/vnd.openxmlformats-officedocument.spreadsheetml.sheet' });
    const url = URL.createObjectURL(blob);
    const a = document.createElement('a');
    a.href = url;
    a.download = outputFileName;
    a.click();
    URL.revokeObjectURL(url);
  };

  return (
    <div style={{ textAlign: 'center', height: '300px' }}>
      <h1>Line Sparkline</h1>
      <button onClick={addLineSparkline}>Start</button>
    </div>
  );
}

export default App;
After running, the effect of adding line sparklines:
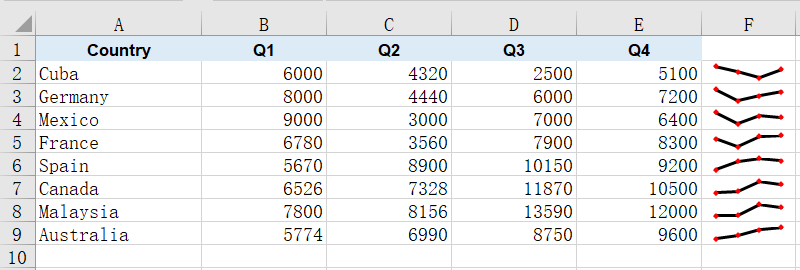
Add Column Sparklines and Highlight the High and Low Points
A column sparkline represents values as a row of thin bars, which reads more directly than a line when you are comparing several numbers within the same row. It works the same way as the line sparkline, except that the color lands on each bar itself rather than on a connecting stroke.
What really makes column sparklines useful is the high and low point markers: the strongest and the weakest quarter in each row are picked out and colored on their own, so you no longer have to compare the numbers by eye to see where a row peaked and where it fell away. The steps are:
- Load the font and the sample data file into the VFS.
- Load the workbook and get the first worksheet.
- Create a column sparkline group with
SparklineGroups.AddGroup()(passingSparklineType.Column) and set the series color withSparklineColor. - Turn on
ShowHighPointandShowLowPoint, and give each its own color withHighPointColorandLowPointColor. - Get the group's sparkline collection with
Add(), add one sparkline per data row in column G and save the workbook.
The following is the complete code example, showing how to add column sparklines to Excel data and highlight the high and low points in React:
function App() {
  const addColumnSparkline = async () => {
    // Get the Spire.XLS WASM module
    const xlsModule = window.wasmModule?.spirexls;

    // Check if the module is ready
    if (!xlsModule) {
      alert('Spire.Xls is not ready yet');
      return;
    }

    // Load the font and the sample data file into the VFS
    await window.spire.FetchFileToVFS('ARIAL.TTF', '/Library/Fonts/', `${process.env.PUBLIC_URL}/font/`);
    const inputFileName = 'SparklineData.xlsx';
    await window.spire.FetchFileToVFS(inputFileName, '', `${process.env.PUBLIC_URL}data/`);

    // Load the workbook and get the first worksheet
    const workbook = new xlsModule.Workbook();
    workbook.LoadFromFile({ fileName: inputFileName });
    const sheet = workbook.Worksheets.get(0);

    // Create a column sparkline group
    const sparklineGroup = sheet.SparklineGroups.AddGroup({ sparklineType: xlsModule.SparklineType.Column });

    // Set the color of the sparkline itself
    sparklineGroup.SparklineColor = xlsModule.Color.get_CadetBlue();

    // Turn on the high and low point markers and give each its own color
    sparklineGroup.ShowHighPoint = true;
    sparklineGroup.HighPointColor = xlsModule.Color.get_Red();
    sparklineGroup.ShowLowPoint = true;
    sparklineGroup.LowPointColor = xlsModule.Color.get_Purple();

    const sparklines = sparklineGroup.Add();

    // Add one sparkline per data row in column G
    for (let row = 2; row <= 9; row++) {
      sparklines.Add({
        dataRange: sheet.Range.get(`B${row}:E${row}`),
        referenceRange: sheet.Range.get(`G${row}`),
      });
    }

    // Save the workbook
    const outputFileName = 'AddColumnSparkline.xlsx';
    workbook.SaveToFile({ fileName: outputFileName });

    // Dispose of the workbook object to free resources
    workbook.Dispose();

    // Read the result file from the VFS and trigger the download
    const fileArray = window.dotnetRuntime.Module.FS.readFile(outputFileName);
    const blob = new Blob([fileArray], { type: 'application/vnd.openxmlformats-officedocument.spreadsheetml.sheet' });
    const url = URL.createObjectURL(blob);
    const a = document.createElement('a');
    a.href = url;
    a.download = outputFileName;
    a.click();
    URL.revokeObjectURL(url);
  };

  return (
    <div style={{ textAlign: 'center', height: '300px' }}>
      <h1>Column Sparkline</h1>
      <button onClick={addColumnSparkline}>Start</button>
    </div>
  );
}

export default App;
After running, the effect of adding column sparklines and highlighting the high and low points:
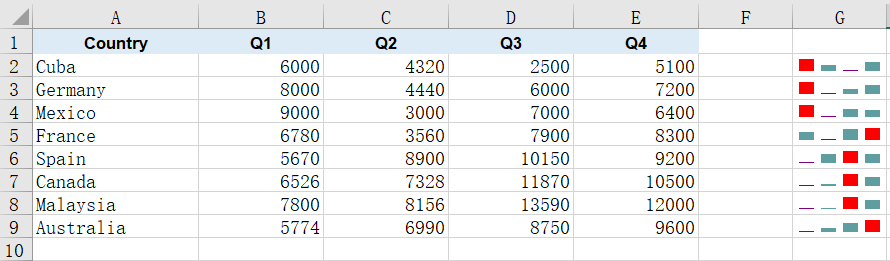
Clear Sparklines from a Worksheet
When a report is revised or the figures are restated, the sparklines drawn beside the old numbers may no longer apply and need to be removed and drawn again. Sparkline groups are held by the worksheet, and once they are gone the cells return to their ordinary state, with their data and other formatting untouched. The steps are:
- Load the font and the sample data file into the VFS.
- Load the workbook and get the second worksheet, which already carries a line sparkline group.
- Clear all sparkline groups on that worksheet with
SparklineGroups.Clear(). - Save the workbook.
The following is the complete code example, showing how to clear sparklines from a worksheet in React:
function App() {
  const clearSparklines = async () => {
    // Get the Spire.XLS WASM module
    const xlsModule = window.wasmModule?.spirexls;

    // Check if the module is ready
    if (!xlsModule) {
      alert('Spire.Xls is not ready yet');
      return;
    }

    // Load the font and the sample data file into the VFS
    await window.spire.FetchFileToVFS('ARIAL.TTF', '/Library/Fonts/', `${process.env.PUBLIC_URL}/font/`);
    const inputFileName = 'SparklineData.xlsx';
    await window.spire.FetchFileToVFS(inputFileName, '', `${process.env.PUBLIC_URL}data/`);

    // Load the workbook and get the second worksheet
    const workbook = new xlsModule.Workbook();
    workbook.LoadFromFile({ fileName: inputFileName });
    const sheet = workbook.Worksheets.get(1);

    // Clear all sparkline groups on that worksheet
    sheet.SparklineGroups.Clear();

    // Save the workbook
    const outputFileName = 'ClearSparklines.xlsx';
    workbook.SaveToFile({ fileName: outputFileName });

    // Dispose of the workbook object to free resources
    workbook.Dispose();

    // Read the result file from the VFS and trigger the download
    const fileArray = window.dotnetRuntime.Module.FS.readFile(outputFileName);
    const blob = new Blob([fileArray], { type: 'application/vnd.openxmlformats-officedocument.spreadsheetml.sheet' });
    const url = URL.createObjectURL(blob);
    const a = document.createElement('a');
    a.href = url;
    a.download = outputFileName;
    a.click();
    URL.revokeObjectURL(url);
  };

  return (
    <div style={{ textAlign: 'center', height: '300px' }}>
      <h1>Clear Sparklines</h1>
      <button onClick={clearSparklines}>Start</button>
    </div>
  );
}

export default App;
After running, the effect of clearing sparklines from a worksheet:
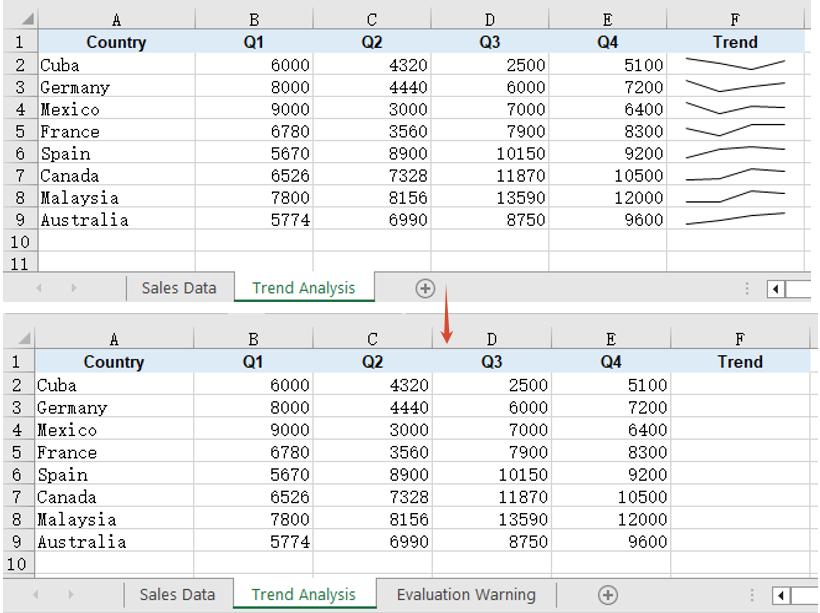
FAQ
Reading the cells back does not show the sparklines
Cause: A sparkline is not cell content. It belongs to a sparkline group on the worksheet and is drawn over its anchor cell, while its data and settings are written into the worksheet's extension block, so walking the cells returns an empty value for the anchor column and no cell-level call can tell you whether a sparkline is there.
Solution: Read it from the worksheet-level SparklineGroups instead. get_Item(0) returns the first group, and its SparklineType tells you whether the batch is a line or a column one; the color settings are read from the same place:
const group = sheet.SparklineGroups.get_Item(0);
console.log(group.SparklineType);   // SparklineType.Line or SparklineType.Column
Setting the line weight and markers on a column sparkline has no effect
Cause: LineWeight and ShowMarkers apply to line sparklines only. A column sparkline represents values as bars, so it has neither a connecting stroke nor data point markers, and although the assignment succeeds, neither property is written to the result file.
Solution: If you need a stroke and markers, create the sparkline group as a line type and set them there:
const sparklineGroup = sheet.SparklineGroups.AddGroup({ sparklineType: xlsModule.SparklineType.Line });
sparklineGroup.LineWeight = 1.5;
sparklineGroup.ShowMarkers = true;
sparklineGroup.MarkersColor = xlsModule.Color.get_Red();
Get a Free License
Spire.XLS for JavaScript offers a 30-day full-featured free trial license with no functional limitations. Apply here to evaluate before purchasing.
Add Gradient and Pattern Fills to Excel in React with JavaScript
2026-09-22 01:52:29 Written by liu taliaA report whose header and total rows carry nothing but data and borders is hard to scan. Tinting those cells is the usual answer, but a flat color only goes so far: sometimes a light-to-dark sweep is what marks the important row, and sometimes a light dot or stripe texture sets the totals apart without burying the numbers underneath it. Spire.XLS for JavaScript supports both gradient and pattern fills through the Interior object, performing these operations directly in the browser through WebAssembly, managing input and output files with a virtual file system (VFS) and requiring no backend service.
This article covers two core feature points:
For installation and project setup, see Integrating Spire.XLS for JavaScript in a React Project. The examples below assume Spire.XLS is installed and the WebAssembly module has been initialized.
Apply a gradient fill to cells
A gradient fill takes three steps: name the fill type, give the two ends their colors, and say how the transition runs. All three land on the same Interior object -- FillPattern picks the fill type, Gradient.ForeColor and Gradient.BackColor give the two ends their colors, and Gradient.TwoColorGradient takes two parameters: the direction comes from GradientStyleType, which covers horizontal, vertical, both diagonals and the spreads that radiate out from the centre or the corner, while the shading variant comes from GradientVariantsType and runs from ShadingVariants1 to ShadingVariants4. The same pair of colors reads completely differently once the direction and variant change. The steps are:
- Load the font and the sample data into the VFS.
- Create a
Workbook, load it withLoadFromFile, then get the first worksheet withWorksheets.get(0). - Take the header range with
Range.getand setStyle.Interior.FillPatterntoExcelPatternType.Gradient. - Give the two ends of the gradient their colors with
Gradient.ForeColorandGradient.BackColor. - Set the direction and the shading variant with
Gradient.TwoColorGradient. - Save the workbook with
SaveToFile.
The complete code example below shows how to apply a gradient fill to Excel cells in React:
function App() {
  const applyGradient = async () => {
    // Get the Spire.XLS WASM module
    const xlsModule = window.wasmModule?.spirexls;

    // Check if the module is ready
    if (!xlsModule) {
      alert('Spire.Xls is not ready yet');
      return;
    }

    // Load the font and the sample data into the VFS
    await window.spire.FetchFileToVFS('ARIAL.TTF', '/Library/Fonts/', `${process.env.PUBLIC_URL}/font/`);
    const inputFileName = 'FillSample_EN.xlsx';
    await window.spire.FetchFileToVFS(inputFileName, '', `${process.env.PUBLIC_URL}data/`);

    // Load the workbook and get the first worksheet
    const workbook = new xlsModule.Workbook();
    workbook.LoadFromFile({ fileName: inputFileName });
    const sheet = workbook.Worksheets.get(0);

    // Take the header row, A1:E1
    const header = sheet.Range.get('A1:E1');

    // Set the fill type to a gradient
    header.Style.Interior.FillPattern = xlsModule.ExcelPatternType.Gradient;

    // Give the two ends of the gradient their colors
    header.Style.Interior.Gradient.ForeColor = xlsModule.Color.FromArgb(255, 255, 255);
    header.Style.Interior.Gradient.BackColor = xlsModule.Color.FromArgb(79, 129, 189);

    // Two-color gradient: the first parameter sets the direction, the second the shading variant
    header.Style.Interior.Gradient.TwoColorGradient(
      xlsModule.GradientStyleType.Horizontal,
      xlsModule.GradientVariantsType.ShadingVariants1,
    );

    // Save the workbook
    const outputFileName = 'GradientFill.xlsx';
    workbook.SaveToFile({ fileName: outputFileName });

    // Dispose of the workbook object to release resources
    workbook.Dispose();

    // Read the result file from the VFS and trigger the download
    const fileArray = window.dotnetRuntime.Module.FS.readFile(outputFileName);
    const blob = new Blob([fileArray], { type: 'application/vnd.openxmlformats-officedocument.spreadsheetml.sheet' });
    const url = URL.createObjectURL(blob);
    const a = document.createElement('a');
    a.href = url;
    a.download = outputFileName;
    a.click();
    URL.revokeObjectURL(url);
  };

  return (
    <div style={{ textAlign: 'center', height: '300px' }}>
      <h1>Apply Gradient Fill</h1>
      <button onClick={applyGradient}>Start</button>
    </div>
  );
}

export default App;
After running, the effect of applying a gradient fill to the header row:
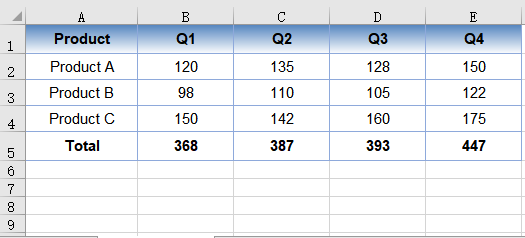
Apply a pattern fill to cells
A pattern fill is not one effect but a family of built-in styles: dots, horizontal and vertical stripes, diagonals, chequerboards and more all live under ExcelPatternType, several dozen values in all, with densities running from 5% to 75%. Compared with a gradient, a pattern carries far less visual weight, so it can be laid across a whole row without getting in the way of reading, which makes it a better fit for marking a total row or setting a block of data apart.
Setting one works the same way as a gradient: Interior.FillPattern picks the style, and then two colors are needed. There is one easy trap here -- Interior.Color sets the color of the pattern itself, while Interior.PatternColor sets the backdrop underneath it, so the two property names mean the opposite of what they suggest. Give the dark color to Interior.Color and the light one to Interior.PatternColor, and the dots float on a pale ground. The steps are:
- Load the font and the sample data into the VFS.
- Create a
Workbook, load it withLoadFromFile, then get the first worksheet withWorksheets.get(0). - Take the total row with
Range.getand setStyle.Interior.FillPatternto the wantedExcelPatternTypevalue. - Give the pattern its color with
Interior.Colorand the backdrop its color withInterior.PatternColor. - Save the workbook with
SaveToFile.
The complete code example below shows how to apply a pattern fill to Excel cells in React:
function App() {
  const applyPattern = async () => {
    // Get the Spire.XLS WASM module
    const xlsModule = window.wasmModule?.spirexls;

    // Check if the module is ready
    if (!xlsModule) {
      alert('Spire.Xls is not ready yet');
      return;
    }

    // Load the font and the sample data into the VFS
    await window.spire.FetchFileToVFS('ARIAL.TTF', '/Library/Fonts/', `${process.env.PUBLIC_URL}/font/`);
    const inputFileName = 'FillSample_EN.xlsx';
    await window.spire.FetchFileToVFS(inputFileName, '', `${process.env.PUBLIC_URL}data/`);

    // Load the workbook and get the first worksheet
    const workbook = new xlsModule.Workbook();
    workbook.LoadFromFile({ fileName: inputFileName });
    const sheet = workbook.Worksheets.get(0);

    // Take the total row, A5:E5
    const total = sheet.Range.get('A5:E5');

    // Pick a built-in pattern, here a 12.5% gray dot pattern
    total.Style.Interior.FillPattern = xlsModule.ExcelPatternType.Percent125Gray;

    // Interior.Color sets the pattern itself, Interior.PatternColor the backdrop behind it
    total.Style.Interior.Color = xlsModule.Color.FromArgb(192, 80, 77);
    total.Style.Interior.PatternColor = xlsModule.Color.FromArgb(255, 242, 204);

    // Save the workbook
    const outputFileName = 'PatternFill.xlsx';
    workbook.SaveToFile({ fileName: outputFileName });

    // Dispose of the workbook object to release resources
    workbook.Dispose();

    // Read the result file from the VFS and trigger the download
    const fileArray = window.dotnetRuntime.Module.FS.readFile(outputFileName);
    const blob = new Blob([fileArray], { type: 'application/vnd.openxmlformats-officedocument.spreadsheetml.sheet' });
    const url = URL.createObjectURL(blob);
    const a = document.createElement('a');
    a.href = url;
    a.download = outputFileName;
    a.click();
    URL.revokeObjectURL(url);
  };

  return (
    <div style={{ textAlign: 'center', height: '300px' }}>
      <h1>Apply Pattern Fill</h1>
      <button onClick={applyPattern}>Start</button>
    </div>
  );
}

export default App;
After running, the effect of applying a pattern fill to the total row:
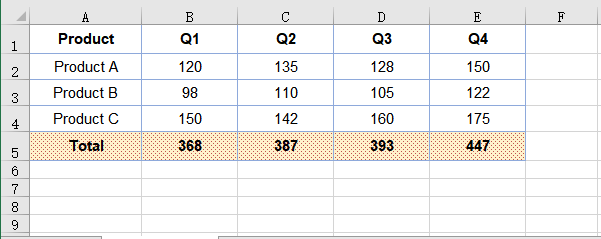
FAQ
The fill is set, so why did the cell's font style stay the same?
Cause: Style.Interior only handles the fill. Fill, font and borders are three independent members of Style, and touching one leaves the other two alone -- darken the background and the text stays the same black, which turns the cell into a smudge; recolor Style.Font and the background does not follow either.
Solution: Set the fill and the font separately, and usually change both together when contrast matters:
// Fill
sheet.Range.get('A1:E1').Style.Interior.Color = xlsModule.Color.FromArgb(79, 129, 189);

// Font
sheet.Range.get('A1:E1').Style.Font.Color = xlsModule.Color.FromArgb(255, 255, 255);
sheet.Range.get('A1:E1').Style.Font.IsBold = true;
Style.Font also carries FontName, Size, IsItalic and Underline, none of which interfere with the fill.
After filling a cell, how do I take the color off again?
Cause: Changing the color only swaps one fill for another; it does not remove the fill. The fill type is still a value other than None, so the pattern or the background color is still written into the cell's style.
Solution: Set the fill type back to ExcelPatternType.None, and the pattern and colors stop applying along with it:
sheet.Range.get('A5:E5').Style.Interior.FillPattern = xlsModule.ExcelPatternType.None;
Get a Free License
Spire.XLS for JavaScript offers a 30-day full-featured free trial license with no functional limitations. Apply here to evaluate before purchasing.
The most direct way to get data into Excel is to assign one cell at a time, which means ten rows take ten loop iterations. But data usually arrives in JavaScript already in blocks -- a list from an API, a table rendered on the page, a computed result set -- and there is no reason to break an array apart just to feed it back cell by cell. The InsertArray method of Spire.XLS for JavaScript takes a whole array at once; combined with a starting row and column and a write direction, a single call drops an entire column or row of data into the worksheet. Spire.XLS for JavaScript performs these operations directly in the browser through WebAssembly, managing input and output files with a virtual file system (VFS) and requiring no backend service.
This article covers two core feature points:
- Import a one-dimensional array into a worksheet
- Import a two-dimensional data table into a worksheet
For installation and project setup, see Integrating Spire.XLS for JavaScript in a React Project. The examples below assume Spire.XLS is installed and the WebAssembly module has been initialized.
Import a one-dimensional array into a worksheet
InsertArray is split into several overloads by data type: stringArray for text, intArray for integers and doubleArray for decimals. That split is not needless fussiness -- Excel treats cells according to their data type. Numbers sit right-aligned and can take part in sums and charts directly, while a number written as text sits left-aligned and a formula referencing it only yields 0. Scores, amounts and quantities -- anything that will be used in a calculation -- belong in a numeric overload.
The remaining parameters decide where the data lands: firstRow and firstColumn give the starting position, with rows and columns both counted from 1, and isVertical picks the direction the array spreads -- false lays it along a row, true down a column. The same ['Jan', 'Feb', 'Mar'] becomes either a header row spanning A1 to C1 or a column of data running down A1 to A3. The steps are:
- Load the font into the VFS.
- Create a
Workbookand get the first worksheet withWorksheets.get(0). - Write a header row horizontally with the
stringArrayoverload ofInsertArray. - Write the name column vertically with
stringArrayand the score column withintArray. - Auto-fit the columns with
AllocatedRange.AutoFitColumns, then save the workbook withSaveToFile.
The complete code example below shows how to import a one-dimensional array into a worksheet in React:
function App() {
  const importArray = async () => {
    // Get the Spire.XLS WASM module
    const xlsModule = window.wasmModule?.spirexls;

    // Check if the module is ready
    if (!xlsModule) {
      alert('Spire.Xls is not ready yet');
      return;
    }

    // Load the font into the VFS
    await window.spire.FetchFileToVFS('ARIAL.TTF', '/Library/Fonts/', `${process.env.PUBLIC_URL}/font/`);

    // Create a new workbook and get the first worksheet
    const workbook = new xlsModule.Workbook();
    const sheet = workbook.Worksheets.get(0);

    // Write a header row horizontally: isVertical false spreads the array across A1:B1
    sheet.InsertArray({
      stringArray: ['Name', 'Score'],
      firstRow: 1,
      firstColumn: 1,
      isVertical: false,
    });

    // Write the name column vertically: isVertical true spreads the array down A2:A4
    sheet.InsertArray({
      stringArray: ['Alice', 'Bob', 'Carol'],
      firstRow: 2,
      firstColumn: 1,
      isVertical: true,
    });

    // Write the score column: numbers go through the intArray overload, so the cells hold
    // numbers rather than text
    sheet.InsertArray({
      intArray: [92, 85, 78],
      firstRow: 2,
      firstColumn: 2,
      isVertical: true,
    });

    // Auto-fit the columns to their content
    sheet.AllocatedRange.AutoFitColumns();

    // Save the workbook
    const outputFileName = 'ImportArray.xlsx';
    workbook.SaveToFile({ fileName: outputFileName });

    // Dispose of the workbook object to release resources
    workbook.Dispose();

    // Read the result file from the VFS and trigger the download
    const fileArray = window.dotnetRuntime.Module.FS.readFile(outputFileName);
    const blob = new Blob([fileArray], { type: 'application/vnd.openxmlformats-officedocument.spreadsheetml.sheet' });
    const url = URL.createObjectURL(blob);
    const a = document.createElement('a');
    a.href = url;
    a.download = outputFileName;
    a.click();
    URL.revokeObjectURL(url);
  };

  return (
    <div style={{ textAlign: 'center', height: '300px' }}>
      <h1>Import 1-D Array</h1>
      <button onClick={importArray}>Start</button>
    </div>
  );
}

export default App;
After running, the effect of importing a one-dimensional array into a worksheet:
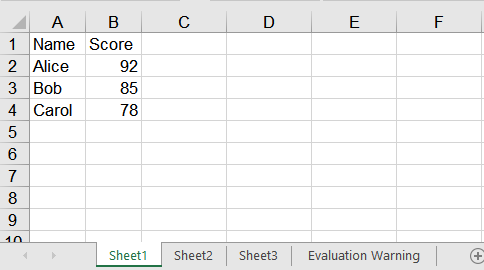
Import a two-dimensional data table into a worksheet
A data table is naturally a two-dimensional array -- a header row first, then one record per row, as in [['Name', 'Subject', 'Score'], ['Alice', 'Math', 92]]. Importing a two-dimensional data table into Excel means splitting it by column and writing each column as a one-dimensional array on its own: write the header across one row, then write the body column by column, text columns with stringArray and numeric ones with intArray. A column holds a single data type throughout, so each call only has to pick one form. When the data arrives in batches, read LastRow to find the last row currently in use and write the next batch from the row after it. The steps are:
- Load the font into the VFS.
- Create a
Workbookand get the first worksheet withWorksheets.get(0). - Write the header across the first row with the
stringArrayoverload ofInsertArray. - Split the body by column and write each one vertically with
stringArrayorintArray. - When a second batch arrives, locate its starting row with
LastRowand write the columns the same way. - Auto-fit the columns with
AllocatedRange.AutoFitColumns, then save the workbook withSaveToFile.
The complete code example below shows how to import a two-dimensional data table into a worksheet in React:
function App() {
  const importDataTable = async () => {
    // Get the Spire.XLS WASM module
    const xlsModule = window.wasmModule?.spirexls;

    // Check if the module is ready
    if (!xlsModule) {
      alert('Spire.Xls is not ready yet');
      return;
    }

    // Load the font into the VFS
    await window.spire.FetchFileToVFS('ARIAL.TTF', '/Library/Fonts/', `${process.env.PUBLIC_URL}/font/`);

    // The two-dimensional data to import, with the header as its first row
    const rows = [
      ['Name', 'Subject', 'Score'],
      ['Alice', 'Math', 92],
      ['Bob', 'Chinese', 85],
    ];

    // Create a new workbook and get the first worksheet
    const workbook = new xlsModule.Workbook();
    const sheet = workbook.Worksheets.get(0);

    // Write one column: text columns go through stringArray, numeric ones through intArray
    const writeColumn = (values, firstRow, firstColumn) => {
      const isNumeric = values.every((value) => typeof value === 'number');
      if (isNumeric) {
        sheet.InsertArray({ intArray: values, firstRow, firstColumn, isVertical: true });
      } else {
        sheet.InsertArray({ stringArray: values, firstRow, firstColumn, isVertical: true });
      }
    };

    // Write the header across the first row
    sheet.InsertArray({
      stringArray: rows[0],
      firstRow: 1,
      firstColumn: 1,
      isVertical: false,
    });

    // Split the body by column and write each one vertically, starting at row 2
    const body = rows.slice(1);
    for (let column = 0; column < rows[0].length; column++) {
      writeColumn(body.map((row) => row[column]), 2, column + 1);
    }

    // A second batch arrives: use LastRow to find where the existing data ends
    const nextBatch = [
      ['Carol', 'English', 78],
      ['Dave', 'Physics', 91],
    ];
    const startRow = sheet.LastRow + 1;
    for (let column = 0; column < rows[0].length; column++) {
      writeColumn(nextBatch.map((row) => row[column]), startRow, column + 1);
    }

    // Auto-fit the columns to their content
    sheet.AllocatedRange.AutoFitColumns();

    // Save the workbook
    const outputFileName = 'ImportDataTable.xlsx';
    workbook.SaveToFile({ fileName: outputFileName });

    // Dispose of the workbook object to release resources
    workbook.Dispose();

    // Read the result file from the VFS and trigger the download
    const fileArray = window.dotnetRuntime.Module.FS.readFile(outputFileName);
    const blob = new Blob([fileArray], { type: 'application/vnd.openxmlformats-officedocument.spreadsheetml.sheet' });
    const url = URL.createObjectURL(blob);
    const a = document.createElement('a');
    a.href = url;
    a.download = outputFileName;
    a.click();
    URL.revokeObjectURL(url);
  };

  return (
    <div style={{ textAlign: 'center', height: '300px' }}>
      <h1>Import 2-D Data Table</h1>
      <button onClick={importDataTable}>Start</button>
    </div>
  );
}

export default App;
After running, the effect of importing a two-dimensional data table into a worksheet:
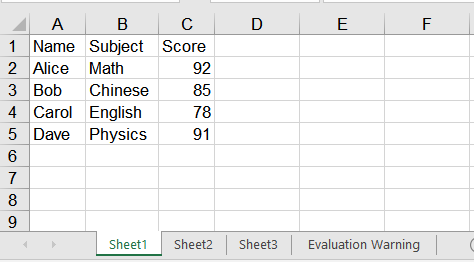
FAQ
How do I put a date into a cell?
Cause: dateTimeArray cannot be used to write a JavaScript Date -- it lands as 0001/1/1. Assigning cell by cell through Range.DateTimeValue does work, but it only accepts a Date object; hand it a string and it reports Value is not a Date.
Solution: For a whole column, the least fuss is to write the date as a yyyy-mm-dd string and pass it to stringArray. The saved cell holds a real date value -- reading NumberValue back gives the date serial number, such as 46037 -- and no number format has to be set:
sheet.InsertArray({
  stringArray: ['2026-01-15', '2026-02-20'],
  firstRow: 1,
  firstColumn: 1,
  isVertical: true,
});
When only one cell needs setting, assign it directly instead, taking care to pass a Date object rather than a string:
sheet.Range.get('A1').DateTimeValue = new Date(Date.UTC(2026, 0, 15));
Do empty values in the array break the write?
Cause: No. null, undefined and the empty string all write an empty cell. InsertArray places each value by its index, so what the value happens to be makes no difference: later elements do not shift, and nothing throws.
Solution: Nothing extra is needed; pass the array as it is. The line below fills A1:D1, with D still landing in the fourth column:
sheet.InsertArray({
  stringArray: ['A', null, '', 'D'],
  firstRow: 1,
  firstColumn: 1,
  isVertical: false,
});
Get a Free License
Spire.XLS for JavaScript offers a 30-day full-featured free trial license with no functional limitations. Apply here to evaluate before purchasing.
