
Spire.XLS for JavaScript (109)
Children categories
Convert Excel to ODS or ODS to Excel with JavaScript in React
2026-08-18 02:51:43 Written by zaki zakiIn daily office work, data often needs to be exchanged between Excel spreadsheets and OpenDocument spreadsheets (ODS). ODS is an open-standard spreadsheet format widely used in open-source office software such as LibreOffice and OpenOffice. Spire.XLS for JavaScript runs entirely in the browser via WebAssembly, using a virtual file system (VFS) to manage input and output files — no backend server is required. It provides simple, easy-to-use APIs that make format conversion more convenient.
With Spire.XLS for JavaScript, you can save an Excel workbook as ODS format to work seamlessly with open-source office software, or import an ODS file to create a fully formatted Excel workbook. This makes data migration between different applications more convenient and efficient.
This article covers two core features:
For installation and project setup, refer to Integrating Spire.XLS for JavaScript in a React Project. The examples below assume Spire.XLS is installed and the WebAssembly module is initialized.
Convert Excel Workbook to ODS File
Exporting Excel data as ODS format makes it easy to open and edit directly in open-source office software such as LibreOffice and OpenOffice. With Spire.XLS for JavaScript, you can save an entire workbook as an ODS file, preserving table structure, styles, and data while enabling cross-platform data sharing. The steps are as follows:
- Create a
Workbookobject and load an existing Excel file. - Call the workbook's
SaveToFile()method, specifying the output filename and theFileFormat.ODSfile format. - Dispose of the workbook resources, read the result file from VFS, and trigger the download.
Below is a complete code example demonstrating how to convert Excel to ODS in React:
function App() {
  const convertToODS = async () => {
    // Get the Spire.XLS WASM module
    const xlsModule = window.wasmModule?.spirexls;

    // Check if the module is ready
    if (!xlsModule) {
      alert('Spire.Xls is not ready yet');
      return;
    }

    // Load the font file to ensure proper text rendering
    await window.spire.FetchFileToVFS('ARIAL.TTF', '/Library/Fonts/', `${process.env.PUBLIC_URL}font/`);

    // Load the sample Excel file into VFS
    await window.spire.FetchFileToVFS('Sample.xlsx', '', `${process.env.PUBLIC_URL}data/`);

    // Create a workbook object and load the Excel file
    const workbook = new xlsModule.Workbook();
    workbook.LoadFromFile({ fileName: 'Sample.xlsx' });

    // Save the workbook as an ODS file
    const outputFileName = 'ExcelToODS.ods';
    workbook.SaveToFile({ fileName: outputFileName, fileFormat: xlsModule.FileFormat.ODS });
    workbook.Dispose();

    // Read the file from VFS and trigger download
    const fileArray = window.dotnetRuntime.Module.FS.readFile(outputFileName);
    const blob = new Blob([fileArray], { type: 'application/vnd.oasis.opendocument.spreadsheet' });
    const url = URL.createObjectURL(blob);
    const a = document.createElement('a');
    a.href = url;
    a.download = outputFileName;
    a.click();
    URL.revokeObjectURL(url);
  };

  return (
    <div style={{ textAlign: 'center', height: '300px' }}>
      <h1>Convert Excel to ODS</h1>
      <button onClick={convertToODS}>
        Generate
      </button>
    </div>
  );
}

export default App;
Excel converted to ODS with Spire.XLS for JavaScript
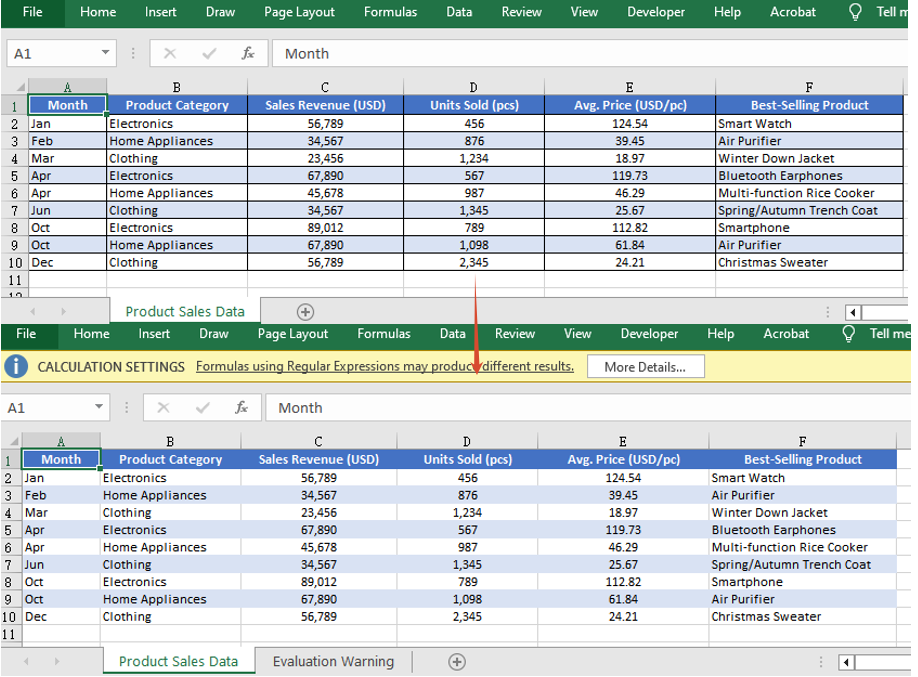
Convert ODS File to Excel Workbook
Importing an ODS file into an Excel spreadsheet allows you to take full advantage of Excel's powerful formatting, calculation, and charting capabilities. Spire.XLS for JavaScript supports loading an ODS file directly via the LoadFromFile() method, which automatically detects its file format, and then you can save the workbook as an Excel file. The steps are as follows:
- Load the font file and ODS sample file into the VFS.
- Create a
Workbookobject and load the ODS file via theLoadFromFile()method. - Save the workbook as an Excel file and trigger the download.
Below is a complete code example demonstrating how to convert ODS to Excel in React:
function App() {
  const convertToExcel = async () => {
    // Get the Spire.XLS WASM module
    const xlsModule = window.wasmModule?.spirexls;

    // Check if the module is ready
    if (!xlsModule) {
      alert('Spire.Xls is not ready yet');
      return;
    }

    // Load the font file to ensure proper text rendering
    await window.spire.FetchFileToVFS('ARIAL.TTF', '/Library/Fonts/', `${process.env.PUBLIC_URL}font/`);

    // Load the ODS sample file into VFS
    await window.spire.FetchFileToVFS('Sample.ods', '', `${process.env.PUBLIC_URL}data/`);

    // Create a workbook object and load the ODS file
    const workbook = new xlsModule.Workbook();
    workbook.LoadFromFile({ fileName: 'Sample.ods' });

    // Save the workbook and release resources
    const outputFileName = 'ODSToExcel.xlsx';
    workbook.SaveToFile({ fileName: outputFileName, version: xlsModule.ExcelVersion.Version2010 });
    workbook.Dispose();

    // Read the file from VFS and trigger download
    const fileArray = window.dotnetRuntime.Module.FS.readFile(outputFileName);
    const blob = new Blob([fileArray], { type: 'application/vnd.openxmlformats-officedocument.spreadsheetml.sheet' });
    const url = URL.createObjectURL(blob);
    const a = document.createElement('a');
    a.href = url;
    a.download = outputFileName;
    a.click();
    URL.revokeObjectURL(url);
  };

  return (
    <div style={{ textAlign: 'center', height: '300px' }}>
      <h1>Convert ODS to Excel</h1>
      <button onClick={convertToExcel}>
        Generate
      </button>
    </div>
  );
}

export default App;
ODS converted to Excel with Spire.XLS for JavaScript

FAQ
Why can't the generated ODS file be opened properly?
Cause: When saving the workbook with the SaveToFile() method, if the correct output file format is not specified via the fileFormat parameter, the generated file format may not match the extension, causing it to fail to open.
Solution: Specify the specific file format enum value xlsModule.FileFormat.ODS when saving as ODS:
const outputFileName = 'ExcelToODS.ods';
workbook.SaveToFile({ fileName: outputFileName, fileFormat: xlsModule.FileFormat.ODS });
How to handle the downloaded ODS file being opened as another type or unrecognized?
Cause: The MIME type is not set correctly when creating the Blob, so the browser cannot recognize the downloaded file as an ODS document, which may cause it to open as another type or display garbled text.
Solution: Specify the correct MIME type when downloading and make sure the download filename ends with .ods:
const blob = new Blob([fileArray], { type: 'application/vnd.oasis.opendocument.spreadsheet' });
const a = document.createElement('a');
a.href = URL.createObjectURL(blob);
a.download = 'ExcelToODS.ods';
a.click();
Get a Free License
Spire.XLS for JavaScript offers a 30-day full-featured free trial license with no functional limitations. Apply here to evaluate before purchasing.
Create and Save Excel Files through Streams with JavaScript in React
2026-08-14 08:13:24 Written by zaki zakiOperating Excel files as streams in web applications allows developers to dynamically create, load, modify, and save Excel files, enabling flexible and efficient data processing. Spire.XLS for JavaScript runs entirely in the browser via WebAssembly, using a virtual file system (VFS) to manage input and output files — no backend server is required. It provides a simple, easy-to-use Stream API that makes creating and saving Excel files through streams more convenient.
Working with streams greatly reduces direct disk I/O operations, improving application performance and responsiveness, especially in scenarios that involve real-time data processing or limited storage. With Spire.XLS for JavaScript, you can dynamically create an Excel file and save it to a stream, load and read workbook data from a stream, or modify content in a stream and save it as a new Excel file — all directly in the browser, simplifying data exchange and system integration.
This article covers three core features:
- Dynamically Create an Excel File and Save It to a Stream
- Load and Read an Excel File from a Stream
- Modify and Save an Excel File in a Stream
For installation and project setup, refer to Integrating Spire.XLS for JavaScript in a React Project. The examples below assume Spire.XLS is installed and the WebAssembly module is initialized.
Dynamically Create an Excel File and Save It to a Stream
With Spire.XLS for JavaScript, you can dynamically create an Excel file in the browser, fill it with data and formatting, and then save the workbook to a file stream via the SaveToStream() method. This approach eliminates the need to store files directly on disk while improving application performance and responsiveness. The steps are as follows:
- Create a
Workbookinstance to generate a new Excel workbook, clear the default worksheets, and add a new worksheet. - Access a specific worksheet using the
Worksheets.get()method. - Define the data to write to the worksheet, for example, organizing data with a two-dimensional array.
- Use the
Range.get_Item()method to access cells and set their values one by one. - Format the worksheet cells, such as setting colors, fonts, borders, or adjusting column widths.
- Create a
Streamobject and save the workbook to the file stream using theSaveToStream()method. The saved stream can be used for further processing, such as downloading as a file or transferring over the network.
Below is a complete code example demonstrating how to dynamically create an Excel file and save it to a stream in React:
function App() {
  const createAndSaveToStream = async () => {
    // Get the Spire.XLS WASM module
    const xlsModule = window.wasmModule?.spirexls;

    // Check if the module is ready
    if (!xlsModule) {
      alert('Spire.Xls is not ready yet');
      return;
    }

    // Load the font file to ensure proper text rendering
    await window.spire.FetchFileToVFS('ARIAL.TTF', '/Library/Fonts/', `${process.env.PUBLIC_URL}font/`);

    // Create a new workbook instance
    const workbook = new xlsModule.Workbook();

    // Clear the default worksheets and add a new worksheet
    workbook.Worksheets.Clear();
    const sheet = workbook.Worksheets.Add('Data');

    // Define the sample data to write to the worksheet (two-dimensional array)
    const headers = ['ID', 'Name', 'Age', 'Country', 'Salary (¥)'];
    const data = [
      [1, 'Zhang Wei', 29, 'China', 8000],
      [2, 'Li Na', 35, 'China', 12000],
      [3, 'Wang Qiang', 42, 'China', 15000],
      [4, 'Jack', 26, 'USA', 9500],
      [5, 'Chen Si', 31, 'China', 11000],
      [6, 'Ishihara Yasuko', 28, 'Japan', 8800]
    ];

    // Write the headers to the first row
    for (let col = 0; col < headers.length; col++) {
      sheet.Range.get_Item({ row: 1, column: col + 1 }).Text = headers[col];
    }

    // Write the data to the following rows
    for (let row = 0; row < data.length; row++) {
      for (let col = 0; col < data[row].length; col++) {
        sheet.Range.get_Item({ row: row + 2, column: col + 1 }).Text = String(data[row][col]);
      }
    }

    // Format the header row
    sheet.Range.get('A1:E1').Style.Color = xlsModule.Color.get_LightSkyBlue();
    sheet.Range.get('A1:E1').Style.Font.FontName = 'Arial';
    sheet.Range.get('A1:E1').Style.Font.Size = 12;
    sheet.Range.get('A1:E1').Style.Font.IsBold = true;

    // Format the data rows
    for (let i = 2; i <= data.length + 1; i++) {
      const dataRange = sheet.Range.get({
        row: i, column: 1,
        lastRow: i, lastColumn: headers.length
      });
      dataRange.Style.Color = xlsModule.Color.get_LightGray();
      dataRange.Style.Font.FontName = 'Arial';
      dataRange.Style.Font.Size = 11;
    }

    // Add borders to the header and all data cells
    const usedRange = sheet.Range.get({
      row: 1, column: 1,
      lastRow: data.length + 1,
      lastColumn: headers.length
    });
    usedRange.Borders.LineStyle = xlsModule.LineStyleType.Thin;
    usedRange.Borders.Color = xlsModule.Color.get_LightSteelBlue();

    // Adjust column widths to fit the content
    for (let col = 1; col <= headers.length; col++) {
      sheet.AutoFitColumn(col);
    }

    // Create a stream and save the workbook to it
    const outputFileName = 'CreateExcelToStream.xlsx';
    const fileStream = new xlsModule.Stream(outputFileName);
    workbook.SaveToStream(fileStream, xlsModule.FileFormat.Version2010);

    // Dispose of the workbook object to release resources
    workbook.Dispose();

    // Read the file from VFS and trigger download
    const fileArray = window.dotnetRuntime.Module.FS.readFile(outputFileName);
    const blob = new Blob([fileArray], { type: 'application/vnd.openxmlformats-officedocument.spreadsheetml.sheet' });
    const url = URL.createObjectURL(blob);
    const a = document.createElement('a');
    a.href = url;
    a.download = outputFileName;
    a.click();
    URL.revokeObjectURL(url);
  };

  return (
    <div style={{ textAlign: 'center', height: '300px' }}>
      <h1>Create Excel and Save to Stream</h1>
      <button onClick={createAndSaveToStream}>
        Generate
      </button>
    </div>
  );
}

export default App;
Excel file dynamically created and saved to a stream with Spire.XLS for JavaScript
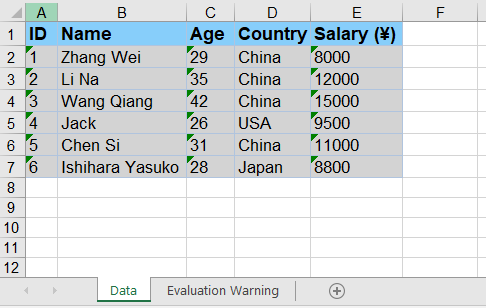
Load and Read an Excel File from a Stream
With Spire.XLS for JavaScript, you can load an Excel file directly from a stream using the LoadFromStream() method. Once loaded, the cell data of the Excel file in the stream can be easily read, enabling fast and flexible data processing without file I/O operations. The steps are as follows:
- Create a
Streamobject pointing to the Excel file to be loaded. - Create a
Workbookobject and load the file from the stream using theLoadFromStream()method. - Get the first worksheet using the
Worksheets.get()method. - Iterate through the rows and columns of the worksheet and extract cell data using the
Range.get()method. - Display the extracted data on the page, or use it for other operations.
Below is a complete code example demonstrating how to load and read an Excel file from a stream in React:
import React, { useState } from 'react';

function App() {
  const [extractedData, setExtractedData] = useState('');

  const loadAndReadFromStream = async () => {
    // Get the Spire.XLS WASM module
    const xlsModule = window.wasmModule?.spirexls;

    // Check if the module is ready
    if (!xlsModule) {
      alert('Spire.Xls is not ready yet');
      return;
    }

    // Load the font file to ensure proper text rendering
    await window.spire.FetchFileToVFS('ARIAL.TTF', '/Library/Fonts/', `${process.env.PUBLIC_URL}font/`);

    // Load the sample Excel file into VFS
    await window.spire.FetchFileToVFS('Sample.xlsx', '', `${process.env.PUBLIC_URL}data/`);

    // Create a workbook object and load the Excel file from a stream
    const workbook = new xlsModule.Workbook();
    const fileStream = new xlsModule.Stream('Sample.xlsx');
    workbook.LoadFromStream(fileStream, xlsModule.FileFormat.Auto);

    // Get the first worksheet of the workbook
    const sheet = workbook.Worksheets.get(0);

    // Iterate through the rows and columns to extract cell data
    const data = [];
    for (let row = sheet.FirstRow; row <= sheet.LastRow; row++) {
      const line = [];
      for (let col = sheet.FirstColumn; col <= sheet.LastColumn; col++) {
        line.push(sheet.Range.get({ row: row, column: col }).Text);
      }
      data.push(line.join(' | '));
    }

    // Dispose of the workbook object to release resources
    workbook.Dispose();

    // Display the extracted data on the page
    setExtractedData(data.join('\n'));
  };

  return (
    <div style={{ textAlign: 'center', height: '300px' }}>
      <h1>Load and Read Excel Data from Stream</h1>
      <button onClick={loadAndReadFromStream}>
        Read
      </button>
      <pre style={{ marginTop: '20px', textAlign: 'left' }}>{extractedData}</pre>
    </div>
  );
}

export default App;
Excel file loaded and read from a stream with Spire.XLS for JavaScript
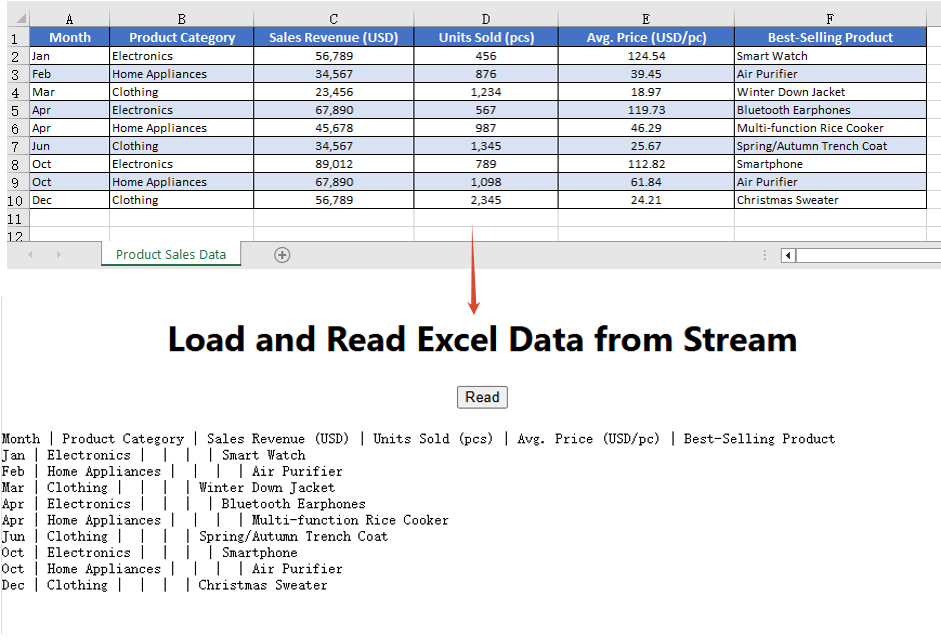
Modify and Save an Excel File in a Stream
With Spire.XLS for JavaScript, you can modify an Excel file in memory. First load the Excel file in the stream into a Workbook object via the LoadFromStream() method; after completing modifications such as changing cell styles or content, save the file back to a stream using the SaveToStream() method. This enables real-time changes to Excel file data without relying on direct file storage operations. The steps are as follows:
- Create a
Streamobject pointing to the Excel file and load the file from the stream via theLoadFromStream()method. - Access the worksheet using the
Worksheets.get()method. - Modify the styles of the header row and data rows (font name, size, background color, etc.) through the
CellRange.Styleproperty. - Use the
AutoFitColumn()method to automatically adjust column widths to fit the content. - Set the border style of the cells.
- Create a new
Streamobject, save the modified workbook to the stream using theSaveToStream()method, read the result file from VFS, and trigger the download.
Below is a complete code example demonstrating how to modify and save an Excel file in a stream in React:
function App() {
  const modifyAndSaveInStream = async () => {
    // Get the Spire.XLS WASM module
    const xlsModule = window.wasmModule?.spirexls;

    // Check if the module is ready
    if (!xlsModule) {
      alert('Spire.Xls is not ready yet');
      return;
    }

    // Load the font file to ensure proper text rendering
    await window.spire.FetchFileToVFS('ARIAL.TTF', '/Library/Fonts/', `${process.env.PUBLIC_URL}font/`);

    // Load the sample Excel file into VFS
    await window.spire.FetchFileToVFS('Sample.xlsx', '', `${process.env.PUBLIC_URL}data/`);

    // Create a workbook object and load the Excel file from a stream
    const workbook = new xlsModule.Workbook();
    const fileStream = new xlsModule.Stream('Sample.xlsx');
    workbook.LoadFromStream(fileStream, xlsModule.FileFormat.Auto);

    // Get the first worksheet of the workbook
    const sheet = workbook.Worksheets.get(0);

    // Modify the style of the header row
    const headerRow = sheet.Range.get({
      row: sheet.FirstRow, column: sheet.FirstColumn,
      lastRow: sheet.FirstRow, lastColumn: sheet.LastColumn
    });
    headerRow.Style.Font.FontName = 'Arial';
    headerRow.Style.Font.Size = 12;
    headerRow.Style.Font.IsBold = true;
    headerRow.Style.Color = xlsModule.Color.get_LightSkyBlue();

    // Modify the styles of the data rows, with alternating colors (even rows)
    for (let i = sheet.FirstRow + 1; i <= sheet.LastRow; i++) {
      const dataRow = sheet.Range.get({
        row: i, column: sheet.FirstColumn,
        lastRow: i, lastColumn: sheet.LastColumn
      });
      dataRow.Style.Font.FontName = 'Arial';
      dataRow.Style.Font.Size = 10;
      dataRow.Style.Color = xlsModule.Color.get_LightGray();
      if (i % 2 === 0) {
        dataRow.Style.Color = xlsModule.Color.get_DarkGray();
      }
    }

    // Adjust column widths to fit the content
    for (let col = sheet.FirstColumn; col <= sheet.LastColumn; col++) {
      sheet.AutoFitColumn(col);
    }

    // Set the border color
    sheet.AllocatedRange.Borders.Color = xlsModule.Color.get_White();

    // Save the modified workbook to a new stream
    const outputFileName = 'ModifyExcelInStream.xlsx';
    const outStream = new xlsModule.Stream(outputFileName);
    workbook.SaveToStream(outStream, xlsModule.FileFormat.Version2010);

    // Dispose of the workbook object to release resources
    workbook.Dispose();

    // Read the file from VFS and trigger download
    const fileArray = window.dotnetRuntime.Module.FS.readFile(outputFileName);
    const blob = new Blob([fileArray], { type: 'application/vnd.openxmlformats-officedocument.spreadsheetml.sheet' });
    const url = URL.createObjectURL(blob);
    const a = document.createElement('a');
    a.href = url;
    a.download = outputFileName;
    a.click();
    URL.revokeObjectURL(url);
  };

  return (
    <div style={{ textAlign: 'center', height: '300px' }}>
      <h1>Modify and Save Excel in Stream</h1>
      <button onClick={modifyAndSaveInStream}>
        Generate
      </button>
    </div>
  );
}

export default App;
Excel file modified and saved in a stream with Spire.XLS for JavaScript
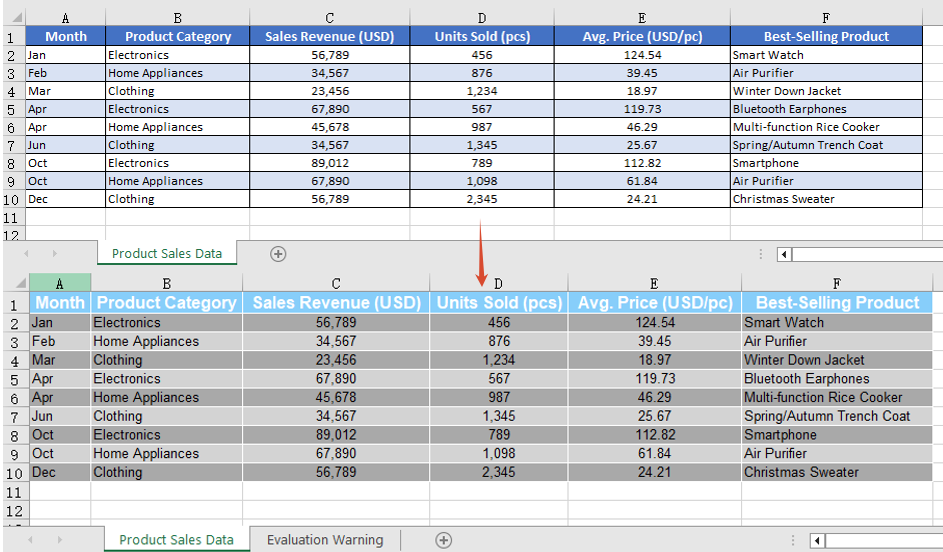
FAQ
How to handle the stream-saved file being unable to open in Excel?
Cause: When saving a workbook via the SaveToStream() method, if the correct output file format is not specified through the FileFormat parameter, the generated file format may not match its extension, causing it to fail to open properly.
Solution: Specify a concrete file format enum value when saving to a stream, such as xlsModule.FileFormat.Version2010:
const fileStream = new xlsModule.Stream(outputFileName);
workbook.SaveToStream(fileStream, xlsModule.FileFormat.Version2010);
How to ensure the workbook loaded from a stream correctly recognizes the file format?
Cause: The LoadFromStream() method needs to identify the file type based on the actual format of the stream data. If the format parameter is set incorrectly, loading may fail or data parsing may produce errors.
Solution: Use xlsModule.FileFormat.Auto when loading so that the library automatically detects the format of the file in the stream:
const fileStream = new xlsModule.Stream('Sample.xlsx');
workbook.LoadFromStream(fileStream, xlsModule.FileFormat.Auto);
Get a Free License
Spire.XLS for JavaScript offers a 30-day full-featured free trial license with no functional limitations. Apply here to evaluate before purchasing.
Convert Excel to Markdown or Markdown to Excel with JavaScript in React
2026-08-14 08:08:14 Written by zaki zakiIn daily office work, data often needs to be exchanged between Excel spreadsheets and Markdown files. Markdown is a lightweight markup language widely used for documentation, blogs, and technical notes. Spire.XLS for JavaScript runs entirely in the browser via WebAssembly, using a virtual file system (VFS) to manage input and output files — no backend server is required. It provides simple, easy-to-use APIs that make format conversion more convenient.
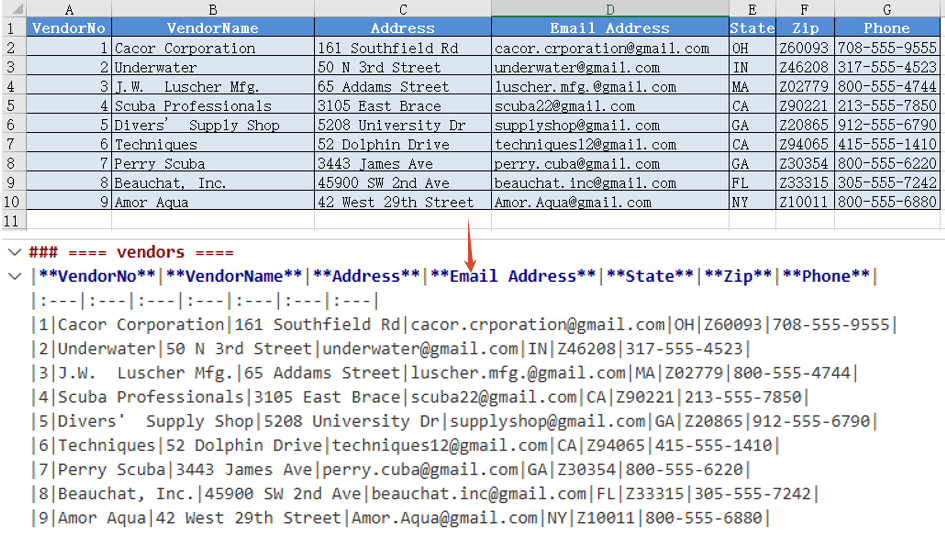
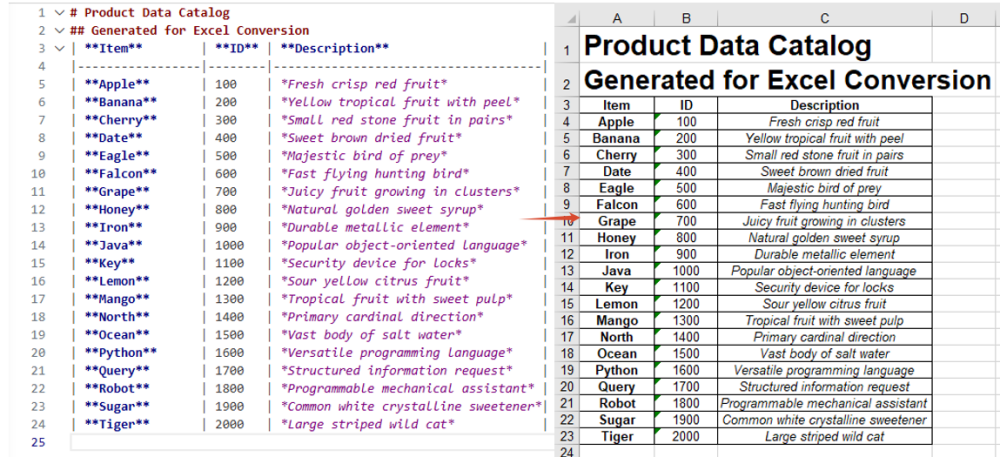
With Spire.XLS for JavaScript, you can export Excel worksheet data as well-structured, easy-to-read Markdown tables, or import Markdown files containing table syntax to create fully formatted Excel workbooks. This makes data migration between different applications more convenient and efficient.
This article covers two core features:
For installation and project setup, refer to Integrating Spire.XLS for JavaScript in a React Project. The examples below assume Spire.XLS is installed and the WebAssembly module is initialized.
Convert Excel Workbook to Markdown File
Exporting Excel data as a Markdown table makes it convenient to read and share spreadsheet data directly in documents, blogs, or version control systems. With Spire.XLS for JavaScript, you can save an entire workbook as a Markdown file, and the resulting table is well-structured and easy to maintain. The steps are as follows:
- Create a
Workbookobject and load an existing Excel file. - Call the workbook's
SaveToFile()method, specifying the output filename and theFileFormat.Markdownfile format. - Dispose of the workbook resources, read the result file from VFS, and trigger the download.
Below is a complete code example demonstrating how to convert Excel to Markdown in React:
function App() {
  const convertToMarkdown = async () => {
    // Get the Spire.XLS WASM module
    const xlsModule = window.wasmModule?.spirexls;

    // Check if the module is ready
    if (!xlsModule) {
      alert('Spire.Xls is not ready yet');
      return;
    }

    // Load the sample Excel file into VFS
    await window.spire.FetchFileToVFS('Sample.xlsx', '', `${process.env.PUBLIC_URL}data/`);

    // Load the font file to ensure proper text rendering
    await window.spire.FetchFileToVFS('ARIAL.TTF', '/Library/Fonts/', `${process.env.PUBLIC_URL}font/`);

    // Create a workbook object and load the Excel file
    const workbook = new xlsModule.Workbook();
    workbook.LoadFromFile({ fileName: 'Sample.xlsx' });

    // Save the workbook as a Markdown file
    const outputFileName = 'ExcelToMarkdown.md';
    workbook.SaveToFile({ fileName: outputFileName, fileFormat: xlsModule.FileFormat.Markdown });
    workbook.Dispose();

    // Read the file from VFS and trigger download
    const fileArray = window.dotnetRuntime.Module.FS.readFile(outputFileName);
    const blob = new Blob([fileArray], { type: 'text/markdown' });
    const url = URL.createObjectURL(blob);
    const a = document.createElement('a');
    a.href = url;
    a.download = outputFileName;
    a.click();
    URL.revokeObjectURL(url);
  };

  return (
    <div style={{ textAlign: 'center', height: '300px' }}>
      <h1>Convert Excel to Markdown</h1>
      <button onClick={convertToMarkdown}>
        Generate
      </button>
    </div>
  );
}

export default App;
Excel converted to Markdown with Spire.XLS for JavaScript
Convert Markdown File to Excel Workbook
Importing a Markdown file into an Excel spreadsheet allows you to take full advantage of Excel's formatting, calculation, and charting capabilities. Spire.XLS for JavaScript supports loading a Markdown file directly via the LoadFromMarkdown() method and converting its table data into worksheet cells. The steps are as follows:
- Load the font file and Markdown sample file into the VFS.
- Create a
Workbookobject and load the Markdown file via theLoadFromMarkdown()method. - Save the workbook as an Excel file and trigger the download.
Below is a complete code example demonstrating how to convert Markdown to Excel in React:
function App() {
  const convertToExcel = async () => {
    // Get the Spire.XLS WASM module
    const xlsModule = window.wasmModule?.spirexls;

    // Check if the module is ready
    if (!xlsModule) {
      alert('Spire.Xls is not ready yet');
      return;
    }

    // Load the font file to ensure proper text rendering
    await window.spire.FetchFileToVFS('ARIAL.TTF', '/Library/Fonts/', `${process.env.PUBLIC_URL}font/`);

    // Load the Markdown sample file into VFS
    await window.spire.FetchFileToVFS('Sample.md', '', `${process.env.PUBLIC_URL}data/`);

    // Create a workbook object and load the Markdown file
    const workbook = new xlsModule.Workbook();
    workbook.LoadFromMarkdown('Sample.md');

    // Save the workbook and release resources
    const outputFileName = 'MarkdownToExcel.xlsx';
    workbook.SaveToFile({ fileName: outputFileName, version: xlsModule.ExcelVersion.Version2010 });
    workbook.Dispose();

    // Read the file from VFS and trigger download
    const fileArray = window.dotnetRuntime.Module.FS.readFile(outputFileName);
    const blob = new Blob([fileArray], { type: 'application/vnd.openxmlformats-officedocument.spreadsheetml.sheet' });
    const url = URL.createObjectURL(blob);
    const a = document.createElement('a');
    a.href = url;
    a.download = outputFileName;
    a.click();
    URL.revokeObjectURL(url);
  };

  return (
    <div style={{ textAlign: 'center', height: '300px' }}>
      <h1>Convert Markdown to Excel</h1>
      <button onClick={convertToExcel}>
        Generate
      </button>
    </div>
  );
}

export default App;
Markdown converted to Excel with Spire.XLS for JavaScript
FAQ
How to handle font file missing issues during conversion?
Cause: If font files are not loaded into the WASM virtual file system (VFS), the exported Markdown content or imported cell text may not render correctly, especially when it contains non-ASCII characters such as Chinese.
Solution: Load the font files into VFS via FetchFileToVFS before conversion:
await window.spire.FetchFileToVFS(
  'ARIAL.TTF', '/Library/Fonts/', `${process.env.PUBLIC_URL}font/`
);
How to handle the downloaded Markdown file being opened as another type or showing garbled text?
Cause: The MIME type is not set correctly when creating the Blob, so the browser cannot recognize the downloaded file as Markdown text, which may cause it to open as another type or display garbled text.
Solution: Specify the correct MIME type when downloading and make sure the download filename ends with .md:
const blob = new Blob([fileArray], { type: 'text/markdown' });
const a = document.createElement('a');
a.href = URL.createObjectURL(blob);
a.download = 'ExcelToMarkdown.md';
a.click();
Get a Free License
Spire.XLS for JavaScript offers a 30-day full-featured free trial license with no functional limitations. Apply here to evaluate before purchasing.
Add, Read, and Delete Excel Shapes with JavaScript in React
2026-08-14 07:40:40 Written by zaki zakiShapes are graphic elements in Excel that enhance the visual appeal of a worksheet and convey information intuitively, such as arrows, rectangles, ovals, and stars. With shapes, you can add annotations, process-flow indicators, or decorative elements next to your data, making reports more vivid and easier to read. Spire.XLS for JavaScript runs entirely in the browser via WebAssembly, using a virtual file system (VFS) to manage input and output files — no backend server required. It provides a complete API for adding shapes and customizing their appearance (such as fill, rotation angle, text, and shadow), reading text and images from shapes, and deleting specified or all shapes.
This article covers three core features:
For installation and project setup, refer to Integrating Spire.XLS for JavaScript in a React Project. The examples below assume Spire.XLS is installed and the WebAssembly module is initialized.
Add Shapes to Excel
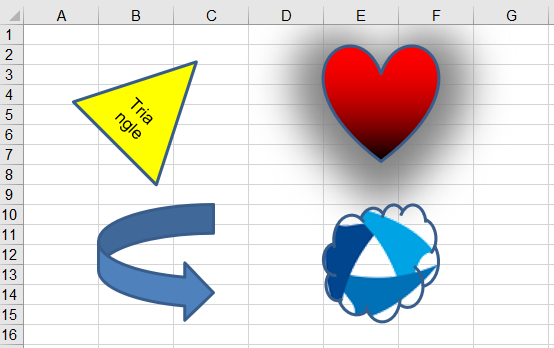
Adding shapes to Excel can highlight key data and beautify the layout of a worksheet. With Spire.XLS for JavaScript, you can add a shape and set its position (row, column) and size (width, height) at once using the PrstGeomShapes.AddPrstGeomShape() method, and then customize its appearance through the shape's properties — set solid, gradient, texture, or picture fill via Fill, add text via Text, set the rotation angle via Rotation, apply a shadow effect via Shadow, and control visibility via Visible. The steps are as follows:
- Create a
Workbookobject and get the default worksheet. - Add shapes using
PrstGeomShapes.AddPrstGeomShape(), setting the shape type, position, and size through the parameters. - Set solid, gradient, texture, or picture fill for the shapes via the
Fillproperty. - Add text to a shape via the
Textproperty, and set the rotation angle via theRotationproperty. - Set a shadow effect for a shape via the
Shadowproperty. - Save the workbook to an Excel file using
SaveToFile().
Below is a complete code example demonstrating how to add and customize various shapes in React:
function App() {
  const addShapes = async () => {
    // Get the Spire.XLS WASM module
    const xlsModule = window.wasmModule?.spirexls;

    // Check if the module is ready
    if (!xlsModule) {
      alert('Spire.Xls is not ready yet');
      return;
    }

    // Load the picture into the virtual file system (VFS)
    await window.spire.FetchFileToVFS('SpireXls.png', '', `${process.env.PUBLIC_URL}/image/`);

    // Create a new workbook and get the default worksheet
    const workbook = new xlsModule.Workbook();
    let sheet = workbook.Worksheets.get(0);

    // Add a triangle shape and fill it with a solid color
    let triangle = sheet.PrstGeomShapes.AddPrstGeomShape(2, 2, 100, 100, xlsModule.PrstGeomShapeType.Triangle);
    triangle.Fill.ForeColor = xlsModule.Color.get_Yellow();
    triangle.Fill.FillType = xlsModule.ShapeFillType.SolidColor;
    // Add text to the triangle and set its rotation angle
    triangle.Text = 'Triangle';
    triangle.Rotation = 45;

    // Add a heart shape and fill it with a gradient color
    let heart = sheet.PrstGeomShapes.AddPrstGeomShape(2, 5, 100, 100, xlsModule.PrstGeomShapeType.Heart);
    heart.Fill.ForeColor = xlsModule.Color.get_Red();
    heart.Fill.FillType = xlsModule.ShapeFillType.Gradient;
    // Set the shadow style for the heart
    heart.Shadow.Angle = 90;
    heart.Shadow.Distance = 10;
    heart.Shadow.Size = 150;
    heart.Shadow.Color = xlsModule.Color.get_Gray();
    heart.Shadow.Blur = 30;
    heart.Shadow.Transparency = 1;
    heart.Shadow.HasCustomStyle = true;

    // Add an arrow shape
    let arrow = sheet.PrstGeomShapes.AddPrstGeomShape(10, 2, 100, 100, xlsModule.PrstGeomShapeType.CurvedRightArrow);

    // Add a cloud shape and fill it with a picture
    let cloud = sheet.PrstGeomShapes.AddPrstGeomShape(10, 5, 100, 100, xlsModule.PrstGeomShapeType.Cloud);
    cloud.Fill.CustomPicture({ im: new xlsModule.Stream('SpireXls.png'), name: 'SpireXls.png' });

    // Save the workbook
    const outputFileName = 'AddShapes.xlsx';
    workbook.SaveToFile(outputFileName);
    workbook.Dispose();

    // Read the file from VFS and trigger download
    const fileArray = window.dotnetRuntime.Module.FS.readFile(outputFileName);
    const blob = new Blob([fileArray], { type: 'application/vnd.openxmlformats-officedocument.spreadsheetml.sheet' });
    const url = URL.createObjectURL(blob);
    const a = document.createElement('a');
    a.href = url;
    a.download = outputFileName;
    a.click();
    URL.revokeObjectURL(url);
  };

  return (
    <div style={{ textAlign: 'center', height: '300px' }}>
      <h1>Add Shapes</h1>
      <button onClick={addShapes}>
        Generate
      </button>
    </div>
  );
}

export default App;
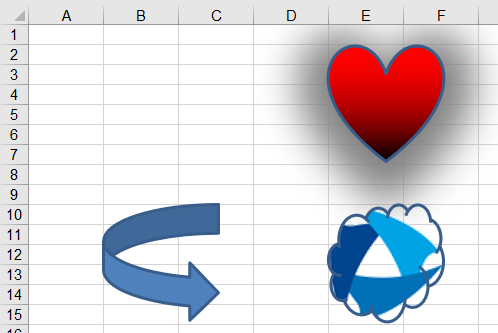
Shapes added to Excel with Spire.XLS for JavaScript
Read Text and Images from Excel Shapes
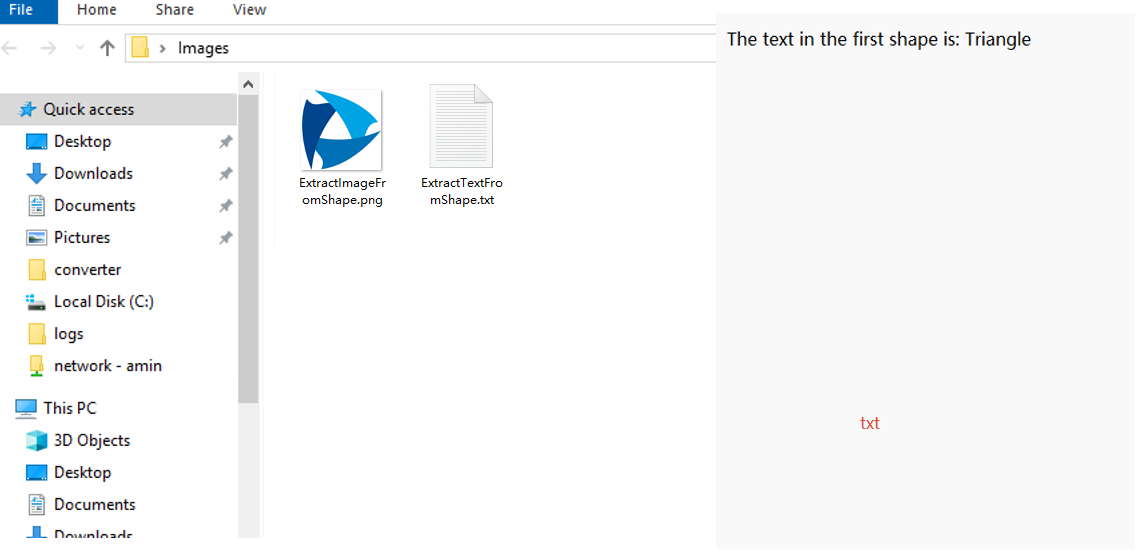
Reading the text and images from shapes helps you extract the data inside shapes in batch, or reuse and archive shape resources. With Spire.XLS for JavaScript, you can load an Excel file containing shapes, get a specified shape by index via PrstGeomShapes.get(), then read its text content via the Text property and get its fill picture via Fill.Picture. The steps are as follows:
- Create a
Workbookobject and load an existing Excel file containing shapes. - Get the worksheet via
workbook.Worksheets.get(). - Get a specified shape by index using
sheet.PrstGeomShapes.get(). - Read the text in the shape via the
Textproperty. - Read the fill picture in the shape via the
Fill.Pictureproperty. - Save the read text and image as txt and png files.
Below is a complete code example demonstrating how to read text and images from shapes in React (the example loads the AddShapes.xlsx file generated in the previous section):
function App() {
  const readShapes = async () => {
    // Get the Spire.XLS WASM module
    const xlsModule = window.wasmModule?.spirexls;

    // Check if the module is ready
    if (!xlsModule) {
      alert('Spire.Xls is not ready yet');
      return;
    }

    // Load the sample file containing shapes into the virtual file system (VFS)
    let excelFileName = 'AddShapes.xlsx';
    await window.spire.FetchFileToVFS(excelFileName, '', `${process.env.PUBLIC_URL}data/`);

    // Create a workbook object and load the existing file
    const workbook = new xlsModule.Workbook();
    workbook.LoadFromFile({ fileName: excelFileName });

    // Get the first worksheet
    let sheet = workbook.Worksheets.get(0);

    // Get the first shape (triangle) and read the text inside it
    let triangle = sheet.PrstGeomShapes.get(0);
    let text = triangle.Text;

    // Get the fourth shape (cloud) and read the picture inside it
    let cloud = sheet.PrstGeomShapes.get(3);
    let image = cloud.Fill.Picture;
    const imageFileName = 'ExtractImageFromShape.png';
    image.Save(imageFileName);

    workbook.Dispose();

    // Save the read text to a txt file and trigger download
    const textFileName = 'ExtractTextFromShape.txt';
    const textBlob = new Blob([`The text in the first shape is: ${text}`], { type: 'text/plain;charset=utf-8' });
    const textUrl = URL.createObjectURL(textBlob);
    const a1 = document.createElement('a');
    a1.href = textUrl;
    a1.download = textFileName;
    a1.click();
    URL.revokeObjectURL(textUrl);

    // Read the image file from VFS and trigger download
    const fileArray = window.dotnetRuntime.Module.FS.readFile(imageFileName);
    const blob = new Blob([fileArray], { type: 'application/png' });
    const url = URL.createObjectURL(blob);
    const a = document.createElement('a');
    a.href = url;
    a.download = imageFileName;
    a.click();
    URL.revokeObjectURL(url);
  };

  return (
    <div style={{ textAlign: 'center', height: '300px' }}>
      <h1>Read Text and Image from Shapes</h1>
      <button onClick={readShapes}>
        Generate
      </button>
    </div>
  );
}

export default App;
Text and images read from Excel shapes with Spire.XLS for JavaScript
Delete Shapes in Excel
When shapes are no longer needed, deleting them in time keeps the worksheet clean and reduces the file size. With Spire.XLS for JavaScript, you can delete a specified shape via the Remove() method, or iterate through the shape collection and call Remove() on each shape to clear all shapes in a worksheet. The steps are as follows:
- Create a
Workbookobject and load an existing Excel file containing shapes. - Get the worksheet via
workbook.Worksheets.get(). - Get a specified shape using
sheet.PrstGeomShapes.get(), and call itsRemove()method to delete the shape. - Save the workbook to an Excel file using
SaveToFile().
Below is a complete code example demonstrating how to delete shapes in React (the example loads the AddShapes.xlsx file generated in the previous section):
function App() {
  const deleteShapes = async () => {
    // Get the Spire.XLS WASM module
    const xlsModule = window.wasmModule?.spirexls;

    // Check if the module is ready
    if (!xlsModule) {
      alert('Spire.Xls is not ready yet');
      return;
    }

    // Load the sample file containing shapes into the virtual file system (VFS)
    let excelFileName = 'AddShapes.xlsx';
    await window.spire.FetchFileToVFS(excelFileName, '', `${process.env.PUBLIC_URL}data/`);

    // Create a workbook object and load the existing file
    const workbook = new xlsModule.Workbook();
    workbook.LoadFromFile({ fileName: excelFileName });

    // Get the first worksheet
    let sheet = workbook.Worksheets.get(0);

    // Delete the first shape in the worksheet
    sheet.PrstGeomShapes.get(0).Remove();

    // Delete all the shapes in the worksheet
    // for (let i = sheet.PrstGeomShapes.Count - 1; i >= 0; i--) {
    //   sheet.PrstGeomShapes.get(i).Remove();
    // }

    // Save the workbook
    const outputFileName = 'DeleteShapes.xlsx';
    workbook.SaveToFile(outputFileName);
    workbook.Dispose();

    // Read the file from VFS and trigger download
    const fileArray = window.dotnetRuntime.Module.FS.readFile(outputFileName);
    const blob = new Blob([fileArray], { type: 'application/vnd.openxmlformats-officedocument.spreadsheetml.sheet' });
    const url = URL.createObjectURL(blob);
    const a = document.createElement('a');
    a.href = url;
    a.download = outputFileName;
    a.click();
    URL.revokeObjectURL(url);
  };

  return (
    <div style={{ textAlign: 'center', height: '300px' }}>
      <h1>Delete Shapes</h1>
      <button onClick={deleteShapes}>
        Generate
      </button>
    </div>
  );
}

export default App;
Specified shape deleted from Excel with Spire.XLS for JavaScript
FAQ
How to get the name and type of a shape?
Cause: When a worksheet contains many shapes, you may need to identify and locate shapes by their name or type rather than by index.
Solution: Read the Name and PrstShapeType properties of the shape to get its name and type:
// Get the worksheet
let sheet = workbook.Worksheets.get(0);
// Get the first shape
let shape = sheet.PrstGeomShapes.get(0);
// Get the name of the shape
let shapeName = shape.Name;
// Get the type of the shape
let shapeType = shape.PrstShapeType;
How to check whether a shape is currently visible?
Cause: After loading shapes from a file, you may need to determine whether a shape is hidden so that you can decide whether to process it further.
Solution: Read the Visible property of the shape to know its visibility state:
// Get the worksheet
let sheet = workbook.Worksheets.get(0);
// Get the first shape
let shape = sheet.PrstGeomShapes.get(0);
// Check whether the shape is visible
let isVisible = shape.Visible;
Get a Free License
Spire.XLS for JavaScript offers a 30-day full-featured free trial license with no functional limitations. Apply here to evaluate before purchasing.
Freeze, Query, and Unfreeze Excel Worksheet Panes with JavaScript in React
2026-08-14 05:35:36 Written by Lisa LiWhen browsing an Excel worksheet that contains a large amount of data, pinning the header or key columns can significantly improve the efficiency of data viewing. The freeze panes feature keeps the specified rows or columns visible while scrolling. Querying the frozen pane range confirms which areas of the current worksheet are frozen. Unfreezing panes restores the normal browsing mode when the fixed display is no longer needed. Spire.XLS for JavaScript completes these operations directly in the browser based on WebAssembly, and manages input and output files through the virtual file system (VFS), without requiring backend service support.
This article introduces three core feature points:
For installation and project configuration, refer to Integrate Spire.XLS for JavaScript in a React Project. The following examples assume that Spire.XLS is installed and the WebAssembly module has been initialized.
Freeze Panes
When a worksheet contains a large amount of data, freezing panes can pin the header or a specific area so that you can always see the key rows or columns while scrolling through the data. Spire.XLS for JavaScript freezes the panes above and to the left of the specified position through the FreezePanes method. For example, FreezePanes(2, 1) freezes the first row, keeping it visible when scrolling vertically.
function App() {
  const sheetToSVG = async () => {
    // Get the Spire.XLS WASM module
    const xlsModule = window.wasmModule?.spirexls;

    // Check whether the module is ready
    if (!xlsModule) {
      alert('Spire.Xls is not ready yet');
      return;
    }

    // Load the font and the Excel file into the VFS
    await window.spire.FetchFileToVFS('ARIAL.TTF', '/Library/Fonts/', `${process.env.PUBLIC_URL}/font/`);
    const inputFileName = 'FreezePanes.xlsx';
    await window.spire.FetchFileToVFS(inputFileName, '', `${process.env.PUBLIC_URL}/static/data/`);

    // Load the workbook
    const workbook = new xlsModule.Workbook();
    workbook.LoadFromFile({ fileName: inputFileName });

    // Get the first worksheet
    const sheet = workbook.Worksheets.get(0);

    // Freeze the first row
    sheet.FreezePanes(2, 1);

    // Set the width of the second column
    sheet.SetColumnWidth(2, 10);

    const outputFileName = "FreezePanes_output.xlsx";
    workbook.SaveToFile({ fileName: outputFileName });

    // Dispose of the workbook object to release resources
    workbook.Dispose();

    // Read the converted file from the VFS and trigger the download
    const fileArray = window.dotnetRuntime.Module.FS.readFile(outputFileName);
    const blob = new Blob([fileArray], { type: "application/vnd.openxmlformats-officedocument.spreadsheetml.sheet" });
    const url = URL.createObjectURL(blob);
    const a = document.createElement('a');
    a.href = url;
    a.download = outputFileName;
    a.click();
    URL.revokeObjectURL(url);
  };

  return (
    <div style={{ textAlign: 'center', height: '300px' }}>
      <h1>Freeze Panes</h1>
      <button onClick={sheetToSVG}>
        Start
      </button>
    </div>
  );
}

export default App;
Original document 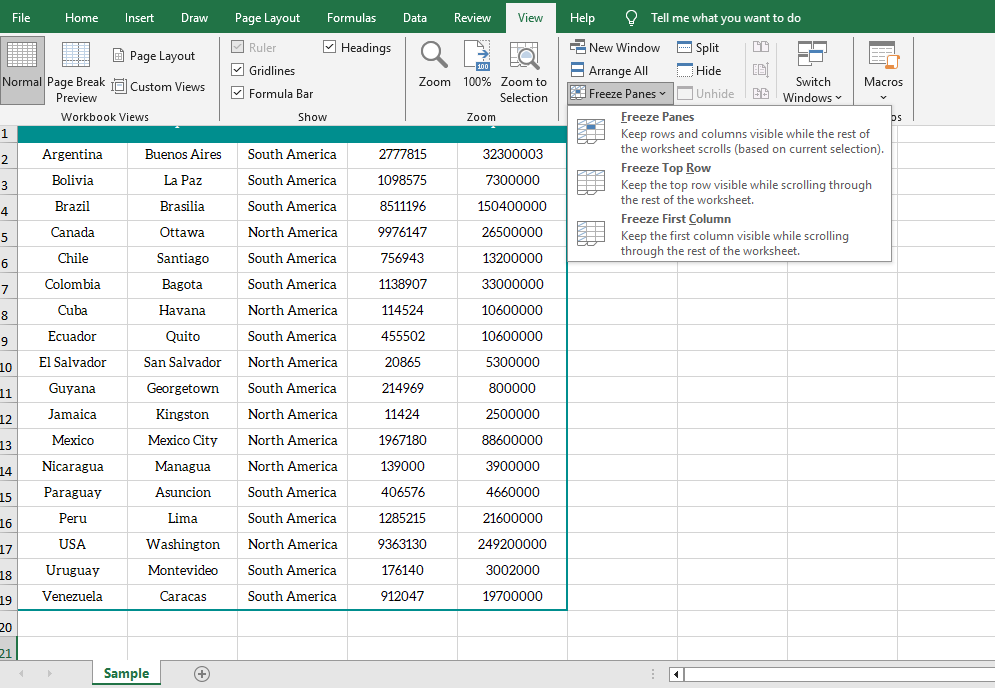 After freezing the first row
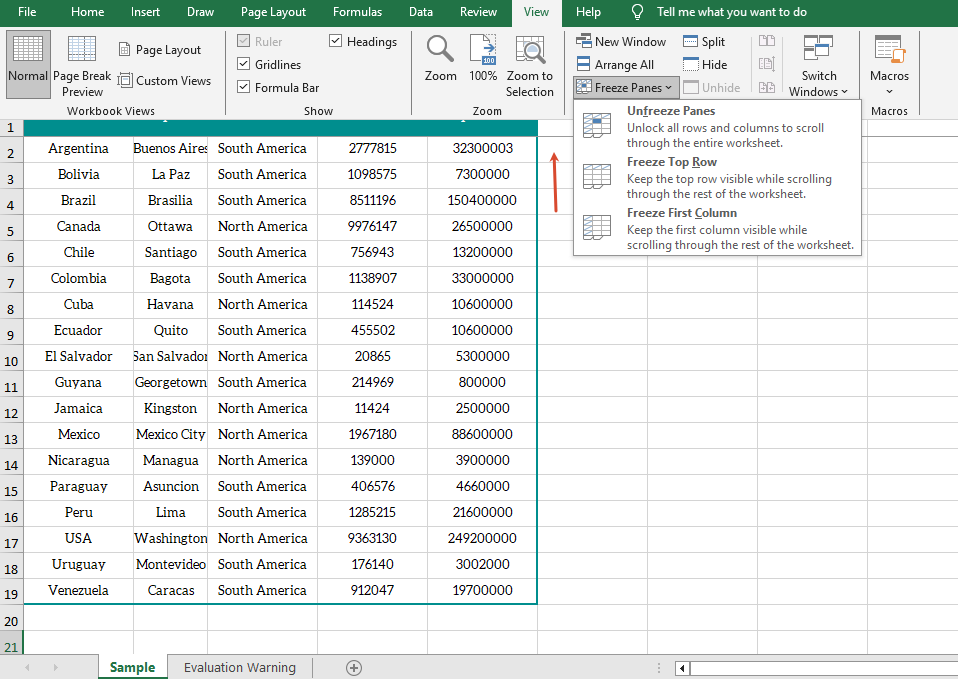
Get the Freeze Pane Range
When working with frozen panes, sometimes you need to confirm the position of the frozen panes in the current worksheet. Spire.XLS for JavaScript obtains the row index and column index of the frozen panes through the GetFreezePanes method, and a return value of 0 indicates that the corresponding direction is not frozen.
function App() {
  const sheetToSVG = async () => {
    // Get the Spire.XLS WASM module
    const xlsModule = window.wasmModule?.spirexls;

    // Check whether the module is ready
    if (!xlsModule) {
      alert('Spire.Xls is not ready yet');
      return;
    }

    // Load the font and the Excel file into the VFS
    await window.spire.FetchFileToVFS('ARIAL.TTF', '/Library/Fonts/', `${process.env.PUBLIC_URL}/font/`);
    const inputFileName = 'GetFreezePaneRange.xlsx';
    await window.spire.FetchFileToVFS(inputFileName, '', `${process.env.PUBLIC_URL}/static/data/`);

    // Load the workbook
    const workbook = new xlsModule.Workbook();
    workbook.LoadFromFile({ fileName: inputFileName });

    // Get the first worksheet
    const sheet = workbook.Worksheets.get(0);

    // Get the row index and column index of the frozen panes
    const indexs = sheet.GetFreezePanes();
    const rowIndex = indexs[0];
    const colIndex = indexs[1];

    // Write the query result to a text file
    const outputFileName = "GetFreezePaneRange_output.txt";
    window.dotnetRuntime.Module.FS.writeFile(outputFileName, `Row index: ${rowIndex}, column index: ${colIndex}`);

    // Dispose of the workbook object to release resources
    workbook.Dispose();

    // Read the converted file from the VFS and trigger the download
    const fileArray = window.dotnetRuntime.Module.FS.readFile(outputFileName);
    const blob = new Blob([fileArray], { type: "text/plain" });
    const url = URL.createObjectURL(blob);
    const a = document.createElement('a');
    a.href = url;
    a.download = outputFileName;
    a.click();
    URL.revokeObjectURL(url);
  };

  return (
    <div style={{ textAlign: 'center', height: '300px' }}>
      <h1>Get Freeze Pane Range</h1>
      <button onClick={sheetToSVG}>
        Start
      </button>
    </div>
  );
}

export default App;
Original document with frozen panes 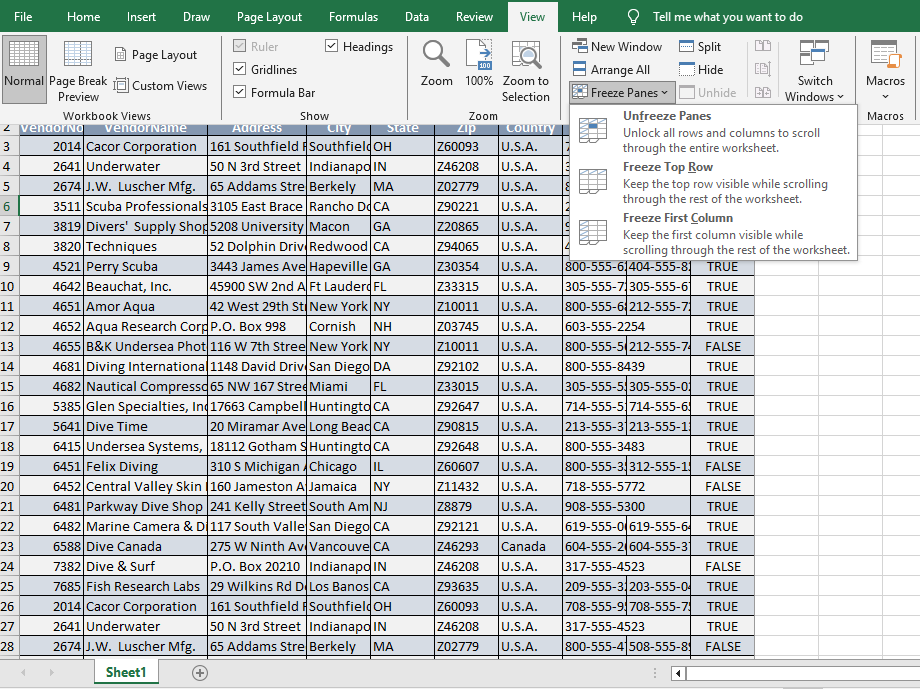 Query result

Unfreeze Panes
When the fixed display is no longer needed, you can cancel the frozen panes that have been set in the worksheet through the RemovePanes method and restore normal scrolling.
function App() {
  const sheetToSVG = async () => {
    // Get the Spire.XLS WASM module
    const xlsModule = window.wasmModule?.spirexls;

    // Check whether the module is ready
    if (!xlsModule) {
      alert('Spire.Xls is not ready yet');
      return;
    }

    // Load the font and the Excel file into the VFS
    await window.spire.FetchFileToVFS('ARIAL.TTF', '/Library/Fonts/', `${process.env.PUBLIC_URL}/font/`);
    const inputFileName = 'Template_Xls_2.xlsx';
    await window.spire.FetchFileToVFS(inputFileName, '', `${process.env.PUBLIC_URL}/static/data/`);

    // Load the workbook
    const workbook = new xlsModule.Workbook();
    workbook.LoadFromFile({ fileName: inputFileName });

    // Get the first worksheet
    const sheet = workbook.Worksheets.get(0);

    // Unfreeze the panes
    sheet.RemovePanes();

    const outputFileName = "UnfreezeExcelPanes_output.xlsx";
    workbook.SaveToFile({ fileName: outputFileName });

    // Dispose of the workbook object to release resources
    workbook.Dispose();

    // Read the converted file from the VFS and trigger the download
    const fileArray = window.dotnetRuntime.Module.FS.readFile(outputFileName);
    const blob = new Blob([fileArray], { type: "application/vnd.openxmlformats-officedocument.spreadsheetml.sheet" });
    const url = URL.createObjectURL(blob);
    const a = document.createElement('a');
    a.href = url;
    a.download = outputFileName;
    a.click();
    URL.revokeObjectURL(url);
  };

  return (
    <div style={{ textAlign: 'center', height: '300px' }}>
      <h1>Unfreeze Panes</h1>
      <button onClick={sheetToSVG}>
        Start
      </button>
    </div>
  );
}

export default App;
Before unfreezing 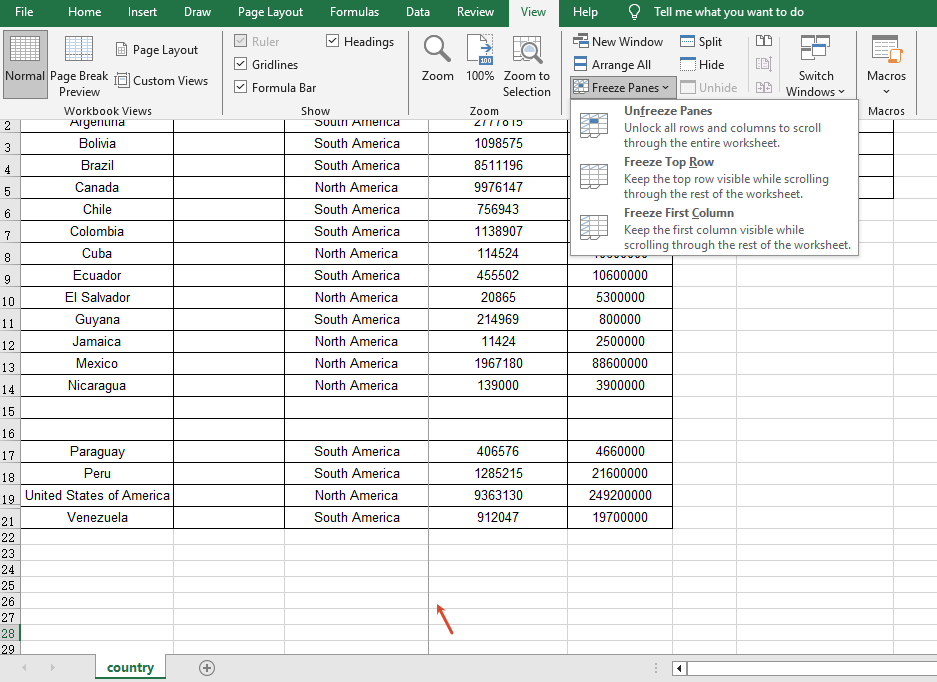 After unfreezing
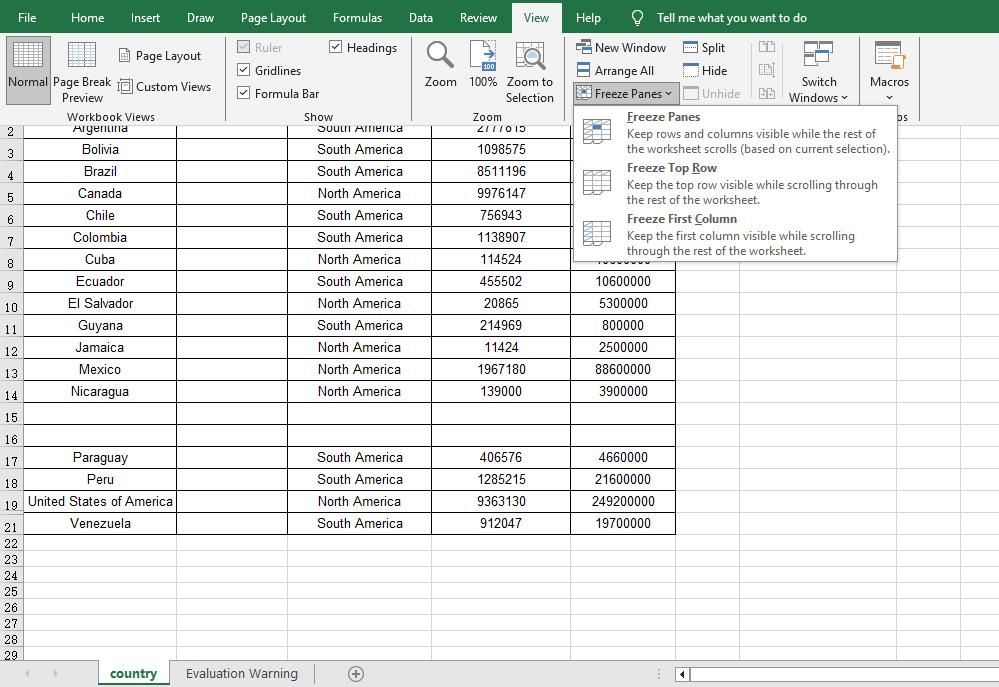
FAQ
The first row still scrolls after freezing panes
Reason: The parameters of the FreezePanes method are set incorrectly, so the frozen area is not the expected row or column.
Solution: The FreezePanes method uses the specified position as the boundary and freezes the panes above and to the left of that position. For example, use FreezePanes(2, 1) to freeze the first row, FreezePanes(3, 1) to freeze the first two rows, and FreezePanes(2, 2) to freeze both the first row and the first column.
Querying the freeze pane range returns 0
Reason: The worksheet has not set any frozen panes, so the queried row and column indexes are 0.
Solution: Call the FreezePanes method to set frozen panes first, and then call GetFreezePanes to query the frozen range.
The freeze effect still shows after unfreezing panes
Reason: The workbook was not saved correctly after unfreezing, or the file opened is the one before the modification.
Solution: After calling the RemovePanes method, be sure to save the workbook with SaveToFile and open the output file to confirm the unfreeze effect.
Get a Free License
If you want to remove the evaluation message in the result documents or get rid of the feature limitations, please contact sales to obtain a 30-day temporary license.
Add, Preview, and Remove Excel Page Breaks with JavaScript in React
2026-08-12 06:20:20 Written by Lisa LiPage breaks are an important tool for controlling the print layout of Excel. They determine where data is divided across printed pages. Setting page breaks properly prevents data from being broken apart pointlessly when printing, resulting in clean, readable paper or PDF reports. Spire.XLS for JavaScript uses WebAssembly to add, preview, and remove page breaks directly in the browser, managing input and output files through a virtual file system (VFS) — no backend server required.
This article covers three core features:
For installation and project configuration, refer to Integrating Spire.XLS for JavaScript in a React Project. The examples below assume Spire.XLS is installed and the WebAssembly module is initialized.
Add Page Breaks
When printing reports, we often want to split data by a fixed number of rows and columns, for example printing a fixed number of data rows per page. Spire.XLS for JavaScript adds horizontal page breaks using the HPageBreaks.Add method and vertical page breaks using the VPageBreaks.Add method, enabling precise page break control.
function App() {
  const sheetToSVG = async () => {
    // Get the Spire.XLS WASM module
    const xlsModule = window.wasmModule?.spirexls;

    // Check if the module is ready
    if (!xlsModule) {
      alert('Spire.Xls is not ready yet');
      return;
    }

    // Load fonts and the Excel file into VFS
    await window.spire.FetchFileToVFS('ARIAL.TTF', '/Library/Fonts/', `${process.env.PUBLIC_URL}/font/`);
    const inputFileName = 'Template_Xls_4.xlsx';
    await window.spire.FetchFileToVFS(inputFileName, '', `${process.env.PUBLIC_URL}/static/data/`);

    // Load the workbook
    const workbook = new xlsModule.Workbook();
    workbook.LoadFromFile({ fileName: inputFileName });

    // Get the first worksheet
    const sheet = workbook.Worksheets.get(0);

    // Add a horizontal page break at row E4
    sheet.HPageBreaks.Add(sheet.Range.get("E4"));
    // Add a vertical page break at column C4
    sheet.VPageBreaks.Add(sheet.Range.get("C4"));

    const outputFileName = "AddPageBreakInXlsFile.xlsx";
    workbook.SaveToFile({ fileName: outputFileName });

    // Release the workbook object to free resources
    workbook.Dispose();

    // Read the converted file from VFS and trigger download
    const fileArray = window.dotnetRuntime.Module.FS.readFile(outputFileName);
    const blob = new Blob([fileArray], { type: "application/vnd.openxmlformats-officedocument.spreadsheetml.sheet" });
    const url = URL.createObjectURL(blob);
    const a = document.createElement('a');
    a.href = url;
    a.download = outputFileName;
    a.click();
    URL.revokeObjectURL(url);
  };

  return (
    <div style={{ textAlign: 'center', height: '300px' }}>
      <h1>Add Page Break</h1>
      <button onClick={sheetToSVG}>
        Start
      </button>
    </div>
  );
}

export default App;
Original document 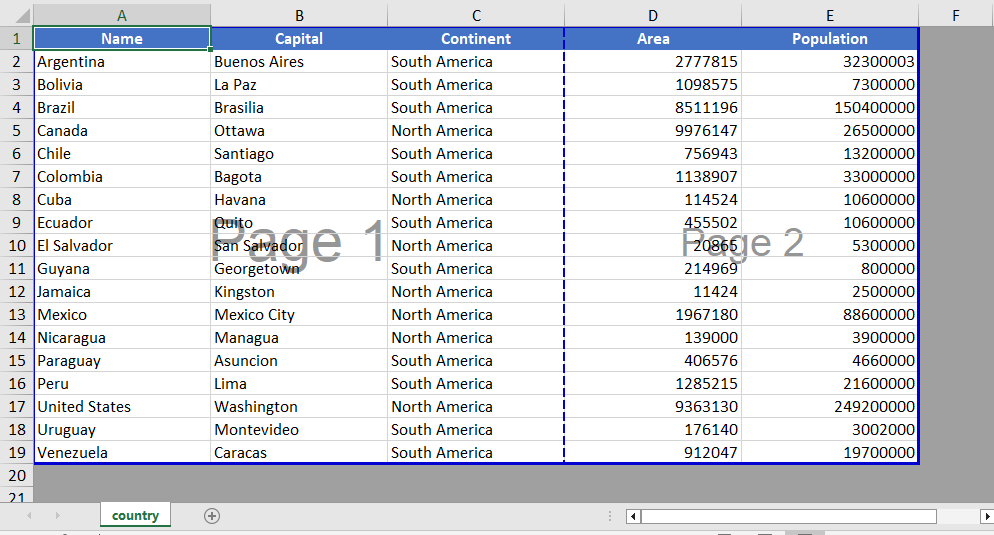 Add page break
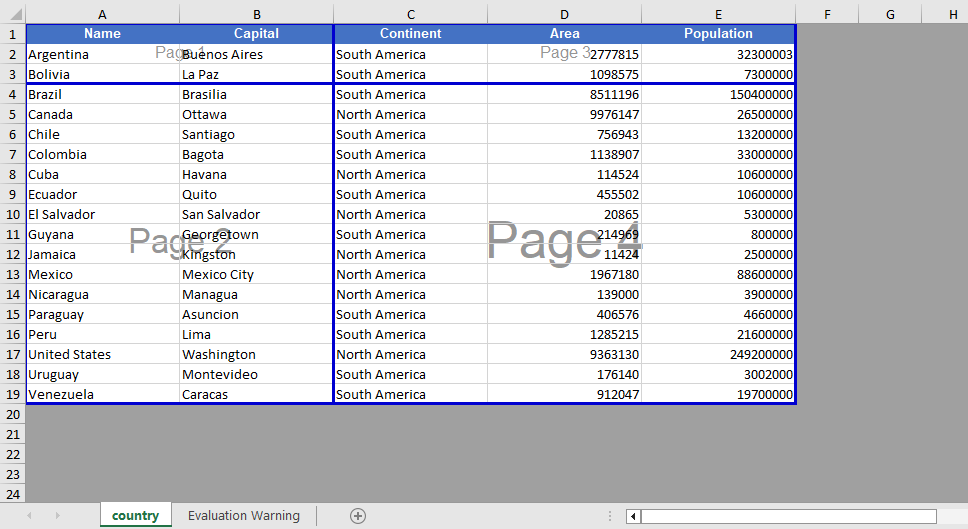
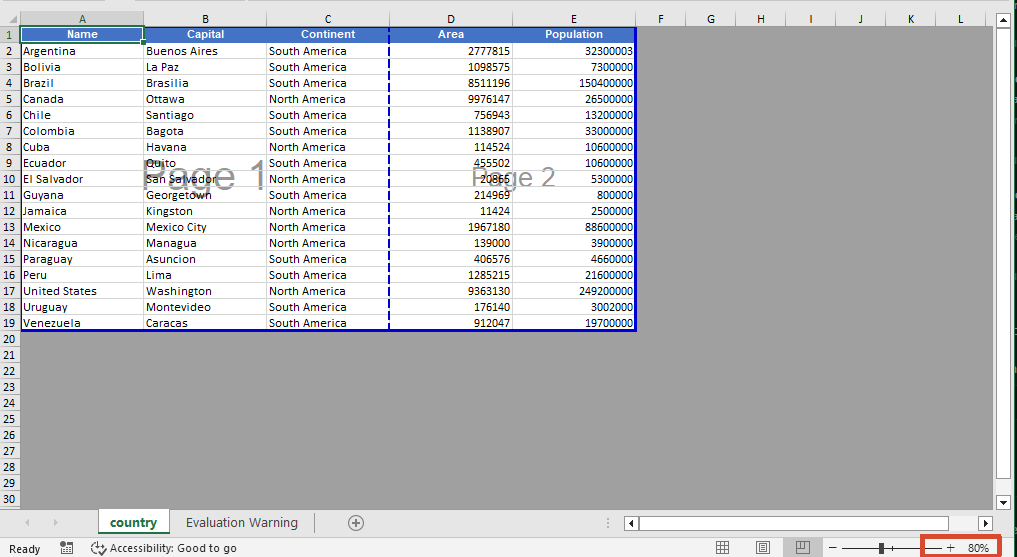
Page Break View Zoom Scale Setting
When viewing page break positions in the view mode, Spire.XLS for JavaScript supports setting the zoom scale of the page break preview view through the ZoomScalePageBreakView property.
function App() {
  const sheetToSVG = async () => {
    // Get the Spire.XLS WASM module
    const xlsModule = window.wasmModule?.spirexls;

    // Check if the module is ready
    if (!xlsModule) {
      alert('Spire.Xls is not ready yet');
      return;
    }

    // Load fonts and the Excel file into VFS
    await window.spire.FetchFileToVFS('ARIAL.TTF', '/Library/Fonts/', `${process.env.PUBLIC_URL}/font/`);
    const inputFileName = 'Template_Xls_4.xlsx';
    await window.spire.FetchFileToVFS(inputFileName, '', `${process.env.PUBLIC_URL}/static/data/`);

    // Load the workbook
    const workbook = new xlsModule.Workbook();
    workbook.LoadFromFile({ fileName: inputFileName });

    // Get the first worksheet
    const sheet = workbook.Worksheets.get(0);

    // Set the zoom scale of the page break preview view
    sheet.ZoomScalePageBreakView = 80;

    const outputFileName = "PageBreakPreview.xlsx";
    workbook.SaveToFile({ fileName: outputFileName });

    // Release the workbook object to free resources
    workbook.Dispose();

    // Read the converted file from VFS and trigger download
    const fileArray = window.dotnetRuntime.Module.FS.readFile(outputFileName);
    const blob = new Blob([fileArray], { type: "application/vnd.openxmlformats-officedocument.spreadsheetml.sheet" });
    const url = URL.createObjectURL(blob);
    const a = document.createElement('a');
    a.href = url;
    a.download = outputFileName;
    a.click();
    URL.revokeObjectURL(url);
  };

  return (
    <div style={{ textAlign: 'center', height: '300px' }}>
      <h1>Page Break Preview</h1>
      <button onClick={sheetToSVG}>
        Start
      </button>
    </div>
  );
}

export default App;
Before setting the zoom scale 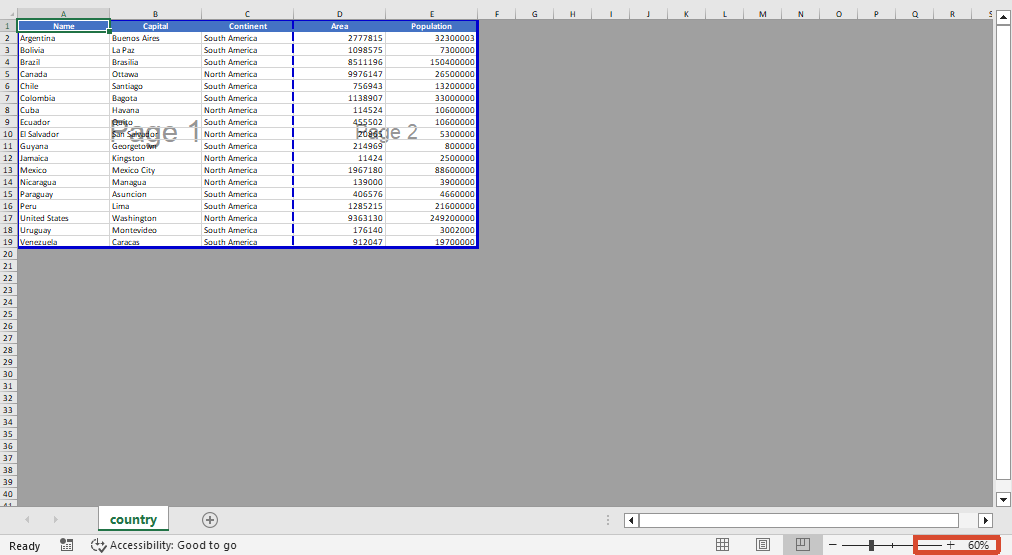 After setting the zoom scale
Remove Page Breaks
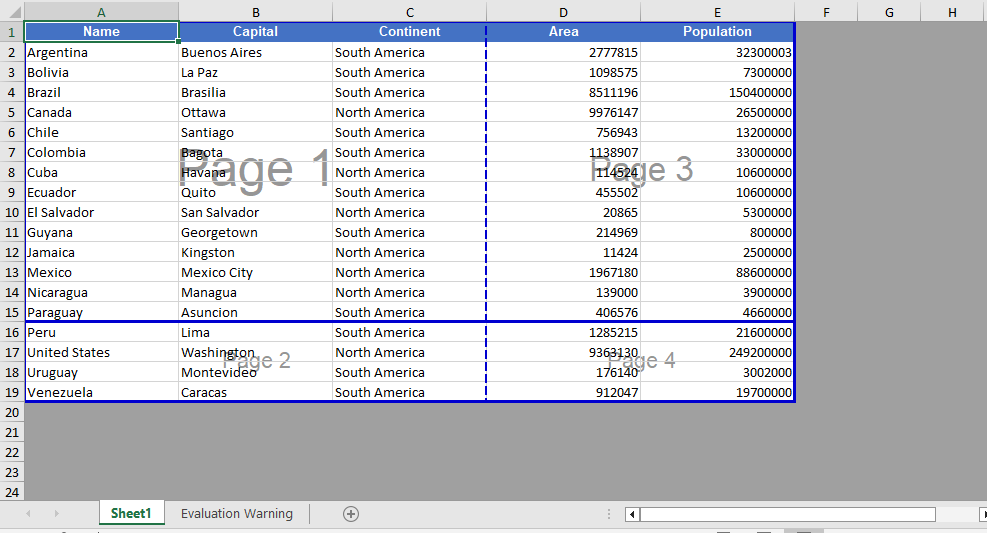
When page breaks are no longer needed, you can clear all page breaks in a specific direction using the Clear method, or delete the page break at a specific position by index using the RemoveAt method. After removal, you can also switch the worksheet to the page break preview view via the ViewMode property to visually confirm the page break effect.
function App() {
  const sheetToSVG = async () => {
    // Get the Spire.XLS WASM module
    const xlsModule = window.wasmModule?.spirexls;

    // Check if the module is ready
    if (!xlsModule) {
      alert('Spire.Xls is not ready yet');
      return;
    }

    // Load fonts and the Excel file into VFS
    await window.spire.FetchFileToVFS('ARIAL.TTF', '/Library/Fonts/', `${process.env.PUBLIC_URL}/font/`);
    const inputFileName = 'PageBreak.xlsx';
    await window.spire.FetchFileToVFS(inputFileName, '', `${process.env.PUBLIC_URL}/static/data/`);

    // Load the workbook
    const workbook = new xlsModule.Workbook();
    workbook.LoadFromFile({ fileName: inputFileName });

    // Get the first worksheet
    const sheet = workbook.Worksheets.get(0);

    // Clear all vertical page breaks
    sheet.VPageBreaks.Clear();

    // Remove the first horizontal page break
    sheet.HPageBreaks.RemoveAt(0);

    // Set the view mode to page break preview to check the page break effect
    sheet.ViewMode = xlsModule.ViewMode.Preview;

    const outputFileName = "RemovePageBreak_output.xlsx";
    workbook.SaveToFile({ fileName: outputFileName });

    // Release the workbook object to free resources
    workbook.Dispose();

    // Read the converted file from VFS and trigger download
    const fileArray = window.dotnetRuntime.Module.FS.readFile(outputFileName);
    const blob = new Blob([fileArray], { type: "application/vnd.openxmlformats-officedocument.spreadsheetml.sheet" });
    const url = URL.createObjectURL(blob);
    const a = document.createElement('a');
    a.href = url;
    a.download = outputFileName;
    a.click();
    URL.revokeObjectURL(url);
  };

  return (
    <div style={{ textAlign: 'center', height: '300px' }}>
      <h1>Remove Page Break</h1>
      <button onClick={sheetToSVG}>
        Start
      </button>
    </div>
  );
}

export default App;
Before removing the page break 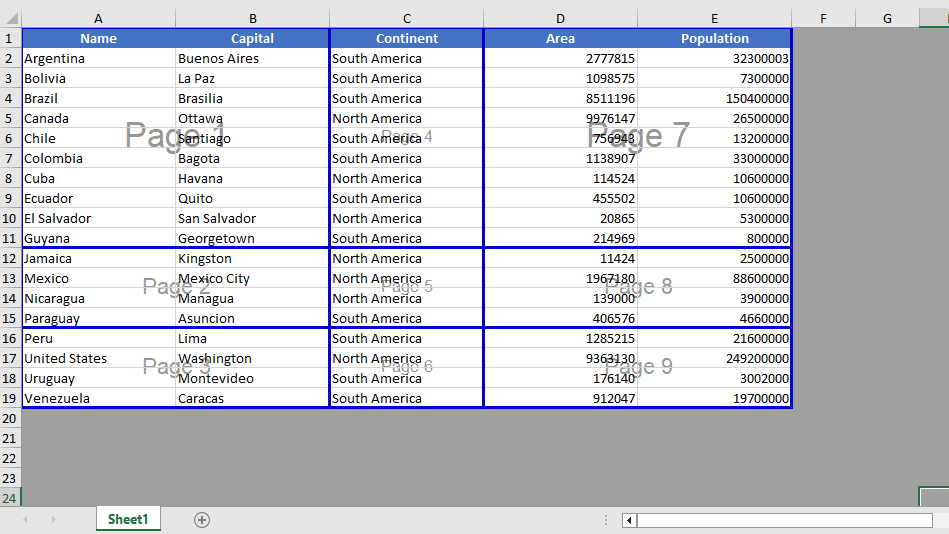 After removing the page break
FAQ
Page breaks do not take effect when printing after being added
Cause: The page break was added to a blank area, or the worksheet has a fixed print zoom scale set, causing the actual page break positions during printing to differ from what was expected.
Solution: Confirm that the page break is added on the row or column of a cell containing data, and check the worksheet's print zoom settings. If necessary, adjust the zoom scale through properties such as ZoomScalePageBreakView so the page breaks take effect as expected.
Page break lines still display after removal
Cause: The worksheet is still in page break preview view mode, or there are automatic page breaks that are generated automatically based on the amount of data.
Solution: Automatic page breaks cannot be removed directly by programming; automatic page breaks are determined by the number of data rows, columns, and the page size. They can be eliminated by adjusting row heights, column widths, or the print zoom scale.
Get a Free License
If you want to remove the evaluation messages in the resulting documents, or get rid of functional limitations, please contact sales to obtain a temporary license valid for 30 days.
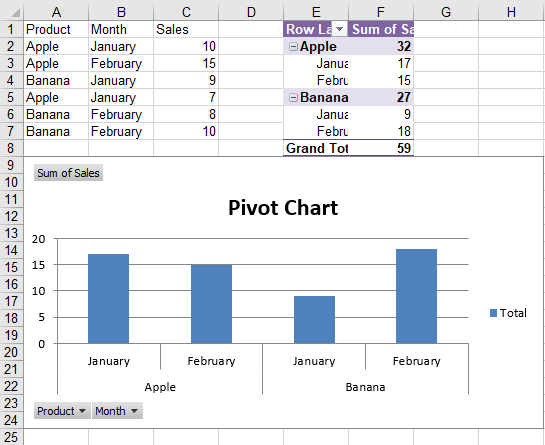
A pivot chart is a graphical representation of the summarized results of a pivot table, making data comparisons and trends immediately visible. It is an essential tool for data analysis and report presentation. Spire.XLS for JavaScript runs entirely in the browser via WebAssembly, using a virtual file system (VFS) to manage input and output files — no backend server required. It provides a complete API for creating pivot charts based on pivot tables, controlling the display of pivot chart field buttons, and customizing the appearance of pivot chart series.
This article covers three core features:
- Create a Pivot Chart in Excel
- Show or Hide Field Buttons of an Excel Pivot Chart
- Set the Format of Excel Pivot Chart Series
For installation and project setup, refer to Integrating Spire.XLS for JavaScript in a React Project. The examples below assume Spire.XLS is installed and the WebAssembly module is initialized.
Create a Pivot Chart in Excel
A pivot chart must be created based on a pivot table. With Spire.XLS for JavaScript, you can first create a pivot table in a worksheet, and then use the Charts.Add() method with the pivotChartType and pivotTable parameters to generate a corresponding pivot chart directly from the pivot table. The steps are as follows:
- Create a
Workbookobject and get the default worksheet. - Populate the worksheet with the source data required for the pivot table.
- Create a pivot table cache using
PivotCaches.Add(). - Add a pivot table using
PivotTables.Add(), and drag fields to the row area and the data area. - Add a chart using
sheet.Charts.Add(), and create a pivot chart based on the pivot table via thepivotChartTypeandpivotTableparameters. - Set the position and title of the pivot chart.
- Save the workbook to an Excel file using
SaveToFile().
Below is a complete code example demonstrating how to create a pivot chart based on a pivot table in React:
function App() {
  const createPivotChart = async () => {
    // Get the Spire.XLS WASM module
    const xlsModule = window.wasmModule?.spirexls;

    // Check if the module is ready
    if (!xlsModule) {
      alert('Spire.Xls is not ready yet');
      return;
    }

    // Load the font into the virtual file system (VFS)
    await window.spire.FetchFileToVFS('ARIAL.TTF', '/Library/Fonts/', `${process.env.PUBLIC_URL}/font/`);

    // Create a new workbook and get the default worksheet
    const workbook = new xlsModule.Workbook();
    let sheet = workbook.Worksheets.get(0);

    // Populate the source data for the pivot table
    sheet.Range.get('A1').Value = 'Product';
    sheet.Range.get('B1').Value = 'Month';
    sheet.Range.get('C1').Value = 'Sales';

    sheet.Range.get('A2').Value = 'Apple';
    sheet.Range.get('A3').Value = 'Apple';
    sheet.Range.get('A4').Value = 'Banana';
    sheet.Range.get('A5').Value = 'Apple';
    sheet.Range.get('A6').Value = 'Banana';
    sheet.Range.get('A7').Value = 'Banana';

    sheet.Range.get('B2').Value = 'January';
    sheet.Range.get('B3').Value = 'February';
    sheet.Range.get('B4').Value = 'January';
    sheet.Range.get('B5').Value = 'January';
    sheet.Range.get('B6').Value = 'February';
    sheet.Range.get('B7').Value = 'February';

    sheet.Range.get('C2').Value = '10';
    sheet.Range.get('C3').Value = '15';
    sheet.Range.get('C4').Value = '9';
    sheet.Range.get('C5').Value = '7';
    sheet.Range.get('C6').Value = '8';
    sheet.Range.get('C7').Value = '10';

    // Create a pivot table
    let dataRange = sheet.Range.get('A1:C7');
    let cache = workbook.PivotCaches.Add({ range: dataRange });
    let pivotTable = sheet.PivotTables.Add('Pivot Table', sheet.Range.get({ row: 1, column: 5 }), cache);

    // Drag fields to the row area
    let pf = pivotTable.PivotFields.get_Item('Product');
    pf.Axis = xlsModule.AxisTypes.Row;
    let pf2 = pivotTable.PivotFields.get_Item('Month');
    pf2.Axis = xlsModule.AxisTypes.Row;

    // Drag a field to the data area
    pivotTable.DataFields.Add(pivotTable.PivotFields.get_Item('Sales'), 'Sum of Sales', xlsModule.SubtotalTypes.Sum);

    // Set the pivot table style and calculate the data
    pivotTable.BuiltInStyle = xlsModule.PivotBuiltInStyles.PivotStyleMedium12;
    pivotTable.CalculateData();

    // Create a clustered column chart based on the pivot table
    let chart = sheet.Charts.Add({ pivotChartType: xlsModule.ExcelChartType.ColumnClustered, pivotTable: pivotTable });
    // Set the pivot chart position
    chart.TopRow = 9;
    chart.LeftColumn = 1;
    chart.RightColumn = 9;
    chart.BottomRow = 25;
    // Set the pivot chart title
    chart.ChartTitle = "Pivot Chart";

    // Save the workbook
    const outputFileName = 'PivotChart.xlsx';
    workbook.SaveToFile(outputFileName);
    workbook.Dispose();

    // Read the file from VFS and trigger download
    const fileArray = window.dotnetRuntime.Module.FS.readFile(outputFileName);
    const blob = new Blob([fileArray], { type: 'application/vnd.openxmlformats-officedocument.spreadsheetml.sheet' });
    const url = URL.createObjectURL(blob);
    const a = document.createElement('a');
    a.href = url;
    a.download = outputFileName;
    a.click();
    URL.revokeObjectURL(url);
  };

  return (
    <div style={{ textAlign: 'center', height: '300px' }}>
      <h1>Create Pivot Chart</h1>
      <button onClick={createPivotChart}>
        Generate
      </button>
    </div>
  );
}

export default App;
Pivot chart created in Excel with Spire.XLS for JavaScript
Show or Hide Field Buttons of an Excel Pivot Chart
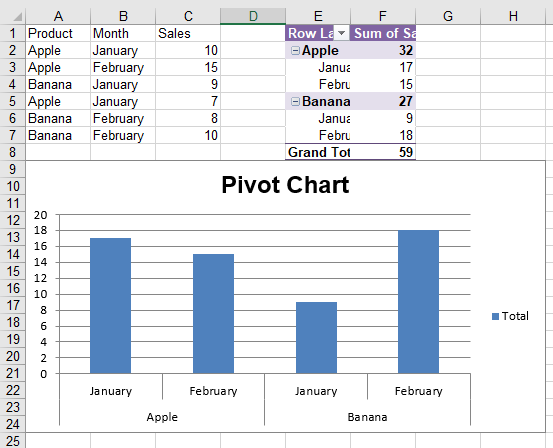
By default, a pivot chart displays field buttons, allowing users to interactively filter and switch field data. When generating reports, you may want to hide some or all of the field buttons to make the chart cleaner. Spire.XLS for JavaScript provides properties such as DisplayEntireFieldButtons, DisplayValueFieldButtons, DisplayAxisFieldButtons, DisplayLegendFieldButtons, and ShowReportFilterFieldButtons to flexibly control the display of each type of field button. The steps are as follows:
- Create a
Workbookobject and load an existing Excel file containing a pivot chart. - Get the worksheet via
workbook.Worksheets.get(). - Get the pivot chart object using
sheet.Charts.get(). - Control whether to display all field buttons via
DisplayEntireFieldButtons. - Control the display of each type of field button via
DisplayValueFieldButtons,DisplayAxisFieldButtons,DisplayLegendFieldButtons, andShowReportFilterFieldButtons. - Save the workbook to an Excel file using
SaveToFile().
Below is a complete code example demonstrating how to show or hide pivot chart field buttons in React (the example loads the PivotChart.xlsx file generated in the previous section):
function App() {
  const showHideFieldButtons = async () => {
    // Get the Spire.XLS WASM module
    const xlsModule = window.wasmModule?.spirexls;

    // Check if the module is ready
    if (!xlsModule) {
      alert('Spire.Xls is not ready yet');
      return;
    }

    // Load the sample file containing a pivot chart into the virtual file system (VFS)
    let excelFileName = 'PivotChart.xlsx';
    await window.spire.FetchFileToVFS(excelFileName, '', `${process.env.PUBLIC_URL}data/`);

    // Create a workbook object and load the existing file
    const workbook = new xlsModule.Workbook();
    workbook.LoadFromFile({ fileName: excelFileName });

    // Get the first worksheet
    let sheet = workbook.Worksheets.get(0);

    // Get the pivot chart
    let chart = sheet.Charts.get(0);

    // Control the display of all field buttons
    chart.DisplayEntireFieldButtons = true;

    // Hide the value field buttons
    chart.DisplayValueFieldButtons = false;
    // Hide the axis field buttons
    chart.DisplayAxisFieldButtons = false;
    // Hide the legend field buttons
    //chart.DisplayLegendFieldButtons = false;
    // Show the report filter field buttons
    //chart.ShowReportFilterFieldButtons = true;

    // Save the workbook
    const outputFileName = 'PivotChartFieldButtons.xlsx';
    workbook.SaveToFile(outputFileName);
    workbook.Dispose();

    // Read the file from VFS and trigger download
    const fileArray = window.dotnetRuntime.Module.FS.readFile(outputFileName);
    const blob = new Blob([fileArray], { type: 'application/vnd.openxmlformats-officedocument.spreadsheetml.sheet' });
    const url = URL.createObjectURL(blob);
    const a = document.createElement('a');
    a.href = url;
    a.download = outputFileName;
    a.click();
    URL.revokeObjectURL(url);
  };

  return (
    <div style={{ textAlign: 'center', height: '300px' }}>
      <h1>Show/Hide PivotChart Field Buttons</h1>
      <button onClick={showHideFieldButtons}>
        Generate
      </button>
    </div>
  );
}

export default App;
Pivot chart field buttons shown or hidden with Spire.XLS for JavaScript
Set the Format of Excel Pivot Chart Series
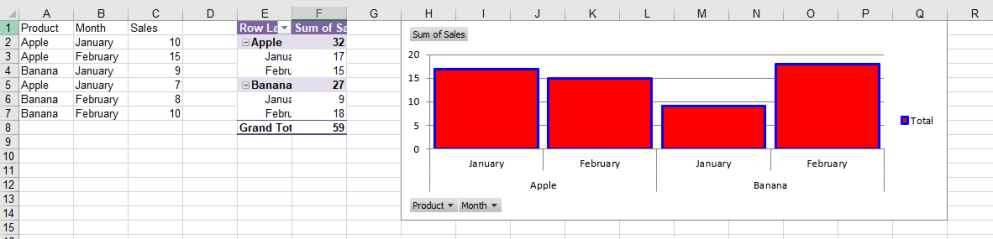
Formatting the series of a pivot chart can make the chart more visually appealing and clearly organized, conveying data information more effectively. With Spire.XLS for JavaScript, you can load an Excel file containing a pivot chart, get the pivot chart via the Charts.get() method, then set fill types, colors, and border styles via the series' DataFormat property, and set formats such as the gap width of the data bars via the format object returned by the GetCommonSerieFormat() method. The steps are as follows:
- Create a
Workbookobject. - Load an Excel file containing a pivot chart using the
LoadFromFile()method. - Get a specific worksheet in the Excel file using the
Worksheets.get()method. - Get the pivot chart in the worksheet using the
Charts.get()method. - Set the position and title of the pivot chart.
- Get the data series of the pivot chart using the
Series.get()method. - Set fill types, colors, and border styles via the
DataFormatproperty, and set formats such as the gap width of the data bars via theGetCommonSerieFormat()method. - Save the generated file using the
SaveToFile()method.
Below is a complete code example demonstrating how to set the format of pivot chart series in React (the example loads the PivotChart.xlsx file containing a pivot chart generated in the previous section):
function App() {
  const formatPivotChartSeries = async () => {
    // Get the Spire.XLS WASM module
    const xlsModule = window.wasmModule?.spirexls;

    // Check if the module is ready
    if (!xlsModule) {
      alert('Spire.Xls is not ready yet');
      return;
    }

    // Load the sample file containing a pivot table into the virtual file system (VFS)
    let excelFileName = 'PivotChart.xlsx';
    await window.spire.FetchFileToVFS(excelFileName, '', `${process.env.PUBLIC_URL}data/`);

    // Create a Workbook object
    const workbook = new xlsModule.Workbook();
    // Load the Excel file
    workbook.LoadFromFile({ fileName: excelFileName });

    // Get the first worksheet
    let sheet = workbook.Worksheets.get(0);

    // Get the pivot chart
    let chart = sheet.Charts.get(0);

    // Set the pivot chart position
    chart.TopRow = 1;
    chart.LeftColumn = 8;
    chart.RightColumn = 18;
    chart.BottomRow = 15;

    // Set the chart title
    chart.ChartTitle = "";

    // Add a series to the pivot chart
    let series = chart.Series.get(0);

    // Set the gap width of the data bars
    series.GetCommonSerieFormat().GapWidth = 10;
    // series.GetCommonSerieFormat().Overlap = 100;

    // Set the fill type, foreground color, and background color of the series
    series.DataFormat.Fill.FillType = xlsModule.ShapeFillType.SolidColor;
    series.DataFormat.ForeGroundColor = xlsModule.Color.get_Red();
    series.DataFormat.BackGroundColor = xlsModule.Color.get_White();

    // Set the border color, line style, and line weight of the series
    series.DataFormat.LineProperties.Pattern = xlsModule.ChartLinePatternType.Solid;
    series.DataFormat.LineProperties.Color = xlsModule.Color.get_Blue();
    series.DataFormat.LineProperties.CustomLineWeight = 2.5;

    // Add a shadow effect to the series
    series.DataFormat.IsShadow = true;

    // Save the workbook
    const outputFileName = 'PivotChartSeriesFormat.xlsx';
    workbook.SaveToFile(outputFileName);
    workbook.Dispose();

    // Read the file from VFS and trigger download
    const fileArray = window.dotnetRuntime.Module.FS.readFile(outputFileName);
    const blob = new Blob([fileArray], { type: 'application/vnd.openxmlformats-officedocument.spreadsheetml.sheet' });
    const url = URL.createObjectURL(blob);
    const a = document.createElement('a');
    a.href = url;
    a.download = outputFileName;
    a.click();
    URL.revokeObjectURL(url);
  };

  return (
    <div style={{ textAlign: 'center', height: '300px' }}>
      <h1>Format PivotChart Series</h1>
      <button onClick={formatPivotChartSeries}>
        Generate
      </button>
    </div>
  );
}

export default App;
Pivot chart series format set with Spire.XLS for JavaScript
FAQ
How to refresh a pivot chart to show the latest data?
Cause: A pivot chart is created based on a pivot table. After modifying the data source of the pivot table, the chart does not automatically sync the updates.
Solution: After modifying the data source, use the Cache.IsRefreshOnLoad property to make the pivot table refresh automatically when the file opens, so the pivot chart is updated accordingly:
// Get the pivot table
let pivotTable = sheet.PivotTables.get(0);
// Refresh the pivot table automatically when the file opens
pivotTable.Cache.IsRefreshOnLoad = true;
Why does my pivot chart not show any data?
Cause: The series of a pivot chart come from the summarized results of a pivot table. If the pivot table has not been calculated, or the pivot chart was not correctly associated with the pivot table, the chart may appear blank.
Solution: Call the CalculateData() method after creating the pivot table to calculate the results, and correctly associate the pivot table via the pivotTable parameter when creating the pivot chart:
// Calculate the data of the pivot table
pivotTable.CalculateData();

// Create a pivot chart based on the pivot table
let chart = sheet.Charts.Add({ pivotChartType: xlsModule.ExcelChartType.ColumnClustered, pivotTable: pivotTable });
Get a Free License
Spire.XLS for JavaScript offers a 30-day full-featured free trial license with no functional limitations. Apply here to evaluate before purchasing.
Extract and Replace Images in Excel with JavaScript in React
2026-08-07 07:55:22 Written by zaki zakiIn office automation workflows, you often need to batch-extract product images from Excel reports, replace outdated logos, or export a specific image individually. Spire.XLS for JavaScript handles all of these image operations directly in the browser via WebAssembly, using a virtual file system (VFS) to manage input and output files — no backend server is required.
This article covers three core features:
- Extract All Images from a Worksheet
- Extract a Specific Image
- Replace an Existing Image in a Worksheet
For installation and project setup, refer to Integrating Spire.XLS for JavaScript in a React Project. The examples below assume Spire.XLS is installed and the WebAssembly module is initialized.
Extract All Images from a Worksheet
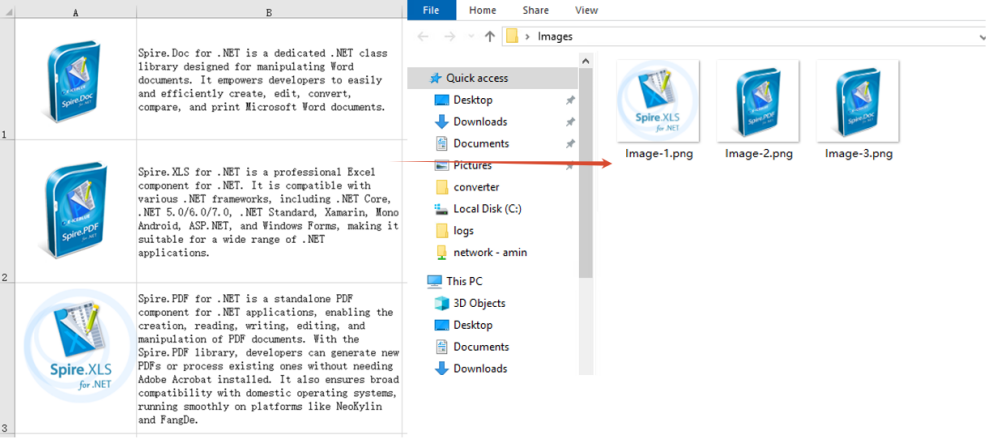
Batch-extracting all images from a worksheet is useful for backing up embedded images in reports, migrating product materials, and similar scenarios. The process consists of three steps: iterate over the Worksheet.Pictures collection, call the Picture.Save method on each image to save it to the VFS, then read each file and trigger a browser download.
function App() {
  const extractAllImages = async () => {
    // Get the Spire.XLS WASM module
    const xlsModule = window.wasmModule?.spirexls;

    // Check if the module is ready
    if (!xlsModule) {
      alert('Spire.Xls is not ready yet');
      return;
    }

    // Load the Excel file into VFS
    const inputFileName = 'ReadImages.xlsx';
    await window.spire.FetchFileToVFS(inputFileName, '', `${process.env.PUBLIC_URL}data/`);

    // Load the workbook and get the first worksheet
    const workbook = new xlsModule.Workbook();
    workbook.LoadFromFile({ fileName: inputFileName });
    const sheet = workbook.Worksheets.get(0);

    // Iterate through all pictures in the worksheet and export each one
    for (let i = 0; i < sheet.Pictures.Count; i++) {
      const pic = sheet.Pictures.get(i);
      const outputFileName = `Image-${i + 1}.png`;
      pic.Picture.Save(outputFileName);

      // Read the exported image file from VFS and trigger download
      const fileArray = window.dotnetRuntime.Module.FS.readFile(outputFileName);
      const blob = new Blob([fileArray], { type: "image/png" });
      const url = URL.createObjectURL(blob);
      const a = document.createElement('a');
      a.href = url;
      a.download = outputFileName;
      a.click();
      URL.revokeObjectURL(url);
    }

    // Release resources
    workbook.Dispose();
  };

  return (
    <div style={{ textAlign: 'center', height: '300px' }}>
      <h1>Extract All Images from Worksheet</h1>
      <button onClick={extractAllImages}>
        Extract All Images
      </button>
    </div>
  );
}

export default App;
Image files extracted and downloaded from the worksheet in batch
Extract a Specific Image
There are two common ways to extract a specific image from a worksheet: retrieve it directly by index, or iterate through pictures by name to find a match. The index approach suits scenarios where the picture position is known (for example, the first picture), while the name approach is better when you know the picture identifier in advance. The process consists of two steps: first locate the target image by index or name, then export it as a local file.
function App() {
  const extractImage = async () => {
    // Get the Spire.XLS WASM module
    const xlsModule = window.wasmModule?.spirexls;

    if (!xlsModule) {
      alert('Spire.Xls is not ready yet');
      return;
    }

    // Load the Excel file into VFS
    const inputFileName = 'ReadImages.xlsx';
    await window.spire.FetchFileToVFS(inputFileName, '', `${process.env.PUBLIC_URL}data/`);

    // Load the workbook and get the first worksheet
    const workbook = new xlsModule.Workbook();
    workbook.LoadFromFile({ fileName: inputFileName });
    const sheet = workbook.Worksheets.get(0);

    // Method 1: Extract by index (e.g., extract the second picture)
    const pic = sheet.Pictures.get(1);
    const outputFileName = 'ExtractByIndex.png';

    // // Method 2: Iterate through pictures by name to find a match
    // let pic = null;
    // const targetName = 'SpireXLS';
    // for (let i = 0; i < sheet.Pictures.Count; i++) {
    //   if (sheet.Pictures.get(i).Name === targetName) {
    //     pic = sheet.Pictures.get(i);
    //     break;
    //   }
    // }
    // const outputFileName = 'ExtractByName.png';

    // Save the picture to VFS and trigger download
    pic.Picture.Save(outputFileName);
    const fileArray = window.dotnetRuntime.Module.FS.readFile(outputFileName);
    const blob = new Blob([fileArray], { type: "image/png" });
    const url = URL.createObjectURL(blob);
    const a = document.createElement('a');
    a.href = url;
    a.download = outputFileName;
    a.click();
    URL.revokeObjectURL(url);

    workbook.Dispose();
  };

  return (
    <div style={{ textAlign: 'center', height: '300px' }}>
      <h1>Extract a Specific Image</h1>
      <button onClick={extractImage}>
        Extract Image
      </button>
    </div>
  );
}

export default App;
Specific image extracted and downloaded by index or name
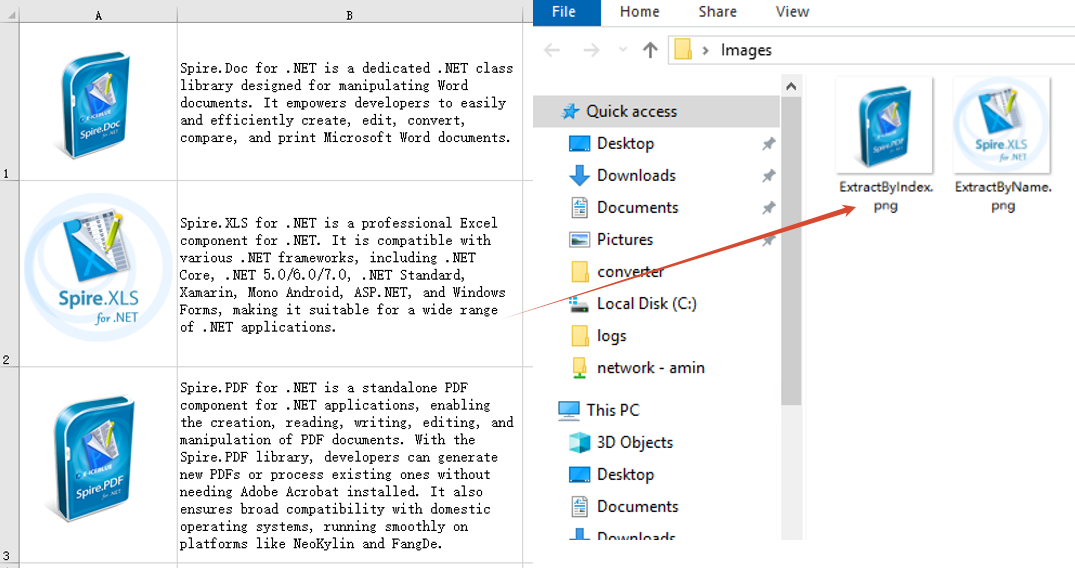
Replace an Existing Image in a Worksheet
Replacing an existing image in a worksheet is a common requirement when updating report logos, changing product display images, and in similar scenarios. The approach is to first retrieve the position and size information of the target image, then delete it via XlsShape.Convert, and finally insert a new image at the same position, setting the new image's size and offsets to match the original.
function App() {
  const replaceImage = async () => {
    // Get the Spire.XLS WASM module
    const xlsModule = window.wasmModule?.spirexls;

    // Check if the module is ready
    if (!xlsModule) {
      alert('Spire.Xls is not ready yet');
      return;
    }

    // Load the Excel file and the new image into VFS
    const inputFileName = 'ReadImages.xlsx';
    await window.spire.FetchFileToVFS(inputFileName, '', `${process.env.PUBLIC_URL}data/`);
    const newImageFile = 'Logo.png';
    await window.spire.FetchFileToVFS(newImageFile, '', `${process.env.PUBLIC_URL}data/`);

    // Load the workbook and get the first worksheet
    const workbook = new xlsModule.Workbook();
    workbook.LoadFromFile({ fileName: inputFileName });
    const sheet = workbook.Worksheets.get(0);

    // Get the first picture and its position and size information
    const oldPic = sheet.Pictures.get(0);
    const topRow = oldPic.TopRow;
    const leftColumn = oldPic.LeftColumn;
    const leftColumnOffset = oldPic.LeftColumnOffset;
    const topRowOffset = oldPic.TopRowOffset;
    const width = oldPic.Width;
    const height = oldPic.Height;

    // Delete the original picture
    xlsModule.XlsShape.Convert(oldPic).Remove();

    // Insert the new picture at the same position
    let picture = sheet.Pictures.Add({ topRow: topRow, leftColumn: leftColumn, fileName: newImageFile });

    // Set the new picture's size and offsets to match the original
    picture.Width = width;
    picture.Height = height;
    picture.LeftColumnOffset = leftColumnOffset;
    picture.TopRowOffset = topRowOffset;

    const outputFileName = 'ReplaceImage-out.xlsx';
    // Save the modified workbook
    workbook.SaveToFile({ fileName: outputFileName, version: xlsModule.ExcelVersion.Version2010 });
    // Release resources
    workbook.Dispose();

    // Read the generated file from VFS and trigger download
    const fileArray = window.dotnetRuntime.Module.FS.readFile(outputFileName);
    const blob = new Blob([fileArray], { type: "application/vnd.openxmlformats-officedocument.spreadsheetml.sheet" });
    const url = URL.createObjectURL(blob);
    const a = document.createElement('a');
    a.href = url;
    a.download = outputFileName;
    a.click();
    URL.revokeObjectURL(url);
  };

  return (
    <div style={{ textAlign: 'center', height: '300px' }}>
      <h1>Replace Image in Worksheet</h1>
      <button onClick={replaceImage}>
        Replace Image
      </button>
    </div>
  );
}

export default App;
The Excel worksheet after the image is replaced
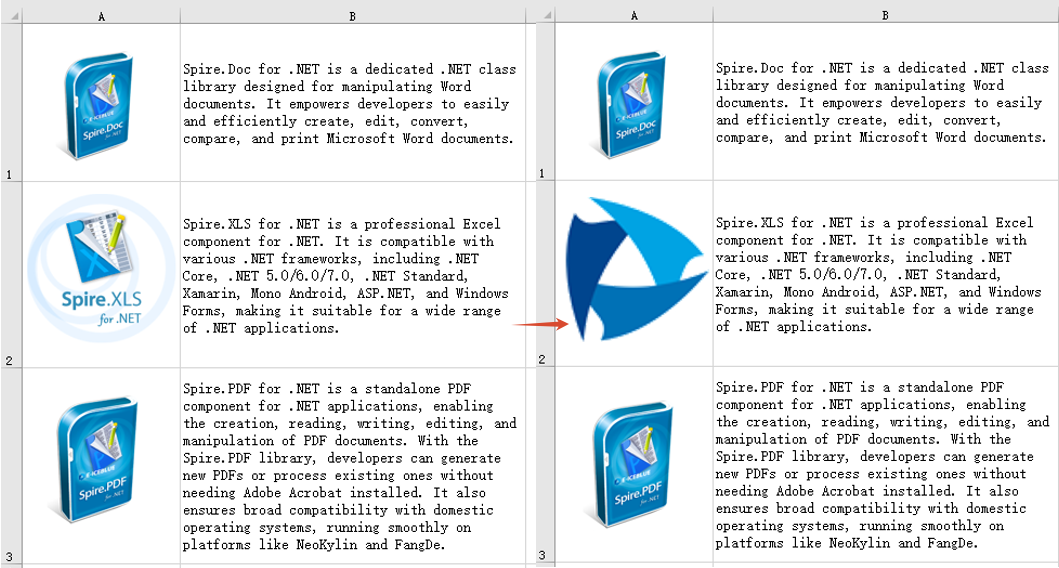
FAQ
Extracted images cannot be opened or the format is incorrect
Cause: The correct file extension was not specified when saving the image, or the MIME type does not match the image format.
Solution: Make sure the file extension used in the Picture.Save method matches the actual image format. If the image is in PNG format, the file extension should be .png; if it is in JPEG format, use .jpg. The Blob type used for the download should be set accordingly:
// PNG format
const blob = new Blob([fileArray], { type: "image/png" });

// JPEG format
const blob = new Blob([fileArray], { type: "image/jpeg" });
The position or size of the image changes after replacement
Cause: The position and size properties of the original image were not recorded before deletion, so the new image cannot be precisely aligned to the original position or retain its original size.
Solution: Save the position properties such as TopRow, LeftColumn, LeftColumnOffset, TopRowOffset and the size properties Width, Height before deleting the image. After inserting the new image, set these properties on the new picture so it matches the original:
// Insert the new picture (specify the row and column position)
let picture = sheet.Pictures.Add({ topRow: topRow, leftColumn: leftColumn, fileName: newImageFile });

// Set size and offsets to match the original
picture.Width = width;
picture.Height = height;
picture.LeftColumnOffset = leftColumnOffset;
picture.TopRowOffset = topRowOffset;
Get a Free License
Spire.XLS for JavaScript offers a 30-day full-featured free trial license with no functional limitations. Apply here to evaluate before purchasing.
Data labels are an essential element of Excel charts for displaying detailed information about data points, such as values, series names, and category names. Spire.XLS for JavaScript runs entirely in the browser via WebAssembly, using a virtual file system (VFS) to manage input and output files — no backend server required. It provides a complete API for controlling data label display content, font formatting, number format, position, background, borders, and other appearance properties.
This article covers two core features:
For installation and project setup, refer to Integrating Spire.XLS for JavaScript in a React Project. The examples below assume Spire.XLS is installed and the WebAssembly module is initialized.
Set Data Label Content and Font
Data labels can display various types of information, including values, series names, category names, and legend keys. With Spire.XLS for JavaScript, you can flexibly control the display content of data labels and customize their font styles to make the chart information clearer and more readable. The steps are as follows:
- Create a
Workbookobject and get the default worksheet. - Populate the worksheet with category labels and numeric data for the chart.
- Add a chart using
sheet.Charts.Add()and set the chart type. - Configure the chart's data range, position, and title.
- Enable data label display content (values, series names, category names) via the
DataLabelsproperty. - Set data label font properties (font name, size, color, bold, etc.).
- Save the workbook to an Excel file using
SaveToFile().
Below is a complete code example demonstrating how to set chart data label content and font in React:
function App() {
  const setDataLabelContentAndFont = async () => {
    // Get the Spire.XLS WASM module
    const xlsModule = window.wasmModule?.spirexls;

    // Check if the module is ready
    if (!xlsModule) {
      alert('Spire.Xls is not ready yet');
      return;
    }

    // Create a new workbook and get the default worksheet
    const workbook = new xlsModule.Workbook();
    let sheet = workbook.Worksheets.get(0);
    sheet.Name = "DataLabelDemo";

    // Populate chart data
    sheet.Range.get("A1").Value = "Month";
    sheet.Range.get("A2").Value = "Jan";
    sheet.Range.get("A3").Value = "Feb";
    sheet.Range.get("A4").Value = "Mar";
    sheet.Range.get("A5").Value = "Apr";
    sheet.Range.get("A6").Value = "May";
    sheet.Range.get("A7").Value = "Jun";

    sheet.Range.get("B1").Value = "Sales";
    sheet.Range.get("B2").NumberValue = 25;
    sheet.Range.get("B3").NumberValue = 18;
    sheet.Range.get("B4").NumberValue = 8;
    sheet.Range.get("B5").NumberValue = 13;
    sheet.Range.get("B6").NumberValue = 22;
    sheet.Range.get("B7").NumberValue = 28;

    // Add a line chart and set its data range
    let chart = sheet.Charts.Add({ chartType: xlsModule.ExcelChartType.LineMarkers });
    chart.DataRange = sheet.Range.get("B1:B7");
    chart.SeriesDataFromRange = false;

    // Set the chart position
    chart.TopRow = 5;
    chart.BottomRow = 26;
    chart.LeftColumn = 2;
    chart.RightColumn = 11;

    // Configure chart title
    chart.ChartTitle = "Data Labels Demo";
    chart.ChartTitleArea.IsBold = true;
    chart.ChartTitleArea.Size = 12;

    // Bind category labels
    let cs1 = chart.Series.get(0);
    cs1.CategoryLabels = sheet.Range.get("A2:A7");

    // Set data label display content: show values, series names, and category names
    cs1.DataPoints.DefaultDataPoint.DataLabels.HasValue = true;
    cs1.DataPoints.DefaultDataPoint.DataLabels.HasSeriesName = true;
    cs1.DataPoints.DefaultDataPoint.DataLabels.HasCategoryName = true;

    // Set data label delimiter
    cs1.DataPoints.DefaultDataPoint.DataLabels.Delimiter = ". ";

    // Customize data label font styles
    cs1.DataPoints.DefaultDataPoint.DataLabels.Size = 9;
    cs1.DataPoints.DefaultDataPoint.DataLabels.Color = xlsModule.Color.get_Red();
    cs1.DataPoints.DefaultDataPoint.DataLabels.FontName = "Calibri";
    cs1.DataPoints.DefaultDataPoint.DataLabels.IsBold = true;

    // Save the workbook
    const outputFileName = 'DataLabelContentAndFont.xlsx';
    workbook.SaveToFile(outputFileName);
    workbook.Dispose();

    // Read the file from VFS and trigger download
    const fileArray = window.dotnetRuntime.Module.FS.readFile(outputFileName);
    const blob = new Blob([fileArray], { type: 'application/vnd.openxmlformats-officedocument.spreadsheetml.sheet' });
    const url = URL.createObjectURL(blob);
    const a = document.createElement('a');
    a.href = url;
    a.download = outputFileName;
    a.click();
    URL.revokeObjectURL(url);
  };

  return (
    <div style={{ textAlign: 'center', height: '300px' }}>
      <h1>Set Data Label Content and Font</h1>
      <button onClick={setDataLabelContentAndFont}>
        Generate
      </button>
    </div>
  );
}

export default App;
Data label content and font set with Spire.XLS for JavaScript
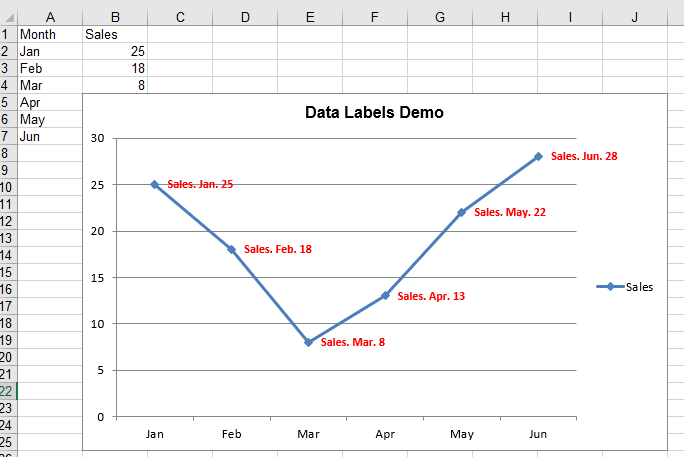
Adjust Data Label Position and Appearance
Beyond display content and font styles, the position and appearance of data labels are also important aspects of chart visual enhancement. Spire.XLS for JavaScript supports adjusting the display position of data labels through the DataLabelPositionType enumeration, and allows you to set fill colors, border styles, and shadow effects for data labels. The steps are as follows:
- Create a
Workbookobject and load an existing Excel file containing a chart. - Get the worksheet via
workbook.Worksheets.get(). - Get the chart object using
sheet.Charts.get(). - Iterate through the chart's data series and set the data label position using
DataLabels.Position. - Set a background fill color for the data labels via
FrameFormat.Fill. - Set border color and style for the data labels via
FrameFormat.Border. - Add shadow effects to data labels via
FrameFormat.Shadow(type, color, transparency, size, blur, angle, and distance). - Save the workbook to an Excel file using
SaveToFile().
Below is a complete code example demonstrating how to adjust chart data label position and appearance in React:
function App() {
  const setDataLabelPositionAndAppearance = async () => {
    // Get the Spire.XLS WASM module
    const xlsModule = window.wasmModule?.spirexls;

    // Check if the module is ready
    if (!xlsModule) {
      alert('Spire.Xls is not ready yet');
      return;
    }

    // Load the sample file into the virtual file system (VFS)
    let excelFileName = 'SampleChart.xlsx';
    await window.spire.FetchFileToVFS(excelFileName, '', `${process.env.PUBLIC_URL}data/`);

    // Create a workbook object and load the existing file
    const workbook = new xlsModule.Workbook();
    workbook.LoadFromFile({ fileName: excelFileName });

    // Get the first worksheet
    let sheet = workbook.Worksheets.get(0);

    // Get the first chart
    let chart = sheet.Charts.get(0);

    // Iterate through all data series and adjust data label position and appearance
    for (let i = 0; i < chart.Series.Count; i++) {
      let cs = chart.Series.get(i);
      // Set data point marker style and size to make data points more prominent
      cs.DataFormat.MarkerSize = 6;
      cs.DataFormat.MarkerStyle = xlsModule.ChartMarkerType.Circle;
      cs.DataFormat.MarkerForegroundColor = xlsModule.Color.get_Blue();
      cs.DataFormat.MarkerBackgroundColor = xlsModule.Color.get_White();

      let dataLabels = cs.DataPoints.DefaultDataPoint.DataLabels;

      // Enable value labels
      dataLabels.HasValue = true;

      // Set data label position
      dataLabels.Position = xlsModule.DataLabelPositionType.Right;

      // Set data label font color and size
      dataLabels.Color = xlsModule.Color.get_Blue();
      dataLabels.Size = 10;

      // Set pink fill background
      dataLabels.FrameFormat.Fill.FillType = xlsModule.ShapeFillType.SolidColor;
      dataLabels.FrameFormat.ForeGroundColor = xlsModule.Color.get_Pink();

      // Set red border
      dataLabels.FrameFormat.Border.Pattern = xlsModule.ChartLinePatternType.Solid;
      dataLabels.FrameFormat.Border.Color = xlsModule.Color.get_Red();

      // Set yellow shadow effect
      dataLabels.FrameFormat.Shadow.ShadowOuterType = xlsModule.XLSXChartShadowOuterType.OffsetDiagonalBottomLeft;
      dataLabels.FrameFormat.Shadow.Color = xlsModule.Color.get_Yellow();
      dataLabels.FrameFormat.Shadow.Transparency = 0;
      dataLabels.FrameFormat.Shadow.Size = 10;
      dataLabels.FrameFormat.Shadow.Blur = 2;
      dataLabels.FrameFormat.Shadow.Angle = 45;
      dataLabels.FrameFormat.Shadow.Distance = 8;
    }

    // Save the workbook
    const outputFileName = 'DataLabelPositionAndAppearance.xlsx';
    workbook.SaveToFile(outputFileName);
    workbook.Dispose();

    // Read the file from VFS and trigger download
    const fileArray = window.dotnetRuntime.Module.FS.readFile(outputFileName);
    const blob = new Blob([fileArray], { type: 'application/vnd.openxmlformats-officedocument.spreadsheetml.sheet' });
    const url = URL.createObjectURL(blob);
    const a = document.createElement('a');
    a.href = url;
    a.download = outputFileName;
    a.click();
    URL.revokeObjectURL(url);
  };

  return (
    <div style={{ textAlign: 'center', height: '300px' }}>
      <h1>Set Data Label Position and Appearance</h1>
      <button onClick={setDataLabelPositionAndAppearance}>
        Generate
      </button>
    </div>
  );
}

export default App;
Data label position and appearance adjusted with Spire.XLS for JavaScript
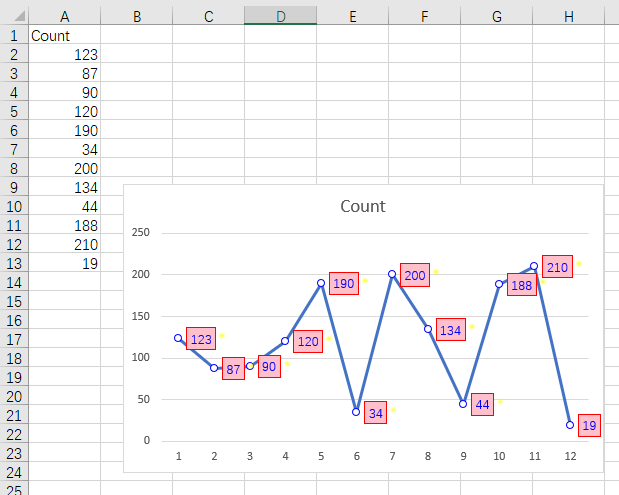
FAQ
How to modify the label content of a specific data point instead of the entire series?
Cause: DefaultDataPoint.DataLabels applies to all data points in a series and cannot control individual data points separately.
Solution: Use DataPoints.get(index) to access a specific data point and set its label:
// Modify the label text of the third data point
chart.Series.get(0).DataPoints.get(2).DataLabels.Text = "Peak";
chart.Series.get(0).DataPoints.get(2).DataLabels.HasValue = false;
How to set number format for data labels (decimal places, currency symbols)
Cause: The number format of data labels matches the cell format by default, but sometimes needs to be controlled independently.
Solution: Use the DataLabels.NumberFormat property to customize the number format:
// Show two decimal places
dataLabels.NumberFormat = "0.00";
// Display as percentage
dataLabels.NumberFormat = "0.0%";
// Display with currency symbol
dataLabels.NumberFormat = "$#,##0";
Get a Free License
Spire.XLS for JavaScript offers a 30-day full-featured free trial license with no functional limitations. Apply here to evaluate before purchasing.
Convert Excel to TXT or TXT to Excel with JavaScript in React
2026-08-03 02:29:40 Written by zaki zakiIn daily office work, data often needs to be exchanged between Excel spreadsheets and plain text (TXT) files. Spire.XLS for JavaScript runs entirely in the browser via WebAssembly, using a virtual file system (VFS) to manage input and output files — no backend server is required. It provides flexible APIs for controlling conversion parameters such as delimiters and encoding formats.
With Spire.XLS for JavaScript, you can export Excel worksheet data as structured text files, or import delimited text files to create fully formatted Excel workbooks. This makes data migration between different applications more convenient and efficient.
This article covers two core features:
For installation and project setup, refer to Integrating Spire.XLS for JavaScript in a React Project. The examples below assume Spire.XLS is installed and the WebAssembly module is initialized.
Convert Excel Worksheet Data to TXT
Exporting Excel data as a plain text file makes it convenient for further processing or analysis in other applications. With Spire.XLS for JavaScript, you can save the contents of a specified worksheet as a TXT file, with flexible control over the field separator and character encoding. The steps are as follows:
- Create a
Workbookobject and load an existing Excel file. - Retrieve a specific worksheet via
workbook.Worksheets.get(index). - Call the worksheet's
SaveToFile()method, specifying the output filename, separator, and encoding. - Dispose of the workbook resources, read the result file from VFS, and trigger the download.
Below is a complete code example demonstrating how to convert Excel to TXT in React:
function App() {
  const convertToText = async () => {
    // Get the Spire.XLS WASM module
    const xlsModule = window.wasmModule?.spirexls;

    // Check if the module is ready
    if (!xlsModule) {
      alert('Spire.Xls is not ready yet');
      return;
    }

    // Load the sample file into VFS
    await window.spire.FetchFileToVFS('Sample.xlsx', '', `${process.env.PUBLIC_URL}data/`);

    // Create a workbook object and load the Excel file
    const workbook = new xlsModule.Workbook();
    workbook.LoadFromFile({ fileName: 'Sample.xlsx' });

    // Get the first worksheet
    let sheet = workbook.Worksheets.get(0);

    // Save the worksheet as a TXT file with space separator and UTF-8 encoding
    const outputFileName = 'ExcelToTxt.txt';
    sheet.SaveToFile({
      fileName: outputFileName,
      separator: " ",
      encoding: xlsModule.Encoding.get_UTF8()
    });
    workbook.Dispose();

    // Read the file from VFS and trigger download
    const fileArray = window.dotnetRuntime.Module.FS.readFile(outputFileName);
    const blob = new Blob([fileArray], { type: 'text/plain' });
    const url = URL.createObjectURL(blob);
    const a = document.createElement('a');
    a.href = url;
    a.download = outputFileName;
    a.click();
    URL.revokeObjectURL(url);
  };

  return (
    <div style={{ textAlign: 'center', height: '300px' }}>
      <h1>Convert Excel to TXT</h1>
      <button onClick={convertToText}>
        Generate
      </button>
    </div>
  );
}

export default App;
Excel converted to TXT with Spire.XLS for JavaScript
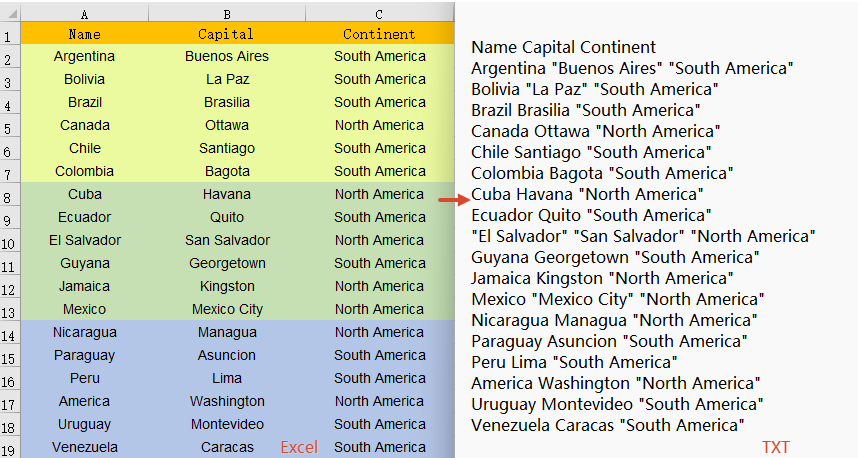
Convert TXT File to Excel Workbook
Importing a delimited text file into an Excel spreadsheet allows you to take full advantage of Excel's formatting, calculation, and charting capabilities. Spire.XLS for JavaScript supports TXT-to-Excel conversion by reading the text file content and writing data to the workbook cell by cell. Formatting such as bold headers can also be applied during the process. The steps are as follows:
- Load the font file and TXT sample file into the VFS.
- Read the TXT file content from VFS, split it by lines, and parse the cell data for each line.
- Create a
Workbookobject, iterate through the data array, and write data to worksheet cells row by row and column by column. - Apply bold styling to the header row and call
AllocatedRange.AutoFitColumns()to auto-fit column widths. - Save the workbook as an Excel file and trigger the download.
Below is a complete code example demonstrating how to convert TXT to Excel in React:
function App() {
  const convertToExcel = async () => {
    // Get the Spire.XLS WASM module
    const xlsModule = window.wasmModule?.spirexls;

    // Check if the module is ready
    if (!xlsModule) {
      alert('Spire.Xls is not ready yet');
      return;
    }

    // Load the font file to ensure proper text rendering
    await window.spire.FetchFileToVFS('ARIAL.TTF', '', `${process.env.PUBLIC_URL}font/`);

    // Load the TXT file into VFS
    await window.spire.FetchFileToVFS('Sample.txt', '', `${process.env.PUBLIC_URL}data/`);

    // Read the text file content from VFS
    const txtData = window.dotnetRuntime.Module.FS.readFile('Sample.txt');
    const text = typeof txtData === 'string' ? txtData : new TextDecoder('utf-8').decode(txtData);

    // Split by lines, compatible with \r\n and \n
    const lines = text.trim().split(/\r?\n/);

    // Parse each line of data (try tab delimiter first, then fallback to other delimiters)
    const data = [];
    for (const line of lines) {
      const trimmed = line.trim();
      if (!trimmed) continue;
      let cells = trimmed.split('\t');
      if (cells.length === 1) {
        cells = trimmed.split(/\s+/);
      }
      data.push(cells);
    }

    // Create a Workbook object
    const workbook = new xlsModule.Workbook();

    // Get the first worksheet
    const sheet = workbook.Worksheets.get(0);

    // Iterate through rows and columns in the data array and write to cells
    for (let row = 0; row < data.length; row++) {
      for (let col = 0; col < data[row].length; col++) {
        const cell = sheet.get_Item(row + 1, col + 1);
        cell.Value = data[row][col];
        // Bold the header row
        if (row === 0) {
          cell.Style.Font.IsBold = true;
        }
      }
    }

    // Auto-fit column widths
    sheet.AllocatedRange.AutoFitColumns();

    // Save the workbook and release resources
    const outputFileName = 'TxtToExcel.xlsx';
    workbook.SaveToFile({ fileName: outputFileName, version: xlsModule.ExcelVersion.Version2010 });
    workbook.Dispose();

    // Read the file from VFS and trigger download
    const fileArray = window.dotnetRuntime.Module.FS.readFile(outputFileName);
    const blob = new Blob([fileArray], { type: 'application/vnd.openxmlformats-officedocument.spreadsheetml.sheet' });
    const url = URL.createObjectURL(blob);
    const a = document.createElement('a');
    a.href = url;
    a.download = outputFileName;
    a.click();
    URL.revokeObjectURL(url);
  };

  return (
    <div style={{ textAlign: 'center', height: '300px' }}>
      <h1>Convert TXT to Excel</h1>
      <button onClick={convertToExcel}>
        Generate
      </button>
    </div>
  );
}

export default App;
TXT converted to Excel with Spire.XLS for JavaScript
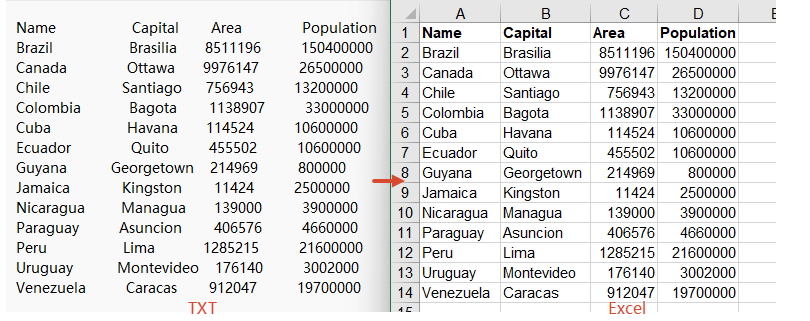
FAQ
How to handle encoding issues during conversion?
Cause: The TXT file in this example uses UTF-8 encoding. If the TXT file uses a different encoding format (such as GBK, GB2312, etc.), decoding it directly with TextDecoder('utf-8') will result in garbled text.
Solution: Specify the corresponding encoding type in the TextDecoder constructor parameter based on the actual encoding of the TXT file:
// UTF-8 encoding
const text = new TextDecoder('utf-8').decode(txtData);

// GBK encoding
const text = new TextDecoder('gbk').decode(txtData);

// GB2312 encoding
const text = new TextDecoder('gb2312').decode(txtData);

// UTF-16 encoding
const text = new TextDecoder('utf-16').decode(txtData);
How to handle TXT files with different delimiters?
Cause: TXT files may use different delimiters such as tabs (\t), spaces, commas (,), semicolons (;), etc. Choosing the wrong delimiter can lead to data parsing errors.
Solution: In JavaScript, you can specify different delimiters by modifying the parameter of the split() method:
// Tab delimiter
let cells = trimmed.split('\t');

// Comma delimiter
let cells = trimmed.split(',');

// Semicolon delimiter
let cells = trimmed.split(';');

// Regular expression: split by one or more whitespace characters (spaces, tabs, etc.)
let cells = trimmed.split(/\s+/);
Get a Free License
Spire.XLS for JavaScript offers a 30-day full-featured free trial license with no functional limitations. Apply here to evaluate before purchasing.
