
.NET (1327)
Children categories
Delete Text Boxes in PowerPoint with C# (Including Empty Ones)
2015-02-16 08:27:07 Written by Koohji Deleting text boxes in a PowerPoint presentation is a crucial step when cleaning up templates or removing unwanted content—but doing it manually can be time-consuming, especially when dealing with multiple slides. If you're looking for how to delete text boxes in PowerPoint using C#, you're in the right place. This guide covers everything from deleting a specific text box to removing empty ones or clearing all text boxes on a slide—providing practical, code-based solutions to streamline your workflow.
- Before We Start: Install PowerPoint Library
- Delete Specific Text Boxes in PowerPoint Slides
- Delete Empty Text Boxes in PowerPoint Slides
- Delete All Text Boxes from a PowerPoint Slide
- Conclusion
- FAQs
Before We Start: Install PowerPoint Library
Before we dive into the main content, let’s first set up the required tools. In this tutorial, we’ll be using Spire.Presentation for .NET to demonstrate how to delete text boxes in a PowerPoint presentation. This is a professional third-party PowerPoint library that allows you to manipulate slide elements—such as adding or deleting text boxes—without relying on Microsoft Office.
To install the library, you have two options:
- Download Spire.Presentation and install it manually from the official website.
- Use NuGet Package Manager, which is the recommended approach for most Visual Studio users. Simply run the following command in the Package Manager Console:
PM> Install-Package Spire.Presentation
This will automatically download and add the library to your project. A free version is available for learning or evaluation, with limited features but no time restrictions.
How to Delete a Specific Text Box in PowerPoint Slides Using C#
When you only need to remove or replace a small part of the slide content, it's best to precisely target the specific text box you want to delete. With the help of Spire.Presentation, you can easily delete a specific text box from a PowerPoint presentation. The basic workflow includes: loading the PowerPoint file, locating the slide, identifying the target text box, and removing it.
We’ll first look at the complete code, then break it down step by step.
Code Example – Remove "Text Box 1" from Slide 2:
using Spire.Presentation;

namespace RemoveTextbox
{
    class Program
    {
        static void Main(string[] args)
        {
            // Create a Presentation instance and load a PowerPoint file
            Presentation ppt = new Presentation("/input/pre1.pptx", FileFormat.Pptx2010);
            // Get the second slide
            ISlide slide = ppt.Slides[1];

            // Loop through all shapes on the slide
            for (int i = 0; i < slide.Shapes.Count;)
            {
                IAutoShape shape = slide.Shapes[i] as IAutoShape;

                // Check if the shape is a text box and contains the specified text
                if (shape != null && shape.IsTextBox && shape.TextFrame.Text.Equals("Text Box 1"))
                {
                    //  Remove the text box
                    slide.Shapes.Remove(shape);
                }
                else
                {
                    i++;
                }
            }

            // Save the modified presentation
            string outputPath = "/output/Deletespecifictextbox.pptx";
            ppt.SaveToFile(outputPath, FileFormat.Pptx2010);
            System.Diagnostics.Process.Start(outputPath);
        }
    }
}
Text boxes removing result preview: 
Key steps explained:
- Create a Presentation class and load a PowerPoint file.
- Get a slide with Presentation.Slides[] property.
- Loop through shapes on the slide and check if they are IAutoShape and contain the target text.
- If it is, delete the text box using ISlide.Shapes.Remove() method.
After cleaning up empty or unwanted text boxes, you may want to add new content dynamically. Learn how to add a paragraph to a PowerPoint slide using C# in this related tutorial.
How to Delete Empty Text Boxes in PowerPoint with C#
When working with PowerPoint presentations, deleting empty text boxes is a common requirement. These unused placeholders can clutter your slides and negatively affect the overall layout. Cleaning them up is an important step in creating a polished and professional presentation.
Code example - Delete all text boxes on the 3rd slide from a Microsoft PowerPoint Presentation:
using Spire.Presentation;

namespace RemoveEmptyTextboxes
{
    class Program
    {
        static void Main(string[] args)
        {
            // Load the PowerPoint presentation
            Presentation ppt = new Presentation("/input/pre1.pptx", FileFormat.Pptx2010);

            // Access the third slide (index starts from 0)
            ISlide slide = ppt.Slides[2];

            // Iterate through all shapes on the slide
            for (int i = 0; i < slide.Shapes.Count;)
            {
                IAutoShape shape = slide.Shapes[i] as IAutoShape;

                // Check if the shape is a text box and its text is null, empty, or whitespace
                if (shape != null && shape.IsTextBox && string.IsNullOrWhiteSpace(shape.TextFrame.Text))
                {
                    // Remove empty text box
                    slide.Shapes.Remove(shape);
                }
                else
                {
                    i++;
                }
            }

            // Save the updated presentation
            string outputPath = "/output/RemoveEmptyTextboxes.pptx";
            ppt.SaveToFile(outputPath, FileFormat.Pptx2010);
        }
    }
}
Text boxes removing result preview: 
Key steps explained:
- Load a PowerPoint file and get a slide.
- Iterate through shapes on the slide and check if they are text boxes and empty.
- Delete all empty text boxes through ISlide.Shapes.Remove() method.
Tip: If you want to delete all empty text boxes from the entire PowerPoint presentation, simply loop through each slide instead of targeting a single one. You can do this by iterating through presentation.Slides and checking each shape on every slide.
foreach (ISlide slide in presentation.Slides)
{
    for (int i = slide.Shapes.Count - 1; i >= 0; i--)
    {
        IShape shape = slide.Shapes[i];
        if (shape is IAutoShape autoShape && string.IsNullOrWhiteSpace(autoShape.TextFrame.Text))
        {
            slide.Shapes.Remove(shape);
        }
    }
}
How to Delete All Text Boxes in PowerPoint Slides Using C#
Now let’s move on to the final section—deleting all text boxes from a slide, including both empty and non-empty ones. This approach is even simpler than the previous examples. You just need to loop through the shapes on a slide, check whether each shape is an IAutoShape, and remove it using the ISlide.Shapes.Remove(shape) method. We won’t break down the steps here, as the code is self-explanatory. Just copy the snippet below, update the file path and other details as needed, and you're good to go.
Code example - Delete all text boxes on the second slide:
namespace RemoveTextboxes
{
    internal class Program
    {
        static void Main(string[] args)
        {
            // Create a new Presentation object
            Presentation ppt = new Presentation("/input/pre1.pptx", FileFormat.Pptx2010);

            // Get the second slide and loop through its shapes
            ISlide slide = ppt.Slides[1];

            for (int i = 0; i < slide.Shapes.Count;)
            {
                // Check if the shape is an AutoShape and remove it
                IAutoShape shape = slide.Shapes[i] as IAutoShape;
                slide.Shapes.Remove(shape);
            }
            // Save the updated presentation
            ppt.SaveToFile("/output/deletetextbox.pptx", FileFormat.Pptx2010);
            System.Diagnostics.Process.Start("Result.pptx");
        }
    }
}
Text boxes removing result preview: 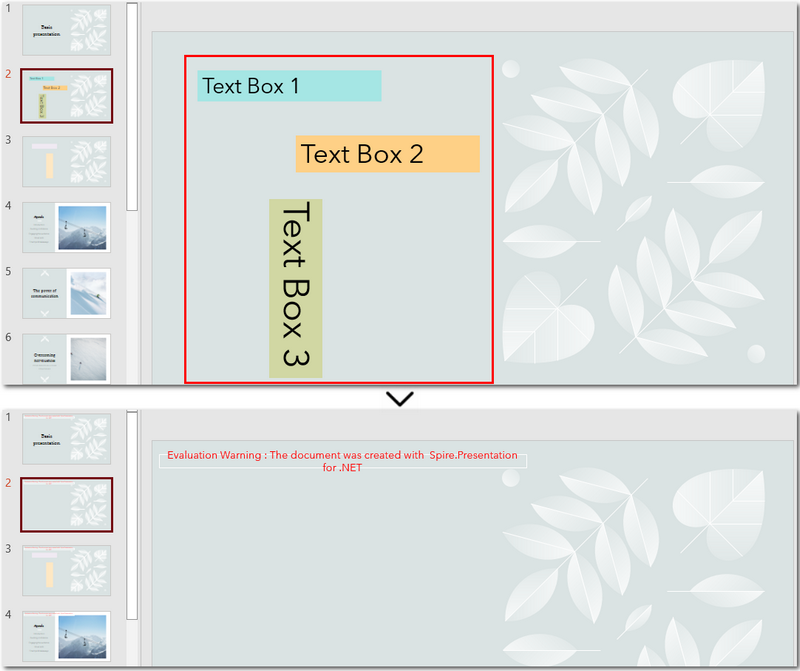
The Conclusion
The page explored how to delete text boxes in PowerPoint using C#. Whether you’re removing a specific text box, deleting empty text boxes, or clearing all text boxes, the process becomes simple and straightforward with the help of Spire.Presentation for .NET. If you’re interested in this PowerPoint library, you can request a free 30-day trial license to explore its full capabilities.
FAQs about Deleting Text Boxes in PowerPoint
1. Why can't I delete a text box in PowerPoint?
There are a few possible reasons: the text box might be part of the slide master, grouped with other elements, or accidentally locked. If you're automating PowerPoint using C#, make sure you correctly access the Shapes collection of the target slide and identify the right shape type (e.g., IAutoShape) before attempting to delete it.
2. How do I delete a text box from a PowerPoint slide using C#?
You can access the slide using Presentation.Slides[index], loop through the Shapes collection, find the text box (typically an IAutoShape), and remove it with ISlide.Shapes.Remove(shape). Full code examples are provided in this article for deleting specific, empty, or all text boxes.
How to Convert Embedded Excel Sheet to Word Table in C#, VB.NET
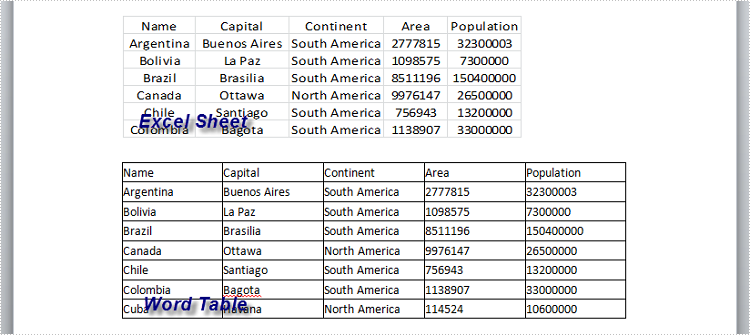
2015-02-11 01:04:49 Written by KoohjiIn our daily work, we may receive Word documents that will sometimes contain embedded Excel object (sheet) and we need to convert embedded Excel sheet to Word table so that we can easily change the date or format the table with style. In this article, you will learn how to convert embedded Excel sheet to Word table using Spire.Doc and Spire.XLS in C#, VB.NET.
Firstly, you need to download Spire.Office because Spire.Doc and Spire.XLS will be used in the same program. Add Spire.Doc.dll and Spire.XLS.dll as references in your VS project. Then follow the program guidance below to finish this work.
Step 1: Create a new Word document, load the sample file. Get the paragraph that contains the Excel object from the section. Initialize a new datatable.
Document doc = new Document("Sample.docx", Spire.Doc.FileFormat.Docx2010);
Section section = doc.Sections[0];
Paragraph para = section.Paragraphs[2];
DataTable dt = new DataTable();
Step 2: Traverse every DocumentObject in the paragraph, use IF statement to test if DocumentObject is OLE object, use another IF statement to test if OLE object type is Excel.Sheet.12. If yes, save the data of OLE object to a workbook through LoadFromStrem(). Then export data from worksheet to datatable.
foreach (DocumentObject obj in para.ChildObjects)
{
    if (DocumentObjectType.OleObject == obj.DocumentObjectType)
    {
        DocOleObject dObj = obj as DocOleObject;
        if (dObj.ObjectType == "Excel.Sheet.12")
        {
            Workbook wb = new Workbook();
            wb.LoadFromStream(new MemoryStream(dObj.NativeData));
            Worksheet ws = wb.Worksheets[0];
            dt = ws.ExportDataTable(ws.AllocatedRange, false);
        }
    }
}
Step 3: Create a new Word table and set row number and column number according to rows and columns of datatable. Export data from datatable to Word table.
Table table = section.AddTable(true);
 table.ResetCells(dt.Rows.Count, dt.Columns.Count);

 for (int i = 0; i < dt.Rows.Count; i++)
 {
     for (int j = 0; j < dt.Columns.Count; j++)
     {
         string text = dt.Rows[i][j] as string;
         table.Rows[i].Cells[j].AddParagraph().AppendText(text);
     }
 }
Step 4: Save the file.
doc.SaveToFile("Result.docx", Spire.Doc.FileFormat.Docx2010);
Result:
Full Code:
using Spire.Doc;
using Spire.Doc.Documents;
using Spire.Doc.Fields;
using Spire.Xls;
using System.Data;
using System.IO;
namespace ApplyTableStyles
{
    class Program
    {

        static void Main(string[] args)
        {

            Document doc = new Document("Sample.docx", Spire.Doc.FileFormat.Docx2010);
            Section section = doc.Sections[0];
            Paragraph para = section.Paragraphs[2];
            DataTable dt = new DataTable();

            foreach (DocumentObject obj in para.ChildObjects)
            {
                if (DocumentObjectType.OleObject == obj.DocumentObjectType)
                {
                    DocOleObject dObj = obj as DocOleObject;
                    if (dObj.ObjectType == "Excel.Sheet.12")
                    {
                        Workbook wb = new Workbook();
                        wb.LoadFromStream(new MemoryStream(dObj.NativeData));
                        Worksheet ws = wb.Worksheets[0];
                        dt = ws.ExportDataTable(ws.AllocatedRange, false);
                    }
                }
            }

            Table table = section.AddTable(true);
            table.ResetCells(dt.Rows.Count, dt.Columns.Count);

            for (int i = 0; i < dt.Rows.Count; i++)
            {
                for (int j = 0; j < dt.Columns.Count; j++)
                {
                    string text = dt.Rows[i][j] as string;
                    table.Rows[i].Cells[j].AddParagraph().AppendText(text);
                }
            }

            doc.SaveToFile("Result.docx", Spire.Doc.FileFormat.Docx2010);
        }
    }
}
Imports Spire.Doc
Imports Spire.Doc.Documents
Imports Spire.Doc.Fields
Imports Spire.Xls
Imports System.Data
Imports System.IO
Namespace ApplyTableStyles
	Class Program

		Private Shared Sub Main(args As String())

			Dim doc As New Document("Sample.docx", Spire.Doc.FileFormat.Docx2010)
			Dim section As Section = doc.Sections(0)
			Dim para As Paragraph = section.Paragraphs(2)
			Dim dt As New DataTable()

			For Each obj As DocumentObject In para.ChildObjects
				If DocumentObjectType.OleObject = obj.DocumentObjectType Then
					Dim dObj As DocOleObject = TryCast(obj, DocOleObject)
					If dObj.ObjectType = "Excel.Sheet.12" Then
						Dim wb As New Workbook()
						wb.LoadFromStream(New MemoryStream(dObj.NativeData))
						Dim ws As Worksheet = wb.Worksheets(0)
						dt = ws.ExportDataTable(ws.AllocatedRange, False)
					End If
				End If
			Next

			Dim table As Table = section.AddTable(True)
			table.ResetCells(dt.Rows.Count, dt.Columns.Count)

			For i As Integer = 0 To dt.Rows.Count - 1
				For j As Integer = 0 To dt.Columns.Count - 1
					Dim text As String = TryCast(dt.Rows(i)(j), String)
					table.Rows(i).Cells(j).AddParagraph().AppendText(text)
				Next
			Next

			doc.SaveToFile("Result.docx", Spire.Doc.FileFormat.Docx2010)
		End Sub
	End Class
End Namespace
Speaker notes in PowerPoint are specific contents that appear only on the presenter's monitor when presenting the slideshow. They can remind the presenter of the important points that he needs to explain to the audience. In this article, we will demonstrate how to add, read or delete speaker notes in PowerPoint in C# and VB.NET using Spire.Presentation for .NET.
Install Spire.Presentation for .NET
To begin with, you need to add the DLL files included in the Spire.Presentation for.NET package as references in your .NET project. The DLL files can be either downloaded from this link or installed via NuGet.
PM> Install-Package Spire.Presentation
Add Speaker Notes in PowerPoint in C# and VB.NET
The following are the main steps to add speaker notes to a PowerPoint document:
- Create a Presentation instance and load a PowerPoint document using Presentation.LoadFromFile() method.
- Get the desired slide that you want to add speaker notes to through Presentation.Slides[slideIndex] property.
- Add a notes slide to the slide using ISlide.AddNotesSlides() method.
- Create a TextParagraph instance.
- Set text for the paragraph through TextParagraph.Text property, then append the paragraph to the notes slide using NotesSlide.NotesTextFrame.Paragraphs.Append() method.
- Save the result document using Presentation.SaveToFile() method.
- C#
- VB.NET
using Spire.Presentation;
namespace AddSpeakerNotes
{
internal class Program
{
static void Main(string[] args)
{
//Load a PowerPoint document
Presentation ppt = new Presentation();
ppt.LoadFromFile("Sample.pptx");
//Get the first slide
ISlide slide = ppt.Slides[0];
//Add a notes slide
NotesSlide notesSlide = slide.AddNotesSlide();
//Add a paragraph to the notes slide
TextParagraph paragraph = new TextParagraph();
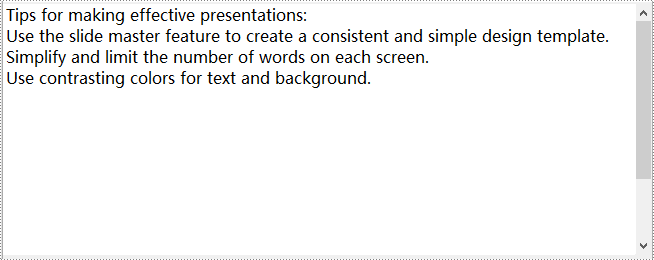
paragraph.Text = "Tips for making effective presentations:";
notesSlide.NotesTextFrame.Paragraphs.Append(paragraph);
//Add a paragraph to the notes slide
paragraph = new TextParagraph();
paragraph.Text = "Use the slide master feature to create a consistent and simple design template.";
notesSlide.NotesTextFrame.Paragraphs.Append(paragraph);
//Add a paragraph to the notes slide
paragraph = new TextParagraph();
paragraph.Text = "Simplify and limit the number of words on each screen.";
notesSlide.NotesTextFrame.Paragraphs.Append(paragraph);
//Add a paragraph to the notes slide
paragraph = new TextParagraph();
paragraph.Text = "Use contrasting colors for text and background.";
notesSlide.NotesTextFrame.Paragraphs.Append(paragraph);
//Set the bullet type and bullet style for specific paragraphs on the notes slide
for (int i = 2; i < notesSlide.NotesTextFrame.Paragraphs.Count;i++)
{
notesSlide.NotesTextFrame.Paragraphs[i].BulletType = TextBulletType.Numbered;
notesSlide.NotesTextFrame.Paragraphs[i].BulletStyle = NumberedBulletStyle.BulletArabicPeriod;
}
//Save the result document
ppt.SaveToFile("SpeakerNotes.pptx", FileFormat.Pptx2013);
}
}
}

Read Speaker Notes in PowerPoint in C# and VB.NET
The following are the steps to read the speaker notes on a PowerPoint slide:
- Create a Presentation instance and load the PowerPoint document using Presentation.LoadFromFile() method.
- Get the desired slide that you want to read speaker notes from through Presentation.Slides[slideIndex] property.
- Get the notes slide from the slide through ISlide.NotesSlide property.
- Get the speaker notes from the notes slide through NotesSlide.NotesTextFrame.Text property.
- Create a StringBuilder instance.
- Append the speaker notes to the string builder, then write them into a .txt file.
- C#
- VB.NET
using Spire.Presentation;
using System.Text;
using System.IO;

namespace ReadSpeakerNotes
{
    internal class Program
    {
        static void Main(string[] args)
        {
            //Load the PowerPoint document
            Presentation ppt = new Presentation();
            ppt.LoadFromFile("SpeakerNotes.pptx");

            //Get the first slide
            ISlide slide = ppt.Slides[0];

            //Get the notes slide from the first slide
            NotesSlide notesSlide = slide.NotesSlide;
            //Get the speaker notes from the notes slide
            string notes = notesSlide.NotesTextFrame.Text;
            //Create a StringBuilder instance
            StringBuilder sb = new StringBuilder();
            //Append the speaker notes to the string builder
            sb.AppendLine(notes);

            //Save to .txt file
            File.WriteAllText("SpeakerNotes.txt", sb.ToString());
        }
    }
}
Delete Speaker Notes in PowerPoint in C# and VB.NET
The following are the steps to delete speaker notes from a PowerPoint slide:
- Create a Presentation instance and load the PowerPoint document using Presentation.LoadFromFile() method.
- Get the desired slide that you want to delete speaker notes from through Presentation.Slides[slideIndex] property.
- Get the notes slide from the slide through ISlide.NotesSlide property.
- Delete a specific speaker note from the notes slide using NotesSlide.NotesTextFrame.Paragraphs.RemoveAt(paragraphIndex) method or delete all the speaker notes from the notes slide using NotesSlide.NotesTextFrame.Paragraphs.Clear() method.
- Save the result document using Presentation.SaveToFile() method.
- C#
- VB.NET
using Spire.Presentation;
using System.Text;
using System.IO;

namespace DeleteSpeakerNotes
{
    internal class Program
    {
        static void Main(string[] args)
        {
            //Load the PowerPoint document
            Presentation ppt = new Presentation();
            ppt.LoadFromFile("SpeakerNotes.pptx");

            //Get the first slide
            ISlide slide = ppt.Slides[0];
            //Get the notes slide from the slide
            NotesSlide notesSlide = slide.NotesSlide;

            //Remove a specific speaker note from notes slide
            //notesSlide.NotesTextFrame.Paragraphs.RemoveAt(1);

            //Remove all the speaker notes from notes slide
            notesSlide.NotesTextFrame.Paragraphs.Clear();

            //Save the result document
            ppt.SaveToFile("DeleteSpeakerNotes.pptx", FileFormat.Pptx2013);

        }
    }
}
Apply for a Temporary License
If you'd like to remove the evaluation message from the generated documents, or to get rid of the function limitations, please request a 30-day trial license for yourself.
The transition of Slide can make presentation of PPT files more attractive. Spire.Presentation for .NET allows developers to manage or customize the slide transition of the slides. Developers can not only apply different slide transitions on the slides, but also customize the behavior of these transition.
To create simple slide transition and set speed and sound mode for transition, follow the steps below:
Step 1: Download Spire.Presentation and add references in VS.
Step 2: Create an instance of Presentation and add a new presentation file.
Presentation ppt = new Presentation();
ppt.LoadFromFile(fp.TestPath + "first_quarter_business_upd.ppt");
Step 3: There are 23 transition types can be set by Spire.Presentation, such as Circle, Cover, Plus, Push, etc. These transitions can be found in TransitionType enum.
ppt.Slides[0].SlideShowTransition.Type = TransitionType.Push;

Step 4: We just applied a simple transition on the slide. Now, to make that even better and controlled, we can set the speed of the transition to create a more customized effect. Spire.Presentation offers Fast, Medium, None, Slow 4 options.
ppt.Slides[0].SlideShowTransition.Speed = TransitionSpeed.Slow;
Step 5: Set the transition sound mode such as None, StartSound, StopPreviousSound.
ppt.Slides[0].SlideShowTransition.SoundMode = TransitionSoundMode.StartSound;
Step 6: Finally write the modified presentation as a PPTX file.
ppt.SaveToFile("setTransitons.pptx", FileFormat.Pptx2010);
The PdfBorders class in Spire.PDF mainly contains three properties - DashStyle, Color and Width. By setting the value of these properties, you're able to change the appearance of grid border. In this article, I'll take color as an example to explain how to design gird border with Spire.PDF in C#.
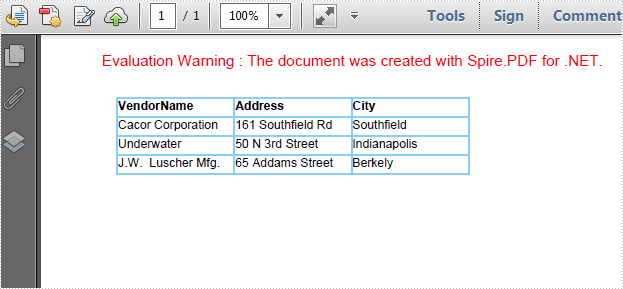
As is shown in the following screenshot, Spire.PDF enables programmers to add color to PDF grid border as well as making the border as invisible.
Code Snippets:
Step 1: Create a new PDF document.
PdfDocument document = new PdfDocument();
PdfPageBase page=document.Pages.Add();
Step 2: Create a string array, create a 4 rows x 3 columns grid according to the length of string array. Set column width and row height.
String[] data
    = {
         "VendorName;Address;City",
         "Cacor Corporation;161 Southfield Rd;Southfield",
         "Underwater;50 N 3rd Street;Indianapolis",
         "J.W.  Luscher Mfg.;65 Addams Street;Berkely"
       };
 PdfGrid grid = new PdfGrid();
 for (int r = 0; r < data.Length; r++)
 {
     PdfGridRow row = grid.Rows.Add();
 }
 grid.Columns.Add(3);
 float width = page.Canvas.ClientSize.Width - (grid.Columns.Count + 1);
 grid.Columns[0].Width = width*0.15f;
 grid.Columns[1].Width = width * 0.15f;
 grid.Columns[2].Width = width * 0.15f;
 float height=page.Canvas.ClientSize.Height-(grid.Rows.Count+1);
 grid.Rows[0].Height = 12.5f;
 grid.Rows[1].Height = 12.5f;
 grid.Rows[2].Height = 12.5f;
 grid.Rows[3].Height = 12.5f;
Step 3: Insert data into grid.
for (int r = 0; r < data.Length; r++)
 {
     String[] rowData = data[r].Split(';');
     for (int c = 0; c < rowData.Length; c++)
     {
         grid.Rows[r].Cells[c].Value = rowData[c];
     }
 }
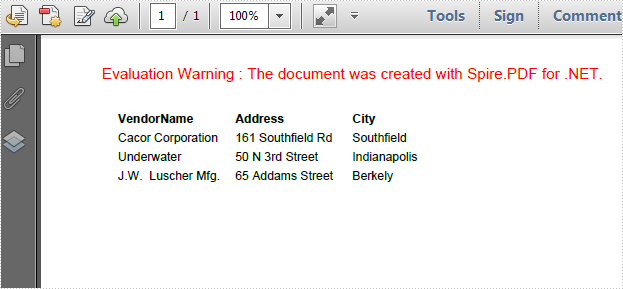
Step 4: Initialize a new instance of PdfBorders and set color property as LightBlue or Transparent. Apply border style to PDF grid.
PdfBorders border = new PdfBorders();
border.All = new PdfPen(Color.LightBlue);

foreach (PdfGridRow pgr in grid.Rows)
{
    foreach (PdfGridCell pgc in pgr.Cells)
    {
        pgc.Style.Borders = border;
    }
}
Step 5: Draw the grid on PDF and save the file.
PdfLayoutResult result = grid.Draw(page, new PointF(10, 30));
document.SaveToFile("result.pdf");
System.Diagnostics.Process.Start("result.pdf");
Entire Code:
using Spire.Pdf;
using Spire.Pdf.Graphics;
using Spire.Pdf.Grid;
using System;
using System.Drawing;


namespace ChangeColorofGridBorder
{
    class Program
    {
        static void Main(string[] args)
        {
            PdfDocument document = new PdfDocument();
            PdfPageBase page = document.Pages.Add();

            String[] data
               = {
        "VendorName;Address;City",
        "Cacor Corporation;161 Southfield Rd;Southfield",
        "Underwater;50 N 3rd Street;Indianapolis",
        "J.W.  Luscher Mfg.;65 Addams Street;Berkely"
      };
            PdfGrid grid = new PdfGrid();
            for (int r = 0; r < data.Length; r++)
            {
                PdfGridRow row = grid.Rows.Add();
            }
            grid.Columns.Add(3);
            float width = page.Canvas.ClientSize.Width - (grid.Columns.Count + 1);
            grid.Columns[0].Width = width * 0.15f;
            grid.Columns[1].Width = width * 0.15f;
            grid.Columns[2].Width = width * 0.15f;
            float height = page.Canvas.ClientSize.Height - (grid.Rows.Count + 1);
            grid.Rows[0].Height = 12.5f;
            grid.Rows[1].Height = 12.5f;
            grid.Rows[2].Height = 12.5f;
            grid.Rows[3].Height = 12.5f;

            //insert data to grid
            for (int r = 0; r < data.Length; r++)
            {
                String[] rowData = data[r].Split(';');
                for (int c = 0; c < rowData.Length; c++)
                {
                    grid.Rows[r].Cells[c].Value = rowData[c];
                }
            }

            grid.Rows[0].Style.Font = new PdfTrueTypeFont(new Font("Arial", 8f, FontStyle.Bold), true);

            //Set borders color to LightBule
            PdfBorders border = new PdfBorders();
            border.All = new PdfPen(Color.LightBlue);

            foreach (PdfGridRow pgr in grid.Rows)
            {
                foreach (PdfGridCell pgc in pgr.Cells)
                {
                    pgc.Style.Borders = border;
                }
            }

            PdfLayoutResult result = grid.Draw(page, new PointF(10, 30));
            document.SaveToFile("result.pdf");
            System.Diagnostics.Process.Start("result.pdf");
        }
    }
}
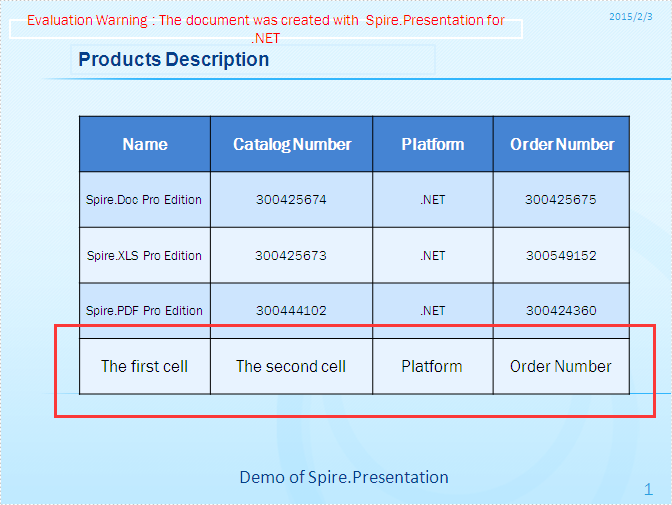
Spire.Presentation is a powerful and standalone .NET component which designed for developers to operate the PowerPoint documents in C# and VB.NET. Spire.Presentation enable developers to insert a new table, remove rows or columns in an existing table, and remove the whole table from the presentation slides. This article we will show you how to add a row to an existing table in presentation slide by using C# code.
Step 1: Create Presentation instance and load file.
Presentation ppt = new Presentation();
ppt.LoadFromFile("table.pptx");
Step 2: Get the table within the PowerPoint document.
ITable table = ppt.Slides[0].Shapes[4] as ITable;
Step 3: Add a new row into the PowerPoint table and set the data for the cells in the new row.
//Get the first row
TableRow row = table.TableRows[0];
//Clone the row and add it to the end of table
table.TableRows.Append(row);
int rowCount = table.TableRows.Count;
//Get the last row
TableRow lastRow = table.TableRows[rowCount - 1];
//Set new data of the first cell of last row
lastRow[0].TextFrame.Text = " The first cell";
//Set new data of the second cell of last row
lastRow[1].TextFrame.Text = " The second cell";
Step 4: Save the document and preview it.
ppt.SaveToFile("result.pptx", FileFormat.Pptx2010);
System.Diagnostics.Process.Start("result.pptx");
Effective screenshot:
Full codes:
using Spire.Presentation;

namespace AddRow
{

    class Program
    {
        static void Main(string[] args)
        {
            Presentation ppt = new Presentation();
            ppt.LoadFromFile("table.pptx");

            ITable table = ppt.Slides[0].Shapes[4] as ITable;
            TableRow row = table.TableRows[0];
            table.TableRows.Append(row);
            int rowCount = table.TableRows.Count;
            TableRow lastRow = table.TableRows[rowCount - 1];
            lastRow[0].TextFrame.Text = "The first cell";
            lastRow[1].TextFrame.Text = "The second cell";

            ppt.SaveToFile("result.pptx", FileFormat.Pptx2010);
            System.Diagnostics.Process.Start("result.pptx");

        }
    }
}
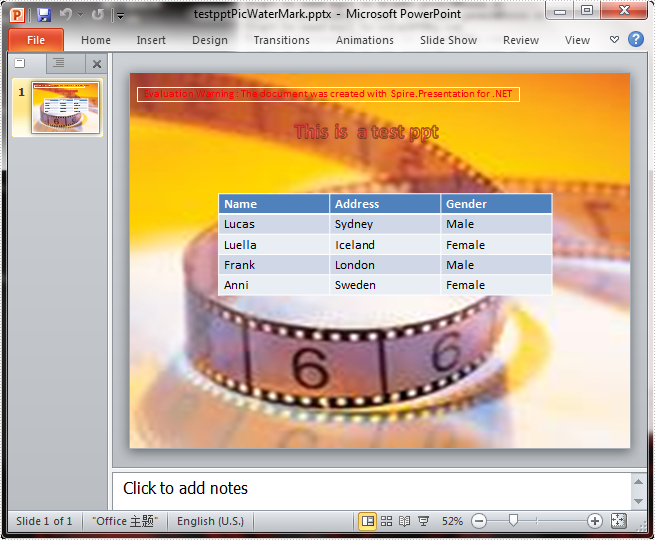
Spire.Presentation offer developers an easy way to add the watermarks to the presentation slides. There are two kinds of watermarks in PowerPoint documents: text watermark and image watermark. We'll learn how to add image watermark in PowerPoint document via Spire.Presentation.
The goal of the article is to make an image as a background img watermark as following screenshot.
Here comes to the steps of how to add image watermarks in C#:
Step 1: Create a presentation document and load the document from the file
Presentation ppt = new Presentation();
ppt.LoadFromFile(fileName);
Step 2: Get the image you want to add as image watermark.
IImageData image = ppt.Images.Append(Image.FromFile("Header.png"));
Step 3: Set the properties of SlideBackground, and then fill the image as watermark.
ppt.Slides[0].SlideBackground.Type = Spire.Presentation.Drawing.BackgroundType.Custom;
ppt.Slides[0].SlideBackground.Fill.FillType = FillFormatType.Picture;
ppt.Slides[0].SlideBackground.Fill.PictureFill.FillType=PictureFillType.Stretch;
ppt.Slides[0].SlideBackground.Fill.PictureFill.Picture.EmbedImage = image;
step4: Save the document to a new file.
ppt.SaveToFile(resultFileName, Spire.Presentation.FileFormat.PPT);
Full codes:
using Spire.Presentation;
using Spire.Presentation.Drawing;
using System.Drawing;
namespace AddimageWatermark
{

    class Program
    {

        static void Main(string[] args)
        {
            Presentation ppt = new Presentation();
            ppt.LoadFromFile(fileName);
            IImageData image = ppt.Images.Append(Image.FromFile("Header.png"));
            ppt.Slides[0].SlideBackground.Type = Spire.Presentation.Drawing.BackgroundType.Custom;
            ppt.Slides[0].SlideBackground.Fill.FillType = FillFormatType.Picture;
            ppt.Slides[0].SlideBackground.Fill.PictureFill.FillType = PictureFillType.Stretch;
            ppt.Slides[0].SlideBackground.Fill.PictureFill.Picture.EmbedImage = image;

            if (fileExtensions == ".ppt")
            {
                ppt.SaveToFile(resultFileName, Spire.Presentation.FileFormat.PPT);
            }
            else
            {
                ppt.SaveToFile(resultFileName, Spire.Presentation.FileFormat.Pptx2007);
            }

            Viewer(resultFileName);
        }
    }
}
How to extract the attachments from PDF document via PDFViewer
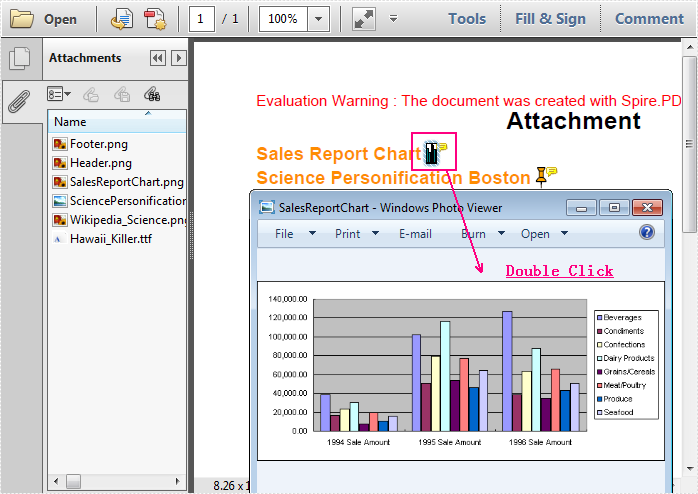
2015-01-29 07:58:39 Written by KoohjiSometimes we need to make use of the attachments added to the PDF files. There are 2 kinds of attachment in pdf, one is common attachment that added to the file directly, the other is attachment annotations which is add to the particular place as an annotation like the following picture, when you click correlative icon, that attachment will be opened.
In this article, we will learn how to extract these two kinds of attachment in C# via Spire.PdfViewer.
Here are the steps:
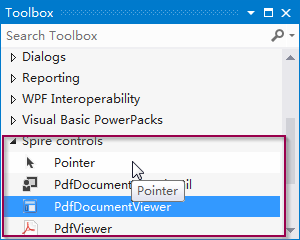
Step 1: Download PdfViewer, add PdfViewer Control to VS Toolbox (How to add control).
Step 2: Create a Windows Forms application, design Form as below.
- Two buttons respectively for common attachment and attachment annotation, and set name for them.
- One open file button and one close attachment button.
- A PdfDocmentViewer in the middle and one ViewList on the bottom.
Step 3: Get attachments
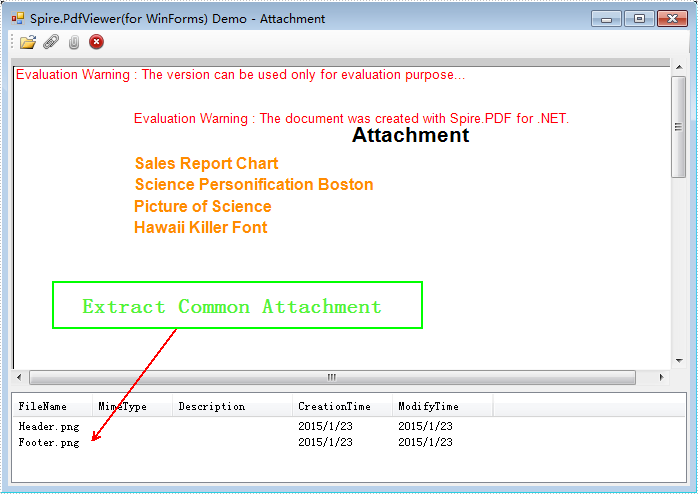
1) Get common attachment via methord GetAttachments(), then traverse attachment array and get common attachment property.
PdfDocumentAttachment[] attchments = this.pdfDocumentViewer1.GetAttachments();
if (attchments != null && attchments.Length > 0)
         {
             for (int i = 0; i < attchments.Length; i++)
             {
                 PdfDocumentAttachment attachment = attchments[i];
                 string fileName = attachment.FileName;
                 string mimeType = attachment.MimeType;
                 string desc = attachment.Description;
                 DateTime createDate = attachment.CreationTime;
                 DateTime modifyDate = attachment.ModifyTime;
                 Object data = attachment.Data;
                 ListViewItem item = new ListViewItem();
                 item.Text = Path.GetFileName(fileName);
                 item.SubItems.Add(mimeType);
                 item.SubItems.Add(desc);
                 item.SubItems.Add(createDate.ToShortDateString());
                 item.SubItems.Add(modifyDate.ToShortDateString());
                 item.Tag = attachment;
                 this.listView1.Items.Add(item);
             }
         }
Results:
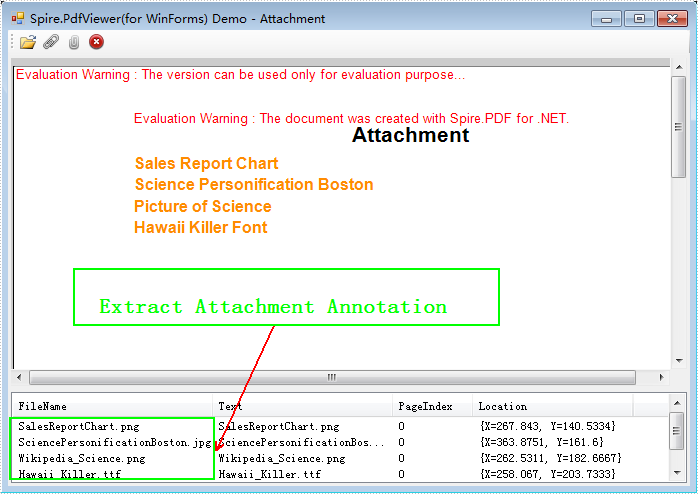
2) Extract attachment annotation:
Get attachment annotations via methord GetAttachmentAnnotaions(). Then traverse annotation array and save each annotation property as an individual item in listview.
PdfDocumentAttachmentAnnotation[] annotations = this.pdfDocumentViewer1.GetAttachmentAnnotaions();
if (annotations != null && annotations.Length > 0)
         {
             for (int i = 0; i < annotations.Length; i++)
             {
                 PdfDocumentAttachmentAnnotation annotation = annotations[i];
                 ListViewItem item = new ListViewItem(annotation.FileName);
                 item.SubItems.Add(annotation.Text);
                 item.SubItems.Add(annotation.PageIndex.ToString());
                 item.SubItems.Add(annotation.Location.ToString());
                 item.Tag = annotation;
                 this.listView1.Items.Add(item);
             }
         }
Results:
3) ListView
Here if we click the file name information of annotation attachment in the listView, PdfDocumentViewer will go to specified attachment annotation.
if (this.m_isAttachmentAnnotation)
     {
         PdfDocumentAttachmentAnnotation annotation = (PdfDocumentAttachmentAnnotation)this.listView1.SelectedItems[0].Tag;
         this.pdfDocumentViewer1.GotoAttachmentAnnotation(annotation);
     }
Double click it, the attachment can be saved to local. Get data of annotation, and write into file.
PdfDocumentAttachmentAnnotation annotation = (PdfDocumentAttachmentAnnotation)item.Tag;
byte[] data = annotation.Data;
writer.Write(data);
About saving common attachment:
PdfDocumentAttachment annotation = (PdfDocumentAttachment)item.Tag;
byte[] data = annotation.Data;
writer.Write(data);
Spire.PDFViewer is a powerful PDF Viewer component performed on .NET and WPF. It enables developers to load PDF document from stream, file and byte array. Also it supports rotation, page layout setup and thumbnail control. Worth a shot. Click to know more
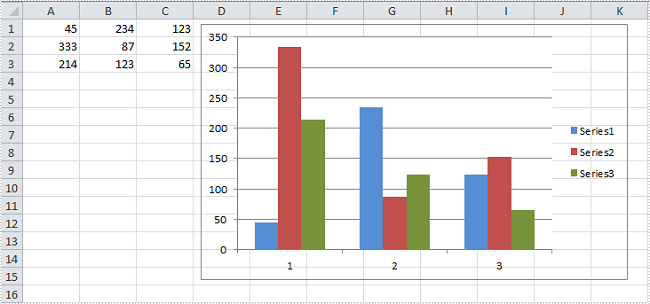
A chart filled with an image of company logo or propaganda is more impressive than a plain chart; adding a proper image into a chart as background will dramatically draw attention from your readers. As is similar to MS Excel, Spire.XLS enables users to insert pictures to specific chart elements such as chart area, bar area and plot area. In this article, I'll introduce how to enhance your chart by inserting image in chart area and plot area in C#, VB.NET.
Test File:
Code Snippet for Inserting Background Image:
Step 1: Create a new workbook and load the test file
Workbook workbook = new Workbook();
workbook.LoadFromFile("test.xlsx");
Step 2: Get the first worksheet from workbook, get the first chart from worksheet.
Worksheet ws = workbook.Worksheets[0];
Chart chart = ws.Charts[0];
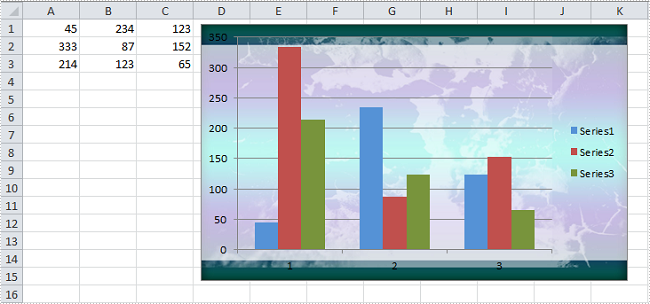
Step 3:
A) Insert chart area with a custom picture and set the transparency of plot area as 0.9. If you don't make plot area transparent, it will cover up the background image filled in chart area. Anyway, it all depends on your own needs.
chart.ChartArea.Fill.CustomPicture(Image.FromFile("05.jpg"), "None");
chart.PlotArea.Fill.Transparency = 0.9;
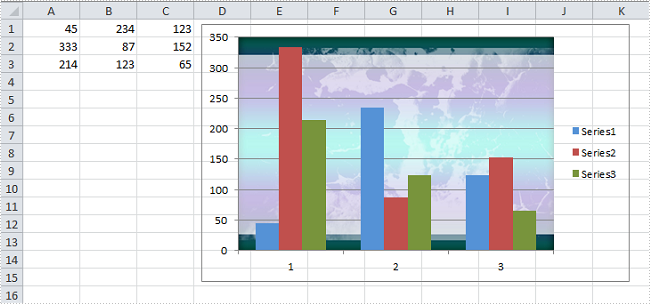
B) Insert plot area with a custom picture
chart.PlotArea.Fill.CustomPicture(Image.FromFile("01.jpg"), "None");
Step 4: Save the file
workbook.SaveToFile("Sample.xlsx",ExcelVersion.Version2010);
Result:
A) Fill chart area with image
B) Fill plot area with image
Full Code:
using Spire.Xls;
using System.Drawing;
namespace FillChartElement
{
    class Program
    {

        static void Main(string[] args)
        {

            Workbook workbook = new Workbook();
            workbook.LoadFromFile("test.xlsx");

            Worksheet ws = workbook.Worksheets[0];
            Chart chart = ws.Charts[0];

            // A. Fill chart area with image
            chart.ChartArea.Fill.CustomPicture(Image.FromFile("05.jpg"), "None");
            chart.PlotArea.Fill.Transparency = 0.9;

            //// B.Fill plot area with image
            //chart.PlotArea.Fill.CustomPicture(Image.FromFile("05.jpg"), "None");

            workbook.SaveToFile("Sample.xlsx", ExcelVersion.Version2010);
        }
    }
}
Imports Spire.Xls
Imports System.Drawing
Namespace FillChartElement
	Class Program

		Private Shared Sub Main(args As String())

			Dim workbook As New Workbook()
			workbook.LoadFromFile("test.xlsx")

			Dim ws As Worksheet = workbook.Worksheets(0)
			Dim chart As Chart = ws.Charts(0)

			' A. Fill chart area with image
			chart.ChartArea.Fill.CustomPicture(Image.FromFile("05.jpg"), "None")
			chart.PlotArea.Fill.Transparency = 0.9

			'''/ B.Fill plot area with image
			'chart.PlotArea.Fill.CustomPicture(Image.FromFile("05.jpg"), "None");

			workbook.SaveToFile("Sample.xlsx", ExcelVersion.Version2010)
		End Sub
	End Class
End Namespace
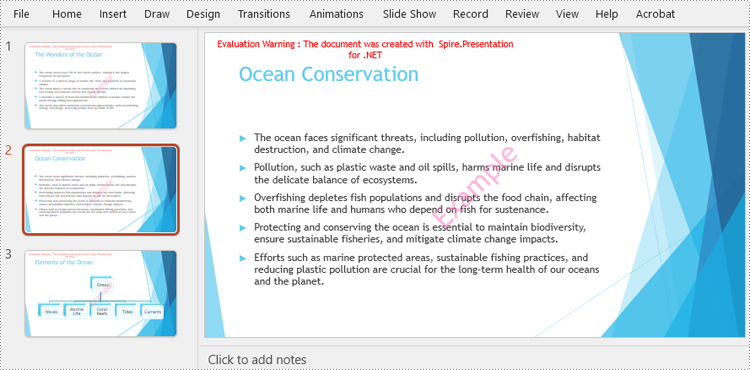
Inserting text watermarks into PowerPoint presentations is an effective way to protect intellectual property and ensure content authenticity of these documents. Spire.Presentation for .NET provides a powerful and flexible way to programmatically add text watermarks to PowerPoint slides. Unlike PowerPoint's built-in features, this approach allows for batch processing, precise control over watermark placement and appearance, and integration into larger .NET applications.
This article will demonstrate how to insert text watermarks to PowerPoint presentations with C# using the Spire.Presentation for .NET library.
Install Spire.Presentation for .NET
To begin with, you need to add the DLL files included in the Spire.Presentation for.NET package as references in your .NET project. The DLL files can be either downloaded from this link or installed via NuGet.
PM> Install-Package Spire.Presentation
Insert a Single Watermark into PowerPoint Slides
Using Spire.Presentation for .NET, developers can add a single text watermark to a PowerPoint presentation by creating a locked transparent text box with the watermark in a custom style on each page. The detailed steps are as follows:
- Create an instance of Presentation class and load a PowerPoint file using Presentation.LoadFromFile() method.
- Define the watermark text, create a Font object, and measure the size of the text.
- Get the size of the slides in the presentation through Presentation.SlideSize.Size property.
- Create a RectangleF object based on the text size and the slide size.
- Iterate through the slides in the presentation:
- Create an IAutoShape object on each slide at the position of the rectangle using ISlide.Shapes.AppendShape() method.
- Set the style of the shape using the properties under IAutoShape class.
- Add the watermark text to the shape through IAutoShape.TextFrame.Text property.
- Get the watermark text as a TextRange object through IAutoShape.TextFrame.TextRange property.
- Set the format of the watermark text through the properties under TextRange class.
- Save the presentation using Presentation.SaveToFile() method.
- C#
using Spire.Presentation;
using Spire.Presentation.Drawing;
using System.Drawing;

namespace SingleTextWatermarkPowerPoint
{
    class Program
    {
        static void Main(string[] args)
        {
            // Create an instance of Presentation
            Presentation presentation = new Presentation();

            // Load a PowerPoint file
            presentation.LoadFromFile("Sample.pptx");

            // Define the watermark text and create a font for it
            string text = "Example";
            // Create a font object
            Font font = new Font("Arial", 50);
            // Measure the size of the watermark text
            Graphics graphics = Graphics.FromImage(new Bitmap(1, 1));
            SizeF size = graphics.MeasureString(text, font);

            // Get the slide size
            SizeF slideSize = presentation.SlideSize.Size;

            // Create a retangle based on the text size and page size
            RectangleF rect = new RectangleF((slideSize.Width - size.Width) / 2, (slideSize.Height - size.Height) /2, size.Width, size.Height);

            // Iterate through the slides in the presentation
            foreach (ISlide slide in presentation.Slides)
            {
                // Create a shape of watermark on each slide
                IAutoShape watermark = slide.Shapes.AppendShape(ShapeType.Rectangle, rect);
                // Set the style of the watermark
                watermark.Fill.FillType = FillFormatType.None;
                watermark.ShapeStyle.LineColor.Color = Color.Empty;
                watermark.Rotation = -45;
                watermark.Locking.SelectionProtection = true;
                watermark.Line.FillType = FillFormatType.None;
                // Add the watermark text to the shape
                watermark.TextFrame.Text = text;
                // Set the style of the watermark text
                TextRange textRange = watermark.TextFrame.TextRange;
                textRange.Fill.FillType = FillFormatType.Solid;
                textRange.Fill.SolidColor.Color = Color.FromArgb(120, Color.HotPink);
                textRange.FontHeight = 50;
            }

            // Save the presentation
            presentation.SaveToFile("output/PowerPointSingleTextWatermark.pptx", FileFormat.Auto);
            presentation.Dispose();
        }
    }
}
Insert Repeated Watermarks into PowerPoint Slides
Developers can insert repeated text watermarks into slides by drawing multiple identical text watermarks at specified intervals on the slides. Here are the detailed steps:
- Create an instance of Presentation class and load a PowerPoint file using Presentation.LoadFromFile() method.
- Define the watermark text, create a Font object, and measure the size of the text.
- Get the size of the slides in the presentation through Presentation.SlideSize.Size property.
- Iterate through the slides in the presentation:
- Define the start position and the intervals.
- Add watermark shapes and text and set their format.
- Move the lateral position to the next interval on the row after finishing adding a watermark.
- Move the vertical position to the next row after finishing adding the watermarks of each row.
- Save the presentation using Presentation.SaveToFile() method.
- C#
using Spire.Presentation.Drawing;
using Spire.Presentation;
using System.Drawing;

namespace RepeatedTextWatermarkPowerPoint
{
    class Program
    {
        static void Main(string[] args)
        {
            // Create an instance of Presentation
            Presentation presentation = new Presentation();

            // Load a PowerPoint file
            presentation.LoadFromFile("Sample.pptx");

            // Define the watermark text and create a font for it
            string text = "Example";
            // Create a font object
            Font font = new Font("Arial", 20);
            // Measure the size of the watermark text
            Graphics graphics = Graphics.FromImage(new Bitmap(1, 1));
            SizeF size = graphics.MeasureString(text, font);

            // Get the slide size
            SizeF slideSize = presentation.SlideSize.Size;

            // Iterate through the slides in the presentation
            foreach (ISlide slide in presentation.Slides)
            {
                float x = 30;
                float y = 80;
                for (int i = 0; i < 3; i++)
                {
                    for (int j = 0; j < 3; j++)
                    {
                        // Create a rectangle
                        RectangleF rect = new RectangleF(x, y, size.Width, size.Height);
                        IAutoShape watermark = slide.Shapes.AppendShape(ShapeType.Rectangle, rect);
                        // Set the style of the watermark
                        watermark.Fill.FillType = FillFormatType.None;
                        watermark.ShapeStyle.LineColor.Color = Color.Empty;
                        watermark.Rotation = -45;
                        watermark.Locking.SelectionProtection = true;
                        watermark.Line.FillType = FillFormatType.None;
                        // Add the watermark text to the shape
                        watermark.TextFrame.Text = text;
                        // Set the style of the watermark text
                        TextRange textRange = watermark.TextFrame.TextRange;
                        textRange.Fill.FillType = FillFormatType.Solid;
                        textRange.Fill.SolidColor.Color = Color.FromArgb(120, Color.HotPink);
                        textRange.FontHeight = 20;
                        x += ((slideSize.Width - 60) / 3 + size.Width / 2);
                    }
                    x = 30;
                    y += ((slideSize.Height - 160) / 3 + size.Height / 2);
                }
            }

            // Save the presentation
            presentation.SaveToFile("output/PowerPointRepeatedTextWatermark.pptx", FileFormat.Auto);
            presentation.Dispose();
        }
    }
}

Apply for a Temporary License
If you'd like to remove the evaluation message from the generated documents, or to get rid of the function limitations, please request a 30-day trial license for yourself.
