
.NET (1327)
Children categories
Convert TIFF to PDF in C# – Multi-Page & Batch Examples
2014-07-22 03:46:39 Written by Administrator
Converting TIFF to PDF using C# is a common requirement in .NET document processing workflows. Developers often need to transform scanned documents or multi-page TIFF files into PDF format for better compatibility, easier distribution, and standardized document management.
TIFF files are widely used in scanning and archiving systems, especially for storing multiple pages in a single file. However, they are not always ideal for sharing or cross-platform viewing, while PDF provides a more universal and consistent format.
With Spire.PDF for .NET, you can efficiently convert TIFF images to PDF using simple and reliable C# code. This article demonstrates how to perform TIFF to PDF conversion in .NET, including handling multi-page TIFF images, adjusting page layouts, and applying best practices for real-world applications.
1. Understanding the Task
TIFF (Tagged Image File Format) is a flexible image format that supports multiple pages within a single file. This makes it popular for:
- Scanned documents: Multi-page contracts, invoices, and forms
- Document archiving: Preserving document history in a single file
- Medical imaging: Storing diagnostic images with multiple views
- Fax transmissions: Traditional fax systems often use TIFF format
Converting TIFF to PDF offers several advantages:
- Universal compatibility: PDF viewers are available on all platforms
- Smaller file size: PDF compression can reduce storage requirements
- Better distribution: PDF is the standard for document sharing
- Enhanced security: PDF supports encryption and access controls
2. Convert TIFF to PDF Using Spire.PDF
This section provides step-by-step examples for converting TIFF images to PDF using Spire.PDF in C#.
Install Spire.PDF for .NET
First, install the library via NuGet Package Manager:
Install-Package FreeSpire.PDF
Or using the .NET CLI:
dotnet add package FreeSpire.PDF
You can also download the Spire.PDF for .NET package and add it to your project manually.
Convert a Single-Page TIFF to PDF
For single-page TIFF files, the simplest approach is to create a PDF page that matches the original image dimensions and draw the image directly onto it. This ensures the TIFF content fills the entire PDF page without unwanted margins or scaling issues.
using Spire.Pdf;
using Spire.Pdf.Graphics;
using System.Drawing;

// Load the TIFF image
PdfImage tiffImage = PdfImage.FromFile("Sample_Page.tiff");

// Create a new PDF document
PdfDocument pdf = new PdfDocument();

// Remove default page margins
pdf.PageSettings.Margins.All = 0;

// Get image dimensions
float width = tiffImage.PhysicalDimension.Width;
float height = tiffImage.PhysicalDimension.Height;

// Add a PDF page with the same size as the TIFF image
PdfPageBase page = pdf.Pages.Add(new SizeF(width, height));

// Draw the image to fully fill the page
page.Canvas.DrawImage(tiffImage, 0, 0, width, height);

// Save the PDF document
pdf.SaveToFile("Sample_Page.pdf");
pdf.Close();

Key API calls:
PdfImage.FromFile: Loads the TIFF image into a PDF-compatible objectPageSettings.Margins.All: Removes default margins to allow full-page renderingPages.Add(SizeF): Creates a PDF page that matches the TIFF dimensionsCanvas.DrawImage: Draws the TIFF image to completely fill the pageSaveToFile: Saves the converted PDF file
This method preserves the original TIFF dimensions and ensures the output PDF displays the image cleanly across the full page.
For more image-to-PDF scenarios, see how to convert images to PDF in C#.
Convert Multi-Page TIFF to PDF
Multi-page TIFF files contain multiple frames, with each frame representing a separate page. During conversion, you can iterate through each frame and create a PDF page that matches the dimensions of the current TIFF frame to preserve the original layout.
using Spire.Pdf;
using Spire.Pdf.Graphics;
using System.Drawing;
using System.Drawing.Imaging;

// Load the multi-page TIFF file
Image tiffImage = Image.FromFile("Sample89.tiff");

// Get frame information
FrameDimension dimension = new FrameDimension(tiffImage.FrameDimensionsList[0]);
int frameCount = tiffImage.GetFrameCount(dimension);

// Create a new PDF document
PdfDocument pdf = new PdfDocument();

// Remove default margins
pdf.PageSettings.Margins.All = 0;

// Process each TIFF frame
for (int i = 0; i < frameCount; i++)
{
    // Select current frame
    tiffImage.SelectActiveFrame(dimension, i);

    // Convert current frame to PdfImage
    PdfImage pdfImage = PdfImage.FromImage(tiffImage);

    // Get current frame dimensions
    float width = pdfImage.PhysicalDimension.Width;
    float height = pdfImage.PhysicalDimension.Height;

    // Create a PDF page matching the frame size
    PdfPageBase page = pdf.Pages.Add(new SizeF(width, height));

    // Draw the frame to fill the page
    page.Canvas.DrawImage(pdfImage, 0, 0, width, height);
}

// Save the PDF document
pdf.SaveToFile("Sample89.pdf");
pdf.Close();

// Release resources
tiffImage.Dispose();
Key concepts:
FrameDimension: Identifies the frame collection in a multi-page TIFF fileGetFrameCount: Retrieves the total number of TIFF pagesSelectActiveFrame: Switches to a specific TIFF frame for processingPages.Add(SizeF): Creates a PDF page that matches each TIFF page sizeCanvas.DrawImage: Renders each TIFF frame onto the corresponding PDF page
This approach preserves all pages in the original TIFF file while ensuring each page fully occupies the PDF canvas without extra margins or scaling issues.
Fit TIFF Images into Standard PDF Pages
In some workflows, the output PDF must follow a standard page size such as A4 or Letter for printing, document sharing, or archival purposes. Instead of creating a PDF page based on the original TIFF dimensions, you can scale the image proportionally to fit within a fixed page size while keeping it horizontally centered.
using Spire.Pdf;
using Spire.Pdf.Graphics;

PdfDocument pdf = new PdfDocument();
PdfImage image = PdfImage.FromFile("Sample_Page.tiff");

// Create an A4 page with margins
PdfPageBase page = pdf.Pages.Add(PdfPageSize.A4, new PdfMargins(20));

// Calculate proportional scaling
float scale = Math.Min(
    page.Canvas.ClientSize.Width / image.PhysicalDimension.Width,
    page.Canvas.ClientSize.Height / image.PhysicalDimension.Height
);

// Calculate final image size
float width = image.PhysicalDimension.Width * scale;
float height = image.PhysicalDimension.Height * scale;

// Center horizontally and align to the top
float x = (page.Canvas.ClientSize.Width - width) / 2;

// Draw image onto the PDF page
page.Canvas.DrawImage(image, x, 0, width, height);

// Save the PDF file
pdf.SaveToFile("Sample89.pdf");
pdf.Close();
The Generated PDF will fit the standard page size while maintaining the original image dimensions.
Why use this approach?
- Standardized output: Ensures all converted PDFs use consistent page sizes such as A4 or Letter
- Better for printing: Prevents unusually sized PDF pages caused by large TIFF dimensions
- Maintains aspect ratio: Scales the image proportionally without distortion
- Cleaner document formatting: Keeps content properly aligned for business and archival workflows
This method works well when you need TIFF files to fit standardized PDF layouts rather than preserving their original dimensions.
You can also explore more PDF layout and page settings tutorials using C#.
3. Advanced TIFF to PDF Conversion Scenarios
For production applications, you often need additional control over the conversion process.
Batch Convert Multiple TIFF Files
In document management systems, scanned archives, or automated workflows, you may need to convert multiple TIFF files into PDF format at once. The following example processes all TIFF files in a folder and converts each file into a separate PDF while preserving the original image dimensions.
using Spire.Pdf;
using Spire.Pdf.Graphics;
using System.Drawing;
using System.IO;

string inputFolder = @"C:\Documents\TIFF";
string outputFolder = @"C:\Documents\PDF";

// Create the output folder if it doesn't exist
Directory.CreateDirectory(outputFolder);

// Process all TIFF files in the folder
foreach (string tiffFile in Directory.GetFiles(inputFolder, "*.tiff"))
{
    PdfImage image = PdfImage.FromFile(tiffFile);

    using (PdfDocument pdf = new PdfDocument())
    {
        // Create a PDF page matching the TIFF dimensions
        PdfPageBase page = pdf.Pages.Add(
            new SizeF(
                image.PhysicalDimension.Width,
                image.PhysicalDimension.Height
            )
        );

        // Draw the TIFF image onto the page
        page.Canvas.DrawImage(
            image,
            0,
            0,
            image.PhysicalDimension.Width,
            image.PhysicalDimension.Height
        );

        // Generate output file path
        string outputFile = Path.Combine(
            outputFolder,
            Path.GetFileNameWithoutExtension(tiffFile) + ".pdf"
        );

        // Save PDF
        pdf.SaveToFile(outputFile);
    }
}
Why use batch conversion?
- Automatically processes large numbers of TIFF files
- Reduces manual conversion work
- Preserves original image dimensions for each file
- Useful for archive migration and document automation workflows
This method works well for converting large collections of single-page TIFF files. If your folder contains multi-page TIFF documents, you can combine this approach with the multi-page conversion logic introduced earlier.
Merge Multiple TIFF Files into One PDF
If you need to combine several TIFF images into a single PDF document, you can add each TIFF file as a separate PDF page. This is useful when consolidating scanned documents, invoices, or image-based reports into one file.
using Spire.Pdf;
using Spire.Pdf.Graphics;
using System.Drawing;

string[] tiffFiles =
{
    "Page1.tiff",
    "Page2.tiff",
    "Page3.tiff"
};

PdfDocument pdf = new PdfDocument();

foreach (string file in tiffFiles)
{
    PdfImage image = PdfImage.FromFile(file);

    float width = image.PhysicalDimension.Width;
    float height = image.PhysicalDimension.Height;

    // Create page matching TIFF dimensions
    PdfPageBase page = pdf.Pages.Add(new SizeF(width, height));

    // Draw TIFF image
    page.Canvas.DrawImage(image, 0, 0, width, height);
}

// Save merged PDF
pdf.SaveToFile("CombinedDocument.pdf");
pdf.Close();
Benefits of merging TIFF files:
- Combine multiple scanned pages into one PDF
- Simplify document sharing
- Preserve original image quality
- Useful for contracts, invoices, and archived records
This method works best when each TIFF file should appear as an individual page in a single PDF document.
If you need to combine multiple converted PDF files into one document, you can also check how to merge PDF files in C#.
Handle Large TIFF Files Efficiently
Large multi-page TIFF files can consume significant memory during conversion. To improve performance, process each frame sequentially and release resources immediately after use.
using Spire.Pdf;
using Spire.Pdf.Graphics;
using System.Drawing;
using System.Drawing.Imaging;

// Process large TIFF files efficiently
using (Image tiffImage = Image.FromFile("LargeDocument.tiff"))
using (PdfDocument pdf = new PdfDocument())
{
    FrameDimension dimension =
        new FrameDimension(tiffImage.FrameDimensionsList[0]);

    int frameCount = tiffImage.GetFrameCount(dimension);

    for (int i = 0; i < frameCount; i++)
    {
        // Activate current frame
        tiffImage.SelectActiveFrame(dimension, i);

        using (PdfImage image = PdfImage.FromImage(tiffImage))
        {
            float width = image.PhysicalDimension.Width;
            float height = image.PhysicalDimension.Height;

            // Create page matching frame size
            PdfPageBase page = pdf.Pages.Add(
                new SizeF(width, height)
            );

            // Draw current frame
            page.Canvas.DrawImage(
                image,
                0,
                0,
                width,
                height
            );
        }
    }

    pdf.SaveToFile("LargeDocument.pdf");
}
Memory optimization tips:
- Use
usingstatements to automatically release resources - Process TIFF frames one at a time
- Avoid loading multiple large images simultaneously
- Improve performance when converting high-resolution scanned documents
This approach is particularly useful for large archival TIFF files, medical scans, and enterprise document migration tasks.
4. Common Issues and Solutions
When converting TIFF to PDF, developers may encounter the following issues.
Multi-Page TIFF Not Fully Converted
Symptoms: Only the first page appears in the PDF output.
Cause: Frames in the TIFF file are not properly iterated.
Solution: Use GetFrameCount and SelectActiveFrame to process each frame.
int frameCount = tiffImage.GetFrameCount(dimension);

for (int i = 0; i < frameCount; i++)
{
    tiffImage.SelectActiveFrame(dimension, i);
    // Process each frame
}
Image Distortion or Layout Issues
Symptoms: Image appears stretched or does not fit properly in the PDF page.
Cause: Incorrect scaling when fitting TIFF into a fixed-size page (e.g., A4).
Solution: Use proportional scaling while keeping aspect ratio.
float scale = Math.Min(
    page.Canvas.ClientSize.Width / image.PhysicalDimension.Width,
    page.Canvas.ClientSize.Height / image.PhysicalDimension.Height
);

float width = image.PhysicalDimension.Width * scale;
float height = image.PhysicalDimension.Height * scale;
High Memory Usage with Large Files
Symptoms: Slow performance or memory issues when processing large TIFF files.
Cause: Loading multi-page TIFF into memory without proper disposal.
Solution: Process frames sequentially and release resources promptly.
using (Image tiffImage = Image.FromFile("Large.tiff"))
using (PdfDocument pdf = new PdfDocument())
{
    // Process frames one by one
}
Unsupported TIFF Format
Symptoms: Errors occur when loading certain TIFF files.
Cause: Non-standard compression or color formats in the TIFF file.
Solution: Ensure the TIFF uses standard formats supported by the library.
Conclusion
Converting TIFF to PDF in C# is a straightforward process with Spire.PDF for .NET. The library provides efficient methods for handling both single-page and multi-page TIFF files while maintaining image quality and layout accuracy.
By following the examples and best practices demonstrated in this article, developers can implement reliable TIFF to PDF conversion for various scenarios including document archiving, batch processing, and enterprise document management systems.
If you want to evaluate the functionality of Spire.PDF for .NET, you can apply for a free trial license.
FAQ
How do I convert a multi-page TIFF to PDF in C#?
Use FrameDimension to access each frame in the TIFF file, then create a separate PDF page for each frame. The GetFrameCount method returns the total number of frames, and SelectActiveFrame allows you to process each frame individually.
What is the best approach for converting TIFF to PDF in .NET?
Using a dedicated library like Spire.PDF for .NET provides the most reliable and efficient solution. It handles image loading and PDF generation with minimal code while supporting multi-page TIFF files.
Does converting TIFF to PDF reduce file size?
PDF compression can reduce file size compared to uncompressed TIFF files. However, the actual size reduction depends on the original TIFF compression, image content, and PDF settings. High-resolution images may still result in large PDF files.
Can I convert TIFF to PDF without installing Microsoft Office or additional software?
Yes. Spire.PDF for .NET operates independently and does not require Microsoft Office, Adobe Acrobat, or any other external software. It performs all conversion operations using its own rendering engine.
How can I maintain image quality when converting TIFF to PDF?
To preserve image quality, avoid unnecessary scaling and match PDF page dimensions to the TIFF image size for best results.
How to reset page number for each section start at 1 in a word document in C#
2014-07-17 09:27:54 Written by KoohjiSections are widely used by developers to set different formatting or layout options to each different section, such as use the different header and footer information for different sections and reset page number for each section dynamically. With the help of Spire.Doc for .NET, we can easily insert word section and remove word section in C# and VB.NET. We will show you how to reset page numbering that starts at 1 for each section easily by using Spire.Doc.
Firstly make sure Spire.Doc for .NET has been installed correctly and then add Spire.Doc.dll as reference in the downloaded Bin folder though the below path: "..\Spire.Doc\Bin\NET4.0\ Spire.Doc.dll". Here comes to the codes of how to reset page numbering for each section.
Step 1: Load three different word documents
Document document1 = new Document();
document1.LoadFromFile("..\\..\\1.docx");

Document document2 = new Document();
document2.LoadFromFile("..\\..\\2.docx");

Document document3 = new Document();
document3.LoadFromFile("..\\..\\3.docx");
Step 2: Use section method to combine all documents into one word document
foreach (Section sec in document2.Sections)
{
document1.Sections.Add(sec.Clone());
}
foreach (Section sec in document3.Sections)
{
document1.Sections.Add(sec.Clone());
}
Step 3: Traverse the document
//Traverse every section of document1
foreach (Section sec in document1.Sections)
{
//Traverse every object of the footer
foreach (DocumentObject obj in sec.HeadersFooters.Footer.ChildObjects)
{
if (obj.DocumentObjectType == DocumentObjectType.StructureDocumentTag)
{
DocumentObject para = obj.ChildObjects[0];
foreach (DocumentObject item in para.ChildObjects)
                        {
if (item.DocumentObjectType == DocumentObjectType.Field)
Step 4: Find the field type FieldNumPages and change it to FieldSectionPages
//Find the item and its field type is FieldNumPages
if ((item as Field).Type == FieldType.FieldNumPages)
{
//Change field type to FieldSectionPages
(item as Field).Type = FieldType.FieldSectionPages;
Step 5: Restart page number of section and set the starting page number to 1
document1.Sections[1].PageSetup.RestartPageNumbering = true;
document1.Sections[1].PageSetup.PageStartingNumber = 1;

document1.Sections[2].PageSetup.RestartPageNumbering = true;
document1.Sections[2].PageSetup.PageStartingNumber = 1;
Step 6: Save the document to file and launch it.
document1.SaveToFile("sample.docx",FileFormat.Docx);
System.Diagnostics.Process.Start("sample.docx");
Full codes:
namespace ResetPageNumber
{
    class Program
    {
        static void Main(string[] args)
        {
            Document document1 = new Document();
            document1.LoadFromFile("..\\..\\1.docx");

            Document document2 = new Document();
            document2.LoadFromFile("..\\..\\2.docx");

            Document document3 = new Document();
            document3.LoadFromFile("..\\..\\3.docx");

            foreach (Section sec in document2.Sections)
            {
                document1.Sections.Add(sec.Clone());
            }

            foreach (Section sec in document3.Sections)
            {
                document1.Sections.Add(sec.Clone());

            }
            foreach (Section sec in document1.Sections)
            {
                foreach (DocumentObject obj in sec.HeadersFooters.Footer.ChildObjects)
                {
                    if (obj.DocumentObjectType == DocumentObjectType.StructureDocumentTag)
                    {
                        DocumentObject para = obj.ChildObjects[0];
                        foreach (DocumentObject item in para.ChildObjects)
                        {
                            if (item.DocumentObjectType == DocumentObjectType.Field)
                            {
                                if ((item as Field).Type == FieldType.FieldNumPages)
                                {
                                    (item as Field).Type = FieldType.FieldSectionPages;
                                }
                            }
                        }
                    }
                }
            }

            document1.Sections[1].PageSetup.RestartPageNumbering = true;
            document1.Sections[1].PageSetup.PageStartingNumber = 1;

            document1.Sections[2].PageSetup.RestartPageNumbering = true;
            document1.Sections[2].PageSetup.PageStartingNumber = 1;

            document1.SaveToFile("sample.docx",FileFormat.Docx);
            System.Diagnostics.Process.Start("sample.docx");
        }
    }
}
In Microsoft PowerPoint, a comment is a note that you can attach to a phrase or paragraph on a slide. Viewing comments added by the author, readers can learn more information about the content. Likewise, readers can also add comments to provide reviews or feedbacks to the author. In this article, you will learn how to programmatically add or remove comments in a PowerPoint slide using Spire.Presentation for .NET.
Install Spire.Presentation for .NET
To begin with, you need to add the DLL files included in the Spire.Presentation for.NET package as references in your .NET project. The DLL files can be either downloaded from this link or installed via NuGet.
PM> Install-Package Spire.Presentation
Add Comments to a Presentation Slide
The detailed steps are as follows:
- Create a Presentation instance.
- Load a PowerPoint document using Presentation.LoadFromFile() method.
- Get CommentAuthor List using Presentation.CommentAuthors property.
- Add the author of the comment using CommentAuthorList.AddAuthor() method.
- Get a specified slide using Presentation.Slides[] property, and then add a comment to the slide using ISlide.AddComment(ICommentAuthor, String, PointF, DateTime) method.
- Save the result document using Presentation.SaveToFile() method.
- C#
- VB.NET
using Spire.Presentation;
using System;
namespace AddComment
{
class Program
{
static void Main(string[] args)
{
//Create a Presentation instance
Presentation presentation = new Presentation();
//Load a PowerPoint document
presentation.LoadFromFile(@"D:\Files\Test.pptx");
//Add the author of the comment
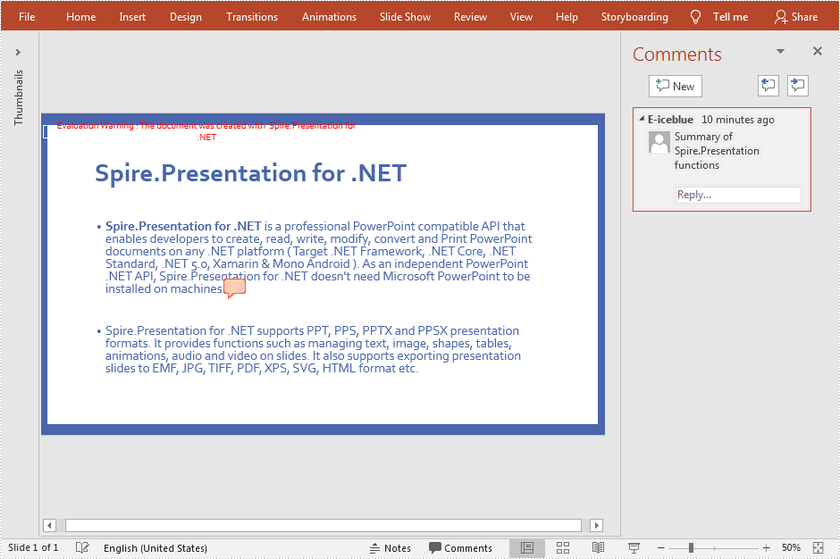
ICommentAuthor author = presentation.CommentAuthors.AddAuthor("E-iceblue", "comment:");
//Add a comment to the specified slide
presentation.Slides[0].AddComment(author, "Summary of Spire.Presentation functions", new System.Drawing.PointF(25, 22), DateTime.Now);
//Save the document
presentation.SaveToFile("comment.pptx", FileFormat.Pptx2010);
}
}
}
Remove Comments from a Presentation Slide
The detailed steps are as follows:
- Create a Presentation instance.
- Load a PowerPoint document using Presentation.LoadFromFile() method.
- Get a specified slide using Presentation.Slides[] property.
- Remove comment from the specified slide using ISlide.DeleteComment(Comment) method.
- Save the result document using Presentation.SaveToFile() method.
- C#
- VB.NET
using Spire.Presentation;
namespace RemoveComment
{
class Program
{
static void Main(string[] args)
{
//Create a Presentation instance
Presentation presentation = new Presentation();
//Load a PowerPoint document
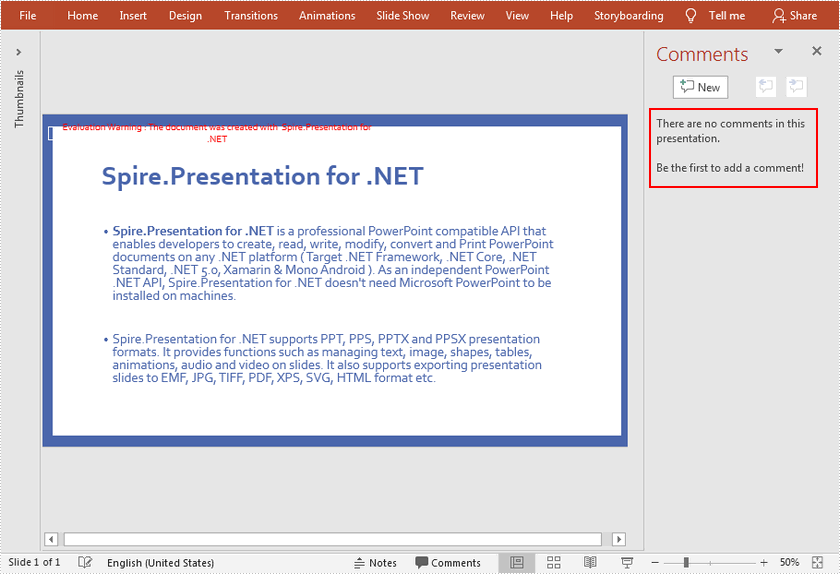
presentation.LoadFromFile("comment.pptx");
//Get the first slide
ISlide slide = presentation.Slides[0];
//Remove comment from the specified slide
slide.DeleteComment(slide.Comments[0]);
//Save the document
presentation.SaveToFile("RemoveComment.pptx", FileFormat.Pptx2010);
}
}
}
Apply for a Temporary License
If you'd like to remove the evaluation message from the generated documents, or to get rid of the function limitations, please request a 30-day trial license for yourself.
Spire.PDF has a function of adding, removing the blank pages in C#. We have already shown you how to remove the blank page in a PDF file. This article will show you how to insert an empty page in a PDF file in C#. By using the Spire.PDF, we can add the blank page to any place in the PDF file you want, such as at the first, the middle of the PDF file or at the end of the PDF file. It is very easy and you only need three lines of code to accomplish this task.
Make sure Spire.PDF for .NET has been installed correctly and then add Spire.Pdf.dll as reference in the downloaded Bin folder though the below path: "..\Spire.Pdf\Bin\NET4.0\Spire.Pdf.dll".
The following code snippet shows you how to insert an empty page in a PDF file. We will show you how to add the empty page at the end of the file and as the second page of the file.
//create a PDF document and load file
PdfDocument doc = new PdfDocument();
doc.LoadFromFile("sample.pdf");

//insert blank page at the end of the PDF file
doc.Pages.Add();

//insert blank page as the second page
doc.Pages.Insert(1);

//Save the document to file
doc.SaveToFile("result.pdf");
Check the effective screenshots as below:
Add the blank page at the end of the PDF file:
Add the blank page as the second page of the PDF file:
Full codes:
using Spire.Pdf;
using System;

namespace InsertPage
{
    class Program
    {
        static void Main(string[] args)
        {
            //create PdfDocument instance and load file
            PdfDocument doc = new PdfDocument();
            doc.LoadFromFile("sample.pdf");

            //insert blank page as last page
            doc.Pages.Add();

            doc.SaveToFile("result.pdf");
            doc.Close();
            System.Diagnostics.Process.Start("result.pdf");

            //create PdfDocument instance and load file
            PdfDocument doc2 = new PdfDocument();
            doc2.LoadFromFile("sample.pdf");

            //insert blank page as second page
            doc2.Pages.Insert(1);

            doc2.SaveToFile("result2.pdf");
            doc2.Close();
            System.Diagnostics.Process.Start("result2.pdf");
        }
    }
}
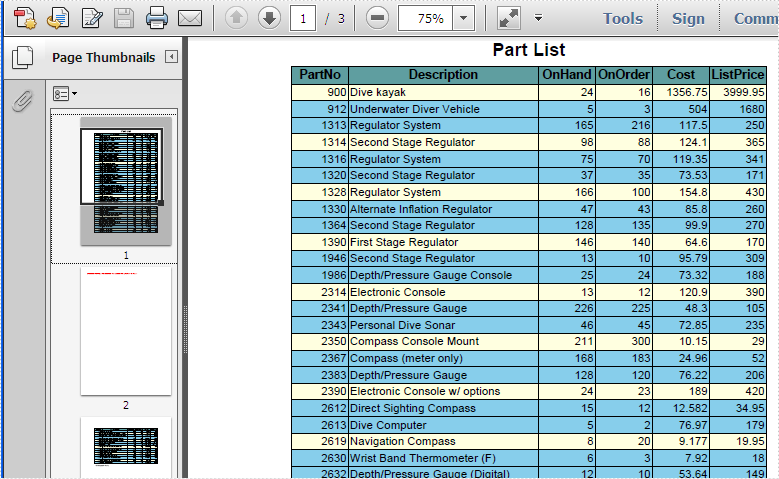
PDF files are widely used for sharing and viewing documents across different platforms, while TIFF files are preferred for storing high-quality images with detailed graphics or photographs. Converting a PDF file to TIFF can maintain the quality of images within the file. Similarly, converting a TIFF image to PDF ensures that the image can be easily viewed, shared, and printed without compatibility issues. In this article, you will learn how to programmatically convert PDF to TIFF or TIFF to PDF in C# using Spire.PDF for .NET.
Install Spire.PDF for .NET
To begin with, you need to add the DLL files included in the Spire.PDF for.NET package as references in your .NET project. The DLL files can be either downloaded from this link or installed via NuGet.
PM> Install-Package Spire.PDF
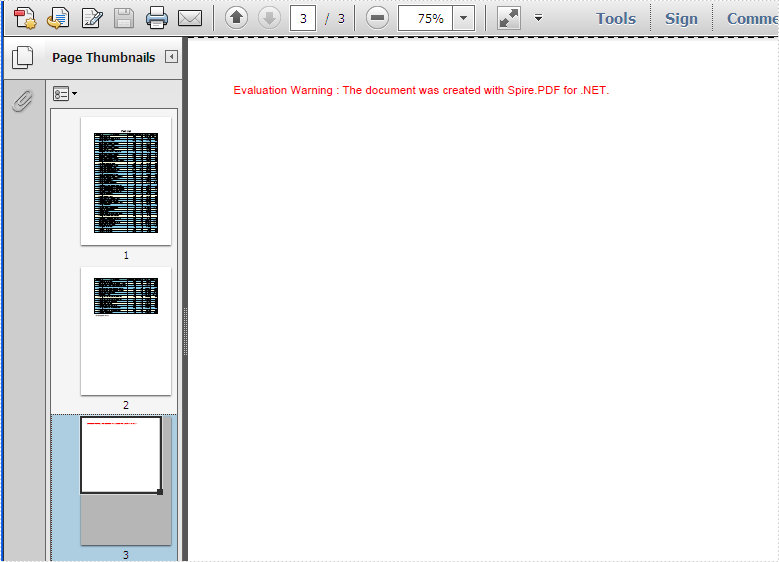
Convert PDF to TIFF in C#
The TIFF format allows multiple images to be stored in a single file. With Spire.PDF for .NET, you can convert each page of a PDF file into a separate image, and then call the custom method JoinTiffImages() to combine these images and save them as a single TIFF image.
The following are the steps to convert a PDF into a multi-page TIFF file using C#.
- Create a PdfDocument object.
- Load a PDF file using PdfDocument.LoadFromFile() method.
- Call custom method SaveAsImage() to convert each page of the PDF to a separate image.
- Call custom method JoinTiffImages() to merge the converted images into a multi-page TIFF image.
- C#
using System;
using System.Drawing;
using System.Drawing.Imaging;
using Spire.Pdf;

namespace SavePdfAsTiff
{
    class Program
    {
        static void Main(string[] args)
        {
            //Create a PdfDocument object
            PdfDocument pdf = new PdfDocument();

            //Load a PDF document
            pdf.LoadFromFile("Report.pdf");

            //Convert PDF pages to images
            Image[] images = SaveAsImage(pdf);

            //Combine the images and save them as a multi-page TIFF file
            JoinTiffImages(images, "result.tiff", EncoderValue.CompressionLZW);
        }

        private static Image[] SaveAsImage(PdfDocument document)
        {
            //Create a new image array
            Image[] images = new Image[document.Pages.Count];

            //Iterate through all pages in the document
            for (int i = 0; i < document.Pages.Count; i++)
            {
                //Convert a specific page to an image
                images[i] = document.SaveAsImage(i);
            }
            return images;
        }

        private static ImageCodecInfo GetEncoderInfo(string mimeType)
        {
            //Get the image encoders
            ImageCodecInfo[] encoders = ImageCodecInfo.GetImageEncoders();
            for (int j = 0; j < encoders.Length; j++)
            {
                //Find the encoder that matches the specified MIME type
                if (encoders[j].MimeType == mimeType)
                    return encoders[j];
            }
            throw new Exception(mimeType + " mime type not found in ImageCodecInfo");
        }

        public static void JoinTiffImages(Image[] images, string outFile, EncoderValue compressEncoder)
        {
            //Set the encoder parameters
            Encoder enc = Encoder.SaveFlag;
            EncoderParameters ep = new EncoderParameters(2);
            ep.Param[0] = new EncoderParameter(enc, (long)EncoderValue.MultiFrame);
            ep.Param[1] = new EncoderParameter(Encoder.Compression, (long)compressEncoder);

            //Get the first image
            Image pages = images[0];
            //Initialize a frame
            int frame = 0;
            //Get an ImageCodecInfo object for processing TIFF image codec information
            ImageCodecInfo info = GetEncoderInfo("image/tiff");

            //Iterate through each Image
            foreach (Image img in images)
            {
                //If it's the first frame, save it to the output file with specified encoder parameters
                if (frame == 0)
                {
                    pages = img;
                    pages.Save(outFile, info, ep);
                }

                else
                {
                    //Save the intermediate frames
                    ep.Param[0] = new EncoderParameter(enc, (long)EncoderValue.FrameDimensionPage);

                    pages.SaveAdd(img, ep);
                }
                //If it's the last frame, flush the encoder parameters and close the file
                if (frame == images.Length - 1)
                {
                    ep.Param[0] = new EncoderParameter(enc, (long)EncoderValue.Flush);
                    pages.SaveAdd(ep);
                }
                frame++;
            }
        }
    }
}
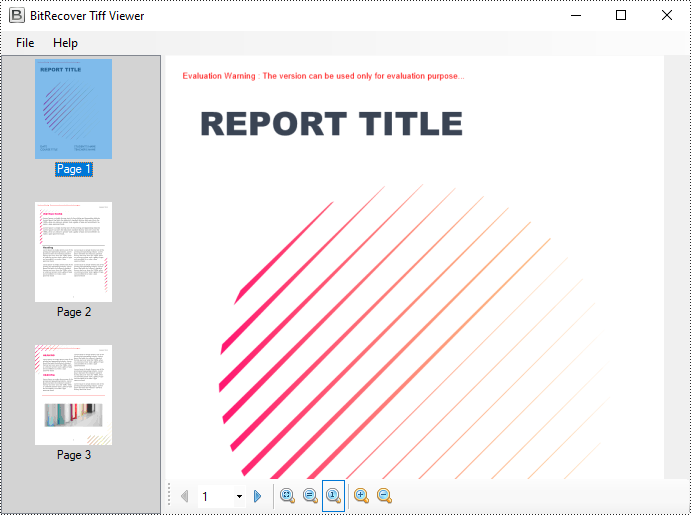
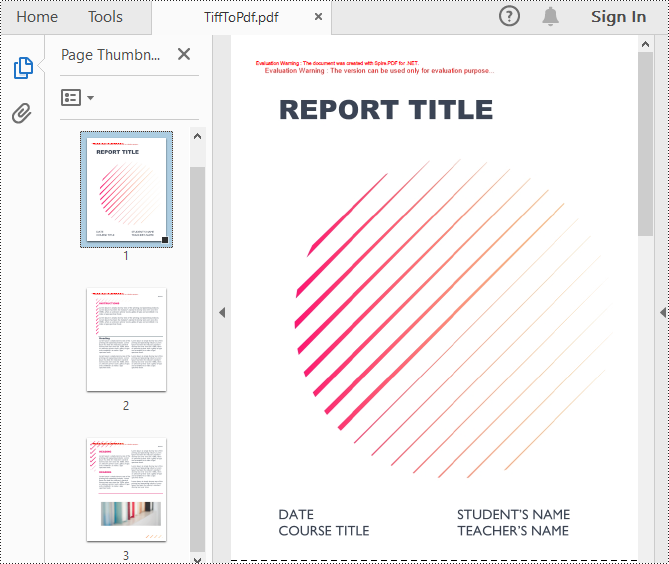
Convert TIFF to PDF in C#
To convert a multi-page TIFF image to a PDF file, you need to convert each frame of the TIFF image to a separate PDF image. Then draw each image at a specified location on a PDF page through the PdfPageBase.Canvas.DrawImage() method.
The following are the steps to convert a TIFF image to a PDF file using C#.
- Create a PdfDocument object.
- Load a TIFF image using Image.FromFile() method.
- Call custom method SplitTiffImage() to split the TIFF image into separate images.
- Iterate through the split images, and then convert each into a PDF image.
- Add a page to the PDF document using PdfDocument.Pages.Add() method.
- Draw the PDF image at a specified location on the page using PdfPageBase.Canvas.DrawImage() method.
- Save the result PDF file using PdfDocument.SaveToFile() method.
- C#
using System;
using System.Drawing;
using System.Drawing.Imaging;
using System.IO;
using Spire.Pdf;
using Spire.Pdf.Graphics;

namespace TiffToPdf
{
    class Program
    {
        static void Main(string[] args)
        {
            //Create a PdfDocument object
            PdfDocument pdf = new PdfDocument();

            //Load a TIFF image
            Image tiffImage = Image.FromFile("result.tiff");

            //Split the Tiff image into separate images
            Image[] images = SplitTiffImage(tiffImage);

            //Iterate through the images
            for (int i = 0; i < images.Length; i++)
            {
                //Convert a specified image into a PDF image
                PdfImage pdfImg = PdfImage.FromImage(images[i]);

                //Get image width and height
                float width = pdfImg.Width;
                float height = pdfImg.Height;

                //Add a page with the same size as the image
                SizeF size = new SizeF(width, height);
                PdfPageBase page = pdf.Pages.Add(size);

                //Draw the image at a specified location on the page
                page.Canvas.DrawImage(pdfImg, 0, 0, width, height);
            }

            //Save the result file
            pdf.SaveToFile("TiffToPdf.pdf");
        }

        public static Image[] SplitTiffImage(Image tiffImage)
        {
            //Get the number of frames in the Tiff image
            int frameCount = tiffImage.GetFrameCount(FrameDimension.Page);
            //Create an image array to store the split tiff images
            Image[] images = new Image[frameCount];
            //Gets the GUID of the first frame dimension
            Guid objGuid = tiffImage.FrameDimensionsList[0];
            //Create a FrameDimension object
            FrameDimension objDimension = new FrameDimension(objGuid);

            //Iterate through each frame
            for (int i = 0; i < frameCount; i++)
            {
                //Select a specified frame
                tiffImage.SelectActiveFrame(objDimension, i);
                //Save the frame in TIFF format to a memory stream
                MemoryStream ms = new MemoryStream();
                tiffImage.Save(ms, ImageFormat.Tiff);
                //Load an image from memory stream
                images[i] = Image.FromStream(ms);
            }
            return images;
        }
    }
}
Apply for a Temporary License
If you'd like to remove the evaluation message from the generated documents, or to get rid of the function limitations, please request a 30-day trial license for yourself.
Excel documents are easy to print, but it would be a bit tricky if you have some special printing requirements. For example, printing only selected range of a sheet, repeating the header row on each page, or fitting a worksheet on one page. This article covers how to set Excel print options via page setup and how to send an Excel document to printer in C# and VB.NET by using Spire.XLS for .NET.
- Set Excel Print Options via Page Setup in C# and VB.NET
- Print Excel Documents Using Print Dialog in C# and VB.NET
- Silently Print Excel Documents in C# and VB.NET
Install Spire.XLS for .NET
To begin with, you need to add the DLL files included in the Spire.XLS for .NET package as references in your .NET project. The DLL files can be either downloaded from this link or installed via NuGet.
PM> Install-Package Spire.XLS
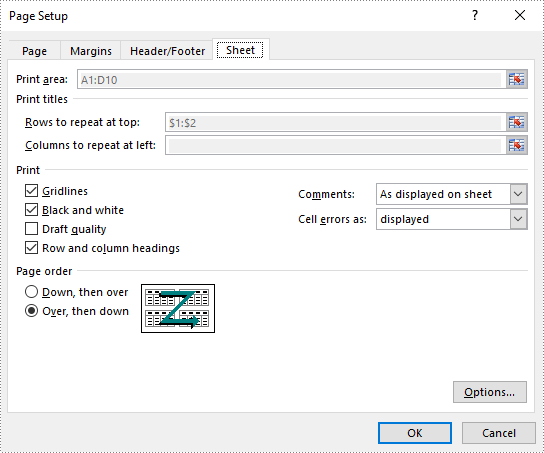
Set Excel Print Options via Page Setup in C# and VB.NET
Excel Page Setup provides options to control how a worksheet will be printed, such as whether to print comments, whether to print gridlines and specify the cell range to print. Spire.XLS offers the PageSetup object to deal with these things. The following are the steps to set Excel print options through PageSetup using Spire.XLS for .NET.
- Create a Workbook object.
- Load an Excel file using Workbook.LoadFromFile() method.
- Get a specific worksheet through Workbook.Worksheets[index] property.
- Get PageSetup object through Worksheet.PageSetup property.
- Set page margins, print area, pint title row, print quality, etc. through the properties under PageSetup object.
- Save the workbook to another Excel file using Workbook.SaveToFile() method.
- C#
- VB.NET
using Spire.Xls;

namespace PrintOptions
{
    class Program
    {
        static void Main(string[] args)
        {
            //Create a workbook
            Workbook workbook = new Workbook();

            //Load an Excel document
            workbook.LoadFromFile(@"C:\Users\Administrator\Desktop\sample.xlsx");

            //Get the first worksheet
            Worksheet worksheet = workbook.Worksheets[0];

            //Get the PageSetup object of the first worksheet
            PageSetup pageSetup = worksheet.PageSetup;

            //Set page margins
            pageSetup.TopMargin = 0.3;
            pageSetup.BottomMargin = 0.3;
            pageSetup.LeftMargin = 0.3;
            pageSetup.RightMargin = 0.3;

            //Specify print area
            pageSetup.PrintArea = "A1:D10";

            //Specify title row
            pageSetup.PrintTitleRows = "$1:$2";

            //Allow to print with row/column headings
            pageSetup.IsPrintHeadings = true;

            //Allow to print with gridlines
            pageSetup.IsPrintGridlines = true;

            //Allow to print comments as displayed on worksheet
            pageSetup.PrintComments = PrintCommentType.InPlace;

            //Set printing quality (dpi)
            pageSetup.PrintQuality = 300;

            //Allow to print worksheet in black & white mode
            pageSetup.BlackAndWhite = true;

            //Set the printing order
            pageSetup.Order = OrderType.OverThenDown;

            //Fit worksheet on one page
            pageSetup.IsFitToPage = true;

            //Save the workbook
            workbook.SaveToFile("PagePrintOptions.xlsx", ExcelVersion.Version2016);
        }
    }
}
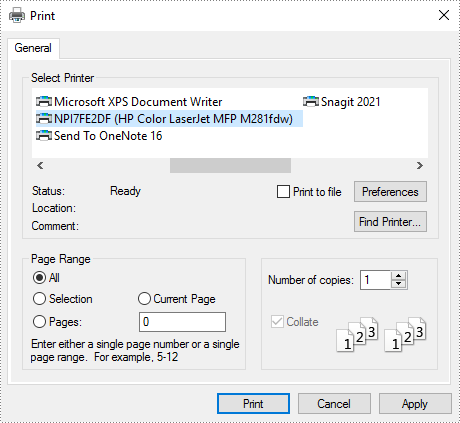
Print Excel Documents Using Print Dialog in C# and VB.NET
A Print Dialog box lets users to select options for a particular print job. For example, the user can specify the printer to use. The following are the steps to send an Excel document to a print dialog using Spire.XLS for .NET.
- Create a Workbook object.
- Load an Excel file using Workbook.LoadFromFile() method.
- Create a PrintDialog object.
- Specify printer settings through the properties under PrintDialog object.
- Apply the print dialog to workbook.
- Get PrintDocument object from the workbook through Workbook.PrintDocument property.
- Invoke the print dialog and start printing using PrintDocument.Print() method.
- C#
- VB.NET
using System;
using Spire.Xls;
using System.Drawing.Printing;
using System.Windows.Forms;

namespace PrintExcelUsingPrintDialog
{
    public partial class Form1 : Form
    {
        public Form1()
        {
            InitializeComponent();
        }

        private void button1_Click(object sender, EventArgs e)
        {
            //Create a Workbook object
            Workbook workbook = new Workbook();

            //Load an Excel file
            workbook.LoadFromFile(@"C:\Users\Administrator\Desktop\sample.xlsx");

            //Fit worksheet on one page
            PageSetup pageSetup = workbook.Worksheets[0].PageSetup;
            pageSetup.IsFitToPage = true;

            //Create a PrintDialog object
            PrintDialog dialog = new PrintDialog();

            //Specify printer settings
            dialog.AllowCurrentPage = true;
            dialog.AllowSomePages = true;
            dialog.AllowSelection = true;
            dialog.UseEXDialog = true;
            dialog.PrinterSettings.Duplex = Duplex.Simplex;

            //Apply the dialog to workbook
            workbook.PrintDialog = dialog;

            //Create a PrintDocument object based on the workbook
            PrintDocument printDocument = workbook.PrintDocument;

            //Invoke the print dialog
            if (dialog.ShowDialog() == DialogResult.OK)
            {
                printDocument.Print();
            }
        }
    }
}
Silently Print Excel Documents in C# and VB.NET
If you do not want to see the print dialog or the print process, you can silently print Excel documents to a specified printer. The following are the steps.
- Create a Workbook object.
- Load an Excel file using Workbook.LoadFromFile() method.
- Set the print controller to StandardPrintController, which will prevent print process from showing.
- Get PrinterSettings object from the workbook through Workbook.PrintDocument.PrinterSettings property.
- Specify printer name, duplex mode and print pages through the properties under PrinerSettings object.
- Print the workbook using Workbook.PrintDocument.Print() method.
- C#
- VB.NET
using Spire.Xls;
using System.Drawing.Printing;

namespace SilentlyPrint
{
    class Program
    {
        static void Main(string[] args)
        {
            //Create a Workbook object
            Workbook workbook = new Workbook();

            //Load an Excel file
            workbook.LoadFromFile(@"C:\Users\Administrator\Desktop\sample.xlsx");

            //Fit worksheet on one page
            PageSetup pageSetup = workbook.Worksheets[0].PageSetup;
            pageSetup.IsFitToPage = true;

            //Set the print controller to StandardPrintController, which will prevent print process from showing
            workbook.PrintDocument.PrintController = new StandardPrintController();

            //Get PrinterSettings from the workbook
            PrinterSettings settings = workbook.PrintDocument.PrinterSettings;

            //Specify printer name, duplex mode and print pages
            settings.PrinterName = "HP LaserJet P1007";
            settings.Duplex = Duplex.Simplex;
            settings.FromPage = 1;
            settings.ToPage = 3;

            //Print the workbook
            workbook.PrintDocument.Print();
        }
    }
}
Apply for a Temporary License
If you'd like to remove the evaluation message from the generated documents, or to get rid of the function limitations, please request a 30-day trial license for yourself.
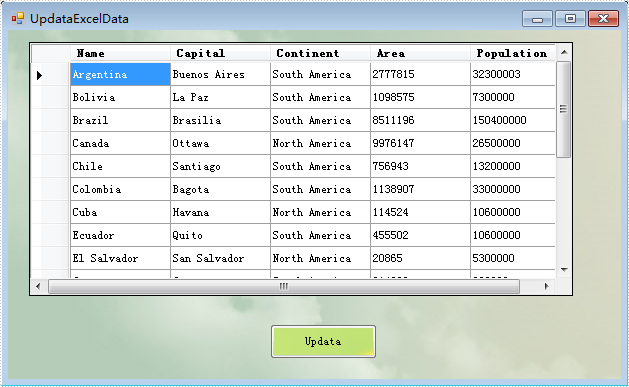
Spire.XLS for .NET is a professional Excel component which enables developers/programmers to fast generate, read, write and modify Excel document for .NET. Spire.XLS for .NET doesn't need Microsoft Office Excel Automation. It allows user to operate Excel document directly such as save to stream, save as web response, copy, lock/unlock worksheet, set up workbook properties, etc. As a professional .NET Excel component, it also includes many useful features, for example, functionalities of importing data from Excel to dataTable and exporting dataTable to Excel from Database.
In this article introduces a method of updating excel data by dataTable via using sheet.ExportDataTable() method and sheet.InsertDataTable() method to import data from excel to dataTable and export dataTable to excel from Database.
The main steps of method are:
Step 1: Load the excel document and use sheet.ExportDataTable() method extract data to dataTable and show by dataGridView control.
private void Form1_Load(object sender, EventArgs e)
        {
            //load excel document to workbook
            workbook.LoadFromFile(@"DatatableSample.xls");
            Worksheet sheet = workbook.Worksheets[0];
            sheet.Name = "Original table";
            //extract data to dataTable from sheet
            DataTable dataTable = sheet.ExportDataTable();
            //show the data to dataGridView
            this.dataGridView.DataSource = dataTable;
        }
The effect screenshot:
Step 2: Create a new sheet to save the updata data and use sheet.InsertDataTable() method to insert dataTable to the sheet.
            //create a new sheet to save Updata data.
            Worksheet sheet = workbook.CreateEmptySheet("Updata Table");
            //extract data from dataGridView
            DataTable dataTable = this.dataGridView.DataSource as DataTable;
            // insert dataTable to sheet
            sheet.InsertDataTable(dataTable, true, 1, 1);
Step 3: Save the result excel document.
workbook.SaveToFile("result.xlsx", ExcelVersion.Version2007);
The effect screenshot:

Download and install Spire.XLS for .NET and use below code to experience this method to update excel data by dataTable.
The full code:
using System;
using System.Data;
using System.Windows.Forms;
using Spire.Xls;
namespace UpdataExcelDataByDataTable
{

    public partial class UpdataExcelData : Form
    {
        private Workbook workbook = new Workbook();
        private void Form1_Load(object sender, EventArgs e)
        {
            workbook.LoadFromFile(@"DatatableSample.xls");
            Worksheet sheet = workbook.Worksheets[0];
            sheet.Name = "Original table";
            DataTable dataTable = sheet.ExportDataTable();
            this.dataGridView.DataSource = dataTable;
        }
        private void Updata_Click(object sender, EventArgs e)
        {
            Worksheet sheet = workbook.CreateEmptySheet("Updata Table");
            DataTable dataTable = this.dataGridView.DataSource as DataTable;
            sheet.InsertDataTable(dataTable, true, 1, 1);
            workbook.SaveToFile("result.xlsx", ExcelVersion.Version2007);
            System.Diagnostics.Process.Start("result.xlsx");
        }
    }
}
Imports System.Data
Imports System.Windows.Forms
Imports Spire.Xls
Public Class Form1
    Private workbook As New Workbook()
    Private Sub Form1_Load(sender As System.Object, e As System.EventArgs) Handles MyBase.Load
        'load excel document to workbook
        workbook.LoadFromFile("DatatableSample.xls")
        Dim sheet As Worksheet = workbook.Worksheets(0)
        sheet.Name = "Original table"
        'extract data to dataTable from sheet
        Dim dataTable As DataTable = sheet.ExportDataTable()
        'show the data to dataGridView
        Me.DataGridView.DataSource = dataTable
    End Sub
If you couldn't successfully use the Spire.Xls, please refer Spire.XLS Quick Start which can guide you quickly use the Spire.Xls.
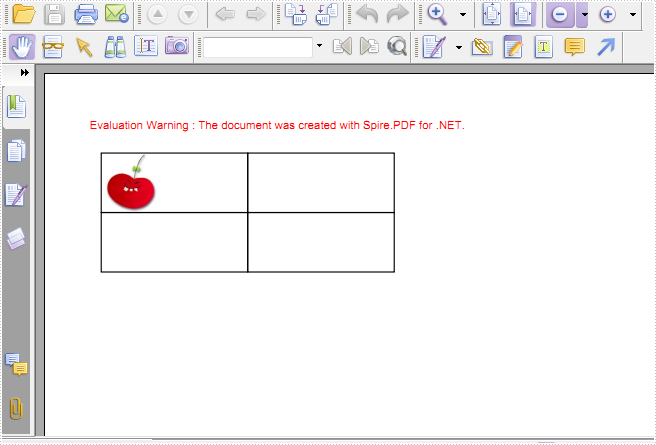
This sample demo has demonstrated how to draw nested grid in PDF document and set grid row&cell format. In the following section, we are going to create a simple PDF grid and show you how to insert an image to a specific PDF grid cell in C#. Before we can follow the code snippet below to accomplish the task, we have to prepare the environment first.
Download Spire.PDF and install it on system, create or open a .NET class application in Visual Studio 2005 or above versions, add Spire.PDF.dll to your .NET project assemblies.Then let's code step by step to make a better understanding about the whole procedure.
Step 1: Create a PDF document and add a new page.
PdfDocument doc = new PdfDocument();
PdfPageBase page = doc.Pages.Add();
Step 2: Create a 2×2 grid to PDF.
PdfGrid grid = new PdfGrid();
PdfGridRow row = grid.Rows.Add();
           row = grid.Rows.Add();
                 grid.Columns.Add(2);
Step 3: Set the cell padding of the PDF grid.
grid.Style.CellPadding = new PdfPaddings(1, 1, 1, 1);
Step 4: Set the width of the columns.
float width = page.Canvas.ClientSize.Width - (grid.Columns.Count + 1);
      grid.Columns[0].Width = width * 0.25f;
      grid.Columns[1].Width = width * 0.25f;
Step 5: Load an image from disk.
PdfGridCellContentList lst = new PdfGridCellContentList();
PdfGridCellContent textAndStyle = new PdfGridCellContent();
textAndStyle.Image = PdfImage.FromFile("..\\..\\image1.jpg");
Step 6: Set the size of image and insert it to the first cell.
textAndStyle.ImageSize = new SizeF(50, 50);
lst.List.Add(textAndStyle);

grid.Rows[0].Cells[0].Value = lst;
grid.Rows[1].Height = grid.Rows[0].Height;
Step 7: Draw PDF grid into page at the specific location.
PdfLayoutResult result = grid.Draw(page, new PointF(10, 30));
Step 8: Save to a PDF file and launch the file.
doc.SaveToFile(outputFile, FileFormat.PDF);
System.Diagnostics.Process.Start(outputFile);
Result:
Full C# Code:
using Spire.Pdf;
using Spire.Pdf.Graphics;
using Spire.Pdf.Grid;
using System.Drawing;

namespace InsertImage
{
    class Program
    {
        static void Main(string[] args)
        {
            string outputFile = @"..\..\output.pdf";
            //Create a pdf document
            PdfDocument doc = new PdfDocument();
            //Add a page for the pdf document
            PdfPageBase page = doc.Pages.Add();
            //Create a pdf grid
            PdfGrid grid = new PdfGrid();
            //Set the cell padding of pdf grid
            grid.Style.CellPadding = new PdfPaddings(1, 1, 1, 1);
            //Add a row for pdf grid
            PdfGridRow row = grid.Rows.Add();
            //Add two columns for pdf grid
            grid.Columns.Add(2);
            float width = page.Canvas.ClientSize.Width - (grid.Columns.Count + 1);
            //Set the width of the first column
            grid.Columns[0].Width = width * 0.25f;
            grid.Columns[1].Width = width * 0.25f;
            //Add a image
            PdfGridCellContentList lst = new PdfGridCellContentList();
            PdfGridCellContent textAndStyle = new PdfGridCellContent();
            textAndStyle.Image = PdfImage.FromFile("..\\..\\image1.jpg");
            //Set the size of image
            textAndStyle.ImageSize = new SizeF(50, 50);
            lst.List.Add(textAndStyle);
            //Add a image into the first cell.
            row.Cells[0].Value = lst;
            //Draw pdf grid into page at the specific location
            PdfLayoutResult result = grid.Draw(page, new PointF(10, 30));
            //Save to a pdf file
            doc.SaveToFile(outputFile, FileFormat.PDF);
            System.Diagnostics.Process.Start(outputFile);
        }
    }
}
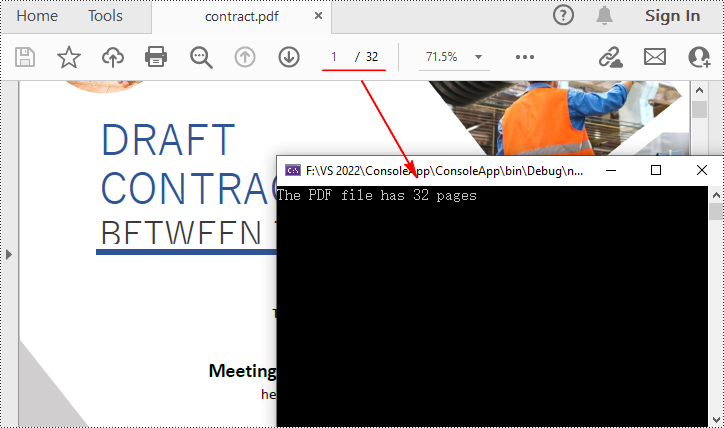
Counting the number of pages in a PDF file is essential for various purposes, such as determining document length, organizing content, and evaluating printing requirements. Apart from knowing page count information using PDF viewers, you can also automate the task through programming. In this article, you will learn how to use C# to get the number of pages in a PDF file using Spire.PDF for .NET.
Install Spire.PDF for .NET
To begin with, you need to add the DLL files included in the Spire.PDF for .NET package as references in your .NET project. The DLL files can be either downloaded from this link or installed via NuGet.
PM> Install-Package Spire.PDF
Get the Number of Pages in a PDF File in C#
Spire.PDF for .NET offers the PdfDocument.Pages.Count property to quickly count the number of pages in a PDF file without opening it. The following are the detailed steps.
- Create a PdfDocument object.
- Load a sample PDF file using PdfDocument.LoadFromFile() method.
- Count the number of pages in the PDF file using PdfDocument.Pages.Count property.
- Output the result and close the PDF.
- C#
using Spire.Pdf;

namespace GetNumberOfPages
{
    class Program
    {
        static void Main(string[] args)
        {
            //Create a PdfDocument object
            PdfDocument pdf = new PdfDocument();

            //Load a sample PDF file
            pdf.LoadFromFile("Contract.pdf");

            //Count the number of pages in the PDF
            int PageNumber = pdf.Pages.Count;
            Console.WriteLine("The PDF file has {0} pages", PageNumber);

            //Close the PDF
            pdf.Close();
        }
    }
}
Apply for a Temporary License
If you'd like to remove the evaluation message from the generated documents, or to get rid of the function limitations, please request a 30-day trial license for yourself.
Spire.Presentation is a powerful and easy-to-use .NET component, especially designed for developers. Using Spire.Presentation you can generate, modify, convert, render, and print documents without installing Microsoft PowerPoint on your machine. There is a document in our website introducing you how to insert table. And in this document, I will introduce you how to remove tables within a PPT document.
Step 1: Create Presentation instance and load file.
Presentation presentation = new Presentation();
presentation.LoadFromFile("sample.ppt");
Step 2: Get the tables within the PPT document.
 List<IShape> shape_tems = new List<IShape>();
foreach (IShape shape in presentation.Slides[0].Shapes)
{
    if (shape is ITable)
    {
        //add new table to table list
        shape_tems.Add(shape);
    }
}
Step 3: Remove all tables.
foreach (IShape shape in shape_tems)
{
    presentation.Slides[0].Shapes.Remove(shape);
}
Step 4: Save the document.
presentation.SaveToFile("result.pptx", FileFormat.Pptx2010);
Download and install Spire.Presentation for .NET and refer to below code to remove tables within PPT document.
Screenshots:
Before:
After:
Full Code:
//create Presentation instance and load file
Presentation presentation = new Presentation();
presentation.LoadFromFile("sample.ppt");

//get the tables in PowerPoint document
List<IShape> shape_tems = new List<IShape>();
foreach (IShape shape in presentation.Slides[0].Shapes)
{
    if (shape is ITable)
    {
        //add new table to table list
        shape_tems.Add(shape);
    }
}

//remove all tables
foreach (IShape shape in shape_tems)
{
    presentation.Slides[0].Shapes.Remove(shape);
}

//save the document
presentation.SaveToFile("result.pptx", FileFormat.Pptx2010);
System.Diagnostics.Process.Start("result.pptx");
'create Presentation instance and load file
Dim presentation As New Presentation()
presentation.LoadFromFile("sample.ppt")

'get the tables in PowerPoint document
Dim shape_tems As New List(Of IShape)()
For Each shape As IShape In presentation.Slides(0).Shapes
    If TypeOf shape Is ITable Then
        'add new table to table list
        shape_tems.Add(shape)
    End If
Next

'remove all tables
For Each shape As IShape In shape_tems
    presentation.Slides(0).Shapes.Remove(shape)
Next

'save the document
presentation.SaveToFile("result.pptx", FileFormat.Pptx2010)
System.Diagnostics.Process.Start("result.pptx")
If you couldn't successfully use Spire.Presentation, please refer Spire.Presentation Quick Start which can guide you quickly use Spire.Presentation.
