
.NET (1327)
Children categories
New method get alias, tag and id of content controls in a Word document in C#
2015-06-05 03:59:58 Written by KoohjiContent controls provide a way for you to design documents. When you add a content control to a document, the control is identified by a border, a title, and temporary text that can provide instructions to the user, and can prevent users from editing or deleting protected sections of a document.
Bind parts of a document or template to data. You can bind content controls to database fields, managed objects in the .NET Framework, XML elements that are stored in the document, and other data sources.
This article illustrates how to get all controls and their properties including alias, id and tag via Spire.Doc with new method and replace the Barcode with another image.
Refer this article to check old method: Get alias, tag and id of content controls in a Word document in C#
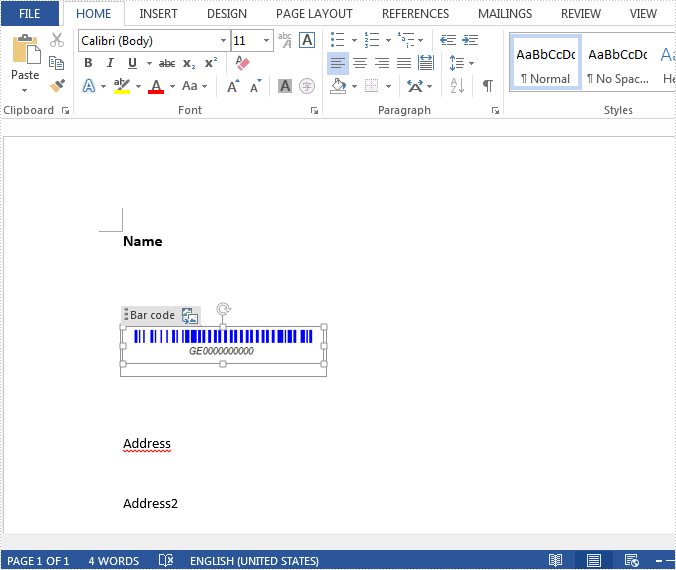
The following is test file new.docx.
Here are the steps:
Step 1: Create a new Word document and load the test file.
Document doc = new Document(@"new.docx");
Step 2: Create a list StructureDocument to store tags. Here, each content control will be identified by tag.
public class StructureTags
        {
            List m_structureDocumnt;
            public List StructureDocument
            {
                get
                {
                    if (m_structureDocumnt == null)
                        m_structureDocumnt = new List();

                    return m_structureDocumnt;
                }
            }

        }
Step 3: Use foreach sentence to get all tags in the Word document.
foreach (Section section in doc.Sections)
            {
                foreach (Body body in section.ChildObjects)
                {
                    ModifyBody(body);
                }
            }
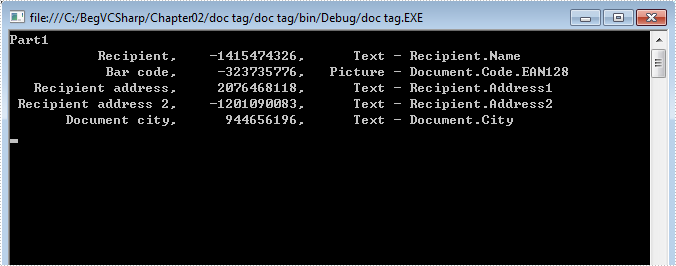
Step 4: Show the properties of all controls.
List tagInlines = structureTags.StructureDocument;
            Console.WriteLine("Part1");
            for (int i = 0; i < tagInlines.Count; i++)
            {
                string alias = tagInlines[i].SDTProperties.Alias;   // Can be null or empty
                decimal id = tagInlines[i].SDTProperties.Id;
                string tag = tagInlines[i].SDTProperties.Tag;
                string STDType = tagInlines[i].SDTProperties.SDTType.ToString();

                Console.WriteLine("{0,20},{1,15},{2, 10} - {3}", alias, id, STDType, tag);
                Console.ReadKey();
             }
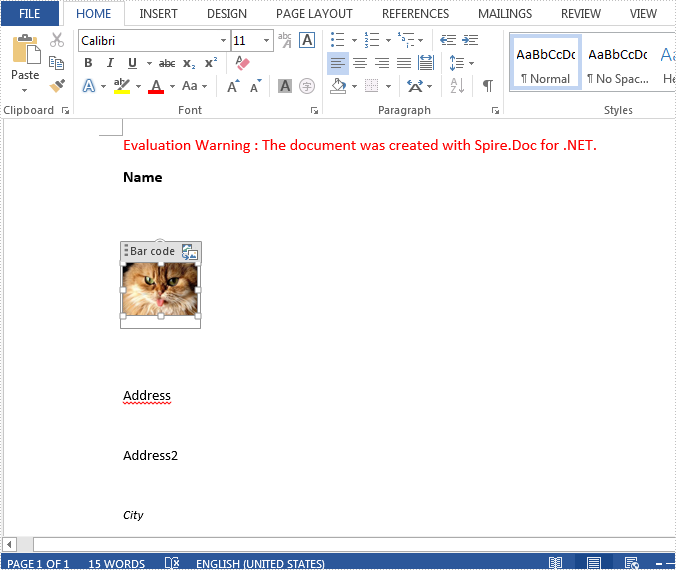
Step 5: Replace image inside of Picture Content Control.
doc.SaveToFile("replace1.docx", FileFormat.Docx2013);
System.Diagnostics.Process.Start("replace1.docx");
Result Screenshot:
Full code:
using Spire.Doc;
using Spire.Doc.Documents;
using Spire.Doc.Fields;
using System;
using System.Drawing;
namespace GetAlias
{

    class Program
    {

           static StructureTags structureTags = new StructureTags();
        static void Main(string[] args)
        {
            Document doc = new Document(@"new.docx");

            foreach (Section section in doc.Sections)
            {
                foreach (Body body in section.ChildObjects)
                {
                    ModifyBody(body);
                }
            }

            List tagInlines = structureTags.StructureDocument;
            Console.WriteLine("Part1");
            for (int i = 0; i < tagInlines.Count; i++)
            {
                string alias = tagInlines[i].SDTProperties.Alias;
                decimal id = tagInlines[i].SDTProperties.Id;
                string tag = tagInlines[i].SDTProperties.Tag;
                string STDType = tagInlines[i].SDTProperties.SDTType.ToString();

                Console.WriteLine("{0,20},{1,15},{2, 10} - {3}", alias, id, STDType, tag);
                Console.ReadKey();

                if (tagInlines[i].SDTProperties.SDTType == SdtType.Picture)
                {
                    DocPicture picture = tagInlines[i].ChildObjects.FirstItem as DocPicture;
                    if (picture == null)
                    {
                        picture = new DocPicture(doc);
                        picture.LoadImage(Image.FromFile(@"cat.jpg"));
                        tagInlines[i].ChildObjects.Add(picture);
                    }
                    else
                    {
                        picture.LoadImage(Image.FromFile(@"cat.jpg"));
                    }
                }
            }

            doc.SaveToFile("replace1.docx", FileFormat.Docx2013);
            System.Diagnostics.Process.Start("replace1.docx");
        }

        static void ModifyBody(Body body)
        {
            if (body == null)
                return;

            foreach (DocumentObject docObj in body.ChildObjects)
            {
                if (docObj is StructureDocumentTag)
                {
                    structureTags.StructureDocument.Add(docObj as StructureDocumentTag);

                }
                else if (docObj is Table)
                {
                    ModifyTable(docObj as Table);
                }
                else if (docObj is Paragraph)
                {
                    ModifyParagraph(docObj as Paragraph);
                }
            }
        }

        static void ModifyTable(Table table)
        {
            if (table == null)
                return;

            foreach (TableRow row in table.Rows)
            {
                foreach (TableCell cell in row.Cells)
                {
                    if (cell is StructureDocumentTagCell)
                    {
                        structureTags.StructureDocument.Add(cell as StructureDocumentTagCell);
                    }
                    else
                    {
                        ModifyBody(cell);
                    }
                }
            }
        }

        static void ModifyParagraph(Paragraph para)
        {
            if (para == null)
                return;

            foreach (DocumentObject docObj in para.ChildObjects)
            {
                if (docObj is StructureDocumentTagInline)
                {

                    structureTags.StructureDocument.Add(docObj as StructureDocumentTagInline);
                }
            }
        }

        public class StructureTags
        {
            List m_structureDocumnt;
            public List StructureDocument
            {
                get
                {
                    if (m_structureDocumnt == null)
                        m_structureDocumnt = new List();

                    return m_structureDocumnt;
                }
            }
        }

        }
    }
Headers and footers are widely used to show addition information such as chapter name, page numbers to keep the document organized. By default, MS Word sets the same headers and footers on each page, but sometimes we need to create different headers or footers for odd and even pages. This article is going to introduce the method to set different odd and even header/footer using Spire.Doc in C#.
Note: Before Start, please download the latest version of Spire.Doc and add Spire.Doc .dll in the bin folder as the reference of Visual Studio.
Step 1: Create a new document and load from file.
Document document = new Document();
document.LoadFromFile("T1.docx");
Step 2: Add a section and set the property true.
Section section = document.Sections[0];
section.PageSetup.DifferentOddAndEvenPagesHeaderFooter = true;
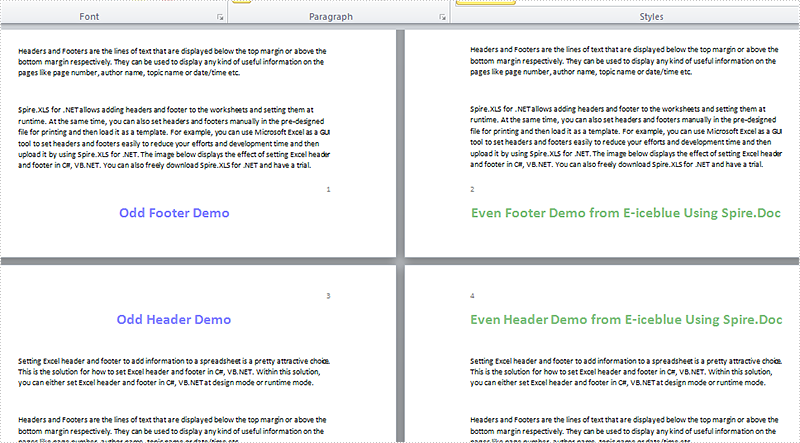
Step 3: Create odd and even footer, odd and even header, and set their format.
//add EvenFooter
Paragraph P1 = section.HeadersFooters.EvenFooter.AddParagraph();
TextRange EF = P1.AppendText("Even Footer Demo from E-iceblue Using Spire.Doc");
EF.CharacterFormat.FontName = "Calibri";
EF.CharacterFormat.FontSize = 20;
EF.CharacterFormat.TextColor = Color.Green;
EF.CharacterFormat.Bold = true;
P1.Format.HorizontalAlignment = HorizontalAlignment.Center;

//add OddFooter
Paragraph P2 = section.HeadersFooters.OddFooter.AddParagraph();
TextRange OF = P2.AppendText("Odd Footer Demo");
P2.Format.HorizontalAlignment = HorizontalAlignment.Center;
OF.CharacterFormat.FontName = "Calibri";
OF.CharacterFormat.FontSize = 20;
OF.CharacterFormat.Bold = true;
OF.CharacterFormat.TextColor = Color.Blue;

//add OddHeader
Paragraph P3 = section.HeadersFooters.OddHeader.AddParagraph();
TextRange OH = P3.AppendText("Odd Header Demo");
P3.Format.HorizontalAlignment = HorizontalAlignment.Center;
OH.CharacterFormat.FontName = "Calibri";
OH.CharacterFormat.FontSize = 20;
OH.CharacterFormat.Bold = true;
OH.CharacterFormat.TextColor = Color.Blue;

//add EvenHeader
Paragraph P4 = section.HeadersFooters.EvenHeader.AddParagraph();
TextRange EH = P4.AppendText("Even Header Demo from E-iceblue Using Spire.Doc");
P4.Format.HorizontalAlignment = HorizontalAlignment.Center;
EH.CharacterFormat.FontName = "Calibri";
EH.CharacterFormat.FontSize = 20;
EH.CharacterFormat.Bold = true;
EH.CharacterFormat.TextColor = Color.Green;
Step 4: Save the document and launch to see effects.
document.SaveToFile("R.docx", FileFormat.Docx2010);
System.Diagnostics.Process.Start("R.docx");
Effects:
Full code:
using System;
using System.Collections.Generic;
using System.Linq;
using System.Text;
using Spire.Doc;
using Spire.Doc.Documents;
using Spire.Doc.Fields;
using System.Drawing;

namespace Mirror_Margin
{
    class Program
    {
        static void Main(string[] args)
        {
            Document document = new Document();
            document.LoadFromFile("T1.docx");
            Section section = document.Sections[0];

            section.PageSetup.DifferentOddAndEvenPagesHeaderFooter = true;

            Paragraph P1 = section.HeadersFooters.EvenFooter.AddParagraph();
            TextRange EF = P1.AppendText("Even Footer Demo from E-iceblue Using Spire.Doc");
            EF.CharacterFormat.FontName = "Calibri";
            EF.CharacterFormat.FontSize = 20;
            EF.CharacterFormat.TextColor = Color.Green;
            EF.CharacterFormat.Bold = true;
            P1.Format.HorizontalAlignment = HorizontalAlignment.Center;


            Paragraph P2 = section.HeadersFooters.OddFooter.AddParagraph();
            TextRange OF = P2.AppendText("Odd Footer Demo");
            P2.Format.HorizontalAlignment = HorizontalAlignment.Center;
            OF.CharacterFormat.FontName = "Calibri";
            OF.CharacterFormat.FontSize = 20;
            OF.CharacterFormat.Bold = true;
            OF.CharacterFormat.TextColor = Color.Blue;

            Paragraph P3 = section.HeadersFooters.OddHeader.AddParagraph();
            TextRange OH = P3.AppendText("Odd Header Demo");
            P3.Format.HorizontalAlignment = HorizontalAlignment.Center;
            OH.CharacterFormat.FontName = "Calibri";
            OH.CharacterFormat.FontSize = 20;
            OH.CharacterFormat.Bold = true;
            OH.CharacterFormat.TextColor = Color.Blue;

            Paragraph P4 = section.HeadersFooters.EvenHeader.AddParagraph();
            TextRange EH = P4.AppendText("Even Header Demo from E-iceblue Using Spire.Doc");
            P4.Format.HorizontalAlignment = HorizontalAlignment.Center;
            EH.CharacterFormat.FontName = "Calibri";
            EH.CharacterFormat.FontSize = 20;
            EH.CharacterFormat.Bold = true;
            EH.CharacterFormat.TextColor = Color.Green;

            document.SaveToFile("R.docx", FileFormat.Docx2010);
            System.Diagnostics.Process.Start("R.docx");
        }
    }
}
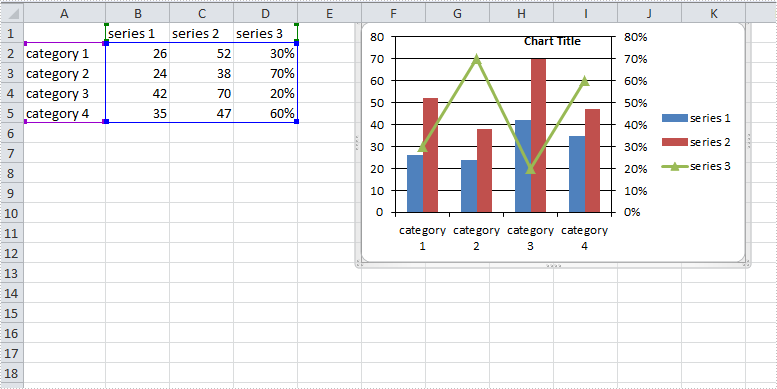
A combination chart that combines two or more chart types in a single chart is often used to emphasize different types of information in that chart. As is shown in the below Excel sheet, we have different type of data in series 3. To clearly display data of different types, it can be helpful to plot varying data sets either with different chart types or on different axes.
In this article, we will introduce how to combine different chart types in one chart and how to add a secondary axis to a chart using Spire.XLS in C#, VB.NET.

Code Snippet:
Step 1: Create a new instance of Workbook class and the load the sample Excel file.
Workbook workbook = new Workbook();
workbook.LoadFromFile("data.xlsx");
Step 2: Get the first worksheet from workbook.
Worksheet sheet=workbook.Worksheets[0];
Step 3: Add a chart to worksheet based on the data from A1 to D5.
Chart chart = sheet.Charts.Add();
chart.DataRange = sheet.Range["A1:D5"];
chart.SeriesDataFromRange = false;
Step 4: Set position of chart.
chart.LeftColumn = 6;
chart.TopRow = 1;
chart.RightColumn = 12;
chart.BottomRow = 13;
Step 5: Apply Column chart type to series 1 and series 2, apply Line chart type to series 3.
var cs1 = (ChartSerie)chart.Series[0];
cs1.SerieType = ExcelChartType.ColumnClustered;

var cs2 = (ChartSerie)chart.Series[1];
cs2.SerieType = ExcelChartType.ColumnClustered;

var cs3 = (ChartSerie)chart.Series[2];
cs3.SerieType = ExcelChartType.LineMarkers;
Step 6: Add a secondary axis to the chart, plot data of series 3 on the secondary axis.
chart.SecondaryCategoryAxis.IsMaxCross = true;
cs3.UsePrimaryAxis = false;
Step 7: Save and launch the file
workbook.SaveToFile("result.xlsx",ExcelVersion.Version2010);
System.Diagnostics.Process.Start("result.xlsx");
Result:
Full Code:
using Spire.Xls;
using Spire.Xls.Charts;
namespace CreateCombinationExcel
{
    class Program
    {

        static void Main(string[] args)
        {
            Workbook workbook = new Workbook();
            workbook.LoadFromFile("data.xlsx");
            Worksheet sheet = workbook.Worksheets[0];

            //add a chart based on the data from A1 to D5
            Chart chart = sheet.Charts.Add();
            chart.DataRange = sheet.Range["A1:D5"];
            chart.SeriesDataFromRange = false;

            //set position of chart
            chart.LeftColumn = 6;
            chart.TopRow = 1;
            chart.RightColumn = 12;
            chart.BottomRow = 13;

            //apply different chart type to different series
            var cs1 = (ChartSerie)chart.Series[0];
            cs1.SerieType = ExcelChartType.ColumnClustered;
            var cs2 = (ChartSerie)chart.Series[1];
            cs2.SerieType = ExcelChartType.ColumnClustered;
            var cs3 = (ChartSerie)chart.Series[2];
            cs3.SerieType = ExcelChartType.LineMarkers;

            //add a secondary axis to chart
            chart.SecondaryCategoryAxis.IsMaxCross = true;
            cs3.UsePrimaryAxis = false;

            //save and launch the file
            workbook.SaveToFile("result.xlsx", ExcelVersion.Version2010);
            System.Diagnostics.Process.Start("result.xlsx");
        }
    }
}
Imports Spire.Xls
Imports Spire.Xls.Charts
Namespace CreateCombinationExcel
	Class Program

		Private Shared Sub Main(args As String())
			Dim workbook As New Workbook()
			workbook.LoadFromFile("data.xlsx")
			Dim sheet As Worksheet = workbook.Worksheets(0)

			'add a chart based on the data from A1 to D5
			Dim chart As Chart = sheet.Charts.Add()
			chart.DataRange = sheet.Range("A1:D5")
			chart.SeriesDataFromRange = False

			'set position of chart
			chart.LeftColumn = 6
			chart.TopRow = 1
			chart.RightColumn = 12
			chart.BottomRow = 13

			'apply different chart type to different series
			Dim cs1 = DirectCast(chart.Series(0), ChartSerie)
			cs1.SerieType = ExcelChartType.ColumnClustered
			Dim cs2 = DirectCast(chart.Series(1), ChartSerie)
			cs2.SerieType = ExcelChartType.ColumnClustered
			Dim cs3 = DirectCast(chart.Series(2), ChartSerie)
			cs3.SerieType = ExcelChartType.LineMarkers

			'add a secondary axis to chart
			chart.SecondaryCategoryAxis.IsMaxCross = True
			cs3.UsePrimaryAxis = False

			'save and launch the file
			workbook.SaveToFile("result.xlsx", ExcelVersion.Version2010)
			System.Diagnostics.Process.Start("result.xlsx")
		End Sub
	End Class
End Namespace
How to save Chart and table on Presentation Slide as image in C#
2015-06-02 07:40:40 Written by KoohjiSpire.Presentation enables developers to export the whole presentation slides with table, chart and shape to image. And it also supports to export the single element in the presentation slides, such as chart, table and shape into image. This article will show you how to save chart and table on Presentation Slide as image in C# and please check the steps as below:
Step 1: Create a presentation document and load from file.
Presentation ppt = new Presentation();
ppt.LoadFromFile("sample.pptx");
Step 2: Traverse every shape in the slide. Call ShapeList.SaveAsImage(int shapeIndex) to save table and chart as image.
//Save table as image in .Png format
Image image = ppt.Slides[0].Shapes.SaveAsImage(4);
image.Save("table.png", System.Drawing.Imaging.ImageFormat.Png);
//Save chart as image in .Jpeg format
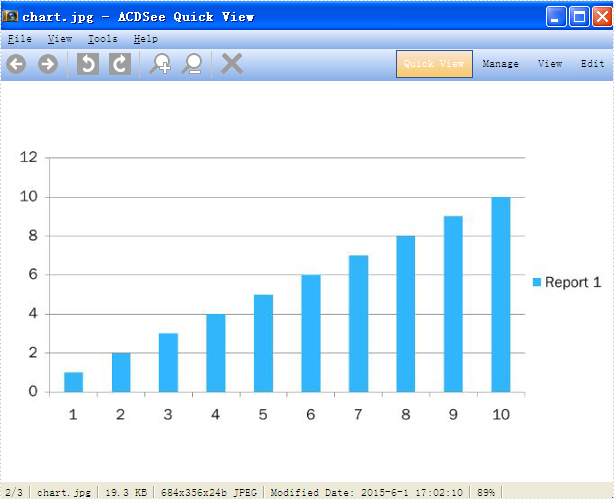
image = ppt.Slides[1].Shapes.SaveAsImage(3);
image.Save("chart.jpg", System.Drawing.Imaging.ImageFormat.Jpeg);
You can use Shapes.SaveAsEMF method to save the chart and table to image in EMF format.
Effective screenshot:
Save Presentation table as image:

Save Presentation chart as image:
Full codes:
using Spire.Presentation;
using System.Drawing;

     namespace SaveTableChartasImage
{
    class Program
    {
        static void Main(string[] args)
        {
            Presentation ppt = new Presentation();
            ppt.LoadFromFile("sample.pptx");

            Image image = ppt.Slides[0].Shapes.SaveAsImage(4);
            image.Save("table.png", System.Drawing.Imaging.ImageFormat.Png);
            image = ppt.Slides[1].Shapes.SaveAsImage(3);
            image.Save("chart.jpg", System.Drawing.Imaging.ImageFormat.Jpeg);

            //ppt.Slides[1].Shapes.SaveAsEMF(3, "chart.emf");
        }
    }
}
C#/VB.NET: Change Security Permissions of PDF Documents
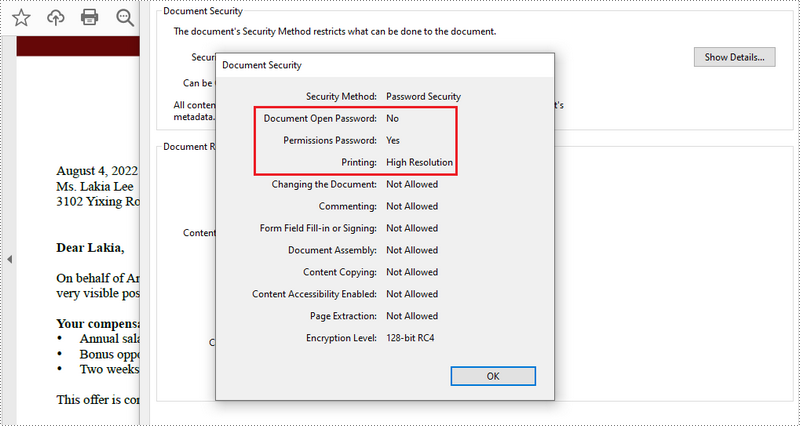
2022-09-29 07:38:00 Written by AdministratorWhen you protect your PDF documents with passwords you can optionally specify a set of permissions. The permissions determine how users can interact with the file. For example, you can apply permissions to your document to prohibit the user from printing or using cut and paste operations. This article demonstrates how to change security permissions of PDF documents using Spire.PDF for .NET in C# and VB.NET.
Install Spire.PDF for .NET
To begin with, you need to add the DLL files included in the Spire.PDF for.NET package as references in your .NET project. The DLL files can be either downloaded from this link or installed via NuGet.
PM> Install-Package Spire.PDF
Change Security Permissions of a PDF Document
The following are the steps to apply security permissions to a PDF document using Spire.PDF for .NET.
- Create a PdfDocument object.
- Load a sample PDF file using PdfDocument.LoadFileFile() method.
- Specify open password and permission password. The open password can be set to empty so that the generated document will not require a password to open.
- Encrypt the document with the open password and permission password, and set the security permissions using PdfDocument.Security.Encypt() method. This method takes PdfPermissionsFlags enumeration as a parameter, which defines user access permissions for an encrypted document.
- Save the document to another PDF file using PdfDocument.SaveToFile() method.
- C#
- VB.NET
using Spire.Pdf;
using Spire.Pdf.Security;

namespace ChangeSecurityPermission
{
    class Program
    {
        static void Main(string[] args)
        {
            //Create a PdfDocument object
            PdfDocument doc = new PdfDocument();

            //Load a sample PDF file
            doc.LoadFromFile(@"C:\Users\Administrator\Desktop\sample.pdf");

            //Specify open password
            string openPsd = string.Empty;

            //Specify permission password
            string permissionPsd = "e-iceblue";

            //Encrypt the document with open password and permission password, and set the permissions and encryption key size
            PdfSecurityPolicy securityPolicy = new PdfPasswordSecurityPolicy(openPsd, permissionPsd);

            // Set the encryption algorithm to AES 128-bit
            securityPolicy.EncryptionAlgorithm = PdfEncryptionAlgorithm.AES_128;

            // Allow printing of the document
            securityPolicy.DocumentPrivilege.AllowPrint = true;

            // Allow filling form fields in the document
            securityPolicy.DocumentPrivilege.AllowFillFormFields = true;

            doc.Encrypt(securityPolicy);

            //Save the document to another PDF file
            doc.SaveToFile("SecurityPermissions.pdf");
        }
    }
}
Apply for a Temporary License
If you'd like to remove the evaluation message from the generated documents, or to get rid of the function limitations, please request a 30-day trial license for yourself.
How to split text into two columns and add line between them
2015-05-28 08:51:50 Written by AdministratorColumns are widely used to set page layout, for which could split text into two or more columns so that the text could flow from one column to the next on the same page. Using Spire.Doc, we could achieve this feature and add a line between columns at the same time. This article is going to introduce how to split text into two columns and add line between them.
Note: please download the latest version of Spire.Doc and add Spire.Doc .dll as reference of Visual Studio.
Step 1: Create a new document and load from file
Document document = new Document();
document.LoadFromFile("S.docx");
Step 2: Add a column to section one, set the width of columns and the spacing between columns. Here we set width as 100f and spacing as 20f.
document.Sections[0].AddColumn(100f, 20f);
Step 3: Add a line between the two columns
document.Sections[0].PageSetup.ColumnsLineBetween = true;
Step 4: Save the document and launch to see effects
document.SaveToFile("result.docx",FileFormat.Docx2013);
System.Diagnostics.Process.Start("result.docx");
Before adding the columns:
Effects:

Full Code:
using System;
using System.Collections.Generic;
using System.Linq;
using System.Text;
using Spire.Doc;

namespace Column
{
    class Program
    {
        static void Main(string[] args)
        {
            Document document = new Document();

            document.LoadFromFile("S.docx");

            document.Sections[0].AddColumn(100f, 20f);

            document.Sections[0].PageSetup.ColumnsLineBetween = true;

            document.SaveToFile("result.docx",FileFormat.Docx2013);
            System.Diagnostics.Process.Start("result.docx");

        }
    }
}
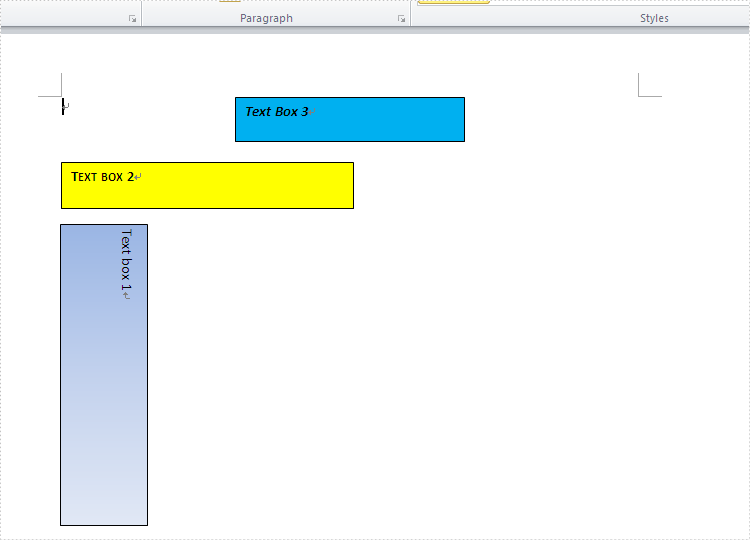
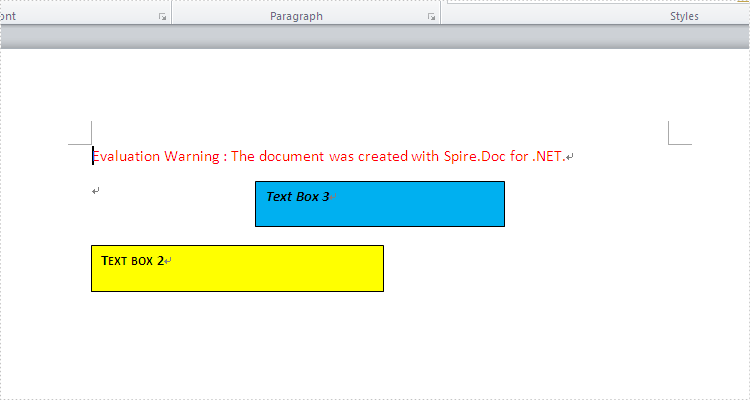
Text Box has been widely used in word documents to present additional information to readers. As a powerful and easy to use .NET word component, Spire.Doc has powerful function to work with text box. We have already showed you how to insert text box to word document and extract Text from Text Boxes in Word document. In this article let's see how to remove text box from word document in C#.
Spire.Doc supports to remove the particular text box or clear all the text boxes from the word documents. We will show you the details as below. Firstly, check the original word document contains three text boxes on it.
Here comes to the steps of how to remove the text box from word document by using the class of TextBoxes.
Step 1: Create a new document and load from file.
Document Doc = new Document();
Doc.LoadFromFile("Sample.docx");
Step 2: Remove the first text box by using the class of TextBoxes.
Doc.TextBoxes.RemoveAt(0);
Step 3: Save and launch the file.
Doc.SaveToFile("result.docx", FileFormat.Docx);
System.Diagnostics.Process.Start("result.docx");
Effective screenshot:
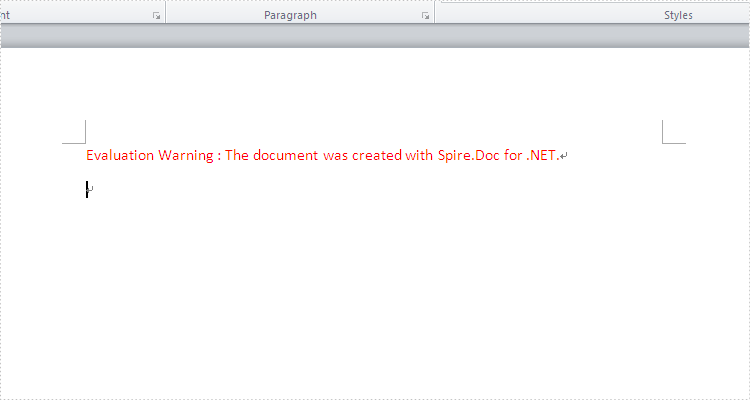
If you want to clear all the text boxes at one time, the following code snippet will fulfill it.
Screenshot after clear all the text boxes:
Doc.TextBoxes.Clear();
Full codes:
namespace Removetextbox
{
    class Program
    {
        static void Main(string[] args)
        {
            Document Doc = new Document();
            Doc.LoadFromFile("Sample.docx");

            Doc.TextBoxes.RemoveAt(0);
            //Doc.TextBoxes.Clear();

            Doc.SaveToFile("result.docx", FileFormat.Docx);
            System.Diagnostics.Process.Start("result.docx");

        }
    }
}
Grid also offers more flexible resizing behavior than Table and lighter weight then a Table. It derives from the Panel element which is best used inside of forms. This article is mainly talk about how to merge cells in grid via Spire.PDF.
Prerequisite:
- Download Spire.PDF for .NET (or Spire.Office for .NET) and install it on your system.
- Add Spire.PDF.dll as reference in the downloaded Bin folder thought the below path: "..\Spire.PDF\Bin\NET4.0\ Spire.PDF.dll".
- Check the codes as below in C#:
Here are the detail steps:
Step 1: Create a new PDF document and add a new page.
PdfDocument doc = new PdfDocument();
PdfPageBase page = doc.Pages.Add();
Step 2: Add a new grid with 5 columns and 2 rows, and set height and width.
PdfGrid grid = new PdfGrid();
grid.Columns.Add(5);
float width = page.Canvas.ClientSize.Width - (grid.Columns.Count + 1);
for (int j = 0; j < grid.Columns.Count;j++)
{
  grid.Columns[j].Width = width * 0.20f;
}

 PdfGridRow row0 = grid.Rows.Add();
 PdfGridRow row1 = grid.Rows.Add();
 float height = 20.0f;
 for (int i = 0; i < grid.Rows.Count; i++)
 {
      grid.Rows[i].Height = height;
 }
Step 3: Draw the current grid.
grid.Draw(page, new PointF(0, 50));
Step 4: Set the font of the grid and fill some content in the cells. Use RowSpan and ColumnSpan to merge certain cells vertically and horizontally.
row0.Style.Font = new PdfTrueTypeFont(new Font("Arial", 16f, FontStyle.Bold), true);
row1.Style.Font = new PdfTrueTypeFont(new Font("Arial", 16f, FontStyle.Italic), true);

row0.Cells[0].Value = "Corporation";
row0.Cells[0].RowSpan = 2;

row0.Cells[1].Value = "B&K Undersea Photo";
row0.Cells[1].StringFormat = new PdfStringFormat(PdfTextAlignment.Center, PdfVerticalAlignment.Middle);
row0.Cells[1].ColumnSpan = 3;

row0.Cells[4].Value = "World";
row0.Cells[4].Style.Font = new PdfTrueTypeFont(new Font("Arial", 10f, FontStyle.Bold | FontStyle.Italic), true);
row0.Cells[4].StringFormat = new PdfStringFormat(PdfTextAlignment.Center, PdfVerticalAlignment.Middle);
row0.Cells[4].Style.BackgroundBrush = PdfBrushes.LightGreen;

row1.Cells[1].Value = "Diving International Unlimited";
row1.Cells[1].StringFormat = new PdfStringFormat(PdfTextAlignment.Center, PdfVerticalAlignment.Middle);
row1.Cells[1].ColumnSpan = 4;
Step 5: Draw the new grid and save the file, the review it.
grid.Draw(page, new PointF(0, 100));

doc.SaveToFile("result.pdf");
System.Diagnostics.Process.Start("result.pdf");
Following is the result screenshot:
Full Code:
using Spire.Pdf;
using Spire.Pdf.Graphics;
using Spire.Pdf.Grid;
using System.Drawing;


namespace MergeCells
{
    class Program
    {
        static void Main(string[] args)
        {
            PdfDocument doc = new PdfDocument();
            PdfPageBase page = doc.Pages.Add();

            PdfGrid grid = new PdfGrid();
            grid.Columns.Add(5);
            float width = page.Canvas.ClientSize.Width - (grid.Columns.Count + 1);
            for (int j = 0; j < grid.Columns.Count; j++)
            {
                grid.Columns[j].Width = width * 0.20f;
            }

            PdfGridRow row0 = grid.Rows.Add();
            PdfGridRow row1 = grid.Rows.Add();
            float height = 20.0f;
            for (int i = 0; i < grid.Rows.Count; i++)
            {
                grid.Rows[i].Height = height;
            }

            grid.Draw(page, new PointF(0, 50));

            row0.Style.Font = new PdfTrueTypeFont(new Font("Arial", 16f, FontStyle.Bold), true);
            row1.Style.Font = new PdfTrueTypeFont(new Font("Arial", 16f, FontStyle.Italic), true);

            row0.Cells[0].Value = "Corporation";
            row0.Cells[0].RowSpan = 2;

            row0.Cells[1].Value = "B&K Undersea Photo";
            row0.Cells[1].StringFormat = new PdfStringFormat(PdfTextAlignment.Center, PdfVerticalAlignment.Middle);
            row0.Cells[1].ColumnSpan = 3;

            row0.Cells[4].Value = "World";
            row0.Cells[4].Style.Font = new PdfTrueTypeFont(new Font("Arial", 10f, FontStyle.Bold | FontStyle.Italic), true);
            row0.Cells[4].StringFormat = new PdfStringFormat(PdfTextAlignment.Center, PdfVerticalAlignment.Middle);
            row0.Cells[4].Style.BackgroundBrush = PdfBrushes.LightGreen;

            row1.Cells[1].Value = "Diving International Unlimited";
            row1.Cells[1].StringFormat = new PdfStringFormat(PdfTextAlignment.Center, PdfVerticalAlignment.Middle);
            row1.Cells[1].ColumnSpan = 4;

            grid.Draw(page, new PointF(0, 100));

            doc.SaveToFile("result.pdf");
            System.Diagnostics.Process.Start("result.pdf");
        }
    }
}
Set position of table in Word Document as outside via Spire.Doc
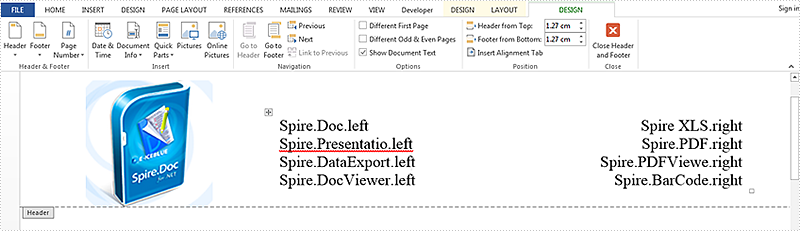
2015-05-22 08:57:03 Written by KoohjiTable in word document can make your data more logical and uncluttered, this article is talk about set absolute position of table in word document via Spire.Doc. Here try to realize placing a table on the right of an image on header.
Here are the steps:
Step 1: Create a new word document and add new section.
Document doc = new Document();
Section sec = doc.AddSection();
Step 2: Create header on Section[0].
HeaderFooter header = doc.Sections[0].HeadersFooters.Header;
Step 3: Add new paragraph on header and set HorizontalAlignment of the paragraph as left.
Paragraph paragraph = header.AddParagraph();
paragraph.Format.HorizontalAlignment = HorizontalAlignment.Left;
Step 4: Load an image for the paragraph.
DocPicture headerimage = paragraph.AppendPicture(Image.FromFile(@"1.png"));
Step 5: Add a table of 4 rows and 2 columns.
Table table = header.AddTable();
table.ResetCells(4, 2);
Step 6: Set the position of the table to the right of the image. Set WrapTextAround is true, HorizPositionAbs is outside, VertRelationTo is margin, and VertPosition is 43 to fit the height of the image.
table.TableFormat.WrapTextAround = true;
table.TableFormat.Positioning.HorizPositionAbs = HorizontalPosition.Outside;
table.TableFormat.Positioning.VertRelationTo = VerticalRelation.Margin;
table.TableFormat.Positioning.VertPosition = 43;
Step 7: Then add contents for the table, first column alignment set as left ,second column alignment set as right.
String[][] data = {
                    new string[] {"Spire.Doc.left","Spire XLS.right"},
                    new string[] {"Spire.Presentatio.left","Spire.PDF.right"},
                    new string[] {"Spire.DataExport.left","Spire.PDFViewe.right"},
                    new string []{"Spire.DocViewer.left","Spire.BarCode.right"}
                              };

            for (int r = 0; r < 4; r++)
            {
                TableRow dataRow = table.Rows[r];
                for (int c = 0; c < 2; c++)
                {
                    if (c == 0)
                    {
                        Paragraph par = dataRow.Cells[c].AddParagraph();
                        par.AppendText(data[r][c]);
                        par.Format.HorizontalAlignment = HorizontalAlignment.Left;
                        dataRow.Cells[c].Width = 180;
                    }
                    else
                    {
                        Paragraph par = dataRow.Cells[c].AddParagraph();
                        par.AppendText(data[r][c]);
                        par.Format.HorizontalAlignment = HorizontalAlignment.Right;
                        dataRow.Cells[c].Width = 180;
                    }
                }
            }
Step 8: Save the file and review it.
doc.SaveToFile("result.docx", FileFormat.Docx);
System.Diagnostics.Process.Start("result.docx");
Here is the screenshot:
Full Code:
using Spire.Doc;
using Spire.Doc.Documents;
using Spire.Doc.Fields;
using System;
using System.Drawing;
namespace SetPosition
{
    class Program
    {

        static void Main(string[] args)
        {

            Document doc = new Document();
            Section sec = doc.AddSection();

            HeaderFooter header = doc.Sections[0].HeadersFooters.Header;

            Paragraph paragraph = header.AddParagraph();
            paragraph.Format.HorizontalAlignment = HorizontalAlignment.Left;
            DocPicture headerimage = paragraph.AppendPicture(Image.FromFile(@"1.png"));

            Table table = header.AddTable();
            table.ResetCells(4, 2);

            table.TableFormat.WrapTextAround = true;
            table.TableFormat.Positioning.HorizPositionAbs = HorizontalPosition.Outside;
            table.TableFormat.Positioning.VertRelationTo = VerticalRelation.Margin;
            table.TableFormat.Positioning.VertPosition = 43;


            String[][] data = {
                    new string[] {"Spire.Doc.left","Spire XLS.right"},
                    new string[] {"Spire.Presentatio.left","Spire.PDF.right"},
                    new string[] {"Spire.DataExport.left","Spire.PDFViewe.right"},
                    new string []{"Spire.DocViewer.left","Spire.BarCode.right"}
                              };

            for (int r = 0; r < 4; r++)
            {
                TableRow dataRow = table.Rows[r];
                for (int c = 0; c < 2; c++)
                {
                    if (c == 0)
                    {
                        Paragraph par = dataRow.Cells[c].AddParagraph();
                        par.AppendText(data[r][c]);
                        par.Format.HorizontalAlignment = HorizontalAlignment.Left;
                        dataRow.Cells[c].Width = 180;
                    }
                    else
                    {
                        Paragraph par = dataRow.Cells[c].AddParagraph();
                        par.AppendText(data[r][c]);
                        par.Format.HorizontalAlignment = HorizontalAlignment.Right;
                        dataRow.Cells[c].Width = 180;
                    }
                }
            }
            doc.SaveToFile("result.docx",Spire.Doc.FileFormat.Docx);
            System.Diagnostics.Process.Start("result.docx");
        }
    }
}
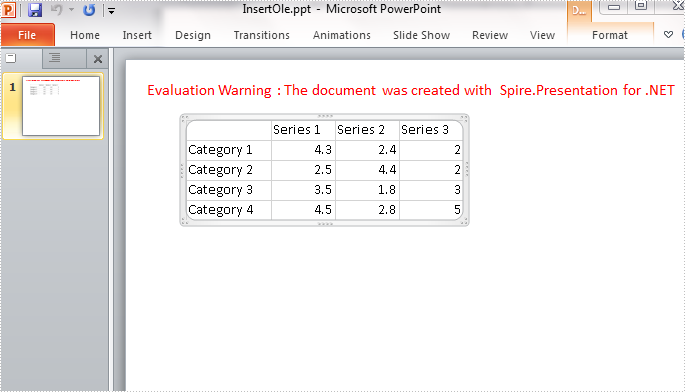
To display Excel data in a PowerPoint presentation, we can copy and paste the data to a slide as a PowerPoint table, a worksheet object, a picture, or plain text. This article introduces how to insert an Excel sheet in PowerPoint as an OLE object in C# and VB.NET.
In this solution, you'll need to use Spire.XLS to load the Excel file and get the data, and then create OEL object using Spire.Presentation. So, please download Spire.Office and reference the related DLLs in your project.
Workbook book = new Workbook();
book.LoadFromFile(@"data.xlsx");
Step 2: Select the cell range from the first worksheet and save it as image.
Image image = book.Worksheets[0].ToImage(1, 1, 5, 4);
Step 3: Initialize a new instance of Presentation class, add the image to presentation.
Presentation ppt = new Presentation();
IImageData oleImage = ppt.Images.Append(image);
Step 4: Insert an OLE object to presentation based on the Excel data.
Rectangle rec = new Rectangle(60,60,image.Width,image.Height);
using (MemoryStream ms = new MemoryStream())
{
    book.SaveToStream(ms);
    ms.Position = 0;
    Spire.Presentation.IOleObject oleObject = ppt.Slides[0].Shapes.AppendOleObject("excel", ms.ToArray(), rec);
    oleObject.SubstituteImagePictureFillFormat.Picture.EmbedImage = oleImage;
    oleObject.ProgId = "Excel.Sheet.12";
}
Step 5: Save the PowerPoint file with the specified format.
ppt.SaveToFile("InsertOle.pptx", Spire.Presentation.FileFormat.Pptx2007);
Output:
Entire Code:
using Spire.Presentation;
using Spire.Presentation.Drawing;
using Spire.Xls;
using System.Drawing;
using System.IO;
namespace ExceltoPPT
{

    class Program
    {

        static void Main(string[] args)
        {
            Workbook book = new Workbook();
            book.LoadFromFile(@"data.xlsx");
            Image image = book.Worksheets[0].ToImage(1, 1, 5, 4);

            Presentation ppt = new Presentation();
            IImageData oleImage = ppt.Images.Append(image);
            Rectangle rec = new Rectangle(60, 60, image.Width, image.Height);
            using (MemoryStream ms = new MemoryStream())
            {
                book.SaveToStream(ms);
                ms.Position = 0;
                Spire.Presentation.IOleObject oleObject = ppt.Slides[0].Shapes.AppendOleObject("excel", ms.ToArray(), rec);
                oleObject.SubstituteImagePictureFillFormat.Picture.EmbedImage = oleImage;
                oleObject.ProgId = "Excel.Sheet.12";
            }

            ppt.SaveToFile("InsertOle.pptx", Spire.Presentation.FileFormat.Pptx2007);


        }
    }
}
Imports Spire.Presentation
Imports Spire.Presentation.Drawing
Imports Spire.Xls
Imports System.Drawing
Imports System.IO
Namespace ExceltoPPT

	Class Program

		Private Shared Sub Main(args As String())
			Dim book As New Workbook()
			book.LoadFromFile("data.xlsx")
			Dim image As Image = book.Worksheets(0).ToImage(1, 1, 5, 4)

			Dim ppt As New Presentation()
			Dim oleImage As IImageData = ppt.Images.Append(image)
			Dim rec As New Rectangle(60, 60, image.Width, image.Height)
			Using ms As New MemoryStream()
				book.SaveToStream(ms)
				ms.Position = 0
				Dim oleObject As Spire.Presentation.IOleObject = ppt.Slides(0).Shapes.AppendOleObject("excel", ms.ToArray(), rec)
				oleObject.SubstituteImagePictureFillFormat.Picture.EmbedImage = oleImage
				oleObject.ProgId = "Excel.Sheet.12"
			End Using

			ppt.SaveToFile("InsertOle.pptx", Spire.Presentation.FileFormat.Pptx2007)


		End Sub
	End Class
End Namespace
