
.NET (1327)
Children categories
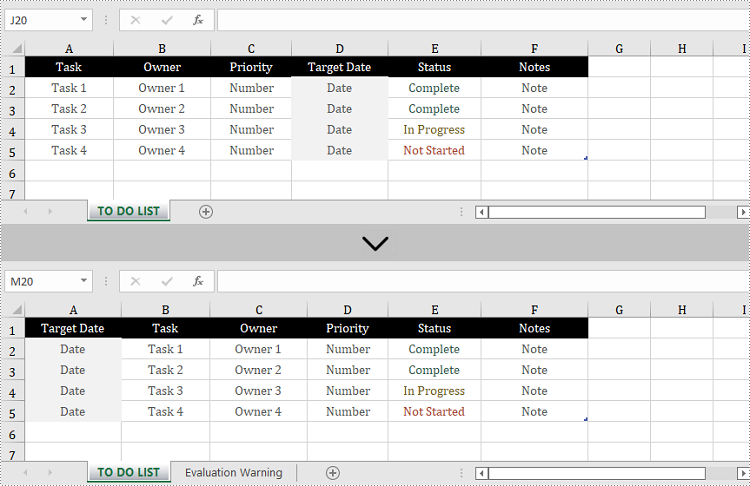
The proper adjustment of the columns' order in Excel can improve readability. For example, by setting the date data as the first column, we can quickly locate data based on a specific date. It is easy to move columns in MS Excel by using Shift and Drag. This article, however, focuses on how to rearrange columns in Excel in C# and VB.NET by using Spire.XLS for .NET.
Install Spire.XLS for .NET
To begin with, you need to add the DLL files included in the Spire.XLS for .NET package as references in your .NET project. The DLL files can be either downloaded from this link or installed via NuGet.
PM> Install-Package Spire.XLS
Reorder Excel Columns in C# and VB.NET
The following are the steps to rearrange columns in Excel using Spire.XLS for .NET.
- Create a Workbook object, and load a sample Excel file using Workbook.LoadFromFile() method.
- Get the target worksheet using Workbook.Worksheets[index] property.
- Specify the new column order in an int array.
- Create a temporary sheet and copy the data from the target sheet into it.
- Copy the columns from the temporary sheet to the target sheet and store them in the new order.
- Remove the temporary sheet.
- Save the workbook to another Excel file using Workbook.SaveToFile() method.
- C#
- VB.NET
using System.Linq;
using Spire.Xls;

namespace MoveColumn
{
    class Program
    {
        static void Main(string[] args)
        {
            //Create a Workbook object
            Workbook workbook = new Workbook();

            //Load an Excel file
            workbook.LoadFromFile(@"C:\Users\Administrator\Desktop\sample.xlsx");

            //Get the first worksheet
            Worksheet worksheet = workbook.Worksheets[0];

            //Set the new column order (the column index starts from 0)
            int[] newColumnOrder = new int[] { 3, 0, 1, 2, 4, 5 };

            //Add a temporary worksheet
            Worksheet newSheet = workbook.Worksheets.Add("temp");

            //Copy data from the first worksheet to the temporary sheet
            newSheet.CopyFrom(worksheet);

            //Loop through the newColumnOrder array
            for (int i = 0; i < newColumnOrder.Count(); i++)
            {
                //Copy the column from the temporary sheet to the first sheet
                newSheet.Columns[newColumnOrder[i]].Copy(worksheet.Columns[i], true, true);

                //Set the width of a certain column the first sheet to that of the temporary sheet
                worksheet.Columns[i].ColumnWidth = newSheet.Columns[newColumnOrder[i]].ColumnWidth;
            }

            //Remove temporary sheet
            workbook.Worksheets.Remove(newSheet);

            //Save the workbook to another Excel file
            workbook.SaveToFile("MoveColumn.xlsx", FileFormat.Version2016);
        }
    }
}
Apply for a Temporary License
If you'd like to remove the evaluation message from the generated documents, or to get rid of the function limitations, please request a 30-day trial license for yourself.
Excel spreadsheets are scalable grid-based files that are used to organize data and perform calculations. People all across the world use spreadsheets to create tables for personal and business usage. To write a large amount of data into an Excel spreadsheet, it is recommended to use the programming method, which saves time and is less error-prone. In this article, you will learn how to write data into Excel in C# and VB.NET using Spire.XLS for .NET.
- Write Text or Number Values to Specific Cells
- Write Arrays to a Worksheet
- Write a DataTable to a Worksheet
Install Spire.XLS for .NET
To begin with, you need to add the DLL files included in the Spire.XLS for .NET package as references in your .NET project. The DLL files can be either downloaded from this link or installed via NuGet.
PM> Install-Package Spire.XLS
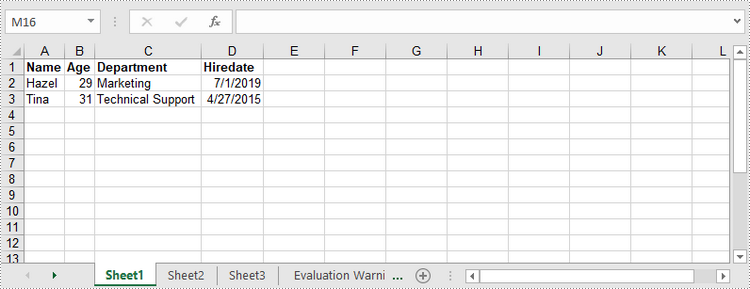
Write Text or Number Values to Specific Cells
A certain cell in a worksheet can be accessed by Worksheet.Range[int row, int column] property. Then, you can add a text value or a number value to the cell through the XlsRange.Value or XlsRange.Value2 property. The following are the detailed steps.
- Create a Workbook object.
- Get the first worksheet through Workbook.Worksheets[] property.
- Get a specific cell through Workhseet.Range[] property.
- Add a text value or a number value to the cell through XlsRange.Value or XlsRange.Value2 property.
- Save the workbook to an Excel file using Workbook.SaveToFile() method.
- C#
- VB.NET
using Spire.Xls;

namespace WriteDataToCells
{
    class Program
    {
        static void Main(string[] args)
        {
            //Create a Workbook object
            Workbook workbook = new Workbook();

            //Get the first worksheet
            Worksheet worksheet = workbook.Worksheets[0];

            //Write data to specific cells
            worksheet.Range[1, 1].Value = "Name";
            worksheet.Range[1, 2].Value = "Age";
            worksheet.Range[1, 3].Value = "Department";
            worksheet.Range[1, 4].Value = "Hiredate";
            worksheet.Range[1, 2].Value = "Hazel";
            worksheet.Range[2, 2].Value2 = 29;
            worksheet.Range[2, 3].Value = "Marketing";
            worksheet.Range[2, 4].Value = "2019-07-01";
            worksheet.Range[3, 1].Value = "Tina";
            worksheet.Range[3, 2].Value2 = 31;
            worksheet.Range[3, 3].Value = "Technical Support";
            worksheet.Range[3, 4].Value = "2015-04-27";

            //Auto fit column widths
            worksheet.AllocatedRange.AutoFitColumns();

            //Apply a style to the first row
            CellStyle style = workbook.Styles.Add("newStyle");
            style.Font.IsBold = true;
            worksheet.Range[1, 1, 1, 4].Style = style;

            //Save to an Excel file
            workbook.SaveToFile("WriteToCells.xlsx", ExcelVersion.Version2016);
        }
    }
}
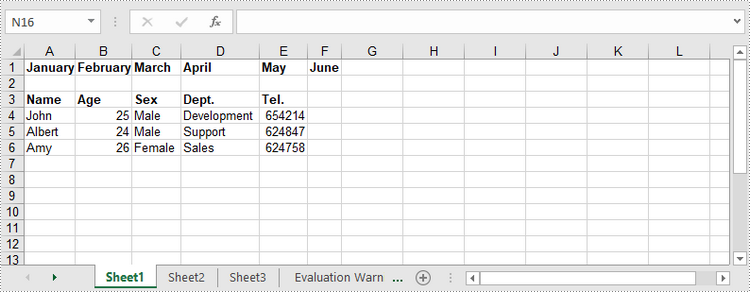
Write Arrays to a Worksheet
Spire.XLS for .NET provides the Worksheet.InsertArrary() method, allowing programmers to write one-dimensional arrays or two-dimensional arrays into the specified cell range of a worksheet. The steps to write arrays to a worksheet are as follows:
- Create a Workbook object.
- Get the first worksheet through Workbook.Worksheets[] property.
- Create a one-dimensional array and a two-dimensional array.
- Insert the arrays to worksheet using Worksheet.InsertArray() method.
- Save the workbook to an Excel file using Workbook.SaveToFile() method.
- C#
- VB.NET
using Spire.Xls;

namespace WriteArraysToWorksheet
{
    class Program
    {
        static void Main(string[] args)
        {
            //Create a Workbook instance
            Workbook workbook = new Workbook();

            //Get the first worksheet
            Worksheet worksheet = workbook.Worksheets[0];

            //Create a one-dimensional array
            string[] oneDimensionalArray = new string[] { "January", "February", "March", "April", "May", "June" };

            //Write the array to the first row of the worksheet
            worksheet.InsertArray(oneDimensionalArray, 1, 1, false);

            //Create a two-dimensional array
            string[,] twoDimensionalArray = new string[,]{

                {"Name", "Age", "Sex", "Dept.", "Tel."},
                {"John", "25", "Male", "Development","654214"},
                {"Albert", "24", "Male", "Support","624847"},
                {"Amy", "26", "Female", "Sales","624758"}
            };

            //Write the array to the worksheet starting from the cell A3
            worksheet.InsertArray(twoDimensionalArray, 3, 1);

            //Auto fit column width in the located range
            worksheet.AllocatedRange.AutoFitColumns();

            //Apply a style to the first and the third row
            CellStyle style = workbook.Styles.Add("newStyle");
            style.Font.IsBold = true;
            worksheet.Range[1, 1, 1, 6].Style = style;
            worksheet.Range[3, 1, 3, 6].Style = style;

            //Save to an Excel file
            workbook.SaveToFile("InsertArrays.xlsx", ExcelVersion.Version2016);
        }
    }
}
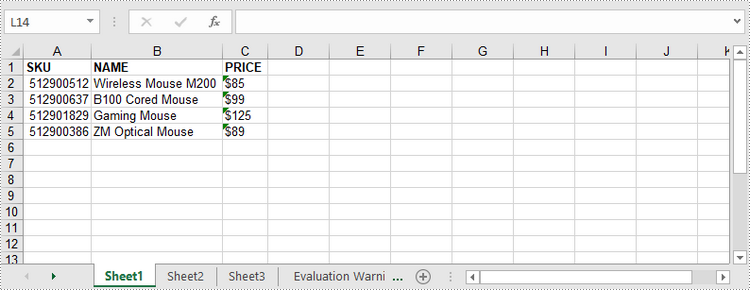
Write a DataTable to a Worksheet
To import data from a DataTable to a worksheet, use the Worksheet.InsertDataTable() method. The following are the detailed steps.
- Create a Workbook object.
- Get the first worksheet through Workbook.Worksheets[] property.
- Create a DataTable with random data.
- Write the DataTable to the worksheet at the specified location using Worksheet.InsertDataTable() method.
- Save the workbook to an Excel file using Workbook.SaveToFile() method.
- C#
- VB.NET
using System;
using System.Data;
using Spire.Xls;

namespace WriteDataTableToWorksheet
{
    class Program
    {
        static void Main(string[] args)
        {
            //Create a Workbook instance
            Workbook workbook = new Workbook();

            //Get the first worksheet
            Worksheet worksheet = workbook.Worksheets[0];

            //Create a DataTable object
            DataTable dataTable = new DataTable();
            dataTable.Columns.Add("SKU", typeof(Int32));
            dataTable.Columns.Add("NAME", typeof(String));
            dataTable.Columns.Add("PRICE", typeof(String));

            //Create rows and add data
            DataRow dr = dataTable.NewRow();
            dr[0] = 512900512;
            dr[1] = "Wireless Mouse M200";
            dr[2] = "$85";
            dataTable.Rows.Add(dr);

            dr = dataTable.NewRow();
            dr[0] = 512900637;
            dr[1] = "B100 Cored Mouse";
            dr[2] = "$99";
            dataTable.Rows.Add(dr);

            dr = dataTable.NewRow();
            dr[0] = 512901829;
            dr[1] = "Gaming Mouse";
            dr[2] = "$125";
            dataTable.Rows.Add(dr);

            dr = dataTable.NewRow();
            dr[0] = 512900386;
            dr[1] = "ZM Optical Mouse";
            dr[2] = "$89";
            dataTable.Rows.Add(dr);

            //Write datatable to the worksheet
            worksheet.InsertDataTable(dataTable, true, 1, 1, true);

            //Auto fit column width in the located range
            worksheet.AllocatedRange.AutoFitColumns();

            //Apply a style to the first and the third row
            CellStyle style = workbook.Styles.Add("newStyle");
            style.Font.IsBold = true;
            worksheet.Range[1, 1, 1, 3].Style = style;

            //Save to an Excel file
            workbook.SaveToFile("InsertDataTable.xlsx", ExcelVersion.Version2016);
        }
    }
}
Apply for a Temporary License
If you'd like to remove the evaluation message from the generated documents, or to get rid of the function limitations, please request a 30-day trial license for yourself.
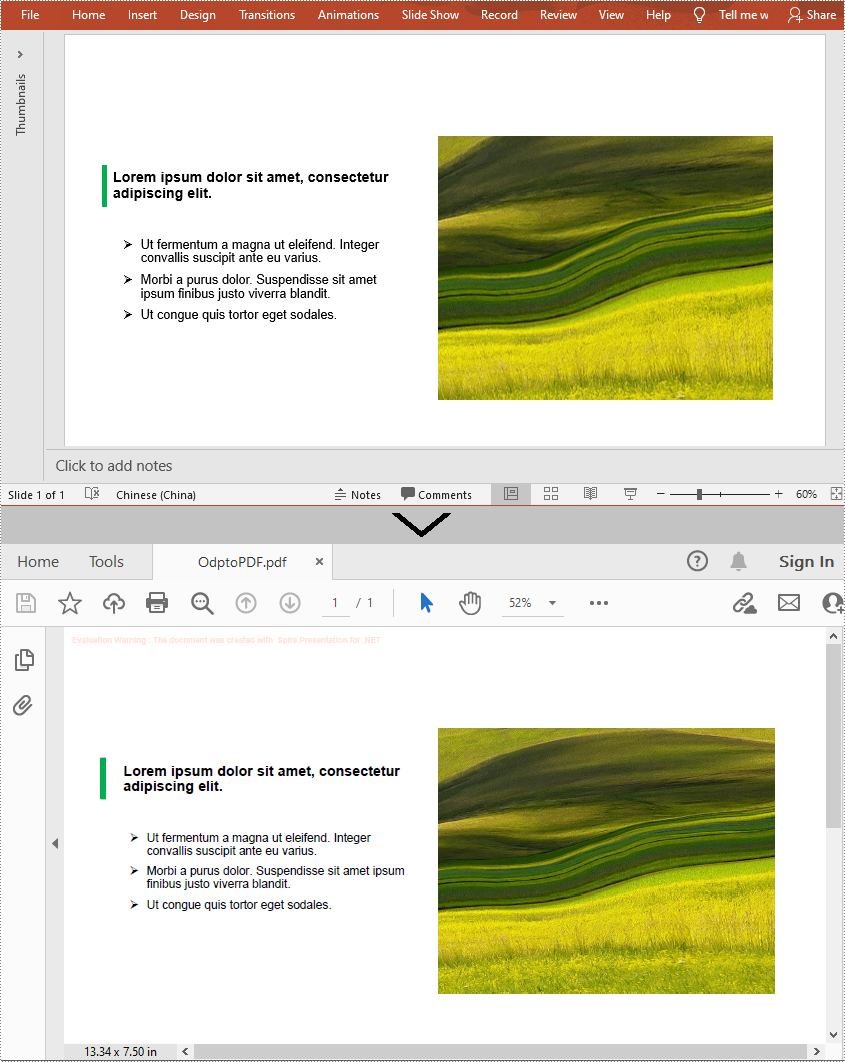
An ODP file is an OpenDocument Presentation file consisting of slides containing images, text, media, and transition effects. Since ODP files can only be opened by specified programs such as OpenOffice Impress, LibreOffice Impress, and Microsoft PowerPoint, if you want your ODP files to be viewable on more devices, you can convert them to PDF. In this article, you will learn how to programmatically convert a ODP file to PDF using Spire.Presentation for .NET.
Install Spire.Presentation for .NET
To begin with, you need to add the DLL files included in the Spire.Presentation for.NET package as references in your .NET project. The DLL files can be either downloaded from this link or installed via NuGet.
PM> Install-Package Spire.Presentation
Convert OpenDocument Presentation to PDF
The detailed steps are as follows:
- Create a Presentation instance.
- Load an ODP file using Presentation.LoadFromFile() method.
- Save the ODP file to PDF using Presentation.SaveToFile(String, FileFormat) method.
- C#
- VB.NET
using Spire.Presentation;

namespace ODPtoPDF
{
    class Program
    {
        static void Main(string[] args)
        {
            //Create a Presentation instance
            Presentation presentation = new Presentation();

            //Load an ODP file
            presentation.LoadFromFile("Sample.odp", FileFormat.ODP);

            //Convert the ODP file to PDF
            presentation.SaveToFile("OdptoPDF.pdf", FileFormat.PDF);

        }
    }
}
Apply for a Temporary License
If you'd like to remove the evaluation message from the generated documents, or to get rid of the function limitations, please request a 30-day trial license for yourself.
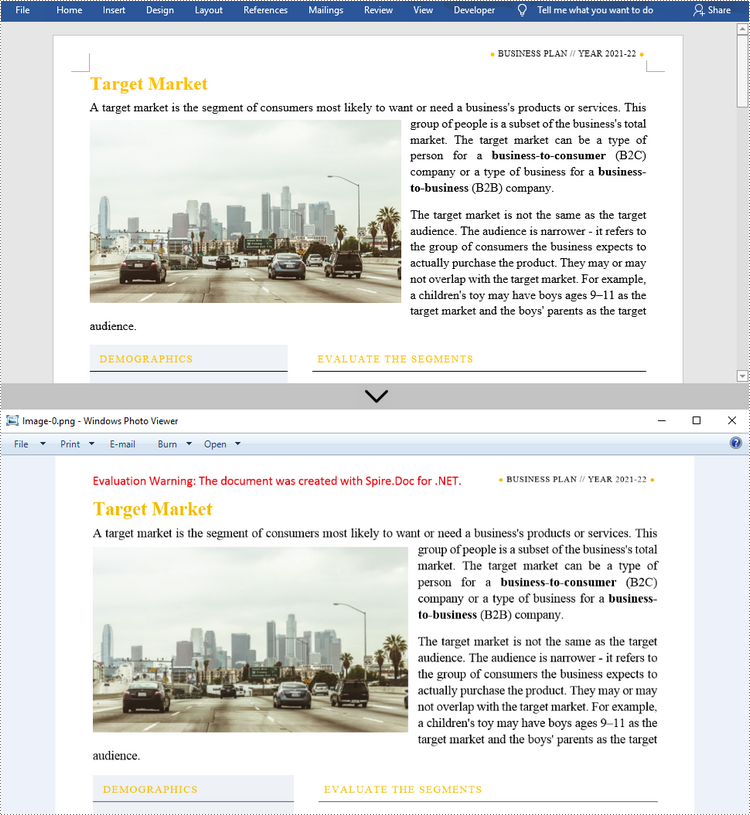
Compared with Word document format, pictures are more convenient to share and preview across platforms, because they do not require MS Word to be installed on machines. Moreover, converting Word to images can preserve the original appearance of the document, which is useful when further modifications are not desired. In this article, you will learn how to convert Word documents to images in C# and VB.NET using Spire.Doc for .NET.
- Convert Word to JPG in C#, VB.NET
- Convert Word to SVG in C#, VB.NET
- Convert Word to PNG with Customized Resolution in C#, VB.NET
Install Spire.Doc for .NET
To begin with, you need to add the DLL files included in the Spire.Doc for.NET package as references in your .NET project. The DLL files can be either downloaded from this link or installed via NuGet.
PM> Install-Package Spire.Doc
Convert Word to JPG in C#, VB.NET
Spire.Doc for .NET offers the Document.SaveToImages() method to convert a whole Word document into individual Bitmap or Metafile images. Then, a Bitmap or Metafile image can be saved as a BMP, EMF, JPEG, PNG, GIF, or WMF format file. The following are the steps to convert a Word document to JPG images using this library.
- Create a Document object.
- Load a Word document using Document.LoadFromFile() method.
- Convert the document to Bitmap images using Document.SaveToImages() method.
- Loop through the image collection to get the specific one and save it as a JPG file.
- C#
- VB.NET
using Spire.Doc;
using Spire.Doc.Documents;
using System;
using System.Drawing;
using System.Drawing.Imaging;
namespace ConvertWordToJPG
{
class Program
{
static void Main(string[] args)
{
//Create a Document object
Document doc = new Document();
//Load a Word document
doc.LoadFromFile("C:\\Users\\Administrator\\Desktop\\Template.docx");
//Convert the whole document into individual images
Image[] images = doc.SaveToImages(ImageType.Bitmap);
//Loop through the image collection
for (int i = 0; i < images.Length; i++)
{
//Save the image to a JPEG format file
string outputfile = String.Format("Image-{0}.jpg", i);
images[i].Save("C:\\Users\\Administrator\\Desktop\\Images\\" + outputfile, ImageFormat.Jpeg);
}
}
}
}
Convert Word to SVG in C#, VB.NET
Using Spire.Doc for .NET, you can save a Word document as a queue of byte arrays. Each byte array can then be written as a SVG file. The detailed steps to convert Word to SVG are as follows.
- Create a Document object.
- Load a Word file using Document.LoadFromFile() method.
- Save the document as a queue of byte arrays using Document.SaveToSVG() method.
- Loop through the items in the queue to get a specific byte array.
- Write the byte array to a SVG file.
- C#
- VB.NET
using Spire.Doc;
using System;
using System.Collections.Generic;
using System.IO;
namespace CovnertWordToSVG
{
class Program
{
static void Main(string[] args)
{
//Create a Document object
Document doc = new Document();
//Load a Word document
doc.LoadFromFile("C:\\Users\\Administrator\\Desktop\\Template.docx");
//Save the document as a queue of byte arrays
Queue<byte[]> svgBytes = doc.SaveToSVG();
//Loop through the items in the queue
for (int i = 0; i < svgBytes.Count; i++)
{
//Convert the queue to an array
byte[][] bytes = svgBytes.ToArray();
//Specify the output file name
string outputfile = String.Format("Image-{0}.svg", i);
//Write the byte[] in a SVG format file
FileStream fs = new FileStream("C:\\Users\\Administrator\\Desktop\\Images\\" + outputfile, FileMode.Create);
fs.Write(bytes[i], 0, bytes[i].Length);
fs.Close();
}
}
}
}
Convert Word to PNG with Customized Resolution in C#, VB.NET
An image with higher resolution is generally more clear. You can customize the image resolution while converting Word to PNG by following the following steps.
- Create a Document object.
- Load a Word file using Document.LoadFromFile() method.
- Convert the document to Bitmap images using Document.SaveToImages() method.
- Loop through the image collection to get the specific one.
- Call the custom method ResetResolution() to reset the image resolution.
- Save the image as a PNG file.
- C#
- VB.NET
using Spire.Doc;
using System;
using System.Drawing;
using System.Drawing.Imaging;
using Spire.Doc.Documents;
namespace ConvertWordToPng
{
class Program
{
static void Main(string[] args)
{
//Create a Document object
Document doc = new Document();
//Load a Word document
doc.LoadFromFile("C:\\Users\\Administrator\\Desktop\\Template.docx");
//Convert the whole document into individual images
Image[] images = doc.SaveToImages(ImageType.Metafile);
//Loop through the image collection
for (int i = 0; i < images.Length; i++)
{
//Reset the resolution of a specific image
Image newimage = ResetResolution(images[i] as Metafile, 150);
//Save the image to a PNG format file
string outputfile = String.Format("Image-{0}.png", i);
newimage.Save("C:\\Users\\Administrator\\Desktop\\Images\\" + outputfile, ImageFormat.Png);
}
}
//Set the image resolution by the ResetResolution() method
public static Image ResetResolution(Metafile mf, float resolution)
{
int width = (int)(mf.Width * resolution / mf.HorizontalResolution);
int height = (int)(mf.Height * resolution / mf.VerticalResolution);
Bitmap bmp = new Bitmap(width, height);
bmp.SetResolution(resolution, resolution);
using (Graphics g = Graphics.FromImage(bmp))
{
g.DrawImage(mf, Point.Empty);
}
return bmp;
}
}
}
Apply for a Temporary License
If you'd like to remove the evaluation message from the generated documents, or to get rid of the function limitations, please request a 30-day trial license for yourself.
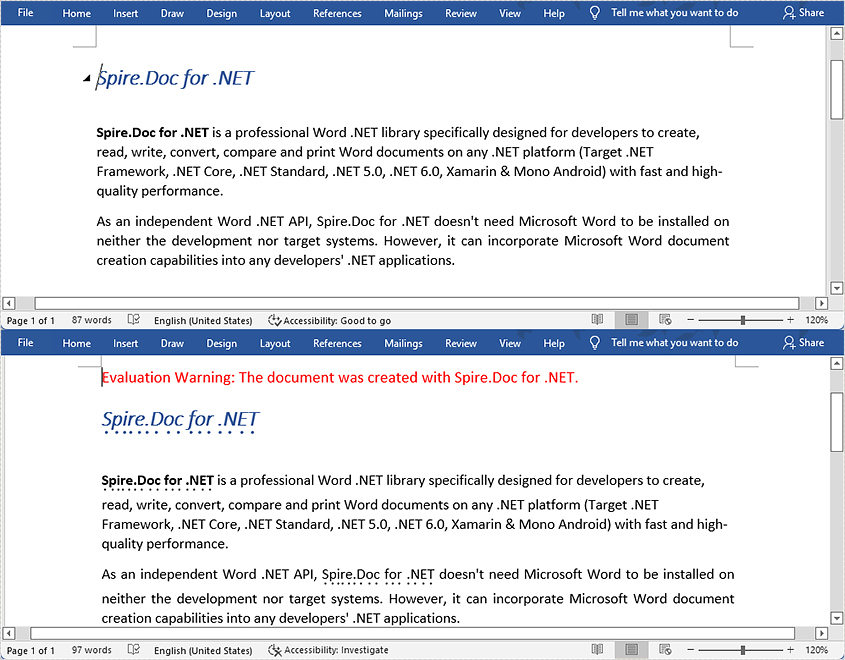
The emphasis mark is used in Word documents to emphasize words and make them more noticeable. It is usually a dot or a circle placed above or under the emphasized words. However, manually selecting words and applying emphasis marks on them takes a lot of work. Fortunately, Spire.Doc for .NET provides a much easier way to apply emphasis marks by codes. This article will show you how to apply emphasis marks to text in Word documents using Spire.Doc for .NET.
Install Spire.Doc for .NET
To begin with, you need to add the DLL files included in the Spire.Doc for.NET package as references in your .NET project. The DLL files can be either downloaded from this link or installed via NuGet.
PM> Install-Package Spire.Doc
Apply Emphasis Mark to Specified Text
The detailed steps are as follows:
- Create a Document instance.
- Load the Word document from disk using Document.LoadFromFile() method.
- Find the text you need to emphasize using Document.FindAllString() method.
- Apply emphasis mark to the found text through CharacterFormat.EmphasisMark property.
- Save the document to another Word file using Document.SaveToFile() method.
- C#
- VB.NET
using System;
using Spire.Doc;
using Spire.Doc.Documents;

namespace applyemphasismark
{
    class Program
    {
        static void Main(string[] args)
        {
            //Create a Document instance
            Document document = new Document();

            //Load the Word document from disk
            document.LoadFromFile(@"D:\testp\test.docx");

            //Find text you want to emphasize
            TextSelection[] textSelections = document.FindAllString("Spire.Doc for .NET", false, true);

            //Apply emphasis mark to the found text
            foreach (TextSelection selection in textSelections)
            {
                selection.GetAsOneRange().CharacterFormat.EmphasisMark = Emphasis.Dot;
            }

            //Save the document to another Word file
            string output = "ApllyEmphasisMark.docx";
            document.SaveToFile(output, FileFormat.Docx);
        }
    }
}
Apply for a Temporary License
If you'd like to remove the evaluation message from the generated documents, or to get rid of the function limitations, please request a 30-day trial license for yourself.
PowerPoint is a presentation document that is typically used for product introductions, performance reports, teaching, and other purposes. Since the design of PowerPoint is a visual behavior and needs constant fine-tuning, it is not recommended to create PowerPoint from scratch programmatically. But if you do have the requirement to create PowerPoint documents in C# or VB.NET, you can try this solution provided by Spire.Presentation for .NET.
Install Spire.Presentation for .NET
To begin with, you need to add the DLL files included in the Spire.Presentation for.NET package as references in your .NET project. The DLL files can be either downloaded from this link or installed via NuGet.
PM> Install-Package Spire.Presentation
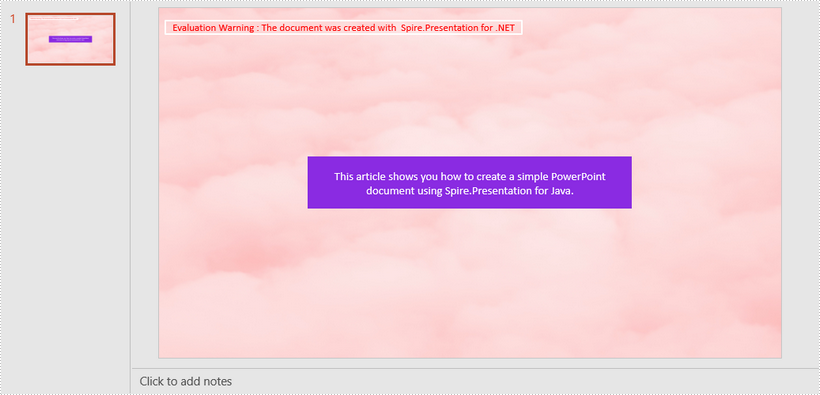
Create a Simple PowerPoint Document
Spire.Presentation for .NET offers the Presentation class and the ISlide interface to represent a PowerPoint document and a slide respectively. It is quite straightforward and simple for developers to use the properties and methods under them to create or manipulate PowerPoint files. The following are the steps to generate a simple PowerPoint document using it.
- Create a Presentation object, and set the slide size type to screen 16x9 through the Presentation.SlideSize.Type property.
- Get the first slide through the Presentation.Slides[] property.
- Set the background image of the slide using ISlide.SlideBackground property.
- Add a rectangle to the slide using ISlide.Shapes.AppendShape() method, positioning the shape at the center of the slide using IAutoShape.SetShapeAlignment() method.
- Set the fill color, line style, font color, and text of the shape through other properties under the IAutoShape object.
- Save the presentation to a .pptx file using Presentation.SaveToFile() method.
- C#
- VB.NET
using System.Drawing;
using Spire.Presentation;
using Spire.Presentation.Drawing;

namespace CreatePowerPoint
{
    class Program
    {
        static void Main(string[] args)
        {
            //Create a Presentation object
            Presentation presentation = new Presentation();

            //Set the slide size type to screen 16x9
            presentation.SlideSize.Type = SlideSizeType.Screen16x9;

            //Get the first slide
            ISlide slide = presentation.Slides[0];

            //Set the background image
            string imgPath = @"C:\Users\Administrator\Desktop\bgImage.jpg";
            IImageData imageData = presentation.Images.Append(Image.FromFile(imgPath));
            slide.SlideBackground.Type = Spire.Presentation.Drawing.BackgroundType.Custom;
            slide.SlideBackground.Fill.FillType = Spire.Presentation.Drawing.FillFormatType.Picture;
            slide.SlideBackground.Fill.PictureFill.FillType = PictureFillType.Stretch;
            slide.SlideBackground.Fill.PictureFill.Picture.EmbedImage = imageData;

            //Insert a rectangle shape
            Rectangle rect = new Rectangle(100, 100, 500, 80);
            IAutoShape shape = slide.Shapes.AppendShape(ShapeType.Rectangle, rect);

            //Position the shape at the center of the slide
            shape.SetShapeAlignment(ShapeAlignment.AlignCenter);
            shape.SetShapeAlignment(ShapeAlignment.DistributeVertically);

            //Set the fill color, line style and font color of the shape
            shape.Fill.FillType = FillFormatType.Solid;
            shape.Fill.SolidColor.Color = Color.BlueViolet;
            shape.ShapeStyle.LineStyleIndex = 0;//no line
            shape.ShapeStyle.FontColor.Color = Color.White;

            //Set the text of the shape
            shape.TextFrame.Text = "This article shows you how to create a simple PowerPoint document using Spire.Presentation for Java.";

            //Save to file
            presentation.SaveToFile("CreatePowerPoint.pptx", FileFormat.Pptx2013);
        }
    }
}
Apply for a Temporary License
If you'd like to remove the evaluation message from the generated documents, or to get rid of the function limitations, please request a 30-day trial license for yourself.
PDF linearization, also known as "Fast Web View", is a way of optimizing PDF files. Ordinarily, users can view a multipage PDF file online only when their web browsers have downloaded all pages from the server. However, if the PDF file is linearized, the browsers can display the first page very quickly even if the full download has not been completed. This article will demonstrate how to convert a PDF to linearized in C# and VB.NET using Spire.PDF for .NET.
Install Spire.PDF for .NET
To begin with, you need to add the DLL files included in the Spire.PDF for.NET package as references in your .NET project. The DLLs files can be either downloaded from this link or installed via NuGet.
- Package Manager
PM> Install-Package Spire.PDF
Convert PDF to Linearized
The following are the steps to convert a PDF file to linearized:
- Load a PDF file using PdfToLinearizedPdfConverter class.
- Convert the file to linearized using PdfToLinearizedPdfConverter.ToLinearizedPdf() method.
- C#
- VB.NET
using Spire.Pdf.Conversion;

namespace ConvertPdfToLinearized
{
    class Program
    {
        static void Main(string[] args)
        {
            //Load a PDF file
            PdfToLinearizedPdfConverter converter = new PdfToLinearizedPdfConverter("Sample.pdf");
            //Convert the file to a linearized PDF
            converter.ToLinearizedPdf("Linearized.pdf");
        }
    }
}
Imports Spire.Pdf.Conversion

Namespace ConvertPdfToLinearized
    Friend Class Program
        Private Shared Sub Main(ByVal args As String())
            'Load a PDF file
            Dim converter As PdfToLinearizedPdfConverter = New PdfToLinearizedPdfConverter("Sample.pdf")
            'Convert the file to a linearized PDF
            converter.ToLinearizedPdf("Linearized.pdf")
        End Sub
    End Class
End Namespace
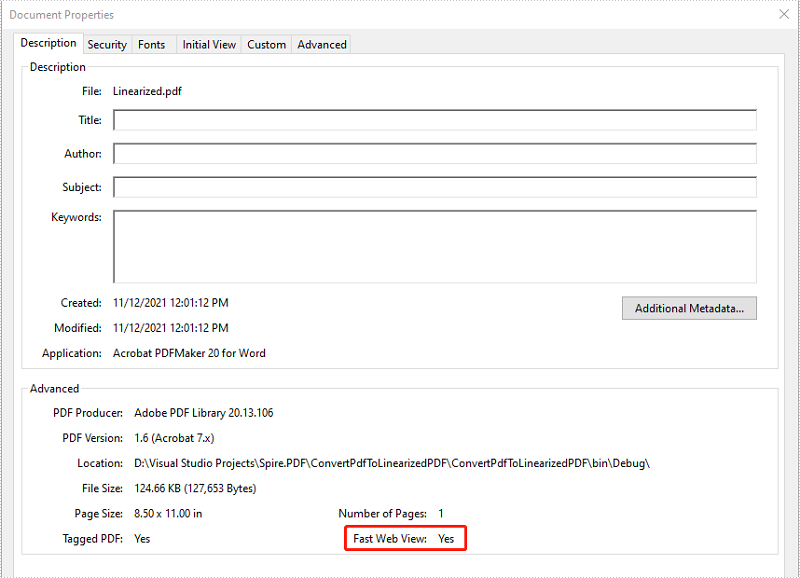
Open the result file in Adobe Acrobat and take a look at the document properties, you can see the value of “Fast Web View” is Yes which means the file is linearized.
Apply for a Temporary License
If you'd like to remove the evaluation message from the generated documents, or to get rid of the function limitations, please request a 30-day trial license for yourself.
Converting a PDF with color images to grayscale can help you reduce the file size and print the PDF in a more affordable mode without consuming colored ink. In this article, you will learn how to achieve the conversion programmatically in C# and VB.NET using Spire.PDF for .NET.
Install Spire.PDF for .NET
To begin with, you need to add the DLL files included in the Spire.PDF for.NET package as references in your .NET project. The DLLs files can be either downloaded from this link or installed via NuGet.
- Package Manager
PM> Install-Package Spire.PDF
Convert PDF to Grayscale
The following are the steps to convert a color PDF to grayscale:
- Load a PDF file using PdfGrayConverter class.
- Convert the PDF to grayscale using PdfGrayConverter.ToGrayPdf() method.
- C#
- VB.NET
using Spire.Pdf.Conversion;

namespace ConvertPdfToGrayscale
{
    class Program
    {
        static void Main(string[] args)
        {
            //Create a PdfGrayConverter instance and load a PDF file
            PdfGrayConverter converter = new PdfGrayConverter(@"Sample.pdf");
            //Convert the PDF to grayscale
            converter.ToGrayPdf("Grayscale.pdf");
            converter.Dispose();
        }
    }
}
Imports Spire.Pdf.Conversion

Namespace ConvertPdfToGrayscale
    Friend Class Program
        Private Shared Sub Main(ByVal args As String())
            'Create a PdfGrayConverter instance and load a PDF file
            Dim converter As PdfGrayConverter = New PdfGrayConverter("Sample.pdf")
            'Convert the PDF to grayscale
            converter.ToGrayPdf("Grayscale.pdf")
            converter.Dispose()
        End Sub
    End Class
End Namespace
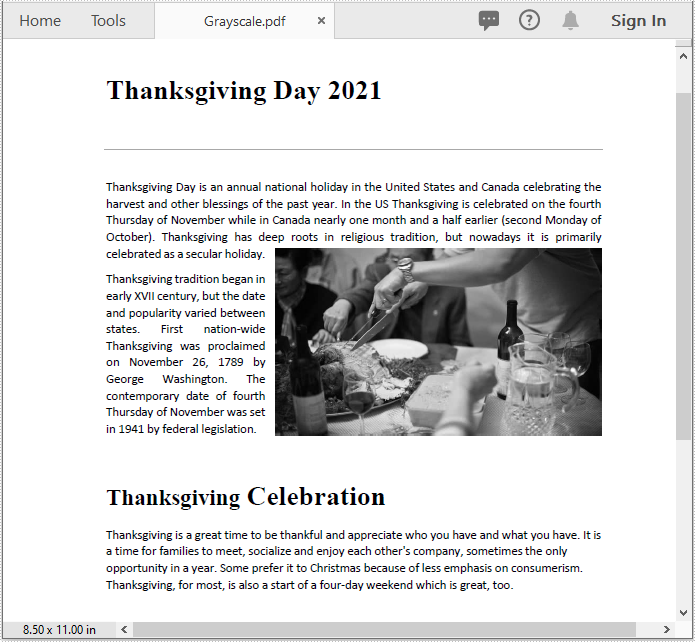
The input PDF:

The output PDF:
Apply for a Temporary License
If you'd like to remove the evaluation message from the generated documents, or to get rid of the function limitations, please request a 30-day trial license for yourself.
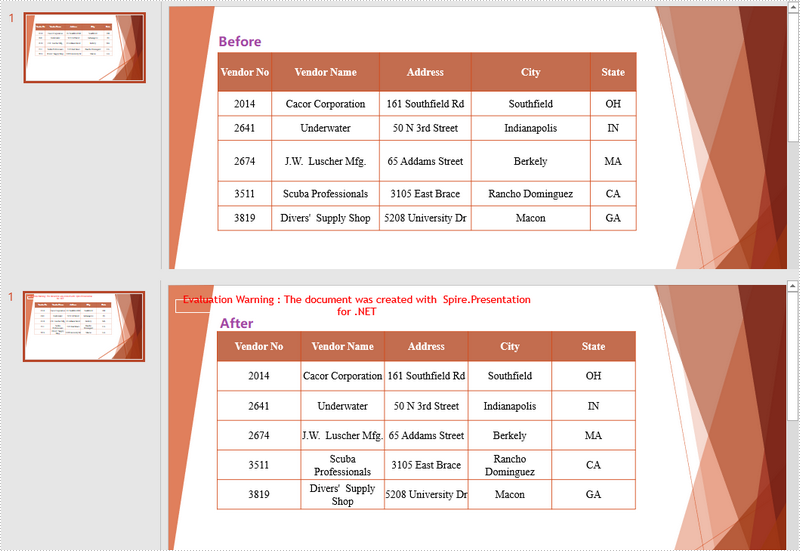
When creating a new table in PowerPoint, the rows and columns are evenly distributed by default. As you insert data into the table cells, the row heights and column widths will be automatically adjusted to fit with the contents. To make the table nicely organized, you may want to re-distribute the rows and columns. This article demonstrates how to accomplish this task in C# and VB.NET using Spire.Presentation for .NET.
Install Spire.Presentation for .NET
To begin with, you need to add the DLL files included in the Spire.Presentation for.NET package as references in your .NET project. The DLL files can be either downloaded from this link or installed via NuGet.
PM> Install-Package Spire.Presentation
Distribute Table Rows and Columns
The following are the steps to distribute table rows and columns evenly in PowerPoint.
- Create a Presentation object, and load the sample PowerPoint document using Presentation.LoadFromFile() method.
- Get the first slide through Presentation.Slides[0] property.
- Loop through the shapes in the first slide, and determine if a certain shape is a table. If yes, convert the shape to an ITable object.
- Distribute the table rows and columns using ITable.DistributeRows() method and ITable.DistributeColumns() method, respectively.
- Save the changes to another file using Presentation.SaveToFile() method.
- C#
- VB.NET
using Spire.Presentation;

namespace DistributeRowsAndColumns
{
    class Program
    {
        static void Main(string[] args)
        {
            //Create a Presentation instance
            Presentation presentation = new Presentation();

            //Load the PowerPoint document
            presentation.LoadFromFile(@"C:\Users\Administrator\Desktop\Table.pptx");

            //Get the first slide
            ISlide slide = presentation.Slides[0];

            //Loop through the shapes
            for (int i = 0; i < slide.Shapes.Count; i++)
            {
                //Determine if a shape is table
                if (slide.Shapes[i] is ITable)
                {
                    //Get the table in the slide
                    ITable table = (ITable)slide.Shapes[i];

                    //Distribute table rows
                    table.DistributeRows(0, table.TableRows.Count-1);

                    //Distribute table columns
                    table.DistributeColumns(0, table.ColumnsList.Count-1);

                }
            }

            //Save the result to file
            presentation.SaveToFile("DistributeRowsAndColumns.pptx", FileFormat.Pptx2013);
        }
    }
}
Imports Spire.Presentation

Namespace DistributeRowsAndColumns
    Class Program
        Shared  Sub Main(ByVal args() As String)
            'Create a Presentation instance
            Dim presentation As Presentation =  New Presentation()

            'Load the PowerPoint document
            presentation.LoadFromFile("C:\Users\Administrator\Desktop\Table.pptx")

            'Get the first slide
            Dim slide As ISlide =  presentation.Slides(0)

            'Loop through the shapes
            Dim i As Integer
            For  i = 0 To  slide.Shapes.Count- 1  Step  i + 1
                'Determine if a shape is table
                If TypeOf slide.Shapes(i) Is ITable Then
                    'Get the table in the slide
                    Dim table As ITable = CType(slide.Shapes(i), ITable)

                    'Distribute table rows
                    table.DistributeRows(0, table.TableRows.Count-1)

                    'Distribute table columns
                    table.DistributeColumns(0, table.ColumnsList.Count-1)

                End If
            Next

            'Save the result to file
            presentation.SaveToFile("DistributeRowsAndColumns.pptx", FileFormat.Pptx2013)
        End Sub
    End Class
End Namespace
Apply for a Temporary License
If you'd like to remove the evaluation message from the generated documents, or to get rid of the function limitations, please request a 30-day trial license for yourself.
Sometimes after you have finished an Excel workbook, you may need to replace some of the existing pictures with better ones for the purpose of making the workbook more appealing and persuasive. In this tutorial, you will learn how to replace a picture in Excel using Spire.XLS for .NET.
Install Spire.XLS for .NET
To begin with, you need to add the DLL files included in the Spire.XLS for .NET package as references in your .NET project. The DLLs files can be either downloaded from this link or installed via NuGet.
- Package Manager
PM> Install-Package Spire.XLS
Replace a Picture in Excel
The following are the detailed steps to replace a picture with another one using Spire.XLS for .NET.
- Create a Workbook object.
- Load a sample file using Workbook.LoadFromFile() method.
- Use Workbook.Worksheets[0] to get the first worksheet.
- Use Worksheet.Pictures[0] property to get the first picture from the first worksheet
- Use Image.FromFile() method to load an image from the specified file, and set it as a new value of ExcelPicture.Picture property. To do so, the original picture will be replaced with the new one.
- Save the document using Workbook.SaveToFile() method.
- C#
- VB.NET
using Spire.Xls;
using Spire.Xls.Collections;
namespace ReplacePictureinExcel
{
    class Program
    {
        static void Main(string[] args)
        {
            //Create a Workbook instance
            Workbook workbook = new Workbook();
            //Load the Excel file
            workbook.LoadFromFile("input.xls");

            //Get the first sheet
            Worksheet sheet = workbook.Worksheets[0];

            //Get Excel picture collection
            PicturesCollection pictureCollection = sheet.Pictures;

            //Get the first picture from the collection
            ExcelPicture excelPicture = pictureCollection[0];

            // Creates an Image from the specified file.
            excelPicture.Picture = System.Drawing.Image.FromFile("input.png");

            //Save the document
            workbook.SaveToFile("ReplaceImage.xlsx", ExcelVersion.Version2013);
        }
    }
}
Imports Spire.Xls
Imports Spire.Xls.Collections
Imports System.Drawing

Namespace ReplacePictureinExcel
	Class Program
		Private Shared Sub Main(args As String())

			'Create a Workbook instance
			Dim workbook As New Workbook()
			'Load the Excel file
			workbook.LoadFromFile(Input.xls)

			'Get the first sheet
			Dim sheet As Worksheet = workbook.Worksheets(0)

			'Get Excel picture collection
			Dim pictureCollection As PicturesCollection = sheet.Pictures

			'Get the first picture from the collection
			Dim excelPicture As ExcelPicture = pictureCollection(0)

			' Creates an Image from the specified file.
			excelPicture.Picture = Image.FromFile(image)

			'Save the document
			workbook.SaveToFile("ReplaceImage.xlsx", ExcelVersion.Version2013)
		End Sub
	End Class
End Namespace
The original file:
The generated file:

Apply for a Temporary License
If you'd like to remove the evaluation message from the generated documents, or to get rid of the function limitations, please request a 30-day trial license for yourself.
