
.NET (1327)
Children categories
Creating charts in PowerPoint slides is a powerful way to enhance presentations by visually representing complex information, making it easier for audiences to grasp key insights. By reading Excel data directly to generate charts, you can streamline the data entry process and ensure data accuracy. Or, if you want to use charts from Excel files directly in PowerPoint presentations, you can directly insert them as pictures into PowerPoint slides, thus maximizing the original formatting and appearance. This article will show how to create charts in PowerPoint slides from Excel data using Spire.Office for .NET in .NET programs.
- Create Charts in PowerPoint Slides with Excel Data using C#
- Insert Excel Charts into PowerPoint Slides as Images using C#
Install Spire.Office for .NET
To begin with, you need to add the DLL files included in the Spire.Office for.NET package as references in your .NET project. The DLL files can be either downloaded from this link or installed via NuGet.
PM> Install-Package Spire.Office
Create Charts in PowerPoint Slides with Excel Data using C#
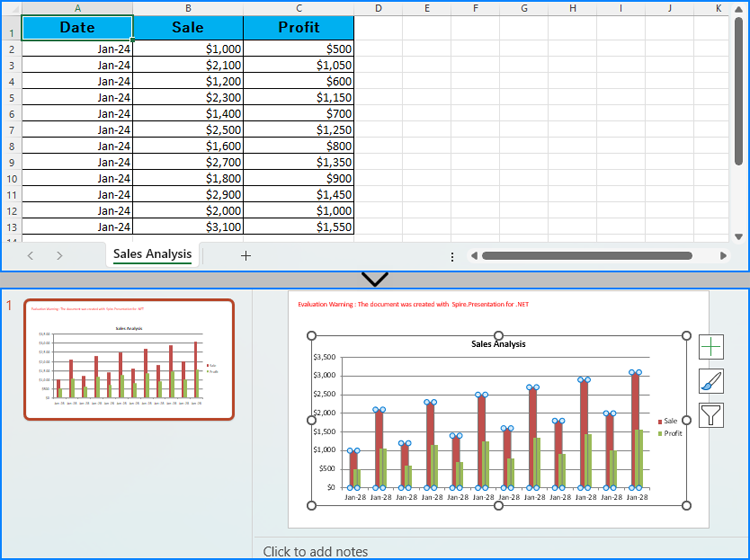
Developers can read data from Excel worksheets with Spire.XLS for .NET and then create charts in PowerPoint slides with Spire.Presentation for .NET using the read data as the charts' data source. The detailed steps for creating charts in PowerPoint presentations with Excel file data are as follows:
- Create an instance of Presentation class.
- Create an instance of Workbook class and load an Excel file using Workbook.LoadFromFile() method.
- Get the first slide in the presentation through Presentation.Slides[] property and create a chart in the first slide of the presentation using ISlide.Shapes.AppendChart() method.
- Clear the default dummy data using IChart.ChartData.Clear() method.
- Get the first worksheet in the workbook through Workbook.Worksheets[] property.
- Iterate through rows in the worksheet and then the columns in the worksheet:
- Get the cell values in the worksheet through Worksheet.AllocatedRange[].Value2 property and set them as the values of the chart’s data through IChart.ChartData[].Value property.
- Set the chart title using properties under IChart.ChartTitle property.
- Set the chart series labels and category labels through IChart.Series.SeriesLabel and IChart.Categories.CategoryLabels properties.
- Set the series values through IChart.Series[].Values property.
- Set the number format of the axis through IChart.PrimaryCategoryAxis.NumberFormat and IChart.PrimaryValueAxis.NumberFormat properties.
- Set the style of the chart through IChart.ChartStyle property.
- Save the presentation using Presentation.SaveToFile() method.
- C#
using Spire.Presentation;
using Spire.Presentation.Charts;
using Spire.Xls;
using System.Drawing;
using FileFormat = Spire.Presentation.FileFormat;
using IChart = Spire.Presentation.Charts.IChart;

namespace PresentationChartExcelData
{
    class Program
    {
        public static void Main(string[] args)
        {
            // Create an instance of Presentation class
            Presentation presentation = new Presentation();

            // Set the slide size
            presentation.SlideSize.Type = SlideSizeType.Screen16x9;

            // Create an instance of Workbook class and load an Excel file
            Workbook workbook = new Workbook();
            workbook.LoadFromFile("Sample.xlsx");

            // Get the first worksheet in the workbook
            Worksheet sheet = workbook.Worksheets[0];

            // Create a chart in the presentation
            RectangleF rect = new RectangleF(50, 100, presentation.SlideSize.Size.Width - 100, presentation.SlideSize.Size.Height - 150);
            ISlide slide = presentation.Slides[0];
            IChart chart = slide.Shapes.AppendChart(ChartType.ColumnClustered, rect);

            // Clear the default dummy data
            chart.ChartData.Clear(0, 0, 5, 5);

            // Iterate through the rows in the worksheet
            for (int i = 0; i < sheet.AllocatedRange.RowCount; i++)
            {
                // Iterate through the columns in the worksheet
                for (int j = 0; j < sheet.AllocatedRange.ColumnCount; j++)
                {
                    // Set the cell values in the worksheet as the values of the chart data
                    chart.ChartData[i, j].Value = sheet.AllocatedRange[i + 1, j + 1].Value2;
                    // Copy number formats
                    chart.ChartData[i, j].NumberFormat = sheet.AllocatedRange[i + 1, j + 1].NumberFormat;
                }
            }

            // Set the chart title
            chart.ChartTitle.TextProperties.Text = sheet.Name;
            chart.ChartTitle.TextProperties.IsCentered = true;
            chart.ChartTitle.Height = 25;
            chart.HasTitle = true;

            // Set the series labels and category labels
            chart.Series.SeriesLabel = chart.ChartData["B1", "C1"];
            chart.Categories.CategoryLabels = chart.ChartData["A2", "A" + sheet.AllocatedRange.RowCount];

            // Set the series values
            chart.Series[0].Values = chart.ChartData["B2", "B" + sheet.AllocatedRange.RowCount];
            chart.Series[1].Values = chart.ChartData["C2", "C" + sheet.AllocatedRange.RowCount];

            // Set the number format of the axis
            chart.PrimaryCategoryAxis.NumberFormat = sheet.AllocatedRange["A2"].NumberFormat;
            chart.PrimaryValueAxis.NumberFormat = sheet.AllocatedRange["B2"].NumberFormat;

            // Set the style of the chart
            chart.ChartStyle = ChartStyle.Style2;

            // Set the overlap and gap width
            chart.OverLap = 50;
            chart.GapWidth = 200;

            // Save the presentation
            presentation.SaveToFile("output/PresentationChartExcelData.pptx", FileFormat.Pptx2019);
            presentation.Dispose();
            workbook.Dispose();
        }
    }
}
Insert Excel Charts into PowerPoint Slides as Images using C#
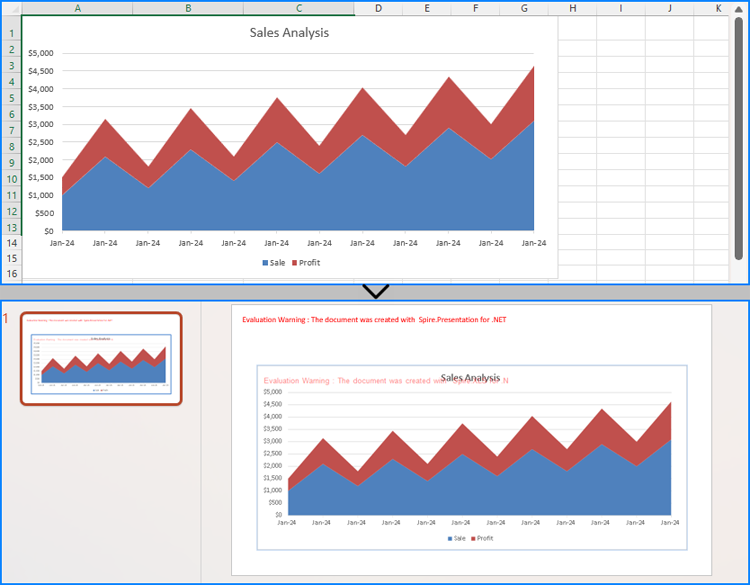
To insert an existing chart from an Excel worksheet into a PowerPoint slide while maintaining its appearance and formatting precisely, the Workbook.SaveChartAsImage() method can be employed. This method allows the Excel chart to be saved as an image, which can then be added to the slide. The specific steps are as follows:
- Create an instance of Presentation class.
- Create an instance of Workbook class and load an Excel file using Workbook.LoadFromFile() method.
- Save a chart in a worksheet as an image using Workbook.SaveChartAsImage() method.
- Embed the image into the presentation using Presentation.Images.Append() method.
- Add the image to a slide using Presentation.Slides[].AppendEmbedImage() method.
- Save the presentation using Presentation.SaveToFile() method.
- C#
using Spire.Presentation;
using Spire.Presentation.Drawing;
using Spire.Xls;
using System.Drawing;
using FileFormat = Spire.Presentation.FileFormat;

namespace PresentationChartExcelChart
{
    class Program
    {
        public static void Main(string[] args)
        {
            // Create an instance of Presentation class
            Presentation presentation = new Presentation();

            // Set the slide size
            presentation.SlideSize.Type = SlideSizeType.Screen16x9;

            // Create an instance of Workbook class and load an Excel file
            Workbook workbook = new Workbook();
            workbook.LoadFromFile("Sample.xlsx");

            // Save the first chart in the first worksheet as an image
            Image image = workbook.SaveChartAsImage(workbook.Worksheets[0], 0);

            // Embed the image into the presentation
            IImageData imageData = presentation.Images.Append(image);

            // Add the image to the first slide
            RectangleF rect = new RectangleF(50, 120, presentation.SlideSize.Size.Width - 100, presentation.SlideSize.Size.Height - 170);
            presentation.Slides[0].Shapes.AppendEmbedImage(ShapeType.Rectangle, imageData, rect);

            // Save the presentation
            presentation.SaveToFile("output/PresentationChartExcelChart.pptx", FileFormat.Pptx2019);
            presentation.Dispose();
            workbook.Dispose();
        }
    }
}
Apply for a Temporary License
If you'd like to remove the evaluation message from the generated documents, or to get rid of the function limitations, please request a 30-day trial license for yourself.
Tables in Word documents allow users to organize data in a clear and structured manner. However, as documents grow in complexity, the need to adjust table structures often arises. Whether you need to combine multiple tables for a comprehensive view or divide a large table for better readability, mastering the art of merging and splitting tables in Word can significantly improve the presentation of your data. In this article, you will learn how to merge or split tables in Word in C# using Spire.Doc for .NET.
Install Spire.Doc for .NET
To begin with, you need to add the DLL files included in the Spire.Doc for.NET package as references in your .NET project. The DLL files can be either downloaded from this link or installed via NuGet.
PM> Install-Package Spire.Doc
Merge Tables in Word in C#
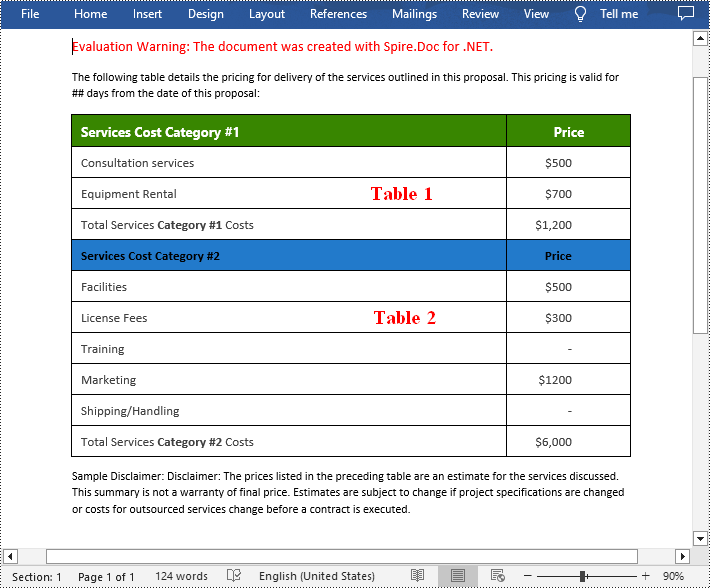
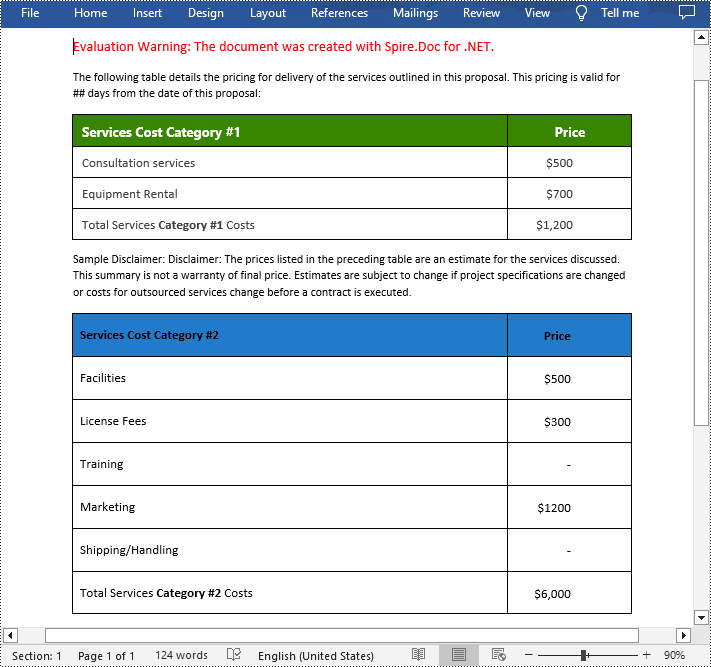
With Spire.Doc for .NET, you can combine two or more tables into one by copying all rows from other tables to the target table and then deleting the other tables. The following are the detailed steps.
- Create a Document instance.
- Load a Word document using Document.LoadFromFile() method.
- Get a specified section using Document.Sections[] property.
- Get two tables in the section using section.Tables[] property.
- Iterate through all rows in the second table and copy them using Table.Rows[].Clone() method.
- Add the rows of the second table to the first table using Table.Rows.Add() method.
- Save the result document using Document.SaveToFile() method.
- C#
using Spire.Doc;

namespace CombineTables
{
    class Program
    {
        static void Main(string[] args)
        {
            //Create a Document instance
            Document doc = new Document();

            //Load a Word document
            doc.LoadFromFile("Cost.docx");

            //Get the first section
            Section section = doc.Sections[0];

            //Get the first and second table in the section
            Table table1 = section.Tables[0] as Table;
            Table table2 = section.Tables[1] as Table;

            //Add the rows of table2 to table1
            for (int i = 0; i < table2.Rows.Count; i++)
            {
                table1.Rows.Add(table2.Rows[i].Clone());
            }

            //Remove the table2
            section.Tables.Remove(table2);

            //Save the result document
            doc.SaveToFile("CombineTables.docx", FileFormat.Docx);
        }
    }
}
Split Tables in Word in C#
To split a table into two or more tables, you need to create a new table, then copy the specified rows from the original table to the new table, and then delete those rows from the original table. The following are the detailed steps.
- Create a Document instance.
- Load a Word document using Document.LoadFromFile() method.
- Get a specified section using Document.Sections[] property.
- Get a specified table in the section using section.Tables[] property.
- Specify the row index where the table will be split.
- Create a new instance of the Table class.
- Iterate through the specified rows in the original table and copy them using Table.Rows[].Clone() method.
- Add the specified rows to the new table using Table.Rows.Add() method.
- Iterate through the copied rows and remove each row from the original table using Table.Rows.RemoveAt() method.
- Add the new table to the section using Section.Tables.Add() method.
- Save the result document using Document.SaveToFile() method.
- C#
using Spire.Doc;

namespace SplitWordTable
{
    class Program
    {
        static void Main(string[] args)
        {
            //Create a Document instance
            Document doc = new Document();

            //Load a Word document
            doc.LoadFromFile("CombineTables.docx");

            //Get the first section
            Section section = doc.Sections[0];

            //Get the first table in the section
            Table table = section.Tables[0] as Table;

            //Specify to split the table from the fifth row
            int splitIndex = 4;

            //Create a new table
            Table newTable = new Table(section.Document);

            //Adds rows (from the 5th to the last row) to the new table
            for (int i = splitIndex; i < table.Rows.Count; i++)
            {
                newTable.Rows.Add(table.Rows[i].Clone());
            }

            //Delete rows from the original table
            for (int i = table.Rows.Count - 1; i >= splitIndex; i--)
            {
                table.Rows.RemoveAt(i);
            }

            //Add the new table to the section
            section.Tables.Add(newTable);

            //Save the result document
            doc.SaveToFile("SplitTable.docx", FileFormat.Docx);
        }
    }
}
Apply for a Temporary License
If you'd like to remove the evaluation message from the generated documents, or to get rid of the function limitations, please request a 30-day trial license for yourself.
Setting the column width in Word tables is crucial for optimizing document readability and aesthetics. Appropriate column widths prevent long lines of text from hindering readability, particularly in text-dense tables. Word offers two approaches: percentages and fixed values. Setting column widths using percentage values allows tables to adapt to different screen sizes, keeping content neatly aligned and enhancing the reading experience. Using fixed values, on the other hand, precisely controls the structure of the table, ensuring consistency and professionalism, making it suitable for designs with strict data alignment requirements or complex layouts. This article will introduce how to set Word table column width based on percentage or fixed value settings using Spire.Doc for .NET in C# projects.
Install Spire.Doc for .NET
To begin with, you need to add the DLL files included in the Spire.Doc for .NET package as references in your .NET project. The DLL files can be either downloaded from this link or installed via NuGet.
PM> Install-Package Spire.Doc
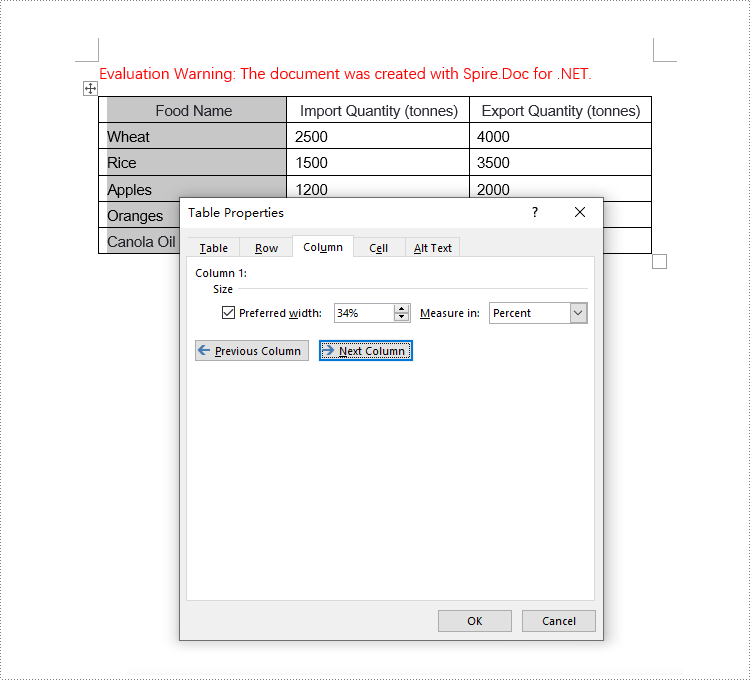
Set Column Width Based on Percentage in C#
When setting column widths in a Word table using percentage values, you first need to set the table's preferred width type to percentage. This is done with Table.PreferredWidth = new PreferredWidth(WidthType.Percentage, (short)100). Then, iterate through each column and set the width to the same or different percentage values as required. Here are the detailed steps:
- Create a Document object.
- Load a document using the Document.LoadFromFile() method.
- Retrieve the first section of the document using Document.Sections[0].
- Get the first table within the section using Section.Tables[0].
- Use a for loop to iterate through all rows in the table.
- Set the column width for cells in different columns to percentage values using the TableRow.Cells[index].SetCellWidth(value, CellWidthType.Percentage) method.
- Save the changes to the Word document using the Document.SaveToFile() method.
- C#
using Spire.Doc;

namespace SpireDocDemo
{
    internal class Program
    {
        static void Main(string[] args)
        {
            // Create a new Document object
            Document doc = new Document();

            // Load the document named "example.docx"
            doc.LoadFromFile("Sample.docx");

            // Get the first Section of the document
            Section section = doc.Sections[0];

            // Cast the first Table in the Section to Table type
            Table table = (Table)section.Tables[0];

            // Create a PreferredWidth object, set the width type to Percentage, and set the width value to 100%
            PreferredWidth percentageWidth = new PreferredWidth(WidthType.Percentage, (short)100);

            // Set the preferred width of the Table to the PreferredWidth object created above
            table.PreferredWidth = percentageWidth;

            // Define a variable of type TableRow
            TableRow tableRow;

            // Iterate through all rows in the Table
            for (int i = 0; i < table.Rows.Count; i++)
            {
                // Get the current row
                tableRow = table.Rows[i];

                // Set the width of the first column cell to 34%, with the type as Percentage
                tableRow.Cells[0].SetCellWidth(34, CellWidthType.Percentage);

                // Set the width of the second column cell to 33%, with the type as Percentage
                tableRow.Cells[1].SetCellWidth(33, CellWidthType.Percentage);

                // Set the width of the third column cell to 33%, with the type as Percentage
                tableRow.Cells[2].SetCellWidth(33, CellWidthType.Percentage);
            }

            // Save the modified document, specifying the file format as Docx2016
            doc.SaveToFile("set_column_width_by_percentage.docx", FileFormat.Docx2016);

            // Close the document
            doc.Close();
        }
    }
}
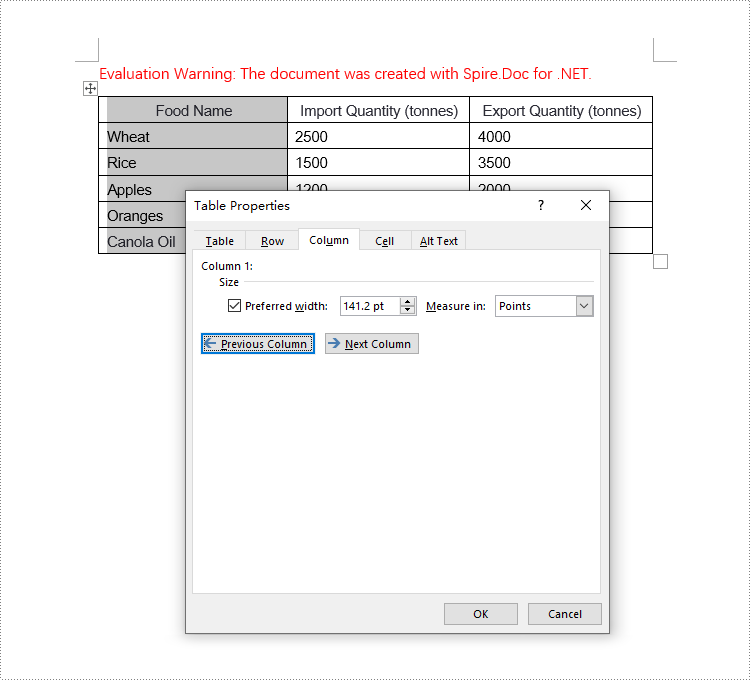
Set Column Width Based on Fixed Value in C#
When setting column widths in a Word table using fixed values, you first need to set the table's layout to fixed. This is done with Table.TableFormat.LayoutType = LayoutType.Fixed. Then, iterate through each column and set the width to the same or different fixed values as required. Here are the detailed steps:
- Create a Document object.
- Load a document using the Document.LoadFromFile() method.
- Retrieve the first section of the document using Document.Sections[0].
- Get the first table within the section using Section.Tables[0].
- Use a for loop to iterate through all rows in the table.
- Set the column width for cells in different columns to fixed values using the TableRow.Cells[index].SetCellWidth(value, CellWidthType.Point) method. Note that value should be replaced with the desired width in points.
- Save the changes to the Word document using the Document.SaveToFile() method.
- C#
using Spire.Doc;

namespace SpireDocDemo
{
    internal class Program
    {
        static void Main(string[] args)
        {
            // Create a new Document object
            Document doc = new Document();

            // Load the document
            doc.LoadFromFile("Sample.docx");

            // Get the first Section of the document
            Section section = doc.Sections[0];

            // Cast the first Table in the Section to Table type
            Table table = (Table)section.Tables[0];

            // Set the table layout type to Fixed
            table.Format.LayoutType = LayoutType.Fixed;

            // Get the left margin
            float leftMargin = section.PageSetup.Margins.Left;

            // Get the right margin
            float rightMargin = section.PageSetup.Margins.Right;

            // Calculate the page width minus the left and right margins
            double pageWidth = section.PageSetup.PageSize.Width - leftMargin - rightMargin;

            // Define a variable of type TableRow
            TableRow tableRow;

            // Loop through all rows in the Table
            for (int i = 0; i < table.Rows.Count; i++)
            {
                // Get the current row
                tableRow = table.Rows[i];

                // Set the width of the first column cell to 34% of the page width
                tableRow.Cells[0].SetCellWidth((float)(pageWidth * 0.34), CellWidthType.Point);

                // Set the width of the second column cell to 33% of the page width
                tableRow.Cells[1].SetCellWidth((float)(pageWidth * 0.33), CellWidthType.Point);

                // Set the width of the third column cell to 33% of the page width
                tableRow.Cells[2].SetCellWidth((float)(pageWidth * 0.33), CellWidthType.Point);
            }

            // Save the modified document, specifying the file format as Docx2016
            doc.SaveToFile("set_column_width_to_fixed_value.docx", FileFormat.Docx2016);

            // Close the document
            doc.Close();
        }
    }
}
Apply for a Temporary License
If you'd like to remove the evaluation message from the generated documents, or to get rid of the function limitations, please request a 30-day trial license for yourself.
C#: Extract Text from Images using the New Model of Spire.OCR for .NET
2024-07-18 01:09:12 Written by AdministratorSpire.OCR for .NET offers developers a new model to extract text from images. In this article, we will demonstrate how to extract text from images in C# using the new model of Spire.OCR for .NET.
The detailed steps are as follows.
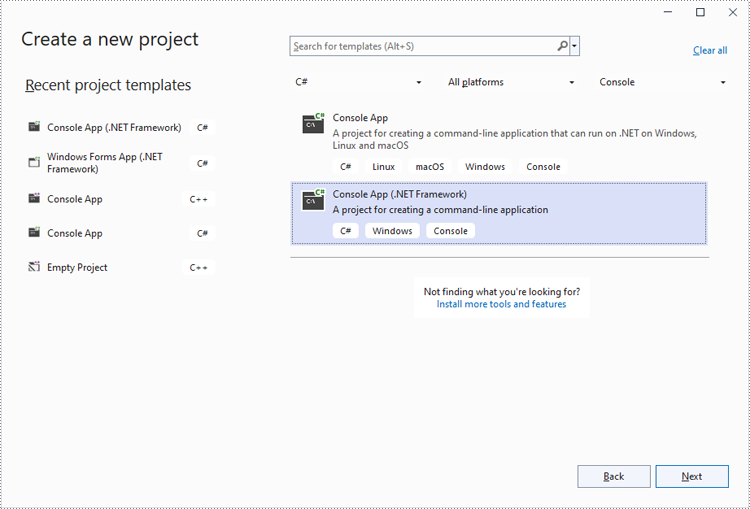
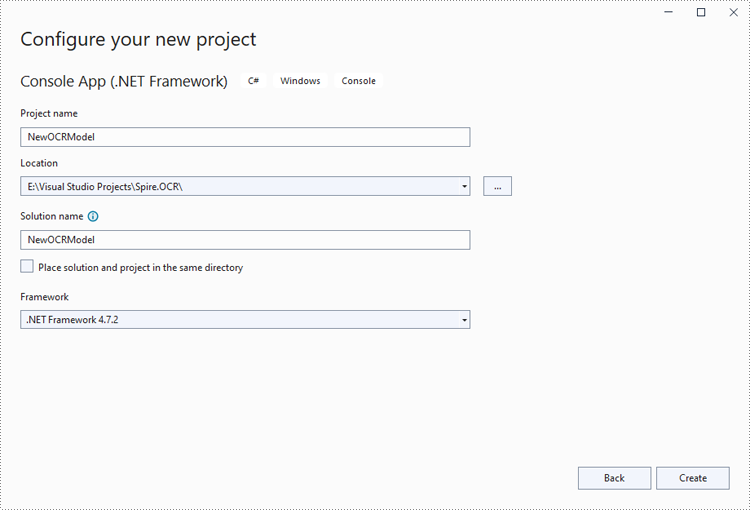
Step 1: Create a Console App (.NET Framework) in Visual Studio.
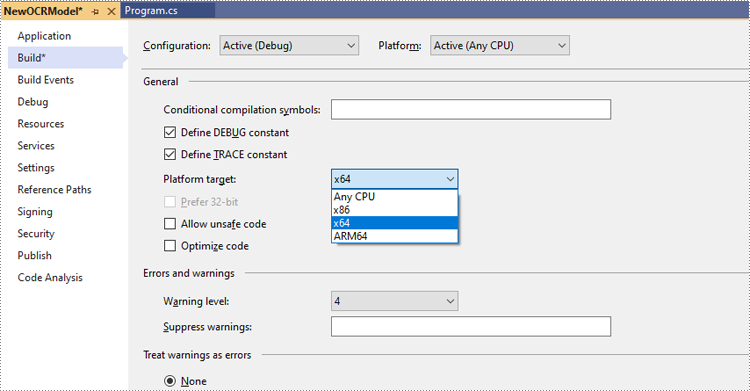
Step 2: Change the platform target of the application to x64.
In the application's Solution Explorer, right-click on the project's name and then select "Properties".
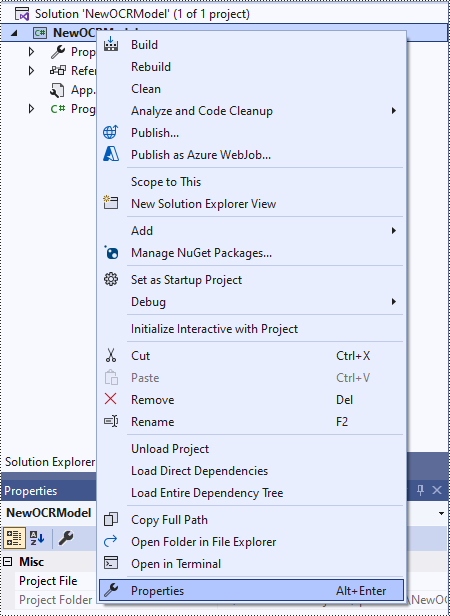
Change the platform target of the application to x64. This step must be performed since Spire.OCR only supports 64-bit platforms.
Step 3: Install Spire.OCR for .NET in your application.
Install Spire.OCR for .NET through NuGet by executing the following command in the NuGet Package Manager Console:
Install-Package Spire.OCR
Step 4: Download the new model of Spire.OCR for .NET.
Download the model that fits in with your operating system from one of the following links.
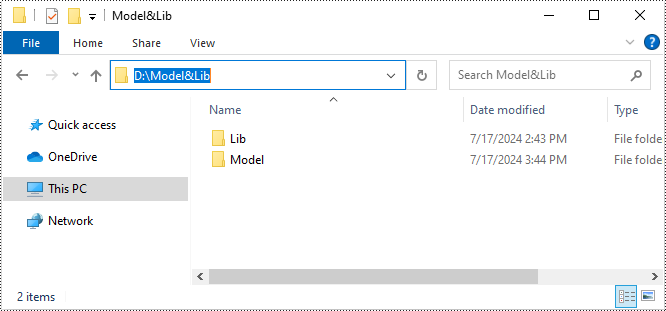
Then extract the package and save it to a specific directory on your computer. In this example, we saved the package to "D:\".
Step 5: Use the new model of Spire.OCR for .NET to extract text from images in C#.
The following code example shows how to extract text from an image using C# and the new model of Spire.OCR for .NET:
- C#
using Spire.OCR;
using System.IO;

namespace NewOCRModel
{
    internal class Program
    {
        static void Main(string[] args)
        {
            // Set license key
            // Spire.OCR.License.LicenseProvider.SetLicenseKey("your-license-key");

            // Create an instance of the OcrScanner class
            OcrScanner scanner = new OcrScanner();

            // Create an instance of the ConfigureOptions class to set up the scanner configuration
            ConfigureOptions configureOptions = new ConfigureOptions();

            // Set the path to the new model
            configureOptions.ModelPath = "D:\\win-x64";

            // Set the language for text recognition. The default is English.
            // Supported languages include English, Chinese, Chinesetraditional, French, German, Japanese, and Korean.
            configureOptions.Language = "English";

            // Apply the configuration options to the scanner
            scanner.ConfigureDependencies(configureOptions);

            // Extract text from an image
            scanner.Scan("test.png");

            //Save the extracted text to a text file
            string text = scanner.Text.ToString();
            File.WriteAllText("Output.txt", text);
        }
    }
}
Apply for a Temporary License
If you'd like to remove the evaluation message from the generated documents, or to get rid of the function limitations, please request a 30-day trial license for yourself.
Tables in Word documents often contain valuable information, ranging from financial data and research results to survey results and statistical records. Extracting the data contained within these tables can unlock a wealth of opportunities, empowering you to leverage it for a variety of purposes, such as in-depth data analysis, trend identification, and seamless integration with other tools or databases. In this article, we will demonstrate how to extract tables from Word documents in C# using Spire.Doc for .NET.
Install Spire.Doc for .NET
To begin with, you need to add the DLL files included in the Spire.Doc for .NET package as references in your .NET project. The DLL files can be either downloaded from this link or installed via NuGet.
PM> Install-Package Spire.Doc
Extract Tables from Word in C#
In Spire.Doc for .NET, the Section.Tables property is used to access the tables contained within a section of a Word document. This property returns a collection of ITable objects, where each object represents a distinct table in the section. Once you have the ITable objects, you can iterate through their rows and cells, and then retrieve the textual content of each cell using cell.Paragraphs[index].Text property.
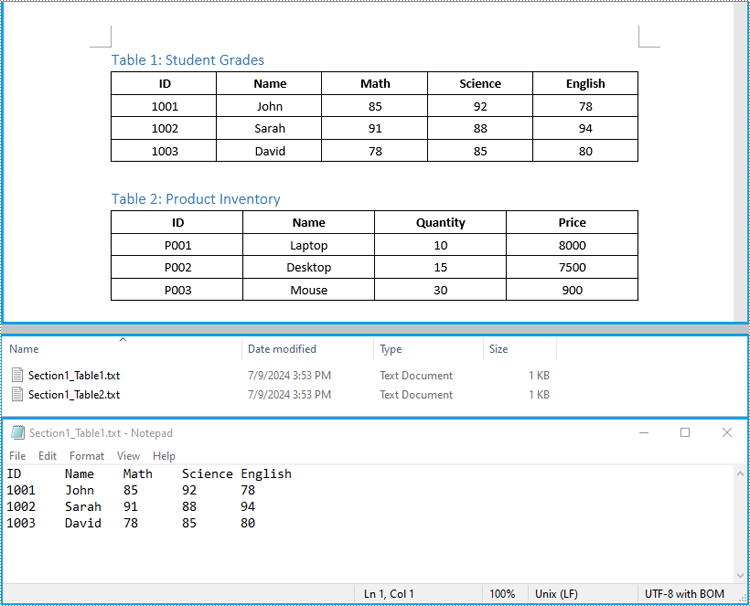
The detailed steps to extract tables from a Word document are as follows:
- Create an object of the Document class and load a Word document using Document.LoadFromFile() method.
- Iterate through the sections in the document and get the table collection of each section through Section.Tables property.
- Iterate through the tables in each section and create a string object for each table.
- Iterate through the rows in each table and the cells in each row, then get the text of each cell through TableCell.Paragraphs[index].Text property and add the cell text to the string.
- Save each string to a text file.
- C#
using Spire.Doc;
using Spire.Doc.Collections;
using Spire.Doc.Interface;
using System.IO;
using System.Text;

namespace ExtractWordTable
{
    internal class Program
    {
        static void Main(string[] args)
        {
            // Create an object of the Document class
            Document doc = new Document();
            // Load a Word document
            doc.LoadFromFile("Tables.docx");

            // Iterate through the sections in the document
            for (int sectionIndex = 0; sectionIndex < doc.Sections.Count; sectionIndex++)
            {
                // Get the current section
                Section section = doc.Sections[sectionIndex];

                // Get the table collection of the section
                TableCollection tables = section.Tables;

                // Iterate through the tables in the section
                for (int tableIndex = 0; tableIndex < tables.Count; tableIndex++)
                {
                    // Get the current table
                    ITable table = tables[tableIndex];

                    // Initialize a string to store the table data
                    string tableData = "";

                    // Iterate through the rows in the table
                    for (int rowIndex = 0; rowIndex < table.Rows.Count; rowIndex++)
                    {
                        // Get the current row
                        TableRow row = table.Rows[rowIndex];
                        // Iterate through the cells in the row
                        for (int cellIndex = 0; cellIndex < row.Cells.Count; cellIndex++)
                        {
                            // Get the current cell
                            TableCell cell = table.Rows[rowIndex].Cells[cellIndex];

                            // Get the text in the cell
                            string cellText = "";
                            for (int paraIndex = 0; paraIndex < cell.Paragraphs.Count; paraIndex++)
                            {
                                cellText += (cell.Paragraphs[paraIndex].Text.Trim() + " ");
                            }

                            // Add the text to the string
                            tableData += cellText.Trim();
                            if (cellIndex < table.Rows[rowIndex].Cells.Count - 1)
                            {
                                tableData += "\t";
                            }
                        }

                        // Add a new line
                        tableData += "\n";
                    }

                    // Save the table data to a text file
                    string filePath = Path.Combine("Tables", $"Section{sectionIndex + 1}_Table{tableIndex + 1}.txt");

                    File.WriteAllText(filePath, tableData, Encoding.UTF8);
                }
            }

            doc.Close();
        }
    }
}
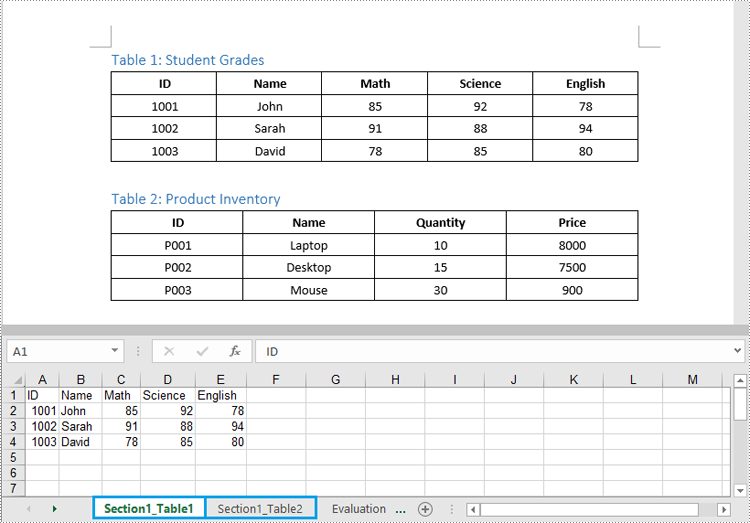
Extract Tables from Word to Excel in C#
In addition to saving the extracted table data to text files, you can also write the data directly into Excel worksheets by using the Spire.XLS for .NET library. However, before you can use Spire.XLS, you need to install it via NuGet:
Install-Package Spire.XLS
The detailed steps to extract tables from Word documents to Excel worksheets are as follows:
- Create an object of the Document class and load a Word document using the Document.LoadFromFile() method.
- Create an object of the Workbook class and clear the default worksheets using Workbook.Worksheets.Clear() method.
- Iterate through the sections in the document and get the table collection of each section through Section.Tables property.
- Iterate through the tables in the section and add a worksheet for each table to the workbook using Workbook.Worksheets.Add() method.
- Iterate through the rows in each table and the cells in each row, then get the text of each cell through TableCell.Paragraphs[index].Text property and write the text to the worksheet using Worksheet.SetCellValue() method.
- Save the workbook to an Excel file using Workbook.SaveToFile() method.
- C#
using Spire.Doc;
using Spire.Doc.Interface;
using Spire.Xls;

namespace ExtractWordTableToExcel
{
    internal class Program
    {
        static void Main(string[] args)
        {
            // Create an object of the Document class
            Document doc = new Document();
            // Load a Word document
            doc.LoadFromFile("Tables.docx");

            // Create an object of the Workbook class
            Workbook wb = new Workbook();
            // Remove the default worksheets
            wb.Worksheets.Clear();

            // Iterate through the sections in the document
            for (int sectionIndex = 0; sectionIndex < doc.Sections.Count; sectionIndex++)
            {
                // Get the current section
                Section section = doc.Sections[sectionIndex];
                // Iterate through the tables in the section
                for (int tableIndex = 0; tableIndex < section.Tables.Count; tableIndex++)
                {
                    // Get the current table
                    ITable table = section.Tables[tableIndex];
                    // Add a worksheet to the workbook
                    Worksheet ws = wb.Worksheets.Add($"Section{sectionIndex + 1}_Table{tableIndex + 1}");

                    // Iterate through the rows in the table
                    for (int rowIndex = 0; rowIndex < table.Rows.Count; rowIndex++)
                    {
                        // Get the current row
                        TableRow row = table.Rows[rowIndex];
                        // Iterate through the cells in the row
                        for (int cellIndex = 0; cellIndex < row.Cells.Count; cellIndex++)
                        {
                            // Get the current cell
                            TableCell cell = row.Cells[cellIndex];
                            // Get the text in the cell
                            string cellText = "";
                            for (int paraIndex = 0; paraIndex < cell.Paragraphs.Count; paraIndex++)
                            {
                                cellText += (cell.Paragraphs[paraIndex].Text.Trim() + " ");
                            }
                            // Write the cell text to the worksheet
                            ws.SetCellValue(rowIndex + 1, cellIndex + 1, cellText);
                        }
                        // Autofit the width of the columns in the worksheet
                        ws.Range.AutoFitColumns();
                    }
                }
            }

            // Save the workbook to an Excel file
            wb.SaveToFile("Tables/WordTableToExcel.xlsx", ExcelVersion.Version2016);
            doc.Close();
            wb.Dispose();
        }
    }
}
Apply for a Temporary License
If you'd like to remove the evaluation message from the generated documents, or to get rid of the function limitations, please request a 30-day trial license for yourself.
Adding, modifying, and removing Word table borders can enhance the readability, aesthetics, and organization of data. Adding borders makes the content of the table clearer, distinguishing between different cells, which helps readers quickly identify information. Modifying border styles (such as line thickness, color, or pattern) can emphasize key data, guide visual flow, or conform to specific document styles and design requirements. Removing borders, in some cases, reduces visual clutter, making the content more compact and minimalist, especially suitable for data presentation where strict divisions are not needed or when you wish to downplay structural visibility. This article will introduce how to add, modify, or remove Word table borders in C# projects using Spire.Doc for .NET.
Install Spire.Doc for .NET
To begin with, you need to add the DLL files included in the Spire.Doc for .NET package as references in your .NET project. The DLL files can be either downloaded from this link or installed via NuGet.
PM> Install-Package Spire.Doc
C# Add Word Table Borders
To set borders for all cells in an entire Word table, you need to iterate over each cell and set its visual border properties. Here are the detailed steps:
- Create a Document object.
- Use the Document.LoadFromFile() method to load a document.
- Retrieve the first section of the document using Document.Sections[0].
- Get the first table in that section by using Section.Tables[0].
- Use a for loop to iterate through all the cells in the table.
- Set TableCell.CellFormat.Borders.BorderType to BorderStyle.Single, which sets the cell border to a single line style.
- Set TableCell.CellFormat.Borders.LineWidth to 1.5, defining the border width to be 1.5 points.
- Set TableCell.CellFormat.Borders.Color to Color.Black, setting the border color to black.
- Save the changes to the Word document using the Document.SaveToFile() method.
- C#
using Spire.Doc;

namespace SpireDocDemo
{
    internal class Program
    {
        static void Main(string[] args)
        {
            // Create a new Document object
            Document doc = new Document();

            // Load the document from a file
            doc.LoadFromFile("TableExample1.docx");

            // Get the first section of the document
            Section section = doc.Sections[0];

            // Get the first table in that section
            Table table = (Table)section.Tables[0];

            // Declare TableRow and TableCell variables for use within loops
            TableRow tableRow;
            TableCell tableCell;

            // Iterate through all rows in the table
            for (int i = 0; i < table.Rows.Count; i++)
            {
                // Get the current row
                tableRow = table.Rows[i];

                // Iterate through all cells in the current row
                for (int j = 0; j < tableRow.Cells.Count; j++)
                {
                    // Get the current cell
                    tableCell = tableRow.Cells[j];

                    // Set the border style of the current cell to single line
                    tableCell.CellFormat.Borders.BorderType = Spire.Doc.Documents.BorderStyle.Single;
                }
            }

            // Save the modified document as a new file
            doc.SaveToFile("AddBorders.docx", FileFormat.Docx2016);

            // Close the document to release resources
            doc.Close();
        }
    }
}
C# Modify Word Table Borders
Spire.Doc offers a range of border properties such as the border style TableCell.CellFormat.Borders.BorderType, border width TableCell.CellFormat.Borders.LineWidth, and border color TableCell.CellFormat.Borders.Color, among others. You can customize these properties to achieve the desired effects. Below are the detailed steps:
- Create a Document object.
- Load a document using the Document.LoadFromFile() method.
- Retrieve the first section of the document using Document.Sections[0].
- Get the first table in the section using Section.Tables[0].
- Use a for loop to iterate over the cells in the table whose border styles you wish to change.
- Change the bottom border color of the cell by setting TableCell.CellFormat.Borders.Bottom.Color to Color.PaleVioletRed.
- Change the bottom border style of the cell by setting TableCell.CellFormat.Borders.Bottom.BorderType to BorderStyle.DotDash.
- Change the bottom border width of the cell by setting TableCell.CellFormat.Borders.Bottom.LineWidth to 2 points.
- Save the changes to the document using the Document.SaveToFile() method.
- C#
using Spire.Doc;
using Spire.Doc.Documents;
using System.Drawing;

namespace SpireDocDemo
{
    internal class Program
    {
        static void Main(string[] args)
        {
            // Create a new Document object
            Document doc = new Document();

            // Load the document from a file
            doc.LoadFromFile("TableExample2.docx");

            // Get the first section of the document
            Section section = doc.Sections[0];

            // Get the first table in that section
            Table table = (Table)section.Tables[0];

            // Declare a TableRow to use within the loop
            TableRow tableRow;

            // Iterate through all rows of the table
            for (int i = 1; i < table.Rows.Count - 1; i++)
            {
                tableRow = table.Rows[i];

                // Set the border color of the current cell
                tableRow.Cells[1].CellFormat.Borders.Bottom.Color = Color.PaleVioletRed;

                // Set the border style of the current cell to DotDash
                tableRow.Cells[1].CellFormat.Borders.Bottom.BorderType = Spire.Doc.Documents.BorderStyle.DotDash;

                // Set the width of the border
                tableRow.Cells[1].CellFormat.Borders.Bottom.LineWidth = 2;
            }

            // Save the modified document as a new file
            doc.SaveToFile("ModifiedBorders.docx", FileFormat.Docx2016);

            // Close the document and release resources
            doc.Close();
        }
    }
}
C# Remove Word Table Borders
During the process of handling Word documents, not only can border styles be applied to entire tables, but customization can also be extended to individual cells. To completely remove all borders from a table, it is recommended to follow a two-step strategy: First, apply border removal settings to the table itself; second, visit each cell within the table individually to clear their border styles. Here are the detailed steps:
- Create a Document object.
- Load a document using the Document.LoadFromFile() method.
- Retrieve the first table in the section using Section.Tables[0].
- Use a for loop to iterate over all cells in the table.
- Set Table.TableFormat.Borders.BorderType = BorderStyle.None to remove borders from the table.
- Set TableCell.CellFormat.Borders.BorderType = BorderStyle.None to remove borders from each cell.
- Save the changes to the Word document using the Document.SaveToFile() method.
- C#
using Spire.Doc;
using Spire.Doc.Documents;
using System.Drawing;

namespace SpireDocDemo
{
    internal class Program
    {
        static void Main(string[] args)
        {
            // Create a new Document object
            Document doc = new Document();

            // Load the document from file
            doc.LoadFromFile("TableExample2.docx");

            // Get the first section of the document
            Section section = doc.Sections[0];

            // Get the first table in that section
            Table table = (Table)section.Tables[0];

            // Remove the borders set on the table
            table.Format.Borders.BorderType = BorderStyle.None;

            // Declare a TableRow to use in the loop
            TableRow tableRow;

            // Iterate through all rows in the table
            for (int i = 0; i < table.Rows.Count; i++)
            {
                tableRow = table.Rows[i];
                for (int j = 0; j < tableRow.Cells.Count; j++)
                {
                    // Remove all borders set on the cell
                    tableRow.Cells[j].CellFormat.Borders.BorderType = BorderStyle.None;
                }
            }

            // Save the modified document as a new file
            doc.SaveToFile("RemoveBorders.docx", FileFormat.Docx2016);

            // Close the document to release resources
            doc.Close();
        }
    }
}

Apply for a Temporary License
If you'd like to remove the evaluation message from the generated documents, or to get rid of the function limitations, please request a 30-day trial license for yourself.
Displaying PowerPoint text box content in multiple columns significantly enhances the presentation of information and audience comprehension. It improves readability by shortening line lengths, making dense text more digestible; optimizes visual layout for an aesthetically pleasing and professional look; and utilizes space efficiently to ensure that information is abundant yet uncluttered. In this article, we will introduce how to add or remove columns in a PowerPoint text box using Spire.Presentation for .NET in C# projects.
Install Spire.Presentation for .NET
To begin with, you need to add the DLL files included in the Spire.Presentation for.NET package as references in your .NET project. The DLL files can be either downloaded from this link or installed via NuGet.
PM> Install-Package Spire.Presentation
Add Columns to a PowerPoint Text Box with C#
Spire.Presentation provides the Shape.TextFrame.ColumnCount property to set the number of columns for content and the Shape.TextFrame.ColumnSpacing property to set the spacing between columns. Below are the detailed steps:
- Create a Presentation object.
- Load a PowerPoint document using the Presentation.LoadFromFile() method.
- Retrieve the first slide using Presentation.Slides[0].
- Obtain the first text box object as IAutoShape.
- Use the Shape.TextFrame.ColumnCount property to set the number of columns for the text box content.
- Use the Shape.TextFrame.ColumnSpacing property to set the spacing between columns.
- Save the document to a specified path using the Presentation.SaveToFile() method.
- C#
using Spire.Presentation;

namespace Spire.PresentationDemo
{
    internal class Program
    {
        static void Main(string[] args)
        {
            // Create a Presentation object
            Presentation presentation = new Presentation();

            // Load the PPTX file
            presentation.LoadFromFile("Sample1.pptx");

            // Get the first slide
            ISlide slide = presentation.Slides[0];

            // Check if the first shape on the slide is of type IAutoShape
            if (slide.Shapes[0] is IAutoShape)
            {
                // Cast the first shape to an IAutoShape object
                IAutoShape shape = (IAutoShape)slide.Shapes[0];

                // Set the number of columns in the shape's text frame to 2
                shape.TextFrame.ColumnCount = 2;

                // Set the column spacing in the shape's text frame to 25 pt
                shape.TextFrame.ColumnSpacing = 25f;
            }

            // Save the modified presentation as a new PPTX file
            presentation.SaveToFile("SetColumns.pptx", Spire.Presentation.FileFormat.Pptx2016);

            // Dispose of the resources used by the Presentation object
            presentation.Dispose();
        }
    }
}

Remove Columns from a PowerPoint Text Box with C#
To remove the columns from the Powerpoint text box, simply set the Shape.TextFrame.ColumnCount property to 1. Below are the detailed steps:
- Create a Presentation object.
- Load a PowerPoint document using the Presentation.LoadFromFile() method.
- Retrieve a slide using the Presentation.Slides[index] property.
- Obtain the text box object as IAutoShape.
- Set Shape.TextFrame.ColumnCount = 1 to remove the columns.
- Save the document to a specified path using the Presentation.SaveToFile() method.
- C#
using Spire.Presentation;

namespace SpirePresentationDemo
{
    internal class Program
    {
        static void Main(string[] args)
        {
            // Create a Presentation object
            Presentation presentation = new Presentation();

            // Load the PPTX file
            presentation.LoadFromFile("Sample2.pptx");

            // Get the first slide
            ISlide slide = presentation.Slides[0];

            // Check if the first shape on the slide is of type IAutoShape
            if (slide.Shapes[0] is IAutoShape)
            {
                // Cast the first shape to an IAutoShape object
                IAutoShape shape = (IAutoShape)slide.Shapes[0];

                // Set the column count of the shape's text frame to 1
                shape.TextFrame.ColumnCount = 1;
            }

            // Save the modified presentation as a new PPTX file
            presentation.SaveToFile("RemoveColumns.pptx", Spire.Presentation.FileFormat.Pptx2016);

            // Dispose of the resources used by the Presentation object
            presentation.Dispose();
        }
    }
}

Apply for a Temporary License
If you'd like to remove the evaluation message from the generated documents, or to get rid of the function limitations, please request a 30-day trial license for yourself.
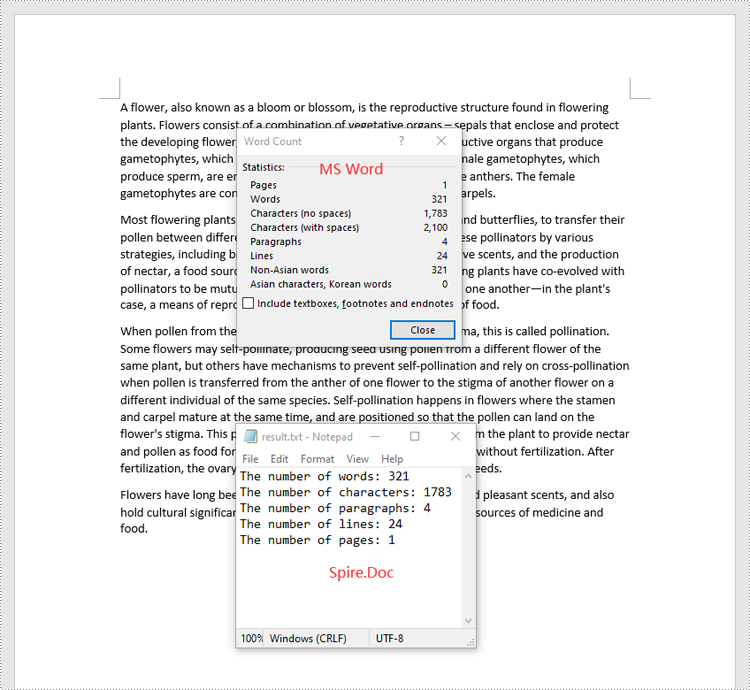
C#: Count Words, Characters, Paragraphs, Lines, and Pages in Word Documents
2024-04-30 07:38:58 Written by KoohjiAccurate counting of words, characters, paragraphs, lines, and pages is essential in achieving precise document analysis. By meticulously tracking these metrics, writers can gain valuable insights into the length, structure, and overall composition of their work. In this article, we will explain how to count words, characters, paragraphs, lines, and pages in Word documents in C# using Spire.Doc for .NET.
- Count Words, Characters, Paragraphs, Lines, and Pages in a Word Document in C#
- Count Words and Characters in a Specific Paragraph of a Word Document in C#
Install Spire.Doc for .NET
To begin with, you need to add the DLL files included in the Spire.Doc for .NET package as references in your .NET project. The DLL files can be either downloaded from this link or installed via NuGet.
PM> Install-Package Spire.Doc
Count Words, Characters, Paragraphs, Lines, and Pages in a Word Document in C#
Spire.Doc for .NET provides the BuiltinDocumentProperties class that enables you to retrieve crucial information from your Word documents. By using this class, you can access a wealth of details, including both the built-in and custom properties, as well as the precise counts of words, characters, paragraphs, lines, and pages contained within the document. The detailed steps are as follows.
- Initialize an object of the Document class.
- Load a sample Word document using the Document.LoadFromFile() method.
- Get the BuiltinDocumentProperties object using the Document.BuiltinDocumentProperties property.
- Get the numbers of words, characters, paragraphs, lines, and pages in the document using the WordCount, CharCount, ParagraphCount, LinesCount and PageCount properties of the BuiltinDocumentProperties class.
- Initialize an object of the StringBuilder class and append the results to it using the StringBuilder.AppendLine() method.
- Write the content in the StringBuilder to a text file using the File.WriteAllText() method.
- C#
using Spire.Doc;
using System.IO;
using System.Text;

namespace CountWordsCharactersEtcInWord
{
    internal class Program
    {
        static void Main(string[] args)
        {
            //Initialize an object of the Document class
            Document document = new Document();
            //Load a sample Word document
            document.LoadFromFile("Input.docx");

            //Get the BuiltinDocumentProperties object
            BuiltinDocumentProperties properties = document.BuiltinDocumentProperties;

            //Get the numbers of words, characters, paragraphs, lines, and pages in the document
            int wordCount = properties.WordCount;
            int charCount = properties.CharCount;
            int paraCount = properties.ParagraphCount;
            int lineCount = properties.LinesCount;
            int pageCount = properties.PageCount;

            //Initialize an object of the StringBuilder class
            StringBuilder sb = new StringBuilder();
            //Append the results to the StringBuilder
            sb.AppendLine("The number of words: " + wordCount);
            sb.AppendLine("The number of characters: " + charCount);
            sb.AppendLine("The number of paragraphs: " + paraCount);
            sb.AppendLine("The number of lines: " + lineCount);
            sb.AppendLine("The number of pages: " + pageCount);

            //Write the content of the StringBuilder to a text file
            File.WriteAllText("result.txt", sb.ToString());
            document.Close();
        }
    }
}
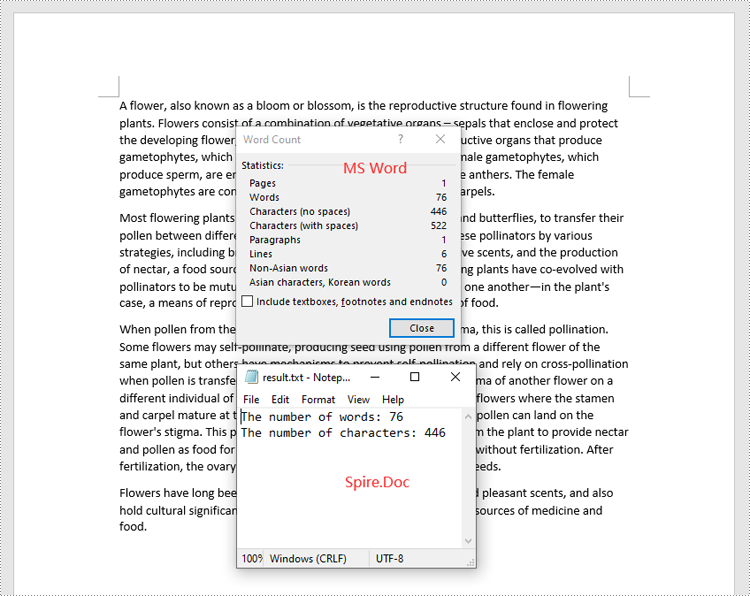
Count Words and Characters in a Specific Paragraph of a Word Document in C#
In addition to counting the words and characters in an entire Word document, Spire.Doc for .NET enables you to count the words and characters of a specific paragraph by using the Paragraph.WordCount and Paragraph.CharCount properties. The detailed steps are as follows.
- Initialize an object of the Document class.
- Load a sample Word document using the Document.LoadFromFile() method.
- Get a specific paragraph using the Document.Sections[sectionindex].Paragraphs[paragraphIndex] property.
- Get the numbers of words and characters in the paragraph using the Paragraph.WordCount and Paragraph.CharCount properties.
- Initialize an object of the StringBuilder class and append the results to it using the StringBuilder.AppendLine() method.
- Write the content in the StringBuilder to a text file using the File.WriteAllText() method.
- C#
using Spire.Doc;
using Spire.Doc.Documents;
using System.IO;
using System.Text;

namespace CountWordsAndCharactersForParagraph
{
    internal class Program
    {
        static void Main(string[] args)
        {
            //Initialize an object of the Document class
            Document document = new Document();
            //Load a sample Word document
            document.LoadFromFile("Input.docx");

            //Get a specific paragraph
            Paragraph paragraph = document.Sections[0].Paragraphs[0];

            //Get the numbers of words and characters in the paragraph
            int wordCount = paragraph.WordCount;
            int charCount = paragraph.CharCount;


            //Initialize an object of the StringBuilder class
            StringBuilder sb = new StringBuilder();
            //Append the results to the StringBuilder
            sb.AppendLine("The number of words: " + wordCount);
            sb.AppendLine("The number of characters: " + charCount);

            //Write the content of the StringBuilder to a text file
            File.WriteAllText("result.txt", sb.ToString());
            document.Close();
        }
    }
}
Apply for a Temporary License
If you'd like to remove the evaluation message from the generated documents, or to get rid of the function limitations, please request a 30-day trial license for yourself.
In a Word document, content controls allow the content of the document to be dynamically updated and modified, providing users with more flexible editing and management options. Through content controls, users can easily insert, delete, or modify content in specific sections without altering the overall structure of the document. This article will explain how to use Spire.Doc for .NET to modify content controls in a Word document within a C# project.
- Modify Content Controls in the Body using C#
- Modify Content Controls within Paragraphs using C#
- Modify Content Controls Wrapping Table Rows using C#
- Modify Content Controls Wrapping Table Cells using C#
- Modify Content Controls within Table Cells using C#
Install Spire.Doc for .NET
To begin with, you need to add the DLL files included in the Spire.Doc for .NET package as references in your .NET project. The DLL files can be either downloaded from this link or installed via NuGet.
PM> Install-Package Spire.Doc
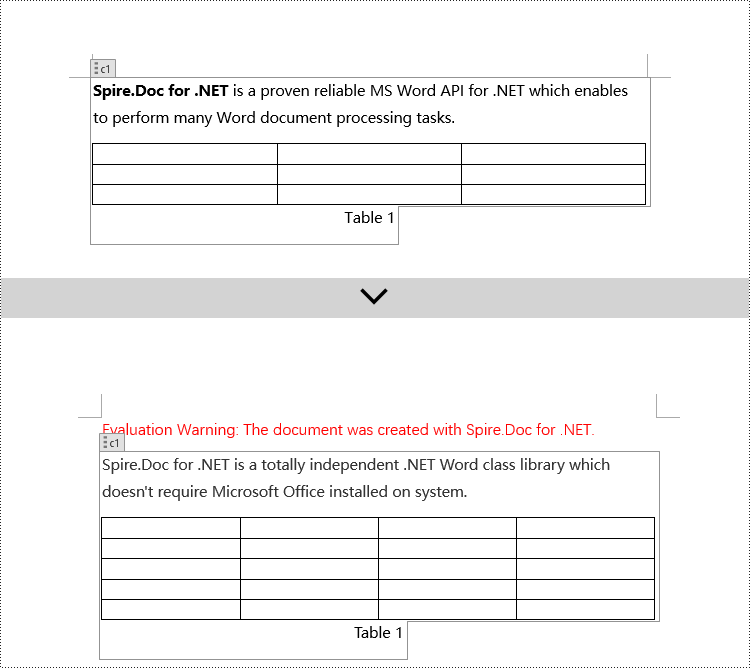
Modify Content Controls in the Body using C#
In Spire.Doc, the object type for content controls in the body is StructureDocumentTag. You can iterate through the collection of child objects in Section.Body to find objects of type StructureDocumentTag and then modify them. Here are the detailed steps:
- Create a Document object.
- Load a document using the Document.LoadFromFile() method.
- Access the body of a section in the document using Section.Body.
- Iterate through the collection of child objects in the body, Body.ChildObjects, to find objects of type StructureDocumentTag.
- Access the StructureDocumentTag.ChildObjects collection and perform the necessary modification operations based on the type of child objects.
- Save the document using the Document.SaveToFile() method.
- C#
using Spire.Doc;
using Spire.Doc.Documents;
using System.Collections.Generic;

namespace SpireDocDemo
{
    internal class Program
    {
        static void Main(string[] args)
        {
            // Create a new document object
            Document doc = new Document();

            // Load document content from a file
            doc.LoadFromFile("Sample1.docx");

            // Get the body of the document
            Body body = doc.Sections[0].Body;

            // Create lists for paragraphs and tables
            List<Paragraph> paragraphs = new List<Paragraph>();
            List<Table> tables = new List<Table>();
            for (int i = 0; i < body.ChildObjects.Count; i++)
            {
                // Get the document object
                DocumentObject documentObject = body.ChildObjects[i];

                // If it is a StructureDocumentTag object
                if (documentObject.DocumentObjectType == DocumentObjectType.StructureDocumentTag)
                {
                    StructureDocumentTag structureDocumentTag = (StructureDocumentTag)documentObject;

                    // If the tag is "c1" or the alias is "c1"
                    if (structureDocumentTag.SDTProperties.Tag == "c1" || structureDocumentTag.SDTProperties.Alias == "c1")
                    {
                        for (int j = 0; j < structureDocumentTag.ChildObjects.Count; j++)
                        {
                            // If it is a paragraph object
                            if (structureDocumentTag.ChildObjects[j].DocumentObjectType == DocumentObjectType.Paragraph)
                            {
                                Paragraph paragraph = (Paragraph)structureDocumentTag.ChildObjects[j];
                                paragraphs.Add(paragraph);
                            }

                            // If it is a table object
                            if (structureDocumentTag.ChildObjects[j].DocumentObjectType == DocumentObjectType.Table)
                            {
                                Table table = (Table)structureDocumentTag.ChildObjects[j];
                                tables.Add(table);
                            }
                        }
                    }
                }
            }

            // Modify the text content of the first paragraph
            paragraphs[0].Text = "Spire.Doc for .NET is a totally independent .NET Word class library which doesn't require Microsoft Office installed on system.";

            // Reset the cells of the first table
            tables[0].ResetCells(5, 4);

            // Save the modified document to a file
            doc.SaveToFile("ModifyBodyContentControls.docx", FileFormat.Docx2016);

            // Release document resources
            doc.Dispose();
        }
    }
}
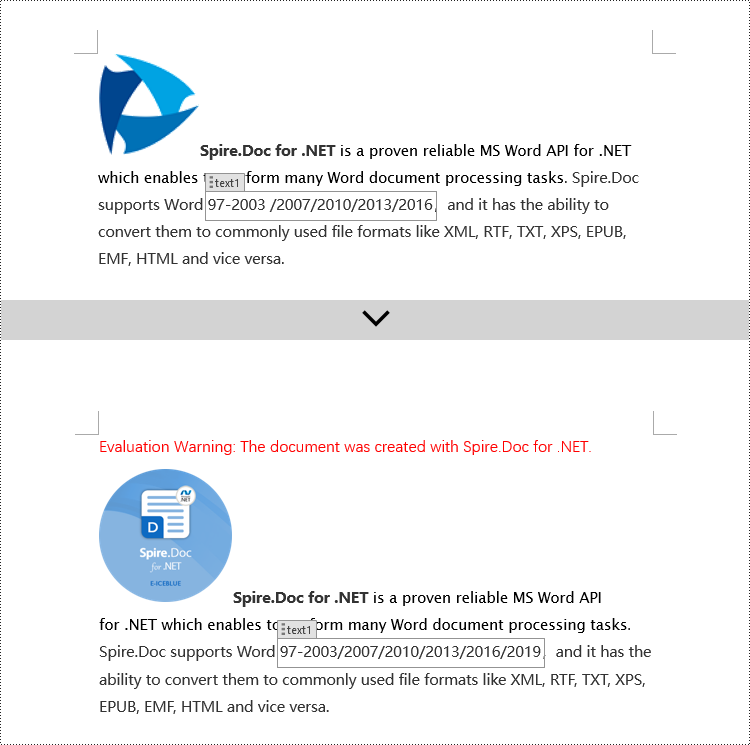
Modify Content Controls within Paragraphs using C#
In Spire.Doc, the object type for content controls within paragraphs is StructureDocumentTagInline. To modify them, you need to iterate through the collection of child objects of Paragraph.ChildObjects, find objects of type StructureDocumentTagInline, and then make the necessary modifications. Here are the detailed steps:
- Create a Document object.
- Load a document using the Document.LoadFromFile() method.
- Access the body of a section in the document using Section.Body.
- Get the first paragraph of the body using Body.Paragraphs[0].
- Iterate through the collection of child objects of the paragraph, Paragraph.ChildObjects, to find objects of type StructureDocumentTagInline.
- Access the collection of child objects of StructureDocumentTagInline, StructureDocumentTagInline.ChildObjects, and perform the required modifications based on the type of the child objects.
- Save the document using the Document.SaveToFile() method.
- C#
using Spire.Doc;
using Spire.Doc.Documents;
using Spire.Doc.Fields;
using System.Collections.Generic;

namespace SpireDocDemo
{
    internal class Program
    {
        static void Main(string[] args)
        {
            // Create a new Document object
            Document doc = new Document();

            // Load document content from a file
            doc.LoadFromFile("Sample2.docx");

            // Get the body of the document
            Body body = doc.Sections[0].Body;

            // Get the first paragraph in the body
            Paragraph paragraph = body.Paragraphs[0];

            // Iterate through child objects in the paragraph
            for (int i = 0; i < paragraph.ChildObjects.Count; i++)
            {
                // Check if the child object is StructureDocumentTagInline
                if (paragraph.ChildObjects[i].DocumentObjectType == DocumentObjectType.StructureDocumentTagInline)
                {
                    // Convert the child object to StructureDocumentTagInline type
                    StructureDocumentTagInline structureDocumentTagInline = (StructureDocumentTagInline)paragraph.ChildObjects[i];

                    // Check if the Tag or Alias property is "text1"
                    if (structureDocumentTagInline.SDTProperties.Tag == "text1" || structureDocumentTagInline.SDTProperties.Alias == "text1")
                    {
                        // Iterate through child objects in the StructureDocumentTagInline object
                        for (int j = 0; j < structureDocumentTagInline.ChildObjects.Count; j++)
                        {
                            // Check if the child object is a TextRange object
                            if (structureDocumentTagInline.ChildObjects[j].DocumentObjectType == DocumentObjectType.TextRange)
                            {
                                // Convert the child object to TextRange type
                                TextRange range = (TextRange)structureDocumentTagInline.ChildObjects[j];

                                // Set the text content to a specified content
                                range.Text = "97-2003/2007/2010/2013/2016/2019";
                            }
                        }
                    }

                    // Check if the Tag or Alias property is "logo1"
                    if (structureDocumentTagInline.SDTProperties.Tag == "logo1" || structureDocumentTagInline.SDTProperties.Alias == "logo1")
                    {
                        // Iterate through child objects in the StructureDocumentTagInline object
                        for (int j = 0; j < structureDocumentTagInline.ChildObjects.Count; j++)
                        {
                            // Check if the child object is an image
                            if (structureDocumentTagInline.ChildObjects[j].DocumentObjectType == DocumentObjectType.Picture)
                            {
                                // Convert the child object to DocPicture type
                                DocPicture docPicture = (DocPicture)structureDocumentTagInline.ChildObjects[j];

                                // Load a specified image
                                docPicture.LoadImage("Doc-NET.png");

                                // Set the width and height of the image
                                docPicture.Width = 100;
                                docPicture.Height = 100;
                            }
                        }
                    }
                }
            }

            // Save the modified document to a new file
            doc.SaveToFile("ModifiedContentControlsInParagraph.docx", FileFormat.Docx2016);

            // Release resources of the Document object
            doc.Dispose();
        }
    }
}
Modify Content Controls Wrapping Table Rows using C#
In Spire.Doc, the object type for a table row content control is StructureDocumentTagRow. To modify it, you need to iterate through the child objects collection of Table.ChildObjects, find objects of type StructureDocumentTagRow, and then make the necessary modifications. Here are the detailed steps:
- Create a Document object.
- Load a document using the Document.LoadFromFile() method.
- Access the body of a section using Section.Body.
- Get the first table in the body using Body.Tables[0].
- Iterate through the child objects collection of the table, Table.ChildObjects, to find objects of type StructureDocumentTagRow.
- Access the collection of cells in the StructureDocumentTagRow.Cells table row content control and make the required modifications to the cell contents.
- Save the document using the Document.SaveToFile() method.
- C#
using Spire.Doc;
using Spire.Doc.Documents;
using Spire.Doc.Fields;
namespace SpireDocDemo
{
internal class Program
{
static void Main(string[] args)
{
// Create a new document object
Document doc = new Document();
// Load the document from a file
doc.LoadFromFile("Sample3.docx");
// Get the body of the document
Body body = doc.Sections[0].Body;
// Get the first table
Table table = (Table)body.Tables[0];
// Iterate through the child objects in the table
for (int i = 0; i < table.ChildObjects.Count; i++)
{
// Check if the child object is of type StructureDocumentTagRow
if (table.ChildObjects[i].DocumentObjectType == DocumentObjectType.StructureDocumentTagRow)
{
// Convert the child object to a StructureDocumentTagRow object
StructureDocumentTagRow structureDocumentTagRow = (StructureDocumentTagRow)table.ChildObjects[i];
// Check if the Tag or Alias property of the StructureDocumentTagRow is "row1"
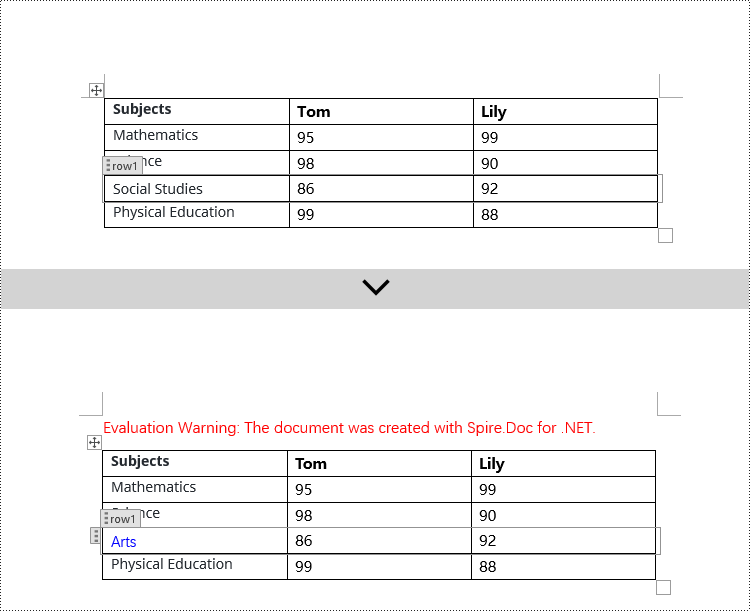
if (structureDocumentTagRow.SDTProperties.Tag == "row1" || structureDocumentTagRow.SDTProperties.Alias == "row1")
{
// Clear the paragraphs in the cell
structureDocumentTagRow.Cells[0].Paragraphs.Clear();
// Add a paragraph in the cell and set the text
TextRange textRange = structureDocumentTagRow.Cells[0].AddParagraph().AppendText("Arts");
textRange.CharacterFormat.TextColor = System.Drawing.Color.Blue;
}
}
}
// Save the modified document to a file
doc.SaveToFile("ModifiedTableRowContentControl.docx", FileFormat.Docx2016);
// Release document resources
doc.Dispose();
}
}
}
Modify Content Controls Wrapping Table Cells using C#
In Spire.Doc, the object type for the content control in a table cell is StructureDocumentTagCell. You need to iterate through the collection of child objects in TableRow.ChildObjects, find objects of type StructureDocumentTagCell, and then perform operations on them. Here are the detailed steps:
- Create a Document object.
- Load a document using the Document.LoadFromFile() method.
- Get the body of a section using Section.Body.
- Get the first table in the body using Body.Tables[0].
- Iterate through the collection of table rows Table.Rows, accessing each TableRow object.
- Iterate through the collection of child objects in the table row TableRow.ChildObjects, finding objects of type StructureDocumentTagCell.
- Access the collection of paragraphs in the StructureDocumentTagCell content control cell, and perform the necessary modifications to the content.
- Save the document using the Document.SaveToFile() method.
- C#
using Spire.Doc;
using Spire.Doc.Documents;
using Spire.Doc.Fields;
namespace SpireDocDemo
{
internal class Program
{
static void Main(string[] args)
{
// Create a new document object
Document doc = new Document();
// Load the document from a file
doc.LoadFromFile("Sample4.docx");
// Get the body of the document
Body body = doc.Sections[0].Body;
// Get the first table in the document
Table table = (Table)body.Tables[0];
// Iterate through the rows of the table
for (int i = 0; i < table.Rows.Count; i++)
{
// Iterate through the child objects in each row
for (int j = 0; j < table.Rows[i].ChildObjects.Count; j++)
{
// Check if the child object is a StructureDocumentTagCell
if (table.Rows[i].ChildObjects[j].DocumentObjectType == DocumentObjectType.StructureDocumentTagCell)
{
// Convert the child object to StructureDocumentTagCell type
StructureDocumentTagCell structureDocumentTagCell = (StructureDocumentTagCell)table.Rows[i].ChildObjects[j];
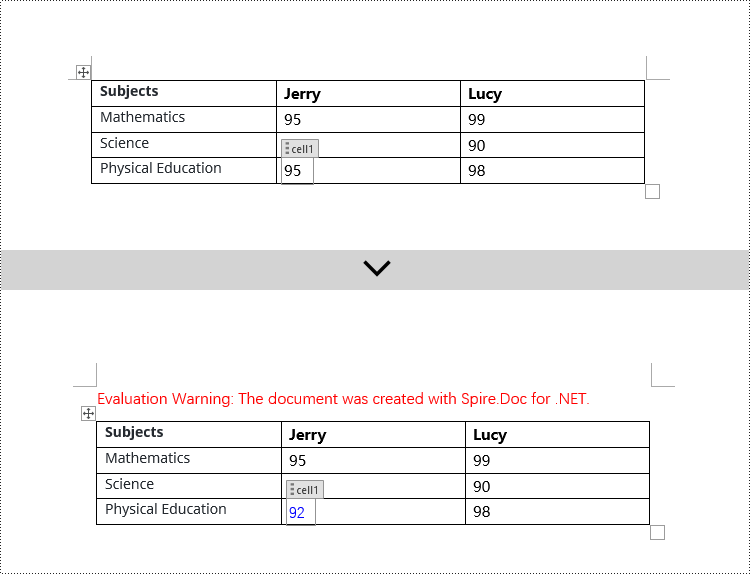
// Check if the Tag or Alias property of structureDocumentTagCell is "cell1"
if (structureDocumentTagCell.SDTProperties.Tag == "cell1" || structureDocumentTagCell.SDTProperties.Alias == "cell1")
{
// Clear the paragraphs in the cell
structureDocumentTagCell.Paragraphs.Clear();
// Add a new paragraph and add text to it
TextRange textRange = structureDocumentTagCell.AddParagraph().AppendText("92");
textRange.CharacterFormat.TextColor = System.Drawing.Color.Blue;
}
}
}
}
// Save the modified document to a new file
doc.SaveToFile("ModifiedTableCellContentControl.docx", FileFormat.Docx2016);
// Dispose of the document object
doc.Dispose();
}
}
}
Modify Content Controls within Table Cells using C#
This case demonstrates modifying content controls within paragraphs in table cells. You need to first access the collection of paragraphs in the cell TableCell.Paragraphs, then iterate through the collection of child objects in each paragraph Paragraph.ChildObjects, find objects of type StructureDocumentTagInline, and make modifications to them. Here are the detailed steps:
- Create a Document object.
- Load a document using the Document.LoadFromFile() method.
- Get the body of a section using Section.Body.
- Get the first table in the body using Body.Tables[0].
- Iterate through the collection of table rows Table.Rows, accessing each TableRow object.
- Iterate through the collection of cells in the table row TableRow.Cells, accessing each TableCell object.
- Iterate through the collection of paragraphs in the cell TableCell.Paragraphs, accessing each Paragraph object.
- Iterate through the collection of child objects in the paragraph Paragraph.ChildObjects, finding objects of type StructureDocumentTagInline.
- Access the ChildObjects collection of the StructureDocumentTagInline object, and perform the necessary modifications based on the type of the child objects.
- Save the document using the Document.SaveToFile() method.
- C#
using Spire.Doc;
using Spire.Doc.Documents;
using Spire.Doc.Fields;
namespace SpireDocDemo
{
internal class Program
{
static void Main(string[] args)
{
// Create a new Document object
Document doc = new Document();
// Load document content from file
doc.LoadFromFile("Sample5.docx");
// Get the body of the document
Body body = doc.Sections[0].Body;
// Get the first table
Table table = (Table)body.Tables[0];
// Iterate through the rows of the table
for (int r = 0; r < table.Rows.Count; r++)
{
// Iterate through the cells in the table row
for (int c = 0; c < table.Rows[r].Cells.Count; c++)
{
// Iterate through the paragraphs in the cell
for (int p = 0; p < table.Rows[r].Cells[c].Paragraphs.Count; p++)
{
// Get the paragraph object
Paragraph paragraph = table.Rows[r].Cells[c].Paragraphs[p];
// Iterate through the child objects in the paragraph
for (int i = 0; i < paragraph.ChildObjects.Count; i++)
{
// Check if the child object is of type StructureDocumentTagInline
if (paragraph.ChildObjects[i].DocumentObjectType == DocumentObjectType.StructureDocumentTagInline)
{
// Convert to StructureDocumentTagInline object
StructureDocumentTagInline structureDocumentTagInline = (StructureDocumentTagInline)paragraph.ChildObjects[i];
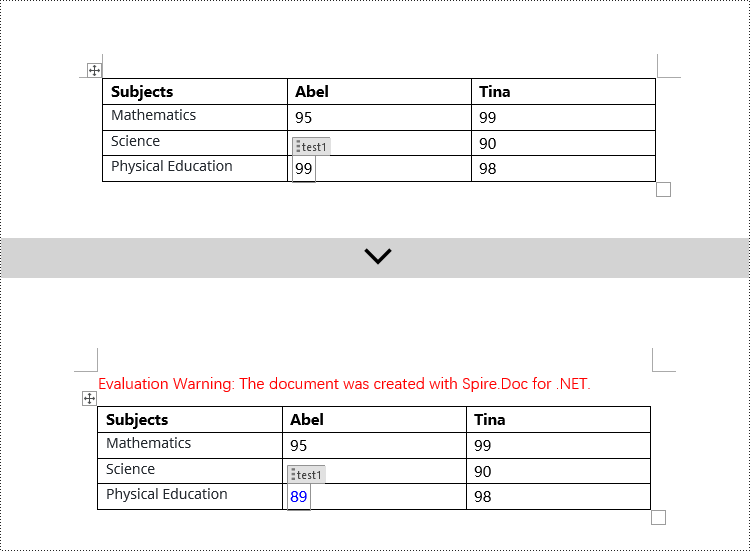
// Check if the Tag or Alias property of StructureDocumentTagInline is "test1"
if (structureDocumentTagInline.SDTProperties.Tag == "test1" || structureDocumentTagInline.SDTProperties.Alias == "test1")
{
// Iterate through the child objects of StructureDocumentTagInline
for (int j = 0; j < structureDocumentTagInline.ChildObjects.Count; j++)
{
// Check if the child object is of type TextRange
if (structureDocumentTagInline.ChildObjects[j].DocumentObjectType == DocumentObjectType.TextRange)
{
// Convert to TextRange object
TextRange textRange = (TextRange)structureDocumentTagInline.ChildObjects[j];
// Set the text content
textRange.Text = "89";
// Set text color
textRange.CharacterFormat.TextColor = System.Drawing.Color.Blue;
}
}
}
}
}
}
}
}
// Save the modified document to a new file
doc.SaveToFile("ModifiedContentControlInParagraphOfTableCell.docx", FileFormat.Docx2016);
// Dispose of the Document object resources
doc.Dispose();
}
}
}
Apply for a Temporary License
If you'd like to remove the evaluation message from the generated documents, or to get rid of the function limitations, please request a 30-day trial license for yourself.
C#: Create a Table Of Contents for a Newly Created Word Document
2024-04-24 01:11:13 Written by KoohjiCreating a table of contents in a newly created Word document is an important means to enhance document quality, improve reading experience, and effectively convey information. As a navigational guide for the document, the table of contents provides readers with a way to quickly locate and navigate through the document's content. Through the table of contents, readers can swiftly grasp the document's structure and content organization, saving reading time and boosting work efficiency. This article will explain how to use Spire.Doc for .NET to create a table of contents for a newly created Word document within a C# project.
- C# Create a Table Of Contents Using Heading Styles
- C# Create a Table Of Contents Using Outline Level Styles
- C# Create a Table Of Contents Using Image Captions
- C# Create a Table Of Contents Using Table Captions
Install Spire.Doc for .NET
To begin with, you need to add the DLL files included in the Spire.Doc for .NET package as references in your .NET project. The DLL files can be either downloaded from this link or installed via NuGet.
PM> Install-Package Spire.Doc
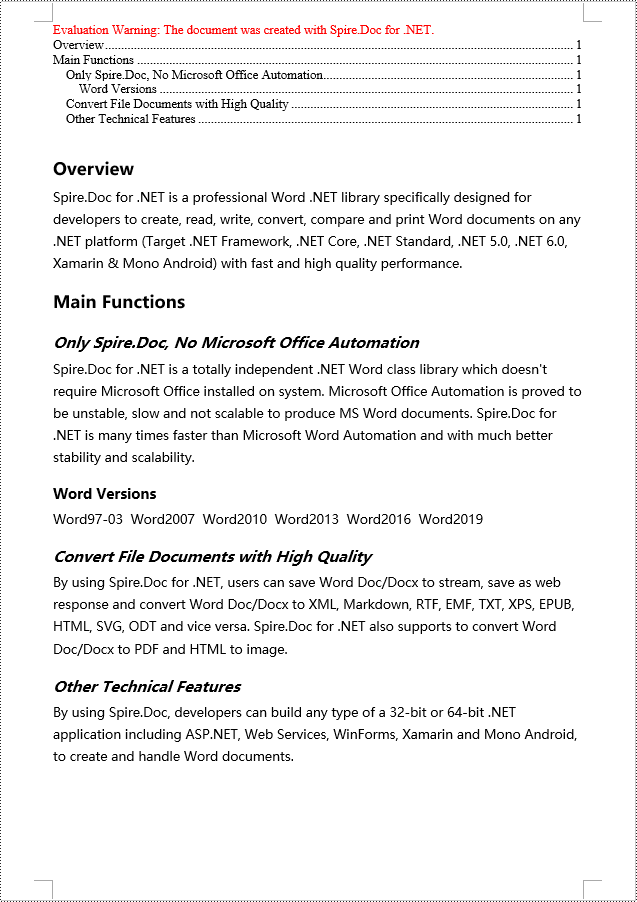
C# Create a Table Of Contents Using Heading Styles
Using heading styles to create a table of contents is a method to automatically generate a table of contents in a Word document by identifying title and subtitles in the document using different levels of heading styles. Here are the detailed steps:
- Create a Document object.
- Add a section using the Document.AddSection() method.
- Add a paragraph using the Section.AddParagraph() method.
- Create a table of contents object using the Paragraph.AppendTOC(int lowerLevel, int upperLevel) method.
- Create a CharacterFormat object and set the font.
- Apply a heading style to the paragraph using the Paragraph.ApplyStyle(BuiltinStyle.Heading1) method.
- Add text content using the Paragraph.AppendText() method.
- Apply character formatting to the text using the TextRange.ApplyCharacterFormat() method.
- Update the table of contents using the Document.UpdateTableOfContents() method.
- Save the document using the Document.SaveToFile() method.
- C#
using Spire.Doc;
using Spire.Doc.Documents;
using Spire.Doc.Fields;
using Spire.Doc.Formatting;

namespace SpireDocDemo
{
    internal class Program
    {
        static void Main(string[] args)
        {
            // Create a new document object
            Document doc = new Document();

            // Add a section to the document
            Section section = doc.AddSection();

            // Add a paragraph
            Paragraph TOCparagraph = section.AddParagraph();
            TOCparagraph.AppendTOC(1, 3);

            // Create a CharacterFormat object and set the font
            CharacterFormat characterFormat1 = new CharacterFormat(doc);
            characterFormat1.FontName = "Microsoft YaHei";

            // Create another CharacterFormat object
            CharacterFormat characterFormat2 = new CharacterFormat(doc);
            characterFormat2.FontName = "Microsoft YaHei";
            characterFormat2.FontSize = 12;

            // Add a paragraph with Heading 1 style
            Paragraph paragraph = section.Body.AddParagraph();
            paragraph.ApplyStyle(BuiltinStyle.Heading1);

            // Add text and apply character formatting
            TextRange textRange1 = paragraph.AppendText("Overview");
            textRange1.ApplyCharacterFormat(characterFormat1);

            // Add regular content
            paragraph = section.Body.AddParagraph();
            TextRange textRange2 = paragraph.AppendText("Spire.Doc for .NET is a professional Word .NET library specifically designed for developers to create, read, write, convert, compare and print Word documents on any .NET platform (Target .NET Framework, .NET Core, .NET Standard, .NET 5.0, .NET 6.0, Xamarin & Mono Android) with fast and high quality performance.");
            textRange2.ApplyCharacterFormat(characterFormat2);

            // Add a paragraph with Heading 1 style
            paragraph = section.Body.AddParagraph();
            paragraph.ApplyStyle(BuiltinStyle.Heading1);
            textRange1 = paragraph.AppendText("Main Functions");
            textRange1.ApplyCharacterFormat(characterFormat1);

            // Add a paragraph with Heading 2 style
            paragraph = section.Body.AddParagraph();
            paragraph.ApplyStyle(BuiltinStyle.Heading2);
            textRange1 = paragraph.AppendText("Only Spire.Doc, No Microsoft Office Automation");
            textRange1.ApplyCharacterFormat(characterFormat1);

            // Add regular content
            paragraph = section.Body.AddParagraph();
            textRange2 = paragraph.AppendText("Spire.Doc for .NET is a totally independent .NET Word class library which doesn't require Microsoft Office installed on system. Microsoft Office Automation is proved to be unstable, slow and not scalable to produce MS Word documents. Spire.Doc for .NET is many times faster than Microsoft Word Automation and with much better stability and scalability.");
            textRange2.ApplyCharacterFormat(characterFormat2);

            // Add a paragraph with Heading 3 style
            paragraph = section.Body.AddParagraph();
            paragraph.ApplyStyle(BuiltinStyle.Heading3);
            textRange1 = paragraph.AppendText("Word Versions");
            textRange1.ApplyCharacterFormat(characterFormat1);
            paragraph = section.Body.AddParagraph();
            textRange2 = paragraph.AppendText("Word97-03  Word2007  Word2010  Word2013  Word2016  Word2019");
            textRange2.ApplyCharacterFormat(characterFormat2);

            // Add a paragraph with Heading 2 style
            paragraph = section.Body.AddParagraph();
            paragraph.ApplyStyle(BuiltinStyle.Heading2);
            textRange1 = paragraph.AppendText("Convert File Documents with High Quality");
            textRange1.ApplyCharacterFormat(characterFormat1);

            // Add regular content
            paragraph = section.Body.AddParagraph();
            textRange2 = paragraph.AppendText("By using Spire.Doc for .NET, users can save Word Doc/Docx to stream, save as web response and convert Word Doc/Docx to XML, Markdown, RTF, EMF, TXT, XPS, EPUB, HTML, SVG, ODT and vice versa. Spire.Doc for .NET also supports to convert Word Doc/Docx to PDF and HTML to image.");
            textRange2.ApplyCharacterFormat(characterFormat2);

            // Add a paragraph with Heading 2 style
            paragraph = section.Body.AddParagraph();
            paragraph.ApplyStyle(BuiltinStyle.Heading2);
            textRange1 = paragraph.AppendText("Other Technical Features");
            textRange1.ApplyCharacterFormat(characterFormat1);

            // Add regular content
            paragraph = section.Body.AddParagraph();
            textRange2 = paragraph.AppendText("By using Spire.Doc, developers can build any type of a 32-bit or 64-bit .NET application including ASP.NET, Web Services, WinForms, Xamarin and Mono Android, to create and handle Word documents.");
            textRange2.ApplyCharacterFormat(characterFormat2);

            // Update the table of contents
            doc.UpdateTableOfContents();

            // Save the document
            doc.SaveToFile("CreateTOCUsingHeadingStyles.docx", FileFormat.Docx2016);

            // Release resources
            doc.Dispose();
        }
    }
}
C# Create a Table Of Contents Using Outline Level Styles
In a Word document, a table of contents can also be created using outline level styles. The ParagraphFormat.OutlineLevel property can be used to specify the level style of a paragraph in the outline. Subsequently, these outline level styles can be applied to the table of contents creation rules through the TableOfContent.SetTOCLevelStyle() method. Here are the detailed steps:
- Create a Document object.
- Add a section using the Document.AddSection() method.
- Create a ParagraphStyle object and set the outline level using ParagraphStyle.ParagraphFormat.OutlineLevel = OutlineLevel.Level1.
- Add the created ParagraphStyle object to the document using the Document.Styles.Add() method.
- Add a paragraph using the Section.AddParagraph() method.
- Create a table of contents object using the Paragraph.AppendTOC(int lowerLevel, int upperLevel) method.
- Set the default setting for creating the table of contents with heading styles to False, TableOfContent.UseHeadingStyles = false.
- Apply the outline level style to the table of contents rules using the TableOfContent.SetTOCLevelStyle(int levelNumber, string styleName) method.
- Create a CharacterFormat object and set the font.
- Apply the style to the paragraph using the Paragraph.ApplyStyle(ParagraphStyle.Name) method.
- Add text content using the Paragraph.AppendText() method.
- Apply character formatting to the text using the TextRange.ApplyCharacterFormat() method.
- Update the table of contents using the Document.UpdateTableOfContents() method.
- Save the document using the Document.SaveToFile() method.
- C#
using Spire.Doc;
using Spire.Doc.Documents;
using Spire.Doc.Fields;
using Spire.Doc.Formatting;

namespace SpireDocDemo
{
    internal class Program
    {
        static void Main(string[] args)
        {
            // Create a document object
            Document doc = new Document();
            Section section = doc.AddSection();

            // Define Outline Level 1
            ParagraphStyle titleStyle1 = new ParagraphStyle(doc);
            titleStyle1.Name = "T1S";
            titleStyle1.ParagraphFormat.OutlineLevel = OutlineLevel.Level1;
            titleStyle1.CharacterFormat.Bold = true;
            titleStyle1.CharacterFormat.FontName = "Microsoft YaHei";
            titleStyle1.CharacterFormat.FontSize = 18f;
            titleStyle1.ParagraphFormat.HorizontalAlignment = HorizontalAlignment.Left;
            doc.Styles.Add(titleStyle1);

            // Define Outline Level 2
            ParagraphStyle titleStyle2 = new ParagraphStyle(doc);
            titleStyle2.Name = "T2S";
            titleStyle2.ParagraphFormat.OutlineLevel = OutlineLevel.Level2;
            titleStyle2.CharacterFormat.Bold = true;
            titleStyle2.CharacterFormat.FontName = "Microsoft YaHei";
            titleStyle2.CharacterFormat.FontSize = 16f;
            titleStyle2.ParagraphFormat.HorizontalAlignment = HorizontalAlignment.Left;
            doc.Styles.Add(titleStyle2);

            // Define Outline Level 3
            ParagraphStyle titleStyle3 = new ParagraphStyle(doc);
            titleStyle3.Name = "T3S";
            titleStyle3.ParagraphFormat.OutlineLevel = OutlineLevel.Level3;
            titleStyle3.CharacterFormat.Bold = true;
            titleStyle3.CharacterFormat.FontName = "Microsoft YaHei";
            titleStyle3.CharacterFormat.FontSize = 14f;
            titleStyle3.ParagraphFormat.HorizontalAlignment = HorizontalAlignment.Left;
            doc.Styles.Add(titleStyle3);

            // Add a paragraph
            Paragraph TOCparagraph = section.AddParagraph();
            TableOfContent toc = TOCparagraph.AppendTOC(1, 3);
            toc.UseHeadingStyles = false;
            toc.UseHyperlinks = true;
            toc.UseTableEntryFields = false;
            toc.RightAlignPageNumbers = true;
            toc.SetTOCLevelStyle(1, titleStyle1.Name);
            toc.SetTOCLevelStyle(2, titleStyle2.Name);
            toc.SetTOCLevelStyle(3, titleStyle3.Name);

            // Define character format
            CharacterFormat characterFormat = new CharacterFormat(doc);
            characterFormat.FontName = "Microsoft YaHei";
            characterFormat.FontSize = 12;

            // Add a paragraph and apply outline level style 1
            Paragraph paragraph = section.Body.AddParagraph();
            paragraph.ApplyStyle(titleStyle1.Name);
            paragraph.AppendText("Overview");

            // Add a paragraph and set the text content
            paragraph = section.Body.AddParagraph();
            TextRange textRange = paragraph.AppendText("Spire.Doc for .NET is a professional Word .NET library specifically designed for developers to create, read, write, convert, compare and print Word documents on any .NET platform (Target .NET Framework, .NET Core, .NET Standard, .NET 5.0, .NET 6.0, Xamarin & Mono Android) with fast and high quality performance.");
            textRange.ApplyCharacterFormat(characterFormat);

            // Add a paragraph and apply outline level style 1
            paragraph = section.Body.AddParagraph();
            paragraph.ApplyStyle(titleStyle1.Name);
            paragraph.AppendText("Main Functions");

            // Add a paragraph and apply outline level style 2
            paragraph = section.Body.AddParagraph();
            paragraph.ApplyStyle(titleStyle2.Name);
            paragraph.AppendText("Only Spire.Doc, No Microsoft Office Automation");

            // Add a paragraph and set the text content
            paragraph = section.Body.AddParagraph();
            textRange = paragraph.AppendText("Spire.Doc for .NET is a totally independent .NET Word class library which doesn't require Microsoft Office installed on system. Microsoft Office Automation is proved to be unstable, slow and not scalable to produce MS Word documents. Spire.Doc for .NET is many times faster than Microsoft Word Automation and with much better stability and scalability.");
            textRange.ApplyCharacterFormat(characterFormat);

            // Add a paragraph and apply outline level style 3
            paragraph = section.Body.AddParagraph();
            paragraph.ApplyStyle(titleStyle3.Name);
            paragraph.AppendText("Word Versions");

            // Add a paragraph and set the text content
            paragraph = section.Body.AddParagraph();
            textRange = paragraph.AppendText("Word97-03  Word2007  Word2010  Word2013  Word2016  Word2019");
            textRange.ApplyCharacterFormat(characterFormat);

            // Add a paragraph and apply outline level style 2
            paragraph = section.Body.AddParagraph();
            paragraph.ApplyStyle(titleStyle2.Name);
            paragraph.AppendText("Convert File Documents with High Quality");

            // Add a paragraph and set the text content
            paragraph = section.Body.AddParagraph();
            textRange = paragraph.AppendText("By using Spire.Doc for .NET, users can save Word Doc/Docx to stream, save as web response and convert Word Doc/Docx to XML, Markdown, RTF, EMF, TXT, XPS, EPUB, HTML, SVG, ODT and vice versa. Spire.Doc for .NET also supports to convert Word Doc/Docx to PDF and HTML to image.");
            textRange.ApplyCharacterFormat(characterFormat);

            // Add a paragraph and apply outline level style 2
            paragraph = section.Body.AddParagraph();
            paragraph.ApplyStyle(titleStyle2.Name);
            paragraph.AppendText("Other Technical Features");

            // Add a paragraph and set the text content
            paragraph = section.Body.AddParagraph();
            textRange = paragraph.AppendText("By using Spire.Doc, developers can build any type of a 32-bit or 64-bit .NET application including ASP.NET, Web Services, WinForms, Xamarin and Mono Android, to create and handle Word documents.");
            textRange.ApplyCharacterFormat(characterFormat);

            // Update the table of contents
            doc.UpdateTableOfContents();

            // Save the document
            doc.SaveToFile("CreateTOCUsingOutlineStyles.docx", FileFormat.Docx2016);

            // Release resources
            doc.Dispose();
        }
    }
}
C# Create a Table Of Contents Using Image Captions
Using the Spire.Doc library, you can create a table of contents based on image captions with the TableOfContent tocForImage = new TableOfContent(Document, " \\h \\z \\c \"Image\"") method. Here are the detailed steps:
- Create a Document object.
- Add a section using the Document.AddSection() method.
- Create a table of content object with TableOfContent tocForImage = new TableOfContent(Document, " \\h \\z \\c \"Image\"") and specify the style of the table of contents.
- Add a paragraph using the Section.AddParagraph() method.
- Add the table of content object to the paragraph using the Paragraph.Items.Add(tocForImage) method.
- Add a field separator using the Paragraph.AppendFieldMark(FieldMarkType.FieldSeparator) method.
- Add the text content "TOC" using the Paragraph.AppendText("TOC") method.
- Add a field end mark using the Paragraph.AppendFieldMark(FieldMarkType.FieldEnd) method.
- Add an image using the Paragraph.AppendPicture() method.
- Add a caption paragraph for the image using the DocPicture.AddCaption() method, including product information and formatting.
- Update the table of contents to reflect changes in the document using the Document.UpdateTableOfContents(tocForImage) method.
- Save the document using the Document.SaveToFile() method.
- C#
using Spire.Doc;
using Spire.Doc.Documents;
using Spire.Doc.Fields;
using Spire.Doc.Formatting;

namespace SpireDocDemo
{
    internal class Program
    {
        static void Main(string[] args)
        {
            // Create a document object
            Document doc = new Document();

            // Add a section to the document
            Section section = doc.AddSection();

            // Create a table of content object for images
            TableOfContent tocForImage = new TableOfContent(doc, " \\h \\z \\c \"Picture\"");

            // Add a paragraph to the section
            Paragraph tocParagraph = section.Body.AddParagraph();

            // Add the TOC object to the paragraph
            tocParagraph.Items.Add(tocForImage);

            // Add a field separator
            tocParagraph.AppendFieldMark(FieldMarkType.FieldSeparator);

            // Add text content
            tocParagraph.AppendText("TOC");

            // Add a field end mark
            tocParagraph.AppendFieldMark(FieldMarkType.FieldEnd);

            // Add a blank paragraph to the section
            section.Body.AddParagraph();

            // Add a paragraph to the section
            Paragraph paragraph = section.Body.AddParagraph();

            // Add an image
            DocPicture docPicture = paragraph.AppendPicture("images/Doc-NET.png");
            docPicture.Width = 100;
            docPicture.Height = 100;

            // Add a caption paragraph for the image
            Paragraph pictureCaptionParagraph = docPicture.AddCaption("Picture", CaptionNumberingFormat.Number, CaptionPosition.BelowItem) as Paragraph;
            pictureCaptionParagraph.AppendText("  Spire.Doc for .NET product");
            pictureCaptionParagraph.Format.AfterSpacing = 20;

            // Continue adding paragraphs to the section
            paragraph = section.Body.AddParagraph();
            docPicture = paragraph.AppendPicture("images/PDF-NET.png");
            docPicture.Width = 100;
            docPicture.Height = 100;
            pictureCaptionParagraph = docPicture.AddCaption("Picture", CaptionNumberingFormat.Number, CaptionPosition.BelowItem) as Paragraph;
            pictureCaptionParagraph.AppendText("  Spire.PDF for .NET product");
            pictureCaptionParagraph.Format.AfterSpacing = 20;
            paragraph = section.Body.AddParagraph();
            docPicture = paragraph.AppendPicture("images/XLS-NET.png");
            docPicture.Width = 100;
            docPicture.Height = 100;
            pictureCaptionParagraph = docPicture.AddCaption("Picture", CaptionNumberingFormat.Number, CaptionPosition.BelowItem) as Paragraph;
            pictureCaptionParagraph.AppendText("  Spire.XLS for .NET product");
            pictureCaptionParagraph.Format.AfterSpacing = 20;
            paragraph = section.Body.AddParagraph();
            docPicture = paragraph.AppendPicture("images/PPT-NET.png");
            docPicture.Width = 100;
            docPicture.Height = 100;
            pictureCaptionParagraph = docPicture.AddCaption("Picture", CaptionNumberingFormat.Number, CaptionPosition.BelowItem) as Paragraph;
            pictureCaptionParagraph.AppendText("  Spire.Presentation for .NET product");

            // Update the table of contents
            doc.UpdateTableOfContents(tocForImage);

            // Save the document to a file
            doc.SaveToFile("CreateTOCWithImageCaptions.docx", Spire.Doc.FileFormat.Docx2016);

            // Dispose of the document object
            doc.Dispose();
        }
    }
}
C# Create a Table Of Contents Using Table Captions
You can also create a table of contents using table captions by using the method TableOfContent tocForTable = new TableOfContent(Document, " \\h \\z \\c \"Table\""). Here are the detailed steps:
- Create a Document object.
- Add a section using the Document.AddSection() method.
- Create a table of content object TableOfContent tocForTable = new TableOfContent(Document, " \\h \\z \\c \"Table\"") and specify the style of the table of contents.
- Add a paragraph using the Section.AddParagraph() method.
- Add the table of content object to the paragraph using the Paragraph.Items.Add(tocForTable) method.
- Add a field separator using the Paragraph.AppendFieldMark(FieldMarkType.FieldSeparator) method.
- Add the text content "TOC" using the Paragraph.AppendText("TOC") method.
- Add a field end mark using the Paragraph.AppendFieldMark(FieldMarkType.FieldEnd) method.
- Add a table using the Section.AddTable() method and set the number of rows and columns using the Table.ResetCells(int rowsNum, int columnsNum) method.
- Add a table caption paragraph using the Table.AddCaption() method, including product information and formatting.
- Update the table of contents to reflect changes in the document using the Document.UpdateTableOfContents(tocForTable) method.
- Save the document using the Document.SaveToFile() method.
- C#
using Spire.Doc;
using Spire.Doc.Documents;
using Spire.Doc.Fields;
using Spire.Doc.Formatting;

namespace SpireDocDemo
{
    internal class Program
    {
        static void Main(string[] args)
        {
            // Create a new document
            Document doc = new Document();

            // Add a section to the document
            Section section = doc.AddSection();

            // Create a TableOfContent object
            TableOfContent tocForTable = new TableOfContent(doc, " \\h \\z \\c \"Table\"");

            // Add a paragraph in the section to place the TableOfContent object
            Paragraph tocParagraph = section.Body.AddParagraph();
            tocParagraph.Items.Add(tocForTable);
            tocParagraph.AppendFieldMark(FieldMarkType.FieldSeparator);
            tocParagraph.AppendText("TOC");
            tocParagraph.AppendFieldMark(FieldMarkType.FieldEnd);

            // Add two empty paragraphs in the section
            section.Body.AddParagraph();
            section.Body.AddParagraph();

            // Add a table in the section
            Table table = section.Body.AddTable(true);
            table.ResetCells(1, 3);

            // Add a caption paragraph for the table
            Paragraph tableCaptionParagraph = table.AddCaption("Table", CaptionNumberingFormat.Number, CaptionPosition.BelowItem) as Paragraph;
            tableCaptionParagraph.AppendText("  One row three columns");
            tableCaptionParagraph.Format.AfterSpacing = 18;

            // Add a new table in the section
            table = section.Body.AddTable(true);
            table.ResetCells(3, 3);

            // Add a caption paragraph for the second table
            tableCaptionParagraph = table.AddCaption("Table", CaptionNumberingFormat.Number, CaptionPosition.BelowItem) as Paragraph;
            tableCaptionParagraph.AppendText("  Three rows three columns");
            tableCaptionParagraph.Format.AfterSpacing = 18;

            // Add another new table in the section
            table = section.Body.AddTable(true);
            table.ResetCells(5, 3);

            // Add a caption paragraph for the third table
            tableCaptionParagraph = table.AddCaption("Table", CaptionNumberingFormat.Number, CaptionPosition.BelowItem) as Paragraph;
            tableCaptionParagraph.AppendText("  Five rows three columns");

            // Update the table of contents
            doc.UpdateTableOfContents(tocForTable);

            // Save the document to a specified file
            doc.SaveToFile("CreateTOCUsingTableCaptions.docx", Spire.Doc.FileFormat.Docx2016);

            // Dispose resources
            doc.Dispose();
        }
    }
}
Apply for a Temporary License
If you'd like to remove the evaluation message from the generated documents, or to get rid of the function limitations, please request a 30-day trial license for yourself.
