.NET (1327)
Children categories
Replace Text with Regular Expression (Regex) in PowerPoint in C#, VB.NET
2021-08-23 07:49:36 Written by KoohjiSpire.Presentation for .NET provides you with the ability to replace text with regular expression using the ReplaceTextWithRegex method of IShape class. The ReplaceTextWithRegex method accepts the following parameters:
Regex: the regular expression to search text.
string: the text to replace with.
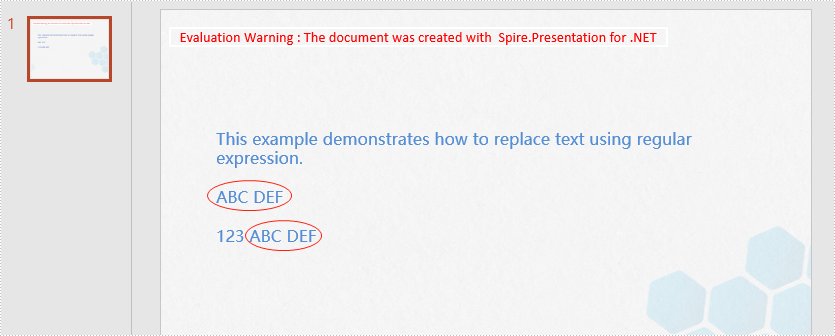
The following example demonstrates how to replace text with regular expression in a PowerPoint document using Spire.Presentation for .NET.
using Spire.Presentation;
using System.Text.RegularExpressions;

namespace ReplaceTextWithRegex
{
    class Program
    {
        static void Main(string[] args)
        {
            //Create a Presentation instance
            Presentation ppt = new Presentation();
            //Load a sample document
            ppt.LoadFromFile("Sample.pptx");

            //Get the first slide
            ISlide slide = ppt.Slides[0];

            //Replace "ABC" and the subsequent to the end of the line as "ABC DEF"
            Regex regex = new Regex("ABC.*");
            string newvalue = "ABC DEF";
            foreach (IShape shape in slide.Shapes)
            {
                shape.ReplaceTextWithRegex(regex, newvalue);
            }

            //Save the result document
            ppt.SaveToFile("ReplaceTextWithRegex.pptx", FileFormat.Pptx2013);
        }
    }
}
Imports Spire.Presentation
Imports System.Text.RegularExpressions

Namespace ReplaceTextWithRegex
    Friend Class Program
        Private Shared Sub Main(ByVal args As String())
            'Create a Presentation instance
            Dim ppt As Presentation = New Presentation()
            'Load the sample document
            ppt.LoadFromFile("Sample.pptx")

            'Get the first slide
            Dim slide As ISlide = ppt.Slides(0)

            'Replace "ABC" and the subsequent to the end of the line as "ABC DEF"
            Dim regex As Regex = New Regex("ABC.*")
            Dim newvalue As String = "ABC DEF"

            For Each shape As IShape In slide.Shapes
                shape.ReplaceTextWithRegex(regex, newvalue)
            Next

            'Save the result document
            ppt.SaveToFile("ReplaceTextWithRegex.pptx", FileFormat.Pptx2013)
        End Sub
    End Class
End Namespace
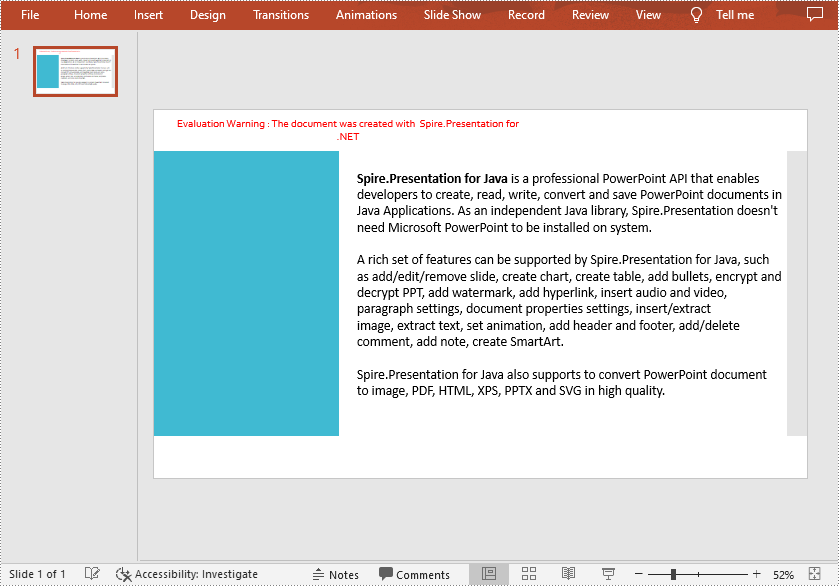
The input PowerPoint document:

The output PowerPoint document:
Convert Shapes and SmartArt in Excel to Image in C#, VB.NET
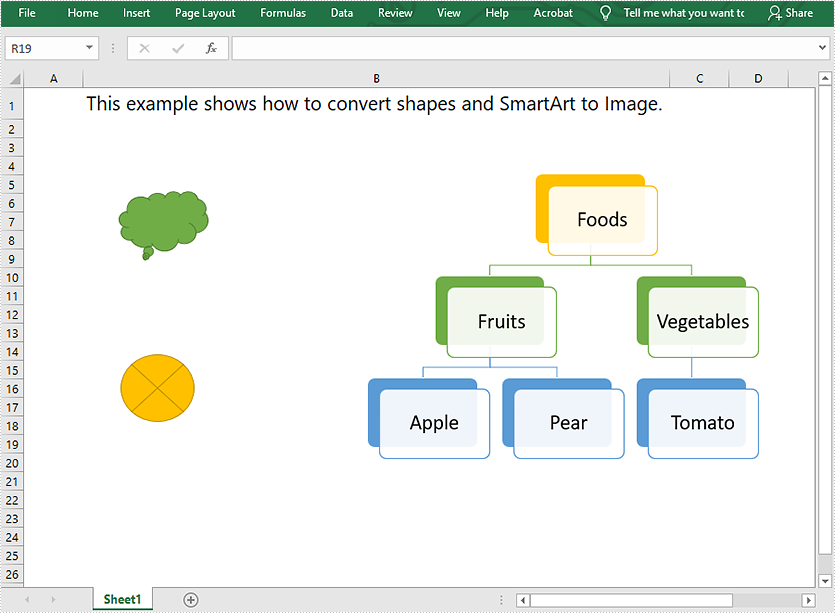
2021-08-10 07:09:45 Written by AdministratorThis article demonstrates how to convert shapes and SmartArt graphics in Excel to Image in C# using Spire.XLS for .NET.
The input Excel file:
using Spire.Xls;
using System.Collections.Generic;
using System.Drawing;
using System.Drawing.Imaging;
namespace Convert_Shapes_and_SmartArt_to_Image
{
class Program
{
static void Main(string[] args)
{
//Create a Workbook object
Workbook workbook = new Workbook();
//Load the Excel file
workbook.LoadFromFile("Sample.xlsx");
//Get the first worksheet
Worksheet sheet = workbook.Worksheets[0];
//Create a SaveShapeTypeOption object
SaveShapeTypeOption shapelist = new SaveShapeTypeOption();
//Save shapes and SmartArt graphics in the worksheet to images
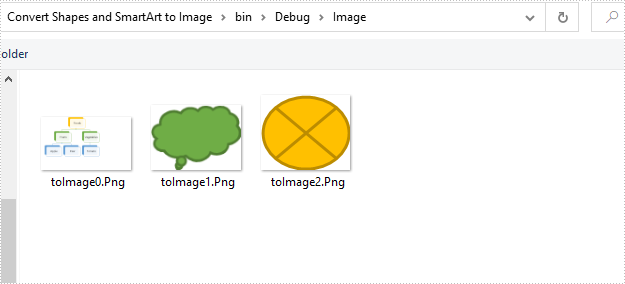
List<Bitmap> images = sheet.SaveShapesToImage(shapelist);
//Save images to file
int index = 0;
foreach (Image img in images)
{
img.Save("Image/" + "toImage" + index + ".Png", ImageFormat.Png);
index++;
}
}
}
}
Imports Spire.Xls
Imports System.Collections.Generic
Imports System.Drawing.Imaging

Namespace Convert_Shapes_and_SmartArt_to_Image
    Friend Class Program
        Private Shared Sub Main(ByVal args As String())
            'Create a Workbook object
            Dim workbook As Workbook = New Workbook()
            'Load the Excel file
            workbook.LoadFromFile("Sample.xlsx")

            'Get the first worksheet
            Dim sheet As Worksheet = workbook.Worksheets(0)

            'Create a SaveShapeTypeOption object
            Dim shapelist As SaveShapeTypeOption = New SaveShapeTypeOption()
            'Save shapes and SmartArt graphics in the worksheet to images
            Dim images As List(Of Bitmap) = sheet.SaveShapesToImage(shapelist)

            'Save images to file
            Dim index As Integer = 0

            For Each img As Image In images
                img.Save("Image/" & "toImage" & index & ".Png", ImageFormat.Png)
                index += 1
            Next
        End Sub
    End Class
End Namespace
Converted images:
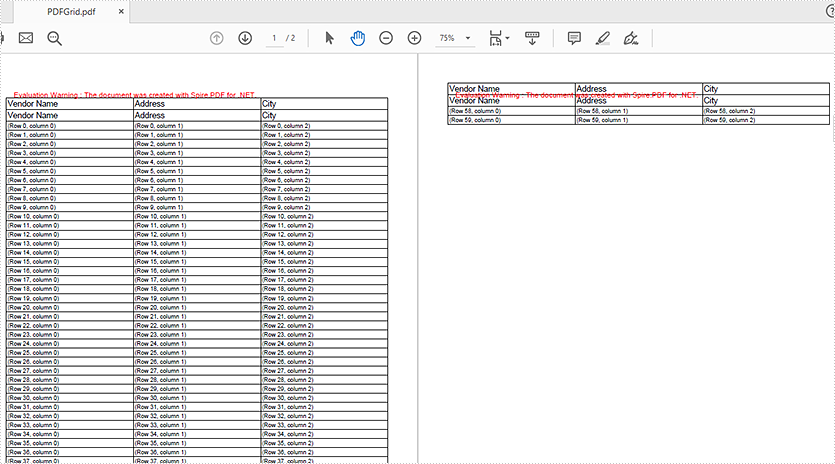
This article will demonstrate how to repeat the table’s header row in C#/VB.NET by using Spire.PDF for .NET.
using Spire.Pdf;
using Spire.Pdf.Graphics;
using Spire.Pdf.Grid;
using System.Drawing;

namespace PDFGrid
{
    class Program
    {
        static void Main(string[] args)
        {
            //Create a pdf document
            PdfDocument doc = new PdfDocument();

            //Add a page to pdf
            PdfPageBase page = doc.Pages.Add();

            //Create a PdfGrid object
            PdfGrid grid = new PdfGrid();

            //Set the cell padding of the grid
            grid.Style.CellPadding = new PdfPaddings(1, 1, 1, 1);

            //Set the Columns of the grid
            grid.Columns.Add(3);

            //Set the header rows and define the data
            PdfGridRow[] pdfGridRows = grid.Headers.Add(2);
            for (int i = 0; i < pdfGridRows.Length; i++)
            {
                pdfGridRows[i].Style.Font = new PdfTrueTypeFont(new Font("Arial", 11f, FontStyle.Regular), true);
                pdfGridRows[i].Cells[0].Value = "Vendor Name";
                pdfGridRows[i].Cells[1].Value = "Address";
                pdfGridRows[i].Cells[2].Value = "City";
            }

            //Repeat the table header rows if the grid exceed one page
            grid.RepeatHeader = true;


            for (int i = 0; i < 60; i++)
            {
                PdfGridRow row = grid.Rows.Add();

                //Add the data to the table
                for (int j = 0; j < grid.Columns.Count; j++)
                {
                    row.Cells[j].Value = "(Row " + i + ", column " + j + ")";
                }
            }

            //draw grid on the pdf page
            PdfLayoutResult pdfLayoutResult = grid.Draw(page, new PointF(0, 20));
            float y = pdfLayoutResult.Bounds.Y + pdfLayoutResult.Bounds.Height;
            PdfPageBase currentPage = pdfLayoutResult.Page;


            //Save the doucment to file
            doc.SaveToFile("PDFGrid.pdf");

        }
    }
}
Imports Spire.Pdf
Imports Spire.Pdf.Graphics
Imports Spire.Pdf.Grid
Imports System.Drawing

Namespace PDFGrid

    Class Program

        Private Shared Sub Main(ByVal args() As String)
            'Create a pdf document
            Dim doc As PdfDocument = New PdfDocument
            'Add a page to pdf
            Dim page As PdfPageBase = doc.Pages.Add
            'Create a PdfGrid object
            Dim grid As PdfGrid = New PdfGrid
            'Set the cell padding of the grid
            grid.Style.CellPadding = New PdfPaddings(1, 1, 1, 1)
            'Set the Columns of the grid
            grid.Columns.Add(3)
            'Set the header rows and define the data
            Dim pdfGridRows() As PdfGridRow = grid.Headers.Add(2)
            Dim i As Integer = 0
            Do While (i < pdfGridRows.Length)
                pdfGridRows(i).Style.Font = New PdfTrueTypeFont(New Font("Arial", 11!, FontStyle.Regular), true)
                pdfGridRows(i).Cells(0).Value = "Vendor Name"
                pdfGridRows(i).Cells(1).Value = "Address"
                pdfGridRows(i).Cells(2).Value = "City"
                i = (i + 1)
            Loop

            'Repeat the table header rows if the grid exceed one page
            grid.RepeatHeader = true
            Dim i As Integer = 0
            Do While (i < 60)
                Dim row As PdfGridRow = grid.Rows.Add
                'Add the data to the table
                Dim j As Integer = 0
                Do While (j < grid.Columns.Count)
                    row.Cells(j).Value = ("(Row "  _
                                + (i + (", column "  _
                                + (j + ")"))))
                    j = (j + 1)
                Loop

                i = (i + 1)
            Loop

            'draw grid on the pdf page
            Dim pdfLayoutResult As PdfLayoutResult = grid.Draw(page, New PointF(0, 20))
            Dim y As Single = (pdfLayoutResult.Bounds.Y + pdfLayoutResult.Bounds.Height)
            Dim currentPage As PdfPageBase = pdfLayoutResult.Page
            'Save the doucment to file
            doc.SaveToFile("PDFGrid.pdf")
        End Sub
    End Class
End Namespace
Effective screenshot of repeating the table's header row:
In the earlier tutorial, we have given a brief introduction on how to insert Textbox in Word and this article will demonstrate how to position the text vertically in a text box using Spire.Doc for .NET.
using Spire.Doc;
using Spire.Doc.Documents;
using Spire.Doc.Fields;
using System;

namespace WordTextbox
{
    class Program
    {
        static void Main(string[] args)
        {
            // Instantiate document object
            Document document = new Document();

            //Add a section
            Section section = document.AddSection();

            //Set the margin
            section.PageSetup.Margins.Left = 90;
            section.PageSetup.Margins.Right = 90;
            Paragraph paragraph = section.AddParagraph();

            //Add texbox 1
            TextBox textBox1 = paragraph.AppendTextBox(section.PageSetup.Margins.Left - 20, section.PageSetup.PageSize.Height + 20);

            //Fix the position of textbox
            textBox1.Format.HorizontalOrigin = HorizontalOrigin.Page;
            textBox1.Format.HorizontalPosition = 0;
            textBox1.Format.VerticalPosition = -10f;
            textBox1.Format.VerticalOrigin = VerticalOrigin.Page;

            //Set the text vertically
            textBox1.Format.TextAnchor = ShapeVerticalAlignment.Center;
            textBox1.Format.LayoutFlowAlt = TextDirection.LeftToRight;

            //Add text and set the font
            Paragraph textboxPara1 = textBox1.Body.AddParagraph();
            TextRange txtrg = textboxPara1.AppendText("Name_______Number_________Class__________");
            txtrg.CharacterFormat.FontName = "Arial";
            txtrg.CharacterFormat.FontSize = 10;
            txtrg.CharacterFormat.TextColor = System.Drawing.Color.Black;
            textboxPara1.Format.HorizontalAlignment = HorizontalAlignment.Center;

            //Save the document
            document.SaveToFile("Result.docx");

        }
    }
}
Namespace WordTextbox

    Class Program

        Private Shared Sub Main(ByVal args() As String)
            Dim document As Document = New Document
            Dim section As Section = document.AddSection
            section.PageSetup.Margins.Left = 90
            section.PageSetup.Margins.Right = 90
            Dim paragraph As Paragraph = section.AddParagraph
            Dim textBox1 As TextBox = paragraph.AppendTextBox((section.PageSetup.Margins.Left - 20), (section.PageSetup.PageSize.Height + 20))
            textBox1.Format.HorizontalOrigin = HorizontalOrigin.Page
            textBox1.Format.HorizontalPosition = 0
            textBox1.Format.VerticalPosition = -10!
            textBox1.Format.VerticalOrigin = VerticalOrigin.Page
            textBox1.Format.TextAnchor = ShapeVerticalAlignment.Center
            textBox1.Format.LayoutFlowAlt = TextDirection.LeftToRight
            Dim textboxPara1 As Paragraph = textBox1.Body.AddParagraph
            Dim txtrg As TextRange = textboxPara1.AppendText("Name_______Number_________Class__________")
            txtrg.CharacterFormat.FontName= "Arial"
            txtrg.CharacterFormat.FontSize = 10
            txtrg.CharacterFormat.TextColor = System.Drawing.Color.Black
            textboxPara1.Format.HorizontalAlignment = HorizontalAlignment.Center
            document.SaveToFile("Result.docx")
        End Sub
    End Class
End Namespace
Output

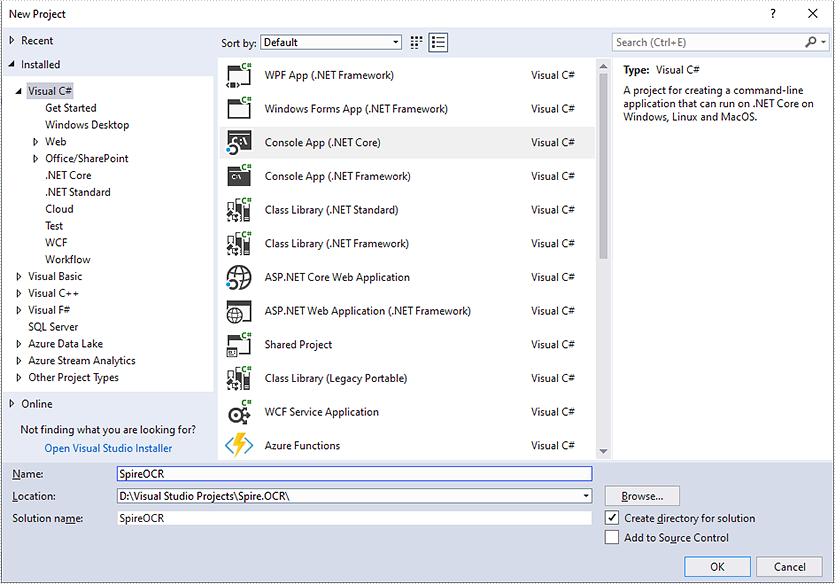
This article demonstrates the steps to use Spire.OCR for .NET in .NET Core applications.
Step 1: Create a .NET Core project in Visual Studio.
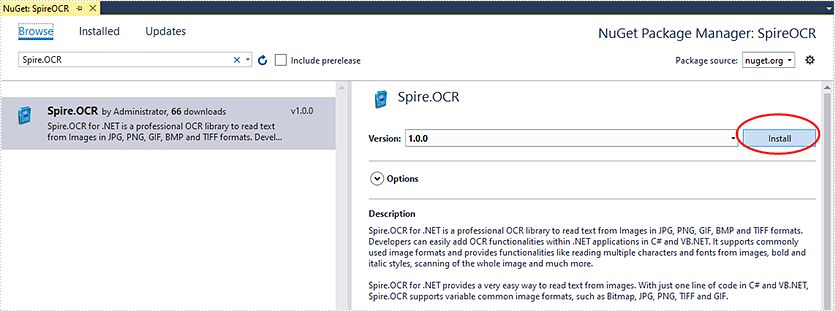
Step 2: Add reference to Spire.OCR for .NET DLLs in your project.
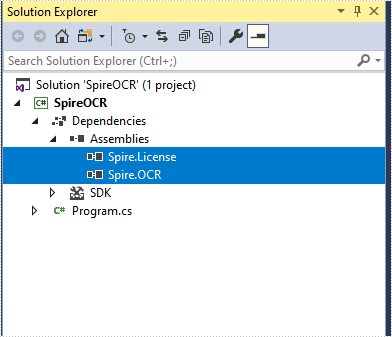
You can add reference to Spire.OCR for .NET DLLs through one of the following two ways:
1. Install Spire.OCR for .NET through NuGet using NuGet Package Manager (recommended):
- In Solution Explorer, right-click the project or "Dependencies" and select "Manage NuGet Packages".
- Click "Browse" tab and search Spire.OCR.
- Install Spire.OCR.
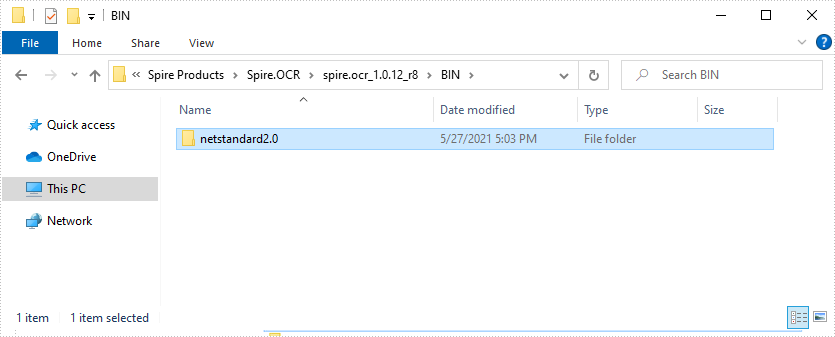
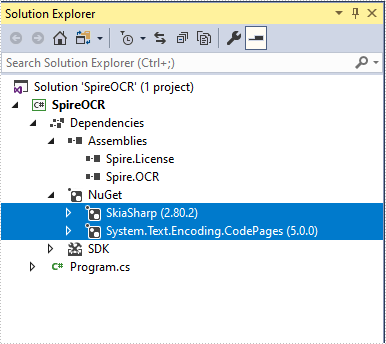
2. Manually add reference to Spire.OCR for .NET DLLs.
- Download Spire.OCR for .NET package from the following link, unzip it, you will get the DLLs from the "netstandard2.0" folder.
- Right-click the project or "Dependencies" – select "Add Reference" – click "Browse" – select all DLLs under "netstandard2.0" folder – click "Add".
- Install the other two packages: SkiaSharp and System.Text.Encoding.CodePages in your project via the NuGet Package Manager.
Right-click the project or "Dependencies" – select "Manage NuGet Packages" – click "Browse" – type the package name – select the package from the search results – click "Install".
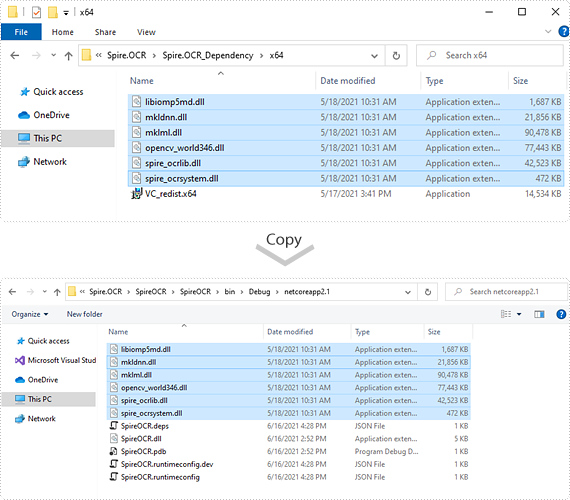
Step 3: Copy dependency DLLs to running directory of your project.
If you install Spire.OCR from NuGet and your project's target framework is .NET Core 3.0 or above, please build the project, then copy the 6 DLLs from bin\Debug\netcoreapp3.0\runtimes\win-x64\native folder to the running directory such as bin\Debug\netcoreapp3.0 or C:\Windows\System32 .

If your project's target framework is below .NET Core 3.0 or you download Spire.OCR from our website, please copy the 6 DLLs from Spire.OCR\Spire.OCR_Dependency\x64 folder to the running directory such as bin\Debug\netcoreapp2.1 or C:\Windows\System32.
Step 4: Now you have successfully included Spire.OCR in your project. You can refer the following code example to scan images using Spire.OCR.
- C#
using Spire.OCR;
using System.IO;

namespace SpireOCR
{
    class Program
    {
        static void Main(string[] args)
        {
            OcrScanner scanner = new OcrScanner();
            scanner.Scan("image.png");
            File.WriteAllText("output.txt", scanner.Text.ToString());
        }
    }
}
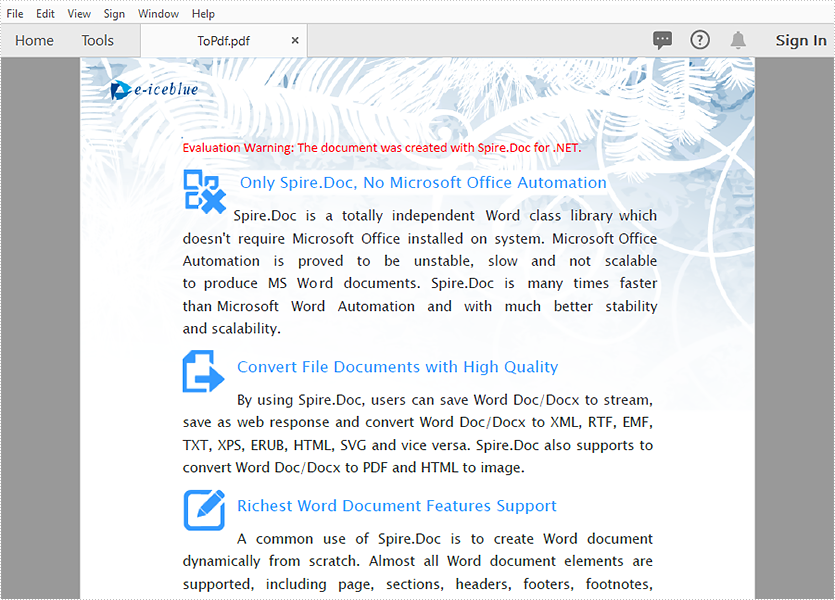
It is possible to perform Word to PDF conversion in Azure apps such as Azure Web apps and Azure Functions apps using Spire.Doc for .NET. In this article, you can see the code example to achieve this function with Spire.Doc for .NET.
The input Word document:
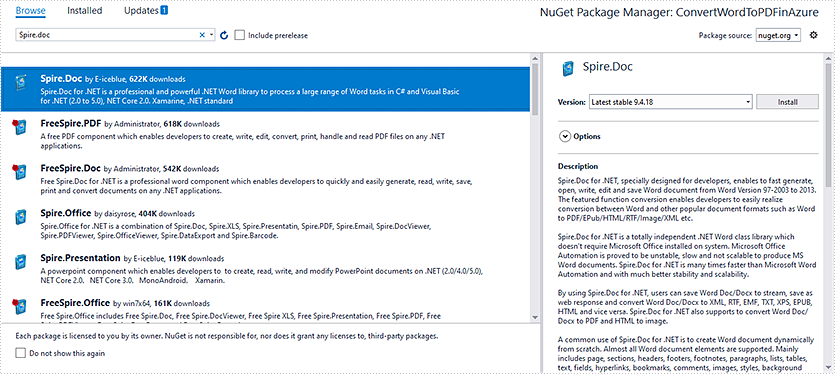
Step 1: Install Spire.Doc NuGet Package as a reference to your project from NuGet.org.
Step 2: Add the following code to convert Word to PDF.
//Create a Document instance
Document document = new Document(false);
//Load the Word document
document.LoadFromFile(@"sample.docx");

//Create a ToPdfParameterList instance
ToPdfParameterList ps = new ToPdfParameterList
{
    UsePSCoversion = true
};
//Save Word document to PDF using PS conversion
document.SaveToFile("ToPdf.pdf", ps);
Private Sub SurroundingSub()
    Dim document As Document = New Document(false)
    document.LoadFromFile("sample.docx")
    Dim ps As ToPdfParameterList = New ToPdfParameterList With {
        .UsePSCoversion = True
    }
    document.SaveToFile("ToPdf.pdf", ps)
End Sub
The Output PDF document:
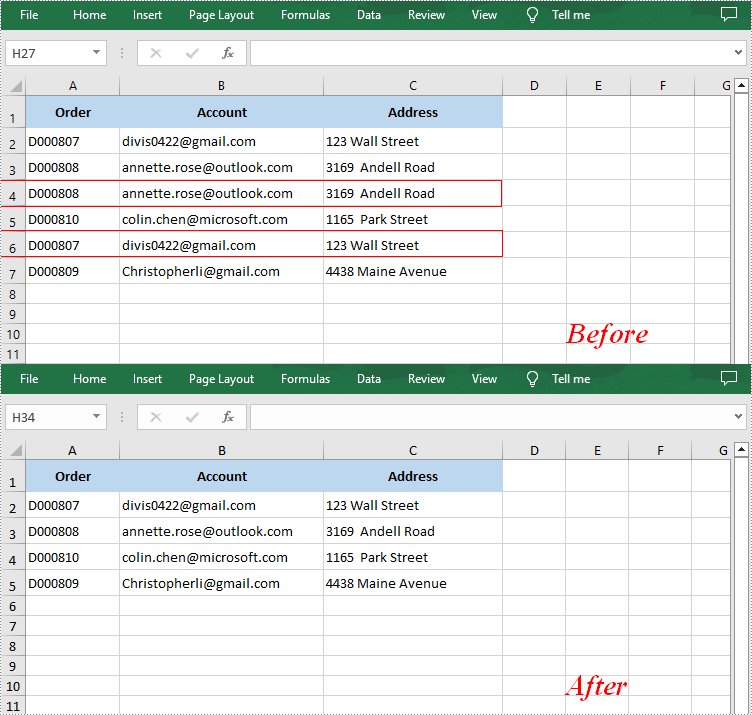
When merging datasets from different sources or copying data from other worksheets, duplicate rows may appear if the data are not properly matched. These duplicate rows may distort data analysis and calculations, leading to incorrect results. Therefore, removing duplicate rows is a frequently needed task, and this article demonstrates how to accomplish this task programmatically using Spire.XLS for .NET.
Install Spire.XLS for .NET
To begin with, you need to add the DLL files included in the Spire.XLS for .NET package as references in your .NET project. The DLL files can be either downloaded from this link or installed via NuGet.
PM> Install-Package Spire.XLS
Remove Duplicate Rows in Excel in C# and VB.NET
Removing duplicate rows manually is a very repetitive and time-consuming task. With Spire.XLS for .NET, you can identify and remove all duplicate rows at once. The following are the detailed steps.
- Create a Workbook instance.
- Load a sample Excel document using Workbook.LoadFromFile() method.
- Get a specified worksheet by its index using Workbook.Worksheets[sheetIndex] property.
- Specify the cell range where duplicate records need to be deleted using Worksheet.Range property.
- Get the rows that contain duplicate content in the specified cell range.
- Loop through all duplicated rows and delete them using Worksheet.DeleteRow() method.
- Save the result document using Workbook.SaveToFile() method.
- C#
- VB.NET
using Spire.Xls;
using System.Linq;

namespace RemoveDuplicateRows
{
    class Program
    {
        static void Main(string[] args)
        {
            //Create a Workbook instance
            Workbook workbook = new Workbook();

            //Load a sample Excel document
            workbook.LoadFromFile("Test.xlsx");

            //Get the first worksheet
            Worksheet sheet = workbook.Worksheets[0];

            //Specify the cell range where duplicate records need to be deleted
            var range = sheet.Range["A1:A" + sheet.LastRow];

            //Get the duplicate row numbers
            var duplicatedRows = range.Rows
                   .GroupBy(x => x.Columns[0].DisplayedText)
                   .Where(x => x.Count() > 1)
                   .SelectMany(x => x.Skip(1))
                   .Select(x => x.Columns[0].Row)
                   .ToList();

            //Remove the duplicate rows
            for (int i = 0; i < duplicatedRows.Count; i++)
            {
                sheet.DeleteRow(duplicatedRows[i] - i);
            }

            //Save the result document
            workbook.SaveToFile("RemoveDuplicateRows.xlsx");
        }
    }
}
Apply for a Temporary License
If you'd like to remove the evaluation message from the generated documents, or to get rid of the function limitations, please request a 30-day trial license for yourself.
C#/VB.NET: Add or Remove Digital Signatures in PowerPoint
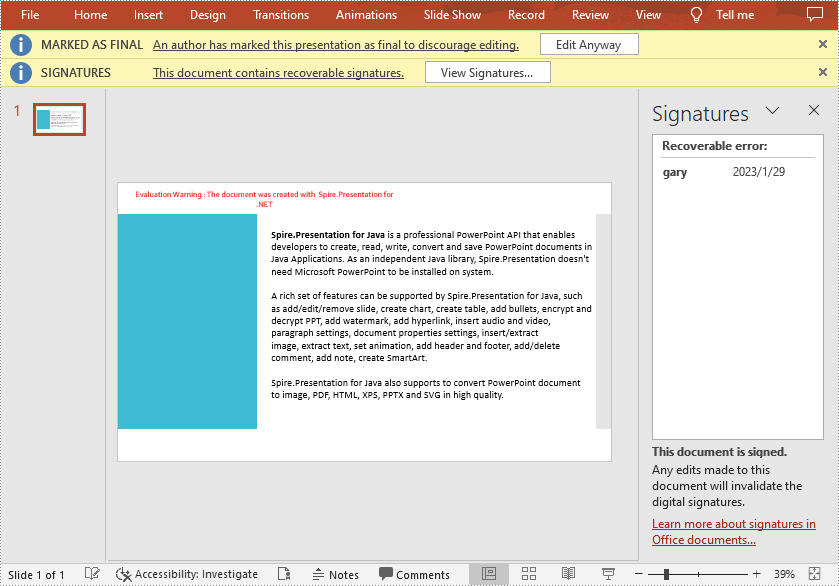
2023-02-02 07:28:00 Written by AdministratorA digital signature is a modern alternative to signing documents manually on paper with pen. It uses an advanced mathematical technique to check the authenticity and integrity of digital documents, which guarantees that the contents in a digital document comes from the signer and has not been altered since then. Sometimes PowerPoint documents that contain confidential information may require a signature. In this article, you will learn how to programmatically add or remove digital signatures in PowerPoint using Spire.Presentation for .NET.
- Add a Digital Signature to PowerPoint in C# and VB.NET
- Remove All Digital Signatures from PowerPoint in C# and VB.NET
Install Spire.Presentation for .NET
To begin with, you need to add the DLL files included in the Spire.Presentation for.NET package as references in your .NET project. The DLL files can be either downloaded from this link or installed via NuGet.
PM> Install-Package Spire.Presentation
Add a Digital Signature to PowerPoint in C# and VB.NET
To add a digital signature, you'll need to have a valid signature certificate first. Then you can digitally sign a PowerPoint document with the certificate using Presentation.AddDigitalSignature (X509Certificate2 certificate, string comments, DateTime signTime) method. The detailed steps are as follows.
- Create a Presentation instance.
- Load a sample PowerPoint document using Presentation.LoadFromFile() method.
- Initializes an instance of X509Certificate2 class with the certificate file name and password.
- Add a digital signature to the PowerPoint document using Presentation.AddDigitalSignature (X509Certificate2 certificate, string comments, DateTime signTime) method.
- Save result document using Presentation.SaveToFile() method.
- C#
- VB.NET
using Spire.Presentation;
using System;

namespace AddDigitalSignature
{
    class Program
    {
        static void Main(string[] args)
        {
            //Create a Presentation instance
            Presentation ppt = new Presentation();

	    //Load a PowerPoint document
            ppt.LoadFromFile("Input.pptx");

            //Add a digital signature
            ppt.AddDigitalSignature("gary.pfx", "e-iceblue", "test", DateTime.Now);

            //Save the result document
            ppt.SaveToFile("AddDigitalSignature_result.pptx", FileFormat.Pptx2010);
            System.Diagnostics.Process.Start("AddDigitalSignature_result.pptx");

            //Dispose
            ppt.Dispose();
        }
    }
}
Remove All Digital Signatures from PowerPoint in C# and VB.NET
At some point you may need to remove the digital signatures from a PowerPoint document. Spire.Presentation for .NET provides the Presentation.RemoveAllDigitalSignatures() method to remove all digital signatures at once. The detailed steps are as follows:
- Create a Presentation instance.
- Load a sample PowerPoint document using Presentation.LoadFromFile() method.
- Determine if the document contains digital signatures using Presentation.IsDigitallySigned property.
- Remove all digital signatures from the document using Presentation.RemoveAllDigitalSignatures() method.
- Save the result document using Presentation.SaveToFile() method.
- C#
- VB.NET
using Spire.Presentation;

namespace RemoveDigitalSignature
{
    class Program
    {
        static void Main(string[] args)
        {
            //Create a Presentation instance
            Presentation ppt = new Presentation();

            //Load a PowerPoint document
            ppt.LoadFromFile("AddDigitalSignature.pptx");

            //Detect if the document is digitally signed
            if (ppt.IsDigitallySigned == true)
            {
                //Remove all digital signatures
                ppt.RemoveAllDigitalSignatures();
            }

            //Save the result document
            ppt.SaveToFile("RemoveDigitalSignature.pptx", FileFormat.Pptx2013);

        }
    }
}
Apply for a Temporary License
If you'd like to remove the evaluation message from the generated documents, or to get rid of the function limitations, please request a 30-day trial license for yourself.
This article shows you how to download a PDF document from an URL using Spire.PDF with C# and VB.NET.
using System.IO;
using System.Net;
using Spire.Pdf;
namespace DownloadPdfFromUrl
{
class Program
{
static void Main(string[] args)
{
//Create a PdfDocument object
PdfDocument doc = new PdfDocument();
//Create a WebClient object
WebClient webClient = new WebClient();
//Download data from URL and save as memory stream
using (MemoryStream ms = new MemoryStream(webClient.DownloadData("https://www.e-iceblue.com/article/toDownload.pdf")))
{
//Load the stream
doc.LoadFromStream(ms);
}
//Save to PDF file
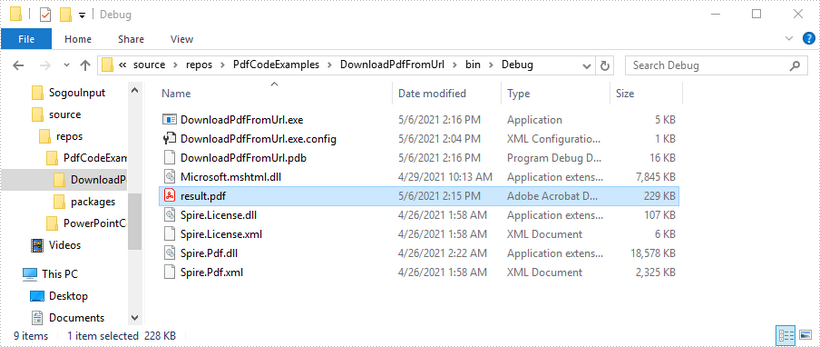
doc.SaveToFile("result.pdf", FileFormat.PDF);
}
}
}
Imports System.IO
Imports System.Net
Imports Spire.Pdf

Namespace DownloadPdfFromUrl
    Class Program
        Shared  Sub Main(ByVal args() As String)
            'Create a PdfDocument object
            Dim doc As PdfDocument = New PdfDocument()

            'Create a WebClient object
            Dim webClient As WebClient = New WebClient()

           'Download data from URL and save as memory stream
           Dim pdfData As Byte() = webClient.DownloadData(""https://www.e-iceblue.com/article/toDownload.pdf"")
           Using ms As New MemoryStream(pdfData)
           'Load the stream
           doc.LoadFromStream(ms)
 End Using

 'Save to PDF file
 doc.SaveToFile(""result.pdf"", FileFormat.PDF)
        End Sub
    End Class
End Namespace
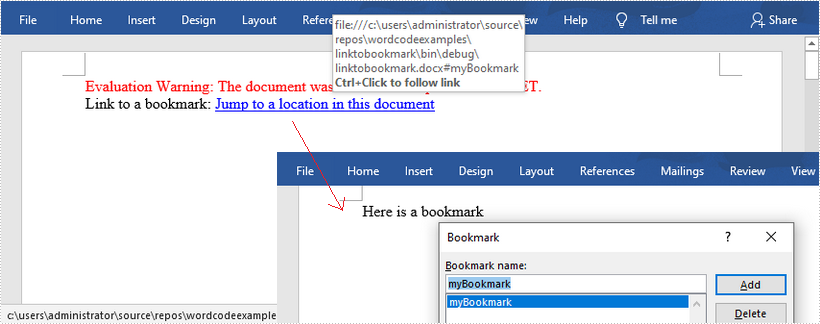
This article shows you how to create a hyperlink to a bookmark within the same Word document by using Spire.Doc with C# and VB.NET.
using Spire.Doc;
using Spire.Doc.Documents;

namespace LinkToBookmark
{
    class Program
    {
        static void Main(string[] args)
        {
            //Create a Document object
            Document doc = new Document();

            //Add two sections
            Section section1 = doc.AddSection();
            Section section2 = doc.AddSection();

            //Insert a paragraph in section 2 and add a bookmark named "myBookmark" to it
            Paragraph bookmarkParagrapg = section2.AddParagraph();
            bookmarkParagrapg.AppendText("Here is a bookmark");
            BookmarkStart start = bookmarkParagrapg.AppendBookmarkStart("myBookmark");
            bookmarkParagrapg.Items.Insert(0, start);
            bookmarkParagrapg.AppendBookmarkEnd("myBookmark");

            //Link to the bookmark
            Paragraph paragraph = section1.AddParagraph();
            paragraph.AppendText("Link to a bookmark: ");
            paragraph.AppendHyperlink("myBookmark", "Jump to a location in this document", HyperlinkType.Bookmark);

            //Save to file
            doc.SaveToFile("LinkToBookmark.docx", FileFormat.Docx2013);
        }
    }
}
Imports Spire.Doc
Imports Spire.Doc.Documents

Namespace LinkToBookmark
    Class Program
        Shared  Sub Main(ByVal args() As String)
            'Create a Document object
            Document doc = New Document()

            'Add two sections
            Dim section1 As Section = doc.AddSection()
            Dim section2 As Section = doc.AddSection()

            'Insert a paragraph in section 2 and add a bookmark named "myBookmark" to it
            Dim bookmarkParagrapg As Paragraph = section2.AddParagraph()
            bookmarkParagrapg.AppendText("Here is a bookmark")
            Dim start As BookmarkStart = bookmarkParagrapg.AppendBookmarkStart("myBookmark")
            bookmarkParagrapg.Items.Insert(0, start)
            bookmarkParagrapg.AppendBookmarkEnd("myBookmark")

            'Link to the bookmark
            Dim paragraph As Paragraph = section1.AddParagraph()
            paragraph.AppendText("Link to a bookmark: ")
            paragraph.AppendHyperlink("myBookmark", "Jump to a location in this document", HyperlinkType.Bookmark)

            'Save to file
            doc.SaveToFile("LinkToBookmark.docx", FileFormat.Docx2013)
        End Sub
    End Class
End Namespace