
.NET (1327)
Children categories
Cross-Platform PDF and Office Printing in C# with Spire.Printing
2026-01-14 09:48:52 Written by jie zou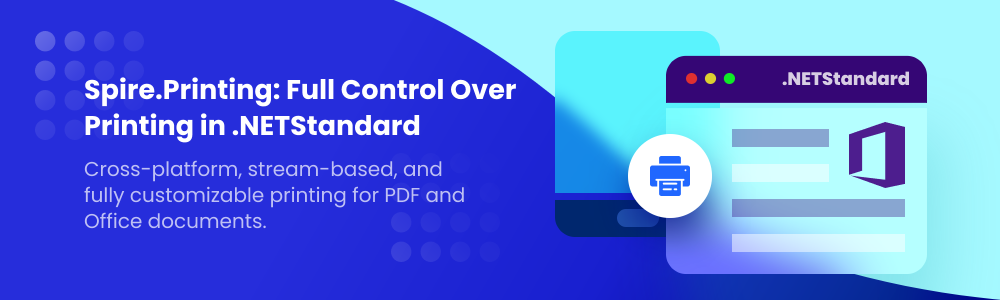
Printing documents is a common requirement in desktop applications, background services, and server-side systems. In practical development and business scenarios, developers often need to print files silently, route jobs to specific printers, or control printing behavior programmatically—without relying on user interaction.
This guide demonstrates how to use Spire.Printing to implement flexible, automated printing of PDF and Office documents in C# across Windows, Linux, and macOS. You will learn how to handle printable streams, select printers programmatically, and apply advanced print settings, enabling reliable cross-platform printing in modern .NET applications.
Table of Contents
- Installing Spire.Printing
- The Core Printing Workflow and Printing Settings
- Printing Word, Excel, PowerPoint, PDF, and Other Documents
- Advanced Print Settings and Operations
- Licensing Notes
Installing Spire.Printing
Spire.Printing is distributed as a NuGet package and can be added to your project in the standard way:
Install-Package Spire.Printing
Platform Compatibility
Spire.Printing is a cross-platform printing library for modern .NET applications. When used together with Spire.Office libraries (with .NET Standard support), it enables printing Word, Excel, PowerPoint, PDF, and other document formats across Windows, Linux, and macOS—without relying on MS Office Interop.
It supports recent .NET runtimes, including .NET 5.0, .NET 6.0, .NET 9.0, and .NET 10.0, and runs on the following platforms:
- Windows (x64, x86)
- Linux (x64, ARM)
- macOS (x64, ARM)
The Core Printing Workflow and Printing Settings
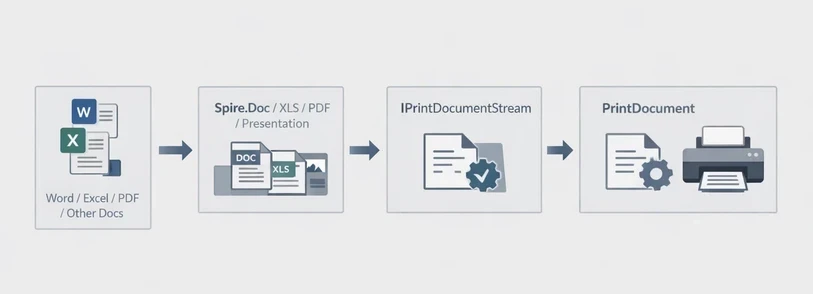
Spire.Printing is designed to send print-ready document streams directly to the printer. On Windows, the printable stream is typically an XPS document, while on Linux and macOS it is a PDF document. It is commonly used with Spire.Office for .NET to implement the printing workflow in .NET applications.
The general process is:
- Create an IPrintDocumentStream instance from the document.
- Create a PrintDocument instance.
- Configure print settings through the PrintSettings property.
- Send the job to the printer.
Code Example
using Spire.Printing;

IPrintDocumentStream documentStream;
if (System.Runtime.InteropServices.RuntimeInformation.IsOSPlatform(System.Runtime.InteropServices.OSPlatform.Windows))
{
    // Windows
    documentStream = new XpsPrintDocument("test.xps");
}
else
{
    // Non-Windows(Linux, MacOS)
    documentStream = new PdfPrintDocument("test.pdf");
}
//new PrintDocument
PrintDocument printDocument = new PrintDocument(documentStream);

//Set paper size
printDocument.PrintSettings.PaperSize = PaperSize.A4;

//Set the number of copies to be printed
printDocument.PrintSettings.Copies = 2;

//Select a page range
printDocument.PrintSettings.SelectPageRange(2, 5);

//Duplex Printing
if (printDocument.PrintSettings.CanDuplex)
{
    //Print in duplex
    printDocument.PrintSettings.Duplex = Duplex.Vertical;
}

//Collated vs. uncollated output:
printDocument.PrintSettings.Collate = true;

//Printing a file to a specific printer, if not set, print to the default printer
printDocument.PrintSettings.PrinterName = "Your Printer Name";

// Print to the specified file
printDocument.PrintSettings.PrintToFile("toXps.xps");

//Record printing logs
printDocument.PrintSettings.PrintLogger = new DefaultPrintLogger("log.txt");

//Print
printDocument.Print();

//Dispose
printDocument.Dispose();
This stream-based model keeps the printing workflow consistent across platforms, while allowing all printer behavior to be customized through the PrintSettings API.
Printing Word, Excel, PowerPoint, PDF, and Other Documents
To print Word, Excel, PowerPoint, PDF, and other document types, Spire.Printing is used together with the corresponding Spire.Office document libraries—Spire.Doc, Spire.XLS, Spire.Presentation, and Spire.PDF (especially the .NET Standard version)—to load the source files, save them into IPrintDocumentStream, and send them to the printer.
Printing Word Documents in C#
Library Installation
Install-Package Spire.Printing
Install-Package Spire.Docfor.NETStandard
Code Example
using Spire.Doc;
using Spire.Printing;

//Check the system
bool isWindows = System.Runtime.InteropServices.RuntimeInformation.IsOSPlatform(System.Runtime.InteropServices.OSPlatform.Windows);

using (Document document = new Document())
{
    //Use Spire.Doc to save documents as. xps or. pdf document streams
    document.LoadFromFile(@"test.docx");
    Spire.Doc.FileFormat fileFormat = !isWindows ? Spire.Doc.FileFormat.PDF : Spire.Doc.FileFormat.XPS;
    MemoryStream stream = new MemoryStream();
    document.SaveToStream(stream, fileFormat);

    //Save to IPrintDocumentStream according to the system
    IPrintDocumentStream docStream = !isWindows ? new PdfPrintDocument(stream) : new XpsPrintDocument(stream);

    //Print
    PrintDocument printDoc = new PrintDocument(docStream);
    printDoc.PrintSettings.SelectPageRange(1, 1);
    printDoc.Print();

    //Dispose
    printDoc.Dispose();
}
Printing Excel Files in C#
Library Installation
Install-Package Spire.Printing
Install-Package Spire.XLSfor.NETStandard
Code Example
using Spire.Printing;
using Spire.Xls;

//Check the system
bool isWindows = System.Runtime.InteropServices.RuntimeInformation.IsOSPlatform(System.Runtime.InteropServices.OSPlatform.Windows);
using (Workbook wb = new Workbook())
{
    //Use Spire.Xls to save documents as. xps or. pdf document streams
    wb.LoadFromFile("test.xlsx");
    Spire.Xls.FileFormat fileFormat = !isWindows ? Spire.Xls.FileFormat.PDF : Spire.Xls.FileFormat.XPS;
    MemoryStream stream = new MemoryStream();
    wb.SaveToStream(stream, fileFormat);

    //Save to IPrintDocumentStream according to the system
    IPrintDocumentStream xlsStream = !isWindows ? new PdfPrintDocument(stream) : new XpsPrintDocument(stream);

    //Print
    PrintDocument printxls = new PrintDocument(xlsStream);
    printxls.PrintSettings.SelectPageRange(1, 1);
    printxls.Print();

    //Dispose
    printxls.Dispose();
}
Printing PDF Files in C#
Library Installation
Install-Package Spire.Printing
Install-Package Spire.PDFfor.NETStandard
Code Example
using Spire.Pdf;
using Spire.Printing;

//Check the system
bool isWindows = System.Runtime.InteropServices.RuntimeInformation.IsOSPlatform(System.Runtime.InteropServices.OSPlatform.Windows);
using (PdfDocument pdfDocument = new PdfDocument())
{
    //Use Spire.PDF to save documents as. xps or. pdf document streams
    pdfDocument.LoadFromFile("test.pdf");
    Spire.Pdf.FileFormat fileFormat = !isWindows ? Spire.Pdf.FileFormat.PDF : Spire.Pdf.FileFormat.XPS;
    MemoryStream stream = new MemoryStream();
    pdfDocument.SaveToStream(stream, fileFormat);

    //Save to IPrintDocumentStream according to the system
    IPrintDocumentStream pdfStream = !isWindows ? new PdfPrintDocument(stream) : new XpsPrintDocument(stream);

    //Print
    PrintDocument printPdf = new PrintDocument(pdfStream);
    printPdf.PrintSettings.SelectPageRange(1, 1);
    printPdf.Print();

    //Dispose
    printPdf.Dispose();
}
Printing PowerPoint Presentations in C#
Library Installation
Install-Package Spire.Printing
Install-Package Spire.Presentationfor.NETStandard
Code Example
using Spire.Presentation;
using Spire.Printing;

//Check the system
bool isWindows = System.Runtime.InteropServices.RuntimeInformation.IsOSPlatform(System.Runtime.InteropServices.OSPlatform.Windows);
using (Presentation ppt = new Presentation())
{
    //Use Spire.Presentation to save documents as. xps or. pdf document streams
    ppt.LoadFromFile("test.pptx");
    Spire.Presentation.FileFormat fileFormat = !isWindows ? Spire.Presentation.FileFormat.PDF : Spire.Presentation.FileFormat.XPS;
    MemoryStream stream = new MemoryStream();
    ppt.SaveToFile(stream, fileFormat);

    //Save to IPrintDocumentStream according to the system
    IPrintDocumentStream pptStream = !isWindows ? new PdfPrintDocument(stream) : new XpsPrintDocument(stream);

    //Print
    PrintDocument printPpt = new PrintDocument(pptStream);
    printPpt.PrintSettings.SelectPageRange(1, 1);
    printPpt.Print();

    //Dispose
    printPpt.Dispose();
}
Advanced Print Settings and Operations
For automated and cross-platform printing scenarios, Spire.Printing provides additional control over printer selection, paper handling, and page output through the PrintSettings API. These options are commonly used in unattended services and batch-printing workflows.
Discovering and Selecting a Printer
Instead of using the system default, you can enumerate available printers and route the print job to a specific device:
IEnumerable<string> printers = printDocument.PrintSettings.Printers;

// Select the first printer or choose based on your logic
string selectedPrinterName = printers.First();
printDocument.PrintSettings.PrinterName = selectedPrinterName;
This is useful when multiple printers are installed or when deterministic printer routing is required.
Choosing a Supported Paper Size
To ensure compatibility with the selected printer, you can query and apply one of its supported paper sizes:
IEnumerable<PaperSize> paperSizes = printDocument.PrintSettings.PaperSizes;

// Select the first available size or apply custom logic
PaperSize selectedPaperSize = paperSizes.First();
printDocument.PrintSettings.PaperSize = selectedPaperSize;
This guarantees the selected paper size is compatible with the target printer.
Selecting Specific Pages
You can restrict printing to certain pages, either as a continuous range or a specific set:
// Print pages 2 to 5
printDocument.PrintSettings.SelectPageRange(2, 5);

// Print specific pages: 1, 3, 5, 7
int[] pages = { 1, 3, 5, 7 };
printDocument.PrintSettings.SelectSomePages(pages);
Only one of these methods should be used per print job.
These advanced operations allow precise control over print output, making it suitable for automated workflows, batch processing, or scenarios where consistent print settings are required across multiple documents and printers.
Licensing Notes
Without a valid license, Spire.Printing prints only the first 10 pages. This limitation can be removed by applying a license for Spire.Office for .NET or the corresponding document libraries, such as Spire.Doc, Spire.XLS, Spire.PDF, or Spire.Presentation.
Spire.Pdf.License.LicenseProvider.SetLicenseKey(string key);
Spire.Doc.License.LicenseProvider.SetLicenseKey(string key);
Spire.Xls.License.LicenseProvider.SetLicenseKey(string key);
Spire.Presentation.License.LicenseProvider.SetLicenseKey(string key);
For details on how to apply a license key, see the licensing guide.
Conclusion
Spire.Printing provides a flexible and reliable way to implement professional printing in C# applications. It supports stream-based printing of PDF, Word, Excel, and PowerPoint documents across Windows, Linux, and macOS, and works seamlessly with Spire.Office for .NET libraries—especially for .NET Standard—to handle Office and PDF files in modern .NET applications.
With the core printing workflow understood, developers can easily apply advanced print settings, such as selecting printers, paper sizes, or specific pages, to meet real-world business requirements and automated workflows.
For evaluation or short-term testing scenarios, a temporary license can be requested to remove trial limitations during development.
In many web applications, PDF files are more than just downloadable documents—they are often the final output of business processes. Common examples include invoices, financial reports, contracts, certificates, and data exports that must preserve layout and formatting across devices.
For developers working with ASP.NET, the ability to create PDF files directly on the server side is a frequent requirement. Whether you are building a traditional ASP.NET MVC application or a modern ASP.NET Core service, generating PDFs programmatically allows you to deliver consistent, print-ready documents to end users.
However, implementing PDF generation in ASP.NET is not always straightforward. Developers often encounter challenges such as:
- Managing document layout and pagination
- Handling fonts and international text
- Returning PDF files efficiently to the browser
- Supporting both ASP.NET Framework and ASP.NET Core
This article focuses on practical solutions for creating PDF documents in ASP.NET and ASP.NET Core scenarios using Spire.PDF for .NET. You will learn how to generate PDFs using C# in:
- ASP.NET Framework applications
- ASP.NET Core applications
- MVC and Web API–based projects
By the end of this guide, you will have a clear understanding of how ASP.NET PDF generation works and how to apply it in real-world projects.
Quick Navigation
- Overview: Common Approaches to Create PDF in ASP.NET
- Environment Setup for ASP.NET PDF Generation
- How to Create PDF in ASP.NET (Framework) Using C#
- Generate PDF in ASP.NET Core Applications
- Advanced Scenarios for ASP.NET PDF Generation
- Choosing an ASP.NET PDF Library
- Why Use Spire.PDF for ASP.NET PDF Creation
- FAQ: Frequently Asked Questions
1. Overview: Creating PDF Directly in ASP.NET Using C#
In ASP.NET and ASP.NET Core applications, PDF files are often generated as the final output of server-side processes, such as reports, invoices, and data exports.
One of the most reliable ways to achieve this is creating PDF documents directly through C# code. In this approach, the application controls:
- Page creation and pagination
- Text formatting and layout
- File output and response handling
This tutorial focuses on this code-driven PDF generation approach, which works consistently across ASP.NET Framework and ASP.NET Core and is well suited for server-side scenarios where predictable output and layout control are required.
2. Environment Setup for ASP.NET PDF Generation
Before you start generating PDFs in ASP.NET or ASP.NET Core applications, it is important to ensure that your development environment is properly configured. This will help you avoid common issues and get your projects running smoothly.
2.1. .NET SDK Requirements
- ASP.NET Framework: Ensure your project targets .NET Framework 4.6.1 or higher.
- ASP.NET Core: Install .NET 6 or .NET 7 SDK, depending on your project target.
- Verify your installed SDK version using:
dotnet --version
2.2. Installing the Spire.PDF for .NET Library
To generate PDFs, you need a PDF library compatible with your project. One widely used option is Spire.PDF for .NET, which supports both ASP.NET Framework and ASP.NET Core.
- Install via NuGet Package Manager in Visual Studio:
Install-Package Spire.PDF
You can also download Spire.PDF for .NET and install it manually.
- Verify the installation by checking that the Spire.Pdf.dll is referenced in your project.
2.3. Project Template Considerations
- ASP.NET Framework: Use an MVC or Web Forms project and ensure required assemblies (e.g., System.Web) are referenced.
- ASP.NET Core: Use an MVC or API project and configure any required services for the PDF library.
Ensure the environment allows writing files if needed and supports necessary fonts for your documents.
3. How to Create PDF in ASP.NET (Framework) Using C#
This section demonstrates how to create PDF files in ASP.NET Framework applications using C#. These examples apply to classic ASP.NET Web Forms and ASP.NET MVC projects.
3.1 Create a Simple PDF File in ASP.NET
The basic workflow for creating PDF in ASP.NET is:
- Create a PdfDocument instance.
- Add pages and content.
- Save the document using PdfDocument.SaveToFile() method, or return it to the client.
Below is a simple C# example that creates a PDF file and saves it on the server.
using Spire.Pdf;
using Spire.Pdf.Graphics;
using System.Drawing;

PdfDocument document = new PdfDocument();
PdfPageBase page = document.Pages.Add();

PdfFont font = new PdfFont(PdfFontFamily.Helvetica, 12f);
page.Canvas.DrawString(
    "Hello, this PDF was generated in ASP.NET using C#.",
    font,
    PdfBrushes.Black,
    new PointF(40, 40)
);

document.SaveToFile(Server.MapPath("~/Output/Sample.pdf"));
document.Close();
This example demonstrates the core idea of PDF generation in ASP.NET using C#: everything is created programmatically, giving you full control over content and layout.
In real applications, this approach is commonly used to generate:
- Confirmation documents
- Server-side reports
- System-generated notices
If you also want to include images in your PDFs, you can check out our guide on inserting images into PDF files using C# for a step-by-step example.
3.2 Generate PDF in ASP.NET MVC
In ASP.NET MVC projects, PDFs are usually generated inside controller actions and returned directly to the browser. This allows users to download or preview the document without saving it permanently on the server.
A typical PDF generation in MVC implementation looks like this:
using Spire.Pdf;
using Spire.Pdf.Graphics;
using System.Drawing;
using System.IO;
using System.Web.Mvc;

namespace WebApplication.Controllers
{
    public class DefaultController : Controller
    {
        public ActionResult GeneratePdf()
        {
            // Create a PDF document
            using (PdfDocument document = new PdfDocument())
            {
                PdfPageBase page = document.Pages.Add();

                PdfFont font = new PdfFont(PdfFontFamily.Helvetica, 12f);
                page.Canvas.DrawString(
                    "PDF generated in ASP.NET MVC.",
                    font,
                    PdfBrushes.Black,
                    new PointF(40, 40)
                );

                // Save the document to stream and return to browser
                using (MemoryStream stream = new MemoryStream())
                {
                    document.SaveToStream(stream);

                    return File(
                        stream.ToArray(),
                        "application/pdf",
                        "MvcSample.pdf"
                    );
                }
            }
        }
    }
}
Below is the preview of the generated PDF document:

Practical Notes for MVC Projects
- Returning a
FileResultis the most common pattern - Memory streams help avoid unnecessary disk I/O
- This approach works well for on-demand PDF generation triggered by user actions
With this method, you can seamlessly integrate ASP.NET PDF generation into existing MVC workflows such as exporting reports or generating invoices.
Tip: If you need to present PDFs to users in a ASP.NET application, you can use Spire.PDFViewer for ASP.NET, a component that allows you to display PDF documents in a web environment.
4. Generate PDF in ASP.NET Core Applications
With the rise of cross-platform development and cloud-native architectures, ASP.NET Core has become the default choice for many new projects. Although the core idea of PDF generation remains similar, there are several implementation details that differ from the traditional ASP.NET Framework.
This section explains how to generate PDF in ASP.NET Core using C#, covering both MVC-style web applications and Web API–based services.
4.1 Generate PDF in ASP.NET Core Web Application
In an ASP.NET Core web application, PDF files are commonly generated inside controller actions and returned as downloadable files. Unlike ASP.NET Framework, ASP.NET Core does not rely on System.Web, so file handling is typically done using streams.
Below is a simple example demonstrating ASP.NET Core PDF generation in a controller.
Create a new ASP.NET Core Web App (Model-View-Controller) project in your IDE and add a new controller named PdfController with an action named CreatePdf() in the Controllers folder.
using Microsoft.AspNetCore.Mvc;
using Spire.Pdf;
using Spire.Pdf.Graphics;
using System.Drawing;
namespace CoreWebApplication.Controllers
{
public class PdfController : Controller
{
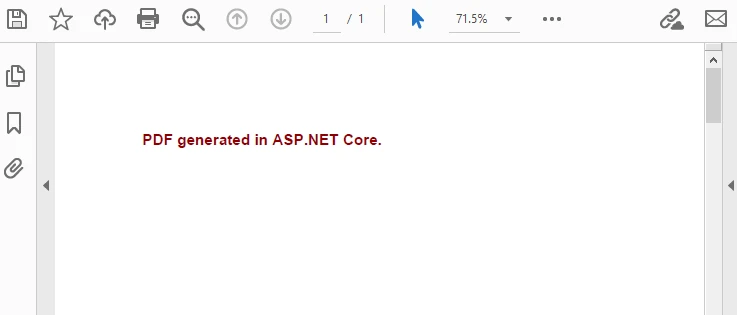
public IActionResult CreatePdf()
{
using (PdfDocument document = new PdfDocument())
{
PdfPageBase page = document.Pages.Add();
PdfFont font = new PdfFont(PdfFontFamily.Helvetica, 14f, PdfFontStyle.Bold);
page.Canvas.DrawString(
"PDF generated in ASP.NET Core.",
font,
PdfBrushes.DarkRed,
new PointF(40, 40)
);
using (MemoryStream stream = new MemoryStream())
{
document.SaveToStream(stream);
return File(
stream.ToArray(),
"application/pdf",
"AspNetCoreSample.pdf"
);
}
}
}
}
}
Below is the preview of the generated PDF document:
Key Differences from ASP.NET Framework
- No dependency on Server.MapPath
- Stream-based file handling is the recommended pattern
- Works consistently across Windows, Linux, and Docker environments
This approach is suitable for dashboards, admin panels, and internal systems where users trigger ASP.NET Core PDF generation directly from the UI.
If you want to create structured tables in your PDFs, you can check out our guide on generating tables in PDF using ASP.NET Core and C# for a step-by-step example.
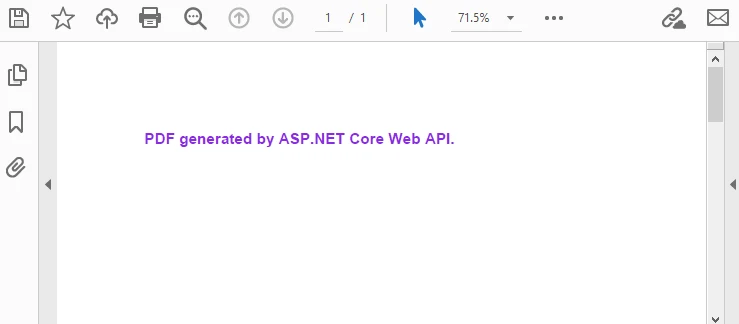
4.2 Generate PDF in ASP.NET Core Web API
For front-end and back-end separated architectures, PDF generation is often implemented in ASP.NET Core Web API projects. In this scenario, the API endpoint returns a PDF file as a binary response, which can be consumed by web clients, mobile apps, or other services.
A typical ASP.NET PDF generation in Web API example looks like this:
Add this code inside a controller named PdfApiController in the Controllers folder.
using Microsoft.AspNetCore.Mvc;
using Spire.Pdf;
using Spire.Pdf.Graphics;
using System.Drawing;

[ApiController]
[Route("api/pdf")]
public class PdfApiController : ControllerBase
{
    [HttpGet("generate")]
    public IActionResult GeneratePdf()
    {
        PdfDocument document = new PdfDocument();
        PdfPageBase page = document.Pages.Add();

        PdfFont font = new PdfFont(PdfFontFamily.Helvetica, 14f, PdfFontStyle.Bold);
        page.Canvas.DrawString(
            "PDF generated by ASP.NET Core Web API.",
            font,
            PdfBrushes.BlueViolet,
            new PointF(40, 40)
        );

        using (MemoryStream stream = new MemoryStream())
        {
            document.SaveToStream(stream);
            document.Close();

            return File(
                stream.ToArray(),
                "application/pdf",
                "ApiGenerated.pdf"
            );
        }
    }
}
Below is the preview of the generated PDF document:
Practical Considerations for Web API
- Always set the correct
Content-Type(application/pdf) - Use streams to avoid unnecessary disk access
- Suitable for microservices and distributed systems
This pattern is widely used when ASP.NET PDF generation is part of an automated workflow rather than a user-driven action.
5. Advanced Scenarios for ASP.NET PDF Generation
Basic examples are useful for learning, but real-world applications often require more advanced PDF features. This section focuses on scenarios that commonly appear in production systems and demonstrate the practical value of server-side PDF generation.
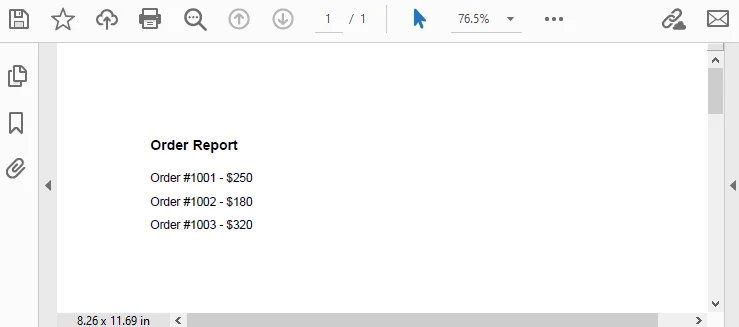
5.1 Export Dynamic Data to PDF
One of the most frequent use cases is exporting dynamic data—such as database query results—into a structured PDF document.
Typical scenarios include:
- Sales reports
- Order summaries
- Financial statements
The example below demonstrates generating a simple table-like layout using dynamic data.
PdfDocument document = new PdfDocument();
PdfPageBase page = document.Pages.Add();

PdfFont headerFont = new PdfFont(PdfFontFamily.Helvetica, 12f, PdfFontStyle.Bold);
PdfFont bodyFont = new PdfFont(PdfFontFamily.Helvetica, 10f);

float y = 40;

// Header
page.Canvas.DrawString("Order Report", headerFont, PdfBrushes.Black, 40, y);
y += 30;

// Sample dynamic data
string[] orders = { "Order #1001 - $250", "Order #1002 - $180", "Order #1003 - $320" };

foreach (string order in orders)
{
    page.Canvas.DrawString(order, bodyFont, PdfBrushes.Black, 40, y);
    y += 20;
}

document.SaveToFile("OrderReport.pdf");
document.Close();
Output Preview:
This approach allows you to:
- Populate PDFs from databases or APIs
- Generate documents dynamically per request
- Maintain consistent formatting regardless of data size
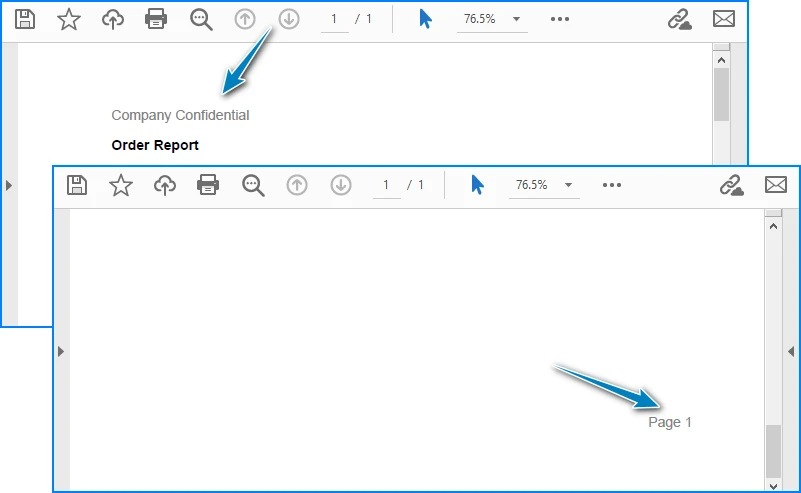
5.2 Styling and Layout Control in Generated PDFs
Another important aspect of ASP.NET PDF generation is layout control. In many business documents, appearance matters as much as content.
Common layout requirements include:
- Page margins and alignment
- Headers and footers
- Multi-page content handling
For example, adding a simple header and footer:
PdfPageBase page = document.Pages.Add();

PdfFont font = new PdfFont(PdfFontFamily.Helvetica, 12f);

page.Canvas.DrawString(
    "Company Confidential",
    font,
    PdfBrushes.Gray,
    new PointF(40, 15)
);

page.Canvas.DrawString(
    "Page 1",
    font,
    PdfBrushes.Gray,
    new PointF(page.Canvas.ClientSize.Width - 60, page.Canvas.ClientSize.Height - 30)
);
Output Preview:
When working with multi-page documents, it is important to:
- Track vertical position (
ycoordinate) - Add new pages when content exceeds page height
- Keep layout logic consistent across pages
These considerations help ensure that generated PDFs are suitable for both on-screen viewing and printing.
5.3 Related PDF Generation Scenarios
In addition to creating PDF files directly via C# code, some ASP.NET applications use other PDF workflows depending on their requirements. Check out the following articles for more examples:
- How to Convert HTML to PDF Using C#
- How to Convert Word DOC/DOCX to PDF Using C#
- How to Convert Excel Workbooks to PDF Using C#
6. Choosing an ASP.NET PDF Library
When implementing PDF generation in ASP.NET or ASP.NET Core, selecting the right PDF library is a critical decision. The choice directly affects development efficiency, long-term maintainability, and runtime performance.
Instead of focusing only on feature lists, it is more practical to evaluate an ASP.NET PDF library based on how it fits real application requirements.
Key Factors to Consider
- API Usability
A good PDF library should provide:
- Clear object models (documents, pages, fonts, graphics)
- Intuitive APIs for drawing text and layout
- Minimal boilerplate code for common tasks
This is especially important for projects where PDF generation logic evolves over time.
- ASP.NET and ASP.NET Core Compatibility
Many teams maintain both legacy ASP.NET applications and newer ASP.NET Core services. Choosing a library that works consistently across:
- ASP.NET Framework
- ASP.NET Core
- MVC and Web API projects
can significantly reduce migration and maintenance costs.
3. Performance and Stability
In production environments, PDF generation often runs:
- On-demand under user requests
- As background jobs
- Inside high-concurrency services
An ASP.NET PDF generator should be stable under load and capable of handling multi-page documents without excessive memory usage.
In practice, libraries generally fall into categories such as HTML-based converters or code-driven PDF APIs. For applications that require predictable output and fine-grained control, direct PDF creation via C# code is often the preferred approach.
7. Why Use Spire.PDF for ASP.NET PDF Creation
For developers who need to create PDF files in ASP.NET using C#, Spire.PDF for .NET provides a balanced solution that fits both tutorial examples and real-world projects.
Practical Advantages in ASP.NET Scenarios
-
Native support for ASP.NET and ASP.NET Core The same API can be used across classic ASP.NET, MVC, ASP.NET Core Web Apps, and Web API projects.
-
Code-driven PDF creation PDFs can be generated directly through C# without relying on external rendering engines or browser components.
-
Rich PDF features Supports text, images, tables, pagination, headers and footers, making it suitable for reports, invoices, and business documents.
-
Deployment-friendly Works well in server environments, including containerized and cloud-hosted ASP.NET Core applications.
Because of these characteristics, Spire.PDF fits naturally into PDF generation in ASP.NET workflows where stability, layout control, and cross-version compatibility matter more than quick HTML rendering.
For a complete reference of all available methods and classes, you can consult the official API documentation: Spire.PDF for .NET API Reference.
8. Frequently Asked Questions (FAQ)
Can I generate PDF in ASP.NET Core without MVC?
Yes. PDF generation in ASP.NET Core does not strictly require MVC. In addition to MVC controllers, PDFs can also be generated and returned from:
- ASP.NET Core Web API controllers
- Minimal APIs
- Background services
As long as the application returns a valid PDF byte stream with the correct Content-Type, the approach works reliably.
What is the difference between generating PDF in ASP.NET and ASP.NET Core?
The core PDF creation logic is similar, but there are some differences:
- ASP.NET Framework relies on
System.Webfeatures such asServer.MapPath - ASP.NET Core uses stream-based file handling
- ASP.NET Core is cross-platform and better suited for modern deployment models
From a PDF API perspective, most logic can be shared between the two.
Is it possible to generate PDF directly from C# code in ASP.NET?
Yes. Many production systems generate PDFs entirely through C# code. This approach:
- Avoids HTML rendering inconsistencies
- Provides precise layout control
- Works well for structured documents such as reports and invoices
It is a common pattern in ASP.NET PDF solutions where consistency and reliability are required.
Conclusion
Generating PDF files is a common requirement in ASP.NET and ASP.NET Core applications, especially for scenarios such as reports, invoices, and data exports. By creating PDFs directly through C# code, you gain full control over document structure, layout, and output behavior.
This guide demonstrated how to generate PDFs in both ASP.NET Framework and ASP.NET Core, covering MVC and Web API scenarios, dynamic data output, and basic layout control. It also discussed how to evaluate PDF libraries based on real application requirements.
If you plan to test these examples in a real project environment without functional limitations, you can apply for a temporary license to unlock all full features during evaluation.
In many modern .NET applications, generating professional-looking PDF documents is a common requirement — especially for invoices, reports, certificates, and forms. Instead of creating PDFs manually, a smarter approach is to use HTML templates . HTML makes it easy to design layouts using CSS, include company branding, and reuse the same structure across multiple documents.
By dynamically inserting data into HTML and converting it to PDF programmatically, you can automate document generation while maintaining design consistency.
In this tutorial, you’ll learn how to generate a PDF from an HTML template in C# .NET using Spire.PDF for .NET. We’ll guide you step-by-step — from setting up your development environment (including the required HTML-to-PDF plugin), preparing the HTML template, inserting dynamic data, and generating the final PDF file.
On this page:
- Why Generate PDFs from HTML Templates in C#?
- Set Up Your .NET Environment
- Prepare an HTML Template
- Insert Dynamic Data into HTML Before Conversion
- Convert Updated HTML Template to PDF in C#
- Best Practices for Generating PDF from HTML in C#
- Final Words
- FAQs About C# HTML Template to PDF Conversion
Why Generate PDFs from HTML Templates in C#?
Using HTML templates for PDF generation offers several advantages:
- Reusability: Design once, reuse anywhere — perfect for reports, receipts, and forms.
- Styling flexibility: HTML + CSS allow rich formatting without complex PDF drawing code.
- Dynamic content: Easily inject runtime data such as customer names, order totals, or timestamps.
- Consistency: Ensure all generated documents follow the same layout and style guidelines.
- Ease of maintenance: You can update the HTML template without changing your C# logic.
Set Up Your .NET Environment
Before you begin coding, make sure your project is properly configured to handle HTML-to-PDF conversion.
1. Install Spire.PDF for .NET
Spire.PDF for .NET is a professional library designed for creating, reading, editing, and converting PDF documents in C# and VB.NET applications—without relying on Adobe Acrobat. It provides powerful APIs for handling text, images, annotations, forms, and HTML-to-PDF conversion.
You can install it via NuGet:
Install-Package Spire.PDF
Or download it directly from the official website and reference the DLL in your project.
2. Install the HTML Rendering Plugin
Spire.PDF relies on an external rendering engine (Qt WebEngine or Chrome) to accurately convert HTML content into PDF. This plugin must be installed separately.
Steps:
- Download the plugin package for your platform.
- Extract the contents to a local folder, such as: C:\plugins-windows-x64\plugins
- In your C# code, register the plugin path before performing the conversion.
HtmlConverter.PluginPath = @"C:\plugins-windows-x64\plugins";
Prepare an HTML Template
Create an HTML file with placeholders for your dynamic data. For example, name it invoice_template.html :
<!DOCTYPE html>
<html>
<head>
  <meta charset="UTF-8">
  <title>Invoice</title>
  <style>
    body { font-family: Arial; margin: 40px; }
    .header { font-size: 24px; font-weight: bold; margin-bottom: 20px; }
    table { width: 100%; border-collapse: collapse; margin-top: 20px; }
    th, td { border: 1px solid #999; padding: 8px; text-align: left; }
  </style>
</head>
<body>
  <div class="header">Invoice for {CustomerName}</div>
  <p>Date: {InvoiceDate}</p>
  <table>
    <tr><th>Item</th><th>Price</th></tr>
    <tr><td>{Item}</td><td>{Price}</td></tr>
  </table>
</body>
</html>
Tips:
- Keep CSS inline or embedded within the HTML file.
- Avoid JavaScript or complex animations.
- Use placeholders like {CustomerName} and {InvoiceDate} for data replacement.
Insert Dynamic Data into HTML Before Conversion
You can read your HTML file as text, replace placeholders with real values, and then save it as a new temporary file.
using System;
using System.IO;

string template = File.ReadAllText("invoice_template.html");

template = template.Replace("{CustomerName}", "John Doe");
template = template.Replace("{InvoiceDate}", DateTime.Now.ToShortDateString());
template = template.Replace("{Item}", "Wireless Mouse");
template = template.Replace("{Price}", "$25.99");

File.WriteAllText("invoice_ready.html", template);
This approach lets you generate customized PDFs for each user or transaction dynamically.
Convert Updated HTML Template to PDF in C#
Now that your HTML content is ready, you can use the HtmlConverter.Convert() method to directly convert the HTML string into a PDF file.
Below is a full code example to create PDF from HTML template file in C#:
using System;
using System.Collections.Generic;
using System.Drawing;
using System.IO;
using Spire.Additions.Qt;
using Spire.Pdf.Graphics;
using Spire.Pdf.HtmlConverter;

namespace CreatePdfFromHtmlTemplate
{
    class Program
    {
        static void Main(string[] args)
        {
            // Path to the HTML template file
            string htmlFilePath = "invoice_template.html";

            // Step 1: Read the HTML template from file
            if (!File.Exists(htmlFilePath))
            {
                Console.WriteLine("Error: HTML template file not found.");
                return;
            }

            string htmlTemplate = File.ReadAllText(htmlFilePath);

            // Step 2: Define dynamic data for invoice placeholders
            Dictionary<string, string> invoiceData = new Dictionary<string, string>()
            {
                { "INVOICE_NUMBER", "INV-2025-001" },
                { "INVOICE_DATE", DateTime.Now.ToString("yyyy-MM-dd") },
                { "BILLER_NAME", "John Doe" },
                { "BILLER_ADDRESS", "123 Main Street, New York, USA" },
                { "BILLER_EMAIL", "john.doe@example.com" },
                { "ITEM_DESCRIPTION", "Consulting Services" },
                { "ITEM_QUANTITY", "10" },
                { "ITEM_UNIT_PRICE", "$100" },
                { "ITEM_TOTAL", "$1000" },
                { "SUBTOTAL", "$1000" },
                { "TAX_RATE", "5" },
                { "TAX", "$50" },
                { "TOTAL", "$1050" }
            };

            // Step 3: Replace placeholders in the HTML template with real values
            string populatedInvoice = PopulateInvoice(htmlTemplate, invoiceData);

            // Optional: Save the populated HTML for debugging or review
            File.WriteAllText("invoice_ready.html", populatedInvoice);

            // Step 4: Specify the plugin path for the HTML to PDF conversion
            string pluginPath = @"C:\plugins-windows-x64\plugins";
            HtmlConverter.PluginPath = pluginPath;

            // Step 5: Define output PDF file path
            string outputFile = "InvoiceOutput.pdf";

            try
            {
                // Step 6: Convert the HTML string to PDF
                HtmlConverter.Convert(
                    populatedInvoice,
                    outputFile,
                    enableJavaScript: true,
                    timeout: 100000,                // 100 seconds
                    pageSize: new SizeF(595, 842),  // A4 size in points
                    margins: new PdfMargins(20),    // 20-point margins
                    loadHtmlType: LoadHtmlType.SourceCode
                );

                Console.WriteLine($"PDF generated successfully: {outputFile}");
            }
            catch (Exception ex)
            {
                Console.WriteLine($"Error during PDF generation: {ex.Message}");
            }
        }

        /// <summary>
        /// Helper method: Replaces placeholders in the HTML with actual data values.
        /// </summary>
        private static string PopulateInvoice(string template, Dictionary<string, string> data)
        {
            string result = template;
            foreach (var entry in data)
            {
                result = result.Replace("{" + entry.Key + "}", entry.Value);
            }
            return result;
        }
    }
}
How it works :
- Create an invoice template with placeholder variables in {VARIABLE_NAME} format.
- Set up a dictionary with key-value pairs containing actual invoice data that matches the template placeholders.
- Replace all placeholders in the HTML template with actual values from the data dictionary.
- Use Spire.PDF with the Qt plugin to render the HTML content as a PDF file.
Result:

Best Practices for Generating PDF from HTML in C#
- Use fixed-width layouts: Avoid fluid or responsive designs to maintain consistent rendering.
- Embed or inline CSS: Ensure your styles are self-contained.
- Use standard fonts: Arial, Times New Roman, or other supported fonts convert reliably.
- Keep images lightweight: Compress large images to improve performance.
- Test with different page sizes: A4 and Letter are the most common formats.
- Avoid unsupported tags: Elements relying on JavaScript (like <canvas>) won’t render.
Final Words
Generating PDFs from HTML templates in C# .NET is a powerful way to automate document creation while preserving visual consistency. By combining Spire.PDF for .NET with the HTML rendering plugin , you can easily transform styled HTML layouts into print-ready PDF files that integrate seamlessly with your applications.
Whether you’re building a reporting system, an invoicing tool, or a document automation service, this approach saves time, reduces complexity, and produces professional results with minimal code.
FAQs About C# HTML Template to PDF Conversion
Q1: Can I use Google Chrome for HTML rendering instead of Qt WebEngine?
Absolutely. For advanced HTML, CSS, or modern JavaScript, we recommend using the Google Chrome engine via the ChromeHtmlConverter class for more precise and reliable PDF results.
For a complete guide, see our article: Convert HTML to PDF using ChromeHtmlConverter
Q2: Do I need to install a plugin for every machine running my application?
Yes, each environment must have access to the HTML rendering plugin (Qt or Chrome engine) for successful HTML-to-PDF conversion.
Q3: Does Spire.PDF support external CSS files or online resources?
Yes, but inline or embedded CSS is recommended for better rendering accuracy.
Q4: Can I use this approach in ASP.NET or web APIs?
Absolutely. You can generate PDFs server-side and return them as downloadable files or streams.
Q5: Is JavaScript supported during HTML rendering?
Limited support. Static elements are rendered correctly, but scripts and dynamic DOM manipulations are not executed.
Get a Free License
To fully experience the capabilities of Spire.PDF for .NET without any evaluation limitations, you can request a free 30-day trial license.
PDF (Portable Document Format) is widely used for sharing, distributing, and preserving documents because it maintains a consistent layout and formatting across platforms. Developers often need to edit PDF files in C#, whether it's to replace text, insert images, add watermarks, or extract pages.
In this step-by-step tutorial, you will learn how to programmatically edit PDFs in C# with the Spire.PDF for .NET library.
Table of Contents
- Why Edit PDFs Programmatically in C#
- C# Library to Edit PDFs
- Step-by-Step Guide: Editing PDF in C#
- Tips for Efficient PDF Editing in C#
- Conclusion
- FAQs
Why Edit PDFs Programmatically in C
While tools like Adobe Acrobat provide manual PDF editing, programmatically editing PDFs has significant advantages:
- Automation: Batch process hundreds of documents without human intervention.
- Integration: Edit PDFs as part of a workflow, such as generating reports, invoices, or certificates dynamically.
- Consistency: Apply uniform styling, stamps, or watermarks across multiple PDFs.
- Flexibility: Extract or replace content programmatically to integrate with databases or external data sources.
C# Library to Edit PDFs
Spire.PDF for .NET is a robust .NET PDF library that enables developers to generate, read, edit, and convert PDF files in .NET applications. It's compatible with both .NET Framework and .NET Core applications.
This library provides a rich set of features for developers working with PDFs:
- PDF Creation: Generate new PDFs from scratch or from existing documents.
- Text Editing: Add, replace, or delete text on any page.
- Image Editing: Insert images, resize, or remove them.
- Page Operations: Insert, remove, extract, or reorder pages.
- Annotations: Add stamps, comments, and shapes for marking content.
- Watermarking: Add text or image watermarks for branding or security.
- Form Handling: Create and fill PDF forms programmatically.
- Digital Signatures: Add and validate signatures for authenticity.
- Encryption: Apply password protection and user permissions.
Step-by-Step Guide: Editing PDF in C
Modifying a PDF file in C# involves several steps: setting up a C# project, installing the library, loading the PDF file, making necessary changes, and saving the document. Let's break down each step in detail.
Step 1: Set Up Your C# Project
Before you start editing PDFs, you need to create a new C# project by following the steps below:
- Open Visual Studio.
- Create a new project. You can choose a Console App or a Windows Forms App depending on your use case.
- Name your project (e.g., PdfEditorDemo) and click Create.
Step 2: Install Spire.PDF
Next, you need to install the Spire.PDF library, which provides all the functionality required to read, edit, and save PDF files programmatically.
You can simply install it via the NuGet Package Manager Console with the following command:
Install-Package Spire.PDF
Alternatively, you can use the NuGet Package Manager GUI to search for Spire.PDF and click Install.
Step 3: Load an Existing PDF
Before you can modify an existing PDF file, you need to load it into a PdfDocument object. This gives you access to its pages, text, images, and structure.
using Spire.Pdf;
PdfDocument pdf = new PdfDocument();
pdf.LoadFromFile("example.pdf");
Step 4: Edit PDF Content
Text editing, image insertion, page management, and watermarking are common operations when working with PDFs. This step covers all these editing tasks.
4.1 Edit Text
Text editing is one of the most common operations when working with PDFs. Depending on your needs, you might want to replace existing text or add new text to specific pages.
Replace existing text:
Replacing text in PDF allows you to update content across a single page or an entire PDF while maintaining formatting consistency. Using the PdfTextReplacer class, you can quickly find and replace text programmatically:
// Get the first page
PdfPageBase page = pdf.Pages[0];
// Create a PdfTextReplacer
PdfTextReplacer textReplacer = new PdfTextReplacer(page);

// Replace all occurrences of target text with new text
textReplacer.ReplaceAllText("Old text", "New text");
Add new text:
In addition to replacing existing content, you may need to insert new text into a PDF. With just one line of code, you can add text to any location on a PDF page:
page.Canvas.DrawString(
    "Hello, World!",
    new PdfTrueTypeFont(new Font("Arial Unicode MS", 15f, FontStyle.Bold), true),
    new PdfSolidBrush(Color.Black),
    90, 30
);
4.2 Insert and Update Images
PDFs often contain visual elements such as logos, charts, or illustrations. You can insert new images or update outdated graphics to enhance the document's visual appeal.
Insert an Image:
// Load an image
PdfImage image = PdfImage.FromFile("logo.png");
// Draw the image at a specific location with defined size
page.Canvas.DrawImage(image, 100, 150, 200, 100);
Update an image:
// Load the new image
PdfImage newImage = PdfImage.FromFile("image1.jpg");
// Create a PdfImageHelper instance
PdfImageHelper imageHelper = new PdfImageHelper();
// Get the image information from the page
PdfImageInfo[] imageInfo = imageHelper.GetImagesInfo(page);
// Replace the first image on the page with the new image
imageHelper.ReplaceImage(imageInfo[0], newImage);
4.3 Add, Remove, or Extract Pages
Managing page structure is another important aspect of PDF editing, such as adding new pages, removing unwanted pages, and extracting particular pages to a new document.
Add a new page:
// Add a new page
PdfPageBase newPage = pdf.Pages.Add();
Remove a page:
// Remove the last page
pdf.Pages.RemoveAt(pdf.Pages.Count - 1);
Extract a page to a new document:
// Create a new PDF document
PdfDocument newPdf = new PdfDocument();
// Extract the third page to a new PDF document
newPdf.InsertPage(pdf, pdf.Pages[2]);
// Save the new PDF document
newPdf.SaveToFile("extracted_page.pdf");
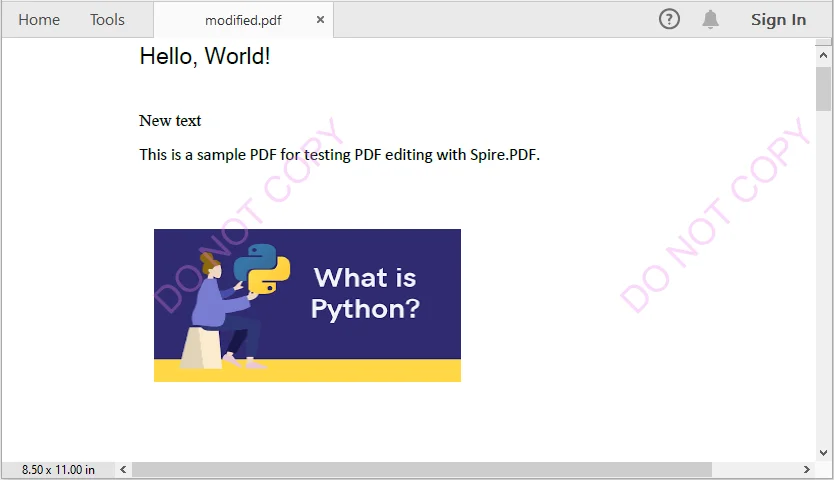
4.4 Add Watermarks
Adding Watermarks to PDFs can help indicate confidentiality, add branding, or protect intellectual property. You can easily add them programmatically to any page:
// Iterate through each page in the PDF document
foreach (PdfPageBase page in pdf.Pages)
{
    // Create a tiling brush for the watermark
    // The brush size is set to half the page width and one-third of the page height
    PdfTilingBrush brush = new PdfTilingBrush(
        new SizeF(page.Canvas.ClientSize.Width / 2, page.Canvas.ClientSize.Height / 3));

    // Set the brush transparency to 0.3 for a semi-transparent watermark
    brush.Graphics.SetTransparency(0.3f);

    // Save the current graphics state for later restoration
    brush.Graphics.Save();

    // Move the origin of the brush to its center to prepare for rotation
    brush.Graphics.TranslateTransform(brush.Size.Width / 2, brush.Size.Height / 2);

    // Rotate the coordinate system by -45 degrees to angle the watermark
    brush.Graphics.RotateTransform(-45);

    // Draw the watermark text on the brush
    // Using Helvetica font, size 24, violet color, centered alignment
    brush.Graphics.DrawString(
        "DO NOT COPY",
        new PdfFont(PdfFontFamily.Helvetica, 24),
        PdfBrushes.Violet,
        0, 0,
        new PdfStringFormat(PdfTextAlignment.Center));

    // Restore the previously saved graphics state, undoing rotation and translation
    brush.Graphics.Restore();

    // Reset the transparency to fully opaque
    brush.Graphics.SetTransparency(1);

    // Draw the brush over the entire page area to apply the watermark
    page.Canvas.DrawRectangle(brush, new RectangleF(new PointF(0, 0), page.Canvas.ClientSize));
}
Step 5: Save the Modified PDF
After making all the necessary edits, the final step is to save your changes.
// Save the Modified PDF and release resources
pdf.SaveToFile("modified.pdf");
pdf.Close();
Output PDF
The output modified.pdf looks like this:
Tips for Efficient PDF Editing in C
When editing PDFs programmatically, it's important to keep a few best practices in mind to ensure the output remains accurate, readable, and efficient.
- Batch Processing: For repetitive tasks, process multiple PDF files in a loop rather than handling them individually. This approach improves efficiency and reduces manual effort.
- Text Placement: Use coordinates carefully when inserting new text. Proper positioning prevents content from overlapping with existing elements and maintains a clean layout.
- Fonts and Encoding: Choose fonts that support the characters you need. This is especially critical for languages such as Chinese, Arabic, or other scripts that require extended font support.
- Memory Management: Always release resources by disposing of PdfDocument objects after use. Proper memory management helps avoid performance issues in larger applications.
Conclusion
This tutorial demonstrates how to edit PDF in C# using Spire.PDF. From replacing text, inserting images, and managing pages, to adding watermarks, each step includes practical code examples. Developers can now automate PDF editing, enhance document presentation, and handle PDFs efficiently within professional applications.
FAQs
Q1: How can I programmatically edit text in a PDF using C#?
A1: You can use a C# PDF library like Spire.PDF to replace existing text or add new text to a PDF. Classes such as PdfTextReplacer and page.Canvas.DrawString() provide precise control over text editing while preserving formatting.
Q2: How do I replace or add text in a PDF using C#?
A2: With C#, libraries like Spire.PDF let you search and replace existing text using PdfTextReplacer or add new text anywhere on a page using page.Canvas.DrawString().
Q3: Can I insert or update images in a PDF programmatically?
A3: Yes. You can load images into your project and use classes like PdfImage and PdfImageHelper to draw or replace images on a PDF page.
Q4: Is it possible to add watermarks to a PDF using code?
A4: Absolutely. You can add text or image watermarks programmatically, control transparency, rotation, and position, and apply them to one or all pages of a PDF.
Q5: How can I extract specific pages from a PDF?
A5: You can create a new PDF document and insert selected pages from the original PDF, enabling you to extract single pages or ranges for separate use.
In .NET development, converting HTML to plain text is a common task, whether you need to extract content from web pages, process HTML emails, or generate lightweight text reports. However, HTML’s rich formatting, tags, and structural elements can complicate workflows that require clean, unformatted text. This is why using C# for HTML to text conversion becomes essential.
Spire.Doc for .NET simplifies this process: it’s a robust library for document manipulation that natively supports loading HTML files/strings and converting them to clean plain text. This guide will explore how to convert HTML to plain text in C# using the library, including detailed breakdowns of two core scenarios: converting HTML strings (in-memory content) and HTML files (disk-based content).
- Why Use Spire.Doc for HTML to Text Conversion?
- Installing Spire.Doc
- Convert HTML Strings to Text in C#
- Convert HTML File to Text in C#
- FAQs
- Conclusion
Why Use Spire.Doc for HTML to Text Conversion?
Spire.Doc is a .NET document processing library that stands out for HTML-to-text conversion due to:
- Simplified Code: Minimal lines of code to handle even complex HTML.
- Structure Preservation: Maintains logical formatting (line breaks, list indentation) in the output text.
- Special Character Support: Automatically converts HTML entities to their plain text equivalents.
- Lightweight: Avoids heavy dependencies, making it suitable for both desktop and web applications
Installing Spire.Doc
Spire.Doc is available via NuGet, the easiest way to manage dependencies:
- In Visual Studio, right-click your project > Manage NuGet Packages.
- Search for Spire.Doc and install the latest stable version.
- Alternatively, use the Package Manager Console:
Install-Package Spire.Doc
After installing, you can dive into the C# code to extract text from HTML.
Convert HTML Strings to Text in C#
This example renders an HTML string into a Document object, then uses SaveToFile() to save it as a plain text file.
using Spire.Doc;
using Spire.Doc.Documents;
namespace HtmlToTextSaver
{
class Program
{
static void Main(string[] args)
{
// Define HTML content
string htmlContent = @"
<html>
<body>
<h1>Sample HTML Content</h1>
<p>This is a paragraph with <strong>bold</strong> and <em>italic</em> text.</p>
<p>Another line with a <a href='https://example.com'>link</a>.</p>
<ul>
<li>List item 1</li>
<li>List item 2 (with <em>italic</em> text)</li>
</ul>
<p>Special characters: © & ®</p>
</body>
</html>";
// Create a Document object
Document doc = new Document();
// Add a section to hold content
Section section = doc.AddSection();
// Add a paragraph
Paragraph paragraph = section.AddParagraph();
// Render HTML into the paragraph
paragraph.AppendHTML(htmlContent);
// Save as plain text
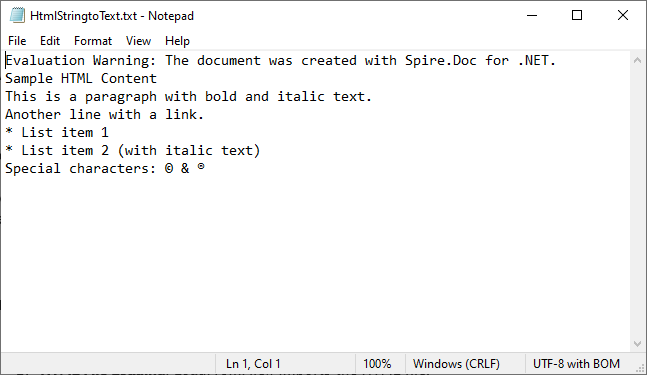
doc.SaveToFile("HtmlStringtoText.txt", FileFormat.Txt);
}
}
}
How It Works:
- HTML String Definition: We start with a sample HTML string containing headings, paragraphs, formatting tags (
<strong>,<em>), links, lists, and special characters. - Document Setup: A
Documentobject is created to manage the content, with aSectionandParagraphto structure the HTML rendering. - HTML Rendering:
AppendHTML()parses the HTML string and converts it into the document's internal structure, preserving content hierarchy. - Text Conversion:
SaveToFile()withFileFormat.Txtconverts the rendered content to plain text, stripping HTML tags while retaining readable structure.
Output:
Extended reading: Parse or Read HTML in C#
Convert HTML File to Text in C#
This example directly loads an HTML file and converts it to text. Ideal for batch processing or working with pre-existing HTML documents (e.g., downloaded web pages, local templates).
using Spire.Doc;
using Spire.Doc.Documents;

namespace HtmlToText
{
    class Program
    {
        static void Main()
        {
            // Create a Document object
            Document doc = new Document();

            // Load an HTML file
            doc.LoadFromFile("sample.html", FileFormat.Html, XHTMLValidationType.None);

            // Convert HTML to plain text
            doc.SaveToFile("HTMLtoText.txt", FileFormat.Txt);
            doc.Dispose();
        }
    }
}
How It Works:
- Document Initialization: A
Documentobject is created to handle the file operations. - HTML File Loading:
LoadFromFile()imports the HTML file, withFileFormat.Htmlspecifying the input type.XHTMLValidationType.Noneensures compatibility with non-strict HTML. - Text Conversion:
SaveToFile()withFileFormat.Txtconverts the loaded HTML content to plain text.
To preserve the original formatting and style, you can refer to the C# tutorial to convert the HTML file to Word.
FAQs
Q1: Can Spire.Doc process malformed HTML?
A: Yes. Spire.Doc includes built-in tolerance for malformed HTML, but you may need to disable strict validation to ensure proper parsing.
When loading HTML files, use XHTMLValidationType.None (as shown in the guide) to skip strict XHTML checks:
doc.LoadFromFile("malformed.html", FileFormat.Html, XHTMLValidationType.None);
This setting tells Spire.Doc to parse the HTML like a web browser (which automatically corrects minor issues like unclosed <p> or <li> tags) instead of rejecting non-compliant content.
Q2: Can I extract specific elements from HTML (like only paragraphs or headings)?
A: Yes, after loading the HTML into a Document object, you can access specific elements through the object model (like paragraphs, tables, etc.) and extract text from only those specific elements rather than the entire document.
Q3: Can I convert HTML to other formats besides plain text using Spire.Doc?
A: Yes, Spire.Doc supports conversion to multiple formats, including Word DOC/DOCX, PDF, image, RTF, and more, making it a versatile document processing solution.
Q4: Does Spire.Doc work with .NET Core/.NET 5+?
A: Spire.Doc fully supports .NET Core, .NET 5/6/7/8, and .NET Framework 4.0+. There’s no difference in functionality across these frameworks, which means you can use the same code (e.g., Document, AppendHTML(), SaveToFile()) regardless of which .NET runtime you’re targeting.
Conclusion
Converting HTML to text in C# is straightforward with the Spire.Doc library. Whether you’re working with HTML strings or files, Spire.Doc simplifies the process by handling HTML parsing, structure preservation, and text conversion. By following the examples in this guide, you can seamlessly integrate HTML-to-text conversion into your C# applications.
You can request a free 30-day trial license here to unlock full functionality and remove limitations of the Spire.Doc library.
The need to efficiently parse HTML in C# is a common requirement for many development tasks, from web scraping, data extraction to content automation. While .NET offers built-in tools (e.g., HtmlAgilityPack), Spire.Doc simplifies HTML parsing in C# with its intuitive object model and seamless integration.
This guide explores how to leverage Spire.Doc for .NET to parse HTML, including loading HTML from various sources, navigating document structure, and extracting critical data.
- Setting Up Spire.Doc
- How Spire.Doc Parses HTML
- How to Load and Parse HTML Content
- Conclusion
- Common Questions
Setting Up Spire.Doc
The easiest way to integrate the C# HTML parser library into your project is via NuGet:
- Open your project in Visual Studio.
- Right-click the project in the Solution Explorer → Select Manage NuGet Packages.
- In the NuGet Package Manager, search for Spire.Doc.
- Select the latest stable version and click Install.
Alternatively, download the library directly from the E-iceblue website, extract the ZIP file, and reference Spire.Doc.dll in your project.
How Spire.Doc Parses HTML
Spire.Doc converts HTML into a structured object model, where elements like <p>, <a>, and <table> are mapped to classes you can programmatically access. Key components include:
- Document: Acts as the container for parsed HTML content.
- Section: Represents a block of content (similar to HTML’s
<body>or<div>sections). - Paragraph: Maps to HTML block elements like
<p>,<h1>, or<li>. - DocumentObject: Base class for all elements within a Paragraph (images, links, etc.).
This model ensures that HTML structures are preserved and accessible via intuitive C# properties and methods.
How to Load and Parse HTML Content
Spire.Doc supports parsing HTML from strings, local files, or even remote URLs (when combined with HTTP clients). Below are detailed examples for each scenario.
Parse an HTML String in C#
Parse an HTML string (e.g., from a web API or database) into Spire.Doc’s object model for inspection.
using Spire.Doc;
using Spire.Doc.Documents;

namespace ParseHtmlString
{
    class Program
    {
        static void Main(string[] args)
        {
            // Create a Document object
            Document doc = new Document();

            // Add a section to act as a container
            Section section = doc.AddSection();
            // Add a paragraph
            Paragraph para = section.AddParagraph();

            // Define HTML content to parse
            string htmlContent = @"
                <h2>Sample HTML String</h2>
                <p>This is a paragraph with <strong>bold text</strong> and a <a href='https://www.e-iceblue.com/'>link</a>.</p>
                <ul>
                    <li>List item 1</li>
                    <li>List item 2</li>
                </ul>
            ";

            // Parse the HTML string into the paragraph
            para.AppendHTML(htmlContent);

            // Print all paragraph text
            Console.WriteLine("Parsed HTML Content:");
            Console.WriteLine("---------------------");

            foreach (Paragraph paragraph in section.Paragraphs)
            {
                Console.WriteLine(paragraph.Text);
            }
        }
    }
}
In this code, the method AppendHTML() automatically converts HTML tags to corresponding Spire.Doc objects (e.g., <h1> → Heading1 style, <ul> → list paragraphs).
Output:

Pro Tip: You can also call the SaveToFile() method to convert the HTML string to Word in C#.
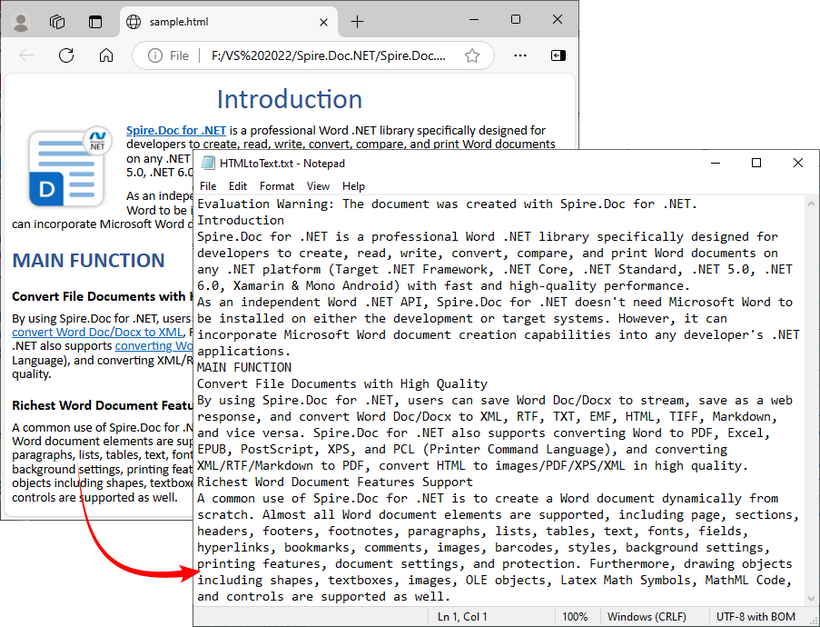
Parse an HTML File in C#
For HTML content stored in a file (e.g., downloaded web pages, static HTML reports), load it via LoadFromFile() and then analyze its structure (e.g., extracting headings, paragraphs).
using Spire.Doc;
using Spire.Doc.Documents;

namespace ParseHtmlFile
{
    class Program
    {
        static void Main(string[] args)
        {
            // Create a Document object
            Document doc = new Document();

            // Load an HTML file
            doc.LoadFromFile("sample.html", FileFormat.Html);

            // Traverse sections (HTML body blocks)
            foreach (Section section in doc.Sections)
            {
                Console.WriteLine($"Section {doc.Sections.IndexOf(section) + 1}:");
                Console.WriteLine("---------------------------------");

                // Traverse paragraphs in the section
                foreach (Paragraph para in section.Paragraphs)
                {
                    // Print paragraph text and style (e.g., heading level)
                    string styleName = para.StyleName;
                    Console.WriteLine($"[{styleName}] {para.Text}"+ "\n");
                }
                Console.WriteLine();
            }
        }
    }
}
This C# code example loads a local HTML file and then uses the Paragraph.StyleName and Paragraph.Text properties to extract content along with its styling information.
Output:

Spire.Doc’s object model allows you to interact with an HTML file just like you would with a Word document. In addition to extracting text content, you can also extract elements like links, tables from HTML.
Parse a URL in C#
To parse HTML from a web page, combine Spire.Doc with HttpClient to fetch the HTML content first, then parse it.
using Spire.Doc;
using Spire.Doc.Documents;

namespace HtmlUrlParsing
{
    class Program
    {
        // HttpClient instance for web requests
        private static readonly HttpClient httpClient = new HttpClient();

        static async Task Main(string[] args)
        {
            try
            {
                // Fetch HTML from a URL
                string url = "https://www.e-iceblue.com/privacypolicy.html";
                Console.WriteLine($"Fetching HTML from: {url}");
                string htmlContent = await FetchHtmlFromUrl(url);

                // Parse the fetched HTML
                Document doc = new Document();
                Section section = doc.AddSection();
                Paragraph paragraph = section.AddParagraph();
                paragraph.AppendHTML(htmlContent);

                // Extract key information
                Console.WriteLine("\nParsed Content Summary:");
                Console.WriteLine($"Sections: {doc.Sections.Count}");
                Console.WriteLine($"Paragraphs: {section.Paragraphs.Count}");
                Console.WriteLine("-------------------------------------------");

                // Extract all heading paragraphs
                foreach (Paragraph para in section.Paragraphs)
                {
                    if (para.StyleName.StartsWith("Heading"))
                    {
                        string headings = para.Text;
                        Console.WriteLine($"Headings: {headings}");
                    }
                }

            }
            catch (Exception ex)
            {
                Console.WriteLine($"Error: {ex.Message}");
            }
        }

        // Helper method to fetch HTML from a URL
        private static async Task<string> FetchHtmlFromUrl(string url)
        {
            // Set a user-agent to avoid being blocked by servers
            httpClient.DefaultRequestHeaders.UserAgent.ParseAdd("Mozilla/5.0 (Windows NT 10.0; Win64; x64)");

            // Send GET request and return HTML content
            HttpResponseMessage response = await httpClient.GetAsync(url);
            response.EnsureSuccessStatusCode(); // Throw on HTTP errors (4xx, 5xx)
            return await response.Content.ReadAsStringAsync();
        }
    }
}
This C# code combines web scraping (fetching HTML from a URL) with document parsing (using Spire.Doc) to extract structured information (like headings) from web content. It’s useful for scenarios like content analysis or web data extraction.
Output:

Conclusion
Spire.Doc for .NET provides a comprehensive solution for reading HTML in C# applications. Whether you're working with HTML strings, local files, or even web URLs, this library streamlines the process with intuitive APIs and reliable performance. By following the examples outlined in this guide, you can efficiently integrate HTML parsing capabilities into your .NET projects.
To fully experience the capabilities of Spire.Doc for .NET, request a free 30-day trial license here.
Common Questions
Q1: Why use Spire.Doc for HTML parsing instead of HtmlAgilityPack?
A: Spire.Doc and HtmlAgilityPack serve different primary goals, so the choice depends on your needs:
- HtmlAgilityPack: A lightweight library only for parsing and manipulating raw HTML (e.g., extracting tags, fixing invalid HTML). It does not handle document formatting or export to Word.
- Spire.Doc: Designed for document manipulation first - it parses HTML and maps it directly to structured Word elements (sections, paragraphs, styles like headings/bold). This is critical if you need to:
- Preserve HTML structure in an editable Word file.
- Extract styled content (e.g., identify "Heading 1" vs. "Normal" text).
- Export parsed HTML to RTF, TXT, PDF, etc.
Q2. How do I convert HTML to Text in C#
A: To convert an HTML file to plain text in C#, get its text content via the GetText() method and then write the result to a .txt file.
// Create a Document object
Document doc = new Document();

// Load an HTML file
doc.LoadFromFile("sample.html", FileFormat.Html);

// Get text from HTML
string text = doc.GetText();

// Write to a text file
File.WriteAllText("HTMLText.txt", text);
Q3: Can Spire.Doc handle malformed or incomplete HTML?
A: Spire.Doc has good error tolerance and can handle imperfect HTML to some extent. However, severely malformed HTML might cause parsing issues. For best results, ensure your HTML is well-formed or use HTML sanitization libraries before parsing with Spire.Doc.
Q3: Can I use Spire.Doc in ASP.NET Core applications?
A: Yes, Spire.Doc is fully compatible with ASP.NET Core applications. The installation and usage process is the same as in other .NET applications.

Markdown (md) is a widely adopted lightweight markup language known for its simplicity and readability. Developers, technical writers, and content creators often use it for documentation, README files, blogs, and technical notes. While Markdown is easy to write and read in its raw form, displaying it on websites or integrating it into web applications requires HTML. Converting Markdown to HTML is therefore a fundamental task for developers working with content management systems, documentation pipelines, or web-based applications.
In this tutorial, you will learn how to convert Markdown to HTML in C#. The guide covers converting both Markdown strings and files to HTML, as well as batch processing multiple Markdown documents efficiently. By the end, you’ll have practical, ready-to-use examples that you can apply directly to real-world projects.
Table of Contents
- Understanding Markdown and HTML: Key Differences and Use Cases
- C# Library for Markdown to HTML Conversion
- Convert a Markdown String to HTML in C# (Step-by-Step)
- Convert a Single Markdown File to HTML in C# (Step-by-Step)
- Batch Convert Multiple Markdown Files to HTML in C#
- Additional Tips for Efficient Markdown to HTML Conversion in C#
- Conclusion
- FAQs
Understanding Markdown and HTML: Key Differences and Use Cases
What is Markdown?
Markdown is a lightweight markup language that allows developers and writers to create structured documents using plain text. It uses straightforward syntax for headings, lists, links, images, code blocks, and more. Its readability in raw form makes it ideal for writing documentation, README files, technical blogs, and collaborative notes.
Example Markdown:
# Project Title

This is a **bold** statement.

- Feature 1

- Feature 2
What is HTML?
HTML (HyperText Markup Language) is the foundational language of the web. Unlike Markdown, HTML provides precise control over document structure, formatting, multimedia embedding, and web interactivity. While Markdown focuses on simplicity, HTML is indispensable for web pages and application content.
Example HTML Output:
<h1>Project Title</h1>
<p>This is a <strong>bold</strong> statement.</p>
<ul>
  <li>Feature 1</li>
  <li>Feature 2</li>
</ul>
Key Differences and Use Cases
| Feature | Markdown | HTML |
|---|---|---|
| Complexity | Simple, minimal syntax | More detailed, verbose |
| Readability | Readable in raw form | Harder to read directly |
| Use Cases | Documentation, readmes, blogs | Websites, web apps, emails |
Use Case Tip: Use Markdown for author-friendly writing, then convert it to HTML for web display, automated documentation pipelines, or content management systems.
C# Library for Markdown to HTML Conversion
For C# developers, one of the most practical libraries for Markdown-to-HTML conversion is Spire.Doc for .NET. This library offers robust document processing capabilities, supporting not only loading Markdown files and converting content to HTML, but also extending to other formats, such as Markdown to Word and PDF. With this flexibility, developers can easily choose the output format that best fits their project needs.
Key Features
- Load Markdown files and convert to HTML
- Preserve headings, lists, links, images, and other Markdown formatting in HTML output
- Batch process multiple Markdown documents efficiently
- Integrate seamlessly with .NET applications without requiring Microsoft Office
- Compatible with .NET Framework and .NET Core
Installation
You can easily add the required library to your C# project in two ways:
- Using NuGet (Recommended)
Run the following command in your Package Manager Console:
This method ensures that the library and its dependencies are automatically downloaded and integrated into your project.Install-Package Spire.Doc - Manual Installation
Alternatively, you can download the library DLL and manually add it as a reference in your project. This approach is useful if you need offline installation or prefer direct control over the library files.
Tip: Using NuGet is generally recommended for faster setup and easier version management.
Convert a Markdown String to HTML in C# (Step-by-Step)
In many applications, Markdown content may be generated dynamically or stored in a database as a string. This section demonstrates how you can convert a Markdown string into a fully formatted HTML file using C#.
Steps to Convert a Markdown String to HTML
- Prepare the Markdown string that you want to convert.
- Save the Markdown string to a .md file with WriteAllText.
- Load the Markdown file into a Document object using LoadFromFile with FileFormat.Markdown.
- Save the document as an HTML file using SaveToFile with FileFormat.Html.
Example Code
using Spire.Doc;
using System;
using System.IO;
namespace MarkdownToHtml
{
internal class Program
{
static void Main(string[] args)
{
// Define the markdown string
string markdown = @"
# Welcome to C# Markdown Tutorial
This tutorial demonstrates **Markdown syntax** in a more detailed way.
Here is a [link](https://example.com).
## Features
- Headings, bold, and italic text
- Links and images
- Ordered and unordered lists
- Code blocks and inline code
- Blockquotes
- Tables
";
// Define the file paths
string markdownFilePath = "example.md"; // Path to save the Markdown file
string outputHtmlPath = "output.html"; // Path to save the converted HTML file
// Create a Markdown file from the markdown string
File.WriteAllText(markdownFilePath, markdown);
// Load the Markdown file
Document document = new Document();
document.LoadFromFile(markdownFilePath, FileFormat.Markdown);
// Save as HTML
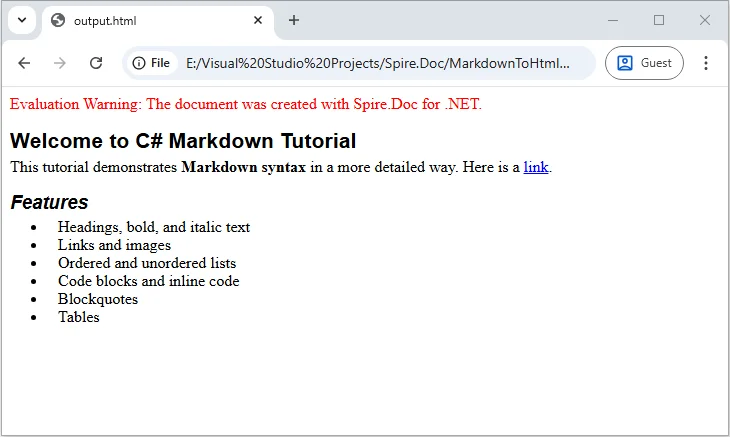
document.SaveToFile(outputHtmlPath, FileFormat.Html);
// Close the document
document.Close();
Console.WriteLine($"Markdown string converted to HTML at: {outputHtmlPath}");
}
}
}
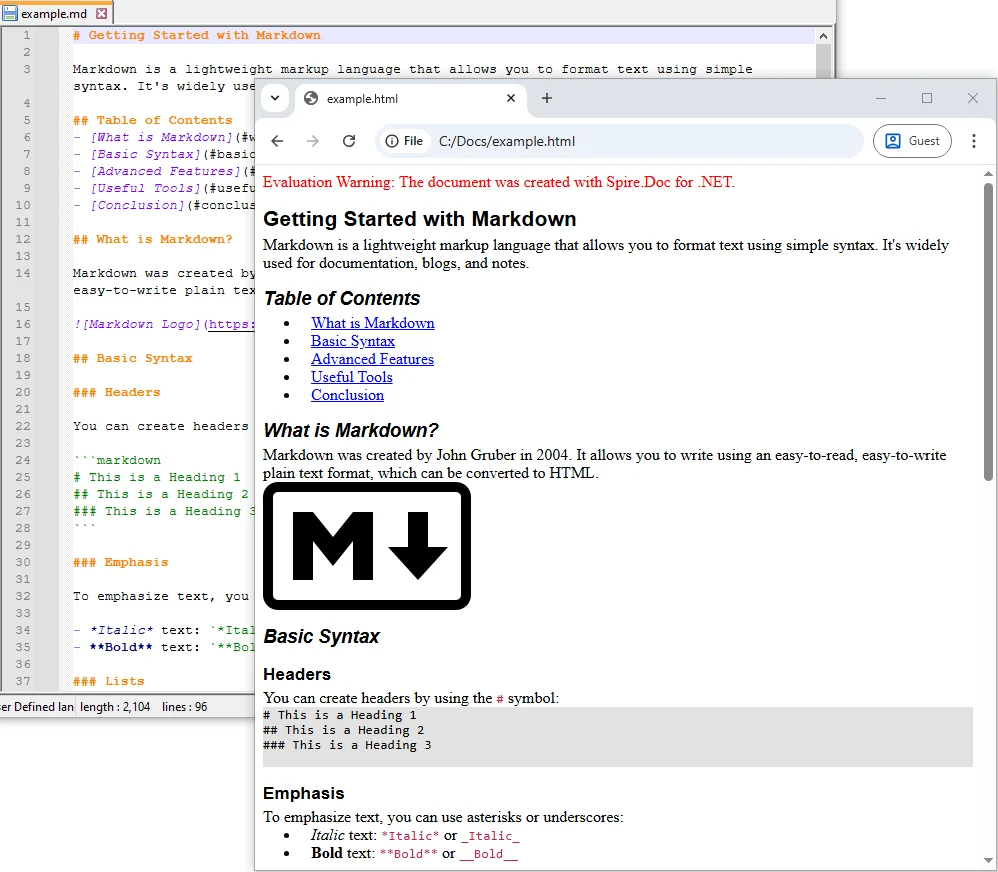
Convert a Single Markdown File to HTML in C# (Step-by-Step)
If you have a Markdown file ready, converting it to HTML for web pages or email templates is straightforward. With Spire.Doc, you can load your Markdown file and export it as a fully formatted HTML document, preserving all styling, including headings, lists, links, images, and other formatting elements.
Steps to Convert a Markdown File to HTML
- Prepare the Markdown file you want to convert.
- Load the file into a Document object using LoadFromFile with the FileFormat.Markdown parameter.
- Save the loaded document as HTML using SaveToFile with FileFormat.Html.
Example Code
using Spire.Doc;
using System;

namespace MarkdownToHtml
{
    internal class Program
    {
        static void Main(string[] args)
        {
            // Path to the Markdown file
            string markdownFile = @"C:\Docs\example.md";
            // Path to save the converted HTML file
            string htmlFile = @"C:\Docs\example.html";

            // Load the Markdown file
            Document document = new Document();
            document.LoadFromFile(markdownFile, FileFormat.Markdown);

            // Save as HTML file
            document.SaveToFile(htmlFile, FileFormat.Html);

            // Close the document
            document.Close();

            Console.WriteLine($"Converted '{markdownFile}' to HTML successfully!");
        }
    }
}
Batch Convert Multiple Markdown Files to HTML in C#
If you have a collection of Markdown files that need to be converted at once, you can use the following C# example to batch process and convert them into HTML.
Example Code
using Spire.Doc;
using System;
using System.IO;

namespace MarkdownToHtml
{
    internal class Program
    {
        static void Main(string[] args)
        {
            // Define the input folder containing Markdown files
            string inputFolder = @"C:\Docs\MarkdownFiles";
            // Define the output folder where converted HTML files will be saved
            string outputFolder = @"C:\Docs\HtmlFiles";

            // Create the output folder if it does not already exist
            Directory.CreateDirectory(outputFolder);

            // Loop through all Markdown (.md) files in the input folder
            foreach (string file in Directory.GetFiles(inputFolder, "*.md"))
            {
                // Load the Markdown file into a Document object
                Document doc = new Document();
                doc.LoadFromFile(file, FileFormat.Markdown);

                // Get the file name without extension
                string fileName = Path.GetFileNameWithoutExtension(file);
                // Build the output path with .html extension
                string outputPath = Path.Combine(outputFolder, fileName + ".html");

                // Save the document as an HTML file
                doc.SaveToFile(outputPath, FileFormat.Html);

                // Print a confirmation message for each converted file
                Console.WriteLine($"Converted {file} to HTML.");
            }

            // Print a final message when batch conversion is complete
            Console.WriteLine("Batch conversion complete.");
        }
    }
}
Additional Tips for Efficient Markdown to HTML Conversion in C#
Converting Markdown to HTML is straightforward, but applying a few practical strategies can help handle advanced scenarios, improve performance, and ensure your HTML output is clean and consistent. Here are some key tips to enhance your conversion workflow:
-
Implement Error Handling When processing multiple files, wrap your conversion logic in try-catch blocks to handle invalid Markdown, missing files, or access permission issues. This ensures your batch conversion won’t fail entirely due to a single problematic file.
try { Document doc = new Document(); doc.LoadFromFile(filePath, FileFormat.Markdown); doc.SaveToFile(outputPath, FileFormat.Html); } catch (Exception ex) { Console.WriteLine($"Failed to convert {filePath}: {ex.Message}"); } -
Optimize Batch Conversion Performance
For large numbers of Markdown files, consider using asynchronous or parallel processing. This reduces conversion time and avoids high memory usage:Parallel.ForEach(Directory.GetFiles(inputFolder, "*.md"), file => { // Conversion logic }); -
Post-Process HTML Output
After conversion, you can enhance the HTML by injecting CSS styles, adding custom attributes, or minifying the output. This is especially useful when integrating HTML into web pages or applications.string htmlContent = File.ReadAllText(outputPath); htmlContent = "<link rel='stylesheet' href='https://cdn.e-iceblue.com/style.css'>" + htmlContent; File.WriteAllText(outputPath, htmlContent); -
Maintain UTF-8 Encoding
Always save Markdown and HTML files with UTF-8 encoding to preserve special characters, symbols, and multilingual content, ensuring consistent rendering across browsers and devices.
Conclusion
In this tutorial, you learned how to convert Markdown to HTML in C#, covering single Markdown strings, individual files, and batch processing multiple documents.
These examples provide a solid foundation for integrating Markdown to HTML conversion into various .NET applications, including documentation systems, blogs, and other content-driven projects. By applying these methods, you can efficiently manage Markdown content and produce consistent, well-structured HTML output.
FAQs
Q1: Can I convert Markdown with images and links using Spire.Doc in C#?
A1: Yes. The library allows you to convert Markdown files that include images, hyperlinks, headings, lists, and code blocks into fully formatted HTML. This ensures the output closely matches your source content.
Q2: Do I need Microsoft Office installed to convert Markdown to HTML in C#?
A2: No. Spire.Doc is a standalone library for .NET, so you can convert Markdown to HTML in C# without Microsoft Office, making it easy to integrate into both desktop and web applications.
Q3: How can I batch convert multiple Markdown files to HTML in C# efficiently?
A3: You can loop through all Markdown files in a folder and convert them using Spire.Doc’s Document.LoadFromFile and SaveToFile methods. This approach allows batch conversion of Markdown documents to HTML in .NET quickly and reliably.
Q4: Can I convert Markdown to HTML dynamically in an ASP.NET application using C#?
A4: Yes. You can dynamically convert Markdown content stored as strings or files to HTML in ASP.NET using Spire.Doc, which is useful for web apps, blogs, or CMS platforms.
Q5: Is Spire.Doc compatible with .NET Core and .NET 6 for Markdown to HTML conversion?
A5: Yes. It supports .NET Framework, .NET Core, .NET 5, and .NET 6+, making it ideal for modern C# projects that require Markdown to HTML conversion.
Q6: Can I customize the HTML output after converting Markdown in C#?
A6: Yes. After conversion, you can add CSS, modify HTML tags, or inject styles programmatically in C# to match your website or application’s design requirements.
Q7: Can Spire.Doc convert other document formats besides Markdown?
A7: Yes. It can convert a wide range of formats, such as Word to PDF or Word to HTML, giving you flexibility to manage different document types in C# projects.
Q8: How do I preserve special characters and encoding when converting Markdown to HTML in C#?
A8: Always save your Markdown files with UTF-8 encoding to ensure special characters, symbols, and multilingual content are preserved during Markdown to HTML conversion.
.NET PDF to JPG Converter: Convert PDF Pages to Images in C#
2025-09-10 03:20:19 Written by Administrator
Working with PDF documents is a common requirement in modern applications. Whether you are building a document management system , an ASP.NET web service , or a desktop viewer application , there are times when you need to display a PDF page as an image. Instead of embedding the full PDF viewer, you can convert PDF pages to JPG images and use them wherever images are supported.
In this guide, we will walk through a step-by-step tutorial on how to convert PDF files to JPG images using Spire.PDF for .NET. We’ll cover the basics of converting a single page, handling multiple pages, adjusting resolution and quality, saving images to streams, and even batch converting entire folders of PDFs.
By the end, you’ll have a clear understanding of how to implement PDF-to-image conversion in your .NET projects.
Table of Contents:
- Install .NET PDF-to-JPG Converter Library
- Core Method: SaveAsImage
- Steps to Convert PDF to JPG in C# .NET
- Convert a Single Page to JPG
- Convert Multiple Pages (All or Range)
- Advanced Conversion Options
- Troubleshooting & Best Practices
- Conclusion
- FAQs
Install .NET PDF-to-JPG Converter Library
To perform the conversion, we’ll use Spire.PDF for .NET , a library designed for developers who need full control over PDFs in C#. It supports reading, editing, and converting PDFs without requiring Adobe Acrobat or any third-party dependencies.
Installation via NuGet
You can install Spire.PDF directly into your project using NuGet Package Manager Console:
Install-Package Spire.PDF
Alternatively, open NuGet Package Manager in Visual Studio, search for Spire.PDF , and click Install.
Licensing Note
Spire.PDF offers a free version with limitations, allowing conversion of only the first few pages. For production use, a commercial license unlocks the full feature set.
Core Method: SaveAsImage
The heart of PDF-to-image conversion in Spire.PDF lies in the SaveAsImage() method provided by the PdfDocument class.
Here’s what you need to know:
-
Syntax (overload 1):
-
Image SaveAsImage(int pageIndex, PdfImageType imageType);
- pageIndex: The zero-based index of the PDF page you want to convert.
- imageType: The type of image to generate, typically PdfImageType.Bitmap.
-
Syntax (overload 2 with resolution):
-
Image SaveAsImage(int pageIndex, PdfImageType imageType, int dpiX, int dpiY);
- dpiX, dpiY: Horizontal and vertical resolution (dots per inch).
Higher DPI = better quality but larger file size.
Supported PdfImageType Values
- Bitmap → returns a raw image.
- Metafile → returns a vector image (less common for JPG export).
Most developers use Bitmap when exporting to JPG.
Steps to Convert PDF to JPG in C# .NET
- Import the Spire.Pdf and System.Drawing namespaces.
- Create a new PdfDocument instance.
- Load the PDF file from the specified path.
- Use SaveAsImage() to convert one or more pages into images.
- Save the generated image(s) in JPG format.
Convert a Single Page to JPG
Here’s a simple workflow to convert a single PDF page to a JPG image:
using Spire.Pdf.Graphics;
using Spire.Pdf;
using System.Drawing.Imaging;
using System.Drawing;

namespace ConvertSpecificPageToPng
{
    class Program
    {
        static void Main(string[] args)
        {
            // Create a PdfDocument object
            PdfDocument doc = new PdfDocument();

            // Load a sample PDF document
            doc.LoadFromFile("C:\\Users\\Administrator\\Desktop\\sample.pdf");

            // Convert a specific page to a bitmap image
            Image image = doc.SaveAsImage(0, PdfImageType.Bitmap);

            // Save the image as a JPG file
            image.Save("ToJPG.jpg", ImageFormat.Jpeg);

            // Disposes resources
            doc.Dispose();
        }
    }
}
Output:

Spire.PDF supports converting PDF to various other image formats like PNG, BMP, SVG, and TIFF. For more details, refer to the documentation: Convert PDF to Image in C#.
Convert Multiple Pages (All or Range)
Convert All Pages
The following loop iterates over all pages, converts each one into an image, and saves it to disk with page numbers in the filename.
for (int i = 0; i < doc.Pages.Count; i++)
{
    Image image = doc.SaveAsImage(i, PdfImageType.Bitmap);
    string fileName = string.Format("Output\\ToJPG-{0}.jpg", i);
    image.Save(fileName, ImageFormat.Jpeg);
}
Convert a Range of Pages
To convert a specific range of pages (e.g., pages 2 to 4), modify the for loop as follows:
for (int i = 1; i <= 3; i++)
{
    Image image = doc.SaveAsImage(i, PdfImageType.Bitmap);
    string fileName = string.Format("Output\\ToJPG-{0}.jpg", i);
    image.Save(fileName, ImageFormat.Jpeg);
}
Advanced Conversion Options
Set Image Resolution/Quality
By default, the output resolution might be too low for printing or detailed analysis. You can set DPI explicitly:
Image image = doc.SaveAsImage(0, PdfImageType.Bitmap, 300, 300);
image.Save("ToJPG.jpg", ImageFormat.Jpeg);
Tips:
- 72 DPI : Default, screen quality.
- 150 DPI : Good for previews and web.
- 300 DPI : High quality, suitable for printing.
Higher DPI results in sharper images but also increases memory and file size.
Save the Converted Images as Stream
Instead of writing directly to disk, you can store the output in memory streams. This is useful in:
- ASP.NET applications returning images to browsers.
- Web APIs sending images as HTTP responses.
- Database storage for binary blobs.
using (MemoryStream ms = new MemoryStream())
{
    pdf.SaveAsImage(0, PdfImageType.Bitmap, 300, 300).Save(ms, ImageFormat.Jpeg);
    byte[] imageBytes = ms.ToArray();
}
Here, the JPG image is stored as a byte array , ready for further processing.
Batch Conversion (Multiple PDFs)
In scenarios where you need to process multiple PDF documents at once, you can apply batch conversion as shown below:
string[] files = Directory.GetFiles("InputPDFs", "*.pdf");
foreach (string file in files)
{
    PdfDocument doc = new PdfDocument();
    doc.LoadFromFile(file);
    for (int i = 0; i < doc.Pages.Count; i++)
    {
        Image image = doc.SaveAsImage(i, PdfImageType.Bitmap);
        string fileName = Path.GetFileNameWithoutExtension(file);
        image.Save($"Output\\{fileName}-Page{i + 1}.jpg", ImageFormat.Jpeg);
    }
    doc.Dispose();
}
Troubleshooting & Best Practices
Working with PDF-to-image conversion in .NET can come with challenges. Here’s how to address them:
- Large PDFs consume memory
- Use lower DPI (e.g., 150 instead of 300).
- Process in chunks rather than loading everything at once.
- Images are blurry or low quality
- Increase DPI.
- Consider using PNG instead of JPG for sharp diagrams or text.
- File paths cause errors
- Always check that the output directory exists.
- Use Path.Combine() for cross-platform paths.
- Handling password-protected PDFs
- Provide the password when loading:
doc.LoadFromFile("secure.pdf", "password123");
- Dispose objects
- Always call Dispose() on PdfDocument and Image objects to release memory.
Conclusion
Converting PDF to JPG in .NET is straightforward with Spire.PDF for .NET . The library provides the SaveAsImage() method, allowing you to convert a single page or an entire document with just a few lines of code. With options for custom resolution, stream handling, and batch conversion , you can adapt the workflow to desktop apps, web services, or cloud platforms.
By following best practices like managing memory and adjusting resolution, you can ensure efficient, high-quality output that fits your project’s requirements.
If you’re exploring more advanced document processing, Spire also offers libraries for Word, Excel, and PowerPoint, enabling a complete .NET document solution.
FAQs
Q1. Can I convert PDFs to formats other than JPG?
Yes. Spire.PDF supports PNG, BMP, SVG, and other common formats.
Q2. What DPI should I use?
- 72 DPI for thumbnails.
- 150 DPI for web previews.
- 300 DPI for print quality.
Q3. Does Spire.PDF support encrypted PDFs?
Yes, but you need to provide the correct password when loading the file.
Q4. Can I integrate this in ASP.NET?
Yes. You can save images to memory streams and return them as HTTP responses.
Q5. Can I convert images back to PDF?
Yes. You can load JPG, PNG, or BMP files and insert them into PDF pages, effectively converting images back into a PDF.
Get a Free License
To fully experience the capabilities of Spire.PDF for .NET without any evaluation limitations, you can request a free 30-day trial license.
Converting HTML to RTF in C# is a key task for developers working with web content that needs to be transformed into editable, universally compatible documents. HTML excels at web display with dynamic styles and structure, while RTF is ideal for shareable, editable files in tools like Word or WordPad.
For .NET developers, using libraries like Spire.Doc can streamline the process. In this tutorial, we'll explore how to use C# to convert HTML to RTF, covering everything from basic implementations to advanced scenarios such as handling HTML images, batch conversion.
- Why Use Spire.Doc for HTML to RTF Conversion?
- Getting Started
- Convert HTML to RTF (C# Code Examples)
- Advanced Conversion Scenarios
- Final Thoughts
- Common Questions
Why Use Spire.Doc for HTML to RTF Conversion?
Spire.Doc for .NET is a lightweight, feature-rich library for creating, editing, and converting Word and RTF documents in .NET applications (supports .NET Framework, .NET Core, and .NET 5+). For HTML to rich text conversion, it offers key benefits:
- Preserves HTML formatting (fonts, colors, links, lists, tables).
- Supports loading HTML from strings or local files.
- No dependency on Microsoft Word or other third-party software.
- Intuitive API with minimal code required.
Getting Started
1. Create a C# Project
If you’re starting from scratch, create a new Console App (.NET Framework/.NET Core) project in Visual Studio. This example uses a console app for simplicity, but the code works in WinForms, WPF, or ASP.NET projects too.
2. Install Spire.Doc via NuGet
The fastest way to add Spire.Doc to your C# project is through NuGet Package Manager:
- Open your C# project in Visual Studio.
- Right-click the project in the Solution Explorer → Select Manage NuGet Packages.
- Search for Spire.Doc and click Install to add the latest version to your project.
Alternatively, use the NuGet Package Manager Console with this command:
Install-Package Spire.Doc
Convert HTML to RTF (C# Code Examples)
Spire.Doc’s Document class handles HTML loading and RTF saving. Below are two common scenarios:
Scenario 1: Convert HTML String to RTF in C#
Use this when HTML content is dynamic (e.g., from user input, APIs, or databases).
using Spire.Doc;
using Spire.Doc.Documents;

namespace HtmlToRtfConverter
{
    class Program
    {
        static void Main(string[] args)
        {
            // Create a Document object
            Document doc = new Document();

            // Define your HTML content
            string htmlString = @"
                    <html>
                        <body>
                            <h1 style='color: #00BFFF; font-family: Arial'>HTML to RTF Conversion</h1>
                            <p>This is a <b>bold paragraph</b> with a <a href='https://www.e-iceblue.com'>link</a>.</p>
                            <ul>
                                <li>Item 1 </li>
                                <li>Item 2</li>
                            </ul>
                            <table border='1' cellpadding='5'>
                                <tr><td>Name</td><td>Gender</td><td>Age</td></tr>
                                <tr><td>John</td><td>Male</td><td>30</td></tr>
                                <tr><td>Kate</td><td>Female</td><td>26</td></tr>
                            </table>
                        </body>
                    </html>";

            // Add a paragraph in Word
            Paragraph para = doc.AddSection().AddParagraph();

            // Append the HTML string to the paragraph
            para.AppendHTML(htmlString);

            // Save the document as RTF
            doc.SaveToFile("HtmlStringToRtf.rtf", FileFormat.Rtf);
            doc.Dispose();

        }
    }
}
In this code:
- Document Object: Represents an empty document.
- HTML String: You can customize this to include any valid HTML (styles, media, or dynamic content from databases/APIs).
- AppendHTML(): Parses HTML tags (e.g.,
<h1>,<table>,<a>) and inserts them into a paragraph. - SaveToFile(): Writes the converted content to an RTF file.
Output:
The SaveToFile method accepts different FileFormat parameters. You can change it to implement HTML to Word conversion in C#.
Scenario 2: Convert HTML File to RTF File
For static HTML files (e.g., templates or saved web pages), use LoadFromFile with parameter FileFormat.Html:
using Spire.Doc;

namespace ConvertHtmlToRTF
{
    class Program
    {
        static void Main()
        {
            // Create a Document object
            Document doc = new Document();

            // Load an HTML file
            doc.LoadFromFile("Test.html", FileFormat.Html);

            // Save the HTML file as rtf format
            doc.SaveToFile("HTMLtoRTF.rtf", FileFormat.Rtf);
            doc.Dispose();
        }
    }
}
This code simplifies HTML-to-RTF conversion into three core steps:
- Creates a Document object.
- Loads an existing HTML file using LoadFromFile() with the FileFormat.Html parameter.
- Saves the loaded HTML as an RTF format using SaveToFile() with the FileFormat.Rtf parameter.
Output:
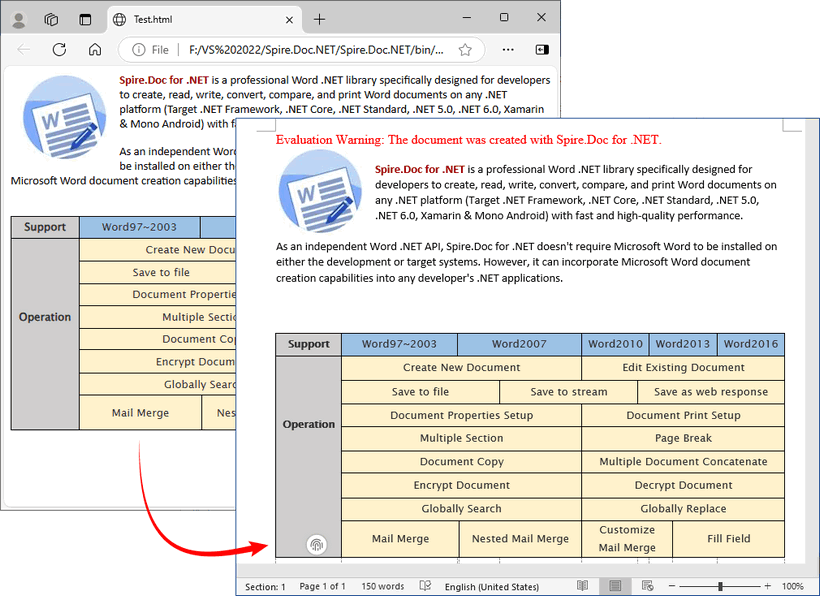
Spire.Doc supports bidirectional conversion, so you can convert the RTF file back to HTML in C# when needed.
Advanced Conversion Scenarios
1. Handling Images in HTML
Spire.Doc preserves images embedded in HTML (via <img> tags). For local images, ensure the src path is correct. For remote images (URLs), Spire.Doc automatically downloads and embeds them.
// HTML with local and remote images
string htmlWithImages = @"<html>
    <body>
        <h3>HTML with Images</h3>
        <p>Local image: <img src='https://cdn.e-iceblue.com/C:\Users\Administrator\Desktop\HelloWorld.png' alt='Sample Image' width='200'></p>
        <p>Remote image: <img src='https://www.e-iceblue.com/images/art_images/csharp-html-to-rtf.png' alt='Online Image'></p>
    </body>
    </html>";

// Append the HTML string to a paragraph
Paragraph para = doc.AddSection().AddParagraph();
para.AppendHTML(htmlWithImages);

// Save the document as RTF
doc.SaveToFile("HtmlWithImage.rtf", FileFormat.Rtf);
2. Batch Conversion of Multiple HTML Files
Process an entire directory of HTML files with a loop:
string inputDir = @"C:\Input\HtmlFiles";
string outputDir = @"C:\Output\RtfFiles";

// Create output directory if it doesn't exist
Directory.CreateDirectory(outputDir);

// Get all .html files in input directory
foreach (string htmlFile in Directory.EnumerateFiles(inputDir, "*.html"))
{
   using (Document doc = new Document())
   {
      doc.LoadFromFile(htmlFile, FileFormat.Html, XHTMLValidationType.None);

      // Use the same filename but with .rtf extension
      string fileName = Path.GetFileNameWithoutExtension(htmlFile) + ".rtf";
      string outputPath = Path.Combine(outputDir, fileName);

      doc.SaveToFile(outputPath, FileFormat.Rtf);
Final Thoughts
Converting HTML to RTF in C# is straightforward with Spire.Doc for .NET. This library eliminates the need for manual parsing and ensures consistent formatting across outputs. Whether you’re working with HTML strings or files, this article provides practical code examples to handle both scenarios.
For further exploration, refer to the Spire.Doc documentation.
Common Questions
Q1: Is Spire.Doc free to use?
A: For large-scale projects, you can request a free 30-day trial license to fully evaluate it. Alternatively, Spire.Doc offers a free community edition without any watermarks (but with certain page/functionality limits).
Q2: Does Spire.Doc preserve HTML hyperlinks, images, and tables in the RTF output?
A: Yes. Spire.Doc retains most HTML elements:
- Hyperlinks:
<a>tags are converted to clickable links in RTF. - Images: Local (
<img src="/path">) and remote (<img src="/URL">) images are embedded in the RTF. - Tables: HTML tables (with border, cellpadding, etc.) are converted to RTF tables with preserved structure.
Q3: Can I style the RTF output further after loading the HTML?
A: Absolutely. After loading the HTML content into the Document object, you can use the full Spire.Doc API to programmatically modify the document before saving it as RTF.
Q4: Can I convert HTML to other formats with Spire.Doc?
A: Yes. Apart from converting to RTF, the library also supports converting HTML to Word, HTML to XML, and HTML to images, etc.
