
.NET (1327)
Children categories
How to Read Barcodes from PDF in C# – Easy Methods with Code
2025-06-19 06:58:45 Written by Administrator
Reading barcodes from PDF in C# is a common requirement in document processing workflows, especially when dealing with scanned forms or digital PDFs. In industries like logistics, finance, healthcare, and manufacturing, PDFs often contain barcodes—either embedded as images or rendered as vector graphics. Automating this process can reduce manual work and improve accuracy.
This guide shows how to read barcode from PDF with C# using two practical methods: extracting images embedded in PDF pages and scanning them, or rendering entire pages as images and detecting barcodes from the result. Both techniques support reliable recognition of 1D and 2D barcodes in different types of PDF documents.
Table of Contents
- Getting Started: Tools and Setup
- Step-by-Step: Read Barcodes from PDF in C#
- Which Method Should You Use?
- Real-World Use Cases
- FAQ
Getting Started: Tools and Setup
To extract or recognize barcodes from PDF documents using C#, make sure your environment is set up correctly.
Here’s what you need:
- Any C# project that supports NuGet package installation (such as .NET Framework, .NET Core, or .NET).
- The following libraries, Spire.Barcode for .NET for barcode recognition and Spire.PDF for .NET for PDF processing, can be installed via NuGet Package Manager:
Install-Package Spire.Barcode
Install-Package Spire.PDF
Step-by-Step: Read Barcodes from PDF in C#
There are two ways to extract barcode data from PDF files. Choose one based on how the barcode is stored in the document.
Method 1: Extract Embedded Images and Detect Barcodes
This method is suitable for scanned PDF documents, where each page often contains a raster image with one or more barcodes. The BarcodeScanner.ScanOne() method can read one barcode from one image.
Code Example: Extract and Scan
using Spire.Barcode;
using Spire.Pdf;
using Spire.Pdf.Utilities;
using System.Drawing;

namespace ReadPDFBarcodeByExtracting
{
    class Program
    {
        static void Main(string[] args)
        {
            // Load a PDF file
            PdfDocument pdf = new PdfDocument();
            pdf.LoadFromFile("Sample.pdf");

            // Get a page and the image information on the page
            PdfPageBase page = pdf.Pages[0];
            PdfImageHelper imageHelper = new PdfImageHelper();
            PdfImageInfo[] imagesInfo = imageHelper.GetImagesInfo(page);

            // Loop through the image information
            int index = 0;
            foreach (PdfImageInfo imageInfo in imagesInfo)
            {
                // Get the image as an Image object
                Image image = imageInfo.Image;
                // Scan the barcode and output the result
                string scanResult = BarcodeScanner.ScanOne((Bitmap)image);
                Console.WriteLine($"Scan result of image {index + 1}:\n" + scanResult + "\n");
                index++;
            }
        }
    }
}
The following image shows a scanned PDF page and the barcode recognition result using Method 1 (extracting embedded images):
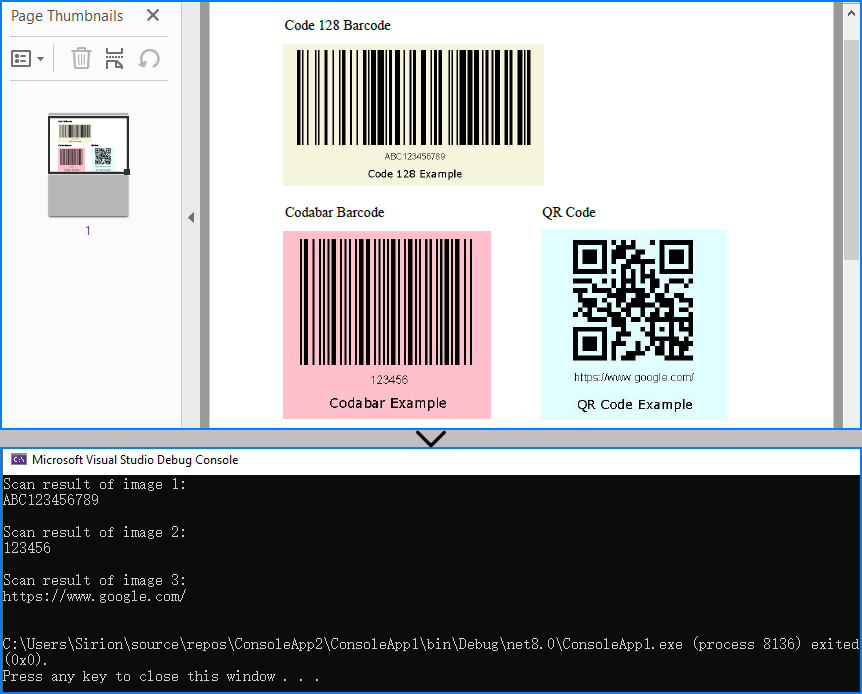
When to use: If the PDF is a scan or contains images with embedded barcodes.
You may also like: Generate Barcodes in C# (QR Code Example)
Method 2: Render Page as Image and Scan
When barcodes are drawn using vector elements (not embedded images), you can render each PDF page as a bitmap and perform barcode scanning on it. The BarcodeScanner.Scan() method can read multiple barcodes from one image.
Code Example: Render and Scan
using Spire.Barcode;
using Spire.Pdf;
using System.Drawing;

namespace ReadPDFBarcodeByExtracting
{
    class Program
    {
        static void Main(string[] args)
        {
            // Load a PDF file
            PdfDocument pdf = new PdfDocument();
            pdf.LoadFromFile("Sample.pdf");

            // Save each page as an image
            for (int i = 0; i < pdf.Pages.Count; i++)
            {
                Image image = pdf.SaveAsImage(i);
                // Read the barcodes on the image
                string[] scanResults = BarcodeScanner.Scan((Bitmap)image);
                // Output the results
                for (int j = 0; j < scanResults.Length; j++)
                {
                    Console.WriteLine($"Scan result of barcode {j + 1} on page {i + 1}:\n" + scanResults[j] + "\n");
                }
            }
        }
    }
}
Below is the result of applying Method 2 (rendering full PDF page) to detect vector barcodes on the page:
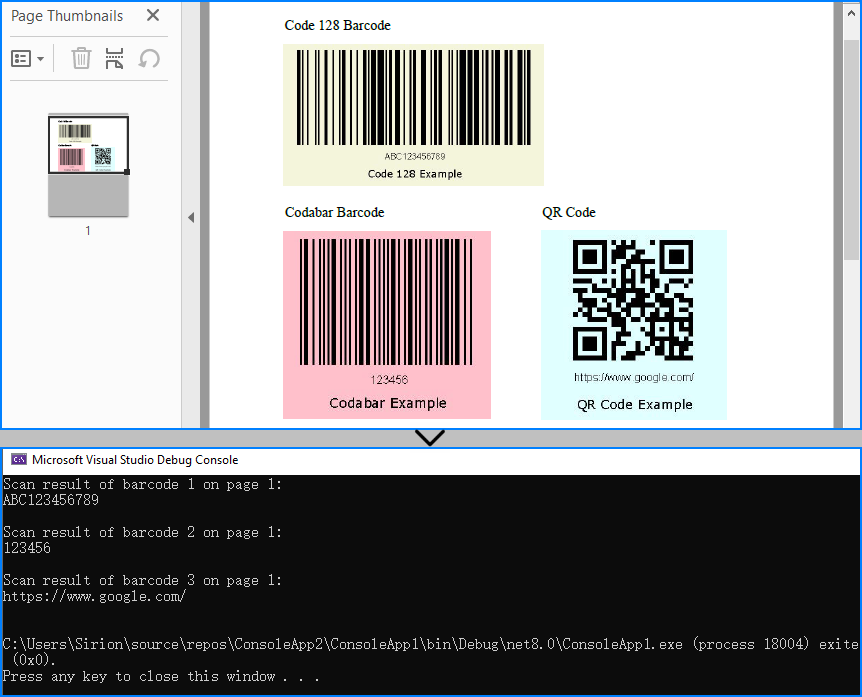
When to use: When barcodes are drawn on the page directly, not embedded as image elements.
Related article: Convert PDF Pages to Images in C#
Which Method Should You Use?
| Use Case | Recommended Method |
|---|---|
| Scanned pages or scanned barcodes | Extract embedded images |
| Digital PDFs with vector barcodes | Render full page as image |
| Hybrid or unknown structure | Try both methods optionally |
You can even combine both methods for maximum reliability when handling unpredictable document structures.
Real-World Use Cases
Here are some typical scenarios where barcode recognition from PDFs in C# proves useful:
-
Logistics automation Extract tracking numbers and shipping IDs from scanned labels, dispatch forms, or signed delivery receipts in bulk.
-
Invoice and billing systems Read barcode-based document IDs or payment references from digital or scanned invoices in batch processing tasks.
-
Healthcare document digitization Automatically scan patient barcodes from lab reports, prescriptions, or admission forms in PDF format.
-
Manufacturing and supply chain Recognize barcodes from packaging reports, quality control sheets, or equipment inspection PDFs.
-
Educational institutions Process barcoded student IDs on scanned test forms or attendance sheets submitted as PDFs.
Tip: In many of these use cases, PDFs come from scanners or online systems, which may embed barcodes as images or page content—both cases are supported with the two methods introduced above.
Conclusion
Reading barcodes from PDF files in C# can be achieved reliably using either image extraction or full-page rendering. Whether you need to extract a barcode from a scanned document or recognize one embedded in PDF content, both methods provide flexible solutions for barcode recognition in C#.
FAQ
Q: Does this work with multi-page PDFs?
Yes. You can loop through all pages in the PDF and scan each one individually.
Q: Can I extract multiple barcodes per page?
Yes. The BarcodeScanner.Scan() method can detect and return all barcodes found on each image.
Q: Can I improve recognition accuracy by increasing resolution?
Yes. When rendering a PDF page to an image, you can set a higher DPI using PdfDocument.SaveAsImage(pageIndex: int, PdfImageType.Bitmap: PdfImageType, dpiX: int, dpiY: int). For example, 300 DPI is ideal for small or low-quality barcodes.
Q: Can I read barcodes from PDF using C# for free?
Yes. You can use Free Spire.Barcode for .NET and Free Spire.PDF for .NET to read barcodes from PDF files in C#. However, the free editions have feature limitations, such as page count or supported barcode types. If you need full functionality without restrictions, you can request a free temporary license to evaluate the commercial editions.
Extract Background Images from PowerPoint Presentations using C# .NET
2025-05-16 09:01:16 Written by Administrator
PowerPoint presentations often contain background images that enhance the visual appeal of slides. Extracting these background images can be crucial for designers and content managers who wish to reuse, analyze, or archive slide visuals independently of the slide content.
This guide provides a clear, step-by-step approach to extracting background images from PowerPoint presentations in .NET using C# and the Spire.Presentation for .NET library.
Table of Contents
- Why Extract Background Images from PowerPoint
- Install .NET PowerPoint Library – Spire.Presentation for .NET
- Extract Background Images from PowerPoint in .NET using C#
- FAQs
- Conclusion
Why Extract Background Images from PowerPoint
Extracting background images from PowerPoint provides several key benefits:
- Reuse Designs: Repurpose background images in other presentations or design projects.
- Analyze Slides: Review and understand slide designs by examining background images separately.
- Archive Visuals: Store background images for documentation, backup, or future use.
Install .NET PowerPoint Library – Spire.Presentation for .NET
Spire.Presentation for .NET is a robust .NET PowerPoint library that enables developers to create, manipulate, and convert PowerPoint presentations without the need for Microsoft PowerPoint.
Key Features of Spire.Presentation for .NET
Here are some key features of Spire.Presentation for .NET:
- Create and edit PowerPoint presentations.
- Convert PowerPoint to other formats such as PDF, Images, HTML, Markdown, and XPS.
- Secure PowerPoint presentations
- Merge/split PowerPoint presentations.
- Slides management, including adding/removing slides, setting/extracting/removing backgrounds, and more.
- Image/shape/chart/smartart insertion and manipulation.
- Animate text/shapes.
Install Spire.Presentation for .NET
Before starting the background image extraction process, you will need to install Spire.Presentation for .NET into your C# project using one of the following methods:
Option1. Install via NuGet (Recommended)
Install-Package Spire.PresentationOption 2: Manually Add DLLs to Your Project
- Download the Spire.Presentation package and extract the files.
- In Visual Studio, right-click References > Add Reference > Browse, then select the appropriate Spire.Presentation.dll based on your target framework.
Extract Background Images from PowerPoint in .NET using C#
Background images in PowerPoint can be applied directly to individual slides or inherited from slide masters. This section demonstrates how to extract both types of background images using Spire.Presentation.
Extract Background Images from Individual Slides
To extract background images from individual slides in PowerPoint, follow these steps:
- Create a Presentation object and load the presentation.
- Loop through all slides in the presentation.
- Check if the slide’s background fill type is image fill (FillFormatType.Picture).
- If yes, retrieve and save the background image.
Sample Code
- C#
using Spire.Presentation;
using Spire.Presentation.Drawing;
using System.IO;

namespace ExtractSlideBackgroundImages
{
    internal class Program
    {
        static void Main(string[] args)
        {
            // Specify the input file path and output folder
            string inputFile = @"example1.pptx";
            string outputFolder = @"ExtractedBackgrounds\Slides";

            // Load the PowerPoint presentation
            Presentation presentation = new Presentation();
            presentation.LoadFromFile(inputFile);

            // Create the output folder
            Directory.CreateDirectory(outputFolder);

            // Loop through all slides
            for (int i = 0; i < presentation.Slides.Count; i++)
            {
                // Check if the slide's background fill type is image fill
                var fill = presentation.Slides[i].SlideBackground.Fill;
                if (fill.FillType == FillFormatType.Picture)
                {
                    // Extract and save the background image
                    var image = fill.PictureFill.Picture.EmbedImage;
                    if (image != null)
                    {
                        string outputPath = Path.Combine(outputFolder, $"SlideBackground_{i + 1}.png");
                        image.Image.Save(outputPath, ImageFormat.Png);
                    }
                }
            }
        }
    }
}
Extract Background Images from Slide Masters
Slide masters define the design and layout of slides, including background images. To extract background images from slide masters:
- Create a Presentation object and load the presentation.
- Loop through all slide masters in the presentation.
- For each master, check if its background fill type is image fill.
- If yes, extract and save the background image.
Sample Code
- C#
using Spire.Presentation;
using Spire.Presentation.Drawing;
using System.Drawing.Imaging;
using System.IO;

namespace ExtractBackgroundImages
{
    internal class Program
    {
        static void Main(string[] args)
        {
            // Specify the input file path and output folder
            string inputFile = @"example2.pptx";
            string outputFolder = @"C:\ExtractedBackgrounds\Masters";

            // Load the PowerPoint presentation
            Presentation presentation = new Presentation();
            presentation.LoadFromFile(inputFile);

            // Create the output folder
            Directory.CreateDirectory(outputFolder);

            // Loop through all slide masters
            for (int i = 0; i < presentation.Masters.Count; i++)
            {
                // Check if the slide master's background fill type is image fill
                var fill = presentation.Masters[i].SlideBackground.Fill;
                if (fill.FillType == FillFormatType.Picture)
                {
                    // Extract and save the background image
                    var image = fill.PictureFill.Picture.EmbedImage;
                    if (image != null)
                    {
                        string outputPath = Path.Combine(outputFolder, $"MasterBackground_{i + 1}.png");
                        image.Image.Save(outputPath, ImageFormat.Png);
                    }
                }
            }

        }
    }
}
Conclusion
Extracting background images from PowerPoint presentations is a crucial technique for developers and designers who want to access slide visuals independently of content. By leveraging the Spire.Presentation for .NET library with C#, you can programmatically extract background images from both individual slides and slide masters with ease.
FAQs
Q: What image formats are supported for extraction?
A: Extracted images can be saved in PNG, JPEG, BMP, or other formats supported by .NET.
Q: In addition to background images, can I extract other images from PowerPoint slides?
A: Yes, you can extract other images, such as those embedded within slide content or shapes, using Spire.Presentation.
Q: Does Spire.Presentation supports extracting text from PowerPoint presentations?
A: Yes, Spire.Presentation can also extract text from slides, including text in shapes, tables, and more.
Get a Free License
To fully experience the capabilities of Spire.Presentation for .NET without any evaluation limitations, you can request a free 30-day trial license.
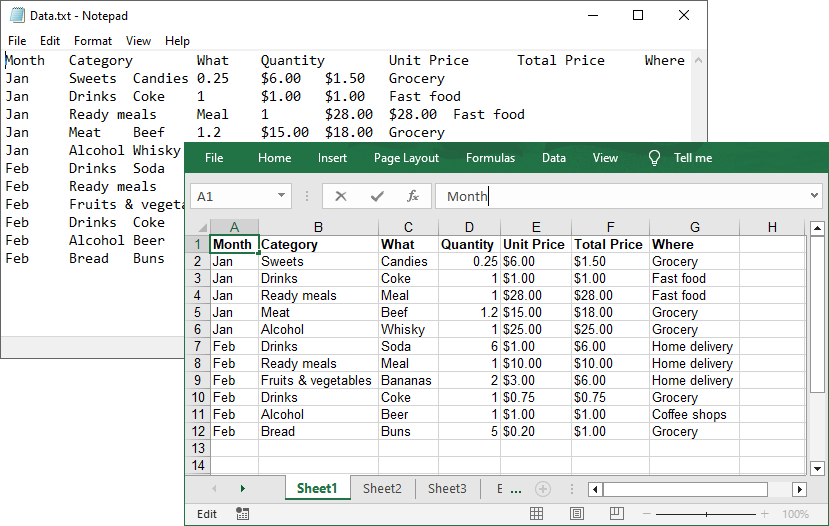
In data processing and management scenarios, efficiently transforming raw text (TXT) files into structured Excel spreadsheets is a common requirement. For developers who are automating reports or processing log files, converting TXT to Excel using C# streamlines data organization and analysis. This guide explores how to achieve this using Spire.XLS for .NET, a powerful library designed to handle Excel XLS or XLSX files without requiring Microsoft Office.
- Why Convert TXT to Excel Programmatically?
- How to Convert Text Files to Excel in C# (Step-by-Step Guide)
- Pro Tips for TXT to Excel Conversion
Why Convert TXT to Excel Programmatically?
Text files are simple but lack the analytical power of Excel. Key advantages of converting TXT to XLS or XLSX format include:
- Automation: Process large or recurring files without manual intervention.
- Data Structuring: Organize raw text into rows, columns, and sheets.
- Advanced Features: Leverage Excel formulas, charts, and pivot tables.
- Integration: Embed conversion feature into .NET applications or APIs.
How to Convert Text Files to Excel in C# (Step-by-Step Guide)
Install Spire.XLS for .NET
Spire.XLS for .NET is a professional Excel document processing component, provides efficient and convenient APIs that allow developers to achieve TXT to Excel conversion through simple code.
Before getting started, you can choose one of these methods to install the library:
Method 1: NuGet Package Manager
- Open your project in Visual Studio.
- Right-click on the project in the Solution Explorer and select "Manage NuGet Packages."
- Search for "Spire.XLS" and click "Install".
Method 2: Package Manager Console
- Go to "Tools > NuGet Package Manager > Package Manager Console."
- Run the following command in the console:
PM> Install-Package Spire.XLS
Method 3: Manual Installation with DLL Files
- Visit the Spire.XLS Download Page and get the latest version.
- Extract the files and then add the Spire.Xls.dll to your project.
Import a Text File into Excel Using C#
Follow the below steps to write the data in a txt file into an Excel worksheet:
- Read TXT File: use the File.ReadAllLines() method to read all lines in a text file and returns them as an array of strings.
- Parse each line:
- Use the string.Trim() method to remove the leading/trailing whitespaces.
- Use the string.Split() method to split the data based on specified delimiters.
- Add the split text data to a list.
- Create a Workbook instance and get a worksheet
- Write Data to specified cells:
- Iterate through the rows and columns in the list.
- Assign the data in the list to the corresponding Excel cells through the Worksheet.Range[].Value property.
- Save the Excel File.
Code Example:
- C#
using Spire.Xls;
using System.IO;
using System.Collections.Generic;

class TxtToExcelConverter
{
    static void Main()
    {
        // Open a text file and read all lines in it
        string[] lines = File.ReadAllLines("Data.txt");

        // Create a list to store the data in text file
        List data = new List();

        // Split data into rows and columns and add to the list
        foreach (string line in lines)
        {
            data.Add(line.Trim().Split('\t')); // Adjust delimiter as needed
        }

        // Create a Workbook object
        Workbook workbook = new Workbook();

        // Get the first worksheet
        Worksheet sheet = workbook.Worksheets[0];

        // Iterate through the rows and columns in the data list
        for (int row = 0; row < data.Count; row++)
        {
            for (int col = 0; col < data[row].Length; col++)
            {
                // Write the text data in specified cells
                sheet.Range[row + 1, col + 1].Value = data[row][col];

                // Set the header row to Bold
                sheet.Range[1, col + 1].Style.Font.IsBold = true;
            }
        }

        // Autofit columns
        sheet.AllocatedRange.AutoFitColumns();

        // Save the Excel file
        workbook.SaveToFile("TXTtoExcel.xlsx", ExcelVersion.Version2016);
        workbook.Dispose();
    }
}
Result:
Pro Tips for TXT to Excel Conversion
- Handling Different Delimiters:
If your TXT file uses a different delimiter (e.g., space, comma, semicolon), modify the parameter of the Split(params char[] separator) method.
- Format Cells:
After a text file being converted to an Excel file, you can take advantage of the Spire.XLS library’s rich features to format cells, such as setting the background colors, adding cell borders, applying number formats, etc.
Conclusion
By following this step-by-step guide, you can efficiently transform unstructured text data into organized Excel spreadsheets, which is ideal for data analysis, reporting, and management. Remember to optimize your implementation for your specific delimiters and leverage Spire.XLS's advanced features for complex conversion scenarios.
Get a Free License
To fully experience the capabilities of Spire.XLS for .NET without any evaluation limitations, you can request a free 30-day trial license.
Generating Word documents programmatically is a common requirement in business applications, whether for creating reports, contracts, or personalized letters. Spire.Doc for .NET provides a comprehensive solution for working with Word documents in C# without Microsoft Office dependencies.
This article explores two effective approaches for document generation from templates: replacing text placeholders and modifying bookmark content.
- Create a Word Document By Replacing Text Placeholders
- Create a Word Document By Replacing Bookmark Content
.NET Library for Creating Word Documents
Spire.Doc for .NET is a professional Word API that enables developers to perform a wide range of document processing tasks. Key features include:
- Creating, reading, editing, and converting Word documents
- Support for DOC, DOCX, RTF, and other formats
- Template-based document generation
- Mail merge functionality
- Preservation of original formatting
The library is particularly useful for automating document generation in enterprise applications, where consistency and efficiency are crucial.
To begin generating Word documents from a template, donwload Spire.Doc for .NET from our official website or install it using the NuGet Package Manager with the following command:
PM> Install-Package Spire.Doc
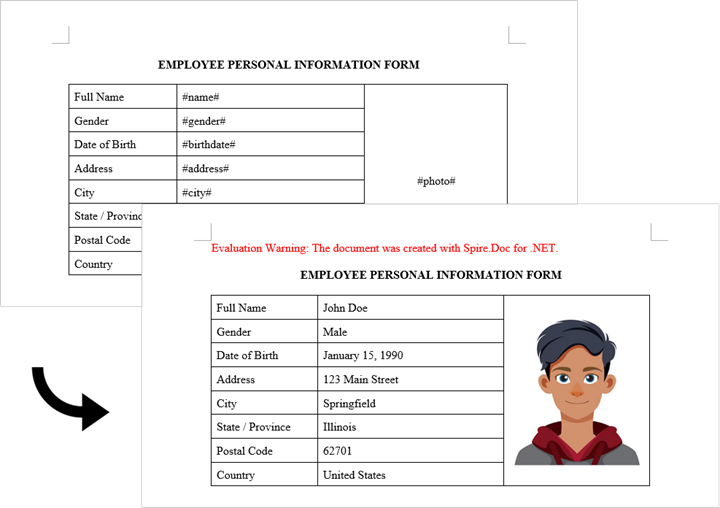
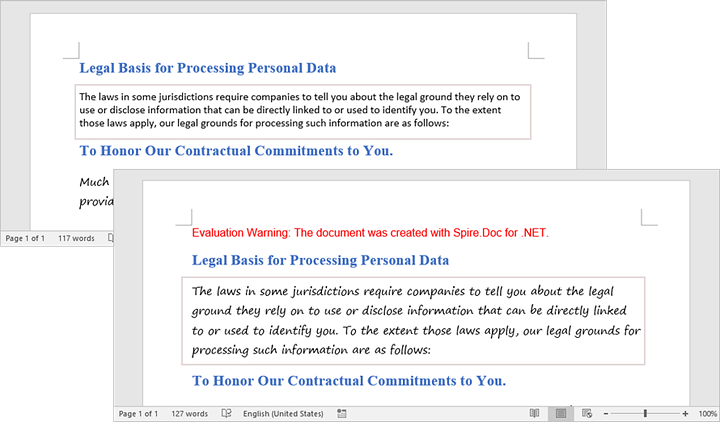
Create a Word Document By Replacing Text Placeholders
The Document.Replace method in the Spire.Doc library is used to find and replace specific text within a Word document. This method allows for the efficient modification of text placeholders, enabling the dynamic generation of documents based on templates.
Here are the steps for Word generation through text pattern replacement:
- Document Initialization: Create a new Document object and load the template file.
- Placeholder Definition: Use a dictionary to map placeholders (like #name#) to their replacement values.
- Text Replacement: The Document.Replace method performs case-sensitive and whole-word replacement of all placeholders.
- Image Handling: The custom ReplaceTextWithImage method locates a text placeholder and substitutes it with an image.
- Document Saving: The modified document is saved with a new filename.
- C#
using Spire.Doc;
using Spire.Doc.Documents;
using Spire.Doc.Fields;
using System.Drawing;

namespace CreateWordByReplacingTextPlaceholders
{
    class Program
    {
        static void Main(string[] args)
        {
            // Initialize a new Document object
            Document document = new Document();

            // Load the template Word file
            document.LoadFromFile("C:\\Users\\Administrator\\Desktop\\Template.docx");

            // Dictionary to hold text placeholders and their replacements
            Dictionary<string, string> replaceDict = new Dictionary<string, string>
            {
                { "#name#", "John Doe" },
                { "#gender#", "Male" },
                { "#birthdate#", "January 15, 1990" },
                { "#address#", "123 Main Street" },
                { "#city#", "Springfield" },
                { "#state#", "Illinois" },
                { "#postal#", "62701" },
                { "#country#", "United States" }
            };

            // Replace placeholders in the document with corresponding values
            foreach (KeyValuePair<string, string> kvp in replaceDict)
            {
                document.Replace(kvp.Key, kvp.Value, true, true);
            }

            // Path to the image file
            String imagePath = "C:\\Users\\Administrator\\Desktop\\portrait.png";

            // Replace the placeholder “#photo#” with an image
            ReplaceTextWithImage(document, "#photo#", imagePath);

            // Save the modified document
            document.SaveToFile("ReplacePlaceholders.docx", FileFormat.Docx);

            // Release resources
            document.Dispose();
        }

        // Method to replace a placeholder in the document with an image
        static void ReplaceTextWithImage(Document document, String stringToReplace, String imagePath)
        {
            // Load the image from the specified path
            Image image = Image.FromFile(imagePath);
            DocPicture pic = new DocPicture(document);
            pic.LoadImage(image);

            // Find the placeholder in the document
            TextSelection selection = document.FindString(stringToReplace, false, true);

            // Get the range of the found text
            TextRange range = selection.GetAsOneRange();
            int index = range.OwnerParagraph.ChildObjects.IndexOf(range);

            // Insert the image and remove the placeholder text
            range.OwnerParagraph.ChildObjects.Insert(index, pic);
            range.OwnerParagraph.ChildObjects.Remove(range);
        }
    }
}
Create a Word Document By Replacing Bookmark Content
The BookmarksNavigator class in Spire.Doc is specifically designed to manage and navigate through bookmarks in a Word document. This class simplifies the process of finding and replacing content in bookmarks, making it easy to update sections of a document without manually searching for each bookmark.
The following are the steps for Word generation using bookmark content replacement:
- Document Initialization: Create a new Document object and load the template file.
- Bookmark Content Definitions: Create a dictionary mapping bookmark names to their replacement content.
- Bookmark Navigation: The BookmarksNavigator class provides precise control over bookmark locations.
- Content Replacement: The ReplaceBookmarkContent method preserves the bookmark while updating its content.
- Document Saving: The modified document is saved with a new filename.
- C#
using Spire.Doc;
using Spire.Doc.Documents;

namespace CreateWordByReplacingBookmarkContent
{
    class Program
    {
        static void Main(string[] args)
        {
            // Initialize a new Document object
            Document document = new Document();

            // Load the template Word file
            document.LoadFromFile("C:\\Users\\Administrator\\Desktop\\Template.docx");

            // Define bookmark names and their replacement values
            Dictionary<string, string> replaceDict = new Dictionary<string, string>
            {
                { "name", "Tech Innovations Inc." },
                { "year", "2015" },
                { "headquarter", "San Francisco, California, USA" },
                { "history", "Tech Innovations Inc. was founded by a group of engineers and " +
                              "entrepreneurs with a vision to revolutionize the technology sector. Starting " +
                              "with a focus on software development, the company expanded its portfolio to " +
                              "include artificial intelligence and cloud computing solutions." }
            };

            // Create a BookmarksNavigator to manage bookmarks in the document
            BookmarksNavigator bookmarkNavigator = new BookmarksNavigator(document);

            // Replace each bookmark's content with the corresponding value
            foreach (KeyValuePair<string, string> kvp in replaceDict)
            {
                bookmarkNavigator.MoveToBookmark(kvp.Key); // Navigate to bookmark
                bookmarkNavigator.ReplaceBookmarkContent(kvp.Value, true); // Replace content
            }

            // Save the modified document
            document.SaveToFile("ReplaceBookmarkContent.docx", FileFormat.Docx2013);

            // Release resources
            document.Dispose();
        }
    }
}

Conclusion
Both approaches provide effective ways to generate documents from templates, but with important differences:
- Text Replacement Method:
- Permanently removes placeholders during replacement
- Best for one-time document generation
- Better suited for replacing text with images
- Bookmark Replacement Method:
- Preserves bookmarks for future updates
- Ideal for templates requiring periodic updates
Additionally, Spire.Doc for .NET supports Mail Merge functionality, which provides another powerful way to dynamically generate documents from templates. This feature is particularly useful for creating personalized documents in bulk, such as form letters or reports, where data comes from a database or other structured source.
Get a Free License
To fully experience the capabilities of Spire.Doc for .NET without any evaluation limitations, you can request a free 30-day trial license.
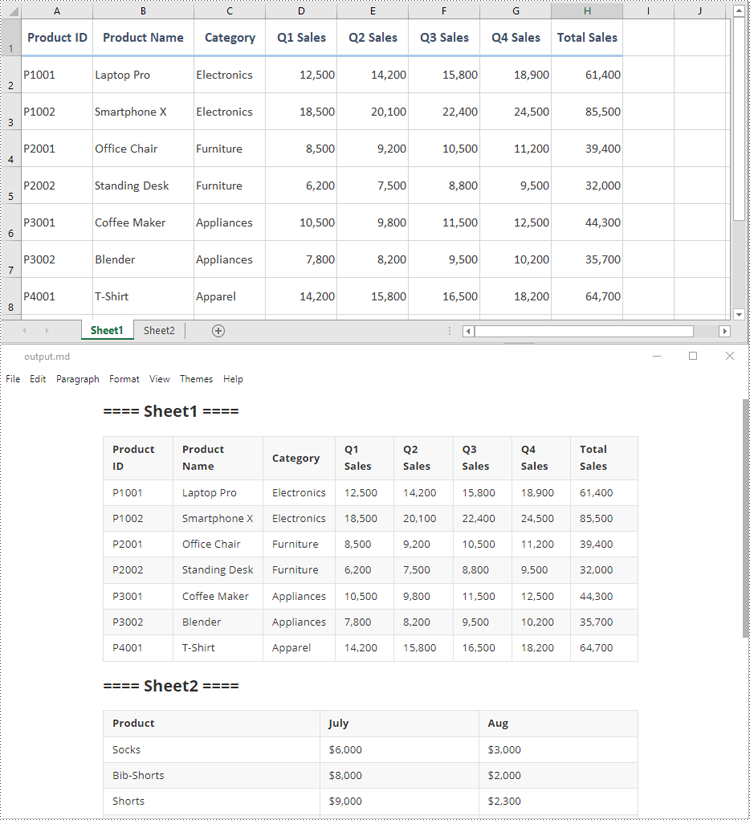
Microsoft Excel is a powerful tool for data management; however, its proprietary format can pose challenges for sharing and integrating data into web workflows. In contrast, Markdown is a lightweight and widely supported markup language that simplifies text formatting for documentation, wikis, and platforms like GitHub.
By converting Excel files to Markdown, you can seamlessly incorporate structured data into technical documents, READMEs, and static websites. This article will guide you through the steps to programmatically convert Excel files to Markdown format using C# and the Spire.XLS for .NET library.
Install Spire.XLS for .NET
To begin with, you need to add the DLL files included in the Spire.XLS for .NET package as references in your .NET project. The DLL files can be either downloaded from this link or installed via NuGet.
PM> Install-Package Spire.XLS
Convert an Excel XLS or XLSX File to Markdown in C#
Developers can effortlessly convert Excel XLS or XLSX files to Markdown files by using the Workbook.SaveToMarkdown() method provided by Spire.XLS for .NET. The detailed steps are as follows.
- Create an object of the Workbook class.
- Load a sample Excel XLS or XLSX file into the Workbook object using the Workbook.LoadFromFile() method.
- Save the Excel file as a Markdown file using the Workbook.SaveToMarkdown() method.
- C#
using Spire.Xls;

namespace ConvertExcelToMarkdown
{
    internal class Program
    {
        static void Main(string[] args)
        {
            // Create an object of the Workbook class
            Workbook workbook = new Workbook();
            // Load a sample Excel XLS file
            //workbook.LoadFromFile("Sample.xls");
            // Load a sample Excel XLSX file
            workbook.LoadFromFile("Sample.xlsx");

            // Save the Excel file as a Markdown file
            workbook.SaveToMarkdown("output.md");
            // Release the resources used by the Workbook object
            workbook.Dispose();
        }
    }
}
Get a Free License
To fully experience the capabilities of Spire.XLS for .NET without any evaluation limitations, you can request a free 30-day trial license.
When working with Word documents, batch extraction of hyperlinks has significant practical applications. Manually extracting URLs from technical documents or product manuals is not only inefficient but also prone to omissions and errors. To address this, this article presents an automated solution using C# to accurately extract hyperlink anchor text, corresponding URLs, and screen tips by parsing document elements. The extracted hyperlink data can support data analysis, SEO optimization, and other applications. The following sections demonstrate how to use Spire.Doc for .NET to extract hyperlinks from a Word document with C# code in .NET programs.
Install Spire.Doc for .NET
To begin with, you need to add the DLL files included in the Spire.Doc for .NET package as references in your .NET project. The DLL files can be either downloaded from this link or installed via NuGet.
PM> Install-Package Spire.Doc
Extracting All Hyperlinks from a Word Document Using C#
In a Word document, hyperlinks are stored as fields. To extract them, the first step is to identify all field objects by checking whether each document object is an instance of the Field class. Then, by checking whether the field object's Type property equals FieldType.FieldHyperlink, we can extract all hyperlink fields.
Once the hyperlinks are identified, we can use the Field.FieldText property to retrieve the hyperlink anchor text and the Field.GetFieldCode() method to obtain the full field code in the following format:
| Hyperlink Type | Field Code Example |
| Standard Hyperlink | HYPERLINK "https://www.example.com/example" |
| Hyperlink with ScreenTip | HYPERLINK "https://www.example.com/example" \o "ScreenTip" |
By parsing the field code, we can extract both the hyperlink URL and the screen tip text, enabling complete retrieval of hyperlink information.
- Create a Document object and use the Document.LoadFromFile() method to load the target Word document.
- Iterate through all sections in the document using foreach (Section section in doc.Sections) to retrieve each section object.
- For each section, iterate through its child objects using foreach (DocumentObject secObj in section.Body.ChildObjects) to access individual elements.
- If a child object is of type Paragraph:
- Iterate through the child objects within the paragraph using foreach (DocumentObject paraObj in paragraph.ChildObjects).
- If a paragraph child object is of type Field and its Field.Type property value equals FieldType.FieldHyperlink, process the Field object.
- For each Field object:
- Extract the anchor text using the Field.FieldText property.
- Retrieve the field code string using the Field.GetFieldCode() method.
- Process the field code string:
- Extract the URL enclosed in quotation marks after "HYPERLINK".
- Check if the field code contains the \o parameter; if present, extract the screen tip text enclosed in double quotes.
- Store the extracted hyperlinks and write them to an output file.
- C#
using Spire.Doc;
using Spire.Doc.Documents;
using Spire.Doc.Fields;

namespace ExtractWordHyperlink
{
    class Program
    {
        static void Main(string[] args)
        {
            // Create an instance of Document
            Document doc = new Document();
            // Load a Word document
            doc.LoadFromFile("Sample.docx");

            // Create a string list to store the hyperlink information
            List<string> hyperlinkInfoList = new List<string>();

            // Iterate through the sections in the document
            foreach (Section section in doc.Sections)
            {
                // Iterate through the child objects in the section
                foreach (DocumentObject secObj in section.Body.ChildObjects)
                {
                    // Check if the current document object is a Paragraph instance
                    if (secObj is Paragraph paragraph )
                    {
                        // Iterate through the child objects in the paragraph
                        foreach (DocumentObject paraObj in paragraph.ChildObjects)
                        {
                            // Check if the current child object is a field
                            if (paraObj is Field field && field.Type == FieldType.FieldHyperlink)
                            {
                                string hyperlinkInfo = "";
                                // Get the anchor text
                                string anchorText = field.FieldText;

                                // Get the field code
                                string fieldCode = field.GetFieldCode();
                                // Get the URL from the field code
                                string url = fieldCode.Split('"')[1];
                                // Check if there is a ScreenTip
                                if (fieldCode.Contains("\\o"))
                                {
                                    // Get the ScreenTip text
                                    string screenTip = fieldCode.Split("\"")[3].Trim();
                                    // Consolidate the information
                                    hyperlinkInfo += $"Anchor Text: {anchorText}\nURL: {url}\nScreenTip: {screenTip}";
                                }
                                else
                                {
                                    hyperlinkInfo += $"Anchor Text: {anchorText}\nURL: {url}";
                                }
                                hyperlinkInfo += "\n";
                                // Append the hyperlink information to the list
                                hyperlinkInfoList.Add(hyperlinkInfo);

                            }
                        }
                    }
                }
            }

            // Write the extracted hyperlink information to a text file
            File.WriteAllLines("output/ExtractedHyperlinks.txt", hyperlinkInfoList);

            doc.Close();
        }
    }
}

Apply for a Temporary License
If you'd like to remove the evaluation message from the generated documents, or to get rid of the function limitations, please request a 30-day trial license for yourself.
When printing a PDF, ensuring the content appears as intended is crucial. Depending on your needs, you may want to print the document at the actual size to maintain the original dimensions or scale it to fit the entire page for a better presentation.

To accommodate different printing needs, Spire.PDF for .NET provides flexible printing options that allow developers to control the output easily. This article will demonstrate how to print a PDF either at the actual size or fit to page in C# using the Spire.PDF for .NET library.
- Print a PDF to Fit the Page Size in C#
- Print a PDF at the Actual Size in C#
- Print a PDF at the Actual Size on Custom-Sized Paper
Install Spire.PDF for .NET
To begin with, you need to add the DLL files included in the Spire.PDF for.NET package as references in your .NET project. The DLLs files can be either downloaded from this link or installed via NuGet.
PM> Install-Package Spire.PDF
Print a PDF to Fit the Page Size in C#
When printing a PDF to fit the page, the content is automatically scaled to match the dimensions of the paper. This ensures that the document fits within the printed area, regardless of its original size.
To fit the content to the page, you can use the PdfDocument.PrintSettings.SelectSinglePageLayout(PdfSinglePageScalingMode pageScalingMode, bool autoPortraitOrLandscape) method. The detailed steps are as follows.
- Create an instance of the PdfDocument class.
- Load the PDF file using the PdfDocument.LoadFromFile() method.
- Configure print settings to scale the PDF to fit the page size for printing using the PdfDocument.PrintSettings.SelectSinglePageLayout(PdfSinglePageScalingMode pageScalingMode, bool autoPortraitOrLandscape) method.
- Call the PdfDocument.Print() method to print the PDF file.
- C#
using Spire.Pdf;
using Spire.Pdf.Print;

namespace PrintPdfToFitPageSize
{
    internal class Program
    {
        static void Main(string[] args)
        {
            // Create an instance of the PdfDocument class
            PdfDocument pdf = new PdfDocument();
            // Load the specified PDF file into the PdfDocument object
            pdf.LoadFromFile("Sample.pdf");

            // Configure print settings to scale the PDF to fit the page size for printing
            pdf.PrintSettings.SelectSinglePageLayout(PdfSinglePageScalingMode.FitSize, false);
            // Execute the print command to print the loaded PDF document
            pdf.Print();


        }
    }
}
Print a PDF at the Actual Size in C#
When printing a PDF at the actual size, the original document dimensions are preserved without scaling. This ensures that the printed output matches the PDF's defined measurements.
To print a PDF at its actual size, you can also use the PdfDocument.PrintSettings.SelectSinglePageLayout(PdfSinglePageScalingMode pageScalingMode, bool autoPortraitOrLandscape) method. The detailed steps are as follows.
- Create an instance of the PdfDocument class.
- Load the PDF file using the PdfDocument.LoadFromFile() method.
- Configure print settings to print the PDF at its actual size without scaling using the PdfDocument.PrintSettings.SelectSinglePageLayout(PdfSinglePageScalingMode pageScalingMode, bool autoPortraitOrLandscape) method.
- Call the PdfDocument.Print() method to print the PDF file.
- C#
using Spire.Pdf;
using Spire.Pdf.Print;
using System.Drawing.Printing;

namespace PrintPdfAtActualSize
{
    internal class Program
    {
        static void Main(string[] args)
        {
            // Create a new instance of the PdfDocument class
            PdfDocument pdf = new PdfDocument();
            // Load the PDF file into the PdfDocument object
            pdf.LoadFromFile("Sample.pdf");

            // Set paper margins as 0
            pdf.PrintSettings.SetPaperMargins(0, 0, 0, 0);

            // Configure print settings to print the PDF at its actual size without scaling
            pdf.PrintSettings.SelectSinglePageLayout(PdfSinglePageScalingMode.ActualSize, false);
            // Execute the print command to print the loaded PDF document
            pdf.Print();
        }
    }
}
Print a PDF at the Actual Size on Custom-Sized Paper
In some cases, you may need to print a PDF at its actual size on a specific size of paper. Spire.PDF allows you to define a custom paper size using the PaperSize class and then you can assign it to the print settings of the document using the PdfDocument.PrintSettings.PaperSize property. The detailed steps are as follows.
- Create an instance of the PdfDocument class.
- Load the PDF file using the PdfDocument.LoadFromFile() method.
- Define a custom paper size for printing using the PaperSize class.
- Assign the custom paper size to the print settings of the file using the using the PdfDocument.PrintSettings.PaperSize property.
- Configure print settings to print the PDF at its actual size without scaling using the PdfDocument.PrintSettings.SelectSinglePageLayout(PdfSinglePageScalingMode pageScalingMode, bool autoPortraitOrLandscape) method.
- Call the PdfDocument.Print() method to print the PDF file.
- C#
using Spire.Pdf;
using Spire.Pdf.Print;
using System.Drawing.Printing;

namespace PrintPdfOnCustomSizedPaper
{
    internal class Program
    {
        static void Main(string[] args)
        {
            // Create a new instance of the PdfDocument class
            PdfDocument pdf = new PdfDocument();
            // Load the specified PDF file into the PdfDocument object
            pdf.LoadFromFile("Sample.pdf");

            //// Define an A3 paper size for printing
            //PaperSize paperSize = new PaperSize
            //{
            //    // Set paper size to A3
            //    RawKind = (int)PaperKind.A3
            //};

            // Define a custom paper size for printing
            PaperSize paperSize = new PaperSize
            {
                // Set the width of the paper
                Width = 283 * 100, //inch*100
                // Set the height of the paper
                Height = 826 * 100, //inch*100
                // Set paper size to custom
                RawKind = (int)PaperKind.Custom
            };

            // Assign the custom paper size to the print settings of the PdfDocument
            pdf.PrintSettings.PaperSize = paperSize;

            // Set paper margins as 0
            pdf.PrintSettings.SetPaperMargins(0, 0, 0, 0);

            // Set print settings to print the PDF at its actual size without scaling
            pdf.PrintSettings.SelectSinglePageLayout(PdfSinglePageScalingMode.ActualSize, false);
            // Execute the print command to print the loaded PDF document
            pdf.Print();
        }
    }
}
Apply for a Temporary License
If you'd like to remove the evaluation message from the generated documents, or to get rid of the function limitations, please request a 30-day trial license for yourself.
Fonts play a crucial role in defining the visual appeal and readability of Word documents, influencing everything from professional reports to creative projects. Whether you're looking to refresh the design of your document by replacing outdated fonts or troubleshooting missing fonts that disrupt formatting, understanding how to retrieve and replace fonts in Microsoft Word is an essential skill.
In this article, you will learn how to get and replace fonts in a Word document using C# and Spire.Doc for .NET.
Install Spire.Doc for .NET
To begin with, you need to add the DLL files included in the Spire.Doc for .NET package as references in your .NET project. The DLL files can be either downloaded from this link or installed via NuGet.
PM> Install-Package Spire.Doc
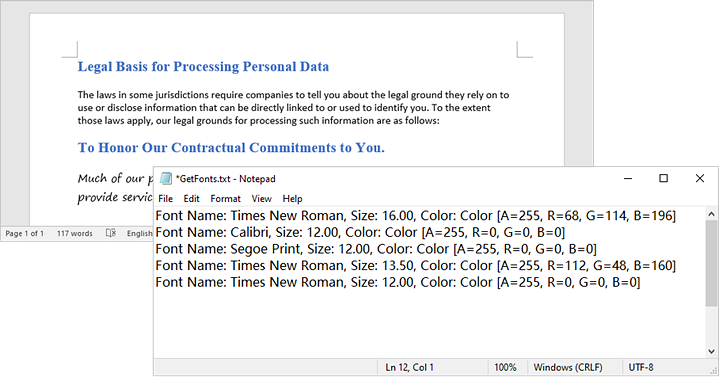
Get Fonts Used in a Word Document in C#
To extract font information from a Word document, you must traverse its sections and paragraphs, examining each child object within the paragraphs. If a child object is identified as a TextRange, you can retrieve the font details—such as the font name, size, and color—using the properties of the TextRange class.
The following are the steps to get fonts used in a Word document in C#:
- Create a Document object.
- Load a Word document using the Document.LoadFromFile() method.
- Iterate through each section, paragraph, and child object.
- For each child object, check if it is an instance of TextRange class.
- If it is, retrieve the font name and size using the TextRange.CharacterFormat.FontName and TextRange.CharacterFormat.FontSize properties.
- Write the font information in a text file.
- C#
using Spire.Doc;
using Spire.Doc.Documents;
using Spire.Doc.Fields;

namespace RetrieveFonts
{
    // Customize a FontInfo class to help store font information
    class FontInfo
    {
        public string Name { get; set; }
        public float? Size { get; set; }

        public FontInfo()
        {
            Name = "";
            Size = null;
        }

        public override bool Equals(object obj)
        {
            if (this == obj) return true;
            if (!(obj is FontInfo other)) return false;
            return Name.Equals(other.Name) && Size.Equals(other.Size);
        }

        public override int GetHashCode()
        {
            return HashCode.Combine(Name, Size);
        }
    }
    class Program
    {
        // Function to write string to a txt file
        static void WriteAllText(string filename, List<string> text)
        {
            try
            {
                using (StreamWriter writer = new StreamWriter(filename))
                {
                    foreach (var line in text)
                    {
                        writer.WriteLine(line);
                    }
                }
            }
            catch (Exception e)
            {
                Console.WriteLine(e.Message);
            }
        }
        static void Main(string[] args)
        {
            List<FontInfo> fontInfos = new List<FontInfo>();
            List<string> fontInformations = new List<string>();

            // Create a Document instance
            Document document = new Document();

            // Load a Word document
            document.LoadFromFile("C:\\Users\\Administrator\\Desktop\\input.docx");

            // Iterate through the sections
            foreach (Section section in document.Sections)
            {
                // Iterate through the paragraphs
                foreach (Paragraph paragraph in section.Body.Paragraphs)
                {
                    // Iterate through the child objects
                    foreach (DocumentObject obj in paragraph.ChildObjects)
                    {
                        if (obj is TextRange txtRange)
                        {
                            // Get the font name, size and text color
                            string fontName = txtRange.CharacterFormat.FontName;
                            float fontSize = txtRange.CharacterFormat.FontSize;
                            string textColor = txtRange.CharacterFormat.TextColor.ToString();

                            // Store the font information
                            FontInfo fontInfo = new FontInfo { Name = fontName, Size = fontSize };

                            if (!fontInfos.Contains(fontInfo))
                            {
                                fontInfos.Add(fontInfo);
                                string str = $"Font Name: {fontInfo.Name}, Size: {fontInfo.Size:F2}, Color: {textColor}";
                                fontInformations.Add(str);
                            }
                        }
                    }
                }
            }

            // Write font information to a txt file
            WriteAllText("GetFonts.txt", fontInformations);

            // Dispose resources
            document.Dispose();
        }
    }
}
Replace a Specific Font in a Word Document in C#
After retrieving the font name from a specific TextRange, you can easily replace it with a new font using the TextRange.CharacterFormat.FontName property. Additionally, you can modify the font size and text color by accessing the corresponding properties in the TextRange class. This allows for comprehensive customization of the text formatting within the document.
The following are the steps to replace a specific font in a Word document in C#:
- Create a Document object.
- Load a Word document using the Document.LoadFromFile() method.
- Iterate through each section and its paragraphs.
- For each paragraph, check each child object to see if it is an instance of the TextRange class.
- If it is a TextRange, retrieve the font name using the TextRange.CharacterFormat.FontName property.
- Compare the font name to the specified font.
- If they match, set a new font name using the TextRange.CharacterFormat.FontName property.
- Save the modified document to a new Word file using the Document.SaveToFile() method.
- C#
using Spire.Doc;
using Spire.Doc.Documents;
using Spire.Doc.Fields;

namespace ReplaceFont
{
    class Program
    {
        static void Main(string[] args)
        {
            // Create a Document instance
            Document document = new Document();

            // Load a Word document
            document.LoadFromFile("C:\\Users\\Administrator\\Desktop\\input.docx");

            // Iterate through the sections
            foreach (Section section in document.Sections)
            {
                // Iterate through the paragraphs
                foreach (Paragraph paragraph in section.Body.Paragraphs)
                {
                    // Iterate through the child objects
                    foreach (DocumentObject obj in paragraph.ChildObjects)
                    {
                        // Determine if a child object is a TextRange
                        if (obj is TextRange txtRange)
                        {
                            // Get the font name
                            string fontName = txtRange.CharacterFormat.FontName;

                            // Determine if the font name is Calibri
                            if (fontName.Equals("Calibri", StringComparison.OrdinalIgnoreCase))
                            {
                                // Replace the font with another font
                                txtRange.CharacterFormat.FontName = "Segoe Print";
                            }
                        }
                    }
                }
            }

            // Save the document to a different file
            document.SaveToFile("ReplaceFont.docx", FileFormat.Docx);

            // Dispose resources
            document.Dispose();
        }
    }
}
Apply for a Temporary License
If you'd like to remove the evaluation message from the generated documents, or to get rid of the function limitations, please request a 30-day trial license for yourself.
Slicers in Excel offer a user-friendly way to filter data in pivot tables and tables, making data analysis both visually appealing and interactive. Unlike traditional filter options, which can be less intuitive, slicers present filter choices as buttons. This allows users to quickly and easily refine their data views. Whether you are handling large datasets or building dynamic dashboards, slicers improve the user experience by providing immediate feedback on the selected criteria. This article explains how to add, update, and remove slicers in Excel in C# using Spire.XLS for .NET.
- Add Slicers to Tables in Excel
- Add Slicers to Pivot Tables in Excel
- Update Slicers in Excel
- Remove Slicers from Excel
Install Spire.XLS for .NET
To begin with, you need to add the DLL files included in the Spire.XLS for .NET package as references in your .NET project. The DLL files can be either downloaded from this link or installed via NuGet.
PM> Install-Package Spire.XLS
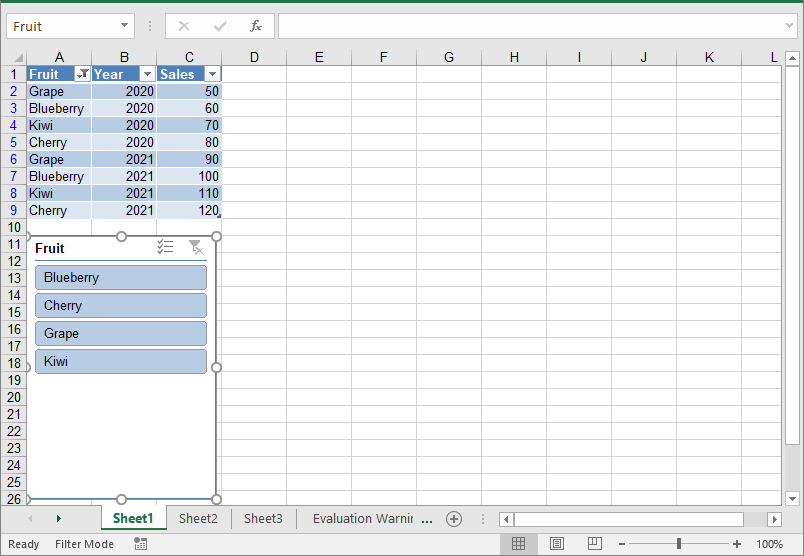
Add Slicers to Tables in Excel
Spire.XLS for .NET offers the Worksheet.Slicers.Add(IListObject table, string destCellName, int index) method to add a slicer to a table in an Excel worksheet. The detailed steps are as follows.
- Create an object of the Workbook class.
- Get the first worksheet using the Workbook.Worksheets[0] property.
- Add data to the worksheet using the Worksheet.Range[].Value property.
- Add a table to the worksheet using the Worksheet.IListObjects.Create() method.
- Add a slicer to the table using the Worksheeet.Slicers.Add(IListObject table, string destCellName, int index) method.
- Save the resulting file using the Workbook.SaveToFile() method.
- C#
using Spire.Xls;
using Spire.Xls.Core;

namespace AddSlicerToTable
{
    internal class Program
    {
        static void Main(string[] args)
        {
            // Create an object of the Workbook class
            Workbook workbook = new Workbook();
            // Get the first worksheet
            Worksheet worksheet = workbook.Worksheets[0];

            // Add data to the worksheet
            worksheet.Range["A1"].Value = "Fruit";
            worksheet.Range["A2"].Value = "Grape";
            worksheet.Range["A3"].Value = "Blueberry";
            worksheet.Range["A4"].Value = "Kiwi";
            worksheet.Range["A5"].Value = "Cherry";
            worksheet.Range["A6"].Value = "Grape";
            worksheet.Range["A7"].Value = "Blueberry";
            worksheet.Range["A8"].Value = "Kiwi";
            worksheet.Range["A9"].Value = "Cherry";

            worksheet.Range["B1"].Value = "Year";
            worksheet.Range["B2"].Value2 = 2020;
            worksheet.Range["B3"].Value2 = 2020;
            worksheet.Range["B4"].Value2 = 2020;
            worksheet.Range["B5"].Value2 = 2020;
            worksheet.Range["B6"].Value2 = 2021;
            worksheet.Range["B7"].Value2 = 2021;
            worksheet.Range["B8"].Value2 = 2021;
            worksheet.Range["B9"].Value2 = 2021;

            worksheet.Range["C1"].Value = "Sales";
            worksheet.Range["C2"].Value2 = 50;
            worksheet.Range["C3"].Value2 = 60;
            worksheet.Range["C4"].Value2 = 70;
            worksheet.Range["C5"].Value2 = 80;
            worksheet.Range["C6"].Value2 = 90;
            worksheet.Range["C7"].Value2 = 100;
            worksheet.Range["C8"].Value2 = 110;
            worksheet.Range["C9"].Value2 = 120;

            //Create a table from the specific data range
            IListObject table = worksheet.ListObjects.Create("Fruit Sales", worksheet.Range["A1:C9"]);

            // Add a slicer to cell "A11" to filter the data based on the first column of the table
            int index = worksheet.Slicers.Add(table, "A11", 0);
            // Set name and style for the slicer
            worksheet.Slicers[index].Name = "Fruit";
            worksheet.Slicers[index].StyleType = SlicerStyleType.SlicerStyleLight1;

            //Save the resulting file
            workbook.SaveToFile("AddSlicerToTable.xlsx", ExcelVersion.Version2013);
            workbook.Dispose();
        }
    }
}
Add Slicers to Pivot Tables in Excel
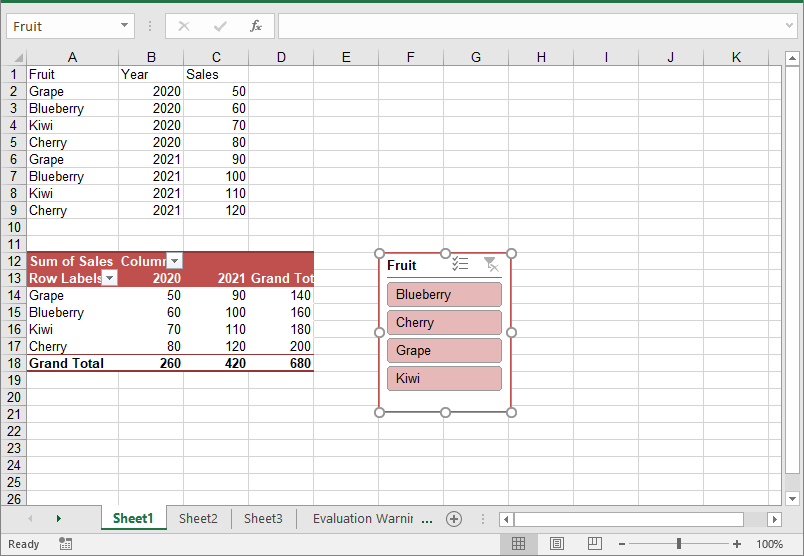
In addition to adding slicers to tables, Spire.XLS for .NET also enables you to add slicers to pivot tables in Excel using the Worksheet.Slicers.Add(IPivotTable pivot, string destCellName, int baseFieldIndex) method. The detailed steps are as follows.
- Create an object of the Workbook class.
- Get the first worksheet using the Workbook.Worksheets[0] property.
- Add data to the worksheet using the Worksheet.Range[].Value property.
- Create a pivot cache from the data using the Workbook.PivotCaches.Add() method.
- Create a pivot table from the pivot cache using the Worksheet.PivotTables.Add() method.
- Drag the pivot fields to the row, column, and data areas. Then calculate the data in the pivot table.
- Add a slicer to the pivot table using the Worksheet.Slicers.Add(IPivotTable pivot, string destCellName, int baseFieldIndex) method.
- Set the properties, such as the name, width, height, style, and cross filter type for the slicer.
- Calculate the data in the pivot table.
- Save the resulting file using the Workbook.SaveToFile() method.
- C#
using Spire.Xls;
using Spire.Xls.Core;

namespace AddSlicerToPivotTable
{
    internal class Program
    {
        static void Main(string[] args)
        {
            // Create an object of the Workbook class
            Workbook workbook = new Workbook();
            // Get the first worksheet
            Worksheet worksheet = workbook.Worksheets[0];

            // Add data to the worksheet
            worksheet.Range["A1"].Value = "Fruit";
            worksheet.Range["A2"].Value = "Grape";
            worksheet.Range["A3"].Value = "Blueberry";
            worksheet.Range["A4"].Value = "Kiwi";
            worksheet.Range["A5"].Value = "Cherry";
            worksheet.Range["A6"].Value = "Grape";
            worksheet.Range["A7"].Value = "Blueberry";
            worksheet.Range["A8"].Value = "Kiwi";
            worksheet.Range["A9"].Value = "Cherry";

            worksheet.Range["B1"].Value = "Year";
            worksheet.Range["B2"].Value2 = 2020;
            worksheet.Range["B3"].Value2 = 2020;
            worksheet.Range["B4"].Value2 = 2020;
            worksheet.Range["B5"].Value2 = 2020;
            worksheet.Range["B6"].Value2 = 2021;
            worksheet.Range["B7"].Value2 = 2021;
            worksheet.Range["B8"].Value2 = 2021;
            worksheet.Range["B9"].Value2 = 2021;

            worksheet.Range["C1"].Value = "Sales";
            worksheet.Range["C2"].Value2 = 50;
            worksheet.Range["C3"].Value2 = 60;
            worksheet.Range["C4"].Value2 = 70;
            worksheet.Range["C5"].Value2 = 80;
            worksheet.Range["C6"].Value2 = 90;
            worksheet.Range["C7"].Value2 = 100;
            worksheet.Range["C8"].Value2 = 110;
            worksheet.Range["C9"].Value2 = 120;

            // Create a pivot cache from the specific data range
            CellRange dataRange = worksheet.Range["A1:C9"];
            PivotCache cache = workbook.PivotCaches.Add(dataRange);

            // Create a pivot table from the pivot cache
            PivotTable pt = worksheet.PivotTables.Add("Fruit Sales", worksheet.Range["A12"], cache);


            // Drag the fields to the row and column areas
            PivotField pf = pt.PivotFields["Fruit"] as PivotField;
            pf.Axis = AxisTypes.Row;
            PivotField pf2 = pt.PivotFields["Year"] as PivotField;
            pf2.Axis = AxisTypes.Column;

            // Drag the field to the data area
            pt.DataFields.Add(pt.PivotFields["Sales"], "Sum of Sales", SubtotalTypes.Sum);

            // Set style for the pivot table
            pt.BuiltInStyle = PivotBuiltInStyles.PivotStyleMedium10;

            // Calculate the pivot table data
            pt.CalculateData();

            // Add a Slicer to the pivot table
            int index_1 = worksheet.Slicers.Add(pt, "F12", 0);

            // Set the name, width, height, and style for the slicer
            worksheet.Slicers[index_1].Name = "Fruit";
            worksheet.Slicers[index_1].Width = 100;
            worksheet.Slicers[index_1].Height = 120;
            worksheet.Slicers[index_1].StyleType = SlicerStyleType.SlicerStyleLight2;

            // Set the cross filter type for the slicer
            XlsSlicerCache slicerCache = worksheet.Slicers[index_1].SlicerCache;
            slicerCache.CrossFilterType = SlicerCacheCrossFilterType.ShowItemsWithNoData;

            // Calculate the pivot table data
            pt.CalculateData();

            // Save the resulting file
            workbook.SaveToFile("AddSlicerToPivotTable.xlsx", ExcelVersion.Version2013);
            workbook.Dispose();
        }
    }
}
Update Slicers in Excel
You can update the properties of a slicer, such as its style, name, caption, and more using the corresponding properties of the XlsSlicer class. The detailed steps are as follows.
- Create an object of the Workbook class.
- Load an Excel file using the Workbook.LoadFromFile() method.
- Get a specific worksheet by its index using the Workbook.Worksheets[index] property.
- Get a specific slicer from the worksheet by its index using the Worksheet.Slicers[index] property.
- Update the properties of the slicer, such as its style, name, caption, and cross filter type using the properties of the XlsSlicer class.
- Save the resulting file using the Workbook.SaveToFile() method.
- C#
using Spire.Xls;
using Spire.Xls.Core;

namespace UpdateSlicer
{
    internal class Program
    {
        static void Main(string[] args)
        {
            // Create an object of the Workbook class
            Workbook workbook = new Workbook();
            // Load an Excel file
            workbook.LoadFromFile("AddSlicerToTable.xlsx");

            // Get the first worksheet
            Worksheet worksheet = workbook.Worksheets[0];

            // Get the first slicer in the worksheet
            XlsSlicer slicer = worksheet.Slicers[0];

            // Change the style, name, and caption for the slicer
            slicer.StyleType = SlicerStyleType.SlicerStyleDark4;
            slicer.Name = "Slicer";
            slicer.Caption = "Slicer";

            // Change the cross filter type for the slicer
            slicer.SlicerCache.CrossFilterType = SlicerCacheCrossFilterType.ShowItemsWithDataAtTop;

            // Deselect an item in the slicer
            XlsSlicerCacheItemCollection slicerCacheItems = slicer.SlicerCache.SlicerCacheItems;
            XlsSlicerCacheItem xlsSlicerCacheItem = slicerCacheItems[0];
            xlsSlicerCacheItem.Selected = false;

            // Save the resulting file
            workbook.SaveToFile("UpdateSlicer.xlsx", ExcelVersion.Version2013);
            workbook.Dispose();
        }
    }
}

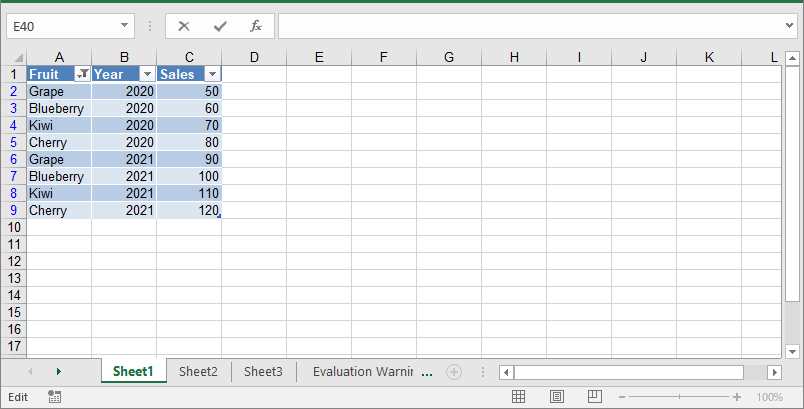
Remove Slicers from Excel
You can remove a specific slicer from an Excel worksheet using the Worksheet.Slicers.RemoveAt() method, or remove all slicers at once using the Worksheet.Slicers.Clear() method. The detailed steps are as follows.
- Create an object of the Workbook class.
- Load an Excel file using the Workbook.LoadFromFile() method.
- Get a specific worksheet by its index using the Workbook.Worksheets[index] property.
- Remove a specific slicer from the worksheet by its index using the Worksheet.Slicers.RemoveAt(index) method. Or remove all slicers from the worksheet using the Worksheet.Slicers.Clear() method.
- Save the resulting file using the Workbook.SaveToFile() method.
- C#
using Spire.Xls;
using Spire.Xls.Core;

namespace RemoveSlicer
{
    internal class Program
    {
        static void Main(string[] args)
        {
            // Create an object of the Workbook class
            Workbook workbook = new Workbook();
            // Load an Excel file
            workbook.LoadFromFile("AddSlicerToTable.xlsx");

            // Get the first worksheet
            Worksheet worksheet = workbook.Worksheets[0];

            // Remove the first slicer by index
            worksheet.Slicers.RemoveAt(0);

            //// Or remove all slicers
            //worksheet.Slicers.Clear();

            // Save the resulting file
            workbook.SaveToFile("RemoveSlicer.xlsx", ExcelVersion.Version2013);
            workbook.Dispose();
        }
    }
}
Apply for a Temporary License
If you'd like to remove the evaluation message from the generated documents, or to get rid of the function limitations, please request a 30-day trial license for yourself.
PowerPoint presentations are widely used tools for visual communication, enabling users to effectively present information in an organized and visually engaging manner. They are ideal for business meetings, educational purposes, and project presentations. However, in some cases, converting PowerPoint presentations into a lightweight, text-based format such as Markdown is more practical.
Markdown is a popular markup language that is widely supported across documentation tools, version control systems, and static site generators. It offers a simple way to format text that is easier to read and write. By converting PowerPoint presentations to Markdown, users can integrate their content into text-based workflows more efficiently. This is especially helpful when collaborating on documents, tracking changes, or publishing content online.
In this article, we will walk you through the steps of converting PowerPoint presentations to Markdown format using C# and the Spire.Presentation for .NET library.
Install Spire.Presentation for .NET
To begin with, you need to add the DLL files included in the Spire.Presentation for.NET package as references in your .NET project. The DLL files can be either downloaded from this link or installed via NuGet.
PM> Install-Package Spire.Presentation
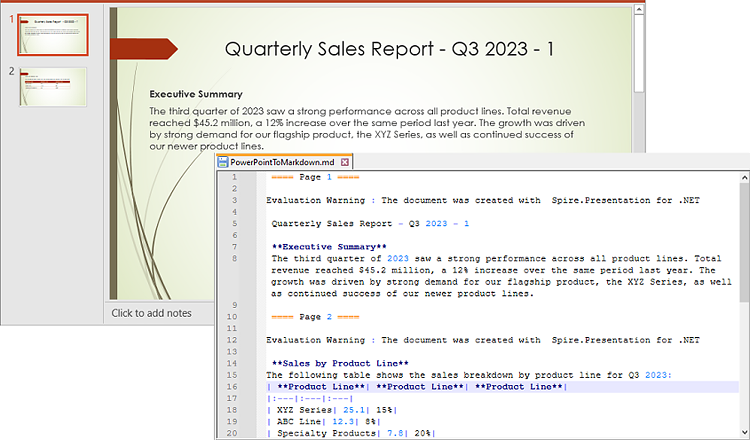
Convert a PowerPoint Presentation to Markdown
Spire.Presentation for .NET provides the Presentation.SaveToFile(string, FileFormat) method, allowing you to convert PowerPoint presentations into various file formats, including PDF, HTML, and Markdown. Below are the steps to convert a PowerPoint presentation to Markdown using Spire.Presentation for .NET:
- Initialize an instance of the Presentation class.
- Load a PowerPoint presentation using Presentation.LoadFromFile(string) method.
- Save the PowerPoint presentation to Markdown format using Presentation.SaveToFile(string, FileFormat) method.
- C#
using Spire.Presentation;

namespace PPTToMarkdown
{
    internal class Program
    {
        static void Main(string[] args)
        {
            //Initialize an instance of the Presentation class
            Presentation ppt = new Presentation();
            //Load a PowerPoint presentation
            ppt.LoadFromFile(@"E:\Program Files\Sample.pptx");

            //Specify the file path for the output Markdown file
            string result = @"E:\Program Files\PowerPointToMarkdown.md";

            //Save the PowerPoint presentation to Markdown format
            ppt.SaveToFile(result, FileFormat.Markdown);
        }
    }
}
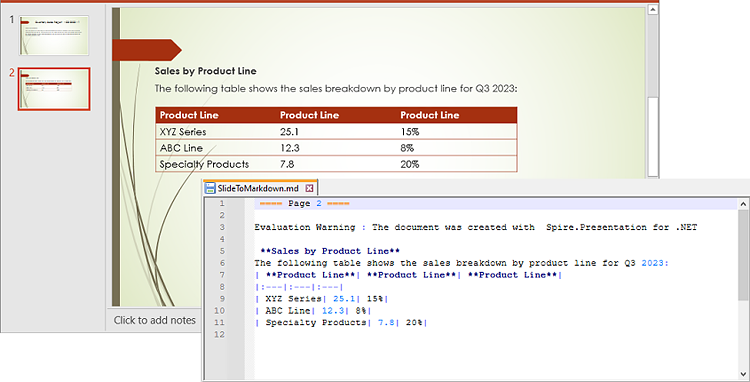
Convert a Specific PowerPoint Slide to Markdown
In some cases, you may need to convert a specific slide instead of the whole presentation to Markdown. Spire.Presentation offers the ISlide.SaveToFile(string, FileFormat) method to convert a PowerPoint slide to Markdown. The following are the detailed steps:
- Initialize an instance of the Presentation class.
- Load a PowerPoint presentation using Presentation.LoadFromFile(string) method.
- Get a specific slide in the PowerPoint presentation by its index through Presentation.Slides[int] property.
- Save the PowerPoint slide to Markdown format using ISlide.SaveToFile(string, FileFormat) method.
- C#
using Spire.Presentation;

namespace SlideToMarkdown
{
    internal class Program
    {
        static void Main(string[] args)
        {
            //Initialize an instance of the Presentation class
            Presentation ppt = new Presentation();
            //Load a PowerPoint presentation
            ppt.LoadFromFile(@"E:\Program Files\Sample.pptx");

            //Get the second slide
            ISlide slide = ppt.Slides[1];

            //Specify the file path for the output Markdown file
            string result = @"E:\Program Files\SlideToMarkdown.md";

            //Save the slide to a Markdown file
            slide.SaveToFile(result, FileFormat.Markdown);
            ppt.Dispose();
        }
    }
}
Apply for a Temporary License
If you'd like to remove the evaluation message from the generated documents, or to get rid of the function limitations, please request a 30-day trial license for yourself.
