
.NET (1327)
Children categories
Spire.OCR for .NET is a professional OCR library that supports recognizing text from Images (such as JPG, PNG, GIF, BMP, and TIFF) in both .NET Framework and .NET Core applications. In this article, we will explain how to use Spire.OCR for .NET to read text from images in .NET Framework applications.
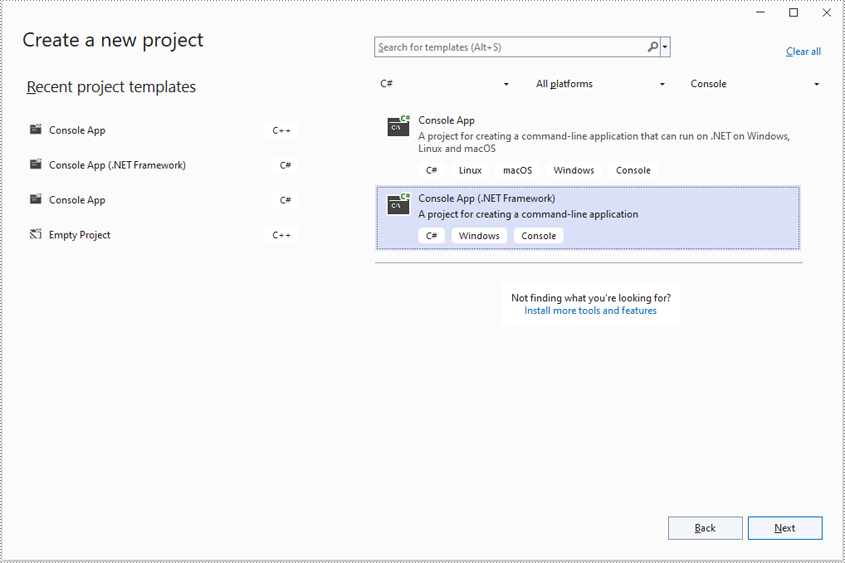
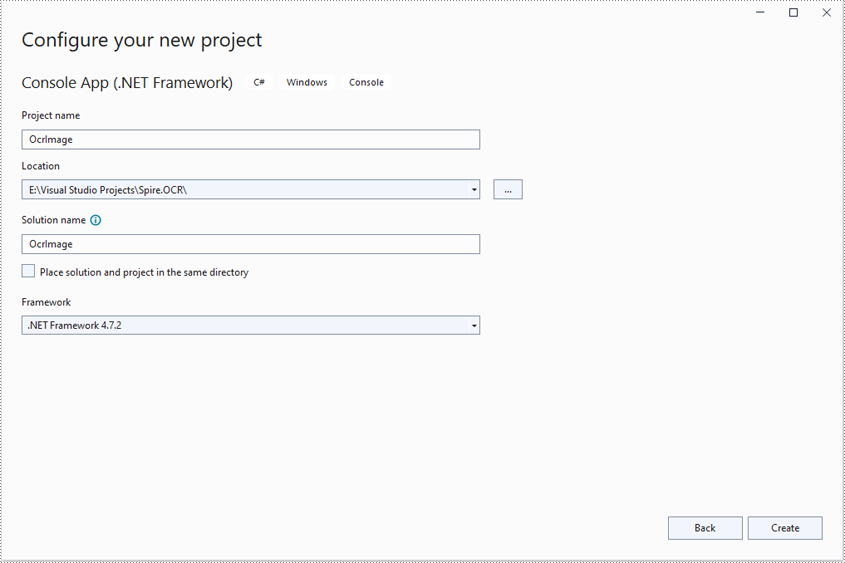
Step 1: Create a console application (.NET Framework) in Visual Studio.
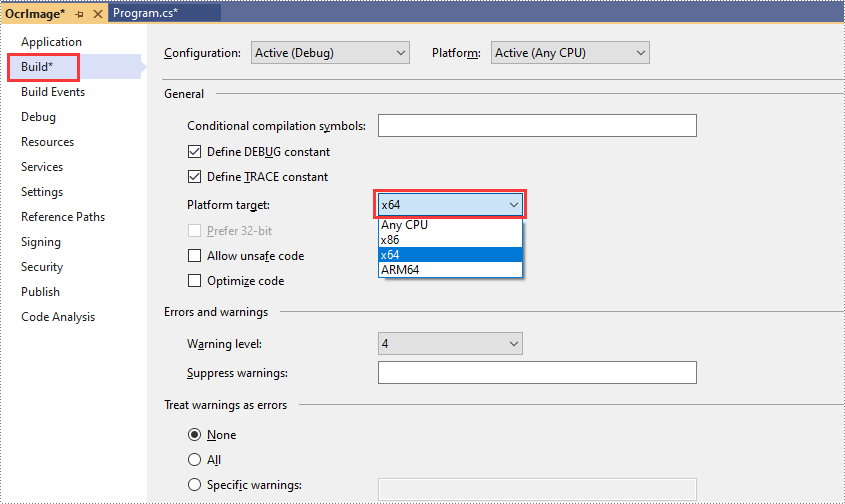
Step 2: Change the platform target of the application to X64.
In the application's solution explorer, right-click on the solution name and then click "Properties".
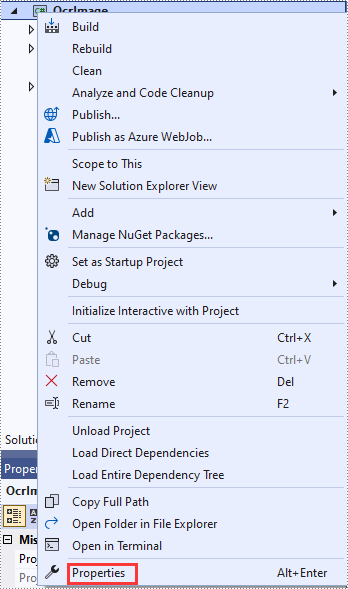
Change the platform target of the application to X64. This step must be performed since Spire.OCR only supports 64-bit platforms.
Step 3: Add a reference to Spire.OCR for .NET DLL in the application.
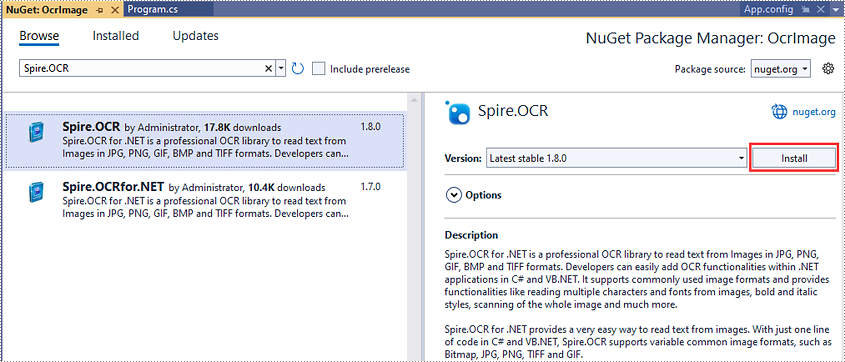
We recommend installing Spire.OCR for .NET through NuGet (Note: only Spire.OCR for .NET Version 1.8.0 or above supports working with .NET Framework). The detailed steps are as follows:
- In the application's solution explorer, right-click on the solution name or "References" and select "Manage NuGet Packages".
- Click the "Browse" tab and search for Spire.OCR.
- Click "Install" to install Spire.OCR.
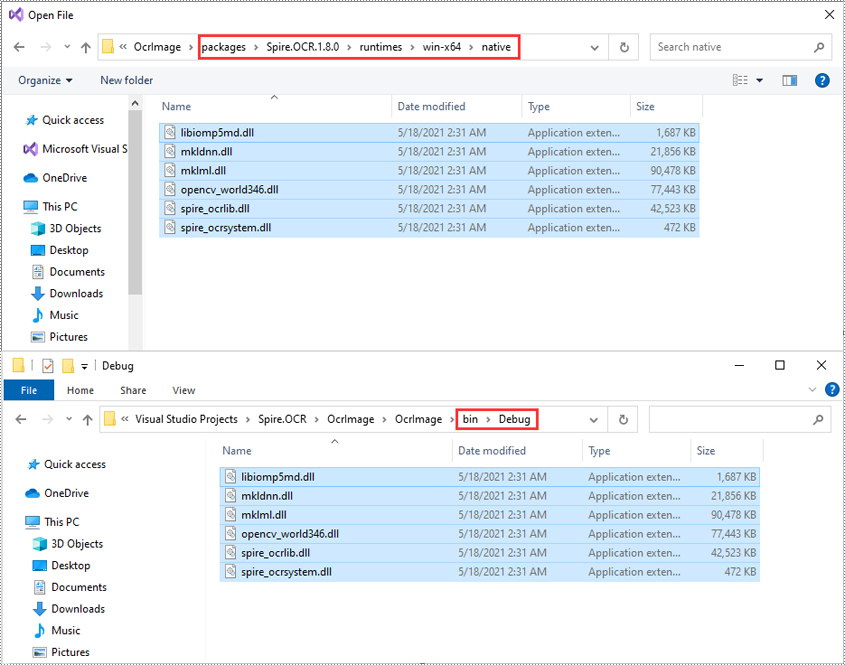
Step 4: Copy DLLs from the "packages" directory to the "Debug" directory in the application.
When you install Spire.OCR through NuGet, NuGet downloads the packages and puts them in your application under a directory called "packages". You need to find the "Spire.OCR" directory under the "packages" directory, then copy the DLLs under the "Spire.OCR" directory (packages\Spire.OCR.1.8.0\runtimes\win-x64\native) to the "Debug" directory of your application.
Now you have successfully included Spire.OCR in your .NET Framework application. You can refer to the following code example to read text from images using Spire.OCR.
- C#
using Spire.OCR;
using System.IO;

namespace OcrImage
{
    internal class Program
    {
        static void Main(string[] args)
        {
            //Create an instance of the OcrScanner class
            OcrScanner scanner = new OcrScanner();

            //Call the OcrScanner.Scan() method to scan text from an image
            scanner.Scan("image.png");

            //Save the scanned text to a .txt file
            string text = scanner.Text.ToString();
            File.WriteAllText("output.txt", text);
        }
    }
}
Apply for a Temporary License
If you'd like to remove the evaluation message from the generated documents, or to get rid of the function limitations, please request a 30-day trial license for yourself.
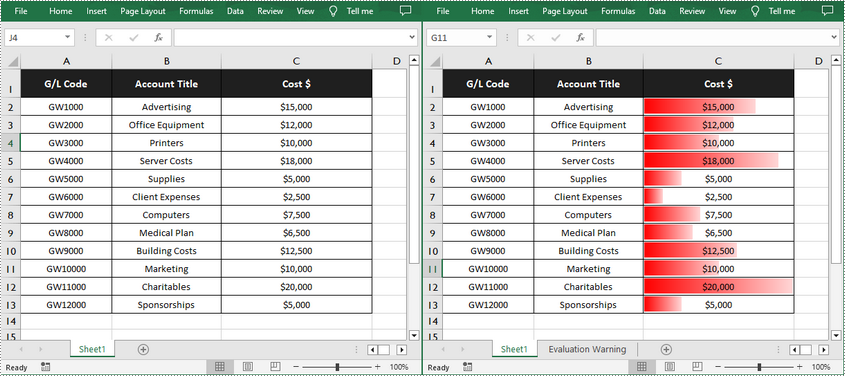
Data bars in Excel are a built-in type of conditional formatting that inserts colored bars in cells to compare the values within them. The length of a bar depends on the value of a cell and the longest bar corresponds to the largest value in a selected data range, which allows you to spot it at a glance. In this article, you will learn how to add data bars in a cell range using Spire.XLS for .NET.
Install Spire.XLS for .NET
To begin with, you need to add the DLL files included in the Spire.XLS for .NET package as references in your .NET project. The DLL files can be either downloaded from this link or installed via NuGet.
PM> Install-Package Spire.XLS
Add Data Bars in Excel in C# and VB.NET
Data bars are a great tool for visually comparing data within a selected range of cells. With Spire.XLS for .NET, you are allowed to add a data bar to a specified data range and also set its format. The following are the detailed steps.
- Create a Workbook instance.
- Load a sample Excel document using Workbook.LoadFromFile() method.
- Get a specified worksheet using Workbook.Worsheets[index] property.
- Add a conditional formatting to the worksheet using Worksheet.ConditionalFormats.Add() method and return an object of XlsConditionalFormats class.
- Set the cell range where the conditional formatting will be applied using XlsConditionalFormats.AddRange() method.
- Add a condition using XlsConditionalFormats.AddCondition() method, and then set its format type to DataBar using IConditionalFormat.FormatType property.
- Set the fill effect and color of the data bars using IConditionalFormat.DataBar.BarFillType and IConditionalFormat.DataBar.BarColor properties.
- Save the result document using Workbook.SaveToFile() method.
- C#
- VB.NET
using Spire.Xls;
using Spire.Xls.Core;
using Spire.Xls.Core.Spreadsheet.Collections;
using Spire.Xls.Core.Spreadsheet.ConditionalFormatting;
using System.Drawing;

namespace ApplyDataBar
{
    class Program
    {
        static void Main(string[] args)
        {
            //Create a Workbook instance
            Workbook workbook = new Workbook();

            //Load a sample Excel docuemnt
            workbook.LoadFromFile("sample.xlsx");

            //Get the first worksheet
            Worksheet sheet = workbook.Worksheets[0];

            //Add a conditional format to the worksheet
            XlsConditionalFormats xcfs = sheet.ConditionalFormats.Add();

            //Set the range where the conditional format will be applied
            xcfs.AddRange(sheet.Range["C2:C13"]);

            //Add a condition and set its format type to DataBar
            IConditionalFormat format = xcfs.AddCondition();
            format.FormatType = ConditionalFormatType.DataBar;

            //Set the fill effect and color of the data bars
            format.DataBar.BarFillType = DataBarFillType.DataBarFillGradient;
            format.DataBar.BarColor = Color.Red;

            //Save the result document
            workbook.SaveToFile("ApplyDataBarsToDataRange.xlsx", ExcelVersion.Version2013);
        }
    }
}
Apply for a Temporary License
If you'd like to remove the evaluation message from the generated documents, or to get rid of the function limitations, please request a 30-day trial license for yourself.
Spire.Email for .NET is a professional .NET Email library specially designed for developers to create, read and manipulate emails from any .NET (C#, VB.NET, ASP.NET, .Net Core, .Net Standard, .NET 5.0, MonoAndroid, Xamarin iOS) platform with fast and high quality performance.
As an independent .NET Email API, Spire.Email for .NET doesn't need Microsoft outlook to be installed on the machine. However, it can incorporate Microsoft Outlook document creation capabilities into any developers' .NET applications.
Spire.PDFViewer for .NET is a powerful PDF Viewer library for .NET. It allows developers to load PDF document from stream, file and byte array. Spire.PDFViewer is available on viewing PDF/A-1B, PDF/X1A and enables to open and read encrypted PDF files. This PDF Viewer control supports multiple printing orientation including landscape, portrait and automatic.
Furthermore, it can export PDFs to popular image formats like .bmp, .png and .jpeg. When viewing PDF document through Spire.PDFViewer, users can set display as fit page, page down/up, zoom in/out, etc. Spire.PDFViewer is a totally independent .NET library which designed for viewing PDF files from .NET application. It does NOT require Adobe Reader or any other 3rd party software/library installed on system.
Spire.DocViewer for .NET is a powerful Word Viewer library for developers to display, convert and interact with Word Documents easily. When developers use Spire.DocViewer for .NET within their own .NET application, they do not require any additional installation to manipulate Word Documents with high performance and strong stability.
Spire.DocViewer for .NET expresses scalability, time-saving and cost-effective to view and print Word Documents. Developers can render Word Documents by using Word elements including text, paragraph, image, list, table, bookmark etc. Furthermore, Spire.DocViewer for .NET allows developers to load all versions of Word Documents and convert Word Documents to PDF, HTML and RTF.
Spire.OCR for .NET is a professional OCR library to read text from Images in JPG, PNG, GIF, BMP and TIFF formats. Developers can easily add OCR functionalities within .NET applications in C# and VB.NET. It supports commonly used image formats and provides functionalities like reading multiple characters and fonts from images, bold and italic styles, scanning of the whole image and much more.
Spire.OCR for .NET provides a very easy way to read text from images. With just one line of code in C# and VB.NET, Spire.OCR supports variable common image formats, such as Bitmap, JPG, PNG, TIFF and GIF.
Spire.Barcode for .NET is a professional barcode library specially designed for .NET developers ( C#, VB.NET, ASP.NET, .NET Core, .Net Standard, .NET 5.0, MonoAndroid, Xamarin.iOS ) to generate, read and scan 1D & 2D barcodes. Developers and programmers can use Spire.Barcode to add Enterprise-Level barcode formats to their .net applications quickly and easily.
Spire.Barcode for .NET provides a very easy way to integrate barcode processing. With just one line of code to create, read 1D & 2D barcode, Spire.Barcode supports variable common image formats, such as Bitmap, JPG, PNG, EMF, TIFF, GIF and WMF.
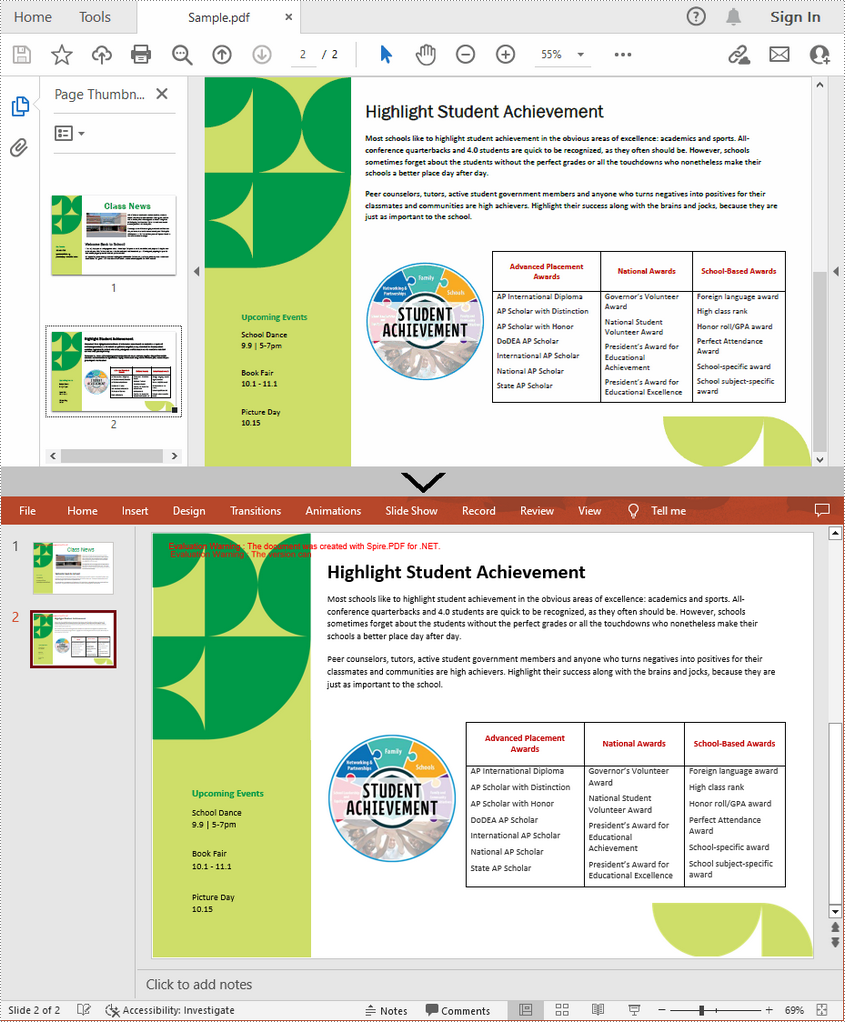
PDF files are great for presenting on different types of devices and sharing across platforms, but it has to admit that editing PDF is a bit challenging. When you receive a PDF file and need to prepare a presentation based on the content inside, it is recommended to convert the PDF file to a PowerPoint document to have a better presentation effect and also to ensure the content can be further edited. This article will demonstrate how to programmatically convert PDF to PowerPoint presentation using Spire.PDF for .NET.
Install Spire.PDF for .NET
To begin with, you need to add the DLL files included in the Spire.PDF for.NET package as references in your .NET project. The DLLs files can be either downloaded from this link or installed via NuGet.
PM> Install-Package Spire.PDF
Convert PDF to PowerPoint Presentation in C# and VB.NET
From Version 8.11.10, Spire.PDF for .NET supports converting PDF to PPTX using PdfDocument.SaveToFile() method. With this method, each page of your PDF file will be converted to a single slide in PowerPoint. Below are the steps to convert a PDF file to an editable PowerPoint document.
- Create a PdfDocument instance.
- Load a sample PDF document using PdfDocument.LoadFromFile() method.
- Save the document as a PowerPoint document using PdfDocument.SaveToFile(string filename, FileFormat.PPTX) method.
- C#
- VB.NET
using Spire.Pdf;

namespace PDFtoPowerPoint
{
    class Program
    {
        static void Main(string[] args)
        {
            //Create a PdfDocument instance
            PdfDocument pdf = new PdfDocument();

            //Load a sample PDF document
            pdf.LoadFromFile(@"C:\Users\Administrator\Desktop\Sample.pdf");

            //Convert the PDF to PPTX document
            pdf.SaveToFile("ConvertPDFtoPowerPoint.pptx", FileFormat.PPTX);
        }
    }
}
Apply for a Temporary License
If you'd like to remove the evaluation message from the generated documents, or to get rid of the function limitations, please request a 30-day trial license for yourself.
Character formatting is used to change the appearance of individual words or phrases. Formatted text can direct the reader's attention to select sections of a document and highlight key information. There are quite a lot of forms of characters formatting that you can use in Word. In this article, you will learn how to apply various types of formatting to characters in Word in C# and VB.NET using Spire.Doc for .NET.
- Font Name
- Font Size
- Font Color
- Highlight Color
- Bold
- Italic
- Underline
- Strikethrough
- Border
- Shadow Effect
- Emphasis Mark
- Subscript and Superscript
Install Spire.Doc for .NET
To begin with, you need to add the DLL files included in the Spire.Doc for .NET package as references in your .NET project. The DLL files can be either downloaded from this link or installed via NuGet.
PM> Install-Package Spire.Doc
Apply Formatting to Characters in Word in C# and VB.NET
In order to apply formatting to a piece of text, you need to get the text in a TextRange and then format the characters within the TextRange through the CharacterFormat property. The following are the detailed steps.
- Create a Document object.
- Add a section to the document using Document.AddSection() method.
- Add a paragraph to the section using Section.AddParagraph() method.
- Append text to the paragraph using Paragraph.AppendText() method and return a TextRange object.
- Apply formatting such as font name, font size, border and highlight color to the characters within the text range through TextRange.CharacterFormat property.
- Save the document to a Word file using Document.SaveToFile() method.
- C#
- VB.NET
using Spire.Doc;
using Spire.Doc.Documents;
using Spire.Doc.Fields;
using System.Drawing;
namespace ApplyFormattingToCharacters
{
class Program
{
static void Main(string[] args)
{
//Create a Document object
Document document = new Document();
//Add a section
Section sec = document.AddSection();
//Add a paragraph
Paragraph paragraph = sec.AddParagraph();
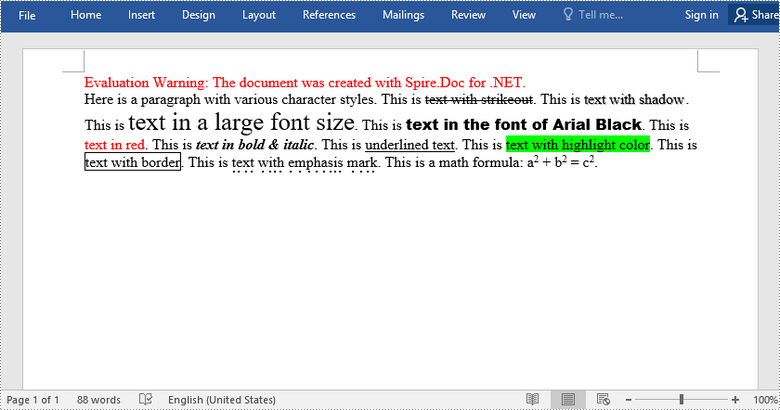
paragraph.AppendText("Here is a paragraph with various character styles. This is ");
//Append text to the paragraph and return a TextRange object
TextRange tr = paragraph.AppendText("text with strikeout");
//Set the character format to strikeout via TextRange object
tr.CharacterFormat.IsStrikeout = true;
//Apply shadow effect to text
paragraph.AppendText(". This is ");
tr = paragraph.AppendText("text with shadow");
tr.CharacterFormat.IsShadow = true;
//Set font size
paragraph.AppendText(". This is ");
tr = paragraph.AppendText("text in a large font size");
tr.CharacterFormat.FontSize = 20;
//Set font name
paragraph.AppendText(". This is ");
tr = paragraph.AppendText("text in the font of Arial Black");
tr.CharacterFormat.FontName = "Arial Black";
//Set font color
paragraph.AppendText(". This is ");
tr = paragraph.AppendText("text in red");
tr.CharacterFormat.TextColor = Color.Red;
//Apply bold & italic to text
paragraph.AppendText(". This is ");
tr = paragraph.AppendText("text in bold & italic");
tr.CharacterFormat.Bold = true;
tr.CharacterFormat.Italic = true;
//Apply underline to text
paragraph.AppendText(". This is ");
tr = paragraph.AppendText("underlined text");
tr.CharacterFormat.UnderlineStyle = UnderlineStyle.Single;
//Apply background color to text
paragraph.AppendText(". This is ");
tr = paragraph.AppendText("text with highlight color");
tr.CharacterFormat.HighlightColor = Color.Green;
//Apply border to text
paragraph.AppendText(". This is ");
tr = paragraph.AppendText("text with border");
tr.CharacterFormat.Border.BorderType = Spire.Doc.Documents.BorderStyle.Single;
tr.CharacterFormat.Border.Color = Color.Black;
//Apply emphasis mark to text
paragraph.AppendText(". This is ");
tr = paragraph.AppendText("text with emphasis mark");
tr.CharacterFormat.EmphasisMark = Emphasis.DotBelow;
//Apply superscript to text
paragraph.AppendText(". This is a math formula: a");
tr = paragraph.AppendText("2");
tr.CharacterFormat.SubSuperScript = SubSuperScript.SuperScript;
paragraph.AppendText(" + b");
tr = paragraph.AppendText("2");
tr.CharacterFormat.SubSuperScript = SubSuperScript.SuperScript;
paragraph.AppendText(" = c");
tr = paragraph.AppendText("2");
tr.CharacterFormat.SubSuperScript = SubSuperScript.SuperScript;
paragraph.AppendText(".");
//Save to file
document.SaveToFile("SetCharacterFormat.docx", FileFormat.Docx);
}
}
}
Apply for a Temporary License
If you'd like to remove the evaluation message from the generated documents, or to get rid of the function limitations, please request a 30-day trial license for yourself.

Word and Excel are designed for different types of content - Word focuses on documents, while Excel is better for structured data and analysis. Because of this, working with the same content across both formats isn't always straightforward.
If you have data in a Word document that you'd like to view or process in Excel, converting it manually can be tedious. With Spire.Doc for .NET, you can now convert Word directly to Excel, making it easier to reuse Word content in Excel.
In this tutorial, you'll learn how to convert Word to Excel in C#.
- Install Spire.Doc for .NET
- Basic Word to Excel Conversion in C#
- Advanced Word to Excel Conversion Scenarios
- Notes and Best Practices
- FAQs
- Get a Free License
Install Spire.Doc for .NET
To begin with, you need to add the DLL files included in the Spire.Doc for .NET package as references in your .NET project. The DLL files can be either downloaded from this link or installed via NuGet.
PM> Install-Package Spire.Doc
Basic Word to Excel Conversion in C#
Converting a Word document to Excel with Spire.Doc is straightforward:
-
Load a Word document using Document.LoadFromFile() method.
-
Save the document as an Excel file using Document.SaveToFile() method.
This works best when your Word document contains structured content, especially tables, which can be naturally mapped into spreadsheet cells.
using Spire.Doc;

namespace WordToExcel
{
    class Program
    {
        static void Main(string[] args)
        {
            // Load the Word document
            Document document = new Document();
            document.LoadFromFile("C:\\Users\\Tommy\\Desktop\\Sample.docx");

            // Save as Excel
            document.SaveToFile("C:\\Users\\Tommy\\Desktop\\Sample.xlsx", FileFormat.XLSX);

            document.Dispose();
        }
    }
}
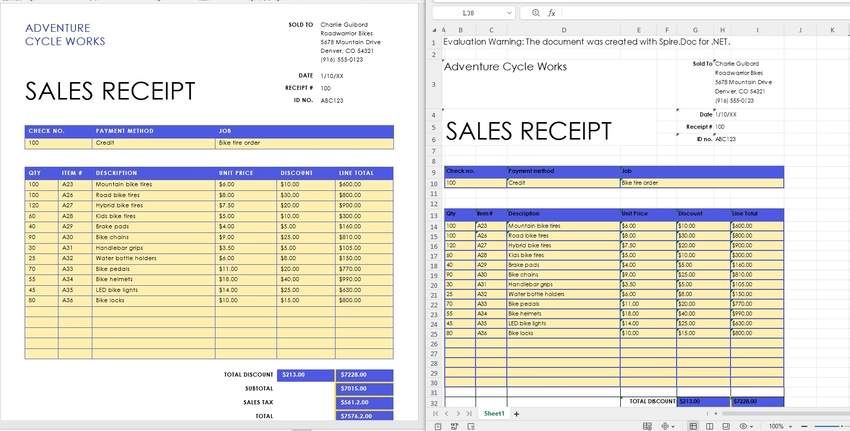
Output Results:
What Gets Converted Well?
When converting Word to Excel, it's important to understand how content is interpreted:
- Tables in Word are converted into Excel worksheets with rows and columns preserved.
- Paragraph text may be inserted into cells, but without strict structure.
- Complex layouts (floating elements, multi-column sections) may not translate perfectly.
- By default, each Section in a Word document is converted into a separate worksheet in Excel.
For best results, ensure your Word document uses clear table structures before conversion.
Advanced Word to Excel Conversion Scenarios
Once you understand the basic conversion process, you can handle more advanced scenarios depending on your needs.
Convert Only Tables from Word to Excel
If you only need structured data, extracting tables from a Word document is often more useful than converting the entire file. By default, all tables within the same section are placed into a single worksheet. To output each table into a separate worksheet, you can place each table into its own section before conversion.
To do this, you can work with the document structure and table objects:
- Use section.Tables to access all tables within a section.
- Use table.Clone() to create a copy of each table.
- Create a new section for each table so that each one is mapped to a separate worksheet in Excel.
This approach gives you precise control over the output and ensures that only relevant data is included in the resulting Excel file.
using Spire.Doc;

class Program
{
    static void Main()
    {
        // Load the Word document
        Document doc = new Document();
        doc.LoadFromFile("G:/Documents/Sample84.docx");

        // Create a new document to store extracted tables
        Document tempDoc = new Document();

        // Iterate through all sections in the source document
        foreach (Section section in doc.Sections)
        {
            // Iterate through all tables in the current section
            foreach (Table table in section.Tables)
            {
                // Create a new section for each table (each section becomes a separate worksheet in Excel)
                Section tempSec = tempDoc.AddSection();

                // Clone the table and add it to the new section
                tempSec.Tables.Add(table.Clone());
            }
        }

        // Save as Excel file
        tempDoc.SaveToFile("Tables.xlsx", FileFormat.XLSX);

        // Close and release resources
        doc.Close();
        tempDoc.Close();
    }
}
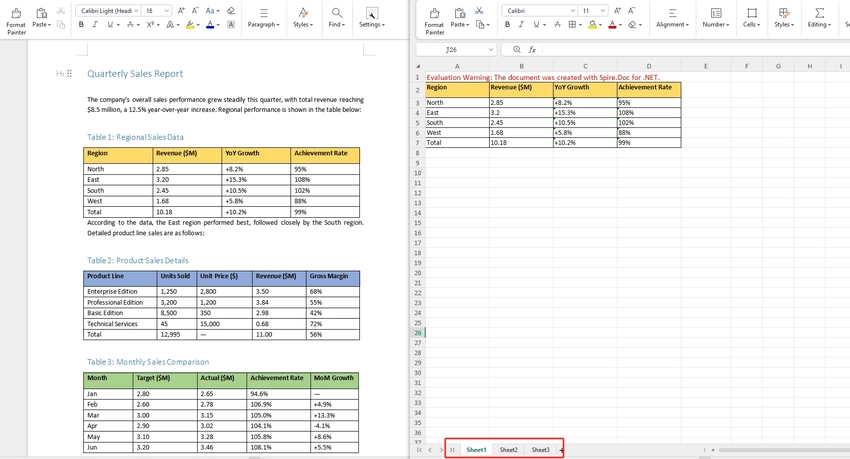
Note: Since each table is placed into its own section before conversion, each table will appear in a separate worksheet in the output Excel file.
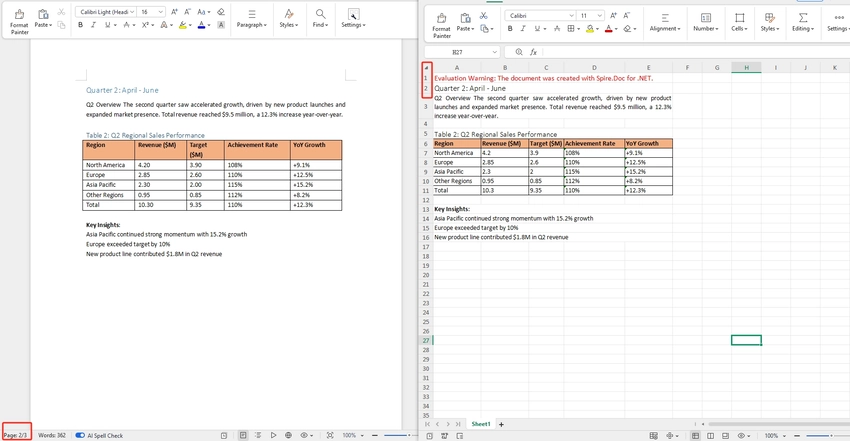
Convert a Specific Page of a Word Document to Excel
In some cases, only a specific page contains the data you need — for example, a summary table on page 2 — use Document.ExtractPages() to isolate that page into a new Document object before converting. This avoids processing the entire file and gives you a cleaner, focused output. If you're only interested in structured data from that page, you can further extract tables from Word in C# before exporting.
using Spire.Doc;

namespace WordPageToExcel
{
    class Program
    {
        static void Main(string[] args)
        {
            // Load the Word document
            Document document = new Document();
            document.LoadFromFile("input.docx");

            // Extract the content of the specified page (e.g., page 1)
            Document pageDoc = document.ExtractPages(0, 1); // Retrieve page 1 (starting from index 0, retrieve page 1).

            // Save the extracted page as Excel
            pageDoc.SaveToFile("output.xlsx", FileFormat.XLSX);

            document.Dispose();
            pageDoc.Dispose();
        }
    }
}
Note: Page boundaries in Word are flow-based and can shift depending on font rendering. If the extracted page doesn't match what you see in Word, verify the page index by testing with a few values around your target.
Batch Convert Multiple Word Documents to Excel
To convert an entire folder of Word files, loop through each .docx file and apply the same conversion. This is useful for bulk migrations or scheduled processing pipelines.
This approach can be easily integrated into background jobs or automation workflows.
using Spire.Doc;
using System.IO;

namespace BatchWordToExcel
{
    class Program
    {
        static void Main(string[] args)
        {
            // Get all Word files from the input folder
            string inputFolder = "inputDocs";
            string outputFolder = "outputExcels";
            Directory.CreateDirectory(outputFolder);

            string[] wordFiles = Directory.GetFiles(inputFolder, "*.docx");

            // Loop through each Word file and convert to Excel
            foreach (string filePath in wordFiles)
            {
                Document document = new Document();
                document.LoadFromFile(filePath);

                string fileName = Path.GetFileNameWithoutExtension(filePath);
                string outputPath = Path.Combine(outputFolder, fileName + ".xlsx");

                document.SaveToFile(outputPath, FileFormat.XLSX);
                document.Dispose();
            }
        }
    }
}
Tip: For large batches, consider wrapping the inner block in a try/catch so a single malformed file doesn't abort the entire run. If your workflow requires combining documents before conversion, learn how to merge Word documents in C#.
Notes and Best Practices
- For best results, use well-structured tables in Word.
- Avoid complex layouts like floating shapes or multi-column designs.
- For large-scale processing, consider handling files in batches to optimize memory usage.
FAQs
Q1: Which Word file formats are supported for conversion?
A: Spire.Doc for .NET supports both .doc and .docx formats as input. You can load either format using Document.LoadFromFile() and the library will handle the rest automatically.
Q2: Will the original formatting be preserved after conversion?
A: The conversion focuses on exporting content into a spreadsheet format. Structured content like tables is usually preserved with good readability, while complex layouts may not be retained exactly as in Word.
Q3: Is this feature suitable for large documents?
A: Yes, but performance may vary depending on document size and complexity. For large files, it is recommended to optimize memory usage and process documents efficiently in your code.
Q4: Can I further customize the Excel output after conversion?
A: Yes. After saving the converted .xlsx file, you can open it with Spire.XLS for .NET to further customize the output, such as adjusting cell styles, fonts, colors, column widths, or adding formulas. The two libraries are designed to work together seamlessly.
Conclusion
In this article, you learned how to convert Word to Excel in C# using Spire.Doc for .NET, from basic document conversion to more advanced scenarios like page extraction and table-focused processing. For more control over the output, such as adjusting fonts, colors, or cell formatting - you can combine it with Spire.XLS for .NET.
You can also explore other conversion features, such as exporting Word documents to PDF, HTML, or images.
Get a Free License
If you'd like to remove the evaluation message from the generated documents, or to get rid of the function limitations, please request a 30-day trial license for yourself.
