
Knowledgebase (2370)
Children categories
How to Count Word Frequency in a Word Document Using Python
2025-05-22 09:16:03 Written by AdministratorWant to count the frequency of words in a Word document? Whether you're analyzing content, generating reports, or building a document tool, Python makes it easy to find how often a specific word appears—across the entire document, within specific sections, or even in individual paragraphs. In this guide, you’ll learn how to use Python to count word occurrences accurately and efficiently, helping you extract meaningful insights from your Word files without manual effort.
- Count Frequency of Words in an Entire Word Document
- Count Word Frequency by Section
- Count Word Frequency by Paragraph
- To Wrap Up
- FAQ
In this tutorial, we’ll use Spire.Doc for Python, a powerful and easy-to-use library for Word document processing. It supports a wide range of features like reading, editing, and analyzing DOCX files programmatically—without requiring Microsoft Office.
You can install it via pip:
pip install spire.doc
Let’s see how it works in practice, starting with counting word frequency in an entire Word document.
How to Count Frequency of Words in an Entire Word Document
Let’s start by learning how to count how many times a specific word or phrase appears in an entire Word document. This is a common task—imagine you need to check how often the word "contract" appears in a 50-page file.
With the FindAllString() method from Spire.Doc for Python, you can quickly search through the entire document and get an exact count in just a few lines of code—saving you both time and effort.
Steps to count the frequency of a word in the entire Word document:
- Create an object of Document class and read a source Word document.
- Specify the keyword to find.
- Find all occurrences of the keyword in the document using Document.FindAllString() method.
- Count the number of matches and print it out.
The following code shows how to count the frequency of the keyword "AI-Generated Art" in the entire Word document:
from spire.doc import *
from spire.doc.common import *

# Create a Document object
document = Document()

# Load a Word document
document.LoadFromFile("E:/Administrator/Python1/input/AI-Generated Art.docx")

# Customize the keyword to find
keyword = "AI-Generated Art"

# Find all matches (False: distinguish case; True: full text search)
textSelections = document.FindAllString(keyword, False, True)

# Count the number of matches
count = len(textSelections)

# Print the result
print(f'"{keyword}" appears {count} times in the entire document.')

# Close the document
document.Close()

How to Count Word Frequency by Section in a Word Document Using Python
A Word document is typically divided into multiple sections, each containing its own paragraphs, tables, and other elements. Sometimes, instead of counting a word's frequency across the entire document, you may want to know how often it appears in each section. To achieve this, we’ll loop through all the document sections and search for the target word within each one. Let’s see how to count word frequency by section using Python.
Steps to count the frequency of a word by section in Word documents:
- Create a Document object and load the Word file.
- Define the target keyword to search.
- Loop through all sections in the document. Within each section, loop through all paragraphs.
- Use regular expressions to count keyword occurrences.
- Accumulate and print the count for each section and the total count.
This code demonstrates how to count how many times "AI-Generated Art" appears in each section of a Word document:
import re
from spire.doc import *
from spire.doc.common import *
# Create a Document object and load a Word file
document = Document()
document.LoadFromFile("E:/Administrator/Python1/input/AI.docx")
# Specify the keyword
keyword = "AI-Generated Art"
# The total count of the keyword
total_count = 0
# Get all sections
sections = document.Sections
# Loop through each section
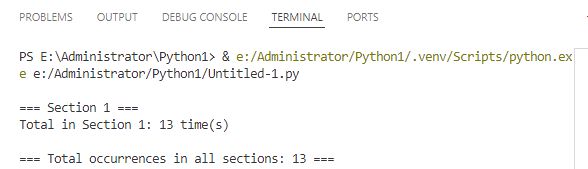
for i in range(sections.Count):
section = sections.get_Item(i)
paragraphs = section.Paragraphs
section_count = 0
print(f"\n=== Section {i + 1} ===")
# Loop through each paragraph in the section
for j in range(paragraphs.Count):
paragraph = paragraphs.get_Item(j)
text = paragraph.Text
# Find all matches using regular expressions
count = len(re.findall(re.escape(keyword), text, flags=re.IGNORECASE))
section_count += count
total_count += count
print(f'Total in Section {i + 1}: {section_count} time(s)')
print(f'\n=== Total occurrences in all sections: {total_count} ===')
# Close the document
document.Close()
How to Count Word Frequency by Paragraph in a Word Document
When it comes to tasks like sensitive word detection or content auditing, it's crucial to perform a more granular analysis of word frequency. In this section, you’ll learn how to count word frequency by paragraph in a Word document, which gives you deeper insight into how specific terms are distributed across your content. Let’s walk through the steps and see a code example in action.
Steps to count the frequency of words by paragraph in Word files:
- Instantiate a Document object and load a Word document from files.
- Specify the keyword to search for.
- Loop through each section and each paragraph in the document.
- Find and count the occurrence of the keyword using regular expressions.
- Print out the count for each paragraph where the keyword appears and the total number of occurrences.
Use the following code to calculate the frequency of "AI-Generated Art" by paragraphs in a Word document:
import re
from spire.doc import *
from spire.doc.common import *
# Create a Document object
document = Document()
# Load a Word document
document.LoadFromFile("E:/Administrator/Python1/input/AI.docx")
# Customize the keyword to find
keyword = "AI-Generated Art"
# Initialize variables
total_count = 0
paragraph_index = 1
# Loop through sections and paragraphs
sections = document.Sections
for i in range(sections.Count):
section = sections.get_Item(i)
paragraphs = section.Paragraphs
for j in range(paragraphs.Count):
paragraph = paragraphs.get_Item(j)
text = paragraph.Text
# Find all occurrences of the keyword while ignoring case
count = len(re.findall(re.escape(keyword), text, flags=re.IGNORECASE))
# Print the result
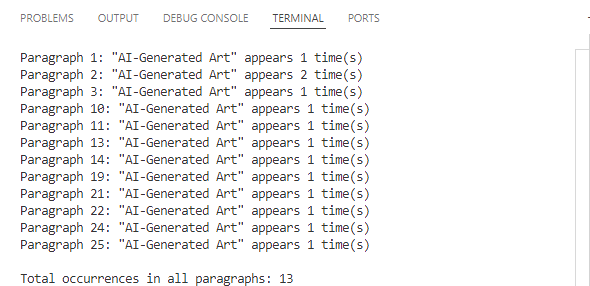
if count > 0:
print(f'Paragraph {paragraph_index}: "{keyword}" appears {count} time(s)')
total_count += count
paragraph_index += 1
# Print the total count
print(f'\nTotal occurrences in all paragraphs: {total_count}')
document.Close()
To Wrap Up
The guide demonstrates how to count the frequency of specific words across an entire Word document, by section, and by paragraph using Python. Whether you're analyzing long reports, filtering sensitive terms, or building smart document tools, automating the task with Spire.Doc for Python can save time and boost accuracy. Give them a try in your own projects and take full control of your Word document content.
FAQs about Counting the Frequency of Words
Q1: How to count the number of times a word appears in Word?
A: You can count word frequency in Word manually using the “Find” feature, or automatically using Python and libraries like Spire.Doc. This lets you scan the entire document or target specific sections or paragraphs.
Q2: Can I analyze word frequency across multiple Word files?
A: Yes. By combining a loop in Python to load multiple documents, you can apply the same word-count logic to each file and aggregate the results—ideal for batch processing or document audits.
How to Convert PDF to CSV in Python (Fast & Accurate Table Extraction)
2025-05-19 03:43:16 Written by Administrator
Working with PDFs that contain tables, reports, or invoice data? Manually copying that information into spreadsheets is slow, error-prone, and just plain frustrating. Fortunately, there's a smarter way: you can convert PDF to CSV in Python automatically — making your data easy to analyze, import, or automate.
In this guide, you’ll learn how to use Python for PDF to CSV conversion by directly extracting tables with Spire.PDF for Python — a pure Python library that doesn’t require any external tools.
✅ No Adobe or third-party tools required
✅ High-accuracy table recognition
✅ Ideal for structured data workflows
In this guide, we’ll cover:
- Convert PDF to CSV in Python Using Table Extraction
- Related Use Cases
- Why Use Spire.PDF for PDF to CSV Conversion in Python?
- Frequently Asked Questions
Convert PDF to CSV in Python Using Table Extraction
The best way to convert PDF to CSV using Python is by extracting tables directly — no need for intermediate formats like Excel. This method is fast, clean, and highly effective for documents with structured data such as invoices, bank statements, or reports. It gives you usable CSV output with minimal code and high accuracy, making it ideal for automation and data analysis workflows.
Step 1: Install Spire.PDF for Python
Before writing code, make sure to install the required library. You can install Spire.PDF for Python via pip:
pip install spire.pdfYou can also install Free Spire.PDF for Python if you're working on smaller tasks:
pip install spire.pdf.freeStep 2: Python Code — Extract Table from PDF and Save as CSV
- Python
from spire.pdf import PdfDocument, PdfTableExtractor
import csv
import os

# Load the PDF document
pdf = PdfDocument()
pdf.LoadFromFile("Sample.pdf")

# Create a table extractor
extractor = PdfTableExtractor(pdf)

# Ensure output directory exists
os.makedirs("output/Tables", exist_ok=True)

# Loop through each page in the PDF
for page_index in range(pdf.Pages.Count):
    # Extract tables on the current page
    tables = extractor.ExtractTable(page_index)
    for table_index, table in enumerate(tables):
        table_data = []

        # Extract all rows and columns
        for row in range(table.GetRowCount()):
            row_data = []
            for col in range(table.GetColumnCount()):
                # Get cleaned cell text
                cell_text = table.GetText(row, col).replace("\n", "").strip()
                row_data.append(cell_text)
            table_data.append(row_data)

        # Write the table to a CSV file
        output_path = os.path.join("output", "Tables", f"Page{page_index + 1}-Table{table_index + 1}.csv")
        with open(output_path, "w", newline="", encoding="utf-8") as csvfile:
            writer = csv.writer(csvfile)
            writer.writerows(table_data)

# Release PDF resources
pdf.Dispose()
The conversion result:
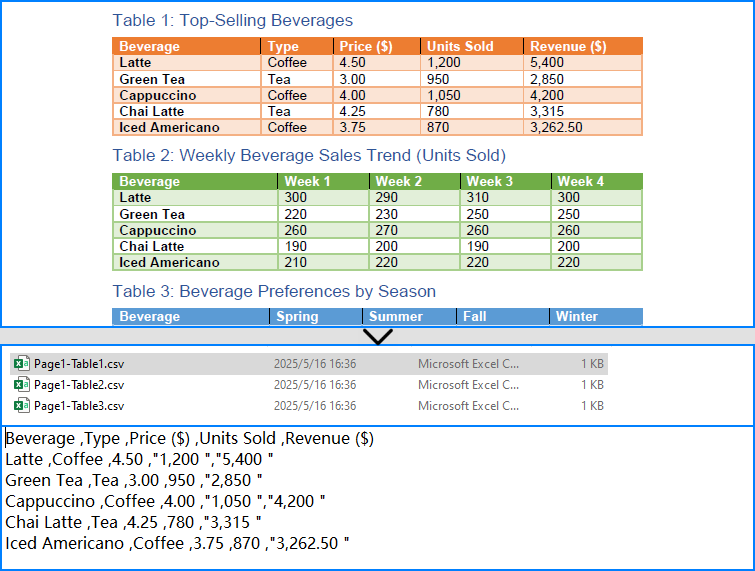
What is PdfTableExtractor?
PdfTableExtractor is a utility class provided by Spire.PDF for Python that detects and extracts table structures from PDF pages. Unlike plain text extraction, it maintains the row-column alignment of tabular data, making it ideal for converting PDF tables to CSV with clean structure.
Best for:
- PDFs with structured tabular data
- Automated Python PDF to CSV conversion
- Fast Python-based data workflows
Relate Article: How to Convert PDFs to Excel XLSX Files with Python
Related Use Cases
If your PDF doesn't contain traditional tables — such as when it's formatted as paragraphs, key-value pairs, or scanned as an image — the following approaches can help you convert such PDFs to CSV using Python effectively:
Useful when data is in paragraph or report form — format it into table-like CSV using Python logic.
Perfect for image-based PDFs — use OCR to detect and export tables to CSV.
Why Choose Spire.PDF for Python?
Spire.PDF for Python is a robust PDF SDK tailored for developers. Whether you're building automated reports, analytics tools, or ETL pipelines — it just works.
Key Benefits:
- Accurate Table Recognition
Smartly extracts structured data from tables
- Pure Python, No Adobe Needed
Lightweight and dependency-free
- Multi-Format Support
Also supports conversion to text, images, Excel, and more
Frequently Asked Questions
Can I convert PDF to CSV using Python?
Yes, you can convert PDF to CSV in Python using Spire.PDF. It supports both direct table extraction to CSV and an optional workflow that converts PDFs to Excel first. No Adobe Acrobat or third-party tools are required.
What's the best way to extract tables from PDFs in Python?
The most efficient way is using Spire.PDF’s PdfTableExtractor class. It automatically detects tables on each page and lets you export structured data to CSV with just a few lines of Python code — ideal for invoices, reports, and automated processing.
Why would I convert PDF to Excel before CSV?
You might convert PDF to Excel first if the layout is complex or needs manual review. This gives you more control over formatting and cleanup before saving as CSV, but it's slower than direct extraction and not recommended for automation workflows.
Does Spire.PDF work without Adobe Acrobat?
Yes. Spire.PDF for Python is a 100% standalone library that doesn’t rely on Adobe Acrobat or any external software. It's a pure Python solution for converting, extracting, and manipulating PDF content programmatically.
Conclusion
Converting PDF to CSV in Python doesn’t have to be a hassle. With Spire.PDF for Python, you can:
- Automatically extract structured tables to CSV
- Build seamless, automated workflows in Python
- Handle both native PDFs and scanned ones (with OCR)
Get a Free License
Spire.PDF for Python offers a free edition suitable for basic tasks. If you need access to more features, you can also apply for a free license for evaluation use. Simply submit a request, and a license key will be sent to your email after approval.
How to Filter Excel Pivot Tables with Python: Step-by-Step Guide
2025-05-16 10:01:44 Written by Administrator
Introduction
Pivot Tables in Excel are versatile tools that enable efficient data summarization and analysis. They allow users to explore data, uncover insights, and generate reports dynamically. One of the most powerful features of Pivot Tables is filtering, which lets users focus on specific data subsets without altering the original data structure.
What This Tutorial Covers
This tutorial provides a detailed, step-by-step guide on how to programmatically apply various types of filters to a Pivot Table in Excel using Python with the Spire.XLS for Python library. It covers the following topics:
- Benefits of Filtering Data in Pivot Tables
- Install Python Excel Library – Spire.XLS for Python
- Add Report Filter to Pivot Table
- Apply Row Field Filter in Pivot Table
- Apply Column Field Filter in Pivot Table
- FAQs
- Conclusion
Benefits of Filtering Data in Pivot Tables
Filtering is an essential feature of Pivot Tables that provides the following benefits:
- Enhanced Data Analysis: Quickly focus on specific segments or categories of your data to draw meaningful insights.
- Dynamic Data Updates: Filters automatically adjust to reflect changes when the underlying data is refreshed, keeping your analysis accurate.
- Improved Data Organization: Display only relevant data in your reports without altering or deleting the original dataset, preserving data integrity.
Install Python Excel Library – Spire.XLS for Python
Before working with Pivot Tables in Excel using Python, ensure the Spire.XLS for Python library is installed. The quickest way to do this is using pip, Python’s package manager. Simply run the following command in your terminal or command prompt:
pip install spire.xlsOnce installed, you’re ready to start automating Pivot Table filtering in your Python projects.
Add Report Filter to Pivot Table
A report filter allows you to filter the entire Pivot Table based on a particular field and value. This type of filter is useful when you want to display data for a specific category or item globally across the Pivot Table, without changing the layout.
Steps to Add a Report Filter
- Initialize the Workbook: Create a Workbook object to manage your Excel file.
- Load the Excel File: Use Workbook.LoadFromFile() to load an existing file containing a Pivot Table.
- Access the Worksheet: Use Workbook.Worksheets[] to select the desired worksheet.
- Locate the Pivot Table: Use Worksheet.PivotTables[] to access the specific Pivot Table.
- Define the Report Filter: Create a PivotReportFilter object specifying the field to filter.
- Apply the Report Filter: Add the filter to the Pivot Table using XlsPivotTable.ReportFilters.Add().
- Save the Updated File: Use Workbook.SaveToFile() to save your changes.
Code Example
- Python
from spire.xls import *

# Create an object of the Workbook class
workbook = Workbook()

# Load an existing Excel file containing a Pivot Table
workbook.LoadFromFile("Sample.xlsx")

# Access the first worksheet
sheet = workbook.Worksheets[0]

# Access the first Pivot Table in the worksheet
pt = sheet.PivotTables[0]

# Create a report filter for the field "Product"
reportFilter = PivotReportFilter("Product", True)

# Add the report filter to the pivot table
pt.ReportFilters.Add(reportFilter)

# Save the updated workbook to a new file
workbook.SaveToFile("AddReportFilter.xlsx", FileFormat.Version2016)
workbook.Dispose()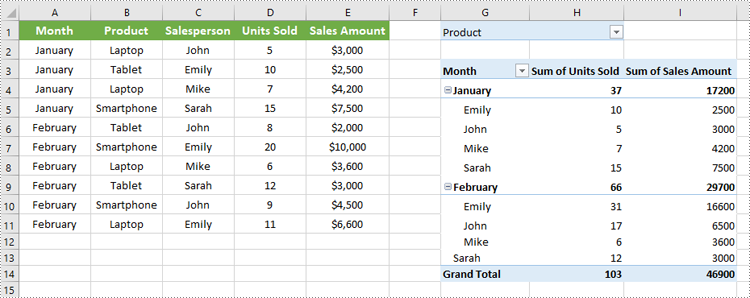
Apply Row Field Filter in Pivot Table
Row field filters allow you to filter data displayed in the row fields of an Excel Pivot Table. These filters can be based on labels (specific text values) or values (numeric criteria).
Steps to Add a Row Field Filter
- Initialize the Workbook: Create a Workbook object to manage the Excel file.
- Load the Excel File: Use Workbook.LoadFromFile() to load your target file containing a Pivot Table.
- Access the Worksheet: Select the desired worksheet using Workbook.Worksheets[].
- Locate the Pivot Table: Access the specific Pivot Table using Worksheet.PivotTables[].
- Add a Row Field Filter: Add a label filter or value filter using
XlsPivotTable.RowFields[].AddLabelFilter() or
XlsPivotTable.RowFields[].AddValueFilter().
- Calculate Pivot Table Data: Use XlsPivotTable.CalculateData() to calculate the pivot table data.
- Save the Updated File: Save your changes using Workbook.SaveToFile().
Code Example
- Python
from spire.xls import *

# Create an object of the Workbook class
workbook = Workbook()

# Load an Excel file
workbook.LoadFromFile("Sample.xlsx")

# Get the first worksheet
sheet = workbook.Worksheets[0]

# Get the first pivot table
pt = sheet.PivotTables[0]

# Add a value filter to the first row field in the pivot table
pt.RowFields[0].AddValueFilter(PivotValueFilterType.GreaterThan, pt.DataFields[0], Int32(5000), None)

# Or add a label filter to the first row field in the pivot table
# pt.RowFields[0].AddLabelFilter(PivotLabelFilterType.Equal, "Mike", None)

# Calculate the pivot table data
pt.CalculateData()

# Save the resulting file
workbook.SaveToFile("AddRowFieldFilter.xlsx", FileFormat.Version2016)
workbook.Dispose()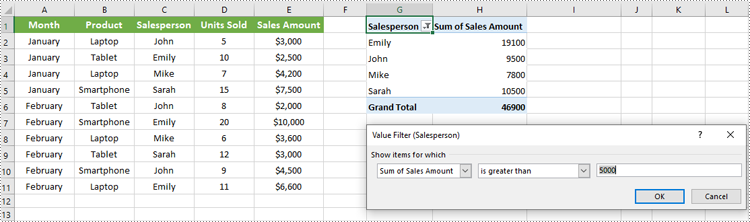
Apply Column Field Filter in Pivot Table
Column field filters in Excel Pivot Tables allow you to filter data displayed in the column fields. Similar to row field filters, column field filters can be based on labels (text values) or values (numeric criteria).
Steps to Add Column Field Filter
- Initialize the Workbook: Create a Workbook object to manage your Excel file.
- Load the Excel File: Use Workbook.LoadFromFile() to open your file containing a Pivot Table.
- Access the Worksheet: Select the target worksheet using Workbook.Worksheets[].
- Locate the Pivot Table: Use Worksheet.PivotTables[] to access the desired Pivot Table.
- Add a Column Field Filter: Add a label filter or value filter using
XlsPivotTable.ColumnFields[].AddLabelFilter() or
XlsPivotTable.ColumnFields[].AddValueFilter().
- Calculate Pivot Table Data: Use XlsPivotTable.CalculateData() to calculate the Pivot Table data.
- Save the Updated File: Save your changes using Workbook.SaveToFile().
Code Example
- Python
from spire.xls import *

# Create an object of the Workbook class
workbook = Workbook()

# Load the Excel file
workbook.LoadFromFile("Sample.xlsx")

# Access the first worksheet
sheet = workbook.Worksheets[0]

# Access the first Pivot Table
pt = sheet.PivotTables[0]

# Add a label filter to the first column field
pt.ColumnFields[0].AddLabelFilter(PivotLabelFilterType.Equal, String("Laptop"), None)

# # Or add a value filter to the first column field
# pt.ColumnFields[0].AddValueFilter(PivotValueFilterType.Between, pt.DataFields[0], Int32(5000), Int32(10000))

# Calculate the pivot table data
pt.CalculateData()

# Save the updated workbook
workbook.SaveToFile("AddColumnFieldFilter.xlsx", FileFormat.Version2016)
workbook.Dispose()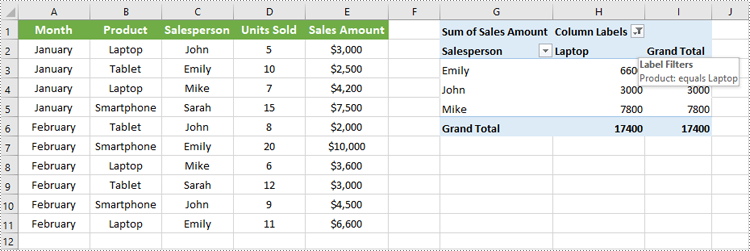
Conclusion
Filtering Pivot Tables in Excel is crucial for effective data analysis, allowing users to zoom in on relevant information without disrupting the table’s structure. Using Spire.XLS for Python, developers can easily automate adding, modifying, and managing filters on Pivot Tables programmatically. This tutorial covered the primary filter types—report filters, row field filters, and column field filters—with detailed code examples to help you get started quickly.
FAQs
Q: Can I add multiple filters to the same Pivot Table?
A: Yes, you can add multiple report filters, row filters, and column filters simultaneously to customize your data views with Spire.XLS.
Q: Do filters update automatically if the source data changes?
A: Yes, after refreshing the Pivot Table or recalculating with CalculateData(), filters will reflect the latest data.
Q: Can I filter based on custom conditions?
A: Spire.XLS supports many filter types including label filters (equals, begins with, contains) and value filters (greater than, less than, between).
Q: Is it possible to remove filters programmatically?
A: Yes, you can remove filters by clearing or resetting the respective filter collections or fields.
Get a Free License
To fully experience the capabilities of Spire.XLS for .NET without any evaluation limitations, you can request a free 30-day trial license.
