
Knowledgebase (2370)
Children categories
Find and Highlight Text in Word with JavaScript in React
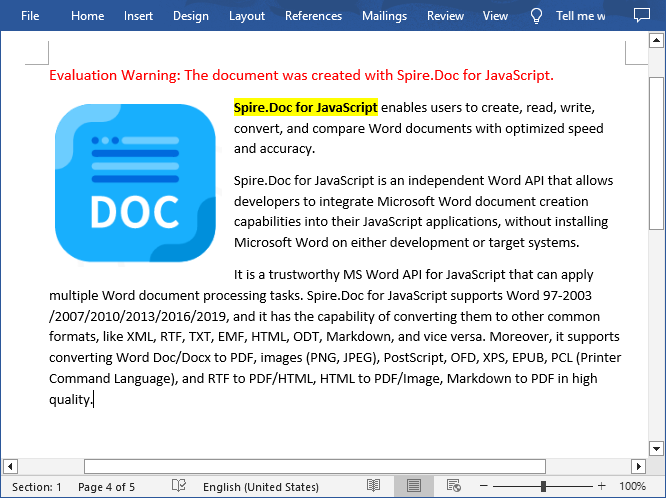
2025-03-12 00:53:31 Written by AdministratorWhen reviewing a long document, the find and highlight feature allows users to quickly locate specific information. For example, if there are multiple people working on a research paper, the find and highlight feature can be used to flag important points or areas that need attention, making it easier for others to focus on those specific parts. This article will demonstrate how to find and highlight text in a Word document in React using Spire.Doc for JavaScript.
- Find and Highlight the First Instance of Specified Text in Word
- Find and Highlight All Instances of Specified Text in Word
Install the JavaScript Library
To get started with inserting images in Word in a React application, you can either download Spire.Doc for JavaScript from our website or install it via npm with the following command:
npm i spire.officeThe downloaded product package integrates Spire.Doc for JavaScript, Spire.XLS for JavaScript, Spire.PDF for JavaScript, and Spire.Presentation for JavaScript. To use the features of Spire.Doc for JavaScript, you need to copy the corresponding files (spire.doc.js, Spire.Doc.Wasm.zip, spire.common.js, Spire.Common.Wasm.zip, and the _framework folder) to the public folder of your project. To ensure proper text rendering, you can add relevant font files with a custom path. In the following example, the font is added to the path: public\static\font.
For more details, refer to the documentation: How to Integrate Spire.Doc for JavaScript in a React Project
Find and Highlight the First Instance of Specified Text in Word in JavaScript
The Document.FindString() method allows to find the first instance of a specified text and then you can set a highlight color for it through the TextRange.CharacterFormat.HighlightColor property. The following are the main steps:
- Create a new document using the new wasmModule.Document() method.
- Load a Word document using the Document.LoadFromFile() method.
- Find the first instance of a specific text using the Document.FindString() method.
- Get the instance as a single text range using the TextSelection.GetAsOneRange() method, and then highlight the text range with a background color using the TextRange.CharacterFormat.HighlightColor property.
- Save the result document using Document.SaveToFile() method.
- JavaScript
import React, { useState, useEffect } from 'react';

function App() {
  const [wasmModule, setWasmModule] = useState(null);
  // Load Spire.Doc
  useEffect(() => {
    (async () => {
      try {
        const publicUrl = process.env.PUBLIC_URL || '';
        const spireModule = await import(/* webpackIgnore: true */ `${publicUrl}/spire.doc.js`);
        const rawModule = spireModule.default || spireModule;
        window.wasmModule = typeof rawModule === 'function'
          ? await rawModule({ locateFile: p => p.endsWith('.wasm') ? `${publicUrl}/${p}` : p })
          : rawModule;
        setWasmModule(window.wasmModule);
      } catch (error) {
        console.error('Failed to load spire.doc.js WASM module:', error);
      }
    })();
  }, []);

  // Function to find and higlight a specified text in Word
  const FindHighlightFirst  = async () => {
    const wasmModule = window.wasmModule.spiredoc;

    if (wasmModule) {
      // Load the font files into the virtual file system (VFS)
      await window.spire.FetchFileToVFS('Arial.ttf', '/Library/Fonts/', `${process.env.PUBLIC_URL}/static/font/`);

      // Specify the input file name and the output file name
      const inputFileName = 'input.docx';
      const outputFileName = 'FindHighlightFirst.docx';

      // Fetch the input file and add it to the VFS
      await window.spire.FetchFileToVFS(inputFileName, '', `${process.env.PUBLIC_URL}/static/data/`);

      // Create an instance of the Document class
      const doc = new wasmModule.Document();

      // Load the Word document
      doc.LoadFromFile(inputFileName);

      // Find the first instance of a specific text
      let textSelection = doc.FindString('Spire.Doc for JavaScript', false, true);

      // Get the instance as a single text range
      let textRange = textSelection.GetAsOneRange();

      // Set highlight color
      textRange.CharacterFormat.HighlightColor = wasmModule.Color.get_Yellow();

      // Save the result document
      doc.SaveToFile({ fileName: outputFileName, fileFormat: wasmModule.FileFormat.Docx2013 });

      // Release resources
      doc.Dispose();

      // Read the generated Word file from VFS
      const modifiedFileArray = window.dotnetRuntime.Module.FS.readFile(outputFileName);

      // Create a Blob object from the Word file
      const modifiedFile = new Blob([modifiedFileArray], { type: "application/vnd.openxmlformats-officedocument.wordprocessingml.document" });

      // Create a URL for the Blob
      const url = URL.createObjectURL(modifiedFile);

      // Create an anchor element to trigger the download
      const a = document.createElement("a");
      a.href = url;
      a.download = outputFileName;
      document.body.appendChild(a);
      a.click();
      document.body.removeChild(a);
      URL.revokeObjectURL(url);
    }
  };

  return (
    <div style={{ textAlign: 'center', height: '300px' }}>
      <h1>Find and Highlight Specified Text in Word Using JavaScript in React</h1>
      <button onClick={FindHighlightFirst} disabled={!wasmModule}>
      Execute
      </button>
    </div>
 );
}

export default App;
Run the code to launch the React app at localhost:3000. Once it's running, click on the "Execute" button to download the result file:
The result file:
Find and Highlight All Instances of Specified Text in Word in JavaScript
Spire.Doc for JavaScript also provides the Document.FindAllString() method to find all instances of a specified text in a Word document. Then you can iterate through these instances and highlight each one with a background color. The following are the main steps:
- Create a new document using the new wasmModule.Document() method.
- Load a Word document using the Document.LoadFromFile() method.
- Find all instances of a specific text in the document using the Document.FindAllString() method.
- Iterate through each found instance and get it as a single text range using the TextSelection.GetAsOneRange() method, then highlight each text range with a bright color using the TextRange.CharacterFormat.HighlightColor property.
- Save the result document using Document.SaveToFile() method.
- JavaScript
import React, { useState, useEffect } from 'react';

function App() {
  const [wasmModule, setWasmModule] = useState(null);
  // Load Spire.Doc
  useEffect(() => {
    (async () => {
      try {
        const publicUrl = process.env.PUBLIC_URL || '';
        const spireModule = await import(/* webpackIgnore: true */ `${publicUrl}/spire.doc.js`);
        const rawModule = spireModule.default || spireModule;
        window.wasmModule = typeof rawModule === 'function'
          ? await rawModule({ locateFile: p => p.endsWith('.wasm') ? `${publicUrl}/${p}` : p })
          : rawModule;
        setWasmModule(window.wasmModule);
      } catch (error) {
        console.error('Failed to load spire.doc.js WASM module:', error);
      }
    })();
  }, []);

  // Function to find and higlight a specified text in Word
  const FindAndHighlightAll   = async () => {
    const wasmModule = window.wasmModule.spiredoc;

    if (wasmModule) {
      // Load the font files into the virtual file system (VFS)
      await window.spire.FetchFileToVFS('Arial.ttf', '/Library/Fonts/', `${process.env.PUBLIC_URL}/static/font/`);

      // Specify the input file name and the output file name
      const inputFileName = 'input.docx';
      const outputFileName = 'FindAndHighlight.docx';

      // Fetch the input file and add it to the VFS
      await window.spire.FetchFileToVFS(inputFileName, '', `${process.env.PUBLIC_URL}/static/data/`);

      // Create an instance of the Document class
      const doc = new wasmModule.Document();

      // Load the Word document
      doc.LoadFromFile(inputFileName);

      // Find all occurrences of the specified text in the document
      let textSelections = doc.FindAllString('Spire.Doc for JavaScript', false, true);

      // Iterate through all found text selections
      for (let i = 0; i < textSelections.length; i++) {
        let selection = textSelections[i];

        // Set highlight color
        selection.GetAsOneRange().CharacterFormat.HighlightColor = wasmModule.Color.get_Yellow();
      }

      // Save the result document
      doc.SaveToFile({ fileName: outputFileName, fileFormat: wasmModule.FileFormat.Docx2013 });

      // Release resources
      doc.Dispose();

      // Read the generated Word file from VFS
      const modifiedFileArray = window.dotnetRuntime.Module.FS.readFile(outputFileName);

      // Create a Blob object from the Word file
      const modifiedFile = new Blob([modifiedFileArray], { type: "application/vnd.openxmlformats-officedocument.wordprocessingml.document" });

      // Create a URL for the Blob
      const url = URL.createObjectURL(modifiedFile);

      // Create an anchor element to trigger the download
      const a = document.createElement("a");
      a.href = url;
      a.download = outputFileName;
      document.body.appendChild(a);
      a.click();
      document.body.removeChild(a);
      URL.revokeObjectURL(url);
    }
  };

  return (
    <<div style={{ textAlign: 'center', height: '300px' }}>
      <<h1>Find and Highlight Specified Text in Word Using JavaScript in React<</h1>
      <<button onClick={FindAndHighlightAll} disabled={!wasmModule}>
      Execute
      <</button>
    </div>
 );
}

export default App;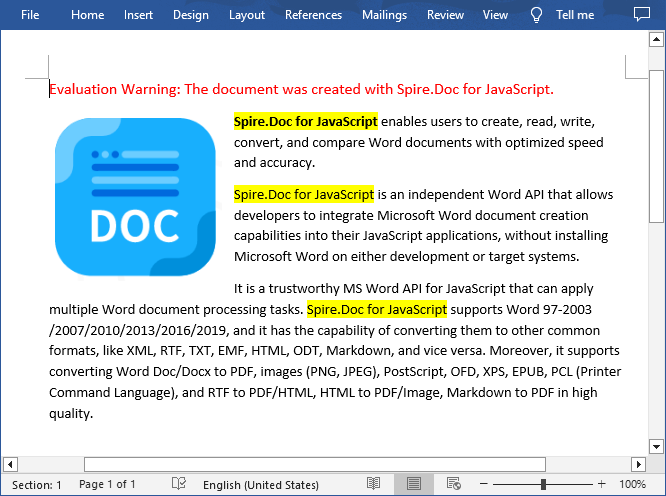
Get a Free License
To fully experience the capabilities of Spire.Doc for JavaScript without any evaluation limitations, you can request a free 30-day trial license.
Lock Cells, Rows, and Columns in Excel with JavaScript in React
2025-03-11 01:57:59 Written by AdministratorWhen working with Excel, you may sometimes need to protect critical data while allowing users to edit other parts of the worksheet. This is especially important for scenarios where certain formulas, headers, or reference values must remain unchanged to ensure data integrity. By locking specific areas, you can prevent accidental modifications, maintain consistency, and control access to key information within the spreadsheet. In this article, you will learn how to lock cells, rows, and columns in Excel in React using JavaScript and the Spire.XLS for JavaScript library.
Install Spire.XLS for JavaScript
To get started with locking cells, rows, and columns in Excel files within a React application, you can either download Spire.XLS for JavaScript from our website or install it via npm with the following command:
npm i spire.office
The downloaded product package has been integrated Spire.Doc for JavaScript,Spire.XLS for JavaScript,Spire.PDF for JavaScript,Spire.Presentation for JavaScript. To use the functionality of Spire.XLS for JavaScript, you need to copy the corresponding files (spire.xls.js, Spire.Xls.Wasm.zip, spire.common.js, Spire.Common.Wasm.zip, and _framework) to the project's "public" folder. At the same time, in order to ensure text rendering, the related font files can be added with custom paths. In the following example, the font addition path is: public\static\font.
For more details, refer to the documentation: How to Integrate Spire.XLS for JavaScript in a React Project
Lock Cells in Excel
Spire.XLS for JavaScript offers the Worksheet.Range.get().Style.Locked property, allowing you to protect critical data cells while enabling edits to the rest of the worksheet. The detailed steps are as follows.
- Create a Workbook object using the new wasmModule.Workbook() method.
- Load a sample Excel file using the Workbook.LoadFromFile() method.
- Get the first worksheet using the Workbook.Worksheets.get() method.
- Unlock all cells in the used range of the worksheet by setting the Worksheet.Range.Style.Locked property to "false".
- Set text for specific cells using the Worksheet.Range.get().Text property and then lock them by setting the Worksheet.Range.get().Style.Locked property to "true".
- Protect the worksheet with a password using the Worksheet.Protect() method.
- Save the result file using the Workbook.SaveToFile() method.
- JavaScript
import React, { useState, useEffect } from 'react';
function App() {
const [wasmModule, setWasmModule] = useState(null);
// Load Spire.XLS
useEffect(() => {
(async () => {
try {
const publicUrl = process.env.PUBLIC_URL || '';
const spireModule = await import(/* webpackIgnore: true */ `${publicUrl}/spire.xls.js`);
const rawModule = spireModule.default || spireModule;
window.wasmModule = typeof rawModule === 'function'
? await rawModule({ locateFile: p => p.endsWith('.wasm') ? `${publicUrl}/${p}` : p })
: rawModule;
setWasmModule(window.wasmModule);
} catch (error) {
console.error('Failed to load spire.xls.js WASM module:', error);
}
})();
}, []);
// Function to lock specific cells in Excel
const LockExcelCells = async () => {
const wasmModule = window.wasmModule.spirexls;
if (wasmModule) {
// Load font into Virtual File System (VFS)
await window.spire.FetchFileToVFS('Arial.ttf', '/Library/Fonts/', `${process.env.PUBLIC_URL}/static/font/`);
// Load the Excel files into the virtual file system (VFS)
let inputFileName = 'sample.xlsx';
await window.spire.FetchFileToVFS(inputFileName, '', `${process.env.PUBLIC_URL}/static/data/`);
// Create a new workbook
let workbook = new wasmModule.Workbook();
// Load the Excel file from the virtual file system
workbook.LoadFromFile({ fileName: inputFileName });
// Get the first worksheet
let sheet = workbook.Worksheets.get(0);
// Unlock all cells in the used range of the worksheet
sheet.Range.Style.Locked = false;
// Lock a specific cell in the worksheet
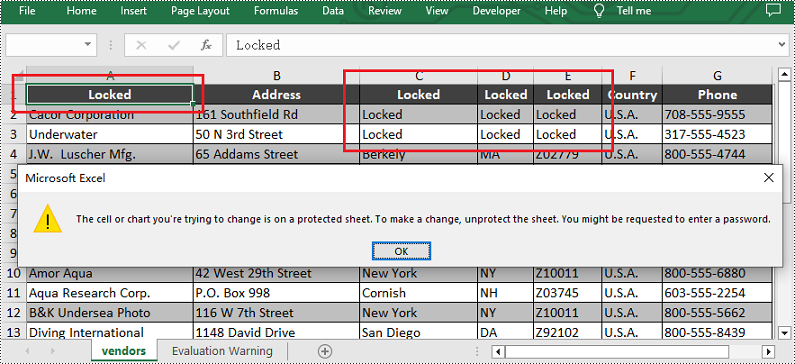
sheet.Range.get("A1").Text = "Locked";
sheet.Range.get("A1").Style.Locked = true;
// Lock a specific cell range in the worksheet
sheet.Range.get("C1:E3").Text = "Locked";
sheet.Range.get("C1:E3").Style.Locked = true;
// Protect the worksheet with a password
sheet.Protect({ password: "123", options: wasmModule.SheetProtectionType.All });
let outputFileName = "LockCells.xlsx";
// Save the resulting file
workbook.SaveToFile({ fileName: outputFileName, version: wasmModule.ExcelVersion.Version2013 });
// Read the saved file and convert to Blob object
const modifiedFileArray = window.dotnetRuntime.Module.FS.readFile(outputFileName);
const modifiedFile = new Blob([modifiedFileArray], { type: 'application/vnd.openxmlformats-officedocument.spreadsheetml.sheet' });
// Create a URL for the Blob and initiate download
const url = URL.createObjectURL(modifiedFile);
const a = document.createElement('a');
a.href = url;
a.download = outputFileName;
document.body.appendChild(a);
a.click();
document.body.removeChild(a);
URL.revokeObjectURL(url);
// Clean up resources used by the workbook
workbook.Dispose();
}
};
return (
<div style={{ textAlign: 'center', height: '300px' }}>
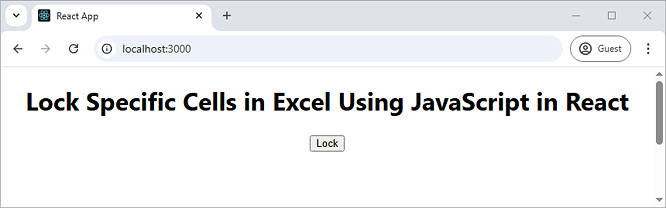
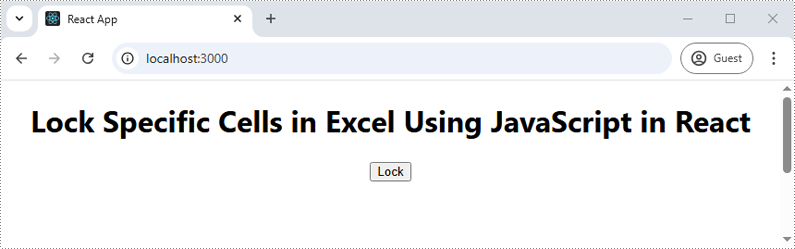
<h1>Lock Specific Cells in Excel Using JavaScript in React</h1>
<button onClick={LockExcelCells} disabled={!wasmModule}>
Lock
</button>
</div>
);
}
export default App;
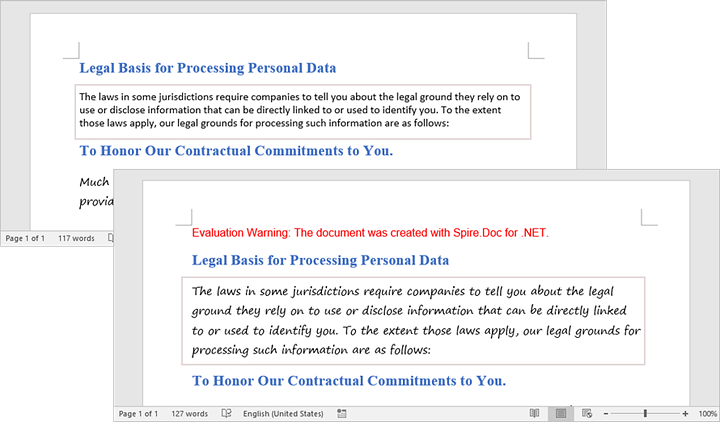
Run the code to launch the React app at localhost:3000. Once it's running, click on the "Lock" button to lock specific cells in the Excel file:
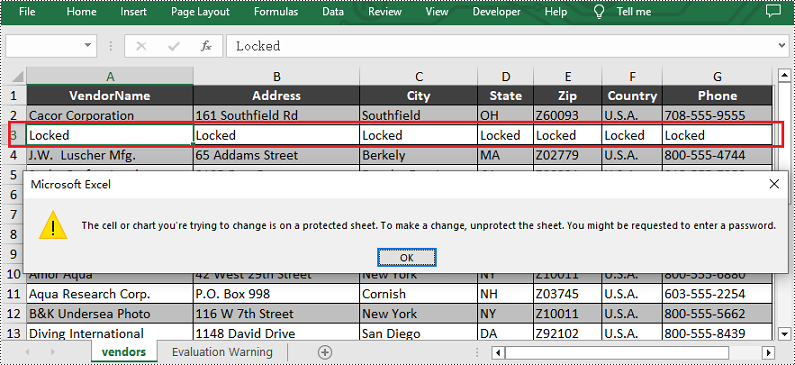
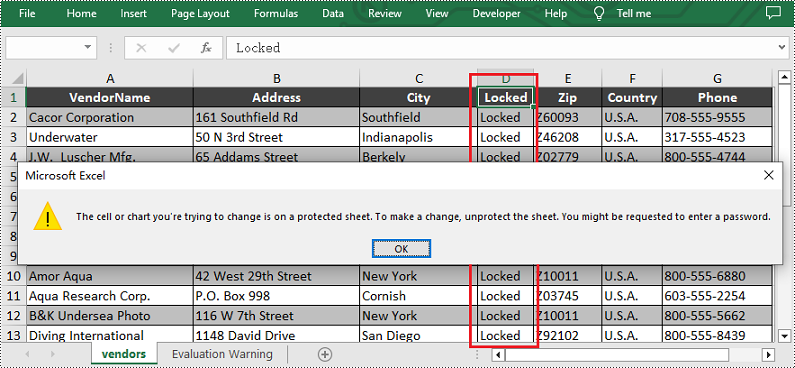
Upon opening the output Excel sheet and attempting to edit the protected cells, a dialog box will appear, notifying you that the cell you're trying to change is on a protected sheet:
Lock Rows in Excel
If you need to preserve row-based data, such as headers or summaries, you can lock entire rows using the Worksheet.Rows.get().Style.Locked property in Spire.XLS for JavaScript. The detailed steps are as follows.
- Create a Workbook object using the new wasmModule.Workbook() method.
- Load a sample Excel file using the Workbook.LoadFromFile() method.
- Get the first worksheet using the Workbook.Worksheets.get() method.
- Unlock all cells in the used range of the worksheet by setting the Worksheet.Range.Style.Locked property to "false".
- Set text for a specific row using the Worksheet.Rows.get().Text property and then lock it by setting the Worksheet.Rows.get().Style.Locked property to "true".
- Protect the worksheet with a password using the Worksheet.Protect() method.
- Save the result file using the Workbook.SaveToFile() method.
- JavaScript
import React, { useState, useEffect } from 'react';
function App() {
  const [wasmModule, setWasmModule] = useState(null);
  // Load Spire.XLS
  useEffect(() => {
    (async () => {
      try {
        const publicUrl = process.env.PUBLIC_URL || '';
        const spireModule = await import(/* webpackIgnore: true */ `${publicUrl}/spire.xls.js`);
        const rawModule = spireModule.default || spireModule;
        window.wasmModule = typeof rawModule === 'function'
          ? await rawModule({ locateFile: p => p.endsWith('.wasm') ? `${publicUrl}/${p}` : p })
          : rawModule;
        setWasmModule(window.wasmModule);
      } catch (error) {
        console.error('Failed to load spire.xls.js WASM module:', error);
      }
    })();
  }, []);

  // Function to lock specific rows in Excel
  const LockExcelRows = async () => {
    const wasmModule = window.wasmModule.spirexls;

    if (wasmModule) {
      // Load font into Virtual File System (VFS)
      await window.spire.FetchFileToVFS('Arial.ttf', '/Library/Fonts/', `${process.env.PUBLIC_URL}/static/font/`);


      // Load the Excel files into the virtual file system (VFS)
      let inputFileName = 'sample.xlsx';
      await window.spire.FetchFileToVFS(inputFileName, '', `${process.env.PUBLIC_URL}/static/data/`);


      // Create a new workbook
      let workbook = new wasmModule.Workbook();

      // Load the Excel file from the virtual file system
      workbook.LoadFromFile({ fileName: inputFileName });

      // Get the first worksheet
      let sheet = workbook.Worksheets.get(0);

      // Unlock all cells in the used range of the worksheet
      sheet.Range.Style.Locked = false;

      // Lock the third row in the worksheet
      sheet.Rows.get(2).Text = "Locked";
      sheet.Rows.get(2).Style.Locked = true;

      // Protect the worksheet with a password
      sheet.Protect({ password: "123", options: wasmModule.SheetProtectionType.All });

      let outputFileName = "LockRows.xlsx";
      // Save the resulting file
      workbook.SaveToFile({ fileName: outputFileName, version: wasmModule.ExcelVersion.Version2013 });

      // Read the saved file and convert to Blob object
      const modifiedFileArray = window.dotnetRuntime.Module.FS.readFile(outputFileName);
      const modifiedFile = new Blob([modifiedFileArray], { type: 'application/vnd.openxmlformats-officedocument.spreadsheetml.sheet' });

      // Create a URL for the Blob and initiate download
      const url = URL.createObjectURL(modifiedFile);
      const a = document.createElement('a');
      a.href = url;
      a.download = outputFileName;
      document.body.appendChild(a);
      a.click();
      document.body.removeChild(a);
      URL.revokeObjectURL(url);

      // Clean up resources used by the workbook
      workbook.Dispose();
    }
  };

  return (
    <div style={{ textAlign: 'center', height: '300px' }}>
      <h1>Lock Specific Rows in Excel Using JavaScript in React</h1>
      <button onClick={LockExcelRows} disabled={!wasmModule}>
        Lock
      </button>
    </div>
  );
}

export default App;
Lock Columns in Excel
To maintain the integrity of key vertical data, such as fixed identifiers or category labels, you can lock entire columns using the Worksheet.Columns.get().Style.Locked property in Spire.XLS for JavaScript. The detailed steps are as follows.
- Create a Workbook object using the new wasmModule.Workbook() method.
- Load a sample Excel file using the Workbook.LoadFromFile() method.
- Get the first worksheet using the Workbook.Worksheets.get() method.
- Unlock all cells in the used range of the worksheet by setting the Worksheet.Range.Style.Locked property to "false".
- Set text for a specific column using the Worksheet.Columns.get().Text property and then lock it by setting the Worksheet.Columns.get().Style.Locked property to "true".
- Protect the worksheet with a password using the Worksheet.Protect() method.
- Save the result file using the Workbook.SaveToFile() method.
- JavaScript
import React, { useState, useEffect } from 'react';
function App() {
  const [wasmModule, setWasmModule] = useState(null);
  // Load Spire.XLS
  useEffect(() => {
    (async () => {
      try {
        const publicUrl = process.env.PUBLIC_URL || '';
        const spireModule = await import(/* webpackIgnore: true */ `${publicUrl}/spire.xls.js`);
        const rawModule = spireModule.default || spireModule;
        window.wasmModule = typeof rawModule === 'function'
          ? await rawModule({ locateFile: p => p.endsWith('.wasm') ? `${publicUrl}/${p}` : p })
          : rawModule;
        setWasmModule(window.wasmModule);
      } catch (error) {
        console.error('Failed to load spire.xls.js WASM module:', error);
      }
    })();
  }, []);

  // Function to lock specific columns in Excel
  const LockExcelColumns = async () => {
    const wasmModule = window.wasmModule.spirexls;

    if (wasmModule) {
      // Load font into Virtual File System (VFS)
      await window.spire.FetchFileToVFS('Arial.ttf', '/Library/Fonts/', `${process.env.PUBLIC_URL}/static/font/`);


      // Load the Excel files into the virtual file system (VFS)
      let inputFileName = 'sample.xlsx';
      await window.spire.FetchFileToVFS(inputFileName, '', `${process.env.PUBLIC_URL}/static/data/`);


      // Create a new workbook
      let workbook = new wasmModule.Workbook();

      // Load the Excel file from the virtual file system
      workbook.LoadFromFile({ fileName: inputFileName });

      // Get the first worksheet
      let sheet = workbook.Worksheets.get(0);

      // Unlock all cells in the used range of the worksheet
      sheet.Range.Style.Locked = false;

      // Lock the fourth column in the worksheet
      sheet.Columns.get(3).Text = "Locked";
      sheet.Columns.get(3).Style.Locked = true;

      // Protect the worksheet with a password
      sheet.Protect({ password: "123", options: wasmModule.SheetProtectionType.All });

      let outputFileName = "LockColumns.xlsx";
      // Save the resulting file
      workbook.SaveToFile({ fileName: outputFileName, version: wasmModule.ExcelVersion.Version2013 });

      // Read the saved file and convert to Blob object
      const modifiedFileArray = window.dotnetRuntime.Module.FS.readFile(outputFileName);
      const modifiedFile = new Blob([modifiedFileArray], { type: 'application/vnd.openxmlformats-officedocument.spreadsheetml.sheet' });

      // Create a URL for the Blob and initiate download
      const url = URL.createObjectURL(modifiedFile);
      const a = document.createElement('a');
      a.href = url;
      a.download = outputFileName;
      document.body.appendChild(a);
      a.click();
      document.body.removeChild(a);
      URL.revokeObjectURL(url);

      // Clean up resources used by the workbook
      workbook.Dispose();
    }
  };

  return (
    <div style={{ textAlign: 'center', height: '300px' }}>
      <h1>Lock Specific Columns in Excel Using JavaScript in React</h1>
      <button onClick={LockExcelColumns} disabled={!wasmModule}>
        Lock
      </button>
    </div>
  );
}

export default App;
Get a Free License
To fully experience the capabilities of Spire.XLS for JavaScript without any evaluation limitations, you can request a free 30-day trial license.
Fonts play a crucial role in defining the visual appeal and readability of Word documents, influencing everything from professional reports to creative projects. Whether you're looking to refresh the design of your document by replacing outdated fonts or troubleshooting missing fonts that disrupt formatting, understanding how to retrieve and replace fonts in Microsoft Word is an essential skill.
In this article, you will learn how to get and replace fonts in a Word document using C# and Spire.Doc for .NET.
Install Spire.Doc for .NET
To begin with, you need to add the DLL files included in the Spire.Doc for .NET package as references in your .NET project. The DLL files can be either downloaded from this link or installed via NuGet.
PM> Install-Package Spire.Doc
Get Fonts Used in a Word Document in C#
To extract font information from a Word document, you must traverse its sections and paragraphs, examining each child object within the paragraphs. If a child object is identified as a TextRange, you can retrieve the font details—such as the font name, size, and color—using the properties of the TextRange class.
The following are the steps to get fonts used in a Word document in C#:
- Create a Document object.
- Load a Word document using the Document.LoadFromFile() method.
- Iterate through each section, paragraph, and child object.
- For each child object, check if it is an instance of TextRange class.
- If it is, retrieve the font name and size using the TextRange.CharacterFormat.FontName and TextRange.CharacterFormat.FontSize properties.
- Write the font information in a text file.
- C#
using Spire.Doc;
using Spire.Doc.Documents;
using Spire.Doc.Fields;
namespace RetrieveFonts
{
// Customize a FontInfo class to help store font information
class FontInfo
{
public string Name { get; set; }
public float? Size { get; set; }
public FontInfo()
{
Name = "";
Size = null;
}
public override bool Equals(object obj)
{
if (this == obj) return true;
if (!(obj is FontInfo other)) return false;
return Name.Equals(other.Name) && Size.Equals(other.Size);
}
public override int GetHashCode()
{
return HashCode.Combine(Name, Size);
}
}
class Program
{
// Function to write string to a txt file
static void WriteAllText(string filename, List<string> text)
{
try
{
using (StreamWriter writer = new StreamWriter(filename))
{
foreach (var line in text)
{
writer.WriteLine(line);
}
}
}
catch (Exception e)
{
Console.WriteLine(e.Message);
}
}
static void Main(string[] args)
{
List<FontInfo> fontInfos = new List<FontInfo>();
List<string> fontInformations = new List<string>();
// Create a Document instance
Document document = new Document();
// Load a Word document
document.LoadFromFile("C:\\Users\\Administrator\\Desktop\\input.docx");
// Iterate through the sections
foreach (Section section in document.Sections)
{
// Iterate through the paragraphs
foreach (Paragraph paragraph in section.Body.Paragraphs)
{
// Iterate through the child objects
foreach (DocumentObject obj in paragraph.ChildObjects)
{
if (obj is TextRange txtRange)
{
// Get the font name, size and text color
string fontName = txtRange.CharacterFormat.FontName;
float fontSize = txtRange.CharacterFormat.FontSize;
string textColor = txtRange.CharacterFormat.TextColor.ToString();
// Store the font information
FontInfo fontInfo = new FontInfo { Name = fontName, Size = fontSize };
if (!fontInfos.Contains(fontInfo))
{
fontInfos.Add(fontInfo);
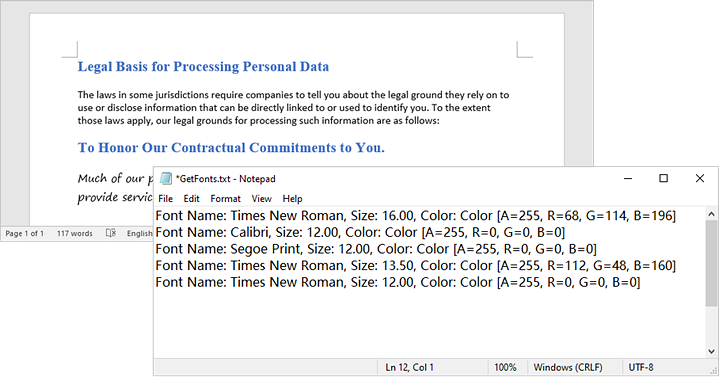
string str = $"Font Name: {fontInfo.Name}, Size: {fontInfo.Size:F2}, Color: {textColor}";
fontInformations.Add(str);
}
}
}
}
}
// Write font information to a txt file
WriteAllText("GetFonts.txt", fontInformations);
// Dispose resources
document.Dispose();
}
}
}
Replace a Specific Font in a Word Document in C#
After retrieving the font name from a specific TextRange, you can easily replace it with a new font using the TextRange.CharacterFormat.FontName property. Additionally, you can modify the font size and text color by accessing the corresponding properties in the TextRange class. This allows for comprehensive customization of the text formatting within the document.
The following are the steps to replace a specific font in a Word document in C#:
- Create a Document object.
- Load a Word document using the Document.LoadFromFile() method.
- Iterate through each section and its paragraphs.
- For each paragraph, check each child object to see if it is an instance of the TextRange class.
- If it is a TextRange, retrieve the font name using the TextRange.CharacterFormat.FontName property.
- Compare the font name to the specified font.
- If they match, set a new font name using the TextRange.CharacterFormat.FontName property.
- Save the modified document to a new Word file using the Document.SaveToFile() method.
- C#
using Spire.Doc;
using Spire.Doc.Documents;
using Spire.Doc.Fields;

namespace ReplaceFont
{
    class Program
    {
        static void Main(string[] args)
        {
            // Create a Document instance
            Document document = new Document();

            // Load a Word document
            document.LoadFromFile("C:\\Users\\Administrator\\Desktop\\input.docx");

            // Iterate through the sections
            foreach (Section section in document.Sections)
            {
                // Iterate through the paragraphs
                foreach (Paragraph paragraph in section.Body.Paragraphs)
                {
                    // Iterate through the child objects
                    foreach (DocumentObject obj in paragraph.ChildObjects)
                    {
                        // Determine if a child object is a TextRange
                        if (obj is TextRange txtRange)
                        {
                            // Get the font name
                            string fontName = txtRange.CharacterFormat.FontName;

                            // Determine if the font name is Calibri
                            if (fontName.Equals("Calibri", StringComparison.OrdinalIgnoreCase))
                            {
                                // Replace the font with another font
                                txtRange.CharacterFormat.FontName = "Segoe Print";
                            }
                        }
                    }
                }
            }

            // Save the document to a different file
            document.SaveToFile("ReplaceFont.docx", FileFormat.Docx);

            // Dispose resources
            document.Dispose();
        }
    }
}
Apply for a Temporary License
If you'd like to remove the evaluation message from the generated documents, or to get rid of the function limitations, please request a 30-day trial license for yourself.
