
Knowledgebase (2370)
Children categories
Applying styles is one of the simplest ways to enhance the professionalism and readability of Excel spreadsheets. Excel provides a wide range of built-in styles that allow users to quickly format cells, ranges, or worksheets. Additionally, users can create custom styles to specify fonts, colors, borders, number formats, and more, tailored to their individual preferences. Whether you're designing professional reports, sales presentations, or project management plans, knowing how to use styles effectively helps make data more visually appealing and easier to understand.
In this guide, you will learn how to apply styles to cells or worksheets in Excel in Python using Spire.XLS for Python.
- Apply a Built-in Style to Cells in Excel in Python
- Apply a Custom Style to Cells in Excel in Python
- Apply a Custom Style to a Worksheet in Excel in Python
Install Spire.XLS for Python
This scenario requires Spire.XLS for Python and plum-dispatch v1.7.4. They can be easily installed in your Windows through the following pip command.
pip install Spire.XLS
If you are unsure how to install, please refer to this tutorial: How to Install Spire.XLS for Python on Windows
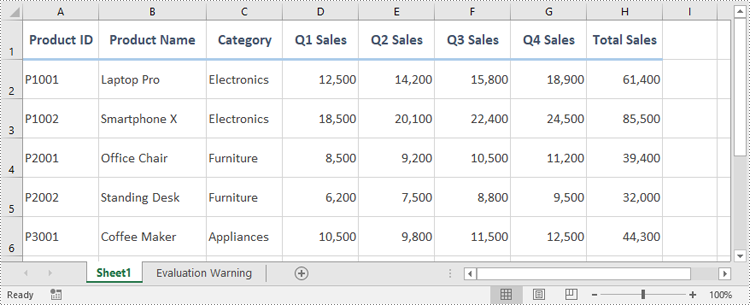
Apply a Built-in Style to Cells in Excel in Python
Spire.XLS for Python offers the CellRange.BuiltInStyle property, which enables developers to apply built-in styles, such as Title, Heading 1, and Heading 2 to individual cells or ranges in Excel. The detailed steps are as follows.
- Create an object of the Workbook class.
- Load an Excel file using the Workbook.LoadFromFile() method.
- Get a specific worksheet by its index using the Workbook.Worksheets[index] property.
- Get the desired cell or range of cells using the Worksheet.Range[] property.
- Apply a built-in style to the cell or range of cells using the CellRange.BuiltInStyle property.
- Save the resulting file using the Workbook.SaveToFile() method.
- Python
from spire.xls import *
from spire.xls.common import *

# Create an object of the Workbook class
workbook = Workbook()
# Load the Excel file
workbook.LoadFromFile("Sample.xlsx")

# Get the first sheet
sheet = workbook.Worksheets[0]

# Get the desired cell range
range = sheet.Range["A1:H1"]
# Apply a built-in style to the cell range
range.BuiltInStyle = BuiltInStyles.Heading2

# Save the resulting file
workbook.SaveToFile("ApplyBuiltinStyle.xlsx", ExcelVersion.Version2016)
workbook.Dispose()
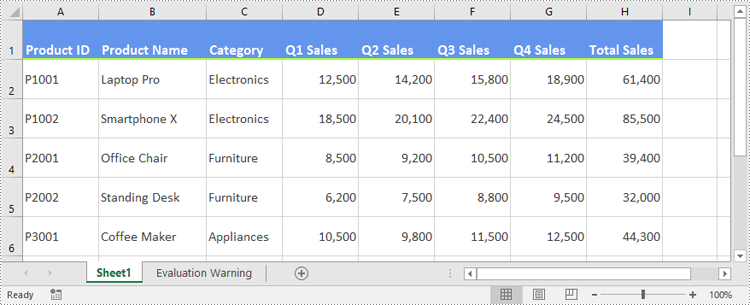
Apply a Custom Style to Cells in Excel in Python
Developers can use the Workbook.Styles.Add() method to create a custom style, which can then be applied to individual cells or ranges using the CellRange.Style property. The detailed steps are as follows.
- Create an object of the Workbook class.
- Load an Excel file using the Workbook.LoadFromFile() method.
- Get a specific worksheet by its index using the Workbook.Worksheets[index] property.
- Get the desired cell or range of cells using the Worksheet.Range[] property.
- Add a custom style to the workbook using the Workbook.Styles.Add() method.
- Define the formatting, such as the font size, font color, text alignment, cell borders and cell background color, using the properties of the CellStyle class.
- Apply the custom style to the cell or range of cells using the CellRange.Style property.
- Save the resulting file using the Workbook.SaveToFile() method.
- Python
from spire.xls import *
from spire.xls.common import *

# Create an object of the Workbook class
workbook = Workbook()
# Load the Excel file
workbook.LoadFromFile("Sample.xlsx")

# Get the first sheet
sheet = workbook.Worksheets[0]

# Get the desired cell range
range = sheet.Range["A1:H1"]

# Add a custom style to the workbook
style = workbook.Styles.Add("CustomCellStyle")
# Set the font size
style.Font.Size = 13
# Set the font color
style.Font.Color = Color.get_White()
# Bold the text
style.Font.IsBold = True
# Set the vertical text alignment
style.VerticalAlignment = VerticalAlignType.Bottom
# Set the horizontal text alignment
style.HorizontalAlignment = HorizontalAlignType.Left
# Set the bottom border color
style.Borders[BordersLineType.EdgeBottom].Color = Color.get_GreenYellow()
# Set the bottom border type
style.Borders[BordersLineType.EdgeBottom].LineStyle = LineStyleType.Medium
# Set the background color
style.Color = Color.get_CornflowerBlue()

# Apply the custom style to the cell range
range.Style = style

# Save the resulting file
workbook.SaveToFile("ApplyCustomStyle.xlsx", ExcelVersion.Version2016)
workbook.Dispose()
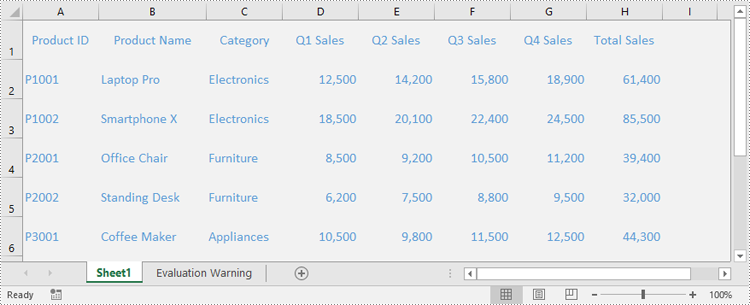
Apply a Custom Style to a Worksheet in Excel in Python
In certain cases, it may be necessary to apply a custom style to an entire worksheet rather than to specific cells or ranges. This can be accomplished using the Worksheet.ApplyStyle() method. The detailed steps are as follows.
- Create an object of the Workbook class.
- Load an Excel file using the Workbook.LoadFromFile() method.
- Get a specific worksheet by its index using the Workbook.Worksheets[index] property.
- Add a custom style to the workbook using the Workbook.Styles.Add() method.
- Define the formatting, such as the font size, font color, and cell background color, using the properties of the CellStyle class.
- Apply the custom style to the worksheet using the Worksheet.ApplyStyle() method.
- Save the resulting file using the Workbook.SaveToFile() method.
- Python
from spire.xls import *
from spire.xls.common import *

# Create an object of the Workbook class
workbook = Workbook()
# Load the Excel file
workbook.LoadFromFile("Sample.xlsx")

# Get the first sheet
sheet = workbook.Worksheets[0]

# Add a custom style to the workbook
style = workbook.Styles.Add("CustomSheetStyle")
# Set the font size
style.Font.Size = 12
# Set the font color
style.Font.Color = Color.FromRgb(91, 155, 213)
# Set the cell background color
style.Color = Color.FromRgb(242, 242, 242)

# Apply the custom style to the worksheet
sheet.ApplyStyle(style)

# Save the resulting file
workbook.SaveToFile("ApplyCustomStyleToSheet.xlsx", ExcelVersion.Version2016)
workbook.Dispose()
Apply for a Temporary License
If you'd like to remove the evaluation message from the generated documents, or to get rid of the function limitations, please request a 30-day trial license for yourself.
Converting PDF to HTML is important for improving accessibility and interactivity in web environments. While PDFs are widely used for their reliable layout and ease of sharing, they can be restrictive when it comes to online use. HTML provides greater flexibility, allowing content to be displayed more effectively on websites and mobile devices. By converting a PDF document into HTML, developers can enhance search engine visibility, enable easier editing, and create more user-friendly experiences. In this article, we will demonstrate how to convert PDF to HTML in React with JavaScript and the Spire.PDF for JavaScript library.
- Convert PDF to HTML in React
- Customize PDF to HTML Conversion Settings in React
- Convert PDF to HTML Stream in React
Install Spire.PDF for JavaScript
To get started with converting PDF to HTML with JavaScript in a React application, you can either download Spire.PDF for JavaScript from our website or install it via npm with the following command:
npm i spire.office
The downloaded product package integrates Spire.Doc for JavaScript, Spire.XLS for JavaScript, Spire.PDF for JavaScript, and Spire.Presentation for JavaScript. To use Spire.PDF for JavaScript functionality, you need to copy the corresponding files (spire.pdf.js, Spire.Pdf.Wasm.zip, spire.common.js, Spire.Common.Wasm.zip, and the _framework folder) to the public folder of your project. Additionally, to ensure proper text rendering, font files can be added to a custom path of your choice. In the following example, the font addition path is: public\static\font.
For more details, refer to the documentation: How to Integrate Spire.PDF for JavaScript in a React Project
Convert PDF to HTML in React
The PdfDocument.SaveToFile() method offered by Spire.PDF for JavaScript allows developers to effortlessly convert a PDF file into HTML format. The detailed steps are as follows.
- Load the required font file and the input PDF file into the Virtual File System (VFS).
- Create a PdfDocument object with the wasmModule.PdfDocument() method.
- Load the PDF file using the PdfDocument.LoadFromFile() method.
- Save the PDF file to HTML format using the PdfDocument.SaveToFile() method.
- JavaScript
import React, { useState, useEffect } from 'react';

function App() {
   const [wasmModule, setWasmModule] = useState(null);
   useEffect(() => {
    (async () => {
      try {
        const publicUrl = process.env.PUBLIC_URL || '';
        const spireModule = await import(/* webpackIgnore: true */ `${publicUrl}/spire.pdf.js`);
        const rawModule = spireModule.default || spireModule;
        window.wasmModule = typeof rawModule === 'function'
          ? await rawModule({ locateFile: p => p.endsWith('.wasm') ? `${publicUrl}/${p}` : p })
          : rawModule;
        setWasmModule(window.wasmModule);
      } catch (error) {
        console.error('Failed to load spire.pdf.js:', error);
      }
    })();
  }, []);

  const ConvertPdfToHTML= async () => {
    // Get WASM module
    const wasmModule = window.wasmModule.spirepdf;

    if (wasmModule) {
      // Load font file to virtual file system (VFS)
      await window.spire.FetchFileToVFS("arial.ttf","/Library/Fonts/",`${process.env.PUBLIC_URL}static/font/`);

      // PDF file name to convert
      let inputFileName = "ToHTML.pdf";

      // Load PDF file to virtual file system (VFS)
      await window.spire.FetchFileToVFS(inputFileName, "", `${process.env.PUBLIC_URL}static/data/`);

      // Create a PdfDocument object
      let doc =new wasmModule.PdfDocument();

      // Load the PDF file
      doc.LoadFromFile(inputFileName);

      // Define the output file name
      const outputFileName = 'PdfToHtml.html';

      // Save the document to an HTML file
      doc.SaveToFile({fileName: outputFileName, fileFormat: wasmModule.FileFormat.HTML});

      // Read the saved file and convert to a Blob object
      const modifiedFileArray = window.dotnetRuntime.Module.FS.readFile(outputFileName);
      const modifiedFile = new Blob([modifiedFileArray], { type: "text/html" });

      // Create a URL for the Blob
      const url = URL.createObjectURL(modifiedFile);

      // Create an anchor element to trigger the download
      const a = document.createElement('a');
      a.href = url;
      a.download = outputFileName ;
      document.body.appendChild(a);
      a.click();
      document.body.removeChild(a);
      URL.revokeObjectURL(url);
    }
  };

  return (
    <div style={{ textAlign: 'center', height: '300px' }}>
      <h1>Convert PDF to HTML in React Using JavaScript</h1>
      <button onClick={ConvertPdfToHTML} disabled={!wasmModule}>
        Convert
      </button>
    </div>
  );

}

export default App;
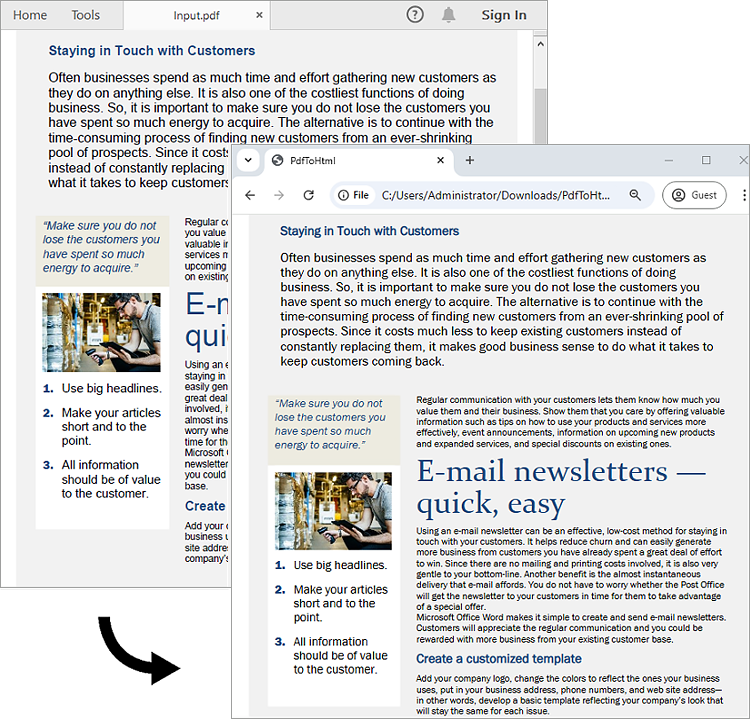
Run the code to launch the React app at localhost:3000. Once it's running, click on the "Convert" button to convert the PDF file to HTML format:
Here is the screenshot of the input PDF file and the converted HTML file:
Customize PDF to HTML Conversion Settings in React
Developers can use the PdfDocument.ConvertOptions.SetPdfToHtmlOptions() method to customize settings during the PDF to HTML conversion process. For instance, they can choose whether to embed SVG or images in the resulting HTML and set the maximum number of pages included in each HTML file. The detailed steps are as follows.
- Load the required font file and the input PDF file into the Virtual File System (VFS).
- Create a PdfDocument object with the wasmModule.PdfDocument() method.
- Load the PDF file using the PdfDocument.LoadFromFile() method.
- Customize the PDF to HTML conversion settings using the PdfDocument.ConvertOptions.SetPdfToHtmlOptions() method.
- Save the PDF document to HTML format using the PdfDocument.SaveToFile() method.
- JavaScript
import React, { useState, useEffect } from 'react';

function App() {
   const [wasmModule, setWasmModule] = useState(null);
   useEffect(() => {
    (async () => {
      try {
        const publicUrl = process.env.PUBLIC_URL || '';
        const spireModule = await import(/* webpackIgnore: true */ `${publicUrl}/spire.pdf.js`);
        const rawModule = spireModule.default || spireModule;
        window.wasmModule = typeof rawModule === 'function'
          ? await rawModule({ locateFile: p => p.endsWith('.wasm') ? `${publicUrl}/${p}` : p })
          : rawModule;
        setWasmModule(window.wasmModule);
      } catch (error) {
        console.error('Failed to load spire.pdf.js:', error);
      }
    })();
  }, []);


  const downloadFileFromVFS = (fileName) => {
    const fileArray = window.dotnetRuntime.Module.FS.readFile(fileName);
    const fileBlob = new Blob([fileArray], { type: 'text/html' });
    const url = URL.createObjectURL(fileBlob);
    const a = document.createElement('a');
    a.href = url;
    a.download = fileName;
    document.body.appendChild(a);
    a.click();
    document.body.removeChild(a);
    URL.revokeObjectURL(url);
  };

  const ConvertPdfToHTML = async () => {
    const wasmModule = window.wasmModule.spirepdf;

    if (wasmModule) {
      await window.spire.FetchFileToVFS("MSYH.TTC", "/Library/Fonts/", `${process.env.PUBLIC_URL}static/font/`);

      // Load the input PDF file into the VFS
      let inputFileName = "ToHTML.pdf";
      await window.spire.FetchFileToVFS(inputFileName, "", `${process.env.PUBLIC_URL}static/data/`);
      let doc = new wasmModule.PdfDocument();
      doc.LoadFromFile(inputFileName);

      const totalPages = doc.Pages.Count;

      // Customize the conversion settings
      doc.ConvertOptions.SetPdfToHtmlOptions({ useEmbeddedSvg: false, useEmbeddedImg: true, maxPageOneFile: 1 });

       // Save the document to an HTML file
      const outputFileName = 'PdfToHtmlOptions.html';
      doc.SaveToFile({ fileName: outputFileName, fileFormat: wasmModule.FileFormat.HTML });

      doc.Close();
      doc.Dispose();

      console.log(`totalPages: ${totalPages}`);

      for (let i = 1; i <= totalPages; i++) {
        const fileName = `PdfToHtmlOptions_${i}-${i}.html`;
        downloadFileFromVFS(fileName);
      }
    }
  };

  return (
    <div style={{ textAlign: 'center', height: '300px' }}>
      <h1>Convert PDF to HTML in React Using JavaScript</h1>
      <button onClick={ConvertPdfToHTML}>
        Convert
      </button>
    </div>
  );
}

export default App;
Convert PDF to HTML Stream in React
Spire.PDF for JavaScript also supports converting a PDF to an HTML stream using the PdfDocument.SaveToStream() method. The detailed steps are as follows.
- Load the required font file and the input PDF file into the Virtual File System (VFS).
- Create a PdfDocument object with the wasmModule.PdfDocument() method.
- Load the PDF file using the PdfDocument.LoadFromFile() method.
- Create a memory stream using the wasmModule.Stream() method.
- Save the PDF document as an HTML stream using the PdfDocument.SaveToStream() method.
- Write the content of the stream to an HTML file using the window.dotnetRuntime.Module.FS.readFile() method.
- JavaScript
import React, { useState, useEffect } from 'react';

function App() {
   const [wasmModule, setWasmModule] = useState(null);
   useEffect(() => {
    (async () => {
      try {
        const publicUrl = process.env.PUBLIC_URL || '';
        const spireModule = await import(/* webpackIgnore: true */ `${publicUrl}/spire.pdf.js`);
        const rawModule = spireModule.default || spireModule;
        window.wasmModule = typeof rawModule === 'function'
          ? await rawModule({ locateFile: p => p.endsWith('.wasm') ? `${publicUrl}/${p}` : p })
          : rawModule;
        setWasmModule(window.wasmModule);
      } catch (error) {
        console.error('Failed to load spire.pdf.js:', error);
      }
    })();
  }, []);

  const ConvertPdfToHTML = async () => {
    const wasmModule = window.wasmModule.spirepdf;

    if (wasmModule) {
      await window.spire.FetchFileToVFS("MSYH.TTC", "/Library/Fonts/", `${process.env.PUBLIC_URL}static/font/`);

      // Load the input PDF file into the VFS
      let inputFileName = "ToHTML.pdf";
      await window.spire.FetchFileToVFS(inputFileName, "", `${process.env.PUBLIC_URL}static/data/`);
      let doc = new wasmModule.PdfDocument();
      doc.LoadFromFile(inputFileName);

      // Define the output file name
      const outputFileName = 'PdfToHtmlStream.html';
      // Create a new memory stream
     let ms = new wasmModule.Stream();

     // Save the file as HTML stream
     doc.SaveToStream({stream: ms, fileformat: wasmModule.FileFormat.HTML});
     ms.Save(outputFileName);

     // Release resources
     ms.Close();
     doc.Close();

     // Read the saved HTML file and convert to a Blob object
     const modifiedFileArray = window.dotnetRuntime.Module.FS.readFile(outputFileName);
     const modifiedFile = new Blob([modifiedFileArray], { type: "text/html" });

     // Create a Blob URL and trigger download
     const url = URL.createObjectURL(modifiedFile);
     const a = document.createElement('a');
     a.href = url;
     a.download = outputFileName;
     document.body.appendChild(a);
     a.click();
     document.body.removeChild(a);
     URL.revokeObjectURL(url);
    }
  };

  return (
    <div style={{ textAlign: 'center', height: '300px' }}>
      <h1>Convert PDF to HTML in React Using JavaScript</h1>
      <button onClick={ConvertPdfToHTML}>
        Convert
      </button>
    </div>
  );
}

export default App;
Get a Free License
To fully experience the capabilities of Spire.PDF for JavaScript without any evaluation limitations, you can request a free 30-day trial license.
Converting PDF files to Word documents is essential for modern web applications focused on document management and editing. Using JavaScript and React, developers can easily integrate this functionality with libraries like Spire.PDF for JavaScript. This guide will walk you through implementing a PDF-to-Word conversion feature in a React application, showing how to load files, configure settings, and enable users to download their converted documents effortlessly.
Install Spire.PDF for JavaScript
To get started with converting PDF to Word with JavaScript in a React application, you can either download Spire.PDF for JavaScript from our website or install it via npm with the following command:
npm i spire.office
The downloaded product package integrates Spire.Doc for JavaScript, Spire.XLS for JavaScript, Spire.PDF for JavaScript, and Spire.Presentation for JavaScript. To use Spire.PDF for JavaScript functionality, you need to copy the corresponding files (spire.pdf.js, Spire.Pdf.Wasm.zip, spire.common.js, Spire.Common.Wasm.zip, and the _framework folder) to the public folder of your project. Additionally, to ensure proper text rendering, font files can be added to a custom path of your choice. In the following example, the font addition path is: public\static\font.
For more details, refer to the documentation: How to Integrate Spire.PDF for JavaScript in a React Project
Convert PDF to Word Using PdfToDocConverter Class
The PdfToDocConverter class from Spire.PDF for JavaScript facilitates the conversion of PDF files to Word documents. It includes the DocxOptions property, allowing developers to customize conversion settings, including document properties. The conversion is performed using the SaveToDocx() method.
Steps to convert PDF to Word using the PdfToDocConverter class in React:
- Load the necessary font files and input PDF file into the virtual file system (VFS).
- Instantiate a PdfToDocConverter object using the wasmModule.PdfToDocConverter() method, passing the PDF file path.
- Customize the generated Word file's properties using the DocxOptions property.
- Use the SaveToDocx() method to convert the PDF document.
- Trigger the download of the resulting Word file.
- JavaScript
import React, { useState, useEffect } from 'react';

function App() {
   const [wasmModule, setWasmModule] = useState(null);
   useEffect(() => {
    (async () => {
      try {
        const publicUrl = process.env.PUBLIC_URL || '';
        const spireModule = await import(/* webpackIgnore: true */ `${publicUrl}/spire.pdf.js`);
        const rawModule = spireModule.default || spireModule;
        window.wasmModule = typeof rawModule === 'function'
          ? await rawModule({ locateFile: p => p.endsWith('.wasm') ? `${publicUrl}/${p}` : p })
          : rawModule;
        setWasmModule(window.wasmModule);
      } catch (error) {
        console.error('Failed to load spire.pdf.js:', error);
      }
    })();
  }, []);

  const ConvertPdfToWord= async () => {
    // Get WASM module
    const wasmModule = window.wasmModule.spirepdf;

    if (wasmModule) {
      // Load font file to virtual file system (VFS)
      await window.spire.FetchFileToVFS("arial.ttf","/Library/Fonts/",`${process.env.PUBLIC_URL}static/font/`);

      // PDF file name to convert
      let inputFileName = "ToDocx.pdf";
      // Load PDF file to virtual file system (VFS)
      await window.spire.FetchFileToVFS(inputFileName, "", `${process.env.PUBLIC_URL}static/data/`);

      // Create a PdfToDocConverter object
      let converter =new wasmModule.PdfToDocConverter({filePath: inputFileName});

      // Set document properties of the generated Word file
      converter.DocxOptions.Subject = "Convert PDF to Word";
      converter.DocxOptions.Authors = "E-ICEBLUE"

      // Define the output file name
      const outputFileName = "ToWord.docx";

      // Convert PDF as a Docx file
      converter.SaveToDocx({fileName: outputFileName});

      // Read the saved file and convert to a Blob object
      const modifiedFileArray = window.dotnetRuntime.Module.FS.readFile(outputFileName);
      const modifiedFile = new Blob([modifiedFileArray], { type: "msword" });

      // Create a URL for the Blob
      const url = URL.createObjectURL(modifiedFile);

      // Create an anchor element to trigger the download
      const a = document.createElement('a');
      a.href = url;
      a.download = outputFileName ;
      document.body.appendChild(a);
      a.click();
      document.body.removeChild(a);
      URL.revokeObjectURL(url);
    }
  };

    return (
    <div style={{ textAlign: 'center', height: '300px' }}>
      <h1>Convert PDF to Word in React</h1>
      <button onClick={ConvertPdfToWord}>
        Convert
      </button>
    </div>
  );
}

export default App;
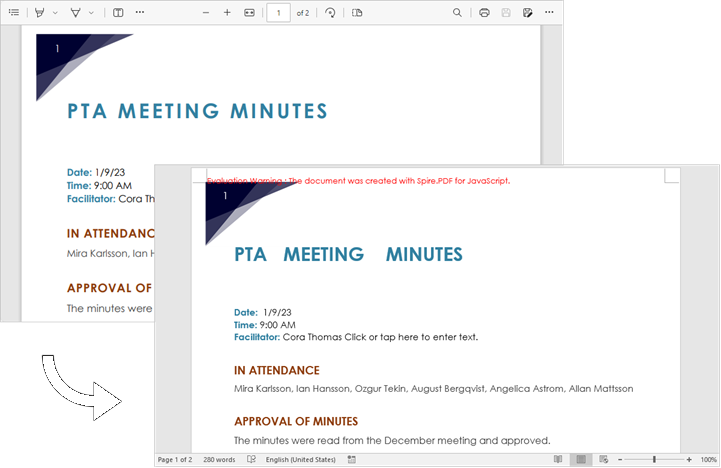
Run the code to launch the React app at localhost:3000. Click "Convert," and a "Save As" window will appear, prompting you to save the output file in your chosen folder.

Below is a screenshot showing the input PDF file and the output Word file:
Convert PDF to Word Using PdfDocument Class
To convert PDF to Word, you can also use the PdfDocument class. This class allows developers to load an existing PDF document, make modifications, and save it as a Word file. This feature is particularly useful for users who need to edit or enhance their PDFs before conversion.
Steps to convert PDF to Word Using the PdfDocument class in React:
- Load the necessary font files and input PDF file into the virtual file system (VFS).
- Create a PdfDocument object using the wasmModule.PdfDocument() method
- Load the PDF document using the PdfDocument.LoadFromFile() method.
- Convert the PDF document to a Word file using the PdfDocument.SaveToFile() method.
- Trigger the download of the resulting Word file.
- JavaScript
import React, { useState, useEffect } from 'react';

function App() {
   const [wasmModule, setWasmModule] = useState(null);
   useEffect(() => {
    (async () => {
      try {
        const publicUrl = process.env.PUBLIC_URL || '';
        const spireModule = await import(/* webpackIgnore: true */ `${publicUrl}/spire.pdf.js`);
        const rawModule = spireModule.default || spireModule;
        window.wasmModule = typeof rawModule === 'function'
          ? await rawModule({ locateFile: p => p.endsWith('.wasm') ? `${publicUrl}/${p}` : p })
          : rawModule;
        setWasmModule(window.wasmModule);
      } catch (error) {
        console.error('Failed to load spire.pdf.js:', error);
      }
    })();
  }, []);

  const ConvertPdfToWord= async () => {
    // Get WASM module
    const wasmModule = window.wasmModule.spirepdf;

    if (wasmModule) {
      // Load font file to virtual file system (VFS)
      await window.spire.FetchFileToVFS("arial.ttf","/Library/Fonts/",`${process.env.PUBLIC_URL}static/font/`);

      // PDF file name to convert
      let inputFileName = "ToDocx.pdf";

      // Load PDF file to virtual file system (VFS)
      await window.spire.FetchFileToVFS(inputFileName, "", `${process.env.PUBLIC_URL}static/data/`);

      // Create a PdfDocument object
      let doc =new wasmModule.PdfDocument();

      // Load the PDF file
      doc.LoadFromFile(inputFileName);

      // Define the output file name
      const outputFileName = "ToWord.docx";

      // Convert PDF as a Docx file
      doc.SaveToFile({fileName: outputFileName,fileFormat: wasmModule.FileFormat.DOCX});

      // Read the saved file and convert to a Blob object
      const modifiedFileArray = window.dotnetRuntime.Module.FS.readFile(outputFileName);
      const modifiedFile = new Blob([modifiedFileArray], { type: "msword" });

      // Create a URL for the Blob
      const url = URL.createObjectURL(modifiedFile);

      // Create an anchor element to trigger the download
      const a = document.createElement('a');
      a.href = url;
      a.download = outputFileName ;
      document.body.appendChild(a);
      a.click();
      document.body.removeChild(a);
      URL.revokeObjectURL(url);
    }
  };

  return (
    <div style={{ textAlign: 'center', height: '300px' }}>
      <h1>Convert PDF to Word in React</h1>
      <button onClick={ConvertPdfToWord}>
        Convert
      </button>
    </div>
  );

}

export default App;
Get a Free License
To fully experience the capabilities of Spire.PDF for JavaScript without any evaluation limitations, you can request a free 30-day trial license.
