
Knowledgebase (2370)
Children categories
How to Read Excel Files in Java (XLS/XLSX) – Complete Guide
2025-06-13 08:30:27 Written by Administrator
Reading Excel files using Java is a common requirement in enterprise applications, especially when dealing with reports, financial data, user records, or third-party integrations. Whether you're building a data import feature, performing spreadsheet analysis, or integrating Excel parsing into a web application, learning how to read Excel files in Java efficiently is essential.
In this tutorial, you’ll discover how to read .xls and .xlsx Excel files using Java. We’ll use practical Java code examples which also cover how to handle large files, read Excel files from InputStream, and extract specific content line by line.
Table of Contents
- 1. Set Up Your Java Project
- 2. How to Read XLSX and XLS Files in Java
- 3. Best Practices for Large Excel Files
- 4. Full Example: Java Program to Read Excel File
- 5. Summary
- 6. FAQ
1. Set Up Your Java Project
To read Excel files using Java, you need a library that supports spreadsheet file formats. Spire.XLS for Java offers support for both .xls (legacy) and .xlsx (modern XML-based) files and provides a high-level API that makes Excel file reading straightforward.
Add Spire.XLS to Your Project
If you're using Maven, add the following to your pom.xml:
<repositories>
    <repository>
        <id>com.e-iceblue</id>
        <name>e-iceblue</name>
        <url>https://repo.e-iceblue.com/nexus/content/groups/public/</url>
    </repository>
</repositories>
<dependencies>
    <dependency>
        <groupId>e-iceblue</groupId>
        <artifactId>spire.xls</artifactId>
        <version>16.6.5</version>
    </dependency>
</dependencies>
If you're not using Maven, you can manually download the JAR from the official Spire.XLS website and add it to your classpath.
For smaller Excel processing tasks, you can also choose Free Spire.XLS for Java.
2. How to Read XLSX and XLS Files in Java
Java programs can easily read Excel files by loading the workbook and iterating through worksheets, rows, and cells. The .xlsx format is commonly used in modern Excel, while .xls is its older binary counterpart. Fortunately, Spire.XLS supports both formats seamlessly with the same code.
Load and Read Excel File (XLSX or XLS)
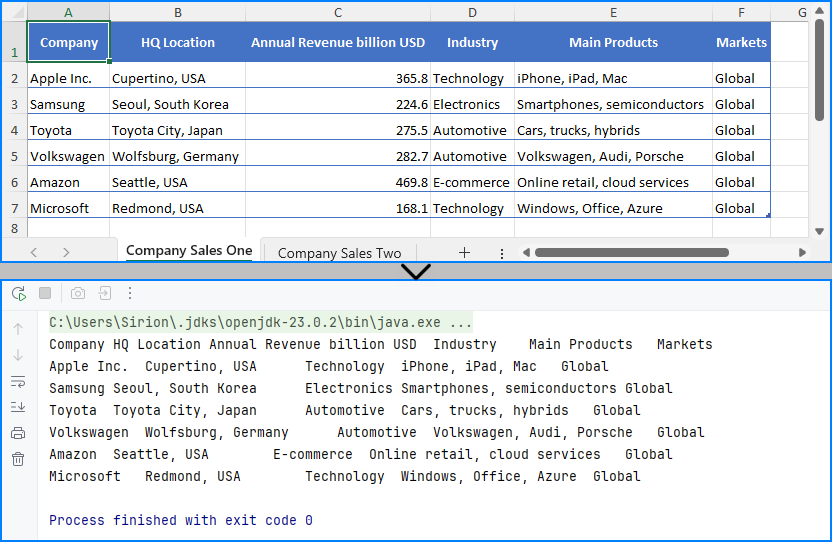
Here’s a basic example that loads an Excel file and prints its content:
import com.spire.xls.*;

public class ReadExcel {
    public static void main(String[] args) {
        // Create a workbook object and load the Excel file
        Workbook workbook = new Workbook();
        workbook.loadFromFile("data.xlsx"); // or "data.xls"

        // Get the first worksheet
        Worksheet sheet = workbook.getWorksheets().get(0);
        // Loop through each used row and column
        for (int i = 1; i <= sheet.getLastRow(); i++) {
            for (int j = 1; j <= sheet.getLastColumn(); j++) {
                // Get cell text of a cell range
                String cellText = sheet.getCellRange(i, j).getValue();
                System.out.print(cellText + "\t");
            }
            System.out.println();
        }
    }
}
You can replace the file path with an .xls file and the code remains unchanged. This makes it simple to read Excel files using Java regardless of format.
The Excel file being read and the output result shown in the console.
Read Excel File Line by Line with Row Objects
In scenarios like user input validation or applying business rules, processing each row as a data record is often more intuitive. In such cases, you can read the Excel file line by line using row objects via the getRows() method.
for (int i = 0; i < sheet.getRows().length; i++) {
    // Get a row
    CellRange row = sheet.getRows()[i];
    if (row != null && !row.isBlank()) {
        for (int j = 0; j < row.getColumns().length; j++) {
            String text = row.getColumns()[j].getText();
            System.out.print((text != null ? text : "") + "\t");
        }
        System.out.println();
    }
}
This technique works particularly well when reading Excel files in Java for batch operations or when you only need to process rows individually.
Read Excel File from InputStream
In web applications or cloud services, Excel files are often received as streams. Here’s how to read Excel files from an InputStream in Java:
import com.spire.xls.*;
import java.io.FileInputStream;
import java.io.FileNotFoundException;
import java.io.InputStream;

public class ReadExcel {
    public static void main(String[] args) throws FileNotFoundException {
        // Create a InputStream
        InputStream stream = new FileInputStream("data.xlsx");
        // Load the Excel file from the stream
        Workbook workbook = new Workbook();
        workbook.loadFromStream(stream);
        System.out.println("Load Excel file successfully.");
    }
}
This is useful when handling file uploads, email attachments, or reading Excel files stored in remote storage.
Read Excel Cell Values in Different Formats
Once you load an Excel file and get access to individual cells, Spire.XLS allows you to read the contents in various formats—formatted text, raw values, formulas, and more.
Here's a breakdown of what each method does:
CellRange cell = sheet.getRange().get(2, 1); // B2

// Formatted text (what user sees in Excel)
String text = cell.getText();

// Raw string value
String value = cell.getValue();

// Generic object (number, boolean, date, etc.)
Object rawValue = cell.getValue2();

// Formula (if exists)
String formula = cell.getFormula();

// Evaluated result of the formula
String result = cell.getEnvalutedValue();

// If it's a number cell
double number = cell.getNumberValue();

// If it's a date cell
java.util.Date date = cell.getDateTimeValue();

// If it's a boolean cell
boolean bool = cell.getBooleanValue();
Tip: Use getValue2() for flexible handling, as it returns the actual underlying object. Use getText() when you want to match Excel's visible content.
You May Also Like: How to Write Data into Excel Files in Java
3. Best Practices for Reading Large Excel Files in Java
When your Excel file contains tens of thousands of rows or multiple sheets, performance can become a concern. To ensure your Java application reads large Excel files efficiently:
- Load only required sheets
- Access only relevant columns or rows
- Avoid storing entire worksheets in memory
- Use row-by-row reading patterns
Here’s an efficient pattern for reading only non-empty rows:
for (int i = 1; i <= sheet.getRows().length; i++) {
    Row row = sheet.getRows()[i];
    if (row != null && !row.isBlank()) {
        // Process only rows with data
    }
}
Even though Spire.XLS handles memory efficiently, following these practices helps scale your Java Excel reading logic smoothly.
See also: Delete Blank Rows and Columns in Excel Using Java
4. Full Example: Java Program to Read Excel File
Here’s a full working Java example that reads an Excel file (users.xlsx) with extended columns such as name, email, age, department, and status. The code extracts only the original three columns (name, email, and age) and filters the output for users aged 30 or older.
import com.spire.xls.*;

public class ExcelReader {
    public static void main(String[] args) {
        Workbook workbook = new Workbook();
        workbook.loadFromFile("users.xlsx");

        Worksheet sheet = workbook.getWorksheets().get(0);
        System.out.println("Name\tEmail\tAge");

        for (int i = 2; i <= sheet.getLastRow(); i++) {
            String name = sheet.getCellRange(i, 1).getValue();
            String email = sheet.getCellRange(i, 2).getValue();
            String ageText = sheet.getCellRange(i, 3).getValue();

            int age = 0;
            try {
                age = Integer.parseInt(ageText);
            } catch (NumberFormatException e) {
                continue;  // Skip rows with invalid age data
            }

            if (age >= 30) {
                System.out.println(name + "\t" + email + "\t" + age);
            }
        }
    }
}
Result of Java program reading the Excel file and printing its contents. 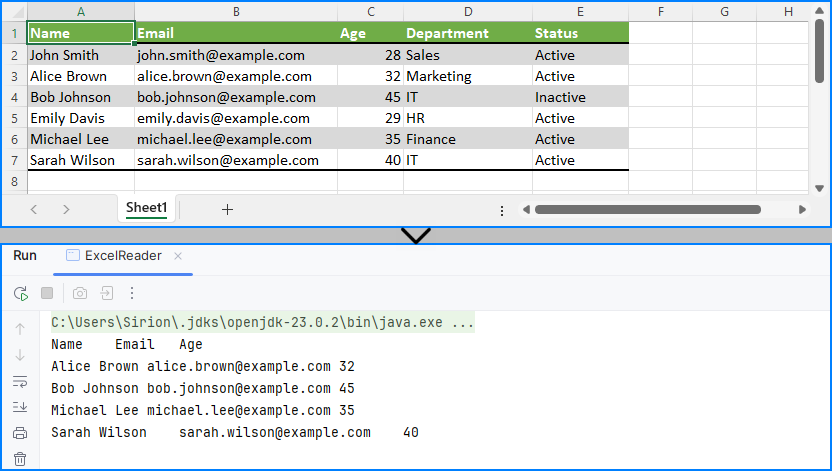
This code demonstrates how to read specific cells from an Excel file in Java and output meaningful tabular data, including applying filters on data such as age.
5. Summary
To summarize, this article showed you how to read Excel files in Java using Spire.XLS, including both .xls and .xlsx formats. You learned how to:
- Set up your Java project with Excel-reading capabilities
- Read Excel files using Java in row-by-row or stream-based fashion
- Handle legacy and modern Excel formats with the same API
- Apply best practices when working with large Excel files
Whether you're reading from an uploaded spreadsheet, a static report, or a stream-based file, the examples provided here will help you build robust Excel processing features in your Java applications.
If you want to unlock all limitations and experience the full power of Excel processing, you can apply for a free temporary license.
6. FAQ
Q1: How to read an Excel file dynamically in Java?
To read an Excel file dynamically in Java—especially when the number of rows or columns is unknown—you can use getLastRow() and getLastColumn() methods to determine the data range at runtime. This ensures that your program can adapt to various spreadsheet sizes without hardcoded limits.
Q2: How to extract data from Excel file in Java?
To extract data from Excel files in Java, load the workbook and iterate through the cells using nested loops. You can retrieve values with getCellRange(row, column).getValue(). Libraries like Spire.XLS simplify this process and support both .xls and .xlsx formats.
Q3: How to read a CSV Excel file in Java?
If your Excel data is saved as a CSV file, you can read it using Java’s BufferedReader or file streams. Alternatively, Spire.XLS supports CSV parsing directly—you can load a CSV file by specifying the separator, such as Workbook.loadFromFile("data.csv", ","). This lets you handle CSV files along with Excel formats using the same API.
Q4: How to read Excel file in Java using InputStream?
Reading Excel files from InputStream in Java is useful in server-side applications, such as handling file uploads. With Spire.XLS, simply call workbook.loadFromStream(inputStream) and process it as you would with any file-based Excel workbook.
How to Read PDFs in Java: Extract Text, Images, and More
2025-06-12 07:07:24 Written by Administrator
In today's data-driven landscape, reading PDF files effectively is essential for Java developers. Whether you're handling scanned invoices, structured reports, or image-rich documents, the ability to read PDFs in Java can enhance workflows and reveal critical insights.
This guide will walk you through practical implementations using Spire.PDF for Java to master PDF reading in Java. You will learn to extract searchable text, retrieve embedded images, read tabular data, and perform OCR on scanned PDF documents.
Table of Contents:
- Java Library for Reading PDF Content
- Extract Text from Searchable PDFs
- Retrieve Images from PDFs
- Read Table Data from PDF Files
- Convert Scanned PDFs to Text via OCR
- Conclusion
- FAQs
Java Library for Reading PDF Content
When it comes to reading PDF in Java, choosing the right library is half the battle. Spire.PDF stands out as a robust, feature-rich solution for developers. It supports text extraction, image retrieval, table parsing, and even OCR integration. Its intuitive API and comprehensive documentation make it ideal for both beginners and experts.
To start extracting PDF content, download Spire.PDF for Java from our website and add it as a dependency in your project. If you’re using Maven, include the following in your pom.xml:
<repositories>
    <repository>
        <id>com.e-iceblue</id>
        <name>e-iceblue</name>
        <url>https://repo.e-iceblue.com/nexus/content/groups/public/</url>
    </repository>
</repositories>
<dependencies>
    <dependency>
        <groupId>e-iceblue</groupId>
        <artifactId>spire.pdf</artifactId>
        <version>11.5.2</version>
    </dependency>
</dependencies>
Below, we’ll explore how to leverage Spire.PDF for various PDF reading tasks.
Extract Text from Searchable PDFs in Java
Searchable PDFs store text in a machine-readable format, allowing for efficient content extraction. The PdfTextExtractor class in Spire.PDF provides a straightforward way to access page content, while PdfTextExtractOptions allows for flexible extraction settings, including options for handling special text layouts and specifying areas for extraction.
Step-by-Step Guide
- Initialize a new instance of PdfDocument to work with your PDF file.
- Use the loadFromFile method to load the desired PDF document.
- Loop through each page of the PDF using a for loop.
- For each page, create an instance of PdfTextExtractor to facilitate text extraction.
- Create a PdfTextExtractOptions object to specify how text should be extracted, including any special strategies.
- Call the extract method on the PdfTextExtractor instance to retrieve the text from the page.
- Write the extracted text to a text file.
The example below shows how to retrieve text from every page of a PDF and output it to individual text files.
import com.spire.pdf.PdfDocument;
import com.spire.pdf.PdfPageBase;
import com.spire.pdf.texts.PdfTextExtractOptions;
import com.spire.pdf.texts.PdfTextExtractor;
import com.spire.pdf.texts.PdfTextStrategy;

import java.io.IOException;
import java.nio.file.Files;
import java.nio.file.Path;
import java.nio.file.Paths;

public class ExtractTextFromSearchablePdf {

    public static void main(String[] args) throws IOException {

        // Create a PdfDocument object
        PdfDocument doc = new PdfDocument();

        // Load a PDF file
        doc.loadFromFile("C:\\Users\\Administrator\\Desktop\\Input.pdf");

        // Iterate through all pages
        for (int i = 0; i < doc.getPages().getCount(); i++) {
            // Get the current page
            PdfPageBase page = doc.getPages().get(i);

            // Create a PdfTextExtractor object
            PdfTextExtractor textExtractor = new PdfTextExtractor(page);

            // Create a PdfTextExtractOptions object
            PdfTextExtractOptions extractOptions = new PdfTextExtractOptions();

            // Specify extract option
            extractOptions.setStrategy(PdfTextStrategy.None);

            // Extract text from the page
            String text = textExtractor.extract(extractOptions);

            // Define the output file path
            Path outputPath = Paths.get("output/Extracted_Page_" + (i + 1) + ".txt");

            // Write to a txt file
            Files.write(outputPath, text.getBytes());
        }

        // Close the document
        doc.close();
    }
}
Result:

Retrieve Images from PDFs in Java
The PdfImageHelper class in Spire.PDF enables efficient extraction of embedded images from PDF documents. It identifies images using PdfImageInfo objects, allowing for easy saving as standard image files.
Step-by-Step Guide
- Initialize a new instance of PdfDocument to work with your PDF file.
- Use the loadFromFile method to load the desired PDF.
- Instantiate PdfImageHelper to assist with image extraction.
- Loop through each page of the PDF.
- For each page, retrieve all image information using the getImagesInfo method.
- Loop through the retrieved image information, extract each image, and save it as a PNG file.
The following example extracts all embedded images from a PDF document and saves them as individual PNG files.
import com.spire.pdf.PdfDocument;
import com.spire.pdf.PdfPageBase;
import com.spire.pdf.utilities.PdfImageHelper;
import com.spire.pdf.utilities.PdfImageInfo;

import javax.imageio.ImageIO;
import java.awt.image.BufferedImage;
import java.io.File;
import java.io.IOException;

public class ExtractAllImages {

    public static void main(String[] args) throws IOException {

        // Create a PdfDocument object
        PdfDocument doc = new PdfDocument();

        // Load a PDF document
        doc.loadFromFile("C:\\Users\\Administrator\\Desktop\\Input.pdf");

        // Create a PdfImageHelper object
        PdfImageHelper imageHelper = new PdfImageHelper();

        // Declare an int variable
        int m = 0;

        // Iterate through the pages
        for (int i = 0; i < doc.getPages().getCount(); i++) {

            // Get a specific page
            PdfPageBase page = doc.getPages().get(i);

            // Get all image information from the page
            PdfImageInfo[] imageInfos = imageHelper.getImagesInfo(page);

            // Iterate through the image information
            for (int j = 0; j < imageInfos.length; j++)
            {
                // Get a specific image information
                PdfImageInfo imageInfo = imageInfos[j];

                // Get the image
                BufferedImage image = imageInfo.getImage();
                File file = new File(String.format("output/Image-%d.png",m));
                m++;

                // Save the image file in PNG format
                ImageIO.write(image, "PNG", file);
            }
        }

        // Clear up resources
        doc.dispose();
    }
}
Result:

Read Table Data from PDF Files in Java
For PDF tables that need conversion to structured data, PdfTableExtractor intelligently recognizes cell boundaries and relationships. The resulting PdfTable objects maintain the original table organization, allowing for cell-level data export.
Step-by-Step Guide
- Initialize an instance of PdfDocument to handle your PDF file.
- Use the loadFromFile method to open the desired PDF.
- Instantiate PdfTableExtractor to facilitate table extraction.
- Iterate through each page of the PDF to extract tables.
- For each page, retrieve tables into a PdfTable array using the extractTable method.
- For each table, iterate through its rows and columns to extract data.
- Write the extracted data to individual text files.
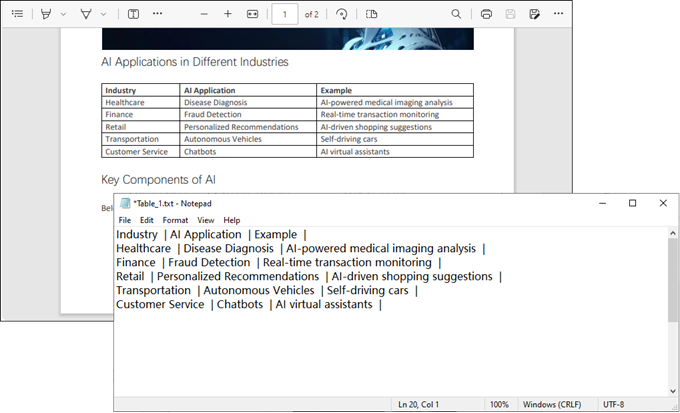
This Java code extracts table data from a PDF document and saves each table as a separate text file.
import com.spire.pdf.PdfDocument;
import com.spire.pdf.utilities.PdfTable;
import com.spire.pdf.utilities.PdfTableExtractor;

import java.io.FileWriter;

public class ExtractTableData {
    public static void main(String[] args) throws Exception {

        // Create a PdfDocument object
        PdfDocument doc = new PdfDocument();

        // Load a PDF document
        doc.loadFromFile("C:\\Users\\Administrator\\Desktop\\Input.pdf");

        // Create a PdfTableExtractor instance
        PdfTableExtractor extractor = new PdfTableExtractor(doc);

        // Initialize a table counter
        int tableCounter = 1;

        // Loop through the pages in the PDF
        for (int pageIndex = 0; pageIndex < doc.getPages().getCount(); pageIndex++) {

            // Extract tables from the current page into a PdfTable array
            PdfTable[] tableLists = extractor.extractTable(pageIndex);

            // If any tables are found
            if (tableLists != null && tableLists.length > 0) {

                // Loop through the tables in the array
                for (PdfTable table : tableLists) {

                    // Create a StringBuilder for the current table
                    StringBuilder builder = new StringBuilder();

                    // Loop through the rows in the current table
                    for (int i = 0; i < table.getRowCount(); i++) {

                        // Loop through the columns in the current table
                        for (int j = 0; j < table.getColumnCount(); j++) {

                            // Extract data from the current table cell and append to the StringBuilder
                            String text = table.getText(i, j);
                            builder.append(text).append(" | ");
                        }
                        builder.append("\r\n");
                    }

                    // Write data into a separate .txt document for each table
                    FileWriter fw = new FileWriter("output/Table_" + tableCounter + ".txt");
                    fw.write(builder.toString());
                    fw.flush();
                    fw.close();

                    // Increment the table counter
                    tableCounter++;
                }
            }
        }

        // Clear up resources
        doc.dispose();
    }
}
Result:
Convert Scanned PDFs to Text via OCR
Scanned PDFs require special handling through OCR engine such as Spire.OCR for Java. The solution first converts pages to images using Spire.PDF's rendering engine, then applies Spire.OCR's recognition capabilities via the OcrScanner class. This two-step approach effectively transforms physical document scans into editable text while supporting multiple languages.
Step 1. Install Spire.OCR and Configure the Environment
- Download Spire.OCR for Java and add the Jar file as a dependency in your project.
- Download the model that fits in with your operating system from one of the following links, and unzip the package somewhere on your disk.
- Configure the model in your code.
OcrScanner scanner = new OcrScanner();
configureOptions.setModelPath("D:\\win-x64");// model path
For detailed steps, refer to: Extract Text from Images Using the New Model of Spire.OCR for Java
Step 2. Convert a Scanned PDF to Text
This code example converts each page of a scanned PDF into an image, applies OCR to extract text, and saves the results in a text file.
import com.spire.ocr.OcrException;
import com.spire.ocr.OcrScanner;
import com.spire.ocr.ConfigureOptions;
import com.spire.pdf.PdfDocument;
import com.spire.pdf.graphics.PdfImageType;

import javax.imageio.ImageIO;
import java.awt.image.BufferedImage;
import java.io.File;
import java.io.IOException;
import java.nio.file.Files;
import java.nio.file.Path;
import java.nio.file.Paths;

public class ExtractTextFromScannedPdf {

    public static void main(String[] args) throws IOException, OcrException {

        // Create an instance of the OcrScanner class
        OcrScanner scanner = new OcrScanner();

        // Configure the scanner
        ConfigureOptions configureOptions = new ConfigureOptions();
        configureOptions.setModelPath("D:\\win-x64"); // Set model path
        configureOptions.setLanguage("English"); // Set language

        // Apply the configuration options
        scanner.ConfigureDependencies(configureOptions);

        // Load a PDF document
        PdfDocument doc = new PdfDocument();
        doc.loadFromFile("C:\\Users\\Administrator\\Desktop\\Input.pdf");

        // Prepare temporary directory
        String tempDirPath = "temp";
        new File(tempDirPath).mkdirs(); // Create temp directory

        StringBuilder allText = new StringBuilder();

        // Iterate through all pages
        for (int i = 0; i < doc.getPages().getCount(); i++) {

            // Convert page to image
            BufferedImage bufferedImage = doc.saveAsImage(i, PdfImageType.Bitmap);
            String imagePath = tempDirPath + File.separator + String.format("page_%d.png", i);
            ImageIO.write(bufferedImage, "PNG", new File(imagePath));

            // Perform OCR
            scanner.scan(imagePath);
            String pageText = scanner.getText().toString();
            allText.append(String.format("\n--- PAGE %d ---\n%s\n", i + 1, pageText));

            // Clean up temp image
            new File(imagePath).delete();
        }

        // Save all extracted text to a file
        Path outputTxtPath = Paths.get("output", "extracted_text.txt");
        Files.write(outputTxtPath, allText.toString().getBytes());

        // Close the document
        doc.close();
        System.out.println("Text extracted to " + outputTxtPath);
    }
}
Conclusion
Mastering how to read PDF in Java opens up a world of possibilities for data extraction and document automation. Whether you’re dealing with searchable text, images, tables, or scanned documents, the right tools and techniques can simplify the process.
By leveraging libraries like Spire.PDF and integrating OCR for scanned files, you can build robust solutions tailored to your needs. Start experimenting with the code snippets provided and unlock the full potential of PDF processing in Java!
FAQs
Q1: Can I extract text from scanned PDFs using Java?
Yes, by combining Spire.PDF with Spire.OCR. Convert PDF pages to images and perform OCR to extract text.
Q2: What’s the best library for reading PDFs in Java?
Spire.PDF is highly recommended for its versatility and ease of use. It supports extraction of text, images, tables, and OCR integration.
Q3: Does Spire.PDF support extraction of PDF elements like metadata, attachments, and hyperlinks?
Yes, Spire.PDF provides comprehensive support for extracting:
- Metadata (title, author, keywords)
- Attachments (embedded files)
- Hyperlinks (URLs and document links)
The library offers dedicated classes like PdfDocumentInformation for metadata and methods to retrieve embedded files ( PdfAttachmentCollection ) and hyperlinks ( PdfUriAnnotation ).
Q4: How to parse tables from PDFs into CSV/Excel programmatically?
Using Spire.PDF for Java, you can extract table data from PDFs, then seamlessly export it to Excel (XLSX) or CSV format with Spire.XLS for Java. For a step-by-step guide, refer to our tutorial: Export Table Data from PDF to Excel in Java.
Get a Free License
To fully experience the capabilities of Spire.PDF for Java without any evaluation limitations, you can request a free 30-day trial license.
Python Tutorial: Delete Text Boxes in PowerPoint Automatically
2025-06-12 07:00:22 Written by AdministratorText boxes are one of the most common elements used to display content in PowerPoint. However, as slides get frequently edited, you may end up with a clutter of unnecessary text boxes. Manually deleting them can be time-consuming. This guide will show you how to delete text boxes in PowerPoint using Python. Whether you want to delete all text boxes, remove a specific one, or clean up only the empty ones, you'll learn how to do it in just a few lines of code — saving time and making your workflow much more efficient. 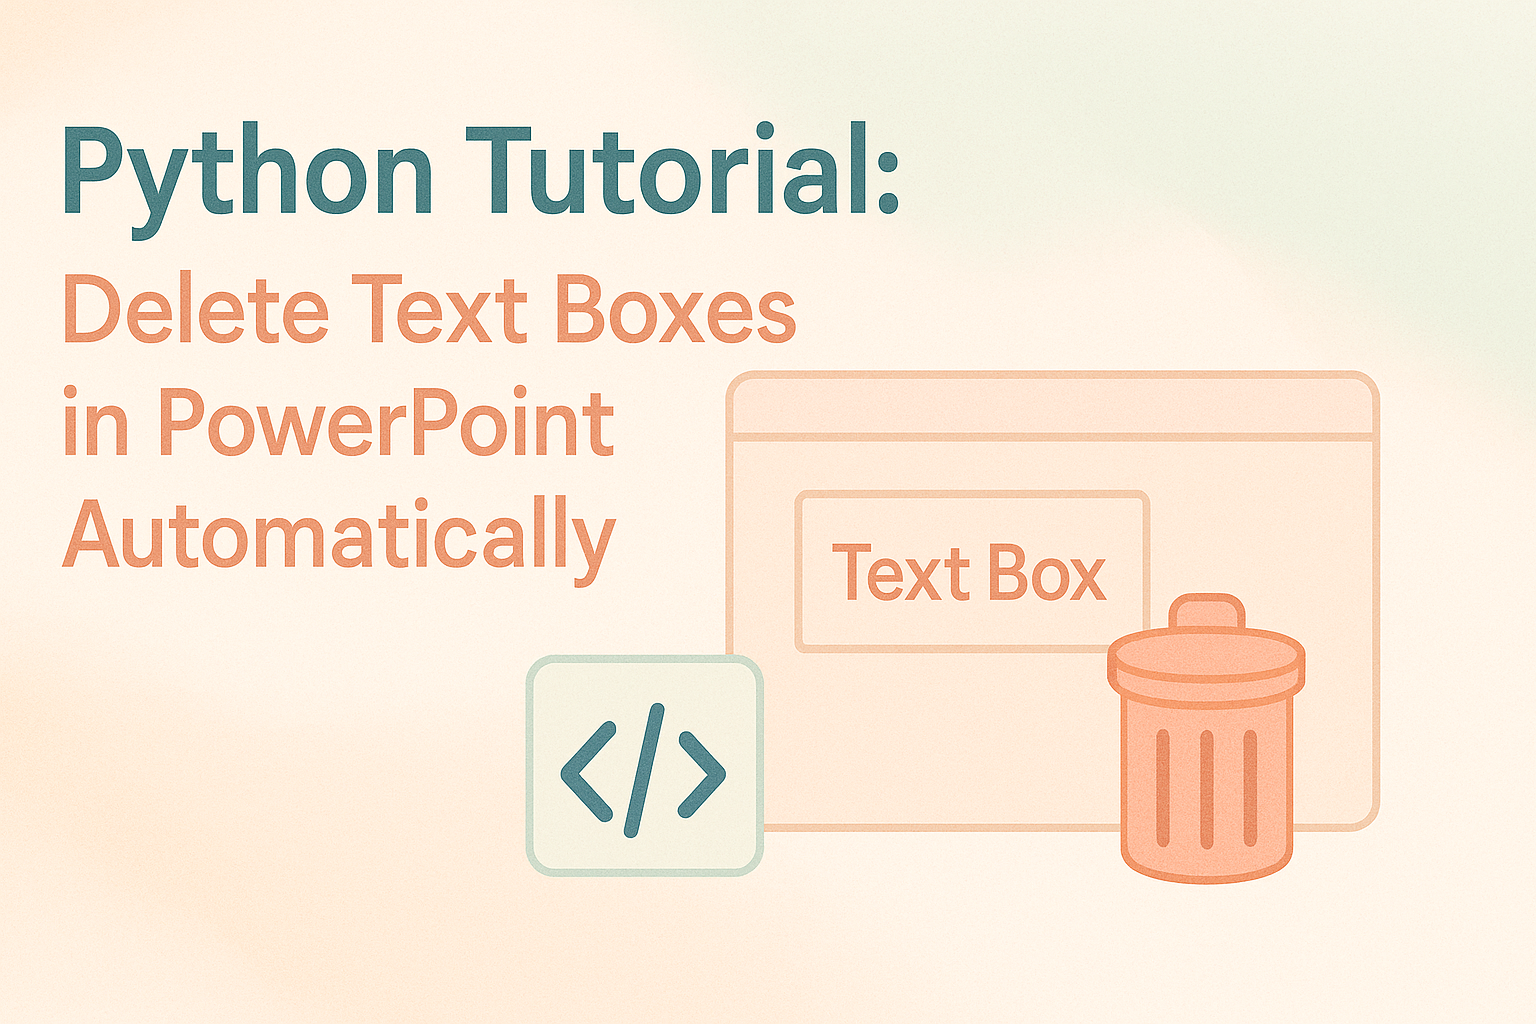
- Install the Python Library
- Delete All Text Boxes
- Delete a Specific Text Box
- Delete Empty Text Boxes
- Compare All Three Methods
- FAQs
Install the Python Library for PowerPoint Automation
To make this task easier, installing the right Python library is essential. In this guide, we’ll use Spire.Presentation for Python to demonstrate how to automate the removal of text boxes in a PowerPoint file. As a standalone third-party component, Spire.Presentation doesn’t require Microsoft Office to be installed on your machine. Its API is simple and beginner-friendly, and installation is straightforward — just run:
pip install spire.presentation
Alternatively, you can download the package for custom installation. A free version is also available, which is great for small projects and testing purposes.
How to Delete All Text Boxes in PowerPoint
Let’s start by looking at how to delete all text boxes — a common need when you're cleaning up a PowerPoint template. Instead of adjusting each text box and its content manually, it's often easier to remove them all and then re-add only what you need. With the help of Spire.Presentation, you can use the IAutoShape.Remove() method to remove text boxes in just a few lines of code. Let’s see how it works in practice. Steps to delete all text boxes in a PowerPoint presentation with Python:
- Create an instance of Presentation class, and load a sample PowerPoint file.
- Loop through all slides and all shapes on slides, and check if the shape is IAutoShape and if it is a text box.
- Remove text boxes in the PowerPoint presentation through IAutoShape.Remove() method.
- Save the modified PowerPoint file.
The following is a complete code example for deleting all text boxes in a PowerPoint presentation:
from spire.presentation import *

# Create a Presentation object and load a PowerPoint file
presentation = Presentation()
presentation.LoadFromFile("E:/Administrator/Python1/input/pre1.pptx")

# Loop through all slides
for slide in presentation.Slides:
    # Loop through all shapes in the slide
    for i in range(slide.Shapes.Count - 1, -1, -1):
        shape = slide.Shapes[i]
        # Check if the shape is IAutoShape and is a text box
        if isinstance(shape, IAutoShape) and shape.IsTextBox:
            # Remove the shape
            slide.Shapes.Remove(shape)

# Save the modified presentation
presentation.SaveToFile("E:/Administrator/Python1/output/RemoveAllTextBoxes.pptx", FileFormat.Pptx2013)
presentation.Dispose()
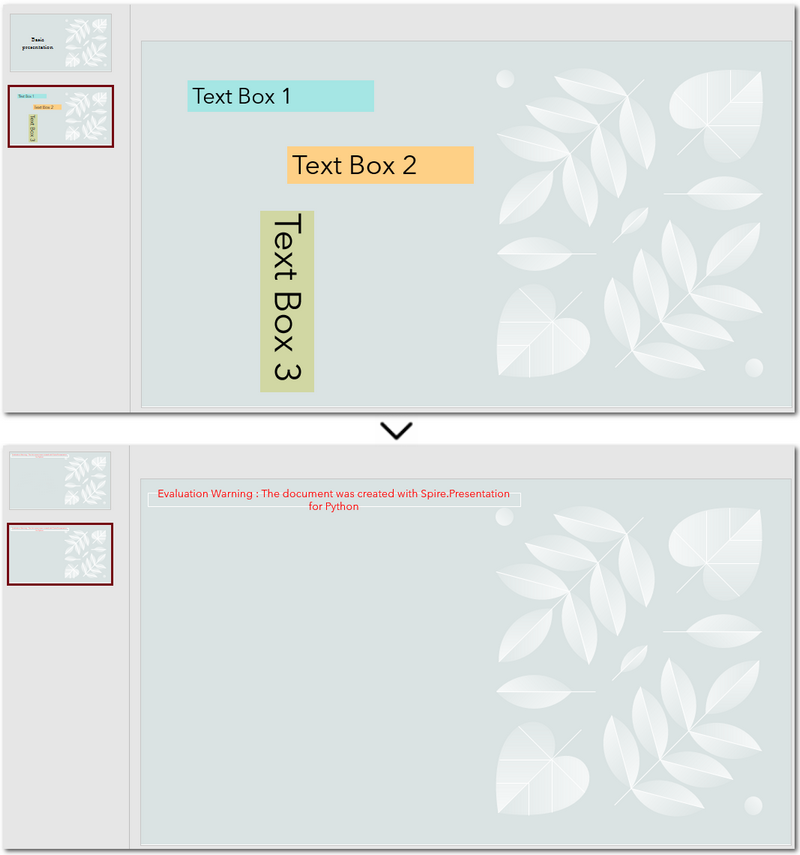
Warm Tip: When looping through shapes, use reverse order to avoid skipping any elements after deletion.
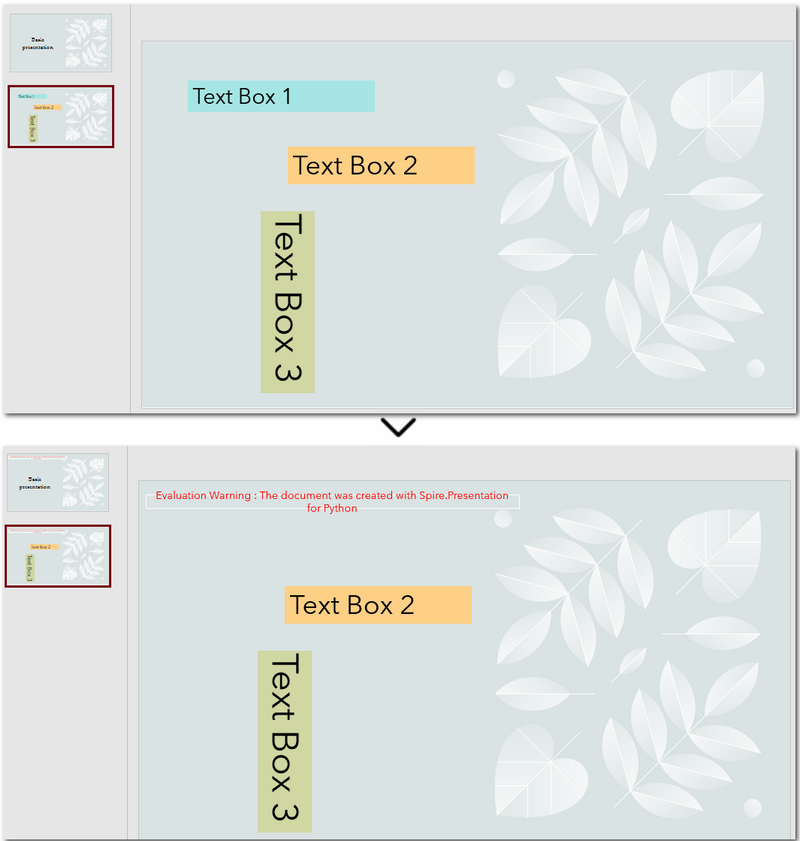
How to Delete a Specific Text Box in PowerPoint
If you only need to remove a few specific text boxes — for example, the first text box on the second slide — this method is perfect for you. In Python, you can first locate the target slide by its index, then identify the text box by its content, and finally remove it. This approach gives you precise control when you know exactly which text box needs to be deleted. Let’s walk through how to do this in practice. Steps to delete a specific text box in PowerPoint using Python:
- Create an object of Presentation class and read a PowerPoint document.
- Get a slide using Presentation.Slides[] property.
- Loop through each shape on the slide and check if it is the target text box.
- Remove the text box through IAutoShape.Remove() method.
- Save the modified PowerPoint presentation.
The following code demonstrates how to delete a text box with the content "Text Box 1" on the second slide of the presentation:
from spire.presentation import *

# Create a new Presentation object and load a PowerPoint file
presentation = Presentation()
presentation.LoadFromFile("E:/Administrator/Python1/input/pre1.pptx")

# Get the second slide
slide = presentation.Slides[1]

# Loop through all shapes on the slide
for i in range(slide.Shapes.Count - 1, -1, -1):
    shape = slide.Shapes[i]
    # Check if the shape is a text box and its text is "Text Box 1"
    if isinstance(shape, IAutoShape) and shape.IsTextBox:
        if shape.TextFrame.Text.strip() == "Text Box 1":
            slide.Shapes.Remove(shape)

# Save the modified presentation
presentation.SaveToFile("E:/Administrator/Python1/output/RemoveSpecificTextbox.pptx", FileFormat.Pptx2013)
presentation.Dispose()
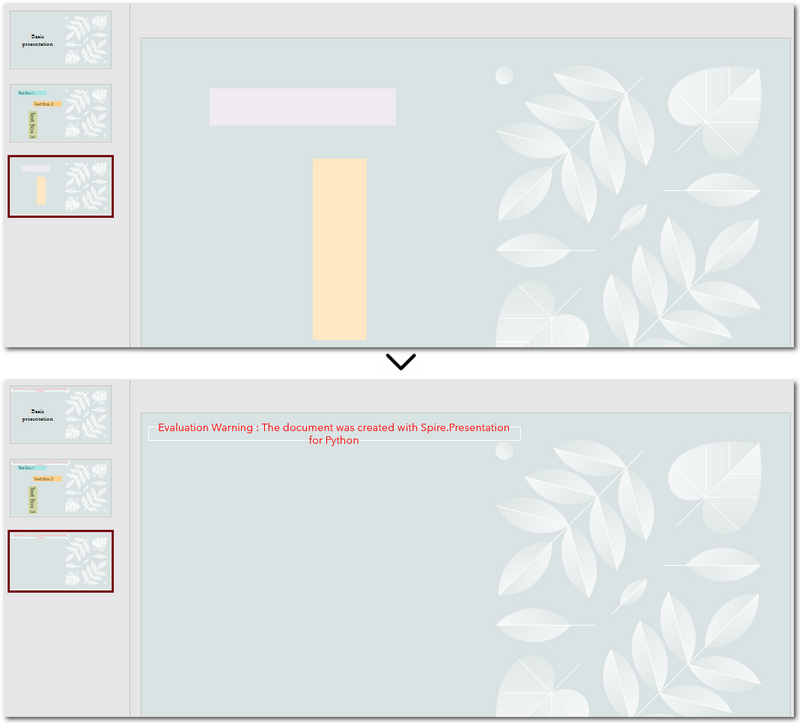
How to Delete Empty Text Boxes in PowerPoint
Another common scenario is removing all empty text boxes from a PowerPoint file — especially when you're cleaning up slides exported from other tools or merging multiple presentations and want to get rid of unused placeholders. Instead of checking each slide manually, automating the process with Python allows you to quickly remove all blank text boxes and keep only the meaningful content. It’s a far more efficient approach. Steps to delete empty text boxes in PowerPoint file using Python:
- Create an object of Presentation class, and load a PowerPoint file.
- Loop through all slides and all shapes on slides.
- Check if the shape is a text box and is empty.
- Remove text boxes in the PowerPoint presentation through IAutoShape.Remove() method.
- Save the modified PowerPoint file.
Here's the code example that shows how to delete empty text boxes in a PowerPoint presentation:
from spire.presentation import *

# Create a Presentation instance and load a sample file
presentation = Presentation()
presentation.LoadFromFile("E:/Administrator/Python1/input/pre1.pptx")

# Loop through each slide
for slide in presentation.Slides:
    # Iterate through shapes
    for i in range(slide.Shapes.Count - 1, -1, -1):
        shape = slide.Shapes[i]
        # Check if the shape is a textbox and its text is empty
        if isinstance(shape, IAutoShape) and shape.IsTextBox:
            text = shape.TextFrame.Text.strip()
            # Remove the shape if it is empty
            if not text:
                slide.Shapes.Remove(shape)

# Save the result file
presentation.SaveToFile("E:/Administrator/Python1/output/RemoveEmptyTextBoxes.pptx", FileFormat.Pptx2013)
presentation.Dispose()
Compare All Three Methods: Which One Should You Use?
Each of the three methods we've discussed has its own ideal use case. If you're still unsure which one fits your needs after reading through them, the table below will help you compare them at a glance — so you can quickly pick the most suitable solution.
| Method | Best For | Keeps Valid Content? |
|---|---|---|
| Delete All Text Boxes | Cleaning up entire templates or resetting slides | ❌ No |
| Delete Specified Text Box | When you know exactly which text box to remove (e.g., slide 2, shape 1) | ✅ Yes |
| Delete Empty Text Boxes | Cleaning up imported or merged presentations | ✅ Yes |
Conclusion and Best Practice
Whether you're refreshing templates, fine-tuning individual slides, or cleaning up empty placeholders, automating PowerPoint with Python can save you hours of manual work. Choose the method that fits your workflow best — and start making your presentations cleaner and more efficient today.
FAQs about Deleting Text Boxes in PowerPoint
Q1: Why can't I delete a text box in PowerPoint?
A: One common reason is that the text box is placed inside the Slide Master layout. In this case, it can’t be selected or deleted directly from the normal slide view. You’ll need to go to the View → Slide Master tab, locate the layout, and delete it from there.
Q2: How can I delete a specific text box using Python?
A: You can locate the specific text box by accessing the slide and then searching for the shape based on its index or text content. Once identified, use the IAutoShape.Remove() method to delete it. This is useful when you know exactly which text box needs to be removed.
Q3: Is it possible to remove a text box without deleting the content?
A: If you want to keep the content but remove the text box formatting (like borders or background), you can extract the text before deleting the shape and reinsert it elsewhere — for example, as a plain paragraph. However, PowerPoint doesn’t natively support detaching text from its container without removing the shape.
