
Knowledgebase (2370)
Children categories
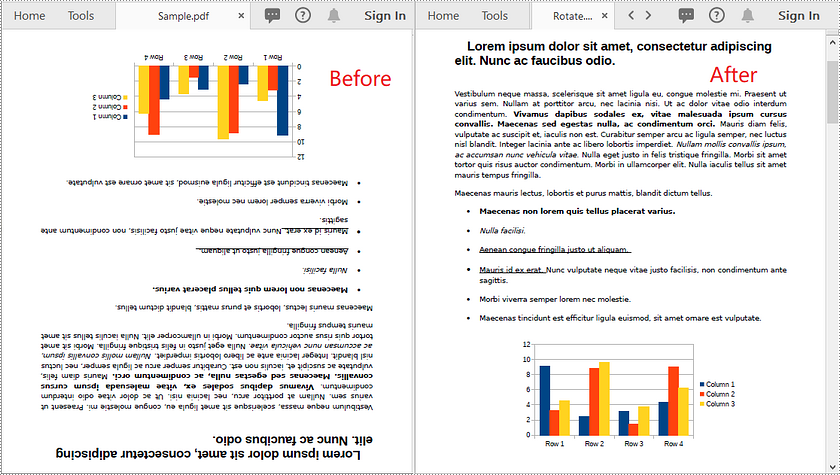
In some cases, you might need to rotate PDF pages. For example, when you receive a PDF document that contains disoriented pages, you may wish to rotate the pages so you can read the document easier. In this article, you will learn how to rotate pages in PDF in C# and VB.NET using Spire.PDF for .NET.
Install Spire.PDF for .NET
To begin with, you need to add the DLL files included in the Spire.PDF for.NET package as references in your .NET project. The DLL files can be either downloaded from this link or installed via NuGet.
PM> Install-Package Spire.PDF
Rotate a Specific Page in PDF using C# and VB.NET
Rotation is based on 90-degree increments. You can rotate a PDF page by 0/90/180/270 degrees. The following are the steps to rotate a PDF page:
- Create an instance of PdfDocument class.
- Load a PDF document using PdfDocument.LoadFromFile() method.
- Get the desired page by its index (zero-based) through PdfDocument.Pages[pageIndex] property.
- Get the original rotation angle of the page through PdfPageBase.Rotation property.
- Increase the original rotation angle by desired degrees.
- Apply the new rotation angle to the page through PdfPageBase.Rotation property.
- Save the result document using PdfDocument.SaveToFile() method.
- C#
- VB.NET
using Spire.Pdf;

namespace RotatePdfPage
{
    class Program
    {
        static void Main(string[] args)
        {
            //Create a PdfDocument instance
            PdfDocument pdf = new PdfDocument();
            //Load a PDF document
            pdf.LoadFromFile("Sample.pdf");

            //Get the first page
            PdfPageBase page = pdf.Pages[0];

            //Get the original rotation angle of the page
            int rotation = (int)page.Rotation;

            //Rotate the page 180 degrees clockwise based on the original rotation angle
            rotation += (int)PdfPageRotateAngle.RotateAngle180;
            page.Rotation = (PdfPageRotateAngle)rotation;

            //Save the result document
            pdf.SaveToFile("Rotate.pdf");
        }
    }
}
Rotate All Pages in PDF using C# and VB.NET
The following are the steps to rotate all pages in a PDF document:
- Create an instance of PdfDocument class.
- Load a PDF document using PdfDocument.LoadFromFile() method.
- Loop through each page in the document.
- Get the original rotation angle of the page through PdfPageBase.Rotation property.
- Increase the original rotation angle by desired degrees.
- Apply the new rotation angle to the page through PdfPageBase.Rotation property.
- Save the result document using PdfDocument.SaveToFile() method.
- C#
- VB.NET
using Spire.Pdf;

namespace RotateAllPdfPages
{
    class Program
    {
        static void Main(string[] args)
        {
            //Create a PdfDocument instance
            PdfDocument pdf = new PdfDocument();
            //Load a PDF document
            pdf.LoadFromFile("Sample.pdf");

            foreach (PdfPageBase page in pdf.Pages)
            {
                //Get the original rotation angle of the page
                int rotation = (int)page.Rotation;
                //Rotate the page 180 degrees clockwise based on the original rotation angle
                rotation += (int)PdfPageRotateAngle.RotateAngle180;
                page.Rotation = (PdfPageRotateAngle)rotation;
            }

            //Save the result document
            pdf.SaveToFile("RotateAll.pdf");
        }
    }
}
Apply for a Temporary License
If you'd like to remove the evaluation message from the generated documents, or to get rid of the function limitations, please request a 30-day trial license for yourself.
In certain cases, you may need to adjust the page size of a Word document to ensure that it fits your specific needs or preferences. For instance, if you are creating a document that will be printed on a small paper size, such as a brochure or flyer, you may want to decrease the page size of the document to avoid any cropping or scaling issues during printing. In this article, we will explain how to adjust the page size of a Word document in C# and VB.NET using Spire.Doc for .NET.
- Adjust the Page Size of a Word Document to a Standard Page Size in C# and VB.NET
- Adjust the Page Size of a Word Document to a Custom Page Size in C# and VB.NET
Install Spire.Doc for .NET
To begin with, you need to add the DLL files included in the Spire.Doc for.NET package as references in your .NET project. The DLL files can be either downloaded from this link or installed via NuGet.
PM> Install-Package Spire.Doc
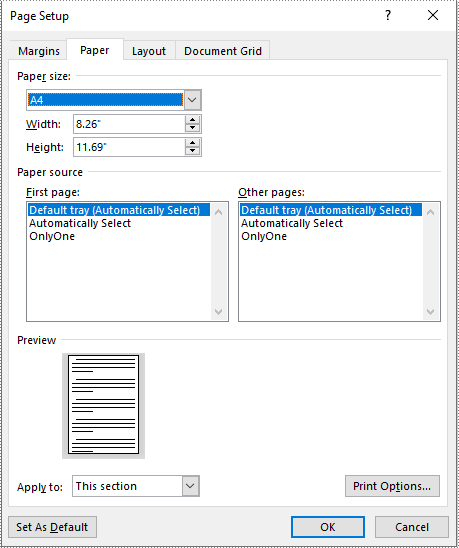
Adjust the Page Size of a Word Document to a Standard Page Size in C# and VB.NET
With Spire.Doc for .NET, you can easily adjust the page sizes of Word documents to a variety of standard page sizes, such as A3, A4, A5, A6, B4, B5, B6, letter, legal, and tabloid. The following steps explain how to change the page size of a Word document to a standard page size using Spire.Doc for .NET:
- Initialize an instance of the Document class.
- Load a Word document using the Document.LoadFromFile() method.
- Iterate through the sections in the document.
- Adjust the page size of each section to a standard page size by setting the value of the Section.PageSetup.PageSize property to a constant value of the PageSize enum.
- Save the result document using the Document.SaveToFile() method.
- C#
- VB.NET
using Spire.Doc;
using Spire.Doc.Documents;

namespace ChangePageSizeToStandardSize
{
    internal class Program
    {
        static void Main(string[] args)
        {
            //Initialize an instance of the Document class
            Document doc = new Document();
            //Load a Word document
            doc.LoadFromFile("Input.docx");

            //Iterate through the sections in the document
            foreach (Section section in doc.Sections)
            {
                //Change the page size of each section to A4
                section.PageSetup.PageSize = PageSize.A4;
            }

            //Save the result document
            doc.SaveToFile("StandardSize.docx", FileFormat.Docx2016);
        }
    }
}
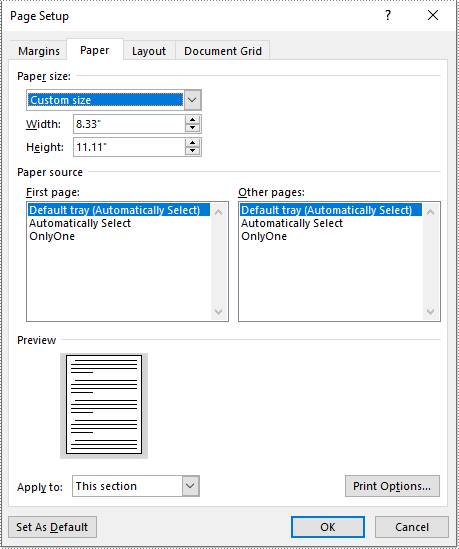
Adjust the Page Size of a Word Document to a Custom Page Size in C# and VB.NET
If you plan to print your document on paper with dimensions that don't match any standard paper size, you can change the page size of your document to a custom page size that matches the exact dimensions of the paper. The following steps explain how to change the page size of a Word document to a custom page size using Spire.Doc for .NET:
- Initialize an instance of the Document class.
- Load a Word document using the Document.LoadFromFile() method.
- Initialize an instance of the SizeF structure from specified dimensions.
- Iterate through the sections in the document.
- Adjust the page size of each section to the specified dimensions by assigning the SizeF instance to the Section.PageSetup.PageSize property.
- Save the result document using the Document.SaveToFile() method.
- C#
- VB.NET
using Spire.Doc;
using System.Drawing;

namespace ChangePageSizeToCustomSize
{
    internal class Program
    {
        static void Main(string[] args)
        {
            //Initialize an instance of the Document class
            Document doc = new Document();
            //Load a Word document
            doc.LoadFromFile("Input.docx");

            //Initialize an instance of the SizeF structure from specified dimensions
            SizeF customSize = new SizeF(600, 800);

            //Iterate through the sections in the document
            foreach (Section section in doc.Sections)
            {
                //Change the page size of each section to the specified dimensions
                section.PageSetup.PageSize = customSize;
            }

            //Save the result document
            doc.SaveToFile("CustomSize.docx", FileFormat.Docx2016);
        }
    }
}
Apply for a Temporary License
If you'd like to remove the evaluation message from the generated documents, or to get rid of the function limitations, please request a 30-day trial license for yourself.
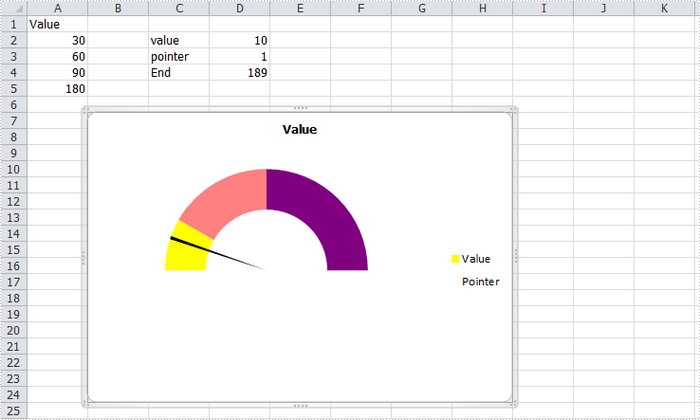
A gauge chart (or speedometer chart) is a combination of doughnut chart and pie chart. It only displays a single value which is used to indicate how far you are from reaching a goal. In this article, you'll learn how to create a gauge chart in C# via Spire.XLS.
Here is the gauge chart that I'm going to create.
Code Snippet:
Step 1: Create a new workbook and add some sample data into the first sheet.
Workbook book = new Workbook();
Worksheet sheet = book.Worksheets[0];
sheet.Range["A1"].Value = "Value";
sheet.Range["A2"].Value = "30";
sheet.Range["A3"].Value = "60";
sheet.Range["A4"].Value = "90";
sheet.Range["A5"].Value = "180";
sheet.Range["C2"].Value = "value";
sheet.Range["C3"].Value = "pointer";
sheet.Range["C4"].Value = "End";
sheet.Range["D2"].Value = "10";
sheet.Range["D3"].Value = "1";
sheet.Range["D4"].Value = "189";
Step 2: Create a doughnut chart based on the data from A1 to A5. Set the chart position.
Chart chart = sheet.Charts.Add(ExcelChartType.Doughnut);
chart.DataRange = sheet.Range["A1:A5"];
chart.SeriesDataFromRange = false;
chart.HasLegend = true;
chart.LeftColumn = 2;
chart.TopRow = 7;
chart.RightColumn = 9;
chart.BottomRow = 25;
Step 3: Set format of Value series. Following code makes the graphic looks like a semi-circle.
var cs1 = (ChartSerie)chart.Series["Value"];
cs1.Format.Options.DoughnutHoleSize = 60;
cs1.DataFormat.Options.FirstSliceAngle = 270;
cs1.DataPoints[0].DataFormat.Fill.ForeColor = Color.Yellow;
cs1.DataPoints[1].DataFormat.Fill.ForeColor = Color.PaleVioletRed;
cs1.DataPoints[2].DataFormat.Fill.ForeColor = Color.DarkViolet;
cs1.DataPoints[3].DataFormat.Fill.Visible = false;
Step 4: Add a new series to the doughnut chart, set chart type as Pie, and set the data range for the series. Format the each data point in the series to make sure only the pointer category is visible in the graphic.
var cs2 = (ChartSerie)chart.Series.Add("Pointer", ExcelChartType.Pie);
cs2.Values = sheet.Range["D2:D4"];
cs2.UsePrimaryAxis = false;
cs2.DataPoints[0].DataLabels.HasValue= true;
cs2.DataFormat.Options.FirstSliceAngle = 270;
cs2.DataPoints[0].DataFormat.Fill.Visible = false;
cs2.DataPoints[1].DataFormat.Fill.FillType = ShapeFillType.SolidColor;
cs2.DataPoints[1].DataFormat.Fill.ForeColor = Color.Black;
cs2.DataPoints[2].DataFormat.Fill.Visible = false;
Step 5: Save and launch to view the effect.
book.SaveToFile("AddGaugeChart.xlsx", FileFormat.Version2010);
System.Diagnostics.Process.Start("AddGaugeChart.xlsx");
Full Code:
using Spire.Xls;
using Spire.Xls.Charts;
using System.Drawing;
namespace CreateGauge
{
    class Program
    {

        static void Main(string[] args)
        {
            Workbook book = new Workbook();
            Worksheet sheet = book.Worksheets[0];
            sheet.Range["A1"].Value = "Value";
            sheet.Range["A2"].Value = "30";
            sheet.Range["A3"].Value = "60";
            sheet.Range["A4"].Value = "90";
            sheet.Range["A5"].Value = "180";
            sheet.Range["C2"].Value = "value";
            sheet.Range["C3"].Value = "pointer";
            sheet.Range["C4"].Value = "End";
            sheet.Range["D2"].Value = "10";
            sheet.Range["D3"].Value = "1";
            sheet.Range["D4"].Value = "189";

            Chart chart = sheet.Charts.Add(ExcelChartType.Doughnut);
            chart.DataRange = sheet.Range["A1:A5"];
            chart.SeriesDataFromRange = false;
            chart.HasLegend = true;
            chart.LeftColumn = 2;
            chart.TopRow = 7;
            chart.RightColumn = 9;
            chart.BottomRow = 25;

            var cs1 = (ChartSerie)chart.Series["Value"];
            cs1.Format.Options.DoughnutHoleSize = 60;
            cs1.DataFormat.Options.FirstSliceAngle = 270;
            cs1.DataPoints[0].DataFormat.Fill.ForeColor = Color.Yellow;
            cs1.DataPoints[1].DataFormat.Fill.ForeColor = Color.PaleVioletRed;
            cs1.DataPoints[2].DataFormat.Fill.ForeColor = Color.DarkViolet;
            cs1.DataPoints[3].DataFormat.Fill.Visible = false;

            var cs2 = (ChartSerie)chart.Series.Add("Pointer", ExcelChartType.Pie);
            cs2.Values = sheet.Range["D2:D4"];
            cs2.UsePrimaryAxis = false;
            cs2.DataPoints[0].DataLabels.HasValue = true;
            cs2.DataFormat.Options.FirstSliceAngle = 270;
            cs2.DataPoints[0].DataFormat.Fill.Visible = false;
            cs2.DataPoints[1].DataFormat.Fill.FillType = ShapeFillType.SolidColor;
            cs2.DataPoints[1].DataFormat.Fill.ForeColor = Color.Black;
            cs2.DataPoints[2].DataFormat.Fill.Visible = false;

            book.SaveToFile("AddGaugeChart.xlsx", FileFormat.Version2010);
            System.Diagnostics.Process.Start("AddGaugeChart.xlsx");

        }
    }
}
