
Python (365)
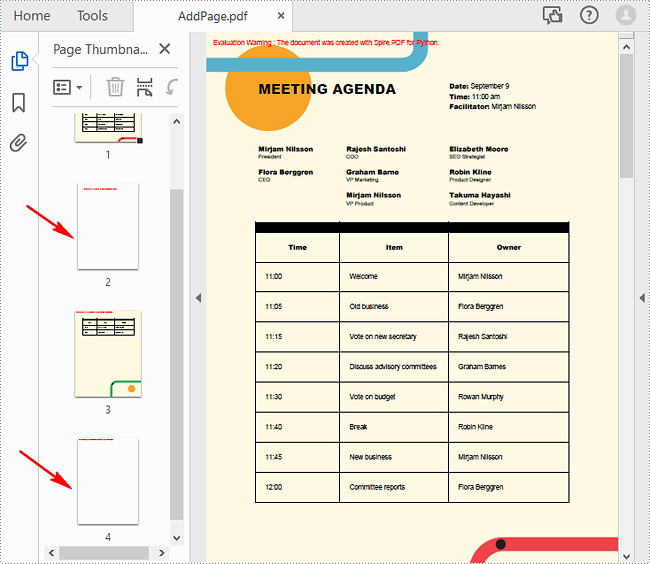
Pages are the most fundamental components of a PDF document. If you want to add new information or supplemental material to an existing PDF, it is necessary to add new pages. Conversely, if there are some pages that contain incorrect or irrelevant content, you can remove them to create a more professional document. In this article, you will learn how to programmatically add or delete pages in PDF using Spire.PDF for Python.
Install Spire.PDF for Python
This scenario requires Spire.PDF for Python and plum-dispatch v1.7.4. They can be easily installed in your Windows through the following pip command.
pip install Spire.PDF
If you are unsure how to install, please refer to this tutorial: How to Install Spire.PDF for Python on Windows
Add Empty Pages to a PDF Document in Python
With Spire.PDF for Python, you can easily add a blank page to a specific position or to the end of the document using PdfDocument.Pages.Insert() or PdfDocument.Pages.Add(SizeF, PdfMargins) methods. The following are the detailed steps.
- Create a PdfDocument object.
- Load a sample PDF document using PdfDocument.LoadFromFile() method.
- Create a new blank page and insert it into a specific position of the document using PdfDocument.Pages.Insert() method.
- Create another new blank page with the specified size and margins, and then append it to the end of the document using PdfDocument.Pages.Add(SizeF, PdfMargins) method.
- Save the result document using PdfDocument.SaveToFile() method.
- Python
from spire.pdf.common import *
from spire.pdf import *

# Create a PdfDocument object
pdf = PdfDocument()

# Load a PDF document
pdf.LoadFromFile("Test.pdf")

# Insert a blank page to the document as the second page
pdf.Pages.Insert(1)

# Add an empty page to the end of the document
pdf.Pages.Add(PdfPageSize.A4(), PdfMargins(0.0, 0.0))

# Save the result document
pdf.SaveToFile("AddPage.pdf")
pdf.Close()
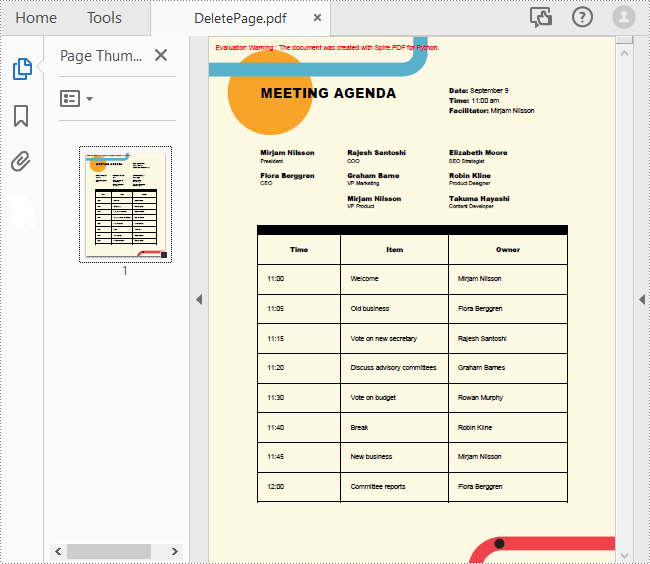
Delete an Existing Page in a PDF Document in Python
To remove a specified page from a PDF, you can use the PdfDocument.Pages.RemoveAt() method. The following are the detailed steps.
- Create a PdfDocument object.
- Load a sample PDF document using PdfDocument.LoadFromFile() method.
- Remove a specified page from the document using PdfDocument.Pages.RemoveAt() method.
- Save the result document using PdfDocument.SaveToFile() method.
- Python
from spire.pdf.common import *
from spire.pdf import *

# Create a PdfDocument object
pdf = PdfDocument()

# Load a PDF document
pdf.LoadFromFile("Test.pdf")

# Delete the second page of the document
pdf.Pages.RemoveAt(1)

# Save the result document
pdf.SaveToFile("DeletePage.pdf")
pdf.Close()
Apply for a Temporary License
If you'd like to remove the evaluation message from the generated documents, or to get rid of the function limitations, please request a 30-day trial license for yourself.
Stamps are a powerful tool in PDF documents that allow users to mark and annotate specific areas or sections of a PDF file. Often used for approval, review, or to indicate a specific status, stamps can greatly enhance collaboration and document management. In PDF, stamps can take various forms, such as a simple checkmark, a customized graphic, a date and time stamp, or even a signature. In this article, you will learn how to add image stamps and dynamic stamps to a PDF document in Python using Spire.PDF for Python.
Install Spire.PDF for Python
This scenario requires Spire.PDF for Python and plum-dispatch v1.7.4. They can be easily installed in your Windows through the following pip command.
pip install Spire.PDF
If you are unsure how to install, please refer to this tutorial: How to Install Spire.PDF for Python on Windows
Add an Image Stamp to PDF Documents in Python
Spire.PDF for Python offers the PdfRubberStampAnnotation class to represent a rubber stamp in a PDF document. In order to create the appearance of a rubber stamp, the PdfTemplate class is used. The PdfTemplate is a piece of canvas on which you can draw whatever information you want, such as text, images, date, and time.
Image stamps can include logos, signatures, watermarks, or any other custom graphics that you want to overlay onto your PDFs. The main steps to add an image stamp to PDF using Spire.PDF for Python are as follows.
- Create a PdfDocument object.
- Load a PDF file using PdfDocument.LoadFromFile() method.
- Load an image that you want to stamp on PDF using PdfImage.FromFile() method.
- Create a PdfTemplate object with the dimensions of the image.
- Draw the image on the template using PdfTemplate.Graphics.DrawImage() method.
- Create a PdfRubberStampAnnotation object, and set the template as its appearance.
- Add the stamp to a specific PDF page using PdfPageBase.AnnotationsWidget.Add() method.
- Save the document to a different file using PdfDocument.SaveToFile() method.
- Python
from spire.pdf.common import *
from spire.pdf import *

# Create a PdfDocument object
doc = PdfDocument()

# Load a PDF document
doc.LoadFromFile("C:\\Users\\Administrator\\Desktop\\input.pdf")

# Get a specific page
page = doc.Pages.get_Item(2)

# Load an image file
image = PdfImage.FromFile("C:\\Users\\Administrator\\Desktop\\secret.png")

# Get the width and height of the image
width = (float)(image.Width)
height = (float)(image.Height)

# Create a PdfTemplate object based on the size of the image
template = PdfTemplate(width, height, True)

# Draw image on the template
template.Graphics.DrawImage(image, 0.0, 0.0, width, height)

# Create a rubber stamp annotation, specifying its location and position
rect = RectangleF((float) (page.ActualSize.Width - width - 50), (float) (page.ActualSize.Height - height - 40), width, height)
stamp = PdfRubberStampAnnotation(rect)

# Create a PdfAppearance object
pdfAppearance = PdfAppearance(stamp)

# Set the template as the normal state of the appearance
pdfAppearance.Normal = template

# Apply the appearance to the stamp
stamp.Appearance = pdfAppearance

# Add the stamp annotation to PDF
page.AnnotationsWidget.Add(stamp)

# Save the file
doc.SaveToFile("output/ImageStamp.pdf")
doc.Close()

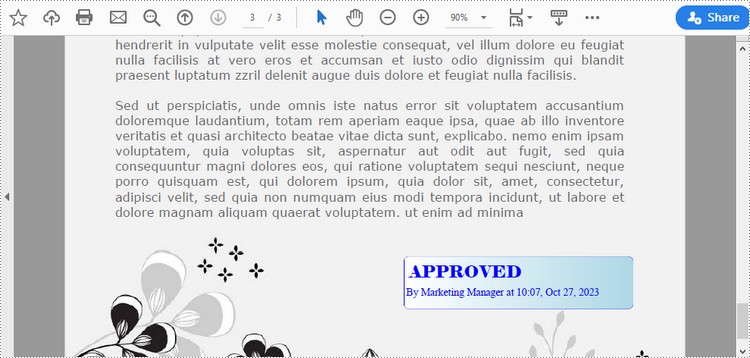
Add a Dynamic Stamp to PDF in Python
Unlike static stamps, dynamic stamps can contain variable information such as the date, time, or user input. The following are the steps to create a dynamic stamp in PDF using Spire.PDF for Python.
- Create a PdfDocument object.
- Load a PDF file using PdfDocument.LoadFromFile() method.
- Create a PdfTemplate object with desired size.
- Draw strings on the template using PdfTemplate.Graphics.DrawString() method.
- Create a PdfRubberStampAnnotation object, and set the template as its appearance.
- Add the stamp to a specific PDF page using PdfPageBase.AnnotationsWidget.Add() method.
- Save the document to a different file using PdfDocument.SaveToFile() method.
- Python
from spire.pdf.common import *
from spire.pdf import *

# Create a PdfDocument object
doc = PdfDocument()

# Load a PDF document
doc.LoadFromFile("C:\\Users\\Administrator\\Desktop\\input.pdf")

# Get a specific page
page = doc.Pages.get_Item(2)

# Create a PdfTemplate object
template = PdfTemplate(220.0, 50.0, True)

# Create two fonts
font1 = PdfTrueTypeFont("Elephant", 16.0, 0, True)
font2 = PdfTrueTypeFont("Times New Roman", 10.0, 0, True)

# Create a solid brush and a gradient brush
solidBrush = PdfSolidBrush(PdfRGBColor(Color.get_Blue()))
rectangle1 = RectangleF(PointF(0.0, 0.0), template.Size)
linearGradientBrush = PdfLinearGradientBrush(rectangle1, PdfRGBColor(Color.get_White()), PdfRGBColor(Color.get_LightBlue()), PdfLinearGradientMode.Horizontal)

# Create a pen
pen = PdfPen(solidBrush)

# Create a rounded rectangle path
CornerRadius = 10.0
path = PdfPath()
path.AddArc(template.GetBounds().X, template.GetBounds().Y, CornerRadius, CornerRadius, 180.0, 90.0)
path.AddArc(template.GetBounds().X + template.Width - CornerRadius, template.GetBounds().Y, CornerRadius, CornerRadius, 270.0, 90.0)
path.AddArc(template.GetBounds().X + template.Width - CornerRadius, template.GetBounds().Y + template.Height - CornerRadius, CornerRadius, CornerRadius, 0.0, 90.0)
path.AddArc(template.GetBounds().X, template.GetBounds().Y + template.Height - CornerRadius, CornerRadius, CornerRadius, 90.0, 90.0)
path.AddLine(template.GetBounds().X, template.GetBounds().Y + template.Height - CornerRadius, template.GetBounds().X, template.GetBounds().Y + CornerRadius / 2)

# Draw path on the template
template.Graphics.DrawPath(pen, path)
template.Graphics.DrawPath(linearGradientBrush, path)

# Draw text on the template
string1 = "APPROVED\n"
string2 = "By Marketing Manager at " + DateTime.get_Now().ToString("HH:mm, MMM dd, yyyy")
template.Graphics.DrawString(string1, font1, solidBrush, PointF(5.0, 5.0))
template.Graphics.DrawString(string2, font2, solidBrush, PointF(2.0, 28.0))

# Create a rubber stamp, specifying its size and location
rectangle2 = RectangleF((float) (page.ActualSize.Width - 220.0 - 50.0), (float) (page.ActualSize.Height - 50.0 - 100.0), 220.0, 50.0)
stamp = PdfRubberStampAnnotation(rectangle2)

# Create a PdfAppearance object and apply the template as its normal state
apprearance = PdfAppearance(stamp)
apprearance.Normal = template

# Apply the appearance to stamp
stamp.Appearance = apprearance

# Add the stamp annotation to annotation collection
page.AnnotationsWidget.Add(stamp)

# Save the file
doc.SaveToFile("output/DynamicStamp.pdf", FileFormat.PDF)
doc.Dispose()
Apply for a Temporary License
If you'd like to remove the evaluation message from the generated documents, or to get rid of the function limitations, please request a 30-day trial license for yourself.
Python: Create Various Types of Lists in a Word Document
2023-10-27 00:57:31 Written by AdministratorLists are a powerful organizational tool that can be used to present information in a structured and easy-to-follow manner. Whether you want to create numbered lists, bulleted lists, or even custom lists with specific formatting, Word provides flexible options to suit your needs. By utilizing different list styles, you can improve the readability and visual appeal of your documents, making it simpler for readers to grasp key points and navigate through the content. In this article, you will learn how to programmatically create various types of lists in a Word document in Python using Spire.Doc for Python.
- Create a Numbered List in Word in Python
- Create a Bulleted List in Word in Python
- Create a Multi-Level Numbered List in Word in Python
- Create a Multi-Level Mixed-Type List in Word in Python
Install Spire.Doc for Python
This scenario requires Spire.Doc for Python and plum-dispatch v1.7.4. They can be easily installed in your Windows through the following pip command.
pip install Spire.Doc
If you are unsure how to install, please refer to this tutorial: How to Install Spire.Doc for Python on Windows
Create a Numbered List in Word in Python
Spire.Doc for Python provides the ListStyle class, which enables you to establish either a numbered list style or a bulleted style. Subsequently, you can utilize the Paragraph.ListFormat.ApplyStyle() method to apply the defined list style to a paragraph. The steps to create a numbered list are as follows.
- Create a Document object.
- Add a section using Document.AddSection() method.
- Create an instance of ListStyle class, specifying the list type to Numbered.
- Get a specific level of the list through ListStyle.Levels[index] property, and set the numbering type through ListLevel.PatternType property.
- Add the list style to the document using Document.ListStyles.Add() method.
- Add several paragraphs to the document using Section.AddParagraph() method.
- Apply the list style to a specific paragraph using Paragraph.ListFormat.ApplyStyle() method.
- Specify the list level through Paragraph.ListFormat.ListLevelNumber property.
- Save the document to a Word file using Document.SaveToFile() method.
- Python
from spire.doc import *
from spire.doc.common import *
# Create a Document object
doc = Document()
# Add a section
section = doc.AddSection()
# Create a numbered list style
listStyle = doc.Styles.Add(ListType.Numbered,"numberedList")
Levels = listStyle.ListRef.Levels
Levels[0].PatternType = ListPatternType.Arabic
Levels[0].TextPosition = 20
# Add a paragraph
paragraph = section.AddParagraph()
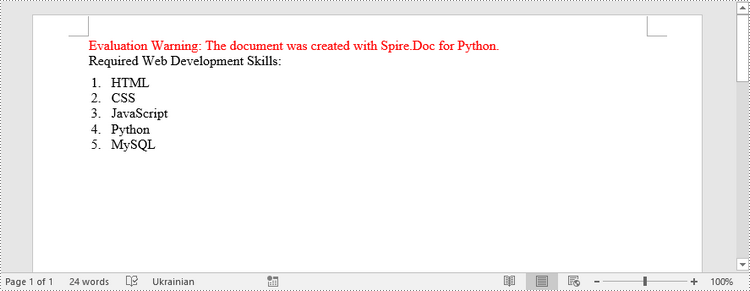
paragraph.AppendText("Required Web Development Skills:")
paragraph.Format.AfterSpacing = 5.0
# Add a paragraph and apply the numbered list style to it
paragraph = section.AddParagraph()
paragraph.AppendText("HTML")
paragraph.ListFormat.ApplyStyle("numberedList")
paragraph.ListFormat.ListLevelNumber = 0
# Add another four paragraphs and apply the numbered list style to them
paragraph = section.AddParagraph()
paragraph.AppendText("CSS")
paragraph.ListFormat.ApplyStyle("numberedList")
paragraph.ListFormat.ListLevelNumber = 0
paragraph = section.AddParagraph()
paragraph.AppendText("JavaScript")
paragraph.ListFormat.ApplyStyle("numberedList")
paragraph.ListFormat.ListLevelNumber = 0
paragraph = section.AddParagraph()
paragraph.AppendText("Python")
paragraph.ListFormat.ApplyStyle("numberedList")
paragraph.ListFormat.ListLevelNumber = 0
paragraph = section.AddParagraph()
paragraph.AppendText("MySQL")
paragraph.ListFormat.ApplyStyle("numberedList")
paragraph.ListFormat.ListLevelNumber = 0
# Save the document to file
doc.SaveToFile("output/NumberedList.docx", FileFormat.Docx)
Create a Bulleted List in Word in Python
Creating a bulleted list follows a similar process to creating a numbered list, with the main difference being that you need to specify the list type as "Bulleted" and assign a bullet symbol to it. The following are the detailed steps.
- Create a Document object.
- Add a section using Document.AddSection() method.
- Create an instance of ListStyle class, specifying the list type to Bulleted.
- Get a specific level of the list through ListStyle.Levels[index] property, and set the bullet symbol through ListLevel.BulletCharacter property.
- Add the list style to the document using Document.ListStyles.Add() method.
- Add several paragraphs to the document using Section.AddParagraph() method.
- Apply the list style to a specific paragraph using Paragraph.ListFormat.ApplyStyle() method.
- Specify the list level through Paragraph.ListFormat.ListLevelNumber property.
- Save the document to a Word file using Document.SaveToFile() method.
- Python
from spire.doc import *
from spire.doc.common import *
# Create a Document object
doc = Document()
# Add a section
section = doc.AddSection()
# Create a bulleted list style
listStyle = doc.Styles.Add(ListType.Bulleted,"bulletedList")
Levels = listStyle.ListRef.Levels
Levels[0].BulletCharacter = "\u00B7"
Levels[0].CharacterFormat.FontName = "Symbol"
Levels[0].TextPosition = 20
# Add a paragraph
paragraph = section.AddParagraph()
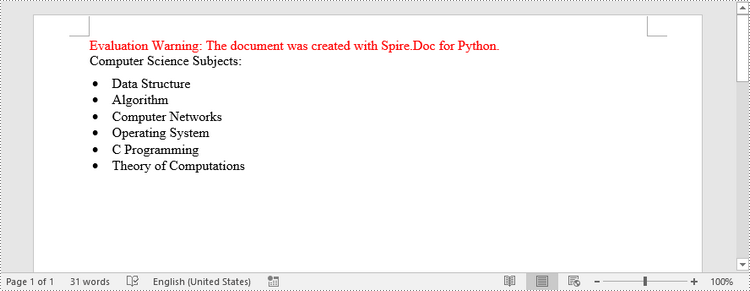
paragraph.AppendText("Computer Science Subjects:")
paragraph.Format.AfterSpacing = 5.0
# Add a paragraph and apply the bulleted list style to it
paragraph = section.AddParagraph()
paragraph.AppendText("Data Structure")
paragraph.ListFormat.ApplyStyle("bulletedList")
paragraph.ListFormat.ListLevelNumber = 0
# Add another five paragraphs and apply the bulleted list style to them
paragraph = section.AddParagraph()
paragraph.AppendText("Algorithm")
paragraph.ListFormat.ApplyStyle("bulletedList")
paragraph.ListFormat.ListLevelNumber = 0
paragraph = section.AddParagraph()
paragraph.AppendText("Computer Networks")
paragraph.ListFormat.ApplyStyle("bulletedList")
paragraph.ListFormat.ListLevelNumber = 0
paragraph = section.AddParagraph()
paragraph.AppendText("Operating System")
paragraph.ListFormat.ApplyStyle("bulletedList")
paragraph.ListFormat.ListLevelNumber = 0
paragraph = section.AddParagraph()
paragraph.AppendText("C Programming")
paragraph.ListFormat.ApplyStyle("bulletedList")
paragraph.ListFormat.ListLevelNumber = 0
paragraph = section.AddParagraph()
paragraph.AppendText("Theory of Computations")
paragraph.ListFormat.ApplyStyle("bulletedList")
paragraph.ListFormat.ListLevelNumber = 0
# Save the document to file
doc.SaveToFile("output/BulletedList.docx", FileFormat.Docx);
Create a Multi-Level Numbered List in Word in Python
A multi-level list consists of at least two different levels. A certain level of a nested list can be accessed by the ListStyle.Levels[index] property, through which you can set the numbering type and prefix. The following are the steps to create a multi-level numbered list in Word.
- Create a Document object.
- Add a section using Document.AddSection() method.
- Create an instance of ListStyle class, specifying the list type to Numbered.
- Get a specific level of the list through ListStyle.Levels[index] property, and set the numbering type and prefix.
- Add the list style to the document using Document.ListStyles.Add() method.
- Add several paragraphs to the document using Section.AddParagraph() method.
- Apply the list style to a specific paragraph using Paragraph.ListFormat.ApplyStyle() method.
- Specify the list level through Paragraph.ListFormat.ListLevelNumber property.
- Save the document to a Word file using Document.SaveToFile() method.
- Python
from spire.doc import *
from spire.doc.common import *
# Create a Document object
doc = Document()
# Add a section
section = doc.AddSection()
# Create a numbered list style, specifying number prefix and pattern type of each level
listStyle = doc.Styles.Add(ListType.Numbered,"levelstyle")
Levels = listStyle.ListRef.Levels
Levels[0].PatternType = ListPatternType.Arabic
Levels[0].TextPosition = 20.0
Levels[1].NumberPrefix = "%1."
Levels[1].PatternType = ListPatternType.Arabic
Levels[2].NumberPrefix = "%1.%2."
Levels[2].PatternType = ListPatternType.Arabic
# Add a paragraph
paragraph = section.AddParagraph()
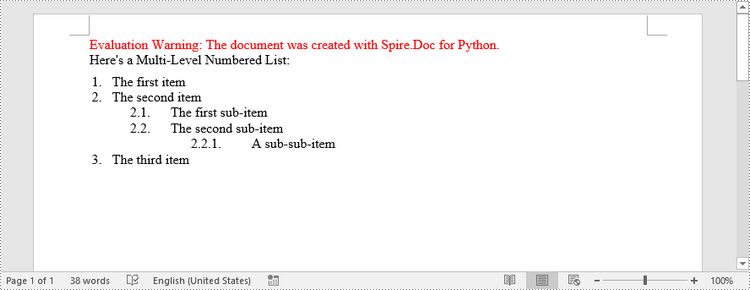
paragraph.AppendText("Here's a Multi-Level Numbered List:")
paragraph.Format.AfterSpacing = 5.0
# Add a paragraph and apply the numbered list style to it
paragraph = section.AddParagraph()
paragraph.AppendText("The first item")
paragraph.ListFormat.ApplyStyle("levelstyle")
paragraph.ListFormat.ListLevelNumber = 0
# Add another five paragraphs and apply the numbered list stype to them
paragraph = section.AddParagraph()
paragraph.AppendText("The second item")
paragraph.ListFormat.ApplyStyle("levelstyle")
paragraph.ListFormat.ListLevelNumber = 0
paragraph = section.AddParagraph()
paragraph.AppendText("The first sub-item")
paragraph.ListFormat.ApplyStyle("levelstyle")
paragraph.ListFormat.ListLevelNumber = 1
paragraph = section.AddParagraph()
paragraph.AppendText("The second sub-item")
paragraph.ListFormat.ContinueListNumbering()
paragraph.ListFormat.ApplyStyle("levelstyle")
paragraph = section.AddParagraph()
paragraph.AppendText("A sub-sub-item")
paragraph.ListFormat.ApplyStyle("levelstyle")
paragraph.ListFormat.ListLevelNumber = 2
paragraph = section.AddParagraph()
paragraph.AppendText("The third item")
paragraph.ListFormat.ApplyStyle("levelstyle")
paragraph.ListFormat.ListLevelNumber = 0
# Save the document to file
doc.SaveToFile("output/MultilevelNumberedList.docx", FileFormat.Docx)
Create a Multi-Level Mixed-Type List in Word in Python
To combine number and symbol bullet points in a multi-level list, create separate list styles (numbered and bulleted) and apply them to different paragraphs. The detailed steps are as follows.
- Create a Document object.
- Add a section using Document.AddSection() method.
- Create a numbered list style and a bulleted list style.
- Add several paragraphs to the document using Section.AddParagraph() method.
- Apply different list style to different paragraphs using Paragraph.ListFormat.ApplyStyle() method.
- Save the document to a Word file using Document.SaveToFile() method.
- Python
from spire.doc import *
from spire.doc.common import *
# Create a Document object
doc = Document()
# Add a section
section = doc.AddSection()
# Create a numbered list style
numberList = doc.Styles.Add(ListType.Numbered, "numberedStyle")
Levels = numberList.ListRef.Levels
Levels[0].PatternType = ListPatternType.Arabic
Levels[0].TextPosition = 20
Levels[1].PatternType = ListPatternType.LowLetter
# Create a bulleted list style
bulletedListStyle = doc.Styles.Add(ListType.Bulleted, "bulletedStyle")
Levels = bulletedListStyle.ListRef.Levels
Levels[2].BulletCharacter = "\u002A"
Levels[2].CharacterFormat.FontName = "Symbol"
# Add a paragraph
paragraph = section.AddParagraph()
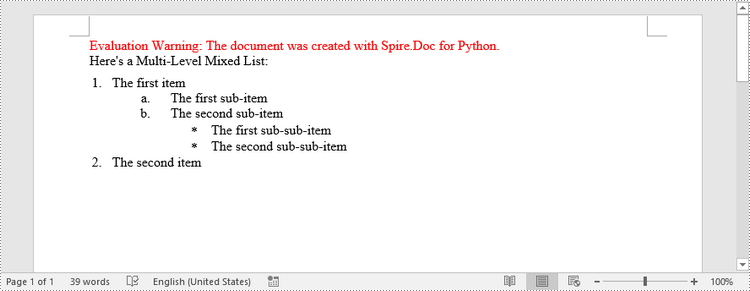
paragraph.AppendText("Here's a Multi-Level Mixed List:")
paragraph.Format.AfterSpacing = 5.0
# Add a paragraph and apply the numbered list style to it
paragraph = section.AddParagraph()
paragraph.AppendText("The first item")
paragraph.ListFormat.ApplyStyle("numberedStyle")
paragraph.ListFormat.ListLevelNumber = 0
# Add the other five paragraphs and apply different list stype to them
paragraph = section.AddParagraph()
paragraph.AppendText("The first sub-item")
paragraph.ListFormat.ApplyStyle("numberedStyle")
paragraph.ListFormat.ListLevelNumber = 1
paragraph = section.AddParagraph()
paragraph.AppendText("The second sub-item")
paragraph.ListFormat.ListLevelNumber = 1
paragraph.ListFormat.ApplyStyle("numberedStyle")
paragraph = section.AddParagraph()
paragraph.AppendText("The first sub-sub-item")
paragraph.ListFormat.ApplyStyle("bulletedStyle")
paragraph.ListFormat.ListLevelNumber = 2
paragraph = section.AddParagraph()
paragraph.AppendText("The second sub-sub-item")
paragraph.ListFormat.ApplyStyle("bulletedStyle")
paragraph.ListFormat.ListLevelNumber = 2
paragraph = section.AddParagraph()
paragraph.AppendText("The second item")
paragraph.ListFormat.ApplyStyle("numberedStyle")
paragraph.ListFormat.ListLevelNumber = 0
# Save the document to file
doc.SaveToFile("output/MultilevelMixedList.docx", FileFormat.Docx)
Apply for a Temporary License
If you'd like to remove the evaluation message from the generated documents, or to get rid of the function limitations, please request a 30-day trial license for yourself.
By default, Excel uses column letters and row numbers to refer to cells and ranges (for example, A1, B2:C5). While this approach is functional, it can become inconvenient, particularly when dealing with large datasets or complex formulas. Named ranges provide a solution to this problem by allowing users to assign custom names to cells or ranges, making them easier to identify, reference, and work with. In this article, we will explain how to create, edit and delete named ranges in Excel in Python using Spire.XLS for Python.
- Create a Named Range in Excel in Python
- Edit an Existing Named Range in Excel in Python
- Delete a Named Range from Excel in Python
Install Spire.XLS for Python
This scenario requires Spire.XLS for Python and plum-dispatch v1.7.4. They can be easily installed in your Windows through the following pip command.
pip install Spire.XLS
If you are unsure how to install, please refer to this tutorial: How to Install Spire.XLS for Python on Windows
Create a Named Range in Excel in Python
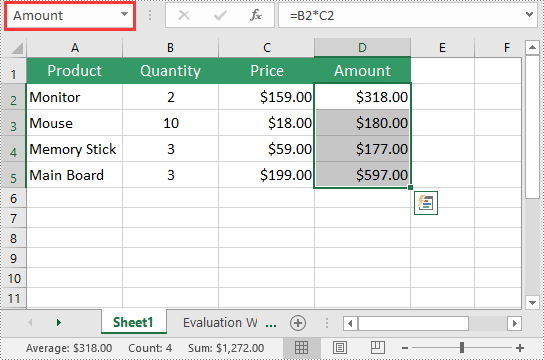
You can use the Workbook.NameRanges.Add() method provided by Spire.XLS for Python to add a named range to an Excel workbook. Once the named range is added, you can define the cell or range of cells it refers to using the INamedRange.RefersToRange property.
The following steps explain how to create a named range in Excel using Spire.XLS for Python:
- Create an object of the Workbook class.
- Load an Excel workbook using the Workbook.LoadFromFile() method.
- Add a named range to the workbook using the Workbook.NameRanges.Add() method.
- Get a specific worksheet in the workbook using the Workbook.Worksheets[] property.
- Set the cell range that the named range refers to using the INamedRange.RefersToRange property.
- Save the resulting file using the Workbook.SaveToFile() method.
- Python
from spire.xls import *
from spire.xls.common import *

# Create an object of the Workbook class
workbook = Workbook()
# Load an Excel workbook
workbook.LoadFromFile("Sample.xlsx")

# Add a named range to the workbook
namedRange = workbook.NameRanges.Add("Amount")

# Get a specific worksheet in the workbook
sheet = workbook.Worksheets[0]

# Set the cell range that the named range references
namedRange.RefersToRange = sheet.Range["D2:D5"]

# Save the resulting file to a specific location
workbook.SaveToFile("CreateNamedRange.xlsx", ExcelVersion.Version2016)

workbook.Dispose()
Edit an Existing Named Range in Excel in Python
After you've created a named range, you may want to modify its name or adjust the cells it refers to.
The following steps explain how to modify the name and cell references of an existing named range in Excel using Spire.XLS for Python:
- Create an object of the Workbook class.
- Load an Excel workbook using the Workbook.LoadFromFile() method.
- Get a specific named range in the workbook using the Workbook.NameRanges[] property.
- Modify the name of the named range using the INamedRange.Name property.
- Modify the cells that the named range refers to using the INamedRange.RefersToRange property.
- Save the resulting file using the Workbook.SaveToFile() method.
- Python
from spire.xls import *
from spire.xls.common import *

# Create an object of the Workbook class
workbook = Workbook()
# Load an Excel workbook
workbook.LoadFromFile("CreateNamedRange.xlsx")

# Get the first named range in the workbook
namedRange = workbook.NameRanges[0]

# Change the name of the named range
namedRange.Name = "MonitorAmount"

# Change the cell range that the named range references
namedRange.RefersToRange = workbook.Worksheets[0].Range["D2"]

# Save the resulting file to a specific location
workbook.SaveToFile("ModifyNamedRange.xlsx", ExcelVersion.Version2016)

workbook.Dispose()

Delete a Named Range from Excel in Python
If you have made significant changes to the structure or layout of your spreadsheet, it might be necessary to delete a named range that is no longer relevant or accurate.
The following steps explain how to delete a named range from Excel using Spire.XLS for Python:
- Create an object of the Workbook class.
- Load an Excel workbook using the Workbook.LoadFromFile() method.
- Remove a specific named range by its index or name using the Workbook.NameRanges.RemoveAt() or Workbook.NameRanges.Remove() method.
- Save the resulting file using the Workbook.SaveToFile() method.
- Python
from spire.xls import *
from spire.common import *

# Create an object of the Workbook class
workbook = Workbook()
# Load an Excel workbook
workbook.LoadFromFile("CreateNamedRange.xlsx")

# Remove the first named range by its index
workbook.NameRanges.RemoveAt(0)

# Remove the first named range by its name
# workbook.NameRanges.Remove("Amount");

# Save the resulting file to a specific location
workbook.SaveToFile("RemoveNamedRange.xlsx", ExcelVersion.Version2016)

workbook.Dispose()

Apply for a Temporary License
If you'd like to remove the evaluation message from the generated documents, or to get rid of the function limitations, please request a 30-day trial license for yourself.
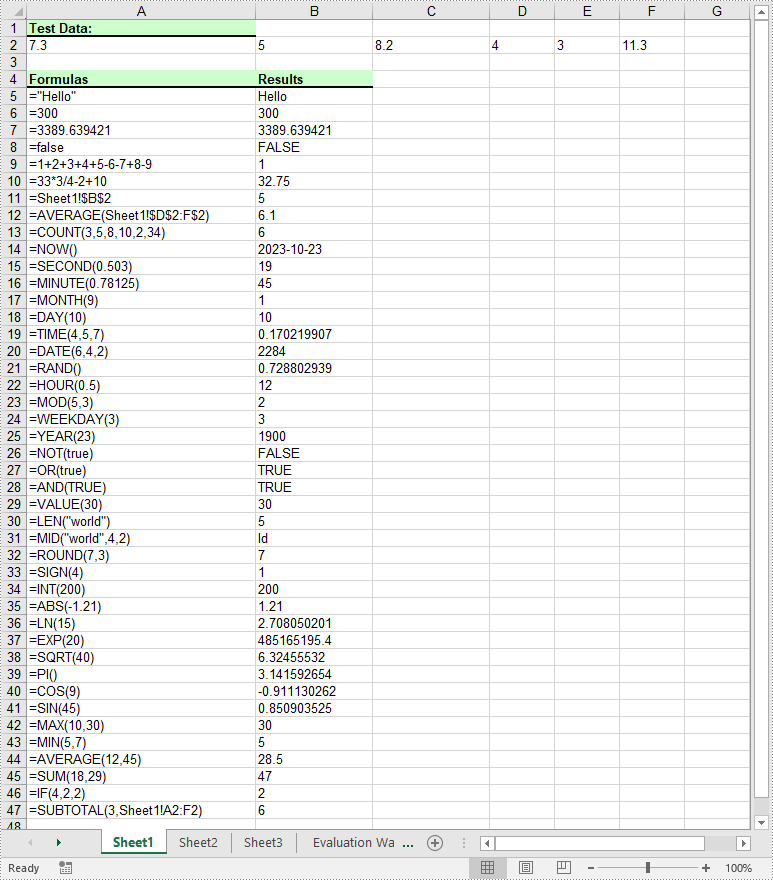
Formulas in Excel are equations or expressions that perform calculations on data within a spreadsheet. They allow you to perform basic arithmetic operations like addition, subtraction, multiplication, and division, as well as more advanced functions like statistical analysis, date and time calculations, and logical evaluations. By incorporating formulas into your Excel spreadsheets, you can save time, eliminate errors, and gain valuable insights from your data. In this article, we will demonstrate how to add or read formulas in Excel in Python using Spire.XLS for Python.
Install Spire.XLS for Python
This scenario requires Spire.XLS for Python and plum-dispatch v1.7.4. They can be easily installed in your Windows through the following pip command.
pip install Spire.XLS
If you are unsure how to install, please refer to this tutorial: How to Install Spire.XLS for Python on Windows
Add Formulas to Excel in Python
Spire.XLS for Python offers the Worksheet.Range[rowIndex, columnIndex].Formula property to add formulas to specific cells in an Excel worksheet. The detailed steps are as follows.
- Create an object of the Workbook class.
- Get a specific worksheet by its index using the Workbook.Worksheets[sheetIndex] property.
- Add some text and numeric data to specific cells of the worksheet using the Worksheet.Range[rowIndex, columnIndex].Text and Worksheet.Range[rowIndex, columnIndex].NumberValue properties.
- Add text and formulas to specific cells of the worksheet using the Worksheet.Range[rowIndex, columnIndex].Text and Worksheet.Range[rowIndex, columnIndex].Formula properties.
- Save the result file using the Workbook.SaveToFile() method.
- Python
from spire.xls import *
from spire.xls.common import *

# Create an object of the Workbook class
workbook = Workbook()

# Get the first worksheet
sheet = workbook.Worksheets[0]

# Declare two variables: currentRow, currentFormula
currentRow = 1
currentFormula = ""

# Add text to the worksheet and set cell style
sheet.Range[currentRow, 1].Text = "Test Data:"
sheet.Range[currentRow, 1].Style.Font.IsBold = True
sheet.Range[currentRow, 1].Style.FillPattern = ExcelPatternType.Solid
sheet.Range[currentRow, 1].Style.KnownColor = ExcelColors.LightGreen1
sheet.Range[currentRow, 1].Style.Borders[BordersLineType.EdgeBottom].LineStyle = LineStyleType.Medium
currentRow += 1

# Add some numeric data to the worksheet
sheet.Range[currentRow, 1].NumberValue = 7.3
sheet.Range[currentRow, 2].NumberValue = 5
sheet.Range[currentRow, 3].NumberValue = 8.2
sheet.Range[currentRow, 4].NumberValue = 4
sheet.Range[currentRow, 5].NumberValue = 3
sheet.Range[currentRow, 6].NumberValue = 11.3
currentRow += 2

# Add text to the worksheet and set cell style
sheet.Range[currentRow, 1].Text = "Formulas"
sheet.Range[currentRow, 2].Text = "Results"
sheet.Range[currentRow, 1, currentRow, 2].Style.Font.IsBold = True
sheet.Range[currentRow, 1, currentRow, 2].Style.KnownColor = ExcelColors.LightGreen1
sheet.Range[currentRow, 1, currentRow, 2].Style.FillPattern = ExcelPatternType.Solid
sheet.Range[currentRow, 1, currentRow, 2].Style.Borders[BordersLineType.EdgeBottom].LineStyle = LineStyleType.Medium
currentRow += 1

# Add text and formulas to the worksheet
# Str
currentFormula = "=\"Hello\""
sheet.Range[currentRow, 1].Text = "'" + currentFormula
sheet.Range[currentRow, 2].Formula = currentFormula
currentRow += 1

# Int
currentFormula = "=300"
sheet.Range[currentRow, 1].Text = "'" + currentFormula
sheet.Range[currentRow, 2].Formula = currentFormula
currentRow += 1

# Float
currentFormula = "=3389.639421"
sheet.Range[currentRow, 1].Text = "'" + currentFormula
sheet.Range[currentRow, 2].Formula = currentFormula
currentRow += 1

# Bool
currentFormula = "=false"
sheet.Range[currentRow, 1].Text = "'" + currentFormula
sheet.Range[currentRow, 2].Formula = currentFormula
currentRow += 1

# Expressions
currentFormula = "=1+2+3+4+5-6-7+8-9"
sheet.Range[currentRow, 1].Text = "'" + currentFormula
sheet.Range[currentRow, 2].Formula = currentFormula
currentRow += 1

currentFormula = "=33*3/4-2+10"
sheet.Range[currentRow, 1].Text = "'" + currentFormula
sheet.Range[currentRow, 2].Formula = currentFormula
currentRow += 1

# Cell reference
currentFormula = "=Sheet1!$B$2"
sheet.Range[currentRow, 1].Text = "'" + currentFormula
sheet.Range[currentRow, 2].Formula = currentFormula
currentRow += 1

# Functions
# AVERAGE
currentFormula = "=AVERAGE(Sheet1!$D$2:F$2)"
sheet.Range[currentRow, 1].Text = "'" + currentFormula
sheet.Range[currentRow, 2].Formula = currentFormula
currentRow += 1

# COUNT
currentFormula = "=COUNT(3,5,8,10,2,34)"
sheet.Range[currentRow, 1].Text = "'" + currentFormula
sheet.Range[currentRow, 2].Formula = currentFormula
currentRow += 1

# NOW
currentFormula = "=NOW()"
sheet.Range[currentRow, 1].Text = "'" + currentFormula
sheet.Range[currentRow, 2].Formula = currentFormula
sheet.Range[currentRow, 2].Style.NumberFormat = "yyyy-MM-DD"
currentRow += 1

# SECOND
currentFormula = "=SECOND(0.503)"
sheet.Range[currentRow, 1].Text = "'" + currentFormula
sheet.Range[currentRow, 2].Formula = currentFormula
currentRow += 1

# MINUTE
currentFormula = "=MINUTE(0.78125)"
sheet.Range[currentRow, 1].Text = "'" + currentFormula
sheet.Range[currentRow, 2].Formula = currentFormula
currentRow += 1

# MONTH
currentFormula = "=MONTH(9)"
sheet.Range[currentRow, 1].Text = "'" + currentFormula
sheet.Range[currentRow, 2].Formula = currentFormula
currentRow += 1

# DAY
currentFormula = "=DAY(10)"
sheet.Range[currentRow, 1].Text = "'" + currentFormula
sheet.Range[currentRow, 2].Formula = currentFormula
currentRow += 1

# TIME
currentFormula = "=TIME(4,5,7)"
sheet.Range[currentRow, 1].Text = "'" + currentFormula
sheet.Range[currentRow, 2].Formula = currentFormula
currentRow += 1

# DATE
currentFormula = "=DATE(6,4,2)"
sheet.Range[currentRow, 1].Text = "'" + currentFormula
sheet.Range[currentRow, 2].Formula = currentFormula
currentRow += 1

# RAND
currentFormula = "=RAND()"
sheet.Range[currentRow, 1].Text = "'" + currentFormula
sheet.Range[currentRow, 2].Formula = currentFormula
currentRow += 1

# HOUR
currentFormula = "=HOUR(0.5)"
sheet.Range[currentRow, 1].Text = "'" + currentFormula
sheet.Range[currentRow, 2].Formula = currentFormula
currentRow += 1

# MOD
currentFormula = "=MOD(5,3)"
sheet.Range[currentRow, 1].Text = "'" + currentFormula
sheet.Range[currentRow, 2].Formula = currentFormula
currentRow += 1

# WEEKDAY
currentFormula = "=WEEKDAY(3)"
sheet.Range[currentRow, 1].Text = "'" + currentFormula
sheet.Range[currentRow, 2].Formula = currentFormula
currentRow += 1

# YEAR
currentFormula = "=YEAR(23)"
sheet.Range[currentRow, 1].Text = "'" + currentFormula
sheet.Range[currentRow, 2].Formula = currentFormula
currentRow += 1

# NOT
currentFormula = "=NOT(true)"
sheet.Range[currentRow, 1].Text = "'" + currentFormula
sheet.Range[currentRow, 2].Formula = currentFormula
currentRow += 1

# OR
currentFormula = "=OR(true)"
sheet.Range[currentRow, 1].Text = "'" + currentFormula
sheet.Range[currentRow, 2].Formula = currentFormula
currentRow += 1

# AND
currentFormula = "=AND(TRUE)"
sheet.Range[currentRow, 1].Text = "'" + currentFormula
sheet.Range[currentRow, 2].Formula = currentFormula
currentRow += 1

# VALUE
currentFormula = "=VALUE(30)"
sheet.Range[currentRow, 1].Text = "'" + currentFormula
sheet.Range[currentRow, 2].Formula = currentFormula
currentRow += 1

# LEN
currentFormula = "=LEN(\"world\")"
sheet.Range[currentRow, 1].Text = "'" + currentFormula
sheet.Range[currentRow, 2].Formula = currentFormula
currentRow += 1

# MID
currentFormula = "=MID(\"world\",4,2)"
sheet.Range[currentRow, 1].Text = "'" + currentFormula
sheet.Range[currentRow, 2].Formula = currentFormula
currentRow += 1

# ROUND
currentFormula = "=ROUND(7,3)"
sheet.Range[currentRow, 1].Text = "'" + currentFormula
sheet.Range[currentRow, 2].Formula = currentFormula
currentRow += 1

# SIGN
currentFormula = "=SIGN(4)"
sheet.Range[currentRow, 1].Text = "'" + currentFormula
sheet.Range[currentRow, 2].Formula = currentFormula
currentRow += 1

# INT
currentFormula = "=INT(200)"
sheet.Range[currentRow, 1].Text = "'" + currentFormula
sheet.Range[currentRow, 2].Formula = currentFormula
currentRow += 1

# ABS
currentFormula = "=ABS(-1.21)"
sheet.Range[currentRow, 1].Text = "'" + currentFormula
sheet.Range[currentRow, 2].Formula = currentFormula
currentRow += 1

# LN
currentFormula = "=LN(15)"
sheet.Range[currentRow, 1].Text = "'" + currentFormula
sheet.Range[currentRow, 2].Formula = currentFormula
currentRow += 1

# EXP
currentFormula = "=EXP(20)"
sheet.Range[currentRow, 1].Text = "'" + currentFormula
sheet.Range[currentRow, 2].Formula = currentFormula
currentRow += 1

# SQRT
currentFormula = "=SQRT(40)"
sheet.Range[currentRow, 1].Text = "'" + currentFormula
sheet.Range[currentRow, 2].Formula = currentFormula
currentRow += 1

# PI
currentFormula = "=PI()"
sheet.Range[currentRow, 1].Text = "'" + currentFormula
sheet.Range[currentRow, 2].Formula = currentFormula
currentRow += 1

# COS
currentFormula = "=COS(9)"
sheet.Range[currentRow, 1].Text = "'" + currentFormula
sheet.Range[currentRow, 2].Formula = currentFormula
currentRow += 1

# SIN
currentFormula = "=SIN(45)"
sheet.Range[currentRow, 1].Text = "'" + currentFormula
sheet.Range[currentRow, 2].Formula = currentFormula
currentRow += 1

# MAX
currentFormula = "=MAX(10,30)"
sheet.Range[currentRow, 1].Text = "'" + currentFormula
sheet.Range[currentRow, 2].Formula = currentFormula
currentRow += 1

# MIN
currentFormula = "=MIN(5,7)"
sheet.Range[currentRow, 1].Text = "'" + currentFormula
sheet.Range[currentRow, 2].Formula = currentFormula
currentRow += 1

# AVERAGE
currentFormula = "=AVERAGE(12,45)"
sheet.Range[currentRow, 1].Text = "'" + currentFormula
sheet.Range[currentRow, 2].Formula = currentFormula
currentRow += 1

# SUM
currentFormula = "=SUM(18,29)"
sheet.Range[currentRow, 1].Text = "'" + currentFormula
sheet.Range[currentRow, 2].Formula = currentFormula
currentRow += 1

# IF
currentFormula = "=IF(4,2,2)"
sheet.Range[currentRow, 1].Text = "'" + currentFormula
sheet.Range[currentRow, 2].Formula = currentFormula
currentRow += 1

# SUBTOTAL
currentFormula = "=SUBTOTAL(3,Sheet1!A2:F2)"
sheet.Range[currentRow, 1].Text = "'" + currentFormula
sheet.Range[currentRow, 2].Formula = currentFormula
currentRow += 1

# Set width of the 1st, 2nd and 3rd columns
sheet.SetColumnWidth(1, 32)
sheet.SetColumnWidth(2, 16)
sheet.SetColumnWidth(3, 16)

# Create a cell style
style = workbook.Styles.Add("Style")
# Set the horizontal alignment as left
style.HorizontalAlignment = HorizontalAlignType.Left
# Apply the style to the worksheet
sheet.ApplyStyle(style)

# Save the result file
workbook.SaveToFile("AddFormulas.xlsx", ExcelVersion.Version2016)
workbook.Dispose()
Read Formulas in Excel in Python
To read formulas in an Excel worksheet, you need to loop through all the cells in the worksheet, after that, find the cells containing formulas using the Cell.HasFormula property, and then get the formulas of the cells using the CellRange.Formula property. The detailed steps are as follows.
- Create an object of the Workbook class.
- Load an Excel file using the Workbook.LoadFromFile() method.
- Get a specific worksheet by its index using the Workbook.Worksheets[sheetIndex] property.
- Get the used range of the worksheet using the Worksheet.AllocatedRange property.
- Create an empty list.
- Loop through all the cells in the used range.
- Find the cells containing formulas using the Cell.HasFormula property.
- Get the names and the formulas of the cells using the CellRange.RangeAddressLocal and CellRange.Formula properties.
- Append the cell names and formulas to the list.
- Write the items in the list into a text file.
- Python
from spire.xls import *
from spire.xls.common import *

# Create an object of the Workbook class
workbook = Workbook()
# Load an Excel file
workbook.LoadFromFile("AddFormulas.xlsx")

# Get the first worksheet
sheet = workbook.Worksheets[0]

# Get the used range of the worksheet
usedRange = sheet.AllocatedRange

# Create an empty list
list = []

# Loop through the cells in the used range
for cell in usedRange:
    # Check if the cell has a formula
    if(cell.HasFormula):
        # Get the cell name
        cellName = cell.RangeAddressLocal
        # Get the formula
        formula = cell.Formula
        # Append the cell name and formula to the list
        list.append(cellName + " has a formula: " + formula)

# Write the items in the list into a text file
with open("Formulas.txt", "w", encoding = "utf-8") as text_file:
    for item in list:
        text_file.write(item + "\n")

workbook.Dispose()

Apply for a Temporary License
If you'd like to remove the evaluation message from the generated documents, or to get rid of the function limitations, please request a 30-day trial license for yourself.
Images have the power to captivate audiences and enhance their understanding of your content. By adding relevant and visually appealing images to your PowerPoint presentations, you can effectively convey complex ideas and make your presentations more memorable and impactful. In this article, we will explain how to add images to PowerPoint presentations in Python using Spire.Presentation for Python.
Install Spire.Presentation for Python
This scenario requires Spire.Presentation for Python and plum-dispatch v1.7.4. They can be easily installed in your Windows through the following pip command.
pip install Spire.Presentation
If you are unsure how to install, please refer to this tutorial: How to Install Spire.Presentation for Python on Windows
Add an Image to a Slide in Python
Spire.Presentation for Python offers the ISlide.Shapes.AppendEmbedImageByPath() method to add an image to a specific slide. The detailed steps are as follows.
- Create an object of the Presentation class.
- Load a PowerPoint presentation using Presentation.LoadFromFile() method.
- Get a specific slide by its index through Presentation.Slides[index] property.
- Add an image to the slide using ISlide.Shapes.AppendEmbedImageByPath() method.
- Save the resulting presentation using Presentation.SaveToFile() method.
- Python
from spire.presentation.common import *
import math
from spire.presentation import *

inputFile = "Input.pptx"
outputFile = "AddImageToSlide.pptx"

# Create an object of the Presentation class
presentation = Presentation()
# Load a PowerPoint presentation
presentation.LoadFromFile(inputFile)

# Get the first slide
slide = presentation.Slides[0]

# Insert an image into the slide
imageFile = "Image.png"
left = math.trunc(presentation.SlideSize.Size.Width / float(2)) - 280
rect1 = RectangleF.FromLTRB (left, 140, 120 + left, 260)
image = slide.Shapes.AppendEmbedImageByPath (ShapeType.Rectangle, imageFile, rect1)
image.Line.FillType = FillFormatType.none

# Save the resulting presentation
presentation.SaveToFile(outputFile, FileFormat.Pptx2010)
presentation.Dispose()
Add an Image to a Slide Master in Python
A slide master is the top-level slide that governs the formatting and styling of all other slides within the presentation. When you make changes to the slide master, such as adding a logo, modifying the background or changing the font styles, those changes are automatically applied to all slides based on that slide master. If you want an image to appear on all your slides, you can add it to the slide master.
Spire.Presentation for Python offers the IMasterSlide.Shapes.AppendEmbedImageByPath() method to add an image to a slide master. The detailed steps are as follows.
- Create an object of the Presentation class.
- Load a PowerPoint presentation using Presentation.LoadFromFile() method.
- Get a specific slide master by its index through Presentation.Masters[index] property.
- Add an image to the slide master using IMasterSlide.Shapes.AppendEmbedImageByPath() method.
- Save the resulting presentation using Presentation.SaveToFile() method.
- Python
from spire.presentation.common import *
import math
from spire.presentation import *

inputFile = "Input1.pptx"
outputFile = "AddImageToSlideMaster.pptx"

# Create an object of the Presentation class
presentation = Presentation()
# Load a PowerPoint presentation
presentation.LoadFromFile(inputFile)

# Get the first slide master
master = presentation.Masters[0]

# Insert an image into the slide master
imageFile = "Logo.png"
rect1 = RectangleF.FromLTRB (40, 40, 80, 80)
image = master.Shapes.AppendEmbedImageByPath (ShapeType.Rectangle, imageFile, rect1)
image.Line.FillType = FillFormatType.none

# Save the resulting presentation
presentation.SaveToFile(outputFile, FileFormat.Pptx2010)
presentation.Dispose()

Apply for a Temporary License
If you'd like to remove the evaluation message from the generated documents, or to get rid of the function limitations, please request a 30-day trial license for yourself.
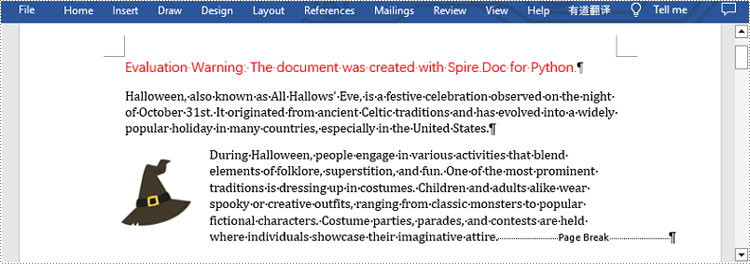
A page break is a formatting element used in documents to indicate the end of one page and the beginning of a new page. It is typically represented by a horizontal line or other visual indicator that separates content into different pages. This feature is commonly used when creating lengthy documents such as reports, essays, or books to enhance the overall layout and readability. In this article, you will learn how to how to insert page break into Word documents in Python using Spire.Doc for Python.
Install Spire.Doc for Python
This scenario requires Spire.Doc for Python and plum-dispatch v1.7.4. They can be easily installed in your Windows through the following pip command.
pip install Spire.Doc
If you are unsure how to install, please refer to this tutorial: How to Install Spire.Doc for Python on Windows
Insert Page Break after a Specific Paragraph
Spire.Doc for Python provides Paragraph.AppendBreak(BreakType.PageBreak) method to insert a page break after a specific paragraph. The following are detailed steps.
- Create an object of Document class.
- Load a sample file from disk using Document.LoadFromFile() method.
- Get the first section of this file by Document.Sections[sectionIndex] property.
- Get the second paragraph in the section by Section.Paragraphs[paragraphIndex] property.
- Insert a page break after this paragraph using Paragraph.AppendBreak(BreakType.PageBreak) method.
- Save the result file using Document.SaveToFile() method.
- Python
from spire.doc import *
from spire.doc.common import *

inputFile =  "sample.docx"
outputFile = "InsertPageBreak.docx"

#Create an object of Document class
document = Document()

#Load a sample file from disk
document.LoadFromFile(inputFile)

#Insert a page break after this paragraph
paragraph.AppendBreak(BreakType.PageBreak)

#Save the result file
document.SaveToFile(outputFile, FileFormat.Docx2013)
document.Close()
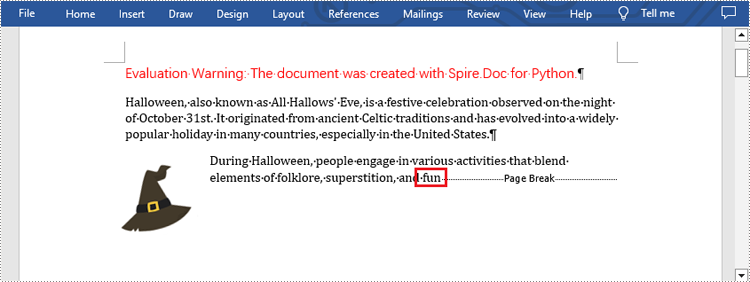
Insert Page Break after a Specific Text
What's more, you are also allowed to insert page break after a specific text by using Paragraph.ChildObjects.Insert() method provided by this library. The following are detailed steps.
- Create an object of Document class.
- Load a sample file from disk using Document.LoadFromFile() method.
- Find a specific text using Document.FindAllString() method.
- Loop through all searched text and access the text range of it by calling TextSelection.GetAsOneRange() method.
- Get the paragraph where the text range is located by ParagraphBase.OwnerParagraph property.
- Get the position index of the text range in the paragraph using Paragraph.ChildObjects.IndexOf() method.
- Create an object of Break class to create a page break.
- Insert page break after the searched text using Paragraph.ChildObjects.Insert() method.
- Save the result file using Document.SaveToFile() method.
- Python
from spire.doc import *
from spire.doc.common import *

inputFile = "sample.docx"
outputFile =  "InsertPageBreakAfterText.docx"

#Create an object of Document class
document = Document()

#Load a sample file from disk
document.LoadFromFile(inputFile)

#Find the specified text
selection = document.FindAllString("fun", True, True)

#Loop through all searched text
for ts in selection:

    #Get the text range of the searched text
    range = ts.GetAsOneRange()

    #Get the paragraph where the text range is located
    paragraph = range.OwnerParagraph

    #Get the position index of the text range in the paragraph
    index = paragraph.ChildObjects.IndexOf(range)

    #Create an object of Break class
    pageBreak = Break(document, BreakType.PageBreak)

    #Insert page break after the searched text
    paragraph.ChildObjects.Insert(index + 1, pageBreak)

#Save the result file
document.SaveToFile(outputFile, FileFormat.Docx2013)
document.Close()
Apply for a Temporary License
If you'd like to remove the evaluation message from the generated documents, or to get rid of the function limitations, please request a 30-day trial license for yourself.
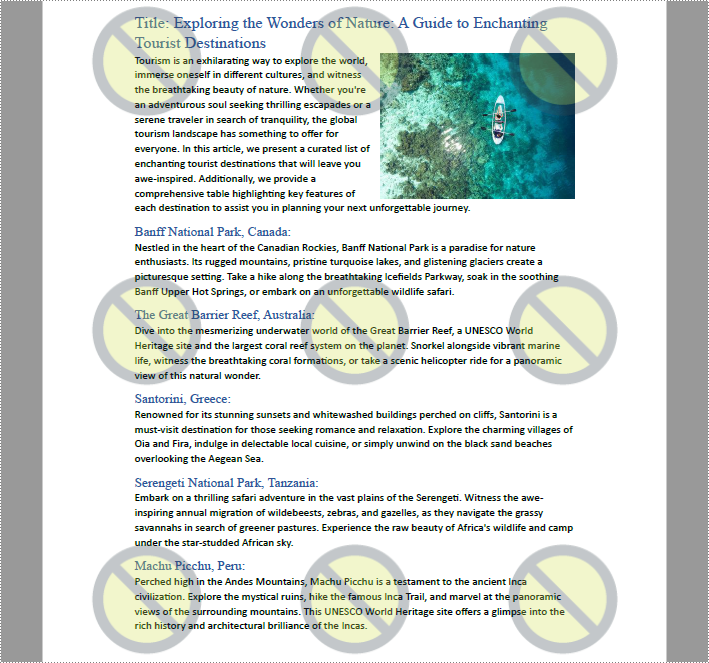
Image watermarks are frequently found on shared documents. Unlike text watermarks, image watermarks provide a simpler and less intrusive way to emphasize copyright, ownership, and confidentiality by displaying company logos, trademarks, warning icons, etc. In addition, adding image watermarks to PDF documents can also help brand promotion and enhance the visual appeal of the documents. This article will explain how to insert image watermarks to PDF documents using Spire.PDF for Python in Python programs.
Install Spire.PDF for Python
This scenario requires Spire.PDF for Python and plum-dispatch v1.7.4. They can be easily installed in your Windows through the following pip commands.
pip install Spire.PDF
If you are unsure how to install, please refer to this tutorial: How to Install Spire.PDF for Python on Windows
Add Single Image Watermarks to PDF Documents
Single image watermarks are transparent images at the center of PDF pages. With Spire.PDF for Python, users can draw a specified image as a watermark on any PDF page. The detailed steps are as follows:
- Create an object of PdfDocument class.
- Load a PDF document using PdfDocument.LoadFromFile() method.
- Load the watermark image using PdfImage.FromFile() method.
- Loop through the pages in the document to add the watermark.
- Get a page using PdfDocument.Pages.get_Item() method.
- Set the transparency of the watermark using PdfPageBase.Canvas.SetTransparency() method.
- Draw the watermark image in the center of the page using PdfPageBase.Canvas.DrawImage() method.
- Save the document using PdfDocument.SaveToFile() method.
- Python
from spire.pdf import *
from spire.pdf.common import *

# Create an object of PdfDocument class
pdf = PdfDocument()

# Load a PDF document
pdf.LoadFromFile("Sample.pdf")

# Load the watermark image
image = PdfImage.FromFile("watermark.png")

# Get the width and height of the image
imageWidth = float(image.Width)
imageHeight = float(image.Height)

# Loop through the pages in the document
for i in range(pdf.Pages.Count):
    # Get a page
    page = pdf.Pages.get_Item(i)
    # Set the transparency of the watermark
    page.Canvas.SetTransparency(0.3)
    # Get the width and height of the page
    pageWidth = page.ActualSize.Width
    pageHeight = page.ActualSize.Height
    # Draw the watermark image on the page
    page.Canvas.DrawImage(image, pageWidth/2 - imageWidth/2, pageHeight/2 - imageHeight/2, imageWidth, imageHeight)

# Save the document
pdf.SaveToFile("output/SingleImageWatermark.pdf")
pdf.Close()
Add Repeating Image Watermarks to PDF Documents
Repeating image watermarks are images repeated regularly on PDF pages. Drawing repeated image watermarks on PDF pages with Spire.PDF for Python involves the use of the PdfTillingBrush class. Below are the detailed steps:
- Create an object of PdfDocument class.
- Load a PDF document using PdfDocument.LoadFromFile() method.
- Load the watermark image using PdfImage.FromFile() method.
- Loop through the pages in the document to add the watermark.
- Get a page using PdfDocument.Pages.get_Item() method.
- Create an object of PdfTilingBrush class and set its size to determine the number of repetitions of the watermark.
- Set the transparency of the watermark using PdfTillingBrush.Graphics.SetTransparency() method.
- Translate the coordinate system to the specified position using PdfTillingBrush.Graphics.TranslateTransform() method to make the watermark displayed in the center of each repetition.
- Draw the watermark image on the tilling brush using PdfTillingBrush.Graphics.DrawImage() method.
- Draw the watermark on the page using PdfPageBase.Canvas.DrawRectangle() method.
- Save the document using PdfDocument.SaveToFile() method.
- Python
from spire.pdf.common import *
from spire.pdf import *

# Create an object of PdfDocument class
pdf = PdfDocument()

# Load a PDF document
pdf.LoadFromFile("Sample.pdf")

# Load the watermark image
image = PdfImage.FromFile("watermark.png")

# Loop through the pages of the document
for i in range(pdf.Pages.Count):
    # Get a page
    page = pdf.Pages.get_Item(i)
    # Create an object of PdfTilingBrush class and set its size
    brush = PdfTilingBrush(SizeF(page.Canvas.Size.Width / float(3), page.Canvas.Size.Height / float(3)))
    # Set the transparency of the watermark
    brush.Graphics.SetTransparency(0.3)
    brush.Graphics.Save()
    # Translate the coordinate to the specified position
    brush.Graphics.TranslateTransform(brush.Size.Width/2 - image.Width/2, brush.Size.Height/2 - image.Height/2)
    # Draw the watermark image on the brush
    brush.Graphics.DrawImage(image, 0.0, 0.0, float(image.Width), float(image.Height))
    brush.Graphics.Restore()
    # Draw the watermark on the page
    page.Canvas.DrawRectangle(brush, RectangleF(PointF(0.0, 0.0), page.Canvas.Size))

# Save the PDF document
pdf.SaveToFile("output/RepeatingImageWatermark.pdf", FileFormat.PDF)
pdf.Close()
Apply for a Temporary License
If you'd like to remove the evaluation message from the generated documents, or to get rid of the function limitations, please request a 30-day trial license for yourself.
Headers and footers are areas located at the top and bottom of each page in a document, used to add additional information or elements. Headers typically include document titles, company names, dates, and other information, while footers often contain page numbers, file paths, copyright statements, and other details. By setting headers and footers in Excel, documents can be made more professional and organized. In this article, we will show you how to add headers and footers to Excel by using Spire.XLS for Python.
Spire.XLS for Python provides the PageSetup class to work with the page setup in Excel including headers and footers. Specifically, it contains LeftHeader property, CenterHeader property, RightHeader property, LeftFooter property, etc. to represent the left section, center section and right section of a header or footer. To add fields to headers or footers, or to apply formatting to text, you'll need to use the scripts listed in the following table.
| Script | Description |
| &P | The current page numbers. |
| &N | The total number of pages. |
| &D | The current data. |
| &T | The current time. |
| &G | A picture. |
| &A | The worksheet name. |
| &F | The file name. |
| &B | Make text bold. |
| &I | Italicize text. |
| &U | Underline text. |
| &"font name" | Represents a font name, for example, &"Arial". |
| & + Integer | Represents font size, for example, &12. |
| &K + Hex color code | Represents font color, for example, &KFF0000. |
Install Spire.XLS for Python
This scenario requires Spire.XLS for Python and plum-dispatch v1.7.4. They can be easily installed in your Windows through the following pip command.
pip install Spire.XLS
If you are unsure how to install, please refer to this tutorial: How to Install Spire.XLS for Python on Windows
Add Text to the Header or Footer in Excel
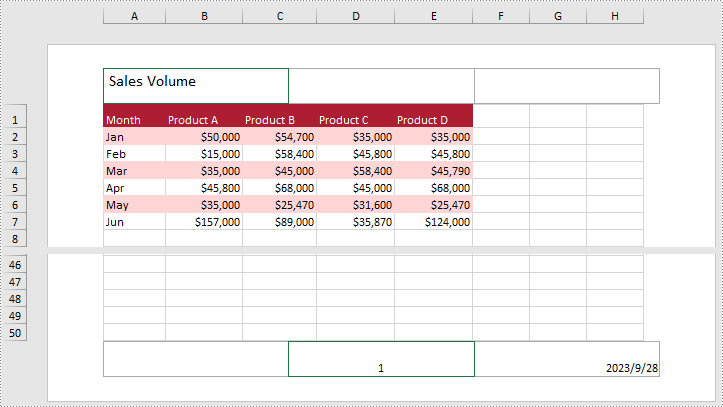
Spire.XLS for Python allows you to add formatted text to the certain section of the header or footer. In this way, you can set different elements in Excel, such as file titles, page numbers or date. Here are the detailed steps.
- Create an object of Workbook class.
- Load a sample Excel file using Workbook.LoadFromFile() method.
- Get the specific worksheet by Workbook.Worksheets[index] property.
- Add text to the left header by setting PageSetup.LeftHeader property as you like.
- Add page number to the center footer by setting PageSetup.CenterFooter property to &P.
- Add the current date to the right footer by setting PageSetup.RightFooter property to &D.
- Save the result file using Workbook.SaveToFile() method.
- Python
from spire.xls import *
from spire.xls.common import *

inputFile = "sample.xlsx"
outputFile = "TextHeaderFooter.xlsx"

#Create an object of Workbook class
workbook = Workbook()

#Load a sample file from disk
workbook.LoadFromFile(inputFile)

#Get the first worksheet of this file
Worksheet = workbook.Worksheets[0]

#Add text to the left header
Worksheet.PageSetup.LeftHeader = "&\"Calibri\"&14 Sales Volume"

#Add page number to the center footer
Worksheet.PageSetup.CenterFooter = "&P"

#Add the current date to the right footer
Worksheet.PageSetup.RightFooter = "&D"

#Set the view mode of the sheet
Worksheet.ViewMode = ViewMode.Layout

#Save the result file
workbook.SaveToFile(outputFile, ExcelVersion.Version2010)
workbook.Dispose()
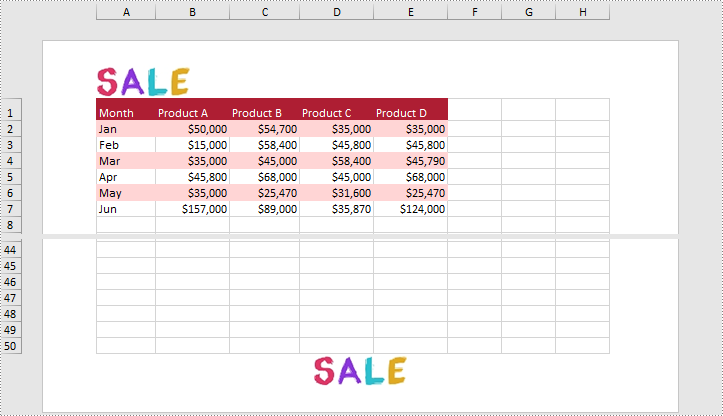
Add Images to the Header or Footer in Excel
What's more, Spire.XLS for Python also supports adding images to the header or footer. The following are detailed steps.
- Create an object of Workbook class.
- Load a sample Excel file using Workbook.LoadFromFile() method.
- Get the specific worksheet by Workbook.Worksheets[index] property.
- Load an image and set it as the image source of the left header by PageSetup.LeftHeaderImage property.
- Display the image in the left header section by setting PageSetup.LeftHeader property to “&G”.
- Set it as the image source of the center footer by PageSetup.CenterFooterImage property.
- Display the image in the center footer section by setting PageSetup.CenterFooter property to “&G”.
- Save the result file using Workbook.SaveToFile() method.
- Python
from spire.xls import *
from spire.xls.common import *

inputFile = "sample.xlsx"
inputImage = "Logo.png"
outputFile = "ImageHeaderFooter.xlsx"

#Create an object of workbook class
workbook = Workbook()

#Load a sample file from disk
workbook.LoadFromFile(inputFile)

#Get the first sheet of this file
sheet = workbook.Worksheets[0]

#Load an image from disk
image = Image.FromFile(inputImage)

#Add the image to the left header
sheet.PageSetup.LeftHeaderImage = image
sheet.PageSetup.LeftHeader = "&G"

#Add the image to the center footer
sheet.PageSetup.CenterFooterImage = image
sheet.PageSetup.CenterFooter = "&G"

#Set the view mode of the sheet
sheet.ViewMode = ViewMode.Layout

#Save the result file
workbook.SaveToFile(outputFile, ExcelVersion.Version2010)
workbook.Dispose()
Apply for a Temporary License
If you'd like to remove the evaluation message from the generated documents, or to get rid of the function limitations, please request a 30-day trial license for yourself.
Watermarking is a critical technique for securing documents, indicating ownership, and preventing unauthorized copying. Whether you're distributing drafts or branding final deliverables, applying watermarks helps protect your content effectively. In this tutorial, you’ll learn how to add watermarks to a PDF in Python using the powerful and easy-to-use Spire.PDF for Python library.
We'll walk through how to insert both text and image watermarks , handle transparency and positioning, and resolve common issues — all with clean, well-documented code examples.
Table of Contents:
- Python Library for Watermarking PDFs
- Adding a Text Watermark to a PDF
- Adding an Image Watermark to a PDF
- Troubleshooting Common Issues
- Wrapping Up
- FAQs
Python Library for Watermarking PDFs
Spire.PDF for Python is a robust library that provides comprehensive PDF manipulation capabilities. For watermarking specifically, it offers:
- High precision in watermark placement and rotation.
- Flexible transparency controls.
- Support for both text and image watermarks.
- Ability to apply watermarks to specific pages or entire documents.
- Preservation of original PDF quality.
Before proceeding, ensure you have Spire.PDF installed in your Python environment:
pip install spire.pdf
Adding a Text Watermark to a PDF
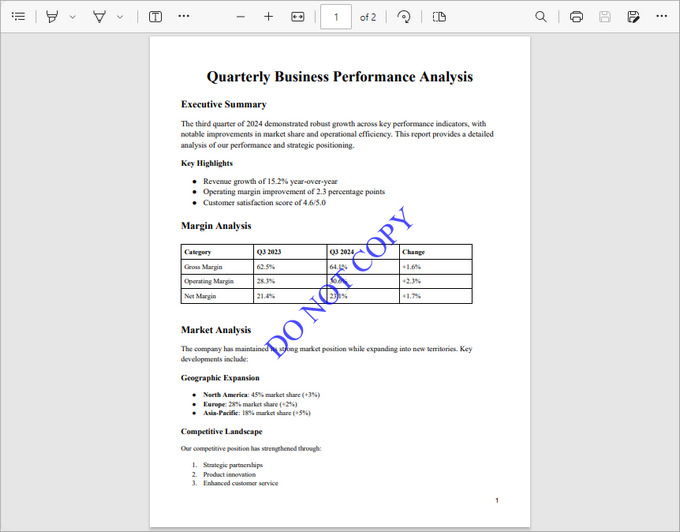
This code snippet demonstrates how to add a diagonal "DO NOT COPY" watermark to each page of a PDF file. It manages the size, color, positioning, rotation, and transparency of the watermark for a professional result.
from spire.pdf import *
from spire.pdf.common import *
import math

# Create an object of PdfDocument class
doc = PdfDocument()

# Load a PDF document from the specified path
doc.LoadFromFile("C:\\Users\\Administrator\\Desktop\\Input.pdf")

# Create an object of PdfTrueTypeFont class for the watermark font
font = PdfTrueTypeFont("Times New Roman", 48.0, 0, True)

# Specify the watermark text
text = "DO NOT COPY"

# Measure the dimensions of the text to ensure proper positioning
text_width = font.MeasureString(text).Width
text_height = font.MeasureString(text).Height

# Loop through each page in the document
for i in range(doc.Pages.Count):

    # Get the current page
    page = doc.Pages.get_Item(i)

    # Save the current canvas state
    state = page.Canvas.Save()

    # Calculate the center coordinates of the page
    x = page.Canvas.Size.Width  / 2
    y = page.Canvas.Size.Height / 2

    # Translate the coodinate system to the center so that the center of the page becomes the origin (0, 0)
    page.Canvas.TranslateTransform(x, y)

    # Rotate the canvas 45 degrees counterclockwise for the watermark
    page.Canvas.RotateTransform(-45.0)

    # Set the transparency of the watermark
    page.Canvas.SetTransparency(0.7)

    # Draw the watermark text at the centered position using negative offsets
    page.Canvas.DrawString(text, font, PdfBrushes.get_Blue(), PointF(-text_width / 2, -text_height / 2))

    # Restore the canvas state to prevent transformations from affecting subsequent drawings
    page.Canvas.Restore(state)

# Save the modified document to a new PDF file
doc.SaveToFile("output/TextWatermark.pdf")

# Dispose resources
doc.Dispose()
Breakdown of the Code :
- Load the PDF Document : The script loads an input PDF file from a specified path using the PdfDocument class.
- Configure Watermark Text : A watermark text ("DO NOT COPY") is set with a specific font (Times New Roman, 48pt) and measured for accurate positioning.
- Apply Transformations : For each page, the script:
- Centers the coordinate system.
- Rotates the canvas by 45 degrees counterclockwise.
- Sets transparency (70%) for the watermark.
- Draw the Watermark : The text is drawn at (-text_width / 2, -text_height / 2), which aligns the text perfectly around the center point of the page, regardless of the rotation applied.
- Save the Document : The modified document is saved to a new PDF file.
Output:
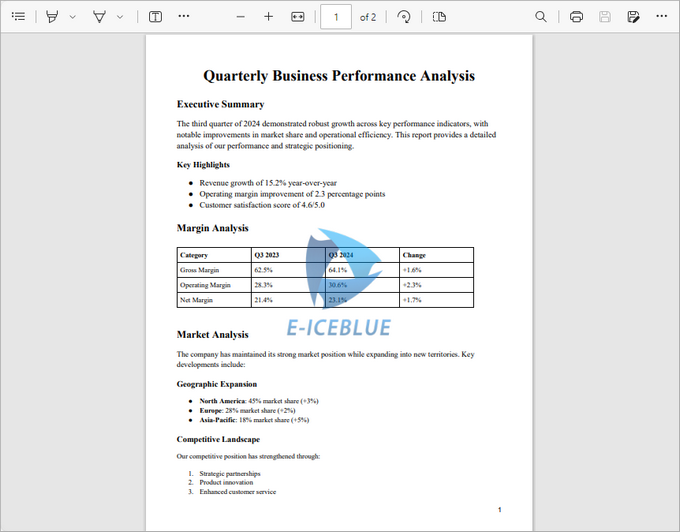
Adding an Image Watermark to a PDF
This code snippet adds a semi-transparent image watermark to each page of a PDF, ensuring proper positioning and a professional appearance.
from spire.pdf import *
from spire.pdf.common import *

# Create an object of PdfDocument class
doc = PdfDocument()

# Load a PDF document from the specified path
doc.LoadFromFile("C:\\Users\\Administrator\\Desktop\\Input.pdf")

# Load the watermark image from the specified path
image = PdfImage.FromFile("C:\\Users\\Administrator\\Desktop\\logo.png")

# Get the width and height of the loaded image for positioning
imageWidth = float(image.Width)
imageHeight = float(image.Height)

# Loop through each page in the document to apply the watermark
for i in range(doc.Pages.Count):
    # Get the current page
    page = doc.Pages.get_Item(i)

    # Set the transparency of the watermark to 50%
    page.Canvas.SetTransparency(0.5)

    # Get the dimensions of the current page
    pageWidth = page.ActualSize.Width
    pageHeight = page.ActualSize.Height

    # Calculate the x and y coordinates to center the image on the page
    x = (pageWidth - imageWidth) / 2
    y = (pageHeight - imageHeight) / 2

    # Draw the image at the calculated center position on the page
    page.Canvas.DrawImage(image, x, y, imageWidth, imageHeight)

# Save the modified document to a new PDF file
doc.SaveToFile("output/ImageWatermark.pdf")

# Dispose resources
doc.Dispose()
Breakdown of the Code :
- Load the PDF Document : The script loads an input PDFfile from a specified path using the PdfDocument class.
- Configure Watermark Image : The watermark image is loaded from a specified path, and its dimensions are retrieved for accurate positioning.
- Apply Transformations : For each page, the script:
- Sets the watermark transparency (50%).
- Calculates the center position of the page for the watermark.
- Draw the Watermark : The image is drawn at the calculated center coordinates, ensuring it is centered on each page.
- Save the Document : The modified document is saved to a new PDF file.
Output:
Apart from watermarks, you can also add stamps to PDFs. Unlike watermarks, which are fixed in place, stamps can be freely moved or deleted, offering greater flexibility in document annotation.
Troubleshooting Common Issues
- Watermark Not Appearing :
- Verify file paths are correct.
- Check transparency isn't set to 0 (fully transparent).
- Ensure coordinates place the watermark within page bounds.
- Quality Issues :
- For text, use higher-quality fonts.
- For images, ensure adequate resolution.
- Rotation Problems :
- Remember that rotation occurs around the current origin point.
- The order of transformations matters (translate then rotate).
Wrapping Up
With Spire.PDF for Python, adding watermarks to PDF documents becomes a simple and powerful process. Whether you need bold "Confidential" text across every page or subtle branding with logos, the library handles it all efficiently. By combining coordinate transformations, transparency settings, and drawing commands, you can create highly customized watermarking workflows tailored to your document's purpose.
FAQs
Q1. Can I add both text and image watermarks to the same PDF?
Yes, you can combine both approaches in a single loop over the PDF pages.
Q2. How can I rotate image watermarks?
Use Canvas.RotateTransform(angle) before drawing the image, similar to the text watermark example.
Q3. Does Spire.PDF support transparent PNGs for watermarks?
Yes, Spire.PDF preserves the transparency of PNG images when used as watermarks.
Q4. Can I apply different watermarks to different pages?
Absolutely. You can implement conditional logic within your page loop to apply different watermarks based on page number or other criteria.
Get a Free License
To fully experience the capabilities of Spire.PDF for Python without any evaluation limitations, you can request a free 30-day trial license.
