
Python (365)
Hiding and showing slides are two practical features in PowerPoint that allow you to control the visibility of slides during a slideshow. Hiding slides is useful when you want to skip certain slides or temporarily remove them from the presentation without deleting them. Whereas showing slides is helpful when you want to re-display the hidden slides. In this article, we will demonstrate how to hide and show slides in a PowerPoint presentation in Python using Spire.Presentation for Python.
- Hide a Specific Slide in PowerPoint in Python
- Show a Hidden Slide in PowerPoint in Python
- Show All Hidden Slides in PowerPoint in Python
Install Spire.Presentation for Python
This scenario requires Spire.Presentation for Python and plum-dispatch v1.7.4. They can be easily installed in your Windows through the following pip command.
pip install Spire.Presentation
If you are unsure how to install, please refer to this tutorial: How to Install Spire.Presentation for Python on Windows
Hide a Specific Slide in PowerPoint in Python
Spire.Presentation for Python provides the ISlide.Hidden property to control the visibility of a slide during a slideshow. If you don’t want a certain slide to be shown, you can hide this slide by setting the ISlide.Hidden property as True. The detailed steps are as follows.
- Create an object of the Presentation class.
- Load a PowerPoint presentation using Presentation.LoadFromFile() method.
- Get a specific slide using Presentation.Slides[index] property.
- Hide the slide by setting the ISlide.Hidden property as True.
- Save the resulting presentation using Presentation.SaveToFile() method.
- Python
from spire.presentation.common import *
from spire.presentation import *

# Create an object of the Presentation class
ppt = Presentation()
# Load a PowerPoint presentation
ppt.LoadFromFile("Sample.pptx")

# Get the second slide and hide it
slide = ppt.Slides[1]
slide.Hidden = True

# Save the resulting presentation to a new .pptx file
ppt.SaveToFile("HideSlide.pptx", FileFormat.Pptx2016)
ppt.Dispose()
Show a Hidden Slide in PowerPoint in Python
To show a hidden slide, you can set the ISlide.Hidden property as False. The detailed steps are as follows.
- Create an object of the Presentation class.
- Load a PowerPoint presentation using Presentation.LoadFromFile() method.
- Get a specific slide using Presentation.Slides[index] property.
- Unhide the slide by setting the ISlide.Hidden property as False.
- Save the resulting presentation using Presentation.SaveToFile() method.
- Python
from spire.presentation.common import *
from spire.presentation import *

# Create an object of the Presentation class
ppt = Presentation()
# Load a PowerPoint presentation
ppt.LoadFromFile("HideSlide.pptx")

# Get the second slide and unhide it
slide = ppt.Slides[1]
slide.Hidden = False

# Save the resulting presentation to a new .pptx file
ppt.SaveToFile("ShowSlide.pptx", FileFormat.Pptx2016)
ppt.Dispose()
Show All Hidden Slides in PowerPoint in Python
To show all hidden slides in a PowerPoint presentation, you need to loop through all the slides in the presentation, then find the hidden slides and unhide them by setting the ISlide.Hidden property as False. The detailed steps are as follows.
- Create an object of the Presentation class.
- Load a PowerPoint presentation using Presentation.LoadFromFile() method.
- Loop through the slides in the presentation.
- Check whether the current slide is hidden or not using ISlide.Hidden property. If the result is true, unhide the slide by setting the ISlide.Hidden property as False.
- Save the resulting presentation using Presentation.SaveToFile() method.
- Python
from spire.presentation.common import *
from spire.presentation import *

# Create an object of the Presentation class
ppt = Presentation()
# Load a PowerPoint presentation
ppt.LoadFromFile("Sample2.pptx")

# Loop through each slide in the presentation
for i in range(ppt.Slides.Count):
    slide = ppt.Slides[i]
    # Check if the slide is hidden
    if(slide.Hidden):
        # Unhide the slide
        slide.Hidden = False

# Save the resulting presentation to a new .pptx file
ppt.SaveToFile("ShowAllHidenSlides.pptx", FileFormat.Pptx2016)
ppt.Dispose()
Apply for a Temporary License
If you'd like to remove the evaluation message from the generated documents, or to get rid of the function limitations, please request a 30-day trial license for yourself.

Converting Word documents (DOCX or DOC) to HTML format is essential when you want to display formatted content on web pages, import legacy documents into content management systems, or generate web previews for DOCX files. HTML’s universal browser compatibility makes it an ideal format for sharing content online.
This guide shows how to convert Word to HTML in Python using Spire.Doc for Python. It covers both basic and advanced conversion techniques with practical examples, helping you handle diverse conversion needs.
Table of Contents
- Why Convert Word to HTML
- Install Word to HTML Converter in Python
- How to Convert Word to HTML Using Python
- Conclusion
- FAQs
Why Convert Word to HTML?
Here are some typical scenarios where converting Word to HTML is beneficial:
- Web publishing: Display Word content in a browser without requiring users to download the document.
- CMS integration: Import Word-based articles into a web-based content system.
- Content preview: Generate HTML previews for Word attachments or document archives.
- Email rendering: Convert DOCX content into HTML-friendly formats for email templates.
Install Word to HTML Converter in Python
Spire.Doc for Python is a professional library designed for Word document processing and conversion. It provides a reliable way to export Word documents to HTML while preserving accurate formatting and layout. 
Benefits of Using Spire.Doc for Word-to-HTML Conversion
- Accurate formatting: Preserves fonts, colors, styles, tables, and images.
- No Office dependency: Does not require Microsoft Word or Office Interop.
- Supports DOCX and DOC: Compatible with both modern and legacy Word formats.
- Customizable output: Fine-tune HTML export settings, including image embedding and CSS styling.
Installation
Install the library from PyPI using the following command:
pip install spire.doc
Need help with the installation? Check this step-by-step guide: How to Install Spire.Doc for Python on Windows.
How to Convert Word to HTML Using Python
This section demonstrates how to convert Word documents to HTML using Spire.Doc for Python. First, you'll see a quick example using default settings for fast export. Then, you'll learn how to customize the HTML output with advanced options.
Quick Conversion with Default Settings
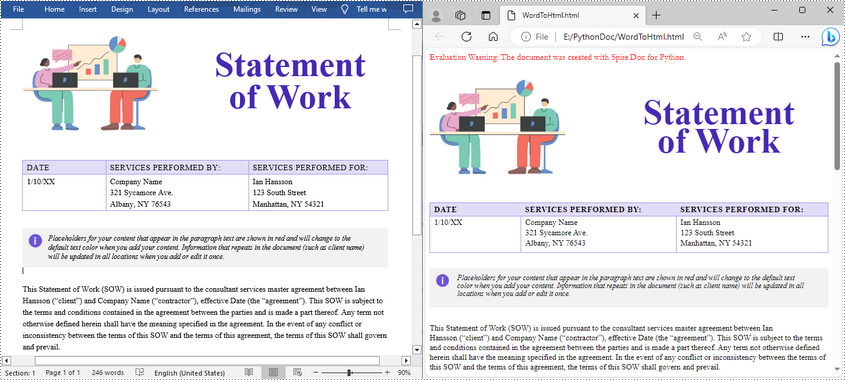
The following code snippet shows how to save a Word document to HTML format using the default export settings. It’s suitable for simple use cases where no customization is needed.
from spire.doc import *
from spire.doc.common import *

# Create a Document instance
document = Document()

# Load a doc or docx document
document.LoadFromFile("Statement.docx")

# Save the document to HTML format
document.SaveToFile("WordToHtml.html", FileFormat.Html)
document.Close()
Advanced Conversion Options
You can customize the HTML export to suit your needs by configuring options such as including headers and footers, linking to an external CSS stylesheet, choosing whether to embed images or save them separately, and exporting form fields as plain text. The example below shows how to set these options.
from spire.doc import *
from spire.doc.common import *

# Create a Document instance
document = Document()

# Load a .docx or .doc document
document.LoadFromFile("Statement.docx")

# Control whether to include headers and footers in the exported HTML
document.HtmlExportOptions.HasHeadersFooters = False

# Specify the name of the CSS file to use for styling the exported HTML
document.HtmlExportOptions.CssStyleSheetFileName = "sample.css"

# Set the CSS stylesheet type to external, so the HTML file links to the specified CSS file instead of embedding styles inline
document.HtmlExportOptions.CssStyleSheetType = CssStyleSheetType.External

# Configure image export: do not embed images inside HTML, save them to a separate folder
document.HtmlExportOptions.ImageEmbedded = False
document.HtmlExportOptions.ImagesPath = "Images/"

# Export form fields as plain text instead of interactive form elements
document.HtmlExportOptions.IsTextInputFormFieldAsText = True

# Save the document as an HTML file
document.SaveToFile("ToHtmlExportOption.html", FileFormat.Html)
document.Close()
Conclusion
Spire.Doc for Python delivers high-fidelity Word-to-HTML conversions without requiring Microsoft Word. Whether for quick exports or customized HTML output, it provides a versatile, dependable solution.
Beyond HTML conversion, Spire.Doc supports a wide range of Word automation tasks such as document merging, text replacement, and PDF conversion, empowering developers to build robust document processing pipelines. To explore these capabilities further, check out the full Python Word programming guide and start enhancing your document workflows today.
FAQs
Q1: Can Spire.Doc convert both DOC and DOCX files to HTML?
A1: Yes, it supports exporting both legacy DOC and modern DOCX formats.
Q2: Is Microsoft Word required for conversion?
A2: No, Spire.Doc works independently without needing Microsoft Word or Office Interop.
Q3: Can images be embedded directly in the HTML instead of saved separately?
A3: Yes, you can embed images directly into the HTML output by setting ImageEmbedded to True. This ensures that all images are included within the HTML file itself, without creating separate image files or folders.
Get a Free License
To fully experience the capabilities of Spire.Doc for Python without any evaluation limitations, you can request a free 30-day trial license.
Adding and deleting slides in PowerPoint are essential actions that allow presenters to control the structure and content of their presentations. Adding slides provides the opportunity to expand and enhance the presentation by introducing new topics or providing supporting information. On the other hand, deleting slides helps streamline the presentation by removing redundant, repetitive, or irrelevant content. In this article, we will demonstrate how to add or delete slides in a PowerPoint Presentation in Python using Spire.Presentation for Python.
- Add a New Slide at the End of the PowerPoint Document in Python
- Insert a New Slide Before a Specific Slide in PowerPoint in Python
- Delete a Specific Slide from a PowerPoint Document in Python
Install Spire.Presentation for Python
This scenario requires Spire.Presentation for Python and plum-dispatch v1.7.4. They can be easily installed in your Windows through the following pip command.
pip install Spire.Presentation
If you are unsure how to install, please refer to this tutorial: How to Install Spire.Presentation for Python on Windows
Add a New Slide at the End of the PowerPoint Document in Python
Spire.Presentation for Python provides the Presentation.Slides.Append() method to add a new slide after the last slide of a PowerPoint presentation. The detailed steps are as follows.
- Create an object of the Presentation class.
- Load a PowerPoint presentation using Presentation.LoadFromFile() method.
- Add a new blank slide at the end of the presentation using Presentation.Slides.Append() method.
- Save the result presentation using Presentation.SaveToFile() method.
- Python
from spire.presentation.common import *
from spire.presentation import *

# Create a Presentation object
presentation = Presentation()

# Load a PowerPoint presentation
presentation.LoadFromFile("Sample.pptx")

# Add a new slide at the end of the presentation
presentation.Slides.Append()

# Save the result presentation to a .pptx file
presentation.SaveToFile("AddSlide.pptx", FileFormat.Pptx2013)
presentation.Dispose()
Insert a New Slide Before a Specific Slide in PowerPoint in Python
You can use the Presentation.Slides.Insert() method to insert a new slide before a specific slide of a PowerPoint presentation. The detailed steps are as follows.
- Create an object of the Presentation class.
- Load a PowerPoint presentation using Presentation.LoadFromFile() method.
- Insert a blank slide before a specific slide using Presentation.Slides.Insert() method.
- Save the result presentation using Presentation.SaveToFile() method.
- Python
from spire.presentation.common import *
from spire.presentation import *

# Create a Presentation object
presentation = Presentation()

# Load a PowerPoint presentation
presentation.LoadFromFile("Sample.pptx")

# Insert a blank slide before the second slide
presentation.Slides.Insert(1)

# Save the result presentation to a .pptx file
presentation.SaveToFile("InsertSlide.pptx", FileFormat.Pptx2013)
presentation.Dispose()
Delete a Specific Slide from a PowerPoint Document in Python
To delete a specific slide from a PowerPoint presentation, you can use the Presentation.Slides.RemoveAt() method. The detailed steps are as follows.
- Create an object of the Presentation class.
- Load a PowerPoint presentation using Presentation.LoadFromFile() method.
- Remove a specific slide from the presentation using Presentation.Slides.RemoveAt() method.
- Save the result presentation using Presentation.SaveToFile() method.
- Python
from spire.presentation.common import *
from spire.presentation import *

# Create a Presentation object
presentation = Presentation()

# Load a PowerPoint presentation
presentation.LoadFromFile("Sample.pptx")

# Remove the first slide
presentation.Slides.RemoveAt(0)

# Save the result presentation to a .pptx file
presentation.SaveToFile("RemoveSlide.pptx", FileFormat.Pptx2013)
presentation.Dispose()
Apply for a Temporary License
If you'd like to remove the evaluation message from the generated documents, or to get rid of the function limitations, please request a 30-day trial license for yourself.
Setting proper margins is an essential step in creating professional Word documents. Margins may seem like a small detail, but they play a vital role in improving the readability and visual appeal of a document. By defining the space around content, margins help maintain a consistent and balanced layout, prevent text from being truncated, and make documents look more organized and aesthetically pleasing. This article will show how to use Spire.Doc for Python to set page margins for Word documents through Python programs.
Install Spire.Doc for Python
This scenario requires Spire.Doc for Python and plum-dispatch v1.7.4. They can be easily installed in your Windows through the following pip command.
pip install Spire.Doc
If you are unsure how to install, please refer to this tutorial: How to Install Spire.Doc for Python on Windows
Set the Page Margins of a Word Document
Spire.Doc for Python provides properties under the Margins class that can be used to set margins for each side of a document separately or to set the same margins for all sides. One important thing to note is that the margins are set based on sections. For consistent margins throughout the document, it is necessary to iterate through each section of the document to set the margins. Below are the detailed steps for setting page margins:
- Create an object of Document class.
- Load a Word document using Document.LoadFromFile() method.
- Loop through the sections of the document.
- Get a section using Document.Sections.get_Item() method.
- Get the margins of the section using Section.PageSetup.Margins property.
- Set the top, bottom, left, and right margin using property under Margins class.
- Python
from spire.doc import *
from spire.doc.common import *

# Create an object of Document class
doc = Document()

# Load a Word document
doc.LoadFromFile("Sample.docx")

# Loop thorugh the sections of document
for i in range(doc.Sections.Count):
    # Get a section
    section = doc.Sections.get_Item(i)
    # Get the margins of the section
    margins = section.PageSetup.Margins
    # Set the top, bottom, left, and right margins
    margins.Top = 17.9
    margins.Bottom = 17.9
    margins.Left = 20.9
    margins.Right = 20.9
    # margins.All = 17.9

# Save the document
doc.SaveToFile("output/SetPageMargins.docx", FileFormat.Auto)
Apply for a Temporary License
If you'd like to remove the evaluation message from the generated documents, or to get rid of the function limitations, please request a 30-day trial license for yourself.
Extract Text from PDF in Python: A Complete Guide with Practical Code Samples
2023-10-09 01:26:32 Written by Administrator
PDF files are everywhere—from contracts and research papers to eBooks and invoices. While they preserve formatting perfectly, extracting text from PDFs can be challenging, especially with large or complex documents. Manual copying is not only slow but often inaccurate.
Whether you’re a developer automating workflows, a data analyst processing content, or simply someone needing quick text extraction, programmatic methods can save you valuable time and effort.
In this comprehensive guide, you’ll learn how to extract text from PDF files in Python using Spire.PDF for Python — a powerful and easy-to-use PDF processing library. We’ll cover extracting all text, targeting specific pages or areas, ignoring hidden text, and capturing layout details such as text position and size.
Table of Contents
- Why Extract Text from PDF Files
- Install Spire.PDF for Python: Powerful PDF Parser Library
- Extract Text from PDF (Basic Example)
- Advanced Text Extraction Features
- Conclusion
- FAQs
Why Extract Text from PDF Files
Text extraction from PDFs is essential for many use cases, including:
- Automating data entry and document processing
- Enabling full-text search and indexing
- Performing data analysis on reports and surveys
- Extracting content for machine learning and NLP
- Converting PDFs to other editable formats
Install Spire.PDF for Python: Powerful PDF Parser Library
Spire.PDF for Python is a comprehensive and easy-to-use PDF processing library that simplifies all your PDF manipulation needs. It offers advanced text extraction capabilities that work seamlessly with both simple and complex PDF documents.
Installation
The library can be installed easily via pip. Open your terminal and run the following command:
pip install spire.pdf
Need help with the installation? Follow this step-by-step guide: How to Install Spire.PDF for Python on Windows
Extract Text from PDF (Basic Example)
If you just want to quickly read all the text from a PDF, this simple example shows how to do it. It iterates over each page, extracts the full text using PdfTextExtractor, and saves it to a text file with spacing and line breaks preserved.
from spire.pdf.common import *
from spire.pdf import *

# Create a PdfDocument object
doc = PdfDocument()

# Load a PDF document
doc.LoadFromFile('C:/Users/Administrator/Desktop/Terms of service.pdf')

# Prepare a variable to hold the extracted text
all_text = ""

# Create a PdfTextExtractOptions object
extractOptions = PdfTextExtractOptions()
# Extract all text including whitespaces
extractOptions.IsExtractAllText = True

# Loop through all pages and extract text
for i in range(doc.Pages.Count):
    page = doc.Pages.get_Item(i)
    textExtractor = PdfTextExtractor(page)
    text = textExtractor.ExtractText(extractOptions)
    # Append text from each page
    all_text += text + "\n"

# Write all extracted text to a file
with open('output/TextOfAllPages.txt', 'w', encoding='utf-8') as file:
    file.write(all_text)
Advanced Text Extraction Features
For greater control over what and how text is extracted, Spire.PDF for Python offers advanced options. You can selectively extract content from specific pages or regions, or even with layout details, such as text position and size, to better suit your specific data processing needs.
Retrieve Text from Selected Pages
Instead of processing an entire PDF, you can target specific pages for text extraction. This is especially useful for large documents where only certain sections are relevant for your task.
from spire.pdf.common import *
from spire.pdf import *
# Create a PdfDocument object
doc = PdfDocument()
# Load a PDF document
doc.LoadFromFile('C:/Users/Administrator/Desktop/Terms of service.pdf')
# Create a PdfTextExtractOptions object and enable full text extraction
extractOptions = PdfTextExtractOptions()
# Extract all text including whitespaces
extractOptions.IsExtractAllText = True
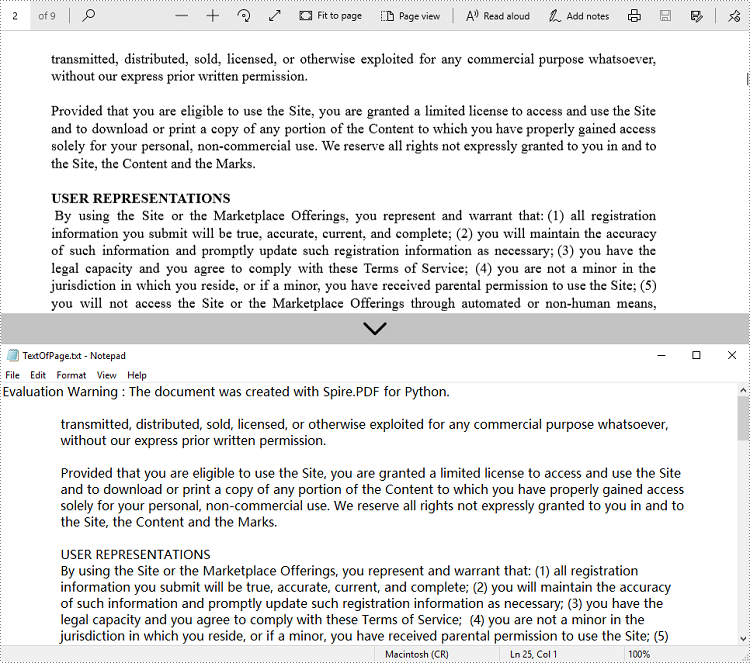
# Get a specific page (e.g., page 2)
page = doc.Pages.get_Item(1)
# Create a PdfTextExtractor object
textExtractor = PdfTextExtractor(page)
# Extract text from the page
text = textExtractor.ExtractText(extractOptions)
# Write the extracted text to a file using UTF-8 encoding
with open('output/TextOfPage.txt', 'w', encoding='utf-8') as file:
file.write(text)
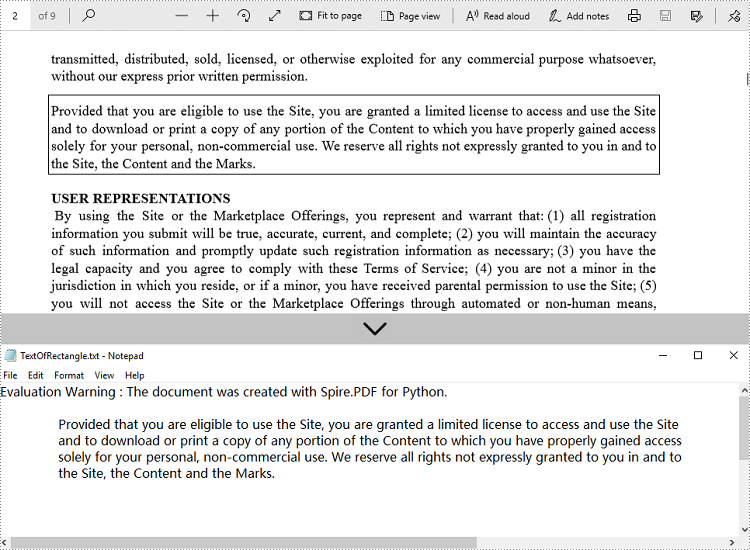
Get Text from Defined Area
When dealing with structured documents like forms or invoices, extracting text from a specific region can be more efficient. You can define a rectangular area and extract only the text within that boundary on the page.
from spire.pdf.common import *
from spire.pdf import *

# Create a PdfDocument object
doc = PdfDocument()

# Load a PDF document
doc.LoadFromFile('C:/Users/Administrator/Desktop/Terms of service.pdf')

# Get a specific page (e.g., page 2)
page = doc.Pages.get_Item(1)

# Create a PdfTextExtractor object
textExtractor = PdfTextExtractor(page)

# Create a PdfTextExtractOptions object
extractOptions = PdfTextExtractOptions()

# Define the rectangular area to extract text from
# RectangleF(left, top, width, height)
extractOptions.ExtractArea = RectangleF(0.0, 100.0, 890.0, 80.0)

# Extract text from the specified area, keeping white spaces
text = textExtractor.ExtractText(extractOptions)

# Write the extracted text to a file using UTF-8 encoding
with open('output/TextOfRectangle.txt', 'w', encoding='utf-8') as file:
    file.write(text)
Ignore Hidden Text During Extraction
Some PDFs contain hidden or invisible text, often used for accessibility or OCR layers. You can choose to ignore such content during extraction to focus only on what is actually visible to users.
from spire.pdf.common import *
from spire.pdf import *

# Create a PdfDocument object
doc = PdfDocument()

# Load a PDF document
doc.LoadFromFile('C:/Users/Administrator/Desktop/Terms of service.pdf')

# Create a PdfTextExtractOptions object
extractOptions = PdfTextExtractOptions()
# Ignore hidden text during extraction
extractOptions.IsShowHiddenText = False

# Get a specific page (e.g., page 2)
page = doc.Pages.get_Item(1)

# Create a PdfTextExtractor object
textExtractor = PdfTextExtractor(page)

# Extract text from the page
text = textExtractor.ExtractText(extractOptions)

# Write the extracted text to a file using UTF-8 encoding
with open('output/ExcludeHiddenText.txt', 'w', encoding='utf-8') as file:
    file.write(text)
Retrieve Text with Position (Coordinates) and Size Information
For layout-sensitive applications—such as converting PDF content into editable formats or reconstructing page structure—you can extract text along with its position and size. This provides precise control over how content is interpreted and used.
from spire.pdf.common import *
from spire.pdf import *

# Create a PdfDocument object
doc = PdfDocument()

# Load a PDF document
doc.LoadFromFile('C:/Users/Administrator/Desktop/Terms of service.pdf')

# Loop through all pages of the document
for i in range(doc.Pages.Count):
    page = doc.Pages.get_Item(i)

    # Create a PdfTextFinder object for the current page
    finder = PdfTextFinder(page)

    # Find all text fragments on the page
    fragments = finder.FindAllText()

    print(f"Page {i + 1}:")

    # Loop through all text fragments
    for fragment in fragments:
        # Extract text content from the current text fragment
        text = fragment.Text

        # Get bounding rectangles with position and size
        rects = fragment.Bounds

        print(f'Text: "{text}"')

        # Iterate through all rectangles
        for rect in rects:
            # Print the position and size information of the current rectangle
            print(f"Position: ({rect.X}, {rect.Y}), Size: ({rect.Width} x {rect.Height})")

        print()
Conclusion
Extracting text from PDF files in Python becomes efficient and flexible with Spire.PDF for Python. Whether you need to process entire documents or extract text from specific pages or regions, Spire.PDF provides a robust set of tools to meet your needs. By automating text extraction, you can streamline workflows, power intelligent search systems, or prepare data for analysis and machine learning.
FAQs
Q1: Can text be extracted from password-protected PDFs?
A1: Yes, Spire.PDF for Python can open and extract text from secured files by providing the correct password when loading the PDF document.
Q2: Is batch text extraction from multiple PDFs supported?
A2: Yes, you can programmatically iterate through a directory of PDF files and apply text extraction to each file efficiently using Spire.PDF for Python.
Q3: Is it possible to extract images or tables from PDFs?
A3: While this guide focuses on text extraction, Spire.PDF for Python also supports image extraction and table extraction.
Q4: Can text be extracted from scanned (image-based) PDFs?
A4: Extracting text from scanned PDFs requires OCR (Optical Character Recognition). Spire.PDF for Python does not include built-in OCR, but you can combine it with an OCR library like Spire.OCR for image-to-text conversion.
Get a Free License
To fully experience the capabilities of Spire.PDF for Python without any evaluation limitations, you can request a free 30-day trial license.
PDF files often contain critical embedded images (e.g., charts, diagrams, scanned documents). For developers, knowing how to extract images from PDF in Python allows them to repurpose graphical content for automated report generation or feed these visuals into machine learning models for analysis and OCR tasks.
This article explores how to leverage the Spire.PDF for Python library to extract images from PDF files via Python, covering the following aspects:
- Installation & Environment Setup
- How to Extract Images from PDFs using Python
- Handle Different Image Formats While Extraction
- Frequently Asked Questions
- Conclusion (Extract Text and More)
Installation & Environment Setup
Before you start using Spire.PDF for Python to extract images from PDF, make sure you have the following in place:
-
Python Environment: Ensure that you have Python installed on your system. It is recommended to use the latest stable version for the best compatibility and performance.
-
Spire.PDF for Python Library: You need to install the Python PDF SDK, and the easiest way is using pip, the Python package installer.
Open your command prompt or terminal and run the following command:
pip install Spire.PDF
How to Extract Images from PDFs using Python
Example 1: Extract Images from a PDF Page
Here’s a complete Python script to extract and save images from a specified page in PDF:
from spire.pdf.common import *
from spire.pdf import *
# Create a PdfDocument instance
pdf = PdfDocument()
# Load a PDF file
pdf.LoadFromFile("template1.pdf")
# Get the first page
page = pdf.Pages.get_Item(0)
# Create a PdfImageHelper instance
imageHelper = PdfImageHelper()
# Get the image information on the page
imageInfo = imageHelper.GetImagesInfo(page)
# Iterate through the image information
for i in range(0, len(imageInfo)):
# Save images to file
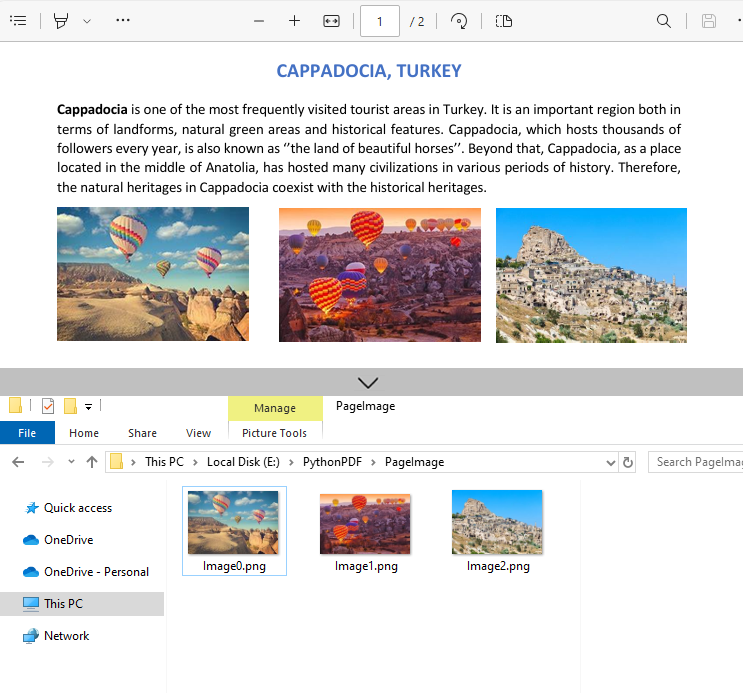
imageInfo[i].Image.Save("PageImage\\Image" + str(i) + ".png")
# Release resources
pdf.Dispose()
Key Steps Explained:
- Load the PDF: Use the LoadFromFile() method to load a PDF file.
- Access a Page: Access a specified PDF page by index.
- Extract Image information:
- Create a PdfImageHelper instance to facilitate image extraction.
- Use the GetImagesInfo() method to retrieve image information from the specified page, and return a list of PdfImageInfo objects.
- Save Images to Files:
- Loops through all detected images on the page
- Use the PdfImageInfo[].Image.Save() method to save the image to disk.
Output:
Example 2: Extract All Images from a PDF File
Building on the single-page extraction method, you can iterate through all pages of the PDF document to extract every embedded image.
Python code example:
from spire.pdf.common import *
from spire.pdf import *
# Create a PdfDocument instance
pdf = PdfDocument()
# Load a PDF file
pdf.LoadFromFile("template1.pdf")
# Create a PdfImageHelper instance
imageHelper = PdfImageHelper()
# Iterate through the pages in the document
for i in range(0, pdf.Pages.Count):
# Get the current page
page = pdf.Pages.get_Item(i)
# Get the image information on the page
imageInfo = imageHelper.GetImagesInfo(page)
# Iterate through the image information items
for j in range(0, len(imageInfo)):
# Save the current image to file
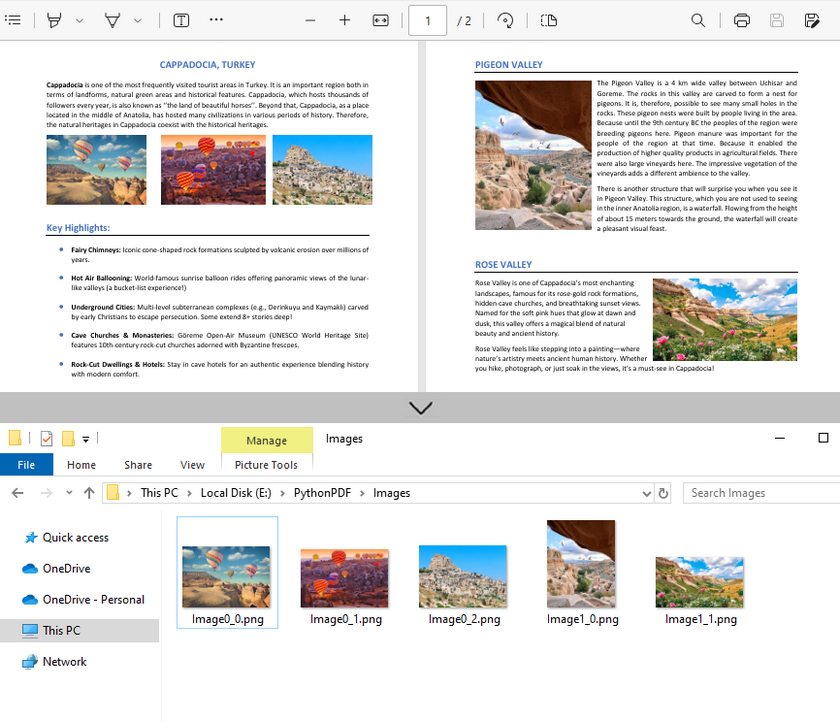
imageInfo[j].Image.Save(f"Images\\Image{i}_{j}.png")
# Release resources
pdf.Close()Output:
Handle Different Image Formats While Extraction
Spire.PDF for Python supports extracting images in various formats such as PNG, JPG/JPEG, BMP, etc. When saving the extracted images, you can choose the appropriate format based on your needs.
Common Image Formats:
| Format | Best Use Cases | PDF Extraction Notes |
|---|---|---|
| JPG/JPEG | Photos, scanned documents | Common in PDFs; quality loss on re-compress |
| PNG | Web graphics, diagrams, screenshots | Preserves transparency; larger file sizes |
| BMP | Windows applications, temp storage | Rare in modern PDFs; avoid for web use |
| TIFF | Archiving, print, OCR input | Ideal for document preservation; multi-page |
| EMF | Windows vector editing | Editable in Illustrator/Inkscape |
Frequently Asked Questions
Q1: Is Spire.PDF for Python a free library?
Spire.PDF for Python offers both free and commercial versions. The free version has limitations, such as a maximum of 10 pages per PDF. For commercial use or to remove these restrictions, you can request a trial license here.
Q2: Can I extract images from a specified page range only?
Yes. Instead of iterating through all pages, specify the page indices you want. For example, to extract images from the pages 2 to 5:
# Extract images from pages 2 to 5
for i in range(1, 4): # Pages are zero-indexed
    page = pdf.Pages.get_Item(i)
    # Process images as before
Q3: Is it possible to extract text from images?
Yes. For scanned PDF files, after extracting the images, you can extract the text in the images in conjunction with the Spire.OCR for Python library.
A step-by-step guide: How to Extract Text from Image Using Python (OCR Code Examples)
Conclusion (Extract Text and More)
Spire.PDF simplifies image extraction from PDF in Python with minimal code. By following this guide, you can:
- Extract images from single pages or entire PDF documents.
- Save images from PDF in various formats (PNG, JPG, BMP or TIFF).
As a PDF document can contain different elements, the Python PDF library is also capable of:
Adding bookmarks to Word documents is a useful feature that allows users to mark specific locations within their documents for quick reference or navigation. Bookmarks serve as virtual placeholders, making it easier to find and revisit important sections of a document without scrolling through lengthy pages. In this article, you will learn how to add bookmarks to a Word document in Python using Spire.Doc for Python.
Install Spire.Doc for Python
This scenario requires Spire.Doc for Python and plum-dispatch v1.7.4. They can be easily installed in your Windows through the following pip command.
pip install Spire.Doc
If you are unsure how to install, please refer to this tutorial: How to Install Spire.Doc for Python on Windows
Add Bookmarks to a Paragraph in Python
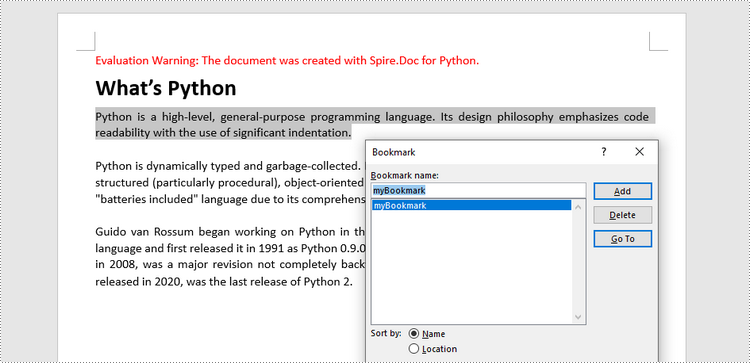
Spire.Doc for Python offers the BookmarkStart to represent the start of a bookmark and the BookmarkEnd to represent the end of a bookmark. To bookmark a paragraph, a BookmarkStart object is placed at the beginning of the paragraph and a BookmarkEnd object is appended at the end of the paragraph. The following are the detailed steps.
- Create a Document object.
- Load a Word file using Document.LoadFromFile() method.
- Get a specific paragraph through Document.Sections[index].Paragraphs[index] property.
- Create a BookmarkStart using Paragraph.AppendBookmarkStart() method and insert it at the beginning of the paragraph using Paragraph.Items.Insert() method.
- Append a BookmarkEnd at the end of the paragraph using Paragraph.AppendBookmarkEnd() method.
- Save the document to a different Word file using Document.SaveToFile() method.
- Python
from spire.doc import *
from spire.doc.common import *

# Create a Document object
doc = Document()

# Load a sample Word file
doc.LoadFromFile('C:/Users/Administrator/Desktop/input.docx')

# Get the second paragraph
paragraph = doc.Sections[0].Paragraphs[2]

# Create a bookmark start
start = paragraph.AppendBookmarkStart('myBookmark')

# Insert it at the beginning of the paragraph
paragraph.Items.Insert(0, start)

# Append a bookmark end at the end of the paragraph
paragraph.AppendBookmarkEnd('myBookmark')

# Save the file
doc.SaveToFile('output/AddBookmarkToParagraph.docx', FileFormat.Docx2019)
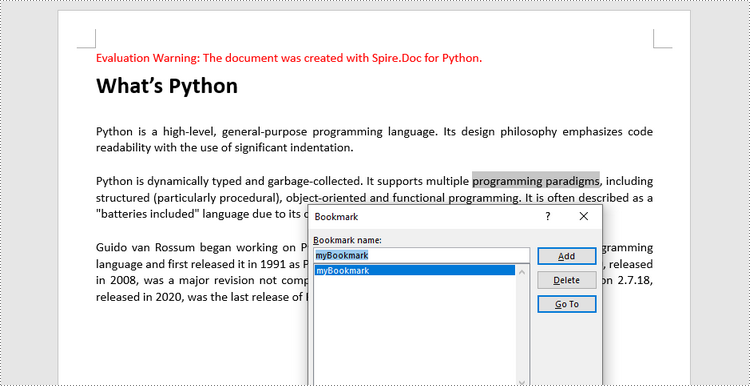
Add Bookmarks to Selected Text in Python
To bookmark a piece of text, you need first to get the text from the document and get its position inside its owner paragraph. And then place a BookmarkStart before it and a BookmarEnd after it. The detailed steps are as follows.
- Create a Document object.
- Load a Word file using Document.LoadFromFile() method.
- Find the string to be marked from the document.
- Get its owner paragraph and its position inside the paragraph.
- Insert a BookmarkStart before the text and a BookmarkEnd after the text.
- Save the document to a different Word file using Document.SaveToFile() method.
- Python
from spire.doc import *
from spire.doc.common import *

# Create a Document object
doc = Document()

# Load a sample Word file
doc.LoadFromFile('C:/Users/Administrator/Desktop/input.docx')

# Specify the string to find
stringToFind = 'programming paradigms'

# Find the selected text from the document
finds = doc.FindAllString(stringToFind, False, True)
specificText = finds[0]

# Find the paragraph where the text is located
paragraph = specificText.GetAsOneRange().OwnerParagraph

# Get the index of the text in the paragraph
index = paragraph.ChildObjects.IndexOf(specificText.GetAsOneRange())

# Create a bookmark start
start = paragraph.AppendBookmarkStart("myBookmark")

# Insert the bookmark start at the index position
paragraph.ChildObjects.Insert(index, start)

# Create a bookmark end
end = paragraph.AppendBookmarkEnd("myBookmark")

# Insert the bookmark end at the end of the selected text
paragraph.ChildObjects.Insert(index + 2, end)

# Save the document to a different file
doc.SaveToFile("output/AddBookmarkToSelectedText.docx", FileFormat.Docx2019)
Apply for a Temporary License
If you'd like to remove the evaluation message from the generated documents, or to get rid of the function limitations, please request a 30-day trial license for yourself.
Large PDF files can sometimes be cumbersome to handle, especially when sharing or uploading them. Splitting a large PDF file into multiple smaller PDFs reduces the file size, making it more manageable and quicker to open and process. In this article, we will demonstrate how to split PDF documents in Python using Spire.PDF for Python.
Install Spire.PDF for Python
This scenario requires Spire.PDF for Python and plum-dispatch v1.7.4. They can be easily installed in your Windows through the following pip command.
pip install Spire.PDF
If you are unsure how to install, please refer to this tutorial: How to Install Spire.PDF for Python on Windows
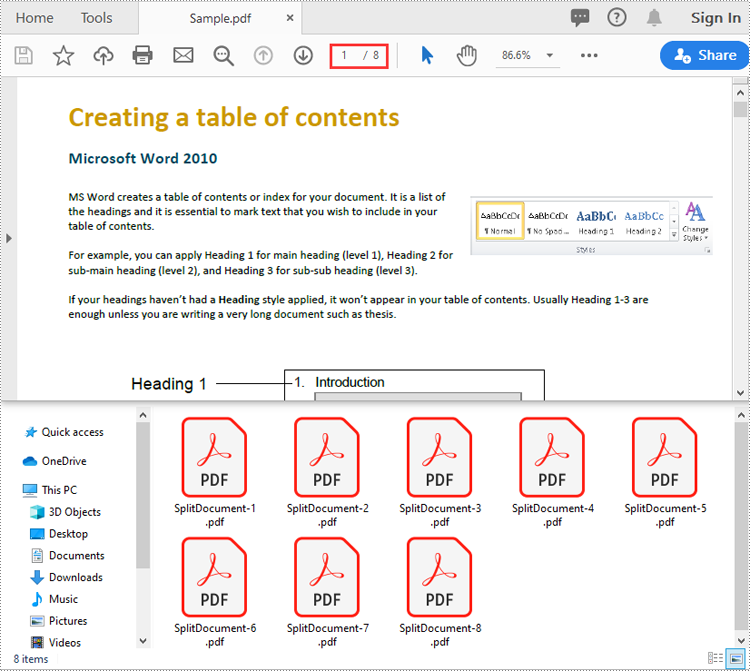
Split a PDF File into Multiple Single-Page PDFs in Python
Spire.PDF for Python offers the PdfDocument.Split() method to divide a multi-page PDF document into multiple single-page PDF files. The following are the detailed steps.
- Create a PdfDocument object.
- Load a PDF document using PdfDocument.LoadFromFile() method.
- Split the document into multiple single-page PDFs using PdfDocument.Split() method.
- Python
from spire.pdf.common import *
from spire.pdf import *

# Create a PdfDocument object
doc = PdfDocument()
# Load a PDF file
doc.LoadFromFile("Sample.pdf")

# Split the PDF file into multiple single-page PDFs
doc.Split("Output/SplitDocument-{0}.pdf", 1)

# Close the PdfDocument object
doc.Close()
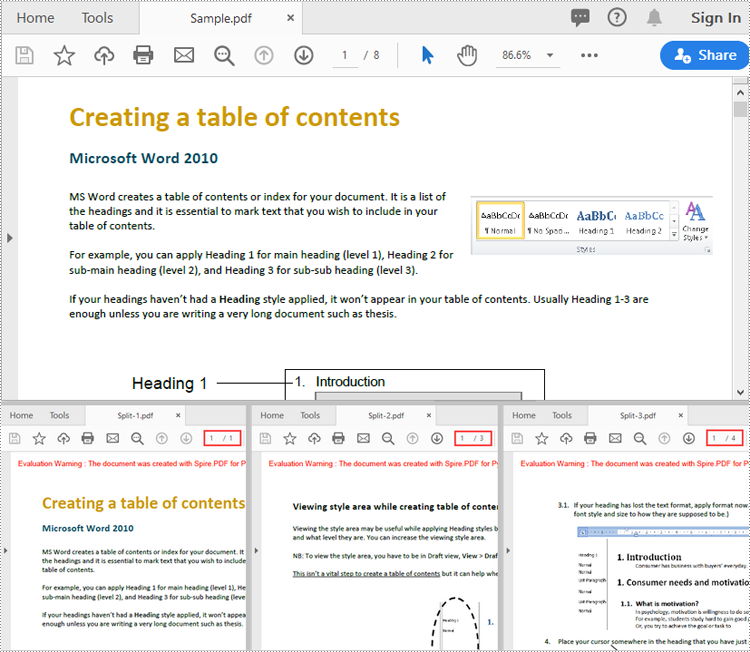
Split a PDF File by Page Ranges in Python
To split a PDF file into two or more PDF files by page ranges, you need to create two or more new PDF files, and then import the specific page or range of pages from the source PDF into the newly created PDF files. The following are the detailed steps.
- Create a PdfDocument object.
- Load a PDF document using PdfDocument.LoadFromFile() method.
- Create three PdfDocument objects.
- Import the first page from the source file into the first document using PdfDocument.InsertPage() method.
- Import pages 2-4 from the source file into the second document using PdfDocument.InsertPageRange() method.
- Import the remaining pages from the source file into the third document using PdfDocument.InsertPageRange() method.
- Save the three documents using PdfDocument.SaveToFile() method.
- Python
from spire.pdf.common import *
from spire.pdf import *

# Create a PdfDocument object
doc = PdfDocument()
# Load a PDF file
doc.LoadFromFile("Sample.pdf")

# Create three PdfDocument objects
newDoc_1 = PdfDocument()
newDoc_2 = PdfDocument()
newDoc_3 = PdfDocument()

# Insert the first page of the source file into the first document
newDoc_1.InsertPage(doc, 0)

# Insert pages 2-4 of the source file into the second document
newDoc_2.InsertPageRange(doc, 1, 3)

# Insert the rest pages of the source file into the third document
newDoc_3.InsertPageRange(doc, 4, doc.Pages.Count - 1)

# Save the three documents
newDoc_1.SaveToFile("Output1/Split-1.pdf")
newDoc_2.SaveToFile("Output1/Split-2.pdf")
newDoc_3.SaveToFile("Output1/Split-3.pdf")

# Close the PdfDocument objects
doc.Close()
newDoc_1.Close()
newDoc_2.Close()
newDoc_3.Close()
Apply for a Temporary License
If you'd like to remove the evaluation message from the generated documents, or to get rid of the function limitations, please request a 30-day trial license for yourself.
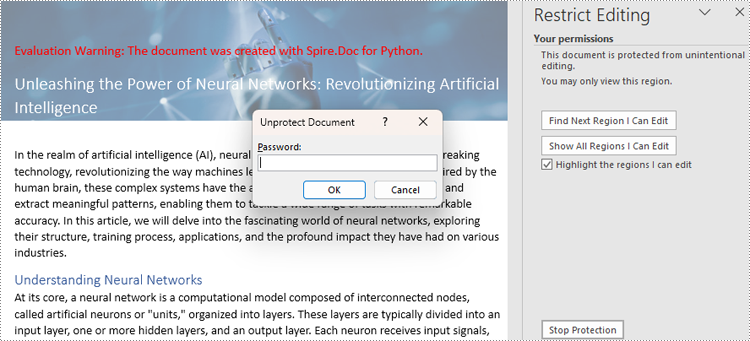
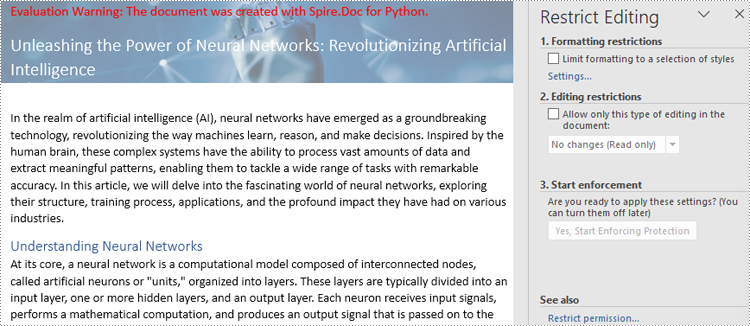
The editing restriction function is a feature in Word documents that allows users to control and limit the editing capabilities and editable areas. It is commonly used to protect sensitive or important document from unauthorized or substandard modifications. By applying editing restrictions, the document owner can specify what types of changes can be made and which part of the document can be edited to protect the document and facilitate collaborating, information gathering, etc. This article is going to show how to restrict Word document editing and remove document editing restrictions using Spire.Doc for Python in Python programs.
- Restrict Editing of Entire Word Documents with Passwords
- Set Exceptions to Word Document Editing Restrictions
- Remove Editing Restrictions from Word Documents
Install Spire.Doc for Python
This scenario requires Spire.Doc for Python and plum-dispatch v1.7.4. They can be easily installed in your Windows through the following pip command.
pip install Spire.Doc
If you are unsure how to install, please refer to this tutorial: How to Install Spire.Doc for Python on Windows
Restrict Editing of Entire Word Documents with Passwords
There are four types or editing restrictions in Word documents: No changes (Read only), Tracked changes, Comments, and Filling in forms. Spire.Doc for Python provides the Document.Protect() method set editing restrictions and ProtectionType Enum to represent the restriction types.
Here is a list of the ProtectionType Enum and the corresponding editing restrictions:
| Enum | Editing Restriction | Description |
| ProtectionType.AllowOnlyReading | No changes (Read only) | Allow reading only. |
| ProtectionType.AllowOnlyRevisions | Tracked changes | Allow tracked changes only. |
| ProtectionType.AllowOnlyComments | Comments | Allow comments only. |
| ProtectionType.AllowOnlyFormFields | Filling in forms | Allow filling out forms only. |
| ProtectionType.NoProtection | None | No restrictions. |
The steps for setting editing restrictions with a password on Word documents are as follows:
- Create an object of Document class.
- Load a Word document using Document.LoadFromFile() method.
- Set specified editing restrictions on the document using Document.Protect(type:ProtectionType, password:str) method.
- Save the document using Document.SaveToFile() method.
- Python
from spire.doc import *
from spire.doc.common import *

# Create an object of Document class
doc = Document()

# Load a Word document
doc.LoadFromFile("Sample.docx")

# Set the editing restriction type to No changes (Read only)
doc.Protect(ProtectionType.AllowOnlyReading, "password")

# Set the editing restriction type to Tracked changes
# doc.Protect(ProtectionType.AllowOnlyRevisions, "password")

# Set the editing restriction type to Comments
# doc.Protect(ProtectionType.AllowOnlyComments, "password")

# Set the editing restriction type to Filling in forms
# doc.Protect(ProtectionType.AllowOnlyFormFields, "password")

# Save the document
doc.SaveToFile("output/EditingRestrictions.docx")
doc.Close()
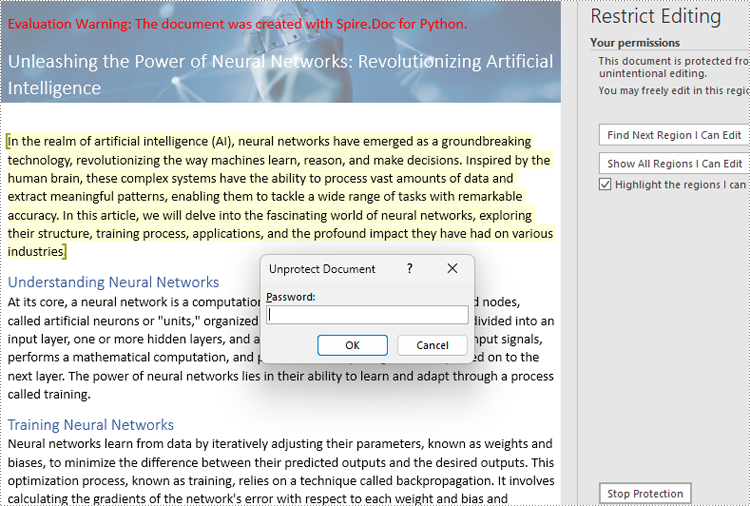
Set Exceptions to Word Document Editing Restrictions
Users can add exceptions (unrestricted areas) when setting editing restrictions on Word documents by inserting permission starting and ending tags. The details steps are as follows:
- Create an object of Document class.
- Load a Word document using Document.LoadFromFile() method.
- Get the first section using Document.Sections.get_Item() method.
- Create an object of PermissionStart class and an object of PermissionEnd class.
- Insert the permission start tag and the end tag to the document using Paragraph.ChildObjects.Insert() method and Paragraph.ChildObjects.Add() method.
- Set the editing restriction using Document.Protect() method.
- Save the document using Document.SaveToFile() method.
- Python
from spire.doc import *
from spire.doc.common import *

# Create an object of Document class
doc = Document()

# Load a Word document
doc.LoadFromFile("Sample.docx")

# Get the first section
section = doc.Sections.get_Item(0)

# Create a permission start tag and an end tag
start = PermissionStart(doc, "exception1")
end = PermissionEnd(doc, "exception1")

# Insert the permission start tag and the end tag to the first section
paragraph = section.Paragraphs.get_Item(1)
paragraph.ChildObjects.Insert(0,start)
paragraph.ChildObjects.Add(end)

# Set the editing restriction
doc.Protect(ProtectionType.AllowOnlyReading, "password")

# Save the document
doc.SaveToFile("output/RestrictionException.docx")
doc.Close()
Remove Editing Restrictions from Word Documents
To remove the editing restrictions of a document, simply set the editing restriction type to no restriction using the Document.Protect() method. The detailed steps are as follows:
- Create an object of Document class.
- Load a Word document using Document.LoadFromFile() method.
- Remove the restriction by setting the restriction type to None using Document.Protect() method.
- Save the document using Document.SaveToFile() method.
- Python
from spire.doc import *
from spire.doc.common import *

# Create an object of Document class
doc = Document()

# Load a Word document
doc.LoadFromFile("output/EditingRestrictions.docx")

# Remove the editing restriction by set the restriction type to None
doc.Protect(ProtectionType.NoProtection)

# Save the document
doc.SaveToFile("output/RemoveEditingRestriction.docx")
doc.Close()
Apply for a Temporary License
If you'd like to remove the evaluation message from the generated documents, or to get rid of the function limitations, please request a 30-day trial license for yourself.
Python Image to PDF Conversion: Best Practices and Code Examples
2023-09-27 01:15:52 Written by Administrator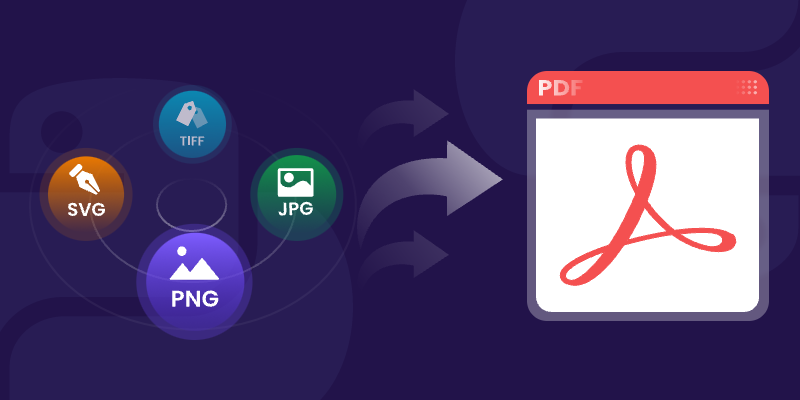
Converting images to PDF programmatically is a common task in document management, as it enhances organization, facilitates sharing, and ensures efficient archiving. By consolidating various image formats into a single PDF document, users can easily manage and distribute their visual content.
In this article, we will explore how to convert a variety of image formats —including PNG , JPEG , TIFF , and SVG —into PDF files using Spire.PDF for Python. We’ll provide detailed instructions and code examples to guide you through the conversion process, highlighting the flexibility and power of this library for handling different image types.
Table of Contents:
- Why Convert Image to PDF?
- Introducing Spire.PDF: Python Image-to-PDF Library
- Convert PNG or JPEG to PDF
- Convert Multi-Page TIFF to PDF
- Convert Scalable SVG to PDF
- Merge Multiple Images into One PDF
- Conclusion
- FAQs
1. Why Convert Image to PDF?
PDFs are preferred for their portability, security, and consistent formatting across devices. Converting images to PDF offers several benefits:
- Preservation of Quality: PDFs retain image resolution, ensuring no loss in clarity.
- Easier Sharing: A single PDF can combine multiple images, simplifying distribution.
- Document Standardization: Converting images to PDF ensures compatibility with most document management systems.
Whether you're archiving scanned documents or preparing a portfolio, converting images to PDF enhances usability.
2. Introducing Spire.PDF: Python Image-to-PDF Library
Spire.PDF for Python is a robust library that enables PDF creation, manipulation, and conversion. Key features include:
- Support for multiple image formats (PNG, JPEG, BMP, SVG, and more).
- Flexible page customization (size, margins, orientation).
- Batch processing and multi-image merging.
- Advanced options like watermarking and encryption (beyond basic conversion).
To install the library, use:
pip install Spire.PDF
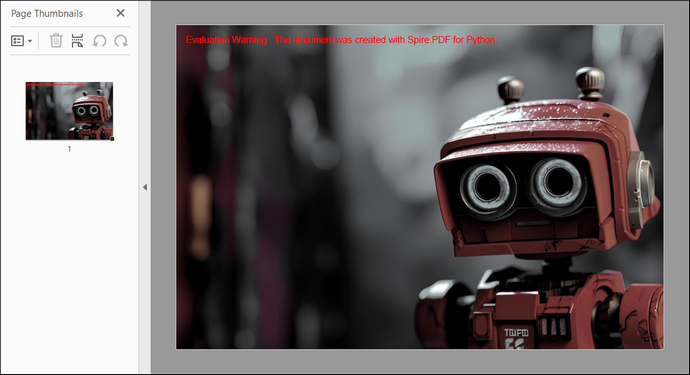
3. Convert PNG or JPEG to PDF in Python
3.1 Generate PDF Matching Image Dimensions
To convert a PNG or JPEG image to PDF while preserving its original size, we start by creating a PdfDocument object, which serves as the container for our PDF. We set the page margins to zero, ensuring that the image will fill the entire page.
After loading the image, we obtain its dimensions to create a new page that matches these dimensions. Finally, we draw the image on the page and save the document to a PDF file. This approach guarantees pixel-perfect conversion without resizing or distortion.
The following code demonstrates how to generate a PDF that perfectly matches your image’s size:
from spire.pdf.common import *
from spire.pdf import *

# Create a PdfDocument object
document = PdfDocument()

# Set the page margins to 0
document.PageSettings.SetMargins(0.0)

# Load an image file
image = PdfImage.FromFile("C:\\Users\\Administrator\\Desktop\\robot.jpg")

# Get the image width and height
imageWidth = image.PhysicalDimension.Width
imageHeight = image.PhysicalDimension.Height

# Add a page that has the same size as the image
page = document.Pages.Add(SizeF(imageWidth, imageHeight))

# Draw image at (0, 0) of the page
page.Canvas.DrawImage(image, 0.0, 0.0)

# Save to file
document.SaveToFile("output/ImageToPdf.pdf")

# Dispose resources
document.Dispose()
Output:
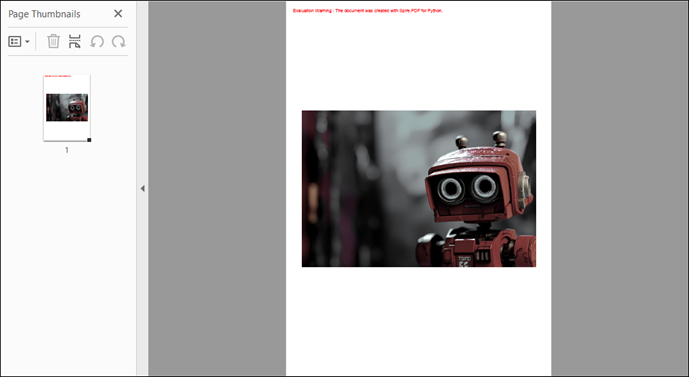
3.2 Custom PDF Layouts and Image Position
To customize the PDF page size and margins, a few modifications to the code are needed. In this example, we set the page size to A4, adjusting the margins accordingly. The image is centered on the page by calculating its position based on the page dimensions. This method creates a more polished layout for the PDF.
The code below shows how to customize PDF settings and position images during conversion:
from spire.pdf.common import *
from spire.pdf import *

# Create a PdfDocument object
document = PdfDocument()

# Set the page margins to 5
document.PageSettings.SetMargins(5.0)

# Define page size (A4 or custom)
document.PageSettings.Size = PdfPageSize.A4()

# Add a new page to the document
page = document.Pages.Add()

# Load the image from file
image = PdfImage.FromFile("C:\\Users\\Administrator\\Desktop\\robot.jpg")

# Get the image dimensions
imageWidth = image.PhysicalDimension.Width
imageHeight = image.PhysicalDimension.Height

# Calculate centered position for the image
x = (page.GetClientSize().Width - imageWidth) / 2
y = (page.GetClientSize().Height - imageHeight) / 2

# Draw the image at the calculated position
page.Canvas.DrawImage(image, x, y, imageWidth, imageHeight)

# Save to a PDF file
document.SaveToFile("output/ImageToPdf.pdf")

# Release resources
document.Dispose()
Output:
4. Convert Multi-Page TIFF to PDF in Python
TIFF files are widely used for high-resolution images, making them suitable for applications such as document scanning and medical imaging. However, Spire.PDF does not support TIFF images natively. To handle TIFF files, we can use the Python Imaging Library (PIL) , which can be installed with the following command:
pip install Pillow
Using PIL, we can access each frame of a TIFF file, temporarily save it as a PNG, and then draw each PNG onto a PDF. This method ensures that each frame is added as a separate page in the PDF, preserving the original quality and layout.
Here is the code snippet for converting a multi-page TIFF to PDF in Python:
from spire.pdf.common import *
from spire.pdf import *
from PIL import Image
import io

# Create a PdfDocument object
document = PdfDocument()

# Set the page margins to 0
document.PageSettings.SetMargins(0.0)

# Load a TIFF image
tiff_image = Image.open("C:\\Users\\Administrator\\Desktop\\TIFF.tiff")

# Iterate through the frames in it
for i in range(getattr(tiff_image, 'n_frames', 1)):

    # Go to the current frame
    tiff_image.seek(i)

    # Extract the image of the current frame
    frame_image = tiff_image.copy()

    # Save the image to a PNG file
    frame_image.save(f"temp/output_frame_{i}.png")

    # Load the image file to PdfImage
    image = PdfImage.FromFile(f"temp/output_frame_{i}.png")

    # Get image width and height
    imageWidth = image.PhysicalDimension.Width
    imageHeight = image.PhysicalDimension.Height

    # Add a page to the document
    page = document.Pages.Add(SizeF(imageWidth, imageHeight))

    # Draw image at (0, 0) of the page
    page.Canvas.DrawImage(image, 0.0, 0.0)

# Save the document to a PDF file
document.SaveToFile("Output/TiffToPdf.pdf",FileFormat.PDF)

# Dispose resources
document.Dispose()
Output:
5. Convert Scalable SVG to PDF in Python
SVG files are vector graphics that provide scalability without loss of quality, making them ideal for web graphics and print media. In this example, we create a PdfDocument object and load an SVG file directly into it. Spire.PDF library efficiently handles the conversion, allowing for quick and straightforward saving of the SVG as a PDF with minimal code.
Below is the code snippet for converting an SVG file to a PDF:
from spire.pdf.common import *
from spire.pdf import *

# Create a PdfDocument object
document = PdfDocument()

# Load an SVG file
document.LoadFromSvg("C:\\Users\\Administrator\\Desktop\\SVG.svg")

# Save the SVG file to PDF
document.SaveToFile("output/SvgToPdf.pdf", FileFormat.PDF)

# Dispose resources
document.Dispose()
Tip : To combine multiple SVG files into a single PDF, convert them separately and then merge the resulting PDFs. For guidance, check out this article: How to Merge PDF Documents in Python.
Output:
6. Merge Multiple Images into One PDF
This process involves iterating through images in a specified directory, loading each one, and creating corresponding pages in the PDF document. Each page is formatted to match the image dimensions, preventing any loss or distortion. Finally, each image is drawn onto its respective page.
Code example for combining a folder of images into a single PDF:
from spire.pdf.common import *
from spire.pdf import *
import os

# Create a PdfDocument object
doc = PdfDocument()

# Set the page margins to 0
doc.PageSettings.SetMargins(0.0)

# Get the folder where the images are stored
path = "C:\\Users\\Administrator\\Desktop\\Images\\"
files = os.listdir(path)

# Iterate through the files in the folder
for root, dirs, files in os.walk(path):
    for file in files:

        # Load a particular image
        image = PdfImage.FromFile(os.path.join(root, file))

        # Get the image width and height
        width = image.PhysicalDimension.Width
        height = image.PhysicalDimension.Height

        # Add a page that has the same size as the image
        page = doc.Pages.Add(SizeF(width, height))

        # Draw image at (0, 0) of the page
        page.Canvas.DrawImage(image, 0.0, 0.0, width, height)

# Save to file
doc.SaveToFile("output/CombineImages.pdf")
doc.Dispose()
Output:

7. Conclusion
Converting images to PDF in Python using the Spire.PDF library is a straightforward task that can be accomplished through various methods for different image formats. Whether you need to convert single images, customize layouts, or merge multiple images, Spire.PDF provides the necessary tools to achieve your goals efficiently. With just a few lines of code, you can create high-quality PDFs from images, enhancing your document management capabilities.
8. FAQs
Q1: Can I convert images in bulk using Spire.PDF?
Yes, Spire.PDF allows you to iterate through directories and convert multiple images to a single PDF or individual PDFs, making bulk conversions easy.
Q2: What image formats does Spire.PDF support?
Spire.PDF supports various image formats, including PNG, JPEG, BMP, and SVG, providing versatility for different use cases.
Q3: Can I customize the PDF layout?
Absolutely. You can set margins, page sizes, and positions of images within the PDF for a tailored layout that meets your requirements.
Q4: Does converting an image to PDF reduce its quality?
No - when using Spire.PDF with default settings, the original image data is embedded without compression.
Get a Free License
To fully experience the capabilities of Spire.PDF for Python without any evaluation limitations, you can request a free 30-day trial license.
