Spotting the order numbers that were entered twice, the ratings that sit below the average, or the handful of largest and smallest orders in a table of several hundred rows is slow work by eye, and easy to get wrong. Conditional formatting hands that judgement to Excel: once a rule is written, the matching cells carry the color themselves, and the marks follow the data when it changes. This article covers the three most common kinds of rule — whether a value repeats, how it compares with the average, and where it ranks. Spire.XLS for JavaScript runs all of this in the browser on WebAssembly, managing input and output files through a virtual file system (VFS) with no backend service required.
This article covers three features:
- Highlight duplicate and unique values
- Highlight values above or below average
- Highlight top or bottom ranked values
For installation and project setup, see Integrating Spire.XLS for JavaScript in a React Project. The examples below assume Spire.XLS is installed and the WebAssembly module has been initialized.
Highlight duplicate and unique values
A conditional formatting rule hangs off a conditional format set: sheet.ConditionalFormats.Add() returns one set, you point it at the cells it applies to, and then add a single condition whose color you set. Duplicate and unique values are two sides of the same comparison — the first matches cells whose value appears more than once in the range, the second matches cells that appear exactly once — so they are usually written as a pair that brings both the repeated order numbers and the one-off ones into view. The steps are:
- Load the font and the test data file into the VFS.
- Load the workbook and get the worksheet.
- Add a conditional format set with
sheet.ConditionalFormats.Add()and point it at the order number column withAddRange. - Add a condition with
AddCondition, set itsFormatTypetoDuplicateValues, and set the fill color. - Add a second set on the same range in the same way, switch the type to
UniqueValues, set another fill color, and save the workbook.
The full code sample below shows how to highlight duplicate and unique values in React:
function App() {
  const highlightDuplicateValues = async () => {
    // Get the Spire.XLS WASM module
    const xlsModule = window.wasmModule?.spirexls;

    // Check whether the module is ready
    if (!xlsModule) {
      alert('Spire.Xls is not ready yet');
      return;
    }

    // Load the font and the test data file into the VFS
    await window.spire.FetchFileToVFS('ARIAL.TTF', '/Library/Fonts/', `${process.env.PUBLIC_URL}/font/`);
    const inputFileName = 'ConditionalFormatData.xlsx';
    await window.spire.FetchFileToVFS(inputFileName, '', `${process.env.PUBLIC_URL}data/`);

    // Load the workbook and take the first worksheet
    const workbook = new xlsModule.Workbook();
    workbook.LoadFromFile({ fileName: inputFileName });
    const sheet = workbook.Worksheets.get(0);

    // Add one conditional format set, applied to the order number column
    const duplicateFormats = sheet.ConditionalFormats.Add();
    duplicateFormats.AddRange(sheet.Range.get("C2:C10"));

    // Add a duplicate-value condition, filling order numbers that appear more than once in IndianRed
    const duplicateCondition = duplicateFormats.AddCondition();
    duplicateCondition.FormatType = xlsModule.ConditionalFormatType.DuplicateValues;
    duplicateCondition.BackColor = xlsModule.Color.get_IndianRed();

    // Add another conditional format set, applied to the same range
    const uniqueFormats = sheet.ConditionalFormats.Add();
    uniqueFormats.AddRange(sheet.Range.get("C2:C10"));

    // Add a unique-value condition, filling order numbers that appear once in Yellow
    const uniqueCondition = uniqueFormats.AddCondition();
    uniqueCondition.FormatType = xlsModule.ConditionalFormatType.UniqueValues;
    uniqueCondition.BackColor = xlsModule.Color.get_Yellow();

    // Save the workbook
    const outputFileName = "HighlightDuplicateValues.xlsx";
    workbook.SaveToFile({ fileName: outputFileName });

    // Dispose of the workbook object to free resources
    workbook.Dispose();

    // Read the result file from the VFS and trigger the download
    const fileArray = window.dotnetRuntime.Module.FS.readFile(outputFileName);
    const blob = new Blob([fileArray], { type: 'application/vnd.openxmlformats-officedocument.spreadsheetml.sheet' });
    const url = URL.createObjectURL(blob);
    const a = document.createElement('a');
    a.href = url;
    a.download = outputFileName;
    a.click();
    URL.revokeObjectURL(url);
  };

  return (
    <div style={{ textAlign: 'center', height: '300px' }}>
      <h1>Highlight Duplicate and Unique Values</h1>
      <button onClick={highlightDuplicateValues}>Start</button>
    </div>
  );
}

export default App;
After running, the effect of highlighting duplicate and unique values:
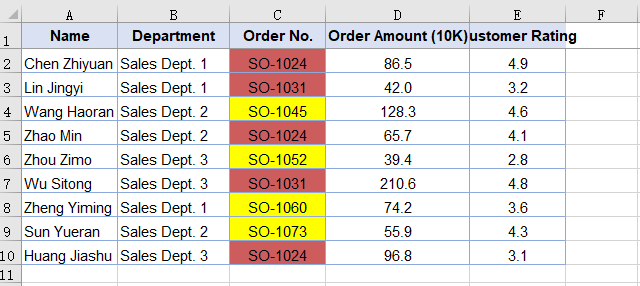
Highlight values above or below average
The average is the yardstick most people reach for when judging a set of numbers. Conditional formatting has a condition built for exactly that comparison: call AddAverageCondition for the above-average or the below-average case, and Excel works out the average of the range itself, then compares each cell against it — one color above the line, another below. Excel computes the average when the file is opened, so editing the data reshuffles the marks along with it. The steps are:
- Load the font and the test data file into the VFS.
- Load the workbook and get the worksheet.
- Add a conditional format set with
sheet.ConditionalFormats.Add()and point it at the customer rating column withAddRange. - Call
AddAverageConditionwithAverageType.Belowand set the fill color. - Add a second set on the same range in the same way, pass
AverageType.Aboveinstead, set another fill color, and save the workbook.
The full code sample below shows how to highlight values above or below average in React:
function App() {
  const highlightAverageValues = async () => {
    // Get the Spire.XLS WASM module
    const xlsModule = window.wasmModule?.spirexls;

    // Check whether the module is ready
    if (!xlsModule) {
      alert('Spire.Xls is not ready yet');
      return;
    }

    // Load the font and the test data file into the VFS
    await window.spire.FetchFileToVFS('ARIAL.TTF', '/Library/Fonts/', `${process.env.PUBLIC_URL}/font/`);
    const inputFileName = 'ConditionalFormatData.xlsx';
    await window.spire.FetchFileToVFS(inputFileName, '', `${process.env.PUBLIC_URL}data/`);

    // Load the workbook and take the first worksheet
    const workbook = new xlsModule.Workbook();
    workbook.LoadFromFile({ fileName: inputFileName });
    const sheet = workbook.Worksheets.get(0);

    // Add one conditional format set, applied to the customer rating column
    const belowFormats = sheet.ConditionalFormats.Add();
    belowFormats.AddRange(sheet.Range.get("E2:E10"));

    // Add a below-average condition, filling with SkyBlue
    const belowCondition = belowFormats.AddAverageCondition(xlsModule.AverageType.Below);
    belowCondition.BackColor = xlsModule.Color.get_SkyBlue();

    // Add another conditional format set, applied to the same range
    const aboveFormats = sheet.ConditionalFormats.Add();
    aboveFormats.AddRange(sheet.Range.get("E2:E10"));

    // Add an above-average condition, filling with Orange
    const aboveCondition = aboveFormats.AddAverageCondition(xlsModule.AverageType.Above);
    aboveCondition.BackColor = xlsModule.Color.get_Orange();

    // Save the workbook
    const outputFileName = "HighlightAverageValues.xlsx";
    workbook.SaveToFile({ fileName: outputFileName });

    // Dispose of the workbook object to free resources
    workbook.Dispose();

    // Read the result file from the VFS and trigger the download
    const fileArray = window.dotnetRuntime.Module.FS.readFile(outputFileName);
    const blob = new Blob([fileArray], { type: 'application/vnd.openxmlformats-officedocument.spreadsheetml.sheet' });
    const url = URL.createObjectURL(blob);
    const a = document.createElement('a');
    a.href = url;
    a.download = outputFileName;
    a.click();
    URL.revokeObjectURL(url);
  };

  return (
    <div style={{ textAlign: 'center', height: '300px' }}>
      <h1>Highlight Above and Below Average Values</h1>
      <button onClick={highlightAverageValues}>Start</button>
    </div>
  );
}

export default App;
After running, the effect of highlighting values above or below average:
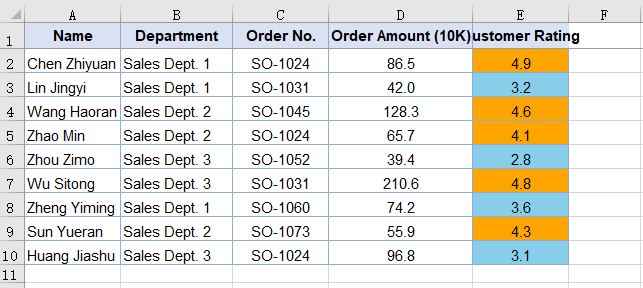
Highlight top or bottom ranked values
Leaderboard questions — which two orders are the largest, which three teams have the lowest completion rate — are hard to answer row by row, but a rank condition only needs the number of places. AddTopBottomCondition ranks the values inside the range you set and colors the cells that come out highest or lowest; it takes two arguments: one decides whether to take the highest or the lowest, the other is how many. The ranking stays inside that range and ignores everything else on the sheet. The steps are:
- Load the font and the test data file into the VFS.
- Load the workbook and get the worksheet.
- Add a conditional format set with
sheet.ConditionalFormats.Add()and point it at the order amount column withAddRange. - Call
AddTopBottomConditionwithTopBottomType.Topand a count of 2, then set the fill color. - Add a second set on the same range in the same way, pass
TopBottomType.Bottominstead, set another fill color, and save the workbook.
The full code sample below shows how to highlight top or bottom ranked values in React:
function App() {
  const highlightRankedValues = async () => {
    // Get the Spire.XLS WASM module
    const xlsModule = window.wasmModule?.spirexls;

    // Check whether the module is ready
    if (!xlsModule) {
      alert('Spire.Xls is not ready yet');
      return;
    }

    // Load the font and the test data file into the VFS
    await window.spire.FetchFileToVFS('ARIAL.TTF', '/Library/Fonts/', `${process.env.PUBLIC_URL}/font/`);
    const inputFileName = 'ConditionalFormatData.xlsx';
    await window.spire.FetchFileToVFS(inputFileName, '', `${process.env.PUBLIC_URL}data/`);

    // Load the workbook and take the first worksheet
    const workbook = new xlsModule.Workbook();
    workbook.LoadFromFile({ fileName: inputFileName });
    const sheet = workbook.Worksheets.get(0);

    // Add one conditional format set, applied to the order amount column
    const topFormats = sheet.ConditionalFormats.Add();
    topFormats.AddRange(sheet.Range.get("D2:D10"));

    // Add a top-2 condition, filling the two largest orders with Red
    const topCondition = topFormats.AddTopBottomCondition(xlsModule.TopBottomType.Top, 2);
    topCondition.FormatType = xlsModule.ConditionalFormatType.TopBottom;
    topCondition.BackColor = xlsModule.Color.get_Red();

    // Add another conditional format set, applied to the same range
    const bottomFormats = sheet.ConditionalFormats.Add();
    bottomFormats.AddRange(sheet.Range.get("D2:D10"));

    // Add a bottom-2 condition, filling the two smallest orders with ForestGreen
    const bottomCondition = bottomFormats.AddTopBottomCondition(xlsModule.TopBottomType.Bottom, 2);
    bottomCondition.FormatType = xlsModule.ConditionalFormatType.TopBottom;
    bottomCondition.BackColor = xlsModule.Color.get_ForestGreen();

    // Save the workbook
    const outputFileName = "HighlightRankedValues.xlsx";
    workbook.SaveToFile({ fileName: outputFileName });

    // Dispose of the workbook object to free resources
    workbook.Dispose();

    // Read the result file from the VFS and trigger the download
    const fileArray = window.dotnetRuntime.Module.FS.readFile(outputFileName);
    const blob = new Blob([fileArray], { type: 'application/vnd.openxmlformats-officedocument.spreadsheetml.sheet' });
    const url = URL.createObjectURL(blob);
    const a = document.createElement('a');
    a.href = url;
    a.download = outputFileName;
    a.click();
    URL.revokeObjectURL(url);
  };

  return (
    <div style={{ textAlign: 'center', height: '300px' }}>
      <h1>Highlight Top and Bottom Ranked Values</h1>
      <button onClick={highlightRankedValues}>Start</button>
    </div>
  );
}

export default App;
After running, the effect of highlighting top or bottom ranked values:
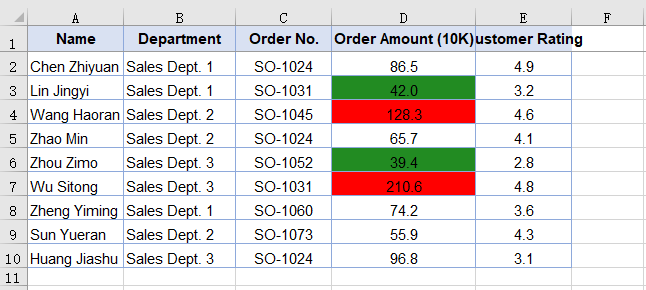
FAQ
Why is the color I set not showing up?
Cause: The color belongs on the condition object, which is what AddCondition, AddAverageCondition or AddTopBottomCondition returns. Assigning BackColor to the outer conditional format set instead is accepted and raises no error, but the rule that reaches the file carries no fill and the cells stay as they were.
Solution: Assign the color to the condition object — the return value of those methods:
// The condition object is what carries the color
const formats = sheet.ConditionalFormats.Add();
formats.AddRange(sheet.Range.get("C2:C10"));
const condition = formats.AddCondition();
condition.FormatType = xlsModule.ConditionalFormatType.DuplicateValues;
condition.BackColor = xlsModule.Color.get_IndianRed();
Why can't I read a conditional format's fill color back from the cell?
Cause: The color of a conditional format does not belong to the cell's own formatting. It is stored with the rule in the file's conditional formatting settings, and the cell keeps the style it already had, so the color read from the cell is the same before and after the rule is added.
Solution: Read the color from the condition object — the return value of AddCondition, AddAverageCondition or AddTopBottomCondition:
// The conditional format color lives on the condition object, not in the cell style
const formats = sheet.ConditionalFormats.Add();
formats.AddRange(sheet.Range.get("C2:C10"));
const condition = formats.AddCondition();
condition.FormatType = xlsModule.ConditionalFormatType.DuplicateValues;
condition.BackColor = xlsModule.Color.get_IndianRed();

// This reads back the color that was just set
console.log(condition.BackColor);
Get a Free License
Spire.XLS for JavaScript offers a 30-day full-featured free trial license with no functional limitations. Apply here to evaluate before purchasing.
