Insert OLE Objects in Excel in React with JavaScript
Besides holding cell data, an Excel workbook is often used as a container for files: a quotation carries a Word version of the contract terms, a product sheet carries a PDF datasheet, and double-clicking the object opens the source file directly. Files embedded into a worksheet like this are OLE objects (Object Linking and Embedding). Inserting one by hand takes two steps in the Excel UI—Insert → Object—but doing it from code in the browser needs a dedicated API.Spire.XLS for JavaScript performs this work directly in the browser through WebAssembly, managing input and output files with a virtual file system (VFS) and requiring no backend service.
This article covers two key features:
For installation and project setup, see Integrating Spire.XLS for JavaScript in a React Project. The examples below assume Spire.XLS is already installed and the WebAssembly module has been initialized.
Insert an OLE Object in Excel
OleObjects.Add inserts an external file into a worksheet. It takes three arguments: the file to embed, the icon the object shows on the sheet, and the link type—OleLinkType.Embed embeds the file into the workbook, OleLinkType.Link inserts it as a link. After the object is in place, Location decides which cell it is anchored to and ObjectType declares what was embedded, which is how Excel knows which program to use when the object is double-clicked. The steps are:
- Create a new workbook and write a caption into a cell.
- Open the workbook to be embedded and render its worksheet to an image, to use as the display icon.
- Embed that Excel file into the worksheet with
OleObjects.Add. - Set
LocationandObjectType. - Save the workbook.
Here is a complete code example that inserts an Excel file into a worksheet as an OLE object in React:
function App() {
  const insertOleObject = async () => {
    // Get the Spire.XLS WASM module
    const xlsModule = window.wasmModule?.spirexls;

    // Check if the module is ready
    if (!xlsModule) {
      alert('Spire.Xls is not ready yet');
      return;
    }

    // Load the font into VFS
    await window.spire.FetchFileToVFS('ARIAL.TTF', '/Library/Fonts/', `${process.env.PUBLIC_URL}/font/`);

    // Load the Excel file to be embedded into VFS
    const embeddedFileName = 'OLEObjects.xlsx';
    await window.spire.FetchFileToVFS(embeddedFileName, '', `${process.env.PUBLIC_URL}/static/data/`);

    // Create a new workbook and write the caption
    const workbook = new xlsModule.Workbook();
    const sheet = workbook.Worksheets.get(0);
    sheet.Range.get("A1").Text = "Here is an OLE object.";

    // Open the embedded workbook and render its worksheet to an image as the display icon
    const embeddedBook = new xlsModule.Workbook();
    embeddedBook.LoadFromFile(embeddedFileName);
    const embeddedSheet = embeddedBook.Worksheets.get(0);
    embeddedSheet.PageSetup.LeftMargin = 0;
    embeddedSheet.PageSetup.RightMargin = 0;
    embeddedSheet.PageSetup.TopMargin = 0;
    embeddedSheet.PageSetup.BottomMargin = 0;
    const image = embeddedSheet.ToImage(1, 1, 19, 5);
    embeddedBook.Dispose();

    // Embed the Excel file into the worksheet; the file data is stored with the workbook
    const oleObject = sheet.OleObjects.Add(
      embeddedFileName,
      image,
      xlsModule.OleLinkType.Embed
    );

    // Anchor the object at cell B4 and declare it as an Excel worksheet
    oleObject.Location = sheet.Range.get("B4");
    oleObject.ObjectType = xlsModule.OleObjectType.ExcelWorksheet;

    // Save the workbook
    const outputFileName = "InsertOLEObject.xlsx";
    workbook.SaveToFile({ fileName: outputFileName, version: xlsModule.ExcelVersion.Version2010 });

    // Release resources
    workbook.Dispose();

    // Read the result file from VFS and trigger the download
    const fileArray = window.dotnetRuntime.Module.FS.readFile(outputFileName);
    const blob = new Blob([fileArray], { type: 'application/vnd.openxmlformats-officedocument.spreadsheetml.sheet' });
    const url = URL.createObjectURL(blob);
    const a = document.createElement('a');
    a.href = url;
    a.download = outputFileName;
    a.click();
    URL.revokeObjectURL(url);
  };

  return (
    <div style={{ textAlign: 'center', height: '300px' }}>
      <h1>Insert an OLE Object</h1>
      <button onClick={insertOleObject}>Start</button>
    </div>
  );
}

export default App;
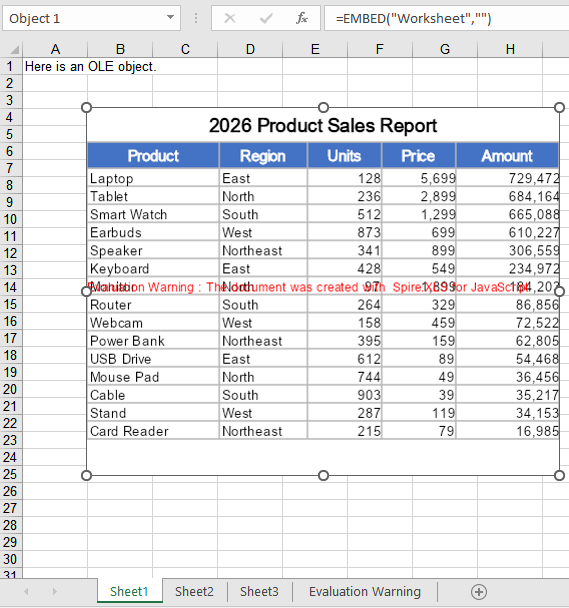
The icon here is taken directly from the rendered embedded worksheet, so the OLE object shows its own content on the sheet. Switching ObjectType to values such as OleObjectType.WordDocument or OleObjectType.AdobeAcrobatDocument declares other kinds of embedded files.
Running it, the effect of inserting a workbook as an OLE object:
Insert an OLE Object with a Custom Icon
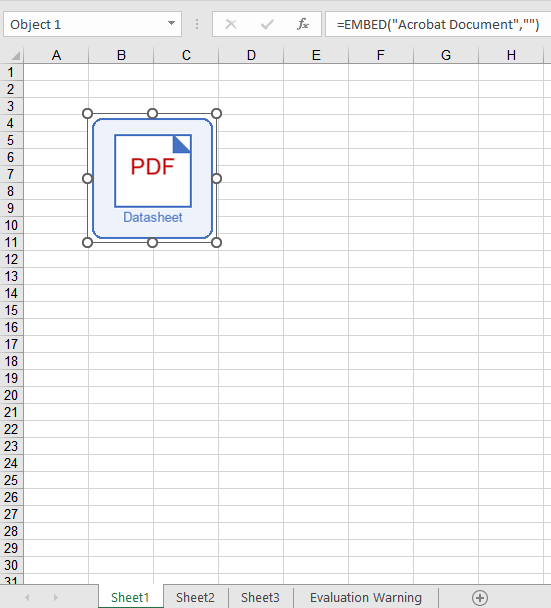
ToImage has to open a workbook and render a row/column range every time, which suits cases where the object should present its own content; when a single icon should be applied to every attachment, reading a ready-made picture is simpler, and the same picture can be reused across attachments. The second argument of OleObjects.Add accepts both kinds of input. The steps are:
- Load the icon image and the attachment file into VFS.
- Create a new workbook and read the icon image into a stream with
new xlsModule.Stream. - Insert the attachment as an embedded object with
OleObjects.Add, passing the icon stream. - Set
LocationandObjectType. - Save the workbook.
Here is a complete code example that inserts a PDF attachment with a custom icon in React:
function App() {
  const insertOleObjectWithIcon = async () => {
    // Get the Spire.XLS WASM module
    const xlsModule = window.wasmModule?.spirexls;

    // Check if the module is ready
    if (!xlsModule) {
      alert('Spire.Xls is not ready yet');
      return;
    }

    // Load the font into VFS
    await window.spire.FetchFileToVFS('ARIAL.TTF', '/Library/Fonts/', `${process.env.PUBLIC_URL}/font/`);

    // Load the icon image and the attachment into VFS
    const iconFileName = 'OLEIcon.png';
    const attachmentFileName = 'Attachment.pdf';
    await window.spire.FetchFileToVFS(iconFileName, '', `${process.env.PUBLIC_URL}/static/data/`);
    await window.spire.FetchFileToVFS(attachmentFileName, '', `${process.env.PUBLIC_URL}/static/data/`);

    // Create a new workbook
    const workbook = new xlsModule.Workbook();
    const sheet = workbook.Worksheets.get(0);

    // Read the icon image as a stream to use as the display icon of the OLE object
    const iconStream = new xlsModule.Stream(iconFileName);

    // Embed the PDF attachment into the worksheet
    const oleObject = sheet.OleObjects.Add(
      attachmentFileName,
      iconStream,
      xlsModule.OleLinkType.Embed
    );

    // Anchor the object at cell B4 and declare it as a PDF document
    oleObject.Location = sheet.Range.get("B4");
    oleObject.ObjectType = xlsModule.OleObjectType.AdobeAcrobatDocument;

    // Save the workbook
    const outputFileName = "InsertOLEObjectWithIcon.xlsx";
    workbook.SaveToFile({ fileName: outputFileName, version: xlsModule.ExcelVersion.Version2010 });

    // Release resources
    workbook.Dispose();

    // Read the result file from VFS and trigger the download
    const fileArray = window.dotnetRuntime.Module.FS.readFile(outputFileName);
    const blob = new Blob([fileArray], { type: 'application/vnd.openxmlformats-officedocument.spreadsheetml.sheet' });
    const url = URL.createObjectURL(blob);
    const a = document.createElement('a');
    a.href = url;
    a.download = outputFileName;
    a.click();
    URL.revokeObjectURL(url);
  };

  return (
    <div style={{ textAlign: 'center', height: '300px' }}>
      <h1>Insert an OLE Object with a Custom Icon</h1>
      <button onClick={insertOleObjectWithIcon}>Start</button>
    </div>
  );
}

export default App;
Running it, the effect of inserting a PDF attachment with a custom icon as an OLE object:
FAQ
Only a blank icon shows up on the sheet after inserting?
Cause: The second argument of OleObjects.Add decides the icon an OLE object shows on the sheet. When the image comes from ToImage, a region that falls outside the used range of the worksheet yields a blank picture, so the inserted object also shows only blank space.
Solution: Keep the region inside the part of the sheet that actually has content, or use a ready-made image file instead:
// Use a fixed picture as the icon, independent of the worksheet content
const iconStream = new xlsModule.Stream('OLEIcon.png');
const oleObject = sheet.OleObjects.Add('Attachment.pdf', iconStream, xlsModule.OleLinkType.Embed);
oleObject.Location = sheet.Range.get("B4");
oleObject.ObjectType = xlsModule.OleObjectType.AdobeAcrobatDocument;
What happens if ObjectType is set to something else?
Cause: ObjectType is not merely a comment—its value is written into the progId field of the workbook, and Excel uses that identifier to find the right program when the object is double-clicked. The same PDF attachment declares a progId of Acrobat Document under OleObjectType.AdobeAcrobatDocument; declare it as OleObjectType.ExcelWorksheet and the progId becomes Worksheet, so Excel attempts to open the PDF with Excel itself, and the object will not open.
Solution: Set ObjectType to the real type of the embedded file. The common values are:
| Embedded file | ObjectType |
|---|---|
| Excel workbook | OleObjectType.ExcelWorksheet |
| Word document | OleObjectType.WordDocument |
| PowerPoint presentation | OleObjectType.PowerPointSlide |
| PDF document | OleObjectType.AdobeAcrobatDocument |
// Declare the real file type so Excel opens it with the right program
oleObject.ObjectType = xlsModule.OleObjectType.AdobeAcrobatDocument;
Get a Free License
Spire.XLS for JavaScript offers a 30-day full-featured free trial license with no functional limitations. Apply here to evaluate before purchasing.
Autofit Row Heights and Column Widths in React with JavaScript
Once the data is in, a table usually needs one last pass before it is usable: a product name squeezed into a sliver of a column, a paragraph of remarks running along a single line until the next non-empty cell cuts it off. Dragging column borders and row dividers by hand is slow, and once there are enough columns it is easy to miss a few. Spire.XLS for JavaScript performs this work directly in the browser through WebAssembly, managing input and output files with a virtual file system (VFS) and requiring no backend service.
This article covers two key features:
- Autofit the Height of a Single Row and the Width of a Single Column
- Autofit the Heights of Multiple Rows and the Widths of Multiple Columns
For installation and project setup, see Integrating Spire.XLS for JavaScript in a React Project. The examples below assume Spire.XLS is already installed and the WebAssembly module has been initialized.
Autofit the Height of a Single Row and the Width of a Single Column
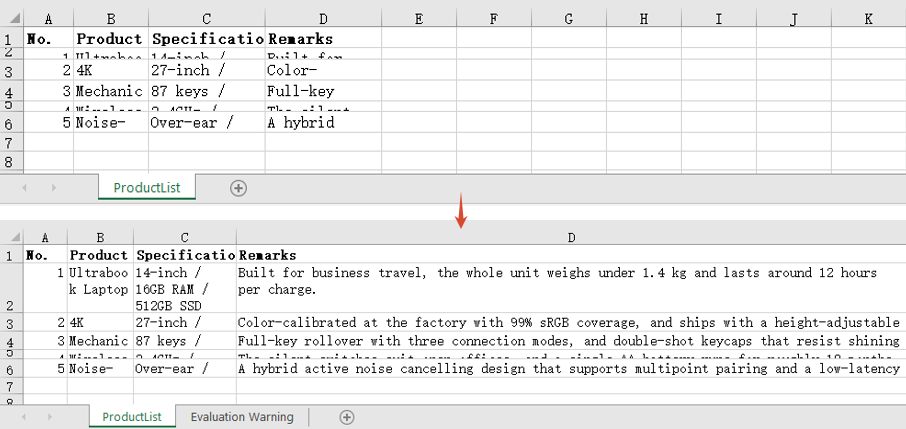
AutoFitRow works out the height of the given row from its content, and AutoFitColumn works out the width of the given column the same way. Each one affects only the row or the column it is pointed at and leaves the rest of the table untouched, which is what you want when a single overflow is the only thing in the way.
Note that row height autofit only means anything for content that needs to wrap: with wrapping turned off the text always sits on one line and the height simply follows the font size, so there is no taller value to calculate. The steps are:
- Load the workbook and get the first worksheet.
- Autofit the height of that row with
AutoFitRow. - Autofit the width of that column with
AutoFitColumn. - Save the workbook.
Here is a complete code example that autofits the height of a single row and the width of a single column in React:
function App() {
  const autoFitSingleRowColumn = async () => {
    // Get the Spire.XLS WASM module
    const xlsModule = window.wasmModule?.spirexls;

    // Check whether the module is ready
    if (!xlsModule) {
      alert('Spire.Xls is not ready yet');
      return;
    }

    // Load the font into the VFS
    await window.spire.FetchFileToVFS('ARIAL.TTF', '/Library/Fonts/', `${process.env.PUBLIC_URL}/font/`);

    // Load the Excel file into the VFS
    const inputFileName = 'AutoFitRowsAndColumns.xlsx';
    await window.spire.FetchFileToVFS(inputFileName, '', `${process.env.PUBLIC_URL}/static/data/`);

    // Load the workbook
    const workbook = new xlsModule.Workbook();
    workbook.LoadFromFile(inputFileName);

    // Get the first worksheet
    const sheet = workbook.Worksheets.get(0);

    // Autofit the height of row 2
    sheet.AutoFitRow(2);

    // Autofit the width of column 4
    sheet.AutoFitColumn(4);

    // Save the workbook
    const outputFileName = "AutoFitSingleRowColumn.xlsx";
    workbook.SaveToFile(outputFileName);

    // Dispose of the workbook object to free resources
    workbook.Dispose();

    // Read the result file from the VFS and trigger the download
    const fileArray = window.dotnetRuntime.Module.FS.readFile(outputFileName);
    const blob = new Blob([fileArray], { type: "application/vnd.openxmlformats-officedocument.spreadsheetml.sheet" });
    const url = URL.createObjectURL(blob);
    const a = document.createElement('a');
    a.href = url;
    a.download = outputFileName;
    a.click();
    URL.revokeObjectURL(url);
  };

  return (
    <div style={{ textAlign: 'center', height: '300px' }}>
      <h1>Autofit Row Height and Column Width</h1>
      <button onClick={autoFitSingleRowColumn}>Start</button>
    </div>
  );
}

export default App;
After running, the effect of autofitting a single row height and a single column width:
Autofit the Heights of Multiple Rows and the Widths of Multiple Columns
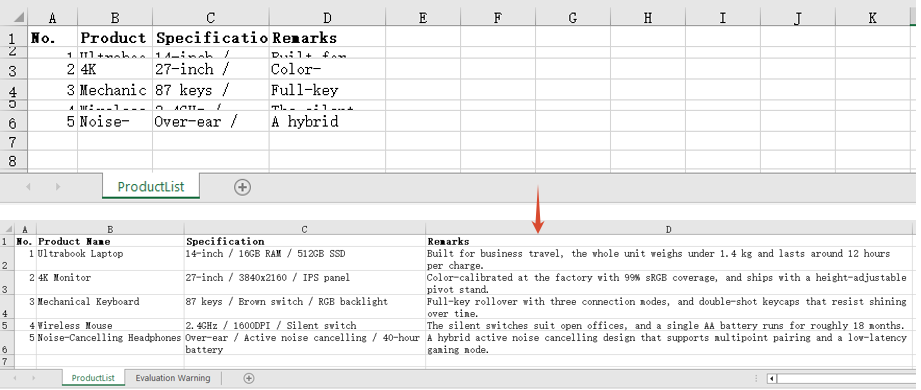
When the whole table needs tidying, calling the methods row by row is not realistic. Calling AutoFitRows or AutoFitColumns on a range recalculates every row and every column the range covers from its own content, so a single call lines up the whole block — the kind of pass you want before exporting a report. The steps are:
- Load the workbook and get the first worksheet.
- Autofit the heights of the rows with
AutoFitRows. - Autofit the widths of the columns with
AutoFitColumns. - Save the workbook.
Here is a complete code example that autofits the heights of multiple rows and the widths of multiple columns in React:
function App() {
  const autoFitMultipleRowsColumns = async () => {
    // Get the Spire.XLS WASM module
    const xlsModule = window.wasmModule?.spirexls;

    // Check whether the module is ready
    if (!xlsModule) {
      alert('Spire.Xls is not ready yet');
      return;
    }

    // Load the font into the VFS
    await window.spire.FetchFileToVFS('ARIAL.TTF', '/Library/Fonts/', `${process.env.PUBLIC_URL}/font/`);

    // Load the Excel file into the VFS
    const inputFileName = 'AutoFitRowsAndColumns.xlsx';
    await window.spire.FetchFileToVFS(inputFileName, '', `${process.env.PUBLIC_URL}/static/data/`);

    // Load the workbook
    const workbook = new xlsModule.Workbook();
    workbook.LoadFromFile(inputFileName);

    // Get the first worksheet
    const sheet = workbook.Worksheets.get(0);

    // Get the used range of the worksheet
    const range = sheet.AllocatedRange;

    // Autofit the height of every row in the range
    range.AutoFitRows();

    // Autofit the width of every column in the range
    range.AutoFitColumns();

    // Save the workbook
    const outputFileName = "AutoFitMultipleRowsColumns.xlsx";
    workbook.SaveToFile(outputFileName);

    // Dispose of the workbook object to free resources
    workbook.Dispose();

    // Read the result file from the VFS and trigger the download
    const fileArray = window.dotnetRuntime.Module.FS.readFile(outputFileName);
    const blob = new Blob([fileArray], { type: "application/vnd.openxmlformats-officedocument.spreadsheetml.sheet" });
    const url = URL.createObjectURL(blob);
    const a = document.createElement('a');
    a.href = url;
    a.download = outputFileName;
    a.click();
    URL.revokeObjectURL(url);
  };

  return (
    <div style={{ textAlign: 'center', height: '300px' }}>
      <h1>Autofit Row Height and Column Width</h1>
      <button onClick={autoFitMultipleRowsColumns}>Start</button>
    </div>
  );
}

export default App;
After running, the effect of autofitting multiple row heights and multiple column widths:
FAQ
I called AutoFitRow() and the row height did not change at all?
Cause: Row height autofit only applies to content that needs to wrap. With wrapping turned off the text stays on a single line and the height follows the font size, so autofit arrives at the same value as the existing height and appears to have done nothing.
Solution: Set WrapText to true first, then autofit the row height:
// With wrapping off, autofitting the row height changes nothing
sheet.Range.get("D2").Style.WrapText = false;
sheet.AutoFitRow(2);

// With wrapping on, the height is recalculated from the wrapped line count
sheet.Range.get("D2").Style.WrapText = true;
sheet.AutoFitRow(2);
AutoFitColumns() has no effect on merged cells?
Cause: Column width autofit measures the content of individual cells. In a merged range only the top-left cell actually holds text and every other position in the range is empty, so the width it works out is only enough for that top-left content.
Solution: Set the width of a merged range by hand with ColumnWidth:
// A7:D7 is a merged range, so autofit cannot work out its combined width
sheet.Range.get("A7:D7").Merge();
sheet.Range.get("A7:D7").AutoFitColumns();

// Set the column width by hand so the merged text fits
sheet.Range.get("A7").ColumnWidth = 40;
Get a Free License
Spire.XLS for JavaScript offers a 30-day full-featured free trial license with no functional limitations. Apply here to evaluate before purchasing.
Modify, Hide and Delete Named Ranges in React with JavaScript
A named range is not something you set up once and forget. As the data table is restructured, the original name may no longer fit, and the referred range can go stale when rows are added or removed. Some named ranges exist only as an intermediate helper for a formula and have no business showing up in the Name Manager. And named ranges that are no longer used, if kept forever, turn the name list into something long and hard to search. Modifying, hiding and deleting are therefore just as much a part of working with named ranges as creating them. Spire.XLS for JavaScript provides a complete named range management API and can perform all of the above in the browser through WebAssembly, with no backend service required.
This article covers three key features:
For installation and project setup, see Integrating Spire.XLS for JavaScript in a React Project. The examples below assume Spire.XLS is already installed and the WebAssembly module has been initialized.
Modify a Named Range
Modifying covers two independent aspects: the name itself and the referred range. The name is reassigned through the Name property and the referred range through the RefersToRange property. The two can be changed separately, or together as in the example below. The steps are:
- Load the workbook and get the first worksheet.
- Take the named range to modify with
workbook.NameRanges.get(0). - Set
Nameto the new name. - Point
RefersToRangeat the new cell range. - Save the workbook.
The following is a complete code example that shows how to modify a named range in React:
function App() {
  const modifyNamedRange = async () => {
    // Get the Spire.XLS WASM module
    const xlsModule = window.wasmModule?.spirexls;

    // Check if the module is ready
    if (!xlsModule) {
      alert('Spire.Xls is not ready yet');
      return;
    }

    // Load the font into VFS
    await window.spire.FetchFileToVFS('ARIAL.TTF', '/Library/Fonts/', `${process.env.PUBLIC_URL}/font/`);

    // Load the Excel file into VFS
    const inputFileName = 'AllNamedRanges.xlsx';
    await window.spire.FetchFileToVFS(inputFileName, '', `${process.env.PUBLIC_URL}/static/data/`);

    // Load the workbook
    const workbook = new xlsModule.Workbook();
    workbook.LoadFromFile(inputFileName);

    // Get the first worksheet
    let sheet = workbook.Worksheets.get(0);

    // Change the name of the named range
    workbook.NameRanges.get(0).Name = "RegionData";

    // Change the cell range the named range refers to
    workbook.NameRanges.get(0).RefersToRange = sheet.Range.get("B2:C4");

    // Save the workbook
    const outputFileName = 'ModifyNamedRange.xlsx';
    workbook.SaveToFile(outputFileName);

    // Release resources
    workbook.Dispose();

    // Read the result file from VFS and trigger the download
    const fileArray = window.dotnetRuntime.Module.FS.readFile(outputFileName);
    const blob = new Blob([fileArray], { type: "application/vnd.openxmlformats-officedocument.spreadsheetml.sheet" });
    const url = URL.createObjectURL(blob);
    const a = document.createElement('a');
    a.href = url;
    a.download = outputFileName;
    a.click();
    URL.revokeObjectURL(url);
  };

  return (
    <div style={{ textAlign: 'center', height: '300px' }}>
      <h1>Modify Named Range</h1>
      <button onClick={modifyNamedRange}>Start</button>
    </div>
  );
}

export default App;
After running, the effect of modifying a named range:
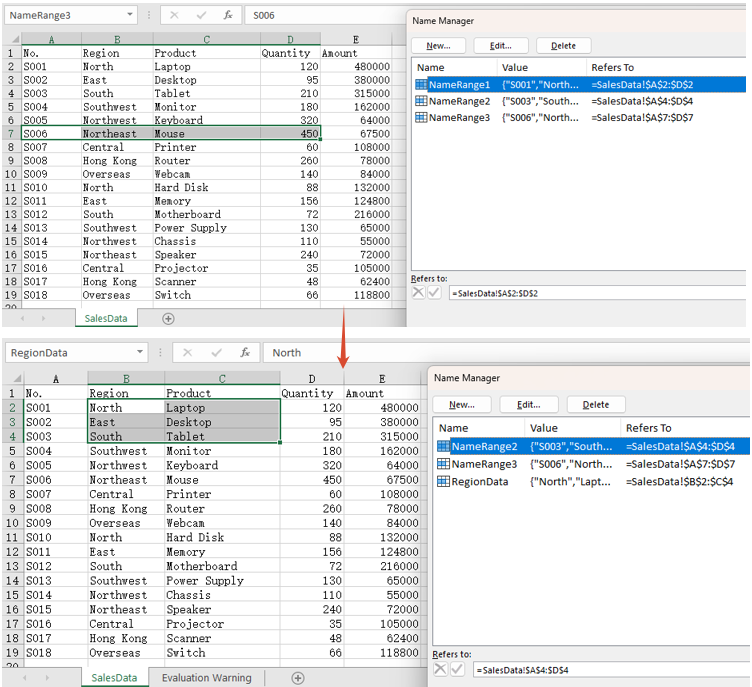
Hide a Named Range
Set the Visible property to false and the named range is hidden. A hidden named range is still stored in the workbook and formulas that refer to it are unaffected — it simply no longer appears in Excel's Name Manager and name box, which keeps the name list tidy. After hiding it, the example below also writes the formula =SUM(NameRange1) into cell F2: the formula still calculates normally, which is exactly what shows that the named range is only hidden, not deleted. The steps are:
- Load the workbook and get the first worksheet.
- Take the named range to hide.
- Set
Visibletofalse. - Write a formula that refers to the named range into a cell, to confirm it still works.
- Save the workbook.
The following is a complete code example that shows how to hide a named range in React:
function App() {
  const hideNamedRange = async () => {
    // Get the Spire.XLS WASM module
    const xlsModule = window.wasmModule?.spirexls;

    // Check if the module is ready
    if (!xlsModule) {
      alert('Spire.Xls is not ready yet');
      return;
    }

    // Load the font into VFS
    await window.spire.FetchFileToVFS('ARIAL.TTF', '/Library/Fonts/', `${process.env.PUBLIC_URL}/font/`);

    // Load the Excel file into VFS
    const inputFileName = 'AllNamedRanges.xlsx';
    await window.spire.FetchFileToVFS(inputFileName, '', `${process.env.PUBLIC_URL}/static/data/`);

    // Load the workbook
    const workbook = new xlsModule.Workbook();
    workbook.LoadFromFile(inputFileName);

    // Get the first worksheet
    let sheet = workbook.Worksheets.get(0);

    // Hide the first named range
    workbook.NameRanges.get(0).Visible = false;

    // Write a formula that refers to the hidden named range, proving it still exists and works
    sheet.Range.get("F1").Text = "Sum After Hiding";
    sheet.Range.get("F2").Formula = "=SUM(NameRange1)";

    // Calculate the formulas so the saved file shows the result as soon as it is opened
    workbook.CalculateAllValue();

    // Save the workbook
    const outputFileName = 'HideNamedRange.xlsx';
    workbook.SaveToFile(outputFileName);

    // Release resources
    workbook.Dispose();

    // Read the result file from VFS and trigger the download
    const fileArray = window.dotnetRuntime.Module.FS.readFile(outputFileName);
    const blob = new Blob([fileArray], { type: "application/vnd.openxmlformats-officedocument.spreadsheetml.sheet" });
    const url = URL.createObjectURL(blob);
    const a = document.createElement('a');
    a.href = url;
    a.download = outputFileName;
    a.click();
    URL.revokeObjectURL(url);
  };

  return (
    <div style={{ textAlign: 'center', height: '300px' }}>
      <h1>Hide Named Range</h1>
      <button onClick={hideNamedRange}>Start</button>
    </div>
  );
}

export default App;
After running, the effect of hiding a named range:
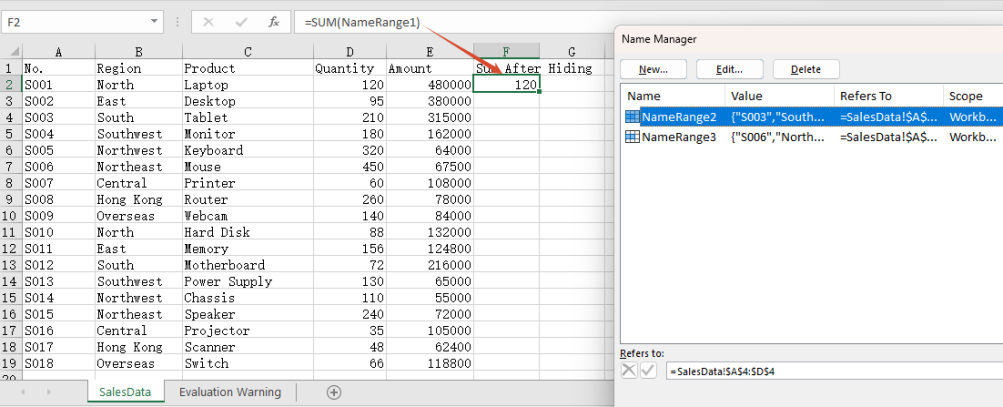
Note: The formula in cell F2 refers to the hidden NameRange1, and it still calculates 120. That shows the named range has only been hidden from view, not removed from the workbook.
Delete a Named Range
There are two ways to delete a named range: call Remove() when the name is known, or RemoveAt() when the position is known. Both remove the named range from the workbook entirely. The steps are:
- Load the workbook.
- Call
Remove()to delete a named range by name. - Call
RemoveAt()to delete a named range by index. - Save the workbook.
The following is a complete code example that shows how to delete a named range in React:
function App() {
  const deleteNamedRange = async () => {
    // Get the Spire.XLS WASM module
    const xlsModule = window.wasmModule?.spirexls;

    // Check if the module is ready
    if (!xlsModule) {
      alert('Spire.Xls is not ready yet');
      return;
    }

    // Load the font into VFS
    await window.spire.FetchFileToVFS('ARIAL.TTF', '/Library/Fonts/', `${process.env.PUBLIC_URL}/font/`);

    // Load the Excel file into VFS
    const inputFileName = 'AllNamedRanges.xlsx';
    await window.spire.FetchFileToVFS(inputFileName, '', `${process.env.PUBLIC_URL}/static/data/`);

    // Load the workbook
    const workbook = new xlsModule.Workbook();
    workbook.LoadFromFile(inputFileName);

    // Delete a named range by name
    workbook.NameRanges.Remove("NameRange2");

    // Delete a named range by index
    workbook.NameRanges.RemoveAt(0);

    // Save the workbook
    const outputFileName = 'DeleteNamedRange.xlsx';
    workbook.SaveToFile(outputFileName);

    // Release resources
    workbook.Dispose();

    // Read the result file from VFS and trigger the download
    const fileArray = window.dotnetRuntime.Module.FS.readFile(outputFileName);
    const blob = new Blob([fileArray], { type: "application/vnd.openxmlformats-officedocument.spreadsheetml.sheet" });
    const url = URL.createObjectURL(blob);
    const a = document.createElement('a');
    a.href = url;
    a.download = outputFileName;
    a.click();
    URL.revokeObjectURL(url);
  };

  return (
    <div style={{ textAlign: 'center', height: '300px' }}>
      <h1>Delete Named Range</h1>
      <button onClick={deleteNamedRange}>Start</button>
    </div>
  );
}

export default App;
After running, the effect of deleting a named range:
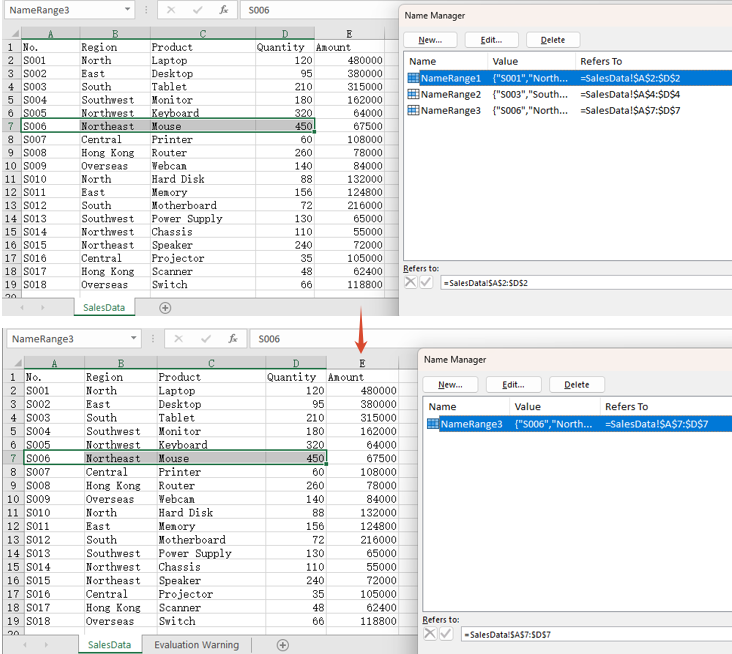
FAQ
Why is the result of a formula missing when the saved file is opened?
Cause: Setting only the Formula property of a cell does not make Spire calculate it. The saved file then contains the formula itself but no calculated result value, so the cell comes up blank when the file is opened.
Solution: Call workbook.CalculateAllValue() before saving, to evaluate the formulas first:
// Calculate all formulas so the result value is written into the saved file
workbook.CalculateAllValue();
Can I pass a named range object to the delete API?
Cause: Remove() takes a name string. Passing a NameRange object does not match the expected type and throws Assert failed: Value is not a String, and nothing is deleted.
Solution: Pass the name when it is known, or the index when the position is known:
// Delete by name
workbook.NameRanges.Remove("NameRange2");

// Delete by index
workbook.NameRanges.RemoveAt(0);
Get a Free License
Spire.XLS for JavaScript offers a 30-day full-featured free trial license with no functional limitations. Apply here to evaluate before purchasing.
Set the Alignment, Indent, Orientation and Wrapping of Excel Cell Text in React with JavaScript
How readable a table is often has nothing to do with the data itself and everything to do with how the text sits inside its cells. Titles need to be centred, amounts need to be pushed right, multi-line descriptions need to be indented, a long sentence in a narrow column needs to fold, and a header set at an angle fits more information into limited column width. All of these are cell text layout settings. Spire.XLS for JavaScript performs them directly in the browser through WebAssembly, managing input and output files with a virtual file system (VFS) and requiring no backend service.
This article covers four key features:
- Set the Alignment of Text
- Set the Indent of Text
- Set the Orientation of Text
- Set the Wrapping of Text
For installation and project setup, see Integrating Spire.XLS for JavaScript in a React Project. The examples below assume Spire.XLS is already installed and the WebAssembly module has been initialized.
Set the Alignment of Text
Alignment works along two axes. Vertical alignment decides where the text sits within the height of the cell and is set through the VerticalAlignment property, which accepts Top, Center, Bottom and others. Horizontal alignment decides where the text sits within the width of the cell and is set through the HorizontalAlignment property, which accepts General, Left, Center, Right and others. The two are independent and can be combined freely. The steps are as follows:
- Create a workbook and get the first worksheet.
- Write the sample text.
- Set the vertical alignment through
VerticalAlignment. - Set the horizontal alignment through
HorizontalAlignment. - Save the workbook.
Here is a complete code example that sets the alignment of cell text in React:
function App() {
  const setTextAlignment = async () => {
    // Get the Spire.XLS WASM module
    const xlsModule = window.wasmModule?.spirexls;

    // Check if the module is ready
    if (!xlsModule) {
      alert('Spire.Xls is not ready yet');
      return;
    }

    // Load the font into VFS
    await window.spire.FetchFileToVFS('ARIAL.TTF', '/Library/Fonts/', `${process.env.PUBLIC_URL}/font/`);

    // Create a new workbook
    const workbook = new xlsModule.Workbook();

    // Get the first worksheet
    const sheet = workbook.Worksheets.get(0);

    // Write the sample text for vertical alignment
    sheet.Range.get("A1").Text = "Alignment";
    sheet.Range.get("B1").Text = "Sample";
    sheet.Range.get("A2").Text = "Vertical Top";
    sheet.Range.get("B2").Text = "VerticalAlignType.Top";
    sheet.Range.get("A3").Text = "Vertical Center";
    sheet.Range.get("B3").Text = "VerticalAlignType.Center";
    sheet.Range.get("A4").Text = "Vertical Bottom";
    sheet.Range.get("B4").Text = "VerticalAlignType.Bottom";

    // Write the sample text for horizontal alignment
    sheet.Range.get("A6").Text = "Horizontal General";
    sheet.Range.get("B6").Text = "HorizontalAlignType.General";
    sheet.Range.get("A7").Text = "Horizontal Left";
    sheet.Range.get("B7").Text = "HorizontalAlignType.Left";
    sheet.Range.get("A8").Text = "Horizontal Center";
    sheet.Range.get("B8").Text = "HorizontalAlignType.Center";
    sheet.Range.get("A9").Text = "Horizontal Right";
    sheet.Range.get("B9").Text = "HorizontalAlignType.Right";

    // Set the vertical alignment
    sheet.Range.get("B2").Style.VerticalAlignment = xlsModule.VerticalAlignType.Top;
    sheet.Range.get("B3").Style.VerticalAlignment = xlsModule.VerticalAlignType.Center;
    sheet.Range.get("B4").Style.VerticalAlignment = xlsModule.VerticalAlignType.Bottom;

    // Set the horizontal alignment
    sheet.Range.get("B6").Style.HorizontalAlignment = xlsModule.HorizontalAlignType.General;
    sheet.Range.get("B7").Style.HorizontalAlignment = xlsModule.HorizontalAlignType.Left;
    sheet.Range.get("B8").Style.HorizontalAlignment = xlsModule.HorizontalAlignType.Center;
    sheet.Range.get("B9").Style.HorizontalAlignment = xlsModule.HorizontalAlignType.Right;

    // Widen column B and raise rows 2-4 so the alignment differences are visible
    sheet.Range.get("B1:B9").ColumnWidth = 32;
    sheet.Range.get("A2:B4").RowHeight = 40;

    // Save the workbook
    const outputFileName = "TextAlignment.xlsx";
    workbook.SaveToFile(outputFileName);

    // Release resources
    workbook.Dispose();

    // Read the result file from VFS and trigger the download
    const fileArray = window.dotnetRuntime.Module.FS.readFile(outputFileName);
    const blob = new Blob([fileArray], { type: "application/vnd.openxmlformats-officedocument.spreadsheetml.sheet" });
    const url = URL.createObjectURL(blob);
    const a = document.createElement('a');
    a.href = url;
    a.download = outputFileName;
    a.click();
    URL.revokeObjectURL(url);
  };

  return (
    <div style={{ textAlign: 'center', height: '300px' }}>
      <h1>Set Text Alignment</h1>
      <button onClick={setTextAlignment}>Start</button>
    </div>
  );
}

export default App;
Vertical alignment is only visible once the row is tall enough, which is why the example sets rows 2-4 to a height of 40; horizontal alignment is at its clearest once the column is wide enough.
After running, the effect of setting the alignment of text:
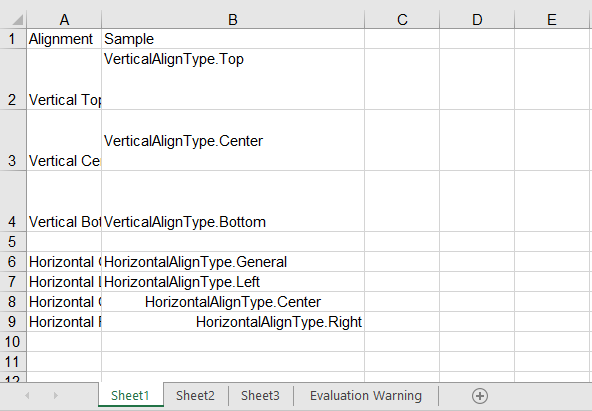
Set the Indent of Text
Indentation leaves blank space on the left (or right) inside a cell, which suits data that has a hierarchy, such as "region → city". The indent level is set through the IndentLevel property, where one level is roughly one character wide. The steps are as follows:
- Create a workbook and get the first worksheet.
- Write the sample text.
- Set the horizontal alignment to left so the indentation takes effect.
- Set an increasing indent level through
IndentLevel. - Save the workbook.
Here is a complete code example that sets the indent of cell text in React:
function App() {
  const setTextIndent = async () => {
    // Get the Spire.XLS WASM module
    const xlsModule = window.wasmModule?.spirexls;

    // Check if the module is ready
    if (!xlsModule) {
      alert('Spire.Xls is not ready yet');
      return;
    }

    // Load the font into VFS
    await window.spire.FetchFileToVFS('ARIAL.TTF', '/Library/Fonts/', `${process.env.PUBLIC_URL}/font/`);

    // Create a new workbook
    const workbook = new xlsModule.Workbook();

    // Get the first worksheet
    const sheet = workbook.Worksheets.get(0);

    // Write the sample text
    sheet.Range.get("A1").Text = "Indent Level";
    sheet.Range.get("B1").Text = "Sample";
    sheet.Range.get("A2").Text = "0";
    sheet.Range.get("B2").Text = "Worldwide";
    sheet.Range.get("A3").Text = "1";
    sheet.Range.get("B3").Text = "North Region";
    sheet.Range.get("A4").Text = "2";
    sheet.Range.get("B4").Text = "Beijing";
    sheet.Range.get("A5").Text = "3";
    sheet.Range.get("B5").Text = "Haidian District";

    // Indentation only takes effect together with left alignment
    sheet.Range.get("B2:B5").Style.HorizontalAlignment = xlsModule.HorizontalAlignType.Left;

    // Set the indentation level of the text
    sheet.Range.get("B2").Style.IndentLevel = 0;
    sheet.Range.get("B3").Style.IndentLevel = 1;
    sheet.Range.get("B4").Style.IndentLevel = 2;
    sheet.Range.get("B5").Style.IndentLevel = 3;

    // Widen column B so the indentation differences are visible
    sheet.Range.get("B1:B5").ColumnWidth = 32;

    // Save the workbook
    const outputFileName = "Indentation.xlsx";
    workbook.SaveToFile(outputFileName);

    // Release resources
    workbook.Dispose();

    // Read the result file from VFS and trigger the download
    const fileArray = window.dotnetRuntime.Module.FS.readFile(outputFileName);
    const blob = new Blob([fileArray], { type: "application/vnd.openxmlformats-officedocument.spreadsheetml.sheet" });
    const url = URL.createObjectURL(blob);
    const a = document.createElement('a');
    a.href = url;
    a.download = outputFileName;
    a.click();
    URL.revokeObjectURL(url);
  };

  return (
    <div style={{ textAlign: 'center', height: '300px' }}>
      <h1>Set Text Indent</h1>
      <button onClick={setTextIndent}>Start</button>
    </div>
  );
}

export default App;
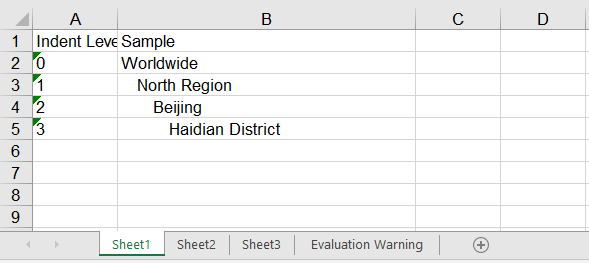
The four rows step in one level at a time, forming exactly the hierarchy "Worldwide → North Region → Beijing → Haidian District". Cell B5 has an IndentLevel of 3, so its text starts about three characters in from the left edge.
After running, the effect of setting the indent of text:
Set the Orientation of Text
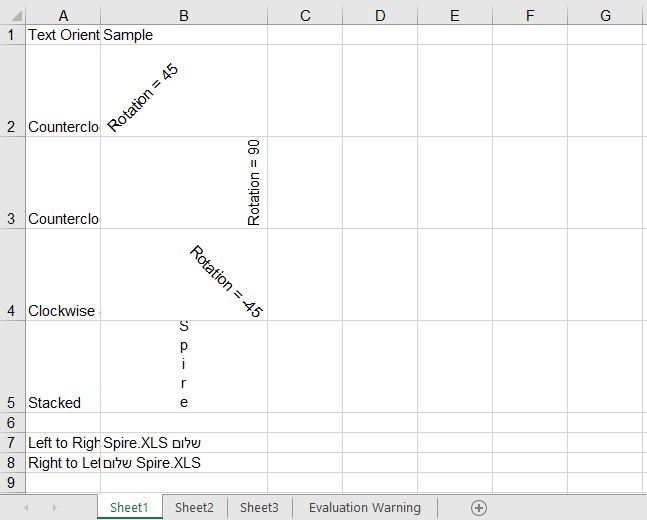
Text orientation covers two independent settings. The first is the rotation angle, set through the Rotation property, where values 0 to 90 are degrees counterclockwise and -1 to -90 are degrees clockwise. There is also the special value 255, which stacks the text vertically one character per line; rotation is often used to fit a long header into a narrow column. The second is the reading order, set through the ReadingOrder property, which accepts LeftToRight, RightToLeft and Context. It decides which direction the mixed content in a cell is laid out from, and is used for languages written from right to left such as Arabic and Hebrew. Rotated or stacked text takes up far more height than usual, so the row height has to be raised at the same time to keep the text inside the cell. The steps are as follows:
- Create a workbook and get the first worksheet.
- Write the sample text.
- Set the rotation angle through
Rotation. - Set the reading order through
ReadingOrder. - Save the workbook.
Here is a complete code example that sets the orientation of cell text in React:
function App() {
  const setTextOrientation = async () => {
    // Get the Spire.XLS WASM module
    const xlsModule = window.wasmModule?.spirexls;

    // Check if the module is ready
    if (!xlsModule) {
      alert('Spire.Xls is not ready yet');
      return;
    }

    // Load the font into VFS
    await window.spire.FetchFileToVFS('ARIAL.TTF', '/Library/Fonts/', `${process.env.PUBLIC_URL}/font/`);

    // Create a new workbook
    const workbook = new xlsModule.Workbook();

    // Get the first worksheet
    const sheet = workbook.Worksheets.get(0);

    // Write the sample text for the rotation angle
    sheet.Range.get("A1").Text = "Text Orientation";
    sheet.Range.get("B1").Text = "Sample";
    sheet.Range.get("A2").Text = "Counterclockwise 45";
    sheet.Range.get("B2").Text = "Rotation = 45";
    sheet.Range.get("A3").Text = "Counterclockwise 90";
    sheet.Range.get("B3").Text = "Rotation = 90";
    sheet.Range.get("A4").Text = "Clockwise 45";
    sheet.Range.get("B4").Text = "Rotation = -45";
    sheet.Range.get("A5").Text = "Stacked";
    sheet.Range.get("B5").Text = "Spire";

    // Write the sample text for the reading order: Latin mixed with Hebrew, so the
    // difference between the two directions is actually visible
    sheet.Range.get("A7").Text = "Left to Right";
    sheet.Range.get("B7").Text = "Spire.XLS שלום";
    sheet.Range.get("A8").Text = "Right to Left";
    sheet.Range.get("B8").Text = "Spire.XLS שלום";

    // Set the rotation angle of the text; 255 stacks the text vertically
    sheet.Range.get("B2").Style.Rotation = 45;
    sheet.Range.get("B3").Style.Rotation = 90;
    sheet.Range.get("B4").Style.Rotation = -45;
    sheet.Range.get("B5").Style.Rotation = 255;

    // Set the reading order of the text
    sheet.Range.get("B7").Style.ReadingOrder = xlsModule.ReadingOrderType.LeftToRight;
    sheet.Range.get("B8").Style.ReadingOrder = xlsModule.ReadingOrderType.RightToLeft;

    // Widen column B and raise rows 2-5 so the rotated and stacked text fits
    sheet.Range.get("B1:B8").ColumnWidth = 20;
    sheet.Range.get("A2:B5").RowHeight = 60;

    // Save the workbook
    const outputFileName = "TextOrientation.xlsx";
    workbook.SaveToFile(outputFileName);

    // Release resources
    workbook.Dispose();

    // Read the result file from VFS and trigger the download
    const fileArray = window.dotnetRuntime.Module.FS.readFile(outputFileName);
    const blob = new Blob([fileArray], { type: "application/vnd.openxmlformats-officedocument.spreadsheetml.sheet" });
    const url = URL.createObjectURL(blob);
    const a = document.createElement('a');
    a.href = url;
    a.download = outputFileName;
    a.click();
    URL.revokeObjectURL(url);
  };

  return (
    <div style={{ textAlign: 'center', height: '300px' }}>
      <h1>Set Text Orientation</h1>
      <button onClick={setTextOrientation}>Start</button>
    </div>
  );
}

export default App;
In the example, B2, B3 and B4 are rotated 45 degrees, 90 degrees and -45 degrees respectively, and B5 uses a Rotation of 255, which stacks the text into a column running top to bottom; all five rows are given a height of 60. B7 and B8 hold the same mixed Latin and Hebrew string with opposite reading orders, and the Hebrew ends up on opposite sides in the two rows — which is exactly what reading order does to mixed content.
After running, the effect of setting the orientation of text:
Set the Wrapping of Text
When a piece of text is longer than the column, it spills over onto the neighbouring empty cell by default, and is cut off as soon as that neighbour has content of its own. Setting the WrapText property to true folds the text inside the cell instead; setting it to false returns the text to a single line. As with rotation, wrapping only changes how the text is laid out and does not adjust the row height by itself, so the row height is usually raised as well to show every folded line in full. The steps are as follows:
- Create a workbook and get the first worksheet.
- Write a long piece of text.
- Turn wrapping on or off through
WrapText. - Adjust the column width and row height so the folding is fully visible.
- Save the workbook.
Here is a complete code example that sets the wrapping of cell text in React:
function App() {
  const setTextWrap = async () => {
    // Get the Spire.XLS WASM module
    const xlsModule = window.wasmModule?.spirexls;

    // Check if the module is ready
    if (!xlsModule) {
      alert('Spire.Xls is not ready yet');
      return;
    }

    // Load the font into VFS
    await window.spire.FetchFileToVFS('ARIAL.TTF', '/Library/Fonts/', `${process.env.PUBLIC_URL}/font/`);

    // Create a new workbook
    const workbook = new xlsModule.Workbook();

    // Get the first worksheet
    const sheet = workbook.Worksheets.get(0);

    // Write the sample text
    sheet.Range.get("A1").Text = "Wrap Text";
    sheet.Range.get("B1").Text = "Sample";
    sheet.Range.get("A2").Text = "On";
    sheet.Range.get("B2").Text = "Spire.XLS for JavaScript can wrap text inside a cell in the browser.";
    sheet.Range.get("A3").Text = "Off";
    sheet.Range.get("B3").Text = "Spire.XLS for JavaScript can wrap text inside a cell in the browser.";

    // Turn wrapping on so the text folds inside the cell when it is wider than the column
    sheet.Range.get("B2").Style.WrapText = true;

    // Turn wrapping off so the text stays on a single line
    sheet.Range.get("B3").Style.WrapText = false;

    // Narrow column B and raise rows 2-3 so the wrapping is visible
    sheet.Range.get("B1:B3").ColumnWidth = 24;
    sheet.Range.get("A2:B3").RowHeight = 60;

    // Save the workbook
    const outputFileName = "WrapText.xlsx";
    workbook.SaveToFile(outputFileName);

    // Release resources
    workbook.Dispose();

    // Read the result file from VFS and trigger the download
    const fileArray = window.dotnetRuntime.Module.FS.readFile(outputFileName);
    const blob = new Blob([fileArray], { type: "application/vnd.openxmlformats-officedocument.spreadsheetml.sheet" });
    const url = URL.createObjectURL(blob);
    const a = document.createElement('a');
    a.href = url;
    a.download = outputFileName;
    a.click();
    URL.revokeObjectURL(url);
  };

  return (
    <div style={{ textAlign: 'center', height: '300px' }}>
      <h1>Set Text Wrap</h1>
      <button onClick={setTextWrap}>Start</button>
    </div>
  );
}

export default App;
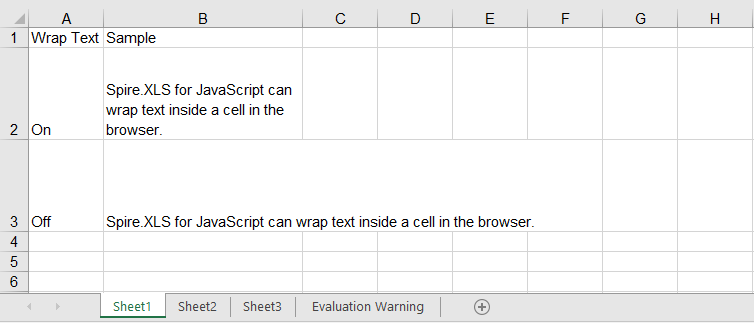
B2 and B3 hold the very same sentence; the only difference is the value of WrapText. B2 folds into several lines and shows in full, while B3 stays on one line. The cell to the right of B3 is empty, so the text spills into it; if there were content there, the overflow would simply be cut off.
After running, the effect of setting the wrapping of text:
FAQ
I set IndentLevel and the text is not indented at all?
Cause: Indentation is only displayed when the horizontal alignment is a non-General value such as Left or Right. Cells default to General alignment, and IndentLevel is ignored outright in that case — so setting only the indent level shows no change.
Solution: Set HorizontalAlignment first, then IndentLevel:
// Indentation only takes effect together with left alignment
sheet.Range.get("B2").Style.HorizontalAlignment = xlsModule.HorizontalAlignType.Left;
sheet.Range.get("B3").Style.HorizontalAlignment = xlsModule.HorizontalAlignType.Left;

// Set the indent level of the text
sheet.Range.get("B2").Style.IndentLevel = 1;
sheet.Range.get("B3").Style.IndentLevel = 2;
I want the text stacked vertically, one character per line — why does Rotation = 90 not do it?
Cause: The 0 to 90 and -1 to -90 ranges of Rotation only deal with the rotation angle. 90 merely lays the text on its side; it never breaks it into a column of single characters.
Solution: Stacked text needs the special value 255:
// 90 degrees simply rotates the text
sheet.Range.get("B2").Style.Rotation = 90;

// 255 stacks the text vertically, one character per line
sheet.Range.get("B3").Style.Rotation = 255;
Get a Free License
Spire.XLS for JavaScript offers a 30-day full-featured free trial license with no functional limitations. Apply here to evaluate before purchasing.
Automated Case File Archiving and Management with Spire.Agent.Office
In courts, law firms and compliance departments, electronic case file archiving is a high-frequency but tedious task. The materials of a single case are often scattered across dozens of PDFs — complaints, evidence lists, hearing transcripts, judgments — of varying counts and page lengths. Archiving means first organizing these loose materials into one complete volume that meets records-management standards, and then filling in an archive register that lists the name, creation date and page count of every material in the volume, for storage and later retrieval.
The traditional approach means switching between several tools: open each file to identify the material type, drag them into the conventional case-file order by hand, type out a cover page and a table of contents, then use image tools to add page numbers, watermarks and passwords separately. When the register is due, every material has to be opened all over again to copy out its name and page count by hand. With dozens of materials, this is slow and prone to mistakes or omissions.
The PDF AI capability of Spire.Agent.Office lets you describe the archiving requirements in natural language. The AI agent understands the request and handles two kinds of work automatically: turning loose materials into a well-formed volume, and extracting the volume's information into an archive register.
Comparison with Traditional SDK API
| Traditional Spire.Office for .NET API | Spire.Agent.Office | |
|---|---|---|
| Driving style | Write loops to iterate files plus code that orders, merges, stamps and encrypts, controlling every step | Describe the archiving requirements in natural language; the AI understands it and orchestrates the execution path |
| Code size | Case file consolidation usually needs 300-500 lines of C# (file enumeration, ordering, page merging, cover and contents generation, page-number drawing, watermark generation, encryption parameters, register reading, etc.) | About 10 lines of calling code + 1 natural-language instruction |
| Requirement change | Change the ordering/watermark style/register fields → change code → compile → redeploy | Modify the instruction and it takes effect immediately |
This article shows how to use the Spire.Agent.Office PDF AI capability to archive case files. Two cases demonstrate the two typical uses — "organizing the volume" and "registering the volume":
- Case 1: Merge case files into one volume
- Case 2: Extract material information and generate an archive register
For product installation and SpireToken configuration, please refer to Integrating Spire.Agent.Office in a .NET Project. The examples below assume that Spire.Agent.Office has been installed and SpireToken has been configured.
Case 1: Merge case files into one volume
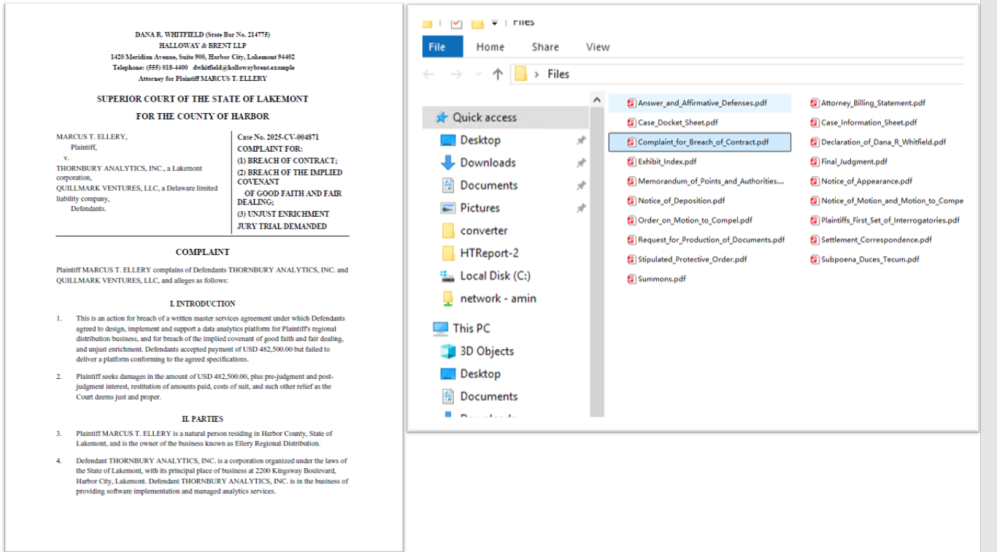
The types of material in a case are fairly fixed, but their counts and page lengths are not: complaints, evidence lists, hearing transcripts, judgments and so on — each type may have several documents, of differing lengths. Archiving requires not only stitching them into one volume in the conventional case-file order, but also adding a cover page and a table of contents, giving the volume continuous page numbers and a unified case-number identifier, and encrypting it when it is handed over or stored to prevent leaks. Doing this by hand means switching between multiple tools, and the more materials there are, the more likely the order gets mixed up, the page numbers fail to run on, or the encryption is missed.
The example below uses the Spire.Agent.Office agent to read all the PDF materials among the attachments, merge them into one volume in the conventional case-file order, generate a cover page and a table of contents automatically, remove the original page numbers and add continuous footers, then stamp the case-number watermark and set an open password:
using Spire.Agent.Office.AI;
using Spire.Agent.Office.Extensions;
using Spire.Pdf;

// Folder containing the PDF materials to consolidate: every PDF in this folder is treated as an attachment
string attachmentDir = @"E:\case_files";  // folder that holds the PDF materials of one case
string[] attachmentPaths = Directory.GetFiles(attachmentDir, "*.pdf");

// PDF-related configuration
string inputPath = "";  // empty input: all materials to archive are among the attachments
string savePath = null;  // result path
string OutDir = @"E:\output";  // output directory (the merged and encrypted case file is saved here)
string key = "**************************";  // SpireToken key
string instruction =
    "Read all the PDF case materials among the attachments and complete the consolidation:" +
    "1. Merge all materials into a single case file PDF in the conventional order of case file documents, and generate a cover page and a table of contents page based on the content;" +
    "2. Remove the original page numbers and add continuous footers to the merged file, centered in the footer as 'Page X of Y', with a font size smaller than the body text so that no existing content is covered;" +
    "3. Add the case-number watermark 'CASE-2026-0001' to every page, rotated 45 degrees, red, without affecting readability;" +
    "4. Set the open password '2026@Case0001' for the case file PDF; this password only restricts opening the document and does not affect printing or copying;" +
    "5. Add a table of contents page and keep the layout, fonts and page settings of each original material;" +
    "Save the final result as a PDF file";

// Call the PDF document processing function
AIResult result = ExecuteDemoPDF(instruction, inputPath, savePath, key, OutDir, attachmentPaths);

// Execute PDF AI processing
static AIResult ExecuteDemoPDF(string instruction, string inputPath, string savePath, string key, string output, string[] attachmentPaths)
{
    // Create the AIOptions configuration object
    AIOptions options = new AIOptions();
    options.WorkDir = output;  // set the working directory to the output directory
    options.SpireToken = key;  // set the SpireToken key

    // Process the PDF document using a PdfDocument object
    using (PdfDocument pdf = new PdfDocument())
    {
        // The input file is empty so nothing is loaded; all files to process come from the attachments
        if (!string.IsNullOrEmpty(inputPath) && File.Exists(inputPath))
        {
            pdf.LoadFromFile(inputPath);
        }
        // Create the AI document processor
        AIDocumentProcessor processor = pdf.AI(options);

        // Execute the AI instruction
        return processor.ExecuteInstruction(pdf, instruction, savePath, attachmentPaths);
    }
}
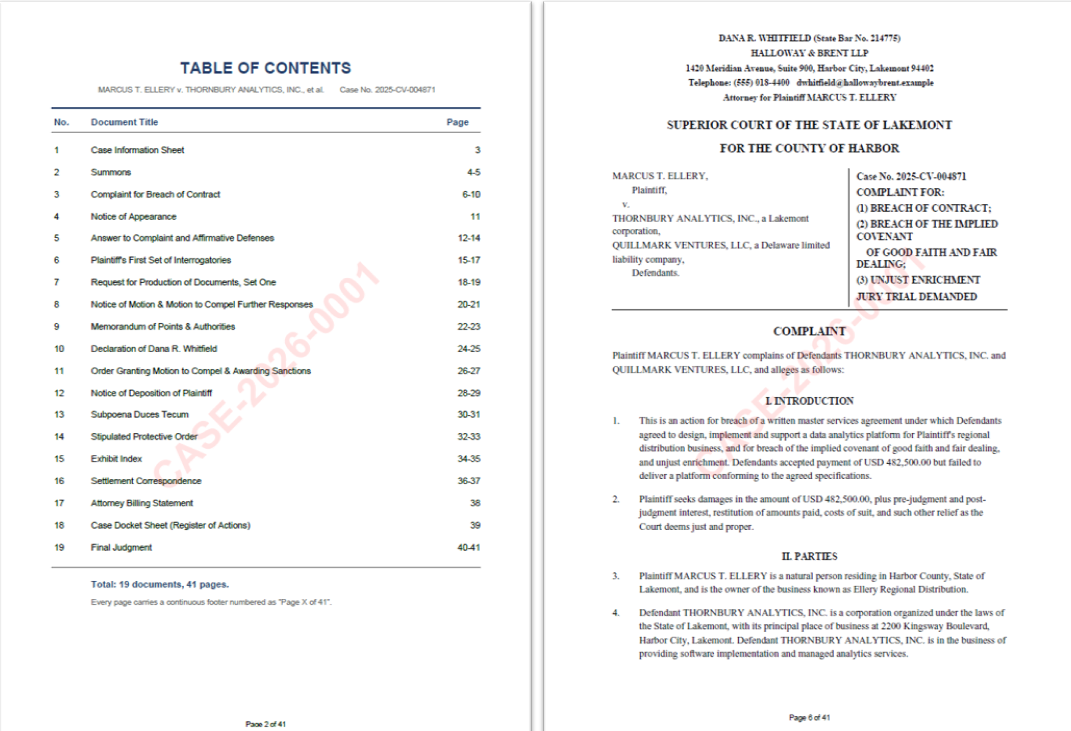
The PDF case materials to be consolidated
 The encrypted case file merged in order, with page numbers and watermark
Case 2: Extract material information and generate an archive register
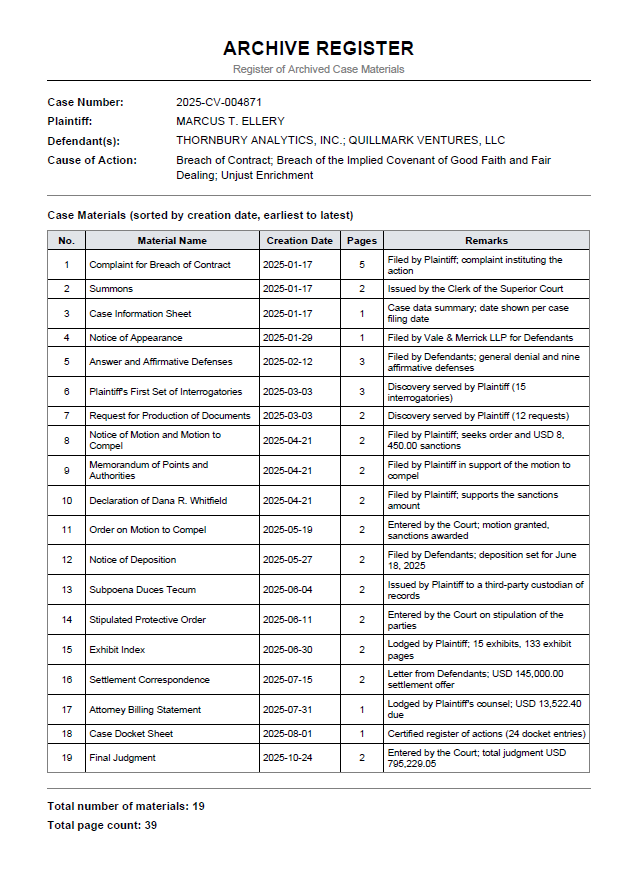
Once the volume is organized, an archive register has to be filed together with it. The register lists the name, creation date and page count of every material in the volume, headed by the case number, the parties and the cause of action. All of this information is already inside the materials themselves, but the traditional approach can only copy it out by hand, opening each material one by one — with many materials, a wrong page count or date is almost unavoidable.
Unlike Case 1, this case does not modify any page. It only reads information: the input is the same set of PDF attachments, but the output is a newly generated register PDF.
The example below uses the Spire.Agent.Office agent to read all the PDF materials among the attachments, extract the case information and the per-material information, sort them by creation date and compile an archive register:
using Spire.Agent.Office.AI;
using Spire.Agent.Office.Extensions;
using Spire.Pdf;

// Folder containing the PDF materials to register: every PDF in this folder is treated as an attachment
string attachmentDir = @"E:\case_files";  // folder that holds the PDF materials of one case
string[] attachmentPaths = Directory.GetFiles(attachmentDir, "*.pdf");

// PDF-related configuration
string inputPath = "";  // empty input: all materials to register are among the attachments
string savePath = null;  // result path
string OutDir = @"E:\output-register";  // output directory (the archive register is saved here)
string key = "**************************";  // SpireToken key
string instruction =
    "Read all the PDF case materials among the attachments, extract the information and compile an 'Archive Register':" +
    "1. Extract the basic case information from the materials: case number, plaintiff, defendant and cause of action;" +
    "2. Extract the material name, creation date and page count from each material;" +
    "3. Sort the materials from the earliest creation date to the latest;" +
    "4. Generate a PDF-format 'Archive Register' in the output directory, with columns: Serial Number, Material Name, Creation Date, Pages, Remarks;" +
    "5. List the case number, plaintiff, defendant and cause of action above the table, and summarize the number of materials and the total page count below it;" ;

// Call the PDF document processing function
AIResult result = ExecuteDemoPDF(instruction, inputPath, savePath, key, OutDir, attachmentPaths);

// Execute PDF AI processing
static AIResult ExecuteDemoPDF(string instruction, string inputPath, string savePath, string key, string output, string[] attachmentPaths)
{
    // Create the AIOptions configuration object
    AIOptions options = new AIOptions();
    options.WorkDir = output;  // set the working directory to the output directory
    options.SpireToken = key;  // set the SpireToken key

    // Process the PDF document using a PdfDocument object
    using (PdfDocument pdf = new PdfDocument())
    {
        // The input file is empty so nothing is loaded; all files to process come from the attachments
        if (!string.IsNullOrEmpty(inputPath) && File.Exists(inputPath))
        {
            pdf.LoadFromFile(inputPath);
        }
        // Create the AI document processor
        AIDocumentProcessor processor = pdf.AI(options);

        // Execute the AI instruction
        return processor.ExecuteInstruction(pdf, instruction, savePath, attachmentPaths);
    }
}
Generated archive register PDF
FAQ
Will the page numbers and watermark cover the body text?
Cause: Page numbers and watermarks are drawing layers overlaid on the page; a poorly chosen position or opacity can indeed cover the content.
Solution: Describe the position and style explicitly in the instruction (for example, "page numbers centered in the footer", "watermark rotated 45 degrees, red") and the AI will draw them as described. When adding page numbers and watermarks, Spire.Agent.Office does not change the original layout, fonts or page settings of the body text.
How is the merge order of the materials determined?
Cause: Case 1 arranges the materials in the conventional order of case file documents (complaint, evidence list, transcript, judgment and so on), while Case 2 sorts them by creation date. If a material type is unusual, or a creation date cannot be recognized, the result may not be as expected.
Solution: For Case 1, state the volume order directly in the instruction (for example, "arrange in the order of complaint, evidence list, hearing transcript, judgment"). For Case 2, make sure the materials carry a creation date, and add a fallback rule for those that genuinely lack one (for example, "materials without a date go last, with the remarks column marked 'date pending'").
Getting a SpireToken Key
- Contact sales@e-iceblue.com or visit https://www.e-iceblue.com/TemLicense.html to obtain a trial/commercial API key
Configure it in your code:
AIOptions options = new AIOptions();
options.SpireToken = key;
Financial Report Parsing and Valuation Modeling Automation with Spire.Agent.Office in C#
In the field of financial analysis and investment research, interpreting listed company financial reports is one of the most fundamental yet time-consuming tasks. A complete annual report is quite lengthy, encompassing not only core statements such as the balance sheet, income statement, cash flow statement, and statement of changes in shareholders' equity, but also a large amount of detailed data in the notes. Analysts need to extract key data from these documents and generate visual charts before forming investment judgments. The traditional approach typically requires manually flipping through PDFs, manually entering data into Excel, manually drawing charts, and writing analysis conclusions. The entire process takes 4-8 hours and is highly prone to errors caused by data entry mistakes.
But parsing is only the first step. In a real investment research and financial modeling workflow, the data ultimately has to land in the analyst's own valuation model. And the valuation model is precisely the most delicate part of the whole workflow: it is usually built up over months or years, containing a large number of custom macros (VBA), pivot tables and deeply nested formulas. The traditional approach leaves no choice but to key the data in cell by cell — the reason nobody dares to batch-write it with a script is that most third-party Excel libraries rebuild the workbook structure when reading and writing. The result is lost macros, broken pivot tables and nested formulas flattened into static values — a carefully maintained model ruined.
This article uses two connected cases and the Spire.Agent.Office Excel AI capabilities to cover the complete chain from "PDF financial report" to "valuation conclusion":
- Case One: Long-Text Financial Report Data Extraction and Analysis
- Case Two: Injecting Financial Data into a Preset Valuation Model
For product installation and SpireToken configuration, please refer to Integrating Spire.Agent.Office in a .NET Project. The following examples assume Spire.Agent.Office is already installed and SpireToken is configured.
Comparison with Traditional SDK API Processing
| Traditional Spire.Office for .NET API | Spire.Agent.Office Processing | |
|---|---|---|
| Driving Method | Write PDF parsing + cell writing + chart creation + formula calculation code | Describe the goal in natural language, AI understands and automatically orchestrates the execution path |
| Code Volume | The two cases together typically require 800-1500 lines of C# code (including PDF table positioning, row/column parsing, chart configuration, etc.) | Approximately 20 lines of calling code + two natural language instructions |
| Table Recognition | Must manually locate table positions in PDF, handle cross-page table splitting, merged cells, and other logic | AI automatically identifies table structures in the document, understands headers and hierarchical relationships |
| Chart Generation | Must manually create Chart objects, configure data ranges, set chart types and styles | AI automatically selects the most appropriate chart type based on data semantics |
| Data Injection | Must hard-code a "source row N → template row M" mapping; any change in reporting structure means changing the code | AI matches by item name semantics; row/column order changes in the source do not affect the result |
| Macros and Pivot Tables | Must handle VBA project and pivot cache preservation yourself; a single mistake corrupts them | Macros, pivot tables and charts are preserved as-is; the AI writes only to the target cells |
| Requirement Changes | Adding new analysis dimensions requires modifying code → compiling → deploying | Modify the description in the instruction, takes effect immediately |
Case One: Long-Text Financial Report Data Extraction and Analysis
AI reads a PDF financial report file, automatically identifies and extracts financial statement tables into an Excel file, while automatically generating visual charts and financial analysis from the data. The entire process requires only one piece of code and one instruction.
using Spire.Agent.Office.AI;
using Spire.Agent.Office.Extensions;
using Spire.Xls;

// PDF financial report file to be processed (passed as an attachment)
string[] attachmentPaths = new string[] { @"C:\FinancialReport\ListedCompany2025AnnualReport.pdf" };
// Save path of the result Excel document
string savePath = @"C:\FinancialReport\AnalysisResult.xlsx";
// SpireToken Key (apply on the official website)
string key = "sk-***************************";

// Natural language instruction
string instruction =
    "Process the attachment file as follows: " +
    "1. Extract all tables from the financial reporting section, placing each table in a separate worksheet named after the original table. " +
    "2. Preserve all original data without adding or modifying any values. " +
    "3. Enhance table readability with appropriate formatting. " +
    "4. Merge multi-page tables into a single worksheet. " +
    "5. Generate suitable charts to visualize the data from each table. " +
    "6. Use the extracted raw data directly for charting, without adding or modifying any values. " +
    "7. Analyze and summarize the company's financial status and trends based on the data provided.";

// AI generation
AIResult result = AnalyzeFinancialReport(instruction, savePath, key, attachmentPaths);

// AI-assisted financial report analysis
static AIResult AnalyzeFinancialReport(string instruction, string savePath, string key, string[] attachmentPaths)
{
    // Configure the AI processing options
    AIOptions options = new AIOptions();
    options.SpireToken = key;
    options.TimeoutMs = 10000000;

    using (Workbook wb = new Workbook())
    {
        AIDocumentProcessor processor = wb.AI(options);
        return processor.ExecuteInstruction(wb, instruction, savePath, attachmentPaths);
    }
}
Financial Report Data Processing and Chart Analysis Results:
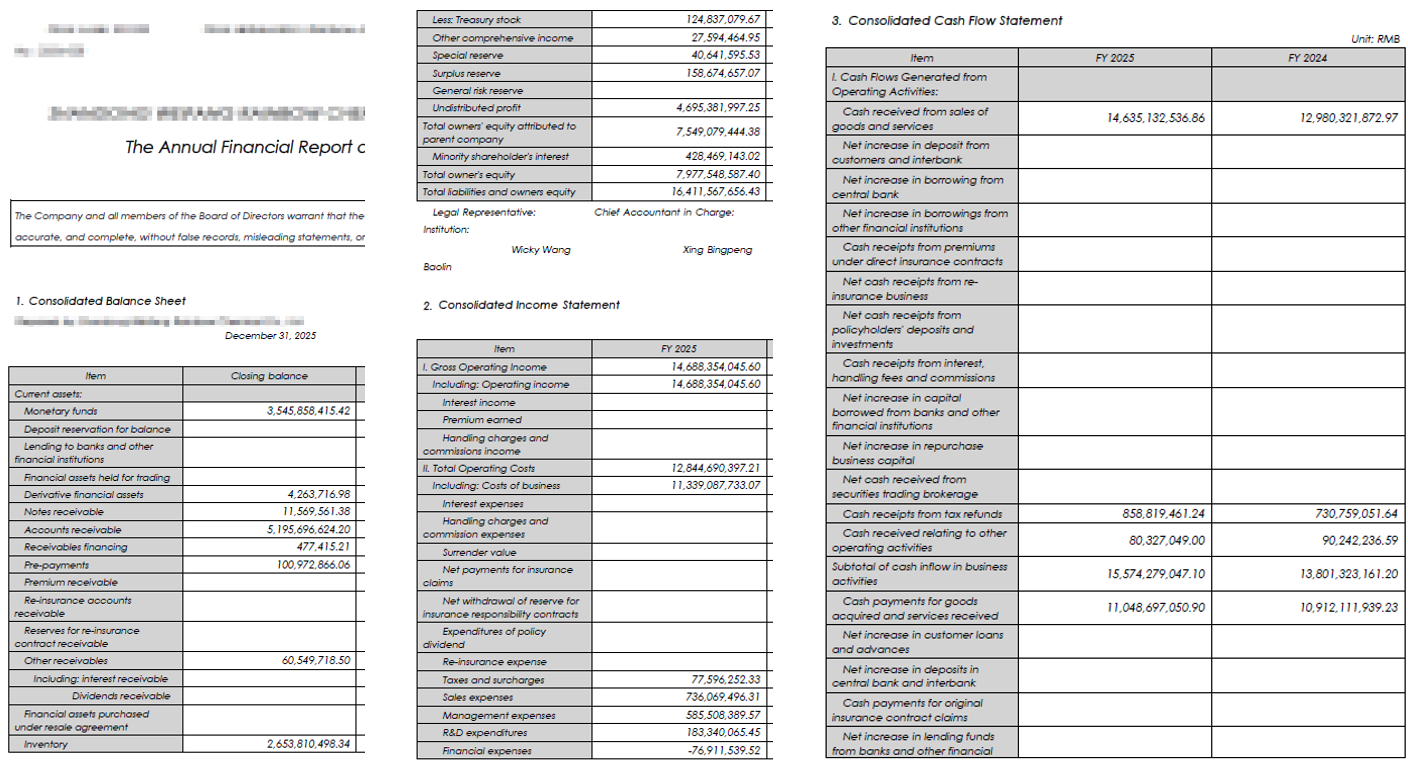 Description: The original input file
The output consists of two parts:
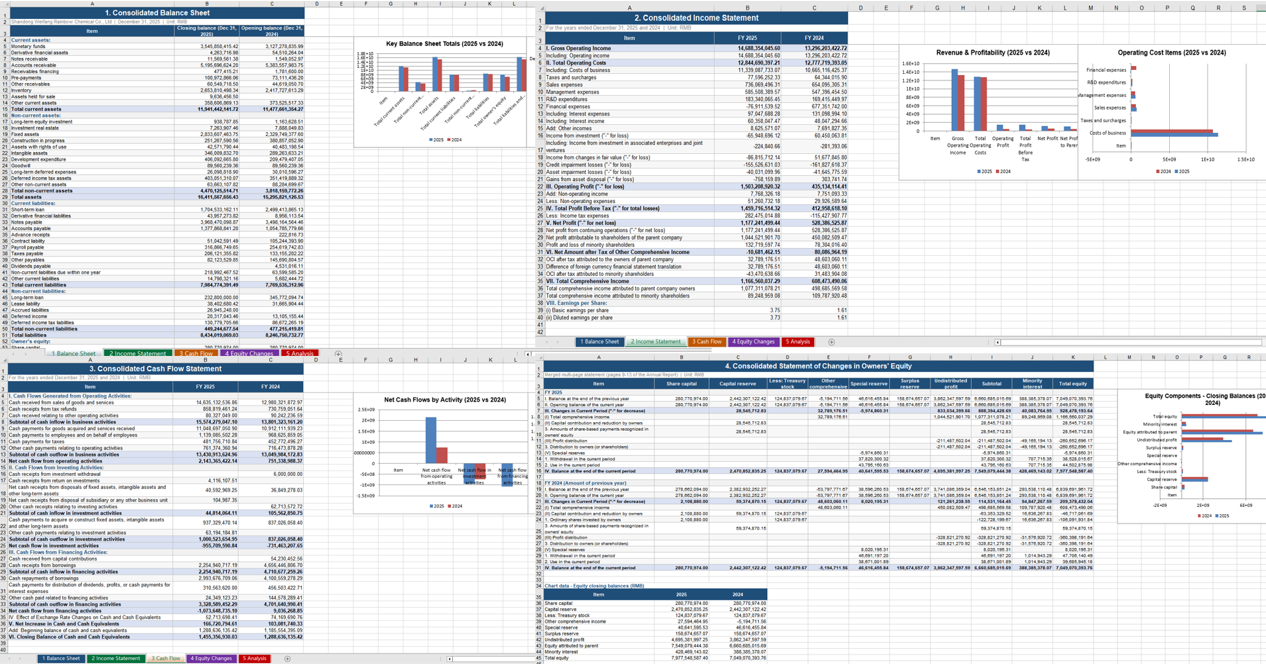 Description: Table data extracted from the PDF financial report, with corresponding visual charts.
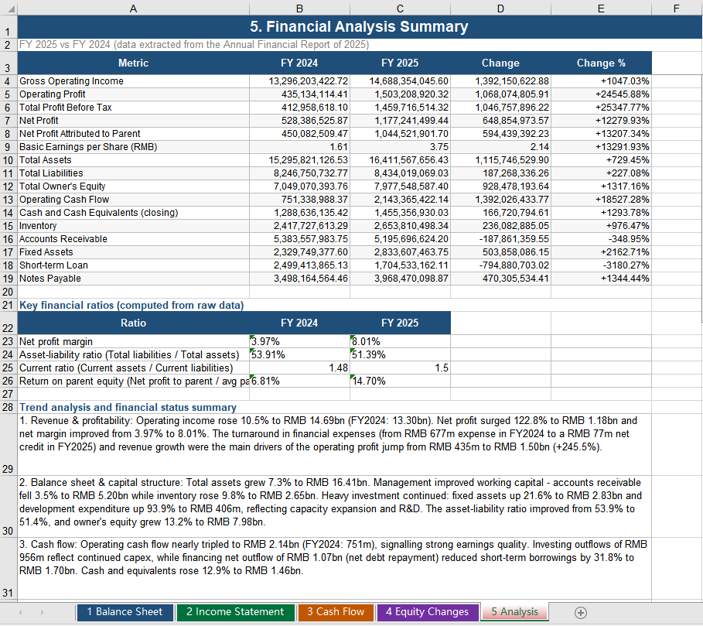 Description: Financial analysis conclusions generated from the extracted data.
Case Two: Injecting Financial Data into a Preset Valuation Model
Case one produced "data"; case two is about "modeling". The process takes two inputs: a preset valuation model template (.xlsm, containing macros, pivot tables and nested formulas) and the financial data workbook produced by case one (.xlsx). AI reads the financial data, fills it into the "Data Input" worksheet of the template by matching item names, and the formulas inside the model recalculate immediately — the valuation curve updates itself.
using Spire.Agent.Office.AI;
using Spire.Agent.Office.Extensions;
using Spire.Xls;

// Preset valuation model template (macros / pivot table / nested formulas / valuation curve chart)
string inputPath = @"C:\FinancialReport\ValuationModelTemplate.xlsm";
// Financial data workbook produced by case one (passed as an attachment)
string[] attachmentPaths = new string[] { @"C:\FinancialReport\AnalysisResult.xlsx" };
// Result document path (null here; the output folder below is used instead)
string savePath = null;
// Output directory
string OutDir = @"C:\FinancialReport\output";
// SpireToken Key (apply on the official website)
string key = "sk-***************************";

// Natural language instruction
string instruction =
    "Read the financial data in the attachment and fill it into the Data Input worksheet of the current valuation model template by matching item names, current period and prior period into the two respective columns; " +
    "fill only the shaded cells, do not modify any existing formula; " +
    "keep the existing macros, pivot table, formulas and chart in the template; " +
    "recalculate the model, refresh the pivot table and update the Valuation Curve after filling; " +
    "save the final result as a macro-enabled Excel file";

// AI generation
AIResult result = InjectDataIntoModel(instruction, inputPath, savePath, key, OutDir, attachmentPaths);

// AI-assisted data injection into the valuation model
static AIResult InjectDataIntoModel(string instruction, string inputPath, string savePath,
                                    string key, string output, string[] attachmentPaths)
{
    // Configure the AI processing options
    AIOptions options = new AIOptions();
    options.WorkDir = output;      // Set the working directory to the output folder
    options.SpireToken = key;      // Set the SpireToken Key

    using (Workbook workbook = new Workbook())
    {
        // Load the valuation model template from file
        if (!string.IsNullOrEmpty(inputPath) && File.Exists(inputPath))
        {
            workbook.LoadFromFile(inputPath);
        }

        // Create the AI document processor
        AIDocumentProcessor processor = workbook.AI(options);

        // Execute the AI instruction
        return processor.ExecuteInstruction(workbook, instruction, savePath, attachmentPaths);
    }
}
The valuation model template before injection:
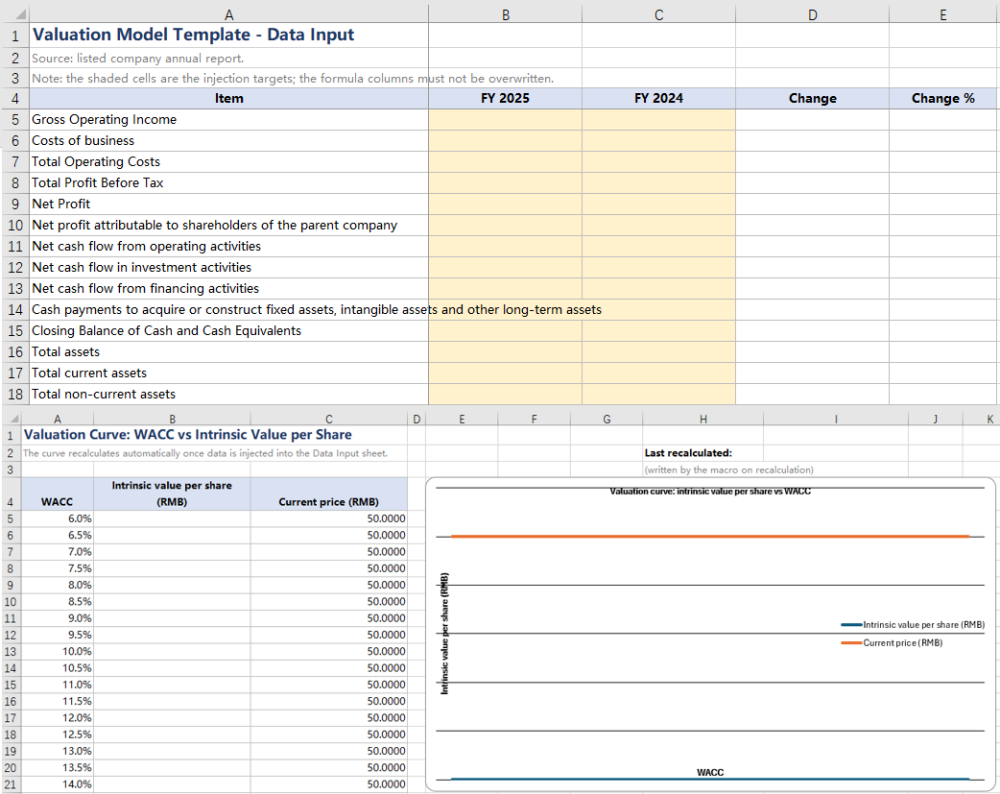 Description: The preset valuation model template; the shaded cells are the injection targets.
The financial data workbook produced by case one, used as the data source for this injection, filled into the Data Input area of the valuation template:
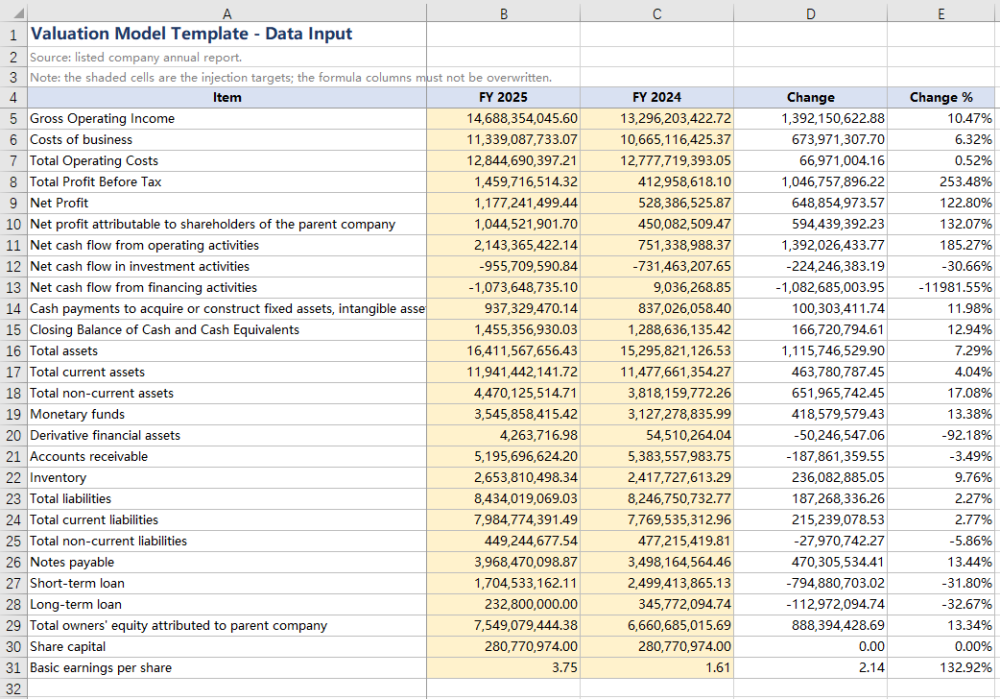 Description: The consolidated balance sheet, income statement and cash flow statement data filled in from among them.
The valuation curve recalculated automatically after injection:
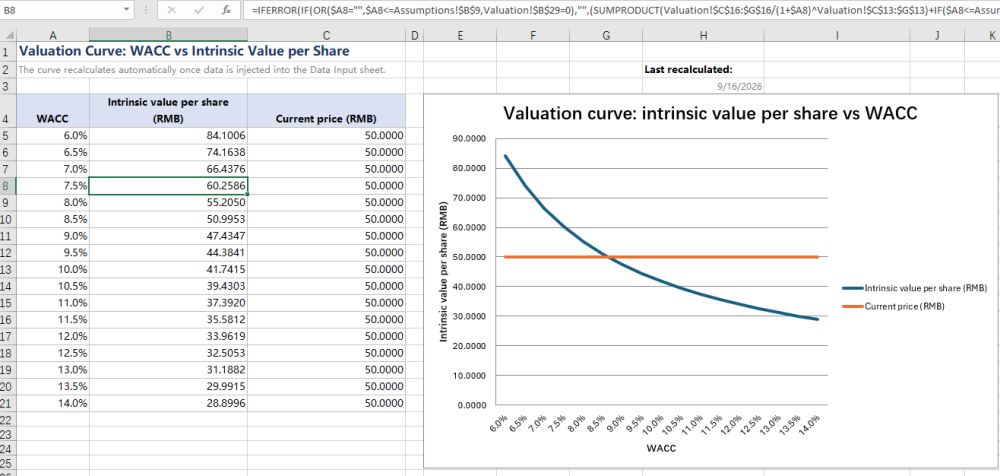 Description: The valuation curve refreshed automatically once the data injection completed.
Frequently Asked Questions
Extracted table data does not match the PDF
Cause: PDF tables may contain complex layouts such as cross-page splitting, merged cells, rotated text, etc., and AI may have deviations during recognition.
Solution: Add "carefully verify data accuracy, especially pay attention to merged cells and cross-page table joining" to the instruction; or limit specific page ranges for batch extraction and review before consolidation.
The valuation curve does not update after data injection
Cause: Model recalculation and pivot table refresh are two independent operations. Writing the data alone does not refresh the pivot cache, and some readers do not proactively recalculate the whole formula chain.
Solution: Explicitly require "recalculate the model and refresh the pivot tables after filling in the data" in the instruction. In addition, the template can be set to force recalculation on open so the curve is always up to date.
Obtaining a SpireToken Key
- Contact sales@e-iceblue.com or visit https://www.e-iceblue.com/TemLicense.html to obtain a trial/commercial API key
Configure it in code:
AIOptions options = new AIOptions();
options.SpireToken = key;
Create Named Ranges in React with JavaScript
In Excel, formulas usually have to hard-code a specific cell range, such as =SUM(D2:D10). As such formulas multiply, maintenance costs rise: when the data range changes, every related formula must be updated one by one, and a single missed edit produces a wrong result. A named range is designed to solve exactly this problem — give a cell range a meaningful name and refer to that name in the formula. The range and the formula are thereby separated: changing the range takes a single edit, every formula that refers to it updates automatically, and the result is both less error-prone and easier to read. Spire.XLS for JavaScript ships a complete named range API and can create both global (workbook-level) and local (worksheet-level) named ranges in the browser through WebAssembly, with no backend service required.
This article covers two key features:
For installation and project setup, see Integrating Spire.XLS for JavaScript in a React Project. The examples below assume Spire.XLS is already installed and the WebAssembly module has been initialized.
Global Named Range
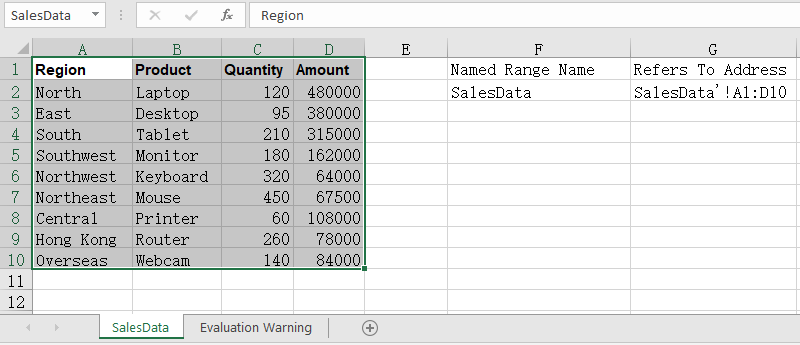
A global named range is stored in the workbook's name collection Workbook.NameRanges, its name is unique across the whole workbook, and any worksheet can refer to it directly. Create it with Workbook.NameRanges.Add() and point it at a cell range through the RefersToRange property. The steps are:
- Load the Excel file that contains the data and get the first worksheet.
- Create a global named range with
workbook.NameRanges.Add("SalesData"). - Set
namedRange.RefersToRangetosheet.Range.get("A1:D10"), that is, the range A1:D10. - Read
namedRange.NameandnamedRange.RefersToRange.RangeAddressand write the name and the referred address back into cells. - Save the workbook with the
Workbook.SaveToFile()method.
The following is a complete code example that shows how to create a global named range in React:
function App() {
  const createGlobalNamedRange = async () => {
    // Get the Spire.XLS WASM module
    const xlsModule = window.wasmModule?.spirexls;

    // Check if the module is ready
    if (!xlsModule) {
      alert('Spire.Xls is not ready yet');
      return;
    }

    // Load the font into VFS
    await window.spire.FetchFileToVFS('ARIAL.TTF', '/Library/Fonts/', `${process.env.PUBLIC_URL}/font/`);

    // Load the Excel file into VFS
    const inputFileName = 'NamedRanges.xlsx';
    await window.spire.FetchFileToVFS(inputFileName, '', `${process.env.PUBLIC_URL}/static/data/`);

    // Load the workbook
    const workbook = new xlsModule.Workbook();
    workbook.LoadFromFile(inputFileName);

    // Get the first worksheet
    let sheet = workbook.Worksheets.get(0);

    // Create a workbook-level (global) named range
    let namedRange = workbook.NameRanges.Add("SalesData");

    // Set the cell range the named range refers to
    namedRange.RefersToRange = sheet.Range.get("A1:D10");

    // Read the name and the referred address
    sheet.Range.get("F1").Text = "Named Range Name";
    sheet.Range.get("F2").Text = namedRange.Name;
    sheet.Range.get("G1").Text = "Refers To Address";
    sheet.Range.get("G2").Text = namedRange.RefersToRange.RangeAddress;

    // Auto-fit the columns
    sheet.AllocatedRange.AutoFitColumns();

    // Save the workbook
    const outputFileName = 'GlobalNamedRange.xlsx';
    workbook.SaveToFile(outputFileName);

    // Release resources
    workbook.Dispose();

    // Read the result file from VFS and trigger the download
    const fileArray = window.dotnetRuntime.Module.FS.readFile(outputFileName);
    const blob = new Blob([fileArray], { type: "application/vnd.openxmlformats-officedocument.spreadsheetml.sheet" });
    const url = URL.createObjectURL(blob);
    const a = document.createElement('a');
    a.href = url;
    a.download = outputFileName;
    a.click();
    URL.revokeObjectURL(url);
  };

  return (
    <div style={{ textAlign: 'center', height: '300px' }}>
      <h1>Create Global Named Range</h1>
      <button onClick={createGlobalNamedRange}>Start</button>
    </div>
  );
}

export default App;
After running, the effect of creating a global named range:
Local Named Range
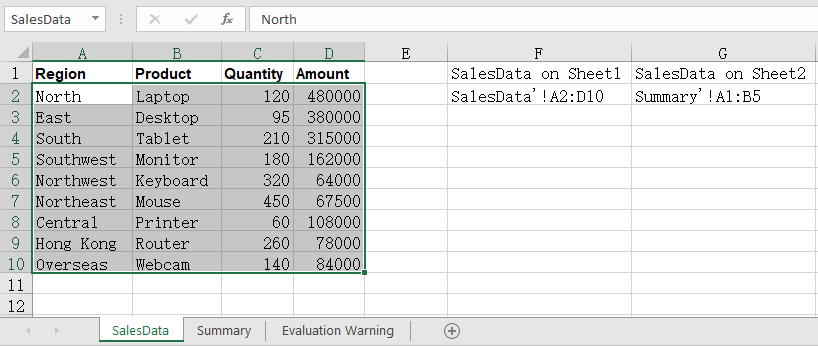
A global named range requires its name to be unique across the entire workbook. When different worksheets all want to use the same name while pointing at different data areas, switch to a local named range instead — added through Worksheet.Names.Add(), its name only takes effect inside the owning worksheet, so same-named ranges can live on several worksheets at once without interfering with each other. The steps are:
- Load the workbook and get the first worksheet.
- Create a local named range on the first worksheet with
sheet.Names.Add("SalesData"), pointing atA2:D10. - Add another worksheet with
workbook.Worksheets.Add()and create a same-named local named range on it, pointing at a different area. - Read the referred address of both ranges back into cells.
- Save the workbook.
The following is a complete code example that shows how to create a local named range in React:
function App() {
  const createLocalNamedRange = async () => {
    // Get the Spire.XLS WASM module
    const xlsModule = window.wasmModule?.spirexls;

    // Check if the module is ready
    if (!xlsModule) {
      alert('Spire.Xls is not ready yet');
      return;
    }

    // Load the font into VFS
    await window.spire.FetchFileToVFS('ARIAL.TTF', '/Library/Fonts/', `${process.env.PUBLIC_URL}/font/`);

    // Load the Excel file into VFS
    const inputFileName = 'NamedRanges.xlsx';
    await window.spire.FetchFileToVFS(inputFileName, '', `${process.env.PUBLIC_URL}/static/data/`);

    // Load the workbook
    const workbook = new xlsModule.Workbook();
    workbook.LoadFromFile(inputFileName);

    // Get the first worksheet
    let sheet = workbook.Worksheets.get(0);

    // Create a local named range on the first worksheet
    let localRange = sheet.Names.Add("SalesData");
    localRange.RefersToRange = sheet.Range.get("A2:D10");

    // Add another worksheet and create a same-named local range on it
    let sheet2 = workbook.Worksheets.Add("Summary");
    let localRange2 = sheet2.Names.Add("SalesData");
    localRange2.RefersToRange = sheet2.Range.get("A1:B5");

    // Read the addresses of the same-named ranges in both worksheets
    sheet.Range.get("F1").Text = "SalesData on Sheet1";
    sheet.Range.get("F2").Text = localRange.RefersToRange.RangeAddress;
    sheet.Range.get("G1").Text = "SalesData on Sheet2";
    sheet.Range.get("G2").Text = localRange2.RefersToRange.RangeAddress;

    // Auto-fit the columns
    sheet.AllocatedRange.AutoFitColumns();

    // Save the workbook
    const outputFileName = 'LocalNamedRange.xlsx';
    workbook.SaveToFile(outputFileName);

    // Release resources
    workbook.Dispose();

    // Read the result file from VFS and trigger the download
    const fileArray = window.dotnetRuntime.Module.FS.readFile(outputFileName);
    const blob = new Blob([fileArray], { type: "application/vnd.openxmlformats-officedocument.spreadsheetml.sheet" });
    const url = URL.createObjectURL(blob);
    const a = document.createElement('a');
    a.href = url;
    a.download = outputFileName;
    a.click();
    URL.revokeObjectURL(url);
  };

  return (
    <div style={{ textAlign: 'center', height: '300px' }}>
      <h1>Create Local Named Range</h1>
      <button onClick={createLocalNamedRange}>Start</button>
    </div>
  );
}

export default App;
After running, the effect of creating a local named range:
FAQ
How do I use a named range in a formula?
Cause: The real value of a named range is being referenced from formulas. Once the amount column is defined as a named range, the formula no longer needs a literal address, and the summed range expands automatically when rows are inserted later.
Solution: Simply write the name of the named range into the formula:
let namedRange = workbook.NameRanges.Add("SalesAmount");
namedRange.RefersToRange = sheet.Range.get("D2:D10");

// Refer to the named range in a formula
sheet.Range.get("F2").Formula = "=SUM(SalesAmount)";
How do I read the named ranges that already exist in a workbook?
Cause: A named range is saved together with the workbook, so it has to be read back before you can tell which names currently exist and which area each one points to.
Solution: Walk the NameRanges collection: take the count first, then read the name and the refers-to address of each entry by index:
// Total number of named ranges
let count = workbook.NameRanges.Count;

// Read the name and the refers-to address of each one
for (let i = 0; i < count; i++) {
  let namedRange = workbook.NameRanges.get(i);
  sheet.Range.get(`F${i + 2}`).Text = namedRange.Name;
  sheet.Range.get(`G${i + 2}`).Text = namedRange.RefersToRange.RangeAddress;
}
This walks workbook-level named ranges; worksheet-level ones are read through sheet.Names, in exactly the same way.
Get a Free License
Spire.XLS for JavaScript offers a 30-day full-featured free trial license with no functional limitations. Apply here to evaluate before purchasing.
Create a Radar Chart with JavaScript in React
When you need to compare several metrics across multiple dimensions at the same time, a radar chart is a very intuitive way to present them — each dimension is placed on an axis radiating out from the center, and the values on those axes are joined into a polygon, so the shape immediately shows where the strengths and weaknesses are. Spire.XLS for JavaScript provides a complete charting API that supports creating radar charts directly in the browser via WebAssembly, without requiring a backend service.
This article covers two core features:
For installation and project configuration, please refer to Integrating Spire.XLS for JavaScript in a React Project. The following examples assume Spire.XLS is already installed and the WebAssembly module has been initialized.
Create a Radar Chart
You can add a radar chart to a worksheet with the sheet.Charts.Add() method. The steps are as follows:
- Load the Excel file that contains the data and get the first worksheet.
- Add a radar chart with
Charts.Add({ chartType: ExcelChartType.Radar }). - Set the
DataRangeproperty to specify the chart data range: the first row holds the series names, the first column holds the category names for each axis, and the remaining cells hold the values. - Set
SeriesDataFromRange = falseso that the data is not taken from a row/column layout. - Set the chart title, position, and legend position.
- Save the workbook with the
Workbook.SaveToFile()method.
Below is a complete code example that shows how to create a radar chart in React:
function App() {
  const createRadarChart = async () => {
    // Get the Spire.XLS WASM module
    const xlsModule = window.wasmModule?.spirexls;

    // Check if the module is ready
    if (!xlsModule) {
      alert('Spire.Xls is not ready yet');
      return;
    }

    // Load the Excel file into VFS
    const inputFileName = 'RadarChartData.xlsx';
    await window.spire.FetchFileToVFS(inputFileName, '', `${process.env.PUBLIC_URL}/static/data/`);

    // Load the workbook
    const workbook = new xlsModule.Workbook();
    workbook.LoadFromFile(inputFileName);

    // Get the first worksheet
    let sheet = workbook.Worksheets.get(0);

    // Add a radar chart
    let chart = sheet.Charts.Add({ chartType: xlsModule.ExcelChartType.Radar });

    // Set the chart data range
    chart.DataRange = sheet.Range.get("A1:C5");
    chart.SeriesDataFromRange = false;

    // Set the chart position
    chart.LeftColumn = 7;
    chart.TopRow = 6;
    chart.RightColumn = 16;
    chart.BottomRow = 29;

    // Set the chart title
    chart.ChartTitle = "Product Sales by Region";
    chart.ChartTitleArea.IsBold = true;
    chart.ChartTitleArea.Size = 12;

    // Set the legend position
    chart.Legend.Position = xlsModule.LegendPositionType.Corner;

    // Save the workbook
    const outputFileName = 'CreateRadarChart.xlsx';
    workbook.SaveToFile(outputFileName);

    // Release resources
    workbook.Dispose();

    // Read the converted file from VFS and trigger download
    const fileArray = window.dotnetRuntime.Module.FS.readFile(outputFileName);
    const blob = new Blob([fileArray], { type: "application/vnd.openxmlformats-officedocument.spreadsheetml.sheet" });
    const url = URL.createObjectURL(blob);
    const a = document.createElement('a');
    a.href = url;
    a.download = outputFileName;
    a.click();
    URL.revokeObjectURL(url);
  };

  return (
    <div style={{ textAlign: 'center', height: '300px' }}>
      <h1>Create a Radar Chart</h1>
      <button onClick={createRadarChart}>Start</button>
    </div>
  );
}

export default App;
After running, the effect of creating a radar chart:

Style the Radar Chart
After creating the radar chart, you can further improve its appearance by setting the chart area, plot area, and series line colors. The steps are as follows:
- Get the radar chart object that has been created.
- Set the
ChartArea.Fill.ForeColorproperty to set the chart background color. - Set the
PlotArea.Fill.ForeColorproperty to set the plot area background color. - Set the
Series[i].Format.LineProperties.Colorproperty to specify the line color of each series;Series.get(0)andSeries.get(1)correspond to the two series in the data range. - Save the workbook.
Below is a complete code example that shows how to style the radar chart:
function App() {
  const styleRadarChart = async () => {
    // Get the Spire.XLS WASM module
    const xlsModule = window.wasmModule?.spirexls;

    // Check if the module is ready
    if (!xlsModule) {
      alert('Spire.Xls is not ready yet');
      return;
    }

    // Load the Excel file into VFS
    const inputFileName = 'RadarChartData.xlsx';
    await window.spire.FetchFileToVFS(inputFileName, '', `${process.env.PUBLIC_URL}/static/data/`);

    // Load the workbook
    const workbook = new xlsModule.Workbook();
    workbook.LoadFromFile(inputFileName);

    // Get the first worksheet
    let sheet = workbook.Worksheets.get(0);

    // Add a radar chart
    let chart = sheet.Charts.Add({ chartType: xlsModule.ExcelChartType.Radar });

    // Set the chart data range
    chart.DataRange = sheet.Range.get("A1:C5");
    chart.SeriesDataFromRange = false;

    // Set the chart position
    chart.LeftColumn = 7;
    chart.TopRow = 6;
    chart.RightColumn = 16;
    chart.BottomRow = 29;

    // Set the chart title
    chart.ChartTitle = "Product Sales by Region";
    chart.ChartTitleArea.IsBold = true;
    chart.ChartTitleArea.Size = 12;

    // Style the radar chart
    // Set the chart area background color
    chart.ChartArea.Fill.ForeColor = xlsModule.Color.get_LightCyan();
    // Set the plot area background color
    chart.PlotArea.Fill.ForeColor = xlsModule.Color.get_LightYellow();
    // Set the color of the first series line
    chart.Series.get(0).Format.LineProperties.Color = xlsModule.Color.get_Orange();
    // Set the color of the second series line
    chart.Series.get(1).Format.LineProperties.Color = xlsModule.Color.get_CornflowerBlue();

    // Save the workbook
    const outputFileName = 'StyledRadarChart.xlsx';
    workbook.SaveToFile(outputFileName);

    // Release resources
    workbook.Dispose();

    // Read the converted file from VFS and trigger download
    const fileArray = window.dotnetRuntime.Module.FS.readFile(outputFileName);
    const blob = new Blob([fileArray], { type: "application/vnd.openxmlformats-officedocument.spreadsheetml.sheet" });
    const url = URL.createObjectURL(blob);
    const a = document.createElement('a');
    a.href = url;
    a.download = outputFileName;
    a.click();
    URL.revokeObjectURL(url);
  };

  return (
    <div style={{ textAlign: 'center', height: '300px' }}>
      <h1>Style the Radar Chart</h1>
      <button onClick={styleRadarChart}>Start</button>
    </div>
  );
}

export default App;
After running, the effect of styling the radar chart:

Frequently Asked Questions
The radar chart does not change after setting a series color
Reason: A radar chart draws each series as a line, so setting a fill color with Series.get(i).Format.Fill has no effect.
Solution: Set the line color through Series.get(i).Format.LineProperties.Color, for example:
chart.Series.get(0).Format.LineProperties.Color = xlsModule.Color.get_Orange();
How do I adjust the legend position of a radar chart?
Reason: The legend is docked to the right of the chart by default, where it competes with the plot area for width — especially noticeable on a radar chart, which already takes up a lot of horizontal space.
Solution: Set the legend position with the chart.Legend.Position property. The available values are LegendPositionType.Bottom, Corner, Top, Right, Left, and NotDocked. For example, to move the legend to the top-right corner:
chart.Legend.Position = xlsModule.LegendPositionType.Corner;
Get a Free License
Spire.XLS for JavaScript offers a 30-day full-featured free trial license with no functional limitations. Apply here to evaluate before purchasing.
Create a Bubble Chart with JavaScript in React
In data analysis scenarios, bubble charts help intuitively display multi-dimensional data relationships. Each data point in a bubble chart is defined by three values: X-axis value, Y-axis value, and bubble size. Spire.XLS for JavaScript provides rich charting APIs that support creating bubble charts directly in the browser via WebAssembly, without requiring a backend service.
This article covers two core features:
For installation and project configuration, please refer to Integrating Spire.XLS for JavaScript in a React Project. The following examples assume Spire.XLS is already installed and the WebAssembly module has been initialized.
Create a Bubble Chart
A bubble chart can be added to a worksheet using the sheet.Charts.Add() method. The specific steps are as follows:
- Create a
Workbookobject and get the first worksheet. - Add a bubble chart via
Charts.Add(ExcelChartType.Bubble). - Set the
DataRangeproperty to specify the chart data area. - Set
SeriesDataFromRange = falseto indicate that data is not obtained from row/column layout. - Set
Series[0].Bubblesto specify the bubble size data range. - Set the chart title, position, and dimensions.
- Save the workbook via
Workbook.SaveToFile().
The following is a complete code example that demonstrates creating a bubble chart in React:
function App() {
  const createBubbleChart = async () => {
    // Get the Spire.XLS WASM module
    const xlsModule = window.wasmModule?.spirexls;

    // Check if the module is ready
    if (!xlsModule) {
      alert('Spire.Xls is not ready yet');
      return;
    }

    // Load the Excel file into VFS
    const inputFileName = 'CreateBubbleChart.xlsx';
    await window.spire.FetchFileToVFS(inputFileName, '', `${process.env.PUBLIC_URL}/static/data/`);

    // Load the workbook
    const workbook = new xlsModule.Workbook();
    workbook.LoadFromFile(inputFileName);

    // Get the first worksheet
    let sheet = workbook.Worksheets.get(0);

    // Add a bubble chart
    let chart = sheet.Charts.Add({ chartType: xlsModule.ExcelChartType.Bubble });

    // Set the chart data range
    chart.DataRange = sheet.Range.get("A1:C5");
    chart.SeriesDataFromRange = false;

    // Set the bubble sizes
    chart.Series.get(0).Bubbles = sheet.Range.get("C2:C5");

    // Set the chart position
    chart.LeftColumn = 7;
    chart.TopRow = 6;
    chart.RightColumn = 16;
    chart.BottomRow = 29;

    // Set the chart title
    chart.ChartTitle = "Bubble Chart";
    chart.ChartTitleArea.IsBold = true;
    chart.ChartTitleArea.Size = 12;

    // Save the workbook
    const outputFileName = 'CreateBubbleChart.xlsx';
    workbook.SaveToFile(outputFileName);

    // Dispose resources
    workbook.Dispose();

    // Read the converted file from VFS and trigger download
    const fileArray = window.dotnetRuntime.Module.FS.readFile(outputFileName);
    const blob = new Blob([fileArray], { type: "application/vnd.openxmlformats-officedocument.spreadsheetml.sheet" });
    const url = URL.createObjectURL(blob);
    const a = document.createElement('a');
    a.href = url;
    a.download = outputFileName;
    a.click();
    URL.revokeObjectURL(url);
  };

  return (
    <div style={{ textAlign: 'center', height: '300px' }}>
      <h1>Create Bubble Chart</h1>
      <button onClick={createBubbleChart}>Start</button>
    </div>
  );
}

export default App;
After running the code, the effect of creating a bubble chart is as follows:

Style the Bubble Chart
After creating a bubble chart, you can enhance its appearance by setting the chart area, plot area, and series colors. The specific steps are as follows:
- Get the created bubble chart object.
- Set the
ChartArea.Fill.ForeColorproperty to set the chart background color. - Set the
PlotArea.Fill.ForeColorproperty to set the plot area background color. - Set the
Series[0].Format.Fill.ForeColorproperty to set the series color. - Set the
Series[0].HasDataLabelsproperty to enable data labels, and specify the label content throughDataPoints.DefaultDataPoint.DataLabels. - Save the workbook.
The following is a complete code example that demonstrates how to style a bubble chart:
function App() {
  const styleBubbleChart = async () => {
    // Get the Spire.XLS WASM module
    const xlsModule = window.wasmModule?.spirexls;

    // Check if the module is ready
    if (!xlsModule) {
      alert('Spire.Xls is not ready yet');
      return;
    }

    // Load the Excel file into VFS
    const inputFileName = 'CreateBubbleChart.xlsx';
    await window.spire.FetchFileToVFS(inputFileName, '', `${process.env.PUBLIC_URL}/static/data/`);

    // Load the workbook
    const workbook = new xlsModule.Workbook();
    workbook.LoadFromFile(inputFileName);

    // Get the first worksheet
    let sheet = workbook.Worksheets.get(0);

    // Add a bubble chart
    let chart = sheet.Charts.Add({ chartType: xlsModule.ExcelChartType.Bubble });

    // Set the chart data range
    chart.DataRange = sheet.Range.get("A1:C5");
    chart.SeriesDataFromRange = false;

    // Set the bubble sizes
    chart.Series.get(0).Bubbles = sheet.Range.get("C2:C5");

    // Set the chart position
    chart.LeftColumn = 7;
    chart.TopRow = 6;
    chart.RightColumn = 16;
    chart.BottomRow = 29;

    // Set the chart title
    chart.ChartTitle = "Bubble Chart";
    chart.ChartTitleArea.IsBold = true;
    chart.ChartTitleArea.Size = 12;

    // Style the bubble chart
    // Set chart area background color
    chart.ChartArea.Fill.ForeColor = xlsModule.Color.get_LightCyan();
    // Set plot area background color
    chart.PlotArea.Fill.ForeColor = xlsModule.Color.get_LightYellow();
    // Set series color
    chart.Series.get(0).Format.Fill.FillType = xlsModule.ShapeFillType.SolidColor;
    chart.Series.get(0).Format.Fill.ForeColor = xlsModule.Color.get_Orange();
    // Enable and set data labels
    chart.Series.get(0).HasDataLabels = true;
    chart.Series.get(0).DataPoints.DefaultDataPoint.DataLabels.HasCategoryName = true;
    chart.Series.get(0).DataPoints.DefaultDataPoint.DataLabels.HasValue = true;

    // Save the workbook
    const outputFileName = 'StyledBubbleChart.xlsx';
    workbook.SaveToFile(outputFileName);

    // Dispose resources
    workbook.Dispose();

    // Read the converted file from VFS and trigger download
    const fileArray = window.dotnetRuntime.Module.FS.readFile(outputFileName);
    const blob = new Blob([fileArray], { type: "application/vnd.openxmlformats-officedocument.spreadsheetml.sheet" });
    const url = URL.createObjectURL(blob);
    const a = document.createElement('a');
    a.href = url;
    a.download = outputFileName;
    a.click();
    URL.revokeObjectURL(url);
  };

  return (
    <div style={{ textAlign: 'center', height: '300px' }}>
      <h1>Style Bubble Chart</h1>
      <button onClick={styleBubbleChart}>Start</button>
    </div>
  );
}

export default App;
After running the code, the effect of styling the bubble chart is as follows:

Frequently Asked Questions
What do columns A, B, and C in DataRange represent?
Reason: Each data point in a bubble chart needs three values — an X-axis value, a Y-axis value, and a bubble size — and the three columns specified by DataRange correspond to them exactly.
Solution: Taking chart.DataRange = sheet.Range.get("A1:C5") as an example, column A serves as the category (X axis), column B as the Y-axis value, and column C is set as the bubble size through chart.Series.get(0).Bubbles = sheet.Range.get("C2:C5"). The order of these three columns cannot be swapped, or both the point positions and the bubble sizes will be wrong.
Why does the data range start at A1 instead of A2?
Reason: The first row of the data range is used as the series name.
Solution: Include the header row in DataRange. In the example, the "Sales" shown in the legend comes from cell B1, so the data range is written as A1:C5 rather than A2:C5.
Get a Free License
Spire.XLS for JavaScript offers a 30-day full-featured free trial license with no functional limitations. Apply here to evaluate before purchasing.
Add Trendline to Excel Charts in React with JavaScript
In data analysis scenarios, trendlines help you visually identify data trends and predict directions from Excel charts. Spire.XLS for JavaScript provides rich trendline APIs that allow you to add various types of trendlines to chart series directly in the browser via WebAssembly, without requiring a backend service.
This article covers two core features:
For installation and project configuration, please refer to Integrating Spire.XLS for JavaScript in a React Project. The following examples assume Spire.XLS is installed and the WebAssembly module has been initialized.
Add Trendline to Chart
You can add trendlines to any series in a chart through the chart.Series.get(i).TrendLines.Add() method. Spire.XLS for JavaScript supports 4 types of trendlines defined in the TrendLineType enumeration:
Linear— Linear trendline, suitable for data showing steady increase or decreaseExponential— Exponential trendline, suitable for scenarios where the growth or decline rate acceleratesLogarithmic— Logarithmic trendline, suitable for data that changes rapidly then stabilizesMoving_Average— Moving average trendline, suitable for smoothing data fluctuations
Specific steps:
- Create a
Workbookobject and get the first worksheet. - Get the chart that needs a trendline through
Worksheet.Charts.get(i). - Call
chart.Series.get(0).TrendLines.Add()with thetypeparameter specifying the trendline type. - Save the workbook through
Workbook.SaveToFile().
Below is a complete code example showing how to add four different types of trendlines to an Excel chart in React:
function App() {
  const addTrendline = async () => {
    // Get the Spire.XLS WASM module
    const xlsModule = window.wasmModule?.spirexls;

    // Check if the module is ready
    if (!xlsModule) {
      alert('Spire.Xls is not ready yet');
      return;
    }

    // Load the Excel file into VFS
    const inputFileName = 'ChartTrendline_en.xlsx';
    await window.spire.FetchFileToVFS(inputFileName, '', `${process.env.PUBLIC_URL}data/`);

    // Load the workbook
    const workbook = new xlsModule.Workbook();
    workbook.LoadFromFile({ fileName: inputFileName });

    // Get the first chart from the first worksheet
    let chart = workbook.Worksheets.get(0).Charts.get(0);

    // Add linear trendline
    chart.ChartTitle = "Linear Trendline";
    chart.Series.get(0).TrendLines.Add({ type: xlsModule.TrendLineType.Linear });

    // Add exponential trendline
    chart = workbook.Worksheets.get(0).Charts.get(0);
    chart.ChartTitle = "Exponential Trendline";
    chart.Series.get(0).TrendLines.Add({ type: xlsModule.TrendLineType.Exponential });

    // Add logarithmic trendline
    chart.ChartTitle = "Logarithmic Trendline";
    chart.Series.get(0).TrendLines.Add({ type: xlsModule.TrendLineType.Logarithmic });

    // Add moving average trendline
    chart.ChartTitle = "Moving Average Trendline";
    chart.Series.get(0).TrendLines.Add({ type: xlsModule.TrendLineType.Moving_Average });

    // Save the document
    const outputFileName = 'AddTrendline.xlsx';
    workbook.SaveToFile({ fileName: outputFileName, version: xlsModule.ExcelVersion.Version2010 });

    // Release resources
    workbook.Dispose();

    // Read the converted file from VFS and trigger download
    const fileArray = window.dotnetRuntime.Module.FS.readFile(outputFileName);
    const blob = new Blob([fileArray], { type: 'application/vnd.openxmlformats-officedocument.spreadsheetml.sheet' });
    const url = URL.createObjectURL(blob);
    const a = document.createElement('a');
    a.href = url;
    a.download = outputFileName;
    a.click();
    URL.revokeObjectURL(url);
  };

  return (
    <div style={{ textAlign: 'center', height: '300px' }}>
      <h1>Add Trendline to Chart</h1>
      <button onClick={addTrendline}>Start</button>
    </div>
  );
}

export default App;
After running the code, you get the effect of adding four different types of trendlines to a chart:

Extract Trendline Formula
You can obtain the mathematical formula of a trendline through the trendLine.Formula property, making it easy to display the trendline's analytical expression in reports.
Specific steps:
- Load the
AddTrendline.xlsxfile generated in Step 1, which contains four charts. - Use
Worksheet.Charts.get(i)to iterate through all four charts. - Read the
trendLine.Formulaproperty from each chart to obtain the formula string, then save all formulas to a text file.
Below is a complete code example showing how to extract trendline formulas in React:
function App() {
  const extractTrendlineFormula = async () => {
    // Get the Spire.XLS WASM module
    const xlsModule = window.wasmModule?.spirexls;

    // Check if the module is ready
    if (!xlsModule) {
      alert('Spire.Xls is not ready yet');
      return;
    }

    // Load the AddTrendline.xlsx file generated in Step 1 into VFS
    const inputFileName = 'AddTrendline.xlsx';
    await window.spire.FetchFileToVFS(inputFileName, '', `${process.env.PUBLIC_URL}data/`);

    // Load the workbook
    const workbook = new xlsModule.Workbook();
    workbook.LoadFromFile({ fileName: inputFileName });

    // Get the first worksheet
    let sheet = workbook.Worksheets.get(0);
    let result = "Extracted trendline formulas from four charts:\n\n";

    // Iterate through all four charts and extract trendline formulas
    for (let i = 0; i < 4; i++) {
      let chart = sheet.Charts.get(i);
      let trendLine = chart.Series.get(0).TrendLines.get(0);
      // Moving average trendline has no mathematical formula
      if (trendLine.Type === xlsModule.TrendLineType.Moving_Average) {
        result += `Chart ${i + 1} (${chart.ChartTitle}): N/A (Moving Average)\n`;
      } else {
        let formula = trendLine.Formula;
        result += `Chart ${i + 1} (${chart.ChartTitle}): ${formula}\n`;
      }
    }

    // Release resources
    workbook.Dispose();

    // Save the formulas to a text file and trigger download
    const outputFileName = 'ExtractTrendline.txt';
    const blob = new Blob([result], { type: "text/plain;charset=utf-8" });
    const url = URL.createObjectURL(blob);
    const a = document.createElement('a');
    a.href = url;
    a.download = outputFileName;
    a.click();
    URL.revokeObjectURL(url);
  };

  return (
    <div style={{ textAlign: 'center', height: '300px' }}>
      <h1>Extract Trendline Formula</h1>
      <button onClick={extractTrendlineFormula}>Start</button>
    </div>
  );
}

export default App;
After running the code, you get the effect of extracting trendline formulas:

FAQ
How to delete an added trendline from a chart?
Cause: A trendline has already been added to the chart, but it needs to be removed or replaced.
Solution: Use the TrendLines.RemoveAt(index) method to remove a trendline at a specific index. Indexing starts from 0. For example, chart.Series.get(0).TrendLines.RemoveAt(0) removes the first trendline from the first series.
How to set forward/backward prediction periods for a trendline?
Cause: A trendline can not only fit existing data, but also predict future or past values based on the trend.
Solution: Use the trendLine.Forward and trendLine.Backward properties to set the number of prediction periods forward and backward respectively. For example, trendLine.Forward = 2 predicts two periods beyond the current data, while trendLine.Backward = 1 extrapolates one period before the data.
Get Free License
Spire.XLS for JavaScript offers a 30-day full-featured free trial license with no functional limitations. Apply here to evaluate before purchasing.