Add Headers and Footers to Excel with JavaScript in React
The header and footer in Excel are text or images placed at the top and bottom of every printed page. The text or images in the header and footer can display basic information about the page or document, such as the file name, company logo, page number, date and time. Spire.XLS for JavaScript completes this directly in the browser based on WebAssembly, managing input/output files through a virtual file system (VFS), with no backend service required.
The PageSetup class provided by Spire.XLS for JavaScript can configure the page of an Excel workbook, including setting the header and footer. The LeftHeader, CenterHeader, RightHeader, LeftFooter, CenterFooter, RightFooter properties in this class add content to the left, center and right of the header or footer. To add fields to the header or footer or to set the text format of the header and footer, you can use the format codes listed in the table below.
| Code | Description |
|---|---|
&P |
Current page number |
&N |
Total number of pages |
&D |
Current date |
&T |
Current time |
&G |
Picture |
&A |
The worksheet name |
&F |
The file name |
&B |
Bold text |
&I |
Italic text |
&U |
Underline text |
&"Font Name" |
The font name, e.g. &"Arial" |
& + Integer |
The font size, e.g. &12 |
&K + 16-digit color code |
The font color, e.g. &KFF0000 |
This article introduces two core features:
For installation and project configuration, refer to Integrating Spire.XLS for JavaScript in a React Project. The examples below assume Spire.XLS is installed and the WebAssembly module is initialized.
Add an Image and Formatted Text to the Header
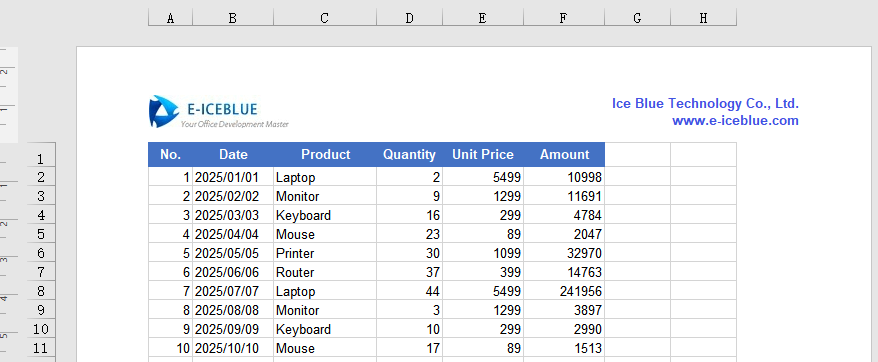
The header sits at the top of every page and is a natural place for a company logo, a document name or other fixed information. Putting the image on the left and text with its own font and color on the right gives every printed or previewed page the same identification without adding it page by page.
Adding an image and formatted text to the header:
| Syntax | Result |
|---|---|
new xlsModule.Stream(imgFileName) |
Reads the image stream from the VFS |
sheet.PageSetup.LeftHeaderImage = image |
Sets the image as the left header image |
sheet.PageSetup.LeftHeader = "&G" |
Displays the image in the left header |
sheet.PageSetup.RightHeader = "&\"Arial\"&B&10&K4253E2..." |
Writes text with the specified font, bold, size and color in the right header |
sheet.ViewMode = xlsModule.ViewMode.Layout |
Switches to Page Layout view for previewing |
workbook.SaveToFile(...) |
Saves the workbook with the header to the VFS |
The steps are:
- Load the font, Excel file and image into the VFS.
- Create a
Workbookobject, load the Excel file withLoadFromFile(), and get the first worksheet withWorkbook.Worksheets.get(0). - Use
Streamto load the image, and set it as the image source of the left header through thePageSetup.LeftHeaderImageproperty. - Use the
PageSetup.LeftHeaderproperty to display the image in the left header. - Use the
PageSetup.RightHeaderproperty to insert formatted text in the right header. - Switch the worksheet to Page Layout view with
ViewMode.Layoutto preview the header. - Use the
Workbook.SaveToFile()method to save the workbook, then release resources withWorkbook.Dispose().
Here is a complete code example showing how to add an image and formatted text to the header of a worksheet in React:
function App() {
  const addImageAndTextToHeader = async () => {
    // Get the Spire.XLS WASM module
    const xlsModule = window.wasmModule?.spirexls;

    // Check whether the module is ready
    if (!xlsModule) {
      alert('Spire.Xls is not ready yet');
      return;
    }

    // Load the font, Excel file and image into the VFS
    await window.spire.FetchFileToVFS('ARIAL.TTF', '/Library/Fonts/', `${process.env.PUBLIC_URL}/font/`);
    const inputFileName = 'HeaderFooter.xlsx';
    await window.spire.FetchFileToVFS(inputFileName, '', `${process.env.PUBLIC_URL}data/`);
    const imgFileName = 'logo.png';
    await window.spire.FetchFileToVFS(imgFileName, '', `${process.env.PUBLIC_URL}data/`);

    // Load the workbook
    const workbook = new xlsModule.Workbook();
    workbook.LoadFromFile({ fileName: inputFileName });

    // Get the first worksheet
    const sheet = workbook.Worksheets.get(0);

    // Load the image and set it as the image source of the left header
    const image = new xlsModule.Stream(imgFileName);
    sheet.PageSetup.LeftHeaderImage = image;
    sheet.PageSetup.LeftHeader = "&G";

    // Add formatted text to the right header
    sheet.PageSetup.RightHeader = "&\"Arial\"&B&10&K4253E2Ice Blue Technology Co., Ltd.  \n www.e-iceblue.com";

    // Switch to Page Layout view to preview the header and footer
    sheet.ViewMode = xlsModule.ViewMode.Layout;

    // Save the document
    const outputFileName = 'HeaderImageAndText_output.xlsx';
    workbook.SaveToFile({ fileName: outputFileName, version: xlsModule.ExcelVersion.Version2010 });

    // Release resources
    workbook.Dispose();

    // Read the converted file from the VFS and trigger a download
    const fileArray = window.dotnetRuntime.Module.FS.readFile(outputFileName);
    const blob = new Blob([fileArray], { type: 'application/vnd.openxmlformats-officedocument.spreadsheetml.sheet' });
    const url = URL.createObjectURL(blob);
    const a = document.createElement('a');
    a.href = url;
    a.download = outputFileName;
    a.click();
    URL.revokeObjectURL(url);
  };

  return (
    <div style={{ textAlign: 'center', height: '300px' }}>
      <h1>Add Image and Formatted Text to Header</h1>
      <button onClick={addImageAndTextToHeader}>
        Start
      </button>
    </div>
  );
}

export default App;
The worksheet after adding an image and formatted text to the header:
Add the Current Date and Page Number to the Footer
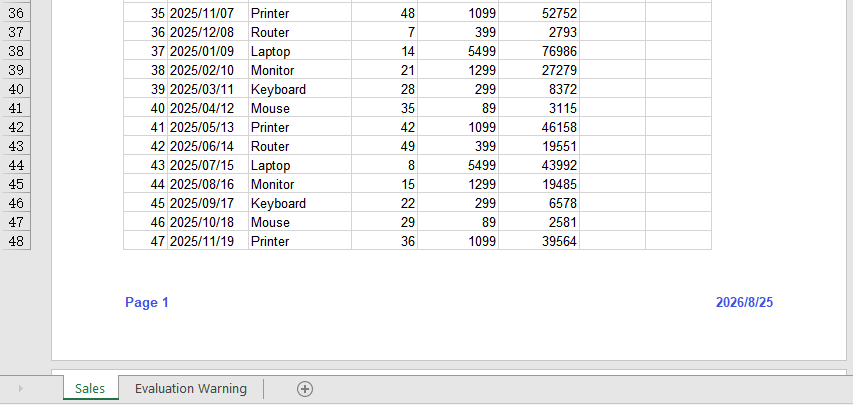
The footer sits at the bottom of every page and is commonly used for page numbers and dates. Both update automatically as pages are printed, so there is no need to maintain them in the sheet body; placing them on the left and right also helps readers find their position when paging through a report.
Adding the current date and page number to the footer:
| Syntax | Result |
|---|---|
sheet.PageSetup.LeftFooter = "...&P..." |
Shows the current page number in the left footer |
sheet.PageSetup.RightFooter = "...&D" |
Shows the current date in the right footer |
sheet.ViewMode = xlsModule.ViewMode.Layout |
Switches to Page Layout view for previewing |
workbook.SaveToFile(...) |
Saves the workbook with the footer to the VFS |
The steps are:
- Load the font and Excel file into the VFS.
- Create a
Workbookobject, load the Excel file withLoadFromFile(), and get the first worksheet withWorkbook.Worksheets.get(0). - Use the
PageSetup.LeftFooterproperty to add a formatted page number to the left footer, customizing its format as you like. - Use the
PageSetup.RightFooterproperty to add the current date to the right footer, and change the appearance of the date text as needed. - Switch the worksheet to Page Layout view with
ViewMode.Layoutto preview the footer. - Use the
Workbook.SaveToFile()method to save the workbook, then release resources withWorkbook.Dispose().
Here is a complete code example showing how to add the current date and page number to the footer of a worksheet in React:
function App() {
  const addDateAndPageNumberToFooter = async () => {
    // Get the Spire.XLS WASM module
    const xlsModule = window.wasmModule?.spirexls;

    // Check whether the module is ready
    if (!xlsModule) {
      alert('Spire.Xls is not ready yet');
      return;
    }

    // Load the font and Excel file into the VFS
    await window.spire.FetchFileToVFS('ARIAL.TTF', '/Library/Fonts/', `${process.env.PUBLIC_URL}/font/`);
    const inputFileName = 'HeaderFooter.xlsx';
    await window.spire.FetchFileToVFS(inputFileName, '', `${process.env.PUBLIC_URL}data/`);

    // Load the workbook
    const workbook = new xlsModule.Workbook();
    workbook.LoadFromFile({ fileName: inputFileName });

    // Get the first worksheet
    const sheet = workbook.Worksheets.get(0);

    // Add the page number to the left footer; &P represents the current page number
    sheet.PageSetup.LeftFooter = "&\"Arial\"&B&10&K4253E2Page &P";

    // Add the current date to the right footer; &D represents the current date
    sheet.PageSetup.RightFooter = "&\"Arial\"&B&10&K4253E2&D";

    // Switch to Page Layout view to preview the header and footer
    sheet.ViewMode = xlsModule.ViewMode.Layout;

    // Save the document
    const outputFileName = 'FooterDatePageNumber_output.xlsx';
    workbook.SaveToFile({ fileName: outputFileName, version: xlsModule.ExcelVersion.Version2010 });

    // Release resources
    workbook.Dispose();

    // Read the converted file from the VFS and trigger a download
    const fileArray = window.dotnetRuntime.Module.FS.readFile(outputFileName);
    const blob = new Blob([fileArray], { type: 'application/vnd.openxmlformats-officedocument.spreadsheetml.sheet' });
    const url = URL.createObjectURL(blob);
    const a = document.createElement('a');
    a.href = url;
    a.download = outputFileName;
    a.click();
    URL.revokeObjectURL(url);
  };

  return (
    <div style={{ textAlign: 'center', height: '300px' }}>
      <h1>Add Current Date and Page Number to Footer</h1>
      <button onClick={addDateAndPageNumberToFooter}>
        Start
      </button>
    </div>
  );
}

export default App;
The worksheet after adding the current date and page number to the footer:
FAQ
Headers and footers are not visible in Excel
Cause: An Excel worksheet is in Normal view by default, and headers and footers are only displayed in Page Layout view or when printing.
Solution: Switch the worksheet to Page Layout view in code with sheet.ViewMode = xlsModule.ViewMode.Layout;, or switch to the "Page Layout" view manually in Excel.
The picture in the header is not displayed
Cause: Only the image source (such as LeftHeaderImage) was set, but the &G placeholder was not used in the corresponding header text, or the image file was not loaded into the VFS correctly.
Solution: Make sure the image has been loaded into the VFS with FetchFileToVFS() and add &G to the header string, for example sheet.PageSetup.LeftHeader = "&G";.
How can the current page number and total page count appear together?
Cause: The footer used only the &P field, so it shows the current page number without any information about the total number of pages.
Solution: Put both &P and &N in the footer string, for example sheet.PageSetup.LeftFooter = "&P / &N";. When printing or previewing, the two fields are replaced with the current page number and the total page count respectively.
Obtain a Free License
Spire.XLS for JavaScript offers a 30-day full-featured free trial license with no functional limitations. Apply here to evaluate before purchasing.
Add and Remove Watermarks in Excel with JavaScript in React
Excel does not have a built-in watermark feature, but in scenarios such as contracts, reports, and internal documents, we often need to mark files with identifiers like "Confidential" or "Sample" to prevent information from being copied and distributed at will. Spire.XLS for JavaScript processes Excel documents directly in the browser based on WebAssembly, and manages input and output files through a virtual file system (VFS), with no backend service required. With the header image feature, you can easily add and remove watermarks in worksheets.
This article covers two core features:
For installation and project configuration, refer to Integrating Spire.XLS for JavaScript in a React Project. The examples below assume Spire.XLS is installed and the WebAssembly module is initialized.
Add a Watermark to an Excel Worksheet
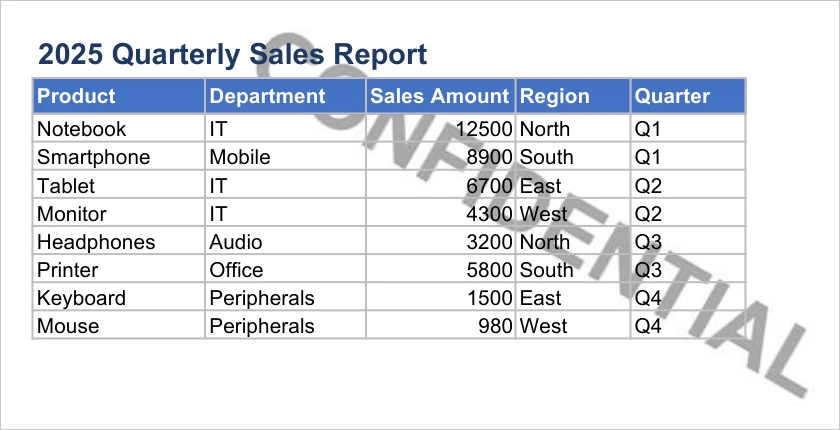
Excel does not have a built-in watermark feature, yet contracts, reports and internal documents often need to mark their origin or scope of use. A watermark lays pale text across the center of the page, leaving the body readable while signaling what the document is for. Drawing the watermark as an image the size of the page and placing it in the header makes it appear on every page.
Adding a watermark to an Excel worksheet:
| Syntax | Result |
|---|---|
sheet.PageSetup.PageWidth / PageHeight |
Gets the page size used to draw a matching watermark image |
watermarkCanvas.toBlob(...) and FS.writeFile(...) |
Creates the watermark image and writes it to the VFS |
new xlsModule.Stream(imgFileName) |
Reads the watermark image stream from the VFS |
sheet.PageSetup.LeftHeaderImage = watermark |
Sets the watermark image as the left header image |
sheet.PageSetup.LeftHeader = "&G" |
Displays the image in the header |
sheet.ViewMode = xlsModule.ViewMode.Layout |
Switches to Page Layout view for previewing |
workbook.SaveToFile(...) |
Saves the watermarked workbook to the VFS |
The steps are:
- Load the font file and the input file into the VFS.
- Create a
Workbookobject, load the Excel document withLoadFromFile(), and get the first worksheet withWorkbook.Worksheets.get(0). - Use the Canvas API to draw a watermark image that matches the page size: a white background with centered LightCoral text rotated -45°.
- Save the watermark image to the virtual file system (VFS) and load it with a
Streamobject. - Set the watermark image as the left header image (
LeftHeaderImage) and set the header text to the image placeholder&G. - Switch the worksheet to Page Layout view with
ViewMode.Layoutto preview the watermark effect. - Use the
Workbook.SaveToFile()method to save the document, then release resources withWorkbook.Dispose().
Here is a complete code example showing how to add a watermark to a worksheet in React:
function App() {
  const addWatermark = async () => {
    // Get the Spire.XLS WASM module
    const xlsModule = window.wasmModule?.spirexls;

    // Check whether the module is ready
    if (!xlsModule) {
      alert('Spire.Xls is not ready yet');
      return;
    }

    // Load the font and the Excel file into the VFS
    await window.spire.FetchFileToVFS('ARIAL.TTF', '/Library/Fonts/', `${process.env.PUBLIC_URL}/font/`);
    const inputFileName = 'Watermark.xlsx';
    await window.spire.FetchFileToVFS(inputFileName, '', `${process.env.PUBLIC_URL}data/`);

    // Load the workbook
    const workbook = new xlsModule.Workbook();
    workbook.LoadFromFile({ fileName: inputFileName });

    // Get the first worksheet
    const sheet = workbook.Worksheets.get(0);

    // Define the watermark text, text color, and background color
    const watermarkText = 'Internal Use';
    const textColor = 'lightcoral';
    const backColor = 'white';

    // Draw the watermark image according to the page size (white background with centered text rotated -45°)
    const drawWatermarkImage = (text, color, bg, width, height) => {
      const canvas = document.createElement('canvas');
      canvas.width = width;
      canvas.height = height;
      const ctx = canvas.getContext('2d');
      // Draw the background
      ctx.fillStyle = bg;
      ctx.fillRect(0, 0, width, height);
      // Set the text style and draw the rotated text at the center of the page
      ctx.fillStyle = color;
      ctx.font = 'bold 48px Arial';
      ctx.textAlign = 'center';
      ctx.textBaseline = 'middle';
      ctx.save();
      ctx.translate(width / 2, height / 2);
      ctx.rotate(-Math.PI / 4);
      ctx.fillText(text, 0, 0);
      ctx.restore();
      return canvas;
    };

    // Draw the watermark image and write it to the virtual file system (VFS)
    const watermarkCanvas = drawWatermarkImage(watermarkText, textColor, backColor, sheet.PageSetup.PageWidth, sheet.PageSetup.PageHeight);
    const watermarkBlob = await new Promise((resolve) => watermarkCanvas.toBlob(resolve, 'image/png'));
    const watermarkBytes = new Uint8Array(await watermarkBlob.arrayBuffer());
    const imgFileName = 'Watermark.png';
    window.dotnetRuntime.Module.FS.writeFile(imgFileName, watermarkBytes);

    // Load the watermark image
    const watermark = new xlsModule.Stream(imgFileName);

    // Set the watermark image as the left header image and display it with the &G placeholder
    sheet.PageSetup.LeftHeaderImage = watermark;
    sheet.PageSetup.LeftHeader = "&G";

    // Switch to Page Layout view to preview the watermark effect
    sheet.ViewMode = xlsModule.ViewMode.Layout;

    // Save the document
    const outputFileName = 'AddWatermark_output.xlsx';
    workbook.SaveToFile({ fileName: outputFileName, version: xlsModule.ExcelVersion.Version2010 });

    // Release resources
    workbook.Dispose();

    // Read the converted file from the VFS and trigger a download
    const fileArray = window.dotnetRuntime.Module.FS.readFile(outputFileName);
    const blob = new Blob([fileArray], { type: 'application/vnd.openxmlformats-officedocument.spreadsheetml.sheet' });
    const url = URL.createObjectURL(blob);
    const a = document.createElement('a');
    a.href = url;
    a.download = outputFileName;
    a.click();
    URL.revokeObjectURL(url);
  };

  return (
    <div style={{ textAlign: 'center', height: '300px' }}>
      <h1>Add Watermark to Excel</h1>
      <button onClick={addWatermark}>
        Start
      </button>
    </div>
  );
}

export default App;
The worksheet after adding a watermark:
Remove a Watermark from an Excel Worksheet
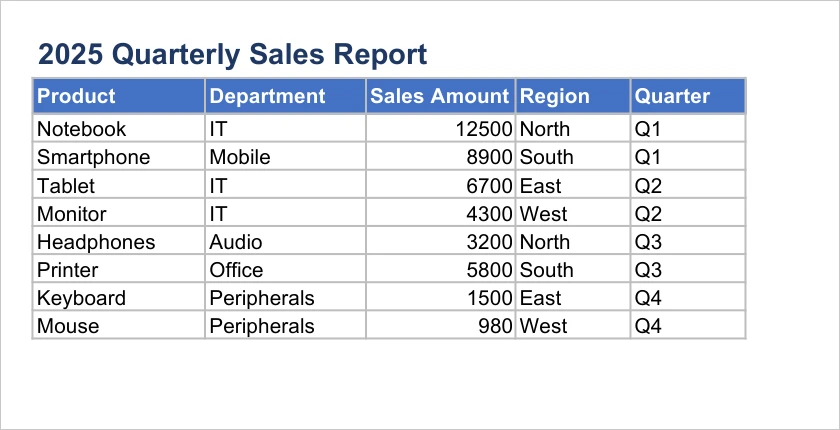
Because the watermark is carried by the header, removing it means clearing the reference in that header. Once the header text is empty, the image is no longer displayed and the body of the worksheet stays as it is.
Removing a watermark from an Excel worksheet:
| Syntax | Result |
|---|---|
workbook.LoadFromFile(...) |
Loads the watermarked workbook |
workbook.Worksheets.get(0) |
Gets the first worksheet to process |
sheet.PageSetup.LeftHeader = "" |
Clears the left header text and the image placeholder |
workbook.SaveToFile(...) |
Saves the workbook without the watermark to the VFS |
The steps are:
- Load the watermarked Excel file into the VFS.
- Create a
Workbookobject, load the document withLoadFromFile(), and get the first worksheet withWorkbook.Worksheets.get(0). - Set
PageSetup.LeftHeaderto an empty string to remove the watermark image placeholder from the header. - Use the
Workbook.SaveToFile()method to save the document, then release resources withWorkbook.Dispose().
Here is a complete code example showing how to remove a watermark from a worksheet in React:
function App() {
  const removeWatermark = async () => {
    // Get the Spire.XLS WASM module
    const xlsModule = window.wasmModule?.spirexls;

    // Check whether the module is ready
    if (!xlsModule) {
      alert('Spire.Xls is not ready yet');
      return;
    }

    // Load the watermarked Excel file into the VFS
    const inputFileName = 'AddWatermark.xlsx';
    await window.spire.FetchFileToVFS(inputFileName, '', `${process.env.PUBLIC_URL}data/`);

    // Load the workbook
    const workbook = new xlsModule.Workbook();
    workbook.LoadFromFile({ fileName: inputFileName });

    // Get the first worksheet
    const sheet = workbook.Worksheets.get(0);

    // Clear the left header text to remove the watermark
    sheet.PageSetup.LeftHeader = "";

    // Save the document
    const outputFileName = 'RemoveWatermark_output.xlsx';
    workbook.SaveToFile({ fileName: outputFileName, version: xlsModule.ExcelVersion.Version2010 });

    // Release resources
    workbook.Dispose();

    // Read the converted file from the VFS and trigger a download
    const fileArray = window.dotnetRuntime.Module.FS.readFile(outputFileName);
    const blob = new Blob([fileArray], { type: 'application/vnd.openxmlformats-officedocument.spreadsheetml.sheet' });
    const url = URL.createObjectURL(blob);
    const a = document.createElement('a');
    a.href = url;
    a.download = outputFileName;
    a.click();
    URL.revokeObjectURL(url);
  };

  return (
    <div style={{ textAlign: 'center', height: '300px' }}>
      <h1>Remove Watermark from Excel</h1>
      <button onClick={removeWatermark}>
        Start
      </button>
    </div>
  );
}

export default App;
The worksheet after removing the watermark:
FAQ
The watermark is not visible in Normal view
Cause: A watermark implemented through a header image is only displayed in Page Layout view and print preview, and is not visible in Excel's Normal view.
Solution: Switch the worksheet view to Page Layout mode to preview the watermark, for example by setting sheet.ViewMode = xlsModule.ViewMode.Layout in the code.
The watermark position is different from expected
Cause: A header image watermark is displayed in the header area, and its horizontal position can be controlled by the left, center, and right header positions. If the position does not match expectations, it is usually because the header position set is inconsistent with the requirement.
Solution: Choose LeftHeaderImage, CenterHeaderImage, or RightHeaderImage to set the watermark image according to your needs, and set the corresponding image placeholder &G with the LeftHeader, CenterHeader, or RightHeader property.
Residual content remains in the file after removing the watermark
Cause: The watermark is implemented through a header image. If only part of the header area is cleared, other areas (such as the left or right header) may still contain the watermark image.
Solution: Make sure to clear the text of all header areas where the watermark was set, including LeftHeader, CenterHeader, and RightHeader.
Obtain a Free License
Spire.XLS for JavaScript offers a 30-day full-featured free trial license with no functional limitations. Apply here to evaluate before purchasing.
Rename Excel Worksheets and Set Tab Colors in React
When a workbook holds several worksheets, default names and look-alike tabs make it hard to tell one sheet from another. Renaming “Sheet1” to “Quarterly Sales” tells a colleague at a glance what the sheet contains; marking the sales, inventory and summary sheets with red, green and light blue tabs removes the need to open each one while switching. Both the name and the tab color live inside the workbook itself, so they survive distribution and archiving without any external notes. Spire.XLS for JavaScript performs these operations in the browser through WebAssembly, managing input and output files with a virtual file system (VFS) and requiring no backend service.
This article covers two core features:
For installation and project setup, see Integrating Spire.XLS for JavaScript in a React Project. The examples below assume Spire.XLS is installed and the WebAssembly module has been initialized.
Rename Excel Worksheets
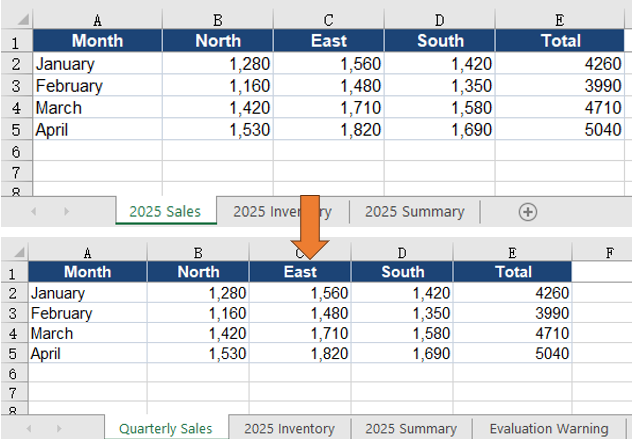
A worksheet name is the first identifier a reader sees after opening the file. With default names such as “Sheet1” and “Sheet2”, even a well-filled workbook has to be opened sheet by sheet before the right table turns up; with a business name such as “Quarterly Sales”, the tab strip itself becomes a table of contents, and the label is preserved when the file is printed or exported. The sample workbook contains sales, inventory and summary data in that order. This section renames the first worksheet.
How to rename a worksheet and what it produces:
| Call | Result |
|---|---|
workbook.Worksheets.get(0) |
Takes the first worksheet by index |
sheet.Name |
Reads back the current worksheet name |
sheet.Name = 'Quarterly Sales' |
Assigns the new worksheet name |
workbook.SaveToFile |
Saves the renamed workbook to the VFS |
The steps are:
- Load the font file and the test data file into the VFS with
window.spire.FetchFileToVFS. - Create a workbook with
new Workbook()and load the input file withworkbook.LoadFromFile. - Take the first worksheet with
workbook.Worksheets.get(0). - Assign the new name to
sheet.Name. - Save the workbook with
workbook.SaveToFile, then release the workbook object withworkbook.Dispose.
The complete example below renames an Excel worksheet in React:
function App() {
  const renameWorksheet = async () => {
    // Get the Spire.XLS WASM module
    const xlsModule = window.wasmModule?.spirexls;

    // Check that the module is ready
    if (!xlsModule) {
      alert('Spire.Xls is not ready yet');
      return;
    }

    // Load the font and the test data file into the VFS
    await window.spire.FetchFileToVFS('ARIAL.TTF', '/Library/Fonts/', `${process.env.PUBLIC_URL}/font/`);
    const inputFileName = 'WorksheetNames.xlsx';
    await window.spire.FetchFileToVFS(inputFileName, '', `${process.env.PUBLIC_URL}data/`);

    // Load the workbook and take the first worksheet
    const workbook = new xlsModule.Workbook();
    workbook.LoadFromFile({ fileName: inputFileName });
    const sheet = workbook.Worksheets.get(0);

    // Assign the new worksheet name
    sheet.Name = 'Quarterly Sales';

    // Save the workbook
    const outputFileName = 'RenameWorksheet.xlsx';
    workbook.SaveToFile({ fileName: outputFileName });

    // Dispose of the workbook to release its resources
    workbook.Dispose();

    // Read the result back out of the VFS and trigger the download
    const fileArray = window.dotnetRuntime.Module.FS.readFile(outputFileName);
    const blob = new Blob([fileArray], { type: 'application/vnd.openxmlformats-officedocument.spreadsheetml.sheet' });
    const url = URL.createObjectURL(blob);
    const a = document.createElement('a');
    a.href = url;
    a.download = outputFileName;
    a.click();
    URL.revokeObjectURL(url);
  };

  return (
    <div style={{ textAlign: 'center', height: '300px' }}>
      <h1>Rename Excel Worksheets</h1>
      <button id="rename-worksheet" onClick={renameWorksheet}>Rename Worksheet</button>
    </div>
  );
}

export default App;
The workbook after renaming the first worksheet:
Set Excel Worksheet Tab Colors
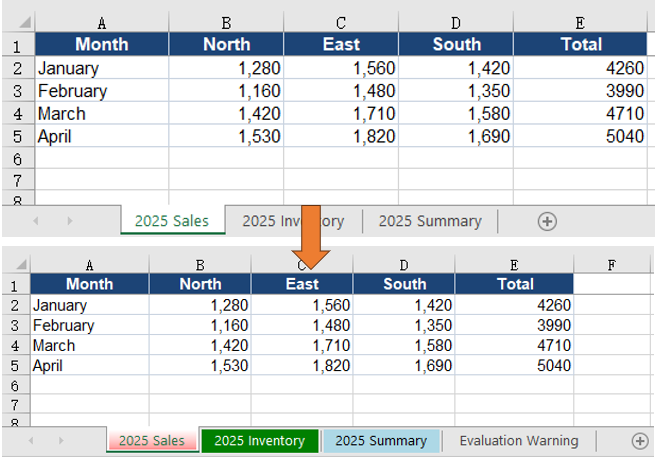
Even with descriptive names, the tab strip remains a row of similarly sized text, which has to be scanned sheet by sheet. Tab colors add a second identifier: red for sales, green for inventory and light blue for summary. Color is perceived before the text is read, so a reader can locate a group directly, and both the color and the name stay in the workbook when the file is shared. The three worksheets in the sample correspond to the three groups, so this section assigns each one a different tab color.
How to set worksheet tab colors and what it produces:
| Call | Result |
|---|---|
workbook.Worksheets.get(0) |
Takes the worksheet whose tab will be colored |
sheet.TabColor = xlsModule.Color.get_Red() |
Turns the worksheet tab red |
sheet.TabColor = xlsModule.Color.get_Green() |
Turns the worksheet tab green |
sheet.TabColor = xlsModule.Color.get_LightBlue() |
Turns the worksheet tab light blue |
xlsModule.Color.FromArgb(255, 255, 193, 7) |
Builds a custom RGB color for TabColor |
The steps are:
- Load the font file and the test data file into the VFS with
window.spire.FetchFileToVFS. - Create a workbook with
new Workbook()and load the input file withworkbook.LoadFromFile. - Take the three worksheets in order with
workbook.Worksheets.get(0),get(1)andget(2). - Assign
xlsModule.Color.get_Red(),get_Green()andget_LightBlue()to each worksheet'sTabColor. - Save the workbook with
workbook.SaveToFile, then release the workbook object withworkbook.Dispose.
The complete example below sets worksheet tab colors in React:
function App() {
  const setTabColor = async () => {
    // Get the Spire.XLS WASM module
    const xlsModule = window.wasmModule?.spirexls;

    // Check that the module is ready
    if (!xlsModule) {
      alert('Spire.Xls is not ready yet');
      return;
    }

    // Load the font and the test data file into the VFS
    await window.spire.FetchFileToVFS('ARIAL.TTF', '/Library/Fonts/', `${process.env.PUBLIC_URL}/font/`);
    const inputFileName = 'WorksheetNames.xlsx';
    await window.spire.FetchFileToVFS(inputFileName, '', `${process.env.PUBLIC_URL}data/`);

    // Load the workbook
    const workbook = new xlsModule.Workbook();
    workbook.LoadFromFile({ fileName: inputFileName });

    // Set the tab colours to red, green and light blue in worksheet order
    workbook.Worksheets.get(0).TabColor = xlsModule.Color.get_Red();
    workbook.Worksheets.get(1).TabColor = xlsModule.Color.get_Green();
    workbook.Worksheets.get(2).TabColor = xlsModule.Color.get_LightBlue();

    // Save the workbook
    const outputFileName = 'SetTabColor.xlsx';
    workbook.SaveToFile({ fileName: outputFileName });

    // Dispose of the workbook to release its resources
    workbook.Dispose();

    // Read the result back out of the VFS and trigger the download
    const fileArray = window.dotnetRuntime.Module.FS.readFile(outputFileName);
    const blob = new Blob([fileArray], { type: 'application/vnd.openxmlformats-officedocument.spreadsheetml.sheet' });
    const url = URL.createObjectURL(blob);
    const a = document.createElement('a');
    a.href = url;
    a.download = outputFileName;
    a.click();
    URL.revokeObjectURL(url);
  };

  return (
    <div style={{ textAlign: 'center', height: '300px' }}>
      <h1>Set Excel Worksheet Tab Colors</h1>
      <button id="set-tab-color" onClick={setTabColor}>Set Tab Colors</button>
    </div>
  );
}

export default App;
The workbook after setting tab colors for the three worksheets:
Set a Custom Tab Color
When the built-in colors do not fit a report's palette, Color.FromArgb builds a custom color. Its four arguments are the alpha, red, green and blue channels, each from 0 to 255:
// Set the first worksheet tab to amber
workbook.Worksheets.get(0).TabColor = xlsModule.Color.FromArgb(255, 255, 193, 7);
FAQ
Worksheet rename reports a duplicate name
Cause: Worksheet names in a workbook must be unique, and the comparison ignores case. Assigning a name already used by another worksheet, such as “Sales” and “sales”, triggers the limit.
Solution: Before renaming, iterate over workbook.Worksheets, read each Name, and confirm the target name is free before assigning it to sheet.Name.
A sheet name containing a slash throws an error
Cause: Excel does not allow worksheet names to contain :, \, /, ?, *, [ or ]; Spire.XLS throws when such a name is assigned.
Solution: Replace the illegal characters with a hyphen or underscore before assigning the value to sheet.Name.
What happens when a worksheet name exceeds 31 characters
Cause: Excel limits worksheet names to 31 characters. Spire.XLS does not report an error; it truncates the name to 31 characters before writing it.
Solution: Check name.length before assigning and shorten the name when it is longer than 31 characters. The truncation happens during assignment, so comparing the saved name with the intended one will reveal the difference.
Getting a worksheet by name throws Arg_NullReferenceException
Cause: workbook.Worksheets.get('name') returns a worksheet only when the name matches exactly. A missing name, a trailing space, or a worksheet that has already been renamed all throw this exception.
Solution: Iterate over workbook.Worksheets and print each Name to confirm the current name before calling get. When the name comes from external input, trim leading and trailing spaces first.
Get a Free License
Spire.XLS for JavaScript offers a 30-day full-featured free trial license with no functional limitations. Apply here to evaluate before purchasing.
Convert Between Excel and UOS in React with JavaScript
UOS is the spreadsheet format of the UOF specification, saved with the .uos extension, and office suites that implement the specification can open it directly. When an Excel report is handed to such an environment and .xlsx is not supported, the workbook has to be converted to UOS first; a UOS file received in return has to be converted back to Excel before it can be edited in the usual tools. Conversion only changes the saved format: formulas, merged areas, number formats and text formatting travel with the file. Spire.XLS for JavaScript performs the conversion in the browser through WebAssembly, and the input and output files are managed by a virtual file system (VFS), with no backend service required.
This article covers two feature points:
For installation and project setup, see Integrating Spire.XLS for JavaScript in a React Project. The examples below assume Spire.XLS is installed and the WebAssembly module has been initialized.
Convert Excel to UOS
Saving an Excel workbook as UOS lets an office suite that only recognizes the UOF format open the report directly. Only the saved format changes; worksheet names, merged areas and number formats stay as they are. Formula cells need one extra step: they have to be calculated before saving so that both the formula and its result are written.
How to convert Excel to UOS and what it produces:
| Call | Result |
|---|---|
window.spire.FetchFileToVFS |
Loads the font file and the Excel file into the virtual file system |
workbook.LoadFromFile({ fileName }) |
Loads the Excel workbook |
workbook.CalculateAllValue() |
Calculates every formula in the workbook |
xlsModule.FileFormat.UOS |
Sets the target format to UOS |
workbook.SaveToFile({ fileName, fileFormat }) |
Writes the workbook to the virtual file system in UOS format |
The steps are:
- Load the font file and the Excel test file into the VFS with
window.spire.FetchFileToVFS. - Create a workbook with
new Workbook()and load the test file withworkbook.LoadFromFile. - Calculate the formulas with
workbook.CalculateAllValue(). - Call
workbook.SaveToFilewithfileFormatset toxlsModule.FileFormat.UOS, writingExcelToUos.uos. - Release the workbook with
workbook.Dispose, then read the result out of the VFS and trigger the download.
The following is a complete code example that shows how to convert an Excel workbook to UOS in React:
function App() {
  const excelToUos = async () => {
    // Get the Spire.XLS WASM module
    const xlsModule = window.wasmModule?.spirexls;

    // Check that the module is ready
    if (!xlsModule) {
      alert('Spire.Xls is not ready yet');
      return;
    }

    // Load the font and the test data file into the VFS
    await window.spire.FetchFileToVFS('ARIAL.TTF', '/Library/Fonts/', `${process.env.PUBLIC_URL}/font/`);
    const inputFileName = 'SalesReport.xlsx';
    await window.spire.FetchFileToVFS(inputFileName, '', `${process.env.PUBLIC_URL}data/`);

    // Load the workbook
    const workbook = new xlsModule.Workbook();
    workbook.LoadFromFile({ fileName: inputFileName });

    // Calculate the formulas so the formula cells carry their results
    workbook.CalculateAllValue();

    // Save as UOS, with the format given by fileFormat
    const outputFileName = 'ExcelToUos.uos';
    workbook.SaveToFile({ fileName: outputFileName, fileFormat: xlsModule.FileFormat.UOS });

    // Dispose of the workbook to release its resources
    workbook.Dispose();

    // Read the result back out of the VFS and trigger the download
    const fileArray = window.dotnetRuntime.Module.FS.readFile(outputFileName);
    const blob = new Blob([fileArray], { type: 'application/octet-stream' });
    const url = URL.createObjectURL(blob);
    const a = document.createElement('a');
    a.href = url;
    a.download = outputFileName;
    a.click();
    URL.revokeObjectURL(url);
  };

  return (
    <div style={{ textAlign: 'center', height: '300px' }}>
      <h1>Convert Between Excel and UOS in React</h1>
      <button id="excel-to-uos" onClick={excelToUos}>Convert Excel to UOS</button>
    </div>
  );
}

export default App;
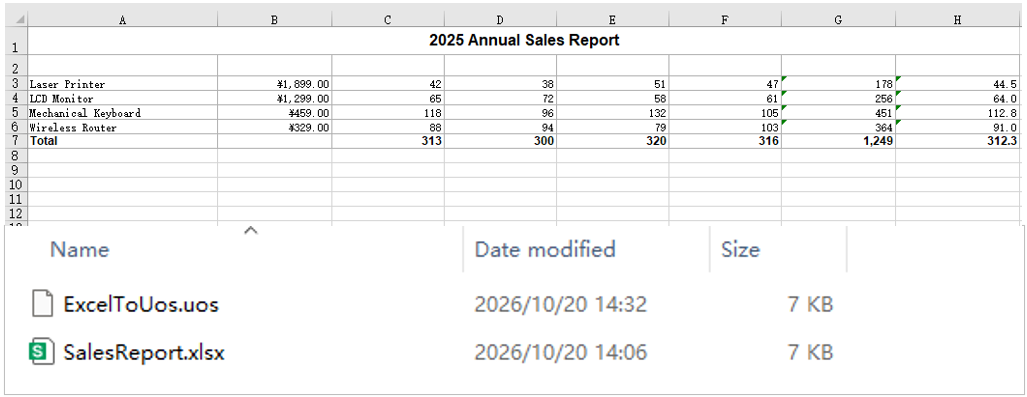
The UOS file produced from the Excel workbook:
Convert UOS to Excel
Converting a received UOS file back to Excel is the reverse of the same process. UOS and Excel store the same workbook content; loading restores worksheet names, cell data and styles, and formulas come back together with their cached results, so nothing has to be recalculated before saving. The converted file can then be opened in Excel or an online spreadsheet tool for further editing, summarizing or printing.
How to convert a UOS file to Excel and what it produces:
| Call | Result |
|---|---|
window.spire.FetchFileToVFS |
Loads the font file and the UOS file into the virtual file system |
workbook.LoadFromFile({ fileName }) |
Reads the UOS file and recognizes it as a workbook |
xlsModule.FileFormat.Version2010 |
Sets the target format to Excel 2010 or later |
workbook.SaveToFile({ fileName, fileFormat }) |
Writes the workbook to the virtual file system in Excel format |
window.dotnetRuntime.Module.FS.readFile |
Reads the result out of the VFS and triggers the download |
The steps are:
- Load the font file and the UOS test file into the VFS with
window.spire.FetchFileToVFS. - Create a workbook with
new Workbook()and load the UOS file withworkbook.LoadFromFile. - Call
workbook.SaveToFilewithfileFormatset toxlsModule.FileFormat.Version2010, writingUosToExcel.xlsx. - Release the workbook with
workbook.Dispose, then read the result out of the VFS and trigger the download.
The following is a complete code example that shows how to convert a UOS file back to Excel in React:
function App() {
  const uosToExcel = async () => {
    // Get the Spire.XLS WASM module
    const xlsModule = window.wasmModule?.spirexls;

    // Check that the module is ready
    if (!xlsModule) {
      alert('Spire.Xls is not ready yet');
      return;
    }

    // Load the font and the test data file into the VFS
    await window.spire.FetchFileToVFS('ARIAL.TTF', '/Library/Fonts/', `${process.env.PUBLIC_URL}/font/`);
    const inputFileName = 'SalesReport.uos';
    await window.spire.FetchFileToVFS(inputFileName, '', `${process.env.PUBLIC_URL}data/`);

    // Load the UOS file
    const workbook = new xlsModule.Workbook();
    workbook.LoadFromFile({ fileName: inputFileName });

    // Save as Excel, with the version given by fileFormat
    const outputFileName = 'UosToExcel.xlsx';
    workbook.SaveToFile({ fileName: outputFileName, fileFormat: xlsModule.FileFormat.Version2010 });

    // Dispose of the workbook to release its resources
    workbook.Dispose();

    // Read the result back out of the VFS and trigger the download
    const fileArray = window.dotnetRuntime.Module.FS.readFile(outputFileName);
    const blob = new Blob([fileArray], { type: 'application/vnd.openxmlformats-officedocument.spreadsheetml.sheet' });
    const url = URL.createObjectURL(blob);
    const a = document.createElement('a');
    a.href = url;
    a.download = outputFileName;
    a.click();
    URL.revokeObjectURL(url);
  };

  return (
    <div style={{ textAlign: 'center', height: '300px' }}>
      <h1>Convert Between Excel and UOS in React</h1>
      <button id="uos-to-excel" onClick={uosToExcel}>Convert UOS to Excel</button>
    </div>
  );
}

export default App;
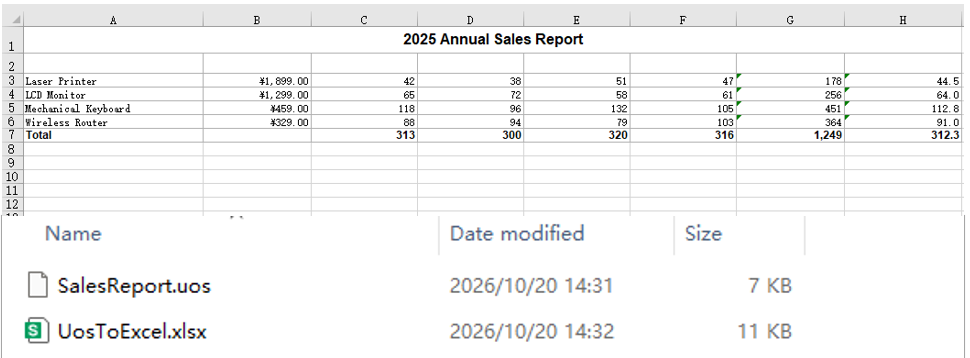
The workbook produced from the UOS file:
FAQ
Why are the formula cells empty in the UOS file after conversion
Cause: During export, the formula and the value of each cell are taken from the workbook's current calculation results. If CalculateAllValue has not been called after loading, the formula cells are still uncalculated and are written as empty cells, so neither the formula nor the value survives.
Solution: Call workbook.CalculateAllValue() after workbook.LoadFromFile and before workbook.SaveToFile, then save with FileFormat.UOS; the formula cells will carry both the formula and the calculated result.
Can I save as UOS by using only the .uos extension without fileFormat
Cause: fileFormat is an optional parameter of SaveToFile. When it is omitted, the save format is inferred from the extension of the output file name, and a recognizable extension selects that format.
Solution: Yes. Name the output file ExcelToUos.uos and call workbook.SaveToFile({ fileName: outputFileName }); the file is still written as UOS. Setting fileFormat explicitly is safer, because a missing or misspelled extension will not silently produce another format.
Get a Free License
Spire.XLS for JavaScript offers a 30-day full-featured free trial license with no functional limitations. Apply here to evaluate before purchasing.
Add a Data Table to an Excel Chart with JavaScript in React
A chart makes a trend visible at a glance, yet it does not give the exact numbers: the height of a column has to be read against the value axis, and the estimate drifts as more series crowd in. A data table lists the category names, series names and values directly below the chart, so readers do not have to go back to the source cells or add a data label to every point. As part of the chart, the table scales and moves with it and stays in place when the chart is exported as an image or printed. Spire.XLS for JavaScript performs these operations in the browser through WebAssembly; the input and output files are managed by a virtual file system (VFS), with no backend service required.
This article covers two feature points:
For installation and project setup, see Integrating Spire.XLS for JavaScript in a React Project. The examples below assume Spire.XLS is installed and the WebAssembly module has been initialized.
Add a data table to the chart
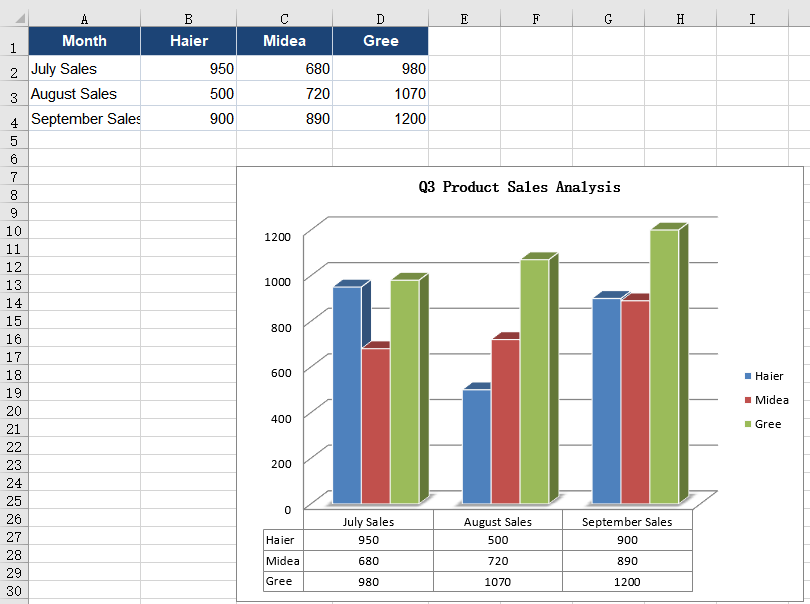
Adding a data table to a chart solves the problem of numbers living apart from the picture. A default column chart only draws the columns; the values stay in the source worksheet and the reader has to move between the two. With several series, a data table sits directly under the category axis, one row per series, its columns aligned with the categories and its rows matching the colours in the legend, so the trend and the figures appear in one place. The sample workbook already holds a quarterly sales table and a column chart; what it lacks is the table below the chart.
Turning the data table on:
| Syntax | Result |
|---|---|
workbook.Worksheets.get(0) |
Takes the first worksheet of the workbook |
sheet.Charts.get(0) |
Takes the first chart on the worksheet |
chart.HasDataTable = true |
Shows a data table below the chart with the categories, series names and values |
workbook.SaveToFile |
Saves the workbook with its data table into the VFS |
The steps are:
- Load the font file and the test data file into the VFS with
window.spire.FetchFileToVFS. - Create a workbook with
new Workbook(), load the input file withworkbook.LoadFromFile, and take the first worksheet withworkbook.Worksheets.get(0). - Take the first chart on the worksheet with
sheet.Charts.get(0). - Set
chart.HasDataTabletotrue, which adds the data table below the chart. - Save the workbook with
workbook.SaveToFileand dispose of it withworkbook.Disposeto free resources.
The full code example below shows how to add a data table to an Excel chart in React:
function App() {
  const addDataTable = async () => {
    // Get the Spire.XLS WASM module
    const xlsModule = window.wasmModule?.spirexls;

    // Check that the module is ready
    if (!xlsModule) {
      alert('Spire.Xls is not ready yet');
      return;
    }

    // Load the font and the test data file into the VFS
    await window.spire.FetchFileToVFS('ARIAL.TTF', '/Library/Fonts/', `${process.env.PUBLIC_URL}/font/`);
    const inputFileName = 'ChartSales.xlsx';
    await window.spire.FetchFileToVFS(inputFileName, '', `${process.env.PUBLIC_URL}data/`);

    // Load the workbook and take the first worksheet and its chart
    const workbook = new xlsModule.Workbook();
    workbook.LoadFromFile({ fileName: inputFileName });
    const sheet = workbook.Worksheets.get(0);
    const chart = sheet.Charts.get(0);

    // Turn on the chart's data table, which lists the categories and series values below the plot
    chart.HasDataTable = true;

    // Save the workbook
    const outputFileName = 'AddDataTable.xlsx';
    workbook.SaveToFile({ fileName: outputFileName });

    // Dispose of the workbook to release its resources
    workbook.Dispose();

    // Read the result back out of the VFS and trigger the download
    const fileArray = window.dotnetRuntime.Module.FS.readFile(outputFileName);
    const blob = new Blob([fileArray], { type: 'application/vnd.openxmlformats-officedocument.spreadsheetml.sheet' });
    const url = URL.createObjectURL(blob);
    const a = document.createElement('a');
    a.href = url;
    a.download = outputFileName;
    a.click();
    URL.revokeObjectURL(url);
  };

  return (
    <div style={{ textAlign: 'center', height: '300px' }}>
      <h1>Add a Data Table to an Excel Chart</h1>
      <button id="add-data-table" onClick={addDataTable}>Add a Data Table to the Chart</button>
    </div>
  );
}

export default App;
The sales report after turning on the chart data table:
Adjust the data table borders, legend keys and text formatting
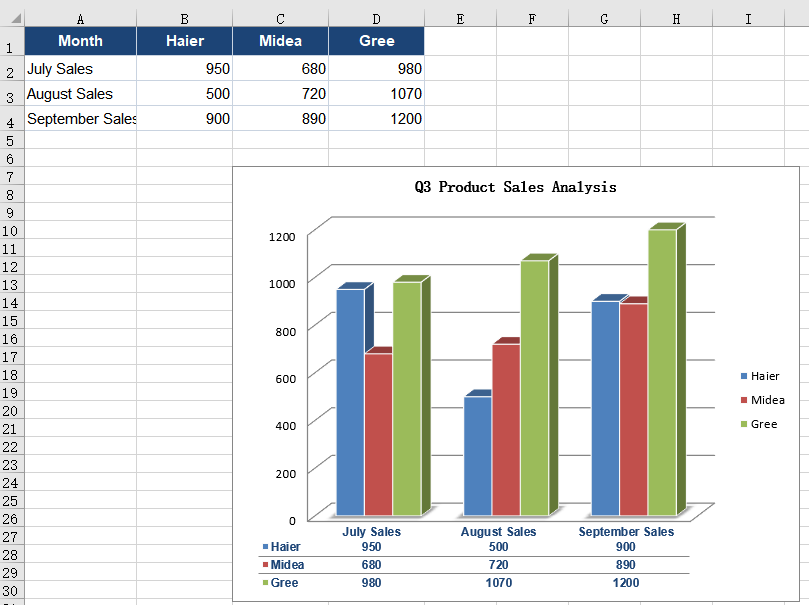
Adjusting the data table borders, legend keys and text formatting keeps the table readable when there are many series and lets it blend into the layout of a report. A newly opened data table carries an outer frame and both horizontal and vertical separators; with three rows of values stacked together it looks like a dense grid. Dropping the outer frame and the vertical lines leaves only the horizontal ones, so the eye follows a row straight to its numbers without being cut off by vertical rules. Turning on the legend keys then puts a colour swatch of the matching series in front of every series name, so readers no longer have to compare each row with the legend. By default the text draws on the chart's own settings -- ten points, black, not bold -- which does not stand out against dark columns and gridlines; dropping the size to nine points fits more numbers on a line, while bolding the text and switching it to a deeper blue ties it to the title and the header row. These settings apply to the data table alone; the chart title, axis labels and legend keep their own fonts.
Borders, legend keys and text formatting:
| Syntax | Result |
|---|---|
chart.DataTable |
Takes the data table object of the chart |
table.HasBorders = false |
Removes the outer frame of the data table |
table.HasVertBorder = false |
Removes the vertical separators between columns |
table.HasHorzBorder = true |
Keeps the horizontal separators between rows |
table.ShowSeriesKeys = true |
Shows a legend key in front of every series name |
table.FontName = 'Arial' |
Sets the data table text to Arial |
table.Size = 9 |
Sets the data table text to 9 points |
table.IsBold = true |
Bolds the data table text |
table.Color = xlsModule.Color.FromArgb(255, 28, 68, 118) |
Sets the data table text to a deep blue |
The steps are:
- Load the font and the test data file into the VFS with
window.spire.FetchFileToVFS, then load the workbook withworkbook.LoadFromFile. - Take the first worksheet with
workbook.Worksheets.get(0)and the first chart withsheet.Charts.get(0). - Set
chart.HasDataTabletotrueto open the data table, then take the object withchart.DataTable. - Set
table.HasBordersandtable.HasVertBordertofalseandtable.HasHorzBordertotrue, so only the horizontal lines remain. - Set
table.ShowSeriesKeystotrueto show the legend key before each series name. - Set
table.FontName,table.Sizeandtable.IsBoldto choose the typeface, the size and the bold weight. - Build a deep blue with
xlsModule.Color.FromArgband assign it totable.Color. - Save the workbook with
workbook.SaveToFileand dispose of it withworkbook.Disposeto free resources.
The full code example below shows how to adjust the data table borders, legend keys and text formatting in React:
function App() {
  const customizeDataTable = async () => {
    // Get the Spire.XLS WASM module
    const xlsModule = window.wasmModule?.spirexls;

    // Check that the module is ready
    if (!xlsModule) {
      alert('Spire.Xls is not ready yet');
      return;
    }

    // Load the font and the test data file into the VFS
    await window.spire.FetchFileToVFS('ARIAL.TTF', '/Library/Fonts/', `${process.env.PUBLIC_URL}/font/`);
    const inputFileName = 'ChartSales.xlsx';
    await window.spire.FetchFileToVFS(inputFileName, '', `${process.env.PUBLIC_URL}data/`);

    // Load the workbook and take the first worksheet and its chart
    const workbook = new xlsModule.Workbook();
    workbook.LoadFromFile({ fileName: inputFileName });
    const sheet = workbook.Worksheets.get(0);
    const chart = sheet.Charts.get(0);

    // Turn on the data table and take its object
    chart.HasDataTable = true;
    const table = chart.DataTable;

    // Drop the outer frame and the vertical lines, keeping only the horizontal ones
    table.HasBorders = false;
    table.HasVertBorder = false;
    table.HasHorzBorder = true;

    // Show the legend key in front of each series name
    table.ShowSeriesKeys = true;

    // Set the data table font, size, bold weight and text colour
    table.FontName = 'Arial';
    table.Size = 9;
    table.IsBold = true;
    table.Color = xlsModule.Color.FromArgb(255, 28, 68, 118);

    // Save the workbook
    const outputFileName = 'DataTableFormatting.xlsx';
    workbook.SaveToFile({ fileName: outputFileName });

    // Dispose of the workbook to release its resources
    workbook.Dispose();

    // Read the result back out of the VFS and trigger the download
    const fileArray = window.dotnetRuntime.Module.FS.readFile(outputFileName);
    const blob = new Blob([fileArray], { type: 'application/vnd.openxmlformats-officedocument.spreadsheetml.sheet' });
    const url = URL.createObjectURL(blob);
    const a = document.createElement('a');
    a.href = url;
    a.download = outputFileName;
    a.click();
    URL.revokeObjectURL(url);
  };

  return (
    <div style={{ textAlign: 'center', height: '300px' }}>
      <h1>Add a Data Table to an Excel Chart</h1>
      <button id="data-table-formatting" onClick={customizeDataTable}>Adjust the Borders, Legend Keys and Text</button>
    </div>
  );
}

export default App;
The data table after adjusting the borders, legend keys and text formatting:
FAQ
What is the difference between a data table and data labels?
Cause: Data labels sit next to each data point and show only that point's value. A data table sits below the chart, one row per series, and gives the category names and all the values together.
Solution: Use data labels when each point needs a callout without a table taking up space; use a data table when readers should take in a whole set of values at once. Both can be present on the same chart and turned on or off as needed.
How do I remove the data table from a chart?
Cause: The data table is controlled by a single switch on the chart; once it is on, it does not disappear with a change of source data or chart type.
Solution: Set chart.HasDataTable to false and save the workbook; the data table below the chart is removed.
How can the data table use a different font from the rest of the chart?
Cause: The data table carries its own text formatting. Until it is set, it follows the rest of the chart's text; once set, only the data table changes.
Solution: Set FontName, Size, IsBold and Color on chart.DataTable. These properties act on the data table only and leave the chart title, axis labels and legend untouched.
What is the legend key in a data table?
Cause: A legend key is the small colour swatch shown in front of a series name, matching the series' marker in the legend. It is off by default, so the data table shows plain text.
Solution: Set table.ShowSeriesKeys to true; a swatch then appears in front of every series name, so a reader can match a row of the data table with the legend directly.
Get a Free License
Spire.XLS for JavaScript offers a 30-day full-featured free trial license with no functional limitations. Apply here to evaluate before purchasing.
Format Excel Text Boxes with JavaScript in React
Text boxes in a worksheet carry notices, reminders or a single conclusion, yet their default look is plain: small black text on white, framed by a thin border that blends into the grid. Enlarging and bolding the font and laying down a light fill make the text rise above the table; inner margins and text wrapping keep long sentences off the border and inside the box; removing the border lets a text box read as a quiet annotation. These changes can be applied in code in one pass instead of one box at a time. Spire.XLS for JavaScript runs in the browser on WebAssembly and handles the input and output files through a virtual file system (VFS), with no backend service required.
This article covers two core feature points:
- Adjust the Font, Background and Border of Text Boxes
- Set the Inner Margins and Text Wrapping of Text Boxes
For installation and project setup, see Integrating Spire.XLS for JavaScript in a React Project. The examples below assume Spire.XLS is installed and the WebAssembly module has been initialised.
Adjust the Font, Background and Border of Text Boxes
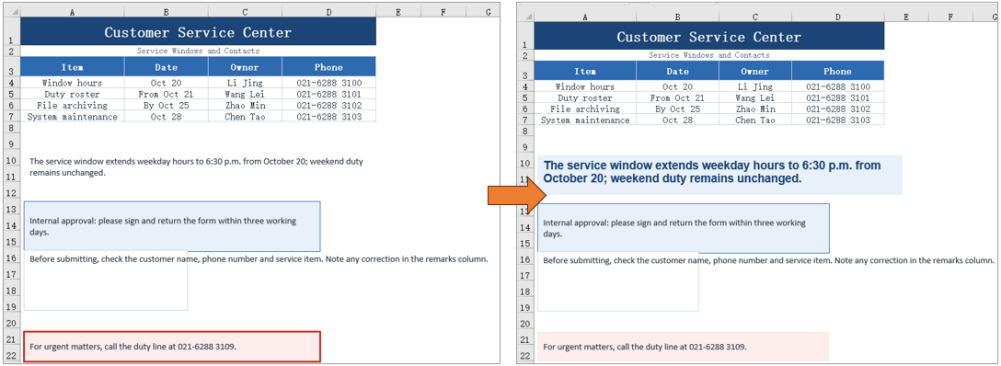
The default 11-point black text on a white background lacks contrast against the sheet. A larger size, a bold weight, another color and a pale fill lift a notice above the grid; clearing a border that competes with the cell lines makes the text read as if written straight on the page, which suits footnotes and corner notes. The same two kinds of change can be applied to one text box or split across different boxes, and this feature point adjusts the font, background and border of text boxes.
| Syntax | Result |
|---|---|
workbook.CreateFont() |
Creates a font object for the text of a text box |
font.FontName, font.Size, font.IsBold, font.Color |
Set the font name, size, bold weight and text color |
xlsModule.RichTextShape.Convert(textBox.RichText) |
Returns the rich text object of the text box |
richText.SetFont(0, textBox.Text.length - 1, font) |
Applies the font to the whole text of the text box |
textBox.Fill.FillType = xlsModule.ShapeFillType.SolidColor |
Switches the text box background to a solid fill |
textBox.Fill.ForeColor |
Sets the color of the solid fill |
textBox.Line.Weight = 0 |
Sets the border weight to zero, so no outline is drawn |
The steps are:
- Take the first text box with
sheet.TextBoxes.get(0). - Create a font object with
workbook.CreateFont()and set its name, size, bold weight and color throughFontName,Size,IsBoldandColor. - Get the rich text object with
xlsModule.RichTextShape.Convert(textBox.RichText), then callSetFont(0, textBox.Text.length - 1, font)to apply the font to the whole text. - Set
textBox.Fill.FillTypetoxlsModule.ShapeFillType.SolidColor, then name the fill color withtextBox.Fill.ForeColor. - Take the fourth text box with
sheet.TextBoxes.get(3)and settextBox.Line.Weightto0to remove its border. - Save the workbook with
workbook.SaveToFile.
The code below is the complete example of adjusting the font, background and border of a text box:
function App() {
  const adjustTextAppearance = async () => {
    // get the Spire.XLS WASM module
    const xlsModule = window.wasmModule?.spirexls;

    // check that the module is ready
    if (!xlsModule) {
      alert('Spire.Xls is not ready yet');
      return;
    }

    // load the font and the test data file into the VFS
    await window.spire.FetchFileToVFS('ARIAL.TTF', '/Library/Fonts/', `${process.env.PUBLIC_URL}/font/`);
    const inputFileName = 'TextBoxSample.xlsx';
    await window.spire.FetchFileToVFS(inputFileName, '', `${process.env.PUBLIC_URL}data/`);

    // load the workbook and take the first worksheet
    const workbook = new xlsModule.Workbook();
    workbook.LoadFromFile({ fileName: inputFileName });
    const sheet = workbook.Worksheets.get(0);

    // take the first text box and create a font with its name, size, bold weight and color
    const textBox = sheet.TextBoxes.get(0);
    const font = workbook.CreateFont();
    font.FontName = 'Arial';
    font.Size = 14;
    font.IsBold = true;
    font.Color = xlsModule.Color.FromArgb(255, 28, 68, 118);

    // apply the font to all the text in the text box
    const richText = xlsModule.RichTextShape.Convert(textBox.RichText);
    richText.SetFont(0, textBox.Text.length - 1, font);

    // fill the text box background with a solid color
    textBox.Fill.FillType = xlsModule.ShapeFillType.SolidColor;
    textBox.Fill.ForeColor = xlsModule.Color.FromArgb(255, 232, 240, 250);

    // take the fourth text box and set the border weight to 0, which removes the border
    const borderBox = sheet.TextBoxes.get(3);
    borderBox.Line.Weight = 0;

    // save the workbook
    const outputFileName = 'TextAppearance.xlsx';
    workbook.SaveToFile({ fileName: outputFileName });

    // dispose of the workbook to release its resources
    workbook.Dispose();

    // read the result back out of the VFS and trigger the download
    const fileArray = window.dotnetRuntime.Module.FS.readFile(outputFileName);
    const blob = new Blob([fileArray], { type: 'application/vnd.openxmlformats-officedocument.spreadsheetml.sheet' });
    const url = URL.createObjectURL(blob);
    const a = document.createElement('a');
    a.href = url;
    a.download = outputFileName;
    a.click();
    URL.revokeObjectURL(url);
  };

  return (
    <div style={{ textAlign: 'center', height: '300px' }}>
      <h1>Format Excel Text Boxes</h1>
      <button onClick={adjustTextAppearance}>Adjust the Font, Background and Border of a Text Box</button>
    </div>
  );
}

export default App;
The notice board after adjusting the font, background and border:
Set the Inner Margins and Text Wrapping of Text Boxes
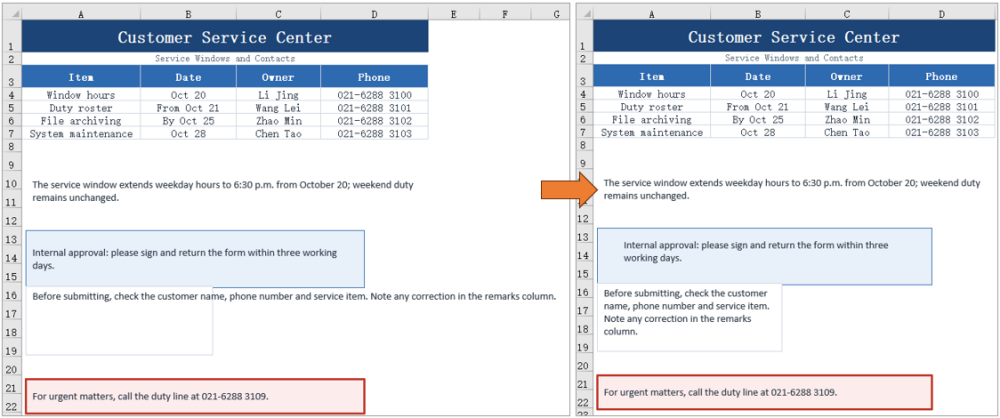
Text pressed against the border is hard to read, especially on a dark fill. Inner margins hold the text away from each edge and can be set separately for the four sides. A long sentence in a narrow box stays on one line by default and runs past the border, while text wrapping folds it onto the next line. The sample leaves about 1 cm on the left and right and 0.4 cm at the top and bottom, and aligns the text to the top left so the shift caused by the margins is visible. This feature point sets the inner margins and text wrapping of text boxes.
| Syntax | Result |
|---|---|
textBox.InnerLeftMargin, InnerRightMargin, InnerTopMargin, InnerBottomMargin |
Set the distance between the text and the left, right, top and bottom border |
xlsModule.CommentHAlignType.Left |
Aligns the text to the left inside the box |
xlsModule.CommentVAlignType.Top |
Aligns the text to the top inside the box |
textBox.IsWrapText = true |
Folds the text onto the next line when it reaches the box width |
The steps are:
- Take the second text box with
sheet.TextBoxes.get(1). - Set
InnerLeftMargin,InnerRightMargin,InnerTopMarginandInnerBottomMarginin turn to leave room on all four sides. - Set
HAlignmenttoxlsModule.CommentHAlignType.LeftandVAlignmenttoxlsModule.CommentVAlignType.Top, so the text starts from the top-left corner. - Take the third text box with
sheet.TextBoxes.get(2)and setIsWrapTexttotrueto turn on text wrapping. - Save the workbook with
workbook.SaveToFile.
The code below is the complete example of setting the inner margins and text wrapping of a text box:
function App() {
  const setTextLayout = async () => {
    // get the Spire.XLS WASM module
    const xlsModule = window.wasmModule?.spirexls;

    // check that the module is ready
    if (!xlsModule) {
      alert('Spire.Xls is not ready yet');
      return;
    }

    // load the font and the test data file into the VFS
    await window.spire.FetchFileToVFS('ARIAL.TTF', '/Library/Fonts/', `${process.env.PUBLIC_URL}/font/`);
    const inputFileName = 'TextBoxSample.xlsx';
    await window.spire.FetchFileToVFS(inputFileName, '', `${process.env.PUBLIC_URL}data/`);

    // load the workbook and take the first worksheet
    const workbook = new xlsModule.Workbook();
    workbook.LoadFromFile({ fileName: inputFileName });
    const sheet = workbook.Worksheets.get(0);

    // take the second text box and set the space between the text and its four borders
    const textBox = sheet.TextBoxes.get(1);
    textBox.InnerLeftMargin = 1;
    textBox.InnerRightMargin = 1;
    textBox.InnerTopMargin = 0.4;
    textBox.InnerBottomMargin = 0.4;

    // align the text to the top left so the effect of the margins is visible
    textBox.HAlignment = xlsModule.CommentHAlignType.Left;
    textBox.VAlignment = xlsModule.CommentVAlignType.Top;

    // take the third text box and turn on wrapping, so text folds at the box width
    const wrapBox = sheet.TextBoxes.get(2);
    wrapBox.IsWrapText = true;

    // save the workbook
    const outputFileName = 'TextLayout.xlsx';
    workbook.SaveToFile({ fileName: outputFileName });

    // dispose of the workbook to release its resources
    workbook.Dispose();

    // read the result back out of the VFS and trigger the download
    const fileArray = window.dotnetRuntime.Module.FS.readFile(outputFileName);
    const blob = new Blob([fileArray], { type: 'application/vnd.openxmlformats-officedocument.spreadsheetml.sheet' });
    const url = URL.createObjectURL(blob);
    const a = document.createElement('a');
    a.href = url;
    a.download = outputFileName;
    a.click();
    URL.revokeObjectURL(url);
  };

  return (
    <div style={{ textAlign: 'center', height: '300px' }}>
      <h1>Format Excel Text Boxes</h1>
      <button onClick={setTextLayout}>Set the Inner Margins and Text Wrapping of a Text Box</button>
    </div>
  );
}

export default App;
The notice board after setting the inner margins and text wrapping:
FAQ
How do I get a text box by name?
Cause: Getting text boxes by index means remembering their order in the collection, and inserting or removing a text box changes that order.
Solution: Use sheet.TextBoxes.get("TextBox 2") to get a text box by name.
How do I format only part of the text in a text box?
Cause: The text of a text box is stored as rich text, and SetFont applies to a character range; anything outside the range keeps its original format.
Solution: Get the rich text object with xlsModule.RichTextShape.Convert(textBox.RichText), then call richText.SetFont(startIndex, endIndex, font) with the range you want. For example, SetFont(0, 3, font) applies to the first four characters only.
Can the border of a text box have another color or a dashed style?
Cause: Besides its weight, the Line object also provides color and dash style settings.
Solution: Set the border color with textBox.Line.ForeColor, the weight with textBox.Line.Weight, and the dash style with textBox.Line.DashStyle, whose value is a member of xlsModule.ShapeDashLineStyleType, such as Dashed for a dashed line.
What if the text does not wrap as expected?
Cause: Text only wraps when IsWrapText is true, and when the text box is wide enough for the whole sentence no line break appears either.
Solution: Confirm that textBox.IsWrapText = true has been set, and check that the width of the text box is smaller than the length of the sentence. When several lines are needed, leave enough height in the text box as well.
Get a Free License
Spire.XLS for JavaScript offers a 30-day full-featured free trial license with no functional limitations. Apply here to evaluate before purchasing.
Copy Excel Cell Format with JavaScript in React
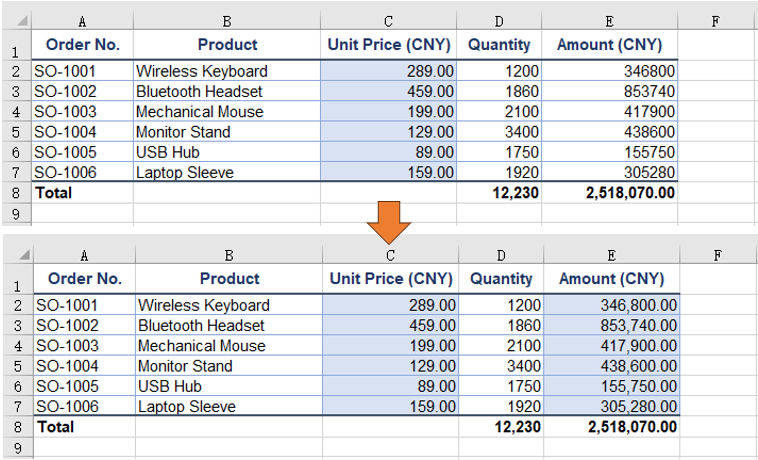
A cell whose formatting is already right often has to be reused elsewhere: the unit price column carries a money format, a light blue fill and thin borders, while the amount column on the same row is still plain. Copying a cell format hands the look the source cell has already settled on to the target cell -- number format, font, fill, border and alignment in one go -- and leaves the data in the target cell untouched. Spire.XLS for JavaScript performs these operations in the browser through WebAssembly; the input and output files are managed by a virtual file system (VFS), with no backend service required.
This article covers two feature points:
For installation and project setup, see Integrating Spire.XLS for JavaScript in a React Project. The examples below assume Spire.XLS is installed and the WebAssembly module has been initialized.
Copy the whole cell format
Every part of a cell's look is kept in a style object of its own. Handing the source cell's style object straight to the target cell carries the number format, font, fill, border and alignment across in one go, while the data in the target cell stays where it is. The sample workbook's unit price column already carries a money format and a light blue fill, and the amount column is still plain, so copying the former onto the latter row by row shows the difference.
Assigning the source cell's whole Style to the target cell's Style completes the copy:
| Syntax | Result |
|---|---|
sheet.Range.get('C2').Style |
Takes the whole style object of the source cell (the unit price column) |
sheet.Range.get('E2').Style = sheet.Range.get('C2').Style |
Hands that whole style to the target cell (the amount column): number format, font, fill, border and alignment follow |
sheet.Range.get({ row, column: 5 }).Text |
The value already in the target cell stays where it is, unaffected by the style assignment |
The steps are:
- Load the font file and the test data file into the VFS with
window.spire.FetchFileToVFS. - Create a workbook with
new Workbook(), load the input file withworkbook.LoadFromFile, and take the first worksheet withworkbook.Worksheets.get(0). - Take the source column's cell and the target column's cell row by row with
sheet.Range.get. - Assign the source cell's
Styleto the target cell'sStyle; the whole cell format follows, and the target cell's value is left untouched. - Save the workbook with
workbook.SaveToFileand dispose of it withworkbook.Disposeto free resources.
The full code example below shows how to copy the whole cell format in React:
function App() {
  const copyCellStyle = async () => {
    // get the Spire.XLS WASM module
    const xlsModule = window.wasmModule?.spirexls;

    // check that the module is ready
    if (!xlsModule) {
      alert('Spire.Xls is not ready yet');
      return;
    }

    // load the font and the test data file into the VFS
    await window.spire.FetchFileToVFS('ARIAL.TTF', '/Library/Fonts/', `${process.env.PUBLIC_URL}/font/`);
    const inputFileName = 'CopyCellStyle.xlsx';
    await window.spire.FetchFileToVFS(inputFileName, '', `${process.env.PUBLIC_URL}data/`);

    // load the workbook and take the first worksheet
    const workbook = new xlsModule.Workbook();
    workbook.LoadFromFile({ fileName: inputFileName });
    const sheet = workbook.Worksheets.get(0);

    // row by row, put the unit price column's format onto the amount column; the amounts stay put
    for (let row = 2; row <= 7; row++) {
      sheet.Range.get(`E${row}`).Style = sheet.Range.get(`C${row}`).Style;
    }

    // save the workbook
    const outputFileName = 'CopyCellStyle-output.xlsx';
    workbook.SaveToFile({ fileName: outputFileName, version: xlsModule.ExcelVersion.Version2016 });

    // dispose of the workbook to free resources
    workbook.Dispose();

    // read the result file from the VFS and start the download
    const fileArray = window.dotnetRuntime.Module.FS.readFile(outputFileName);
    const blob = new Blob([fileArray], { type: 'application/vnd.openxmlformats-officedocument.spreadsheetml.sheet' });
    const url = URL.createObjectURL(blob);
    const a = document.createElement('a');
    a.href = url;
    a.download = outputFileName;
    a.click();
    URL.revokeObjectURL(url);
  };

  return (
    <div style={{ textAlign: 'center', height: '300px' }}>
      <h1>Copy Cell Format</h1>
      <button id="copy-cell-style" onClick={copyCellStyle}>Copy the Whole Cell Format</button>
    </div>
  );
}

export default App;
The worksheet after copying the whole cell format:
Clone and reuse a named style
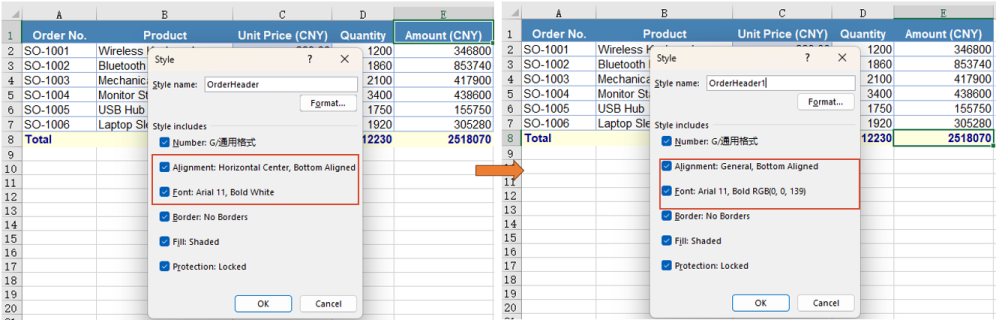
When one set of formatting is needed in several places, registering it as a named style lets it be applied to any range by name, and a colour change has to be made in one place only. A named style lives on the workbook: create it with workbook.Styles.Add, set its properties, then apply it by name through Range.CellStyleName. The example builds a style of white text on a steel blue fill for the header row, then clones it and changes only the colours for the total line -- the change lands on the clone alone, and the original style is unaffected.
A named style is registered on the workbook and applied to a range by name:
| Syntax | Result |
|---|---|
workbook.Styles.Add('OrderHeader') |
Registers a named style called OrderHeader on the workbook |
headerStyle.Font.Color, headerStyle.Color, headerStyle.FillPattern |
Sets the text colour, the fill colour and the fill pattern one by one |
headerStyle.clone() |
Copies out a style of its own, with a number appended to the name |
sheet.Range.get('A1:E1').CellStyleName = headerStyle.Name |
Applies the named style to that range by name |
The steps are:
- Load the font file and the test data file into the VFS with
window.spire.FetchFileToVFS. - Create a workbook with
new Workbook(), load the input file withworkbook.LoadFromFile, and take the first worksheet withworkbook.Worksheets.get(0). - Create a named style with
workbook.Styles.Addand set its font name, size, bold, text colour, fill colour, fill pattern and horizontal alignment. - Apply the style to the header range by name with
sheet.Range.get('A1:E1').CellStyleName. - Clone it with the style's
clone(), change only the text colour and the fill colour, and get the variant the total line needs. - Apply the variant to the total line with
sheet.Range.get('A8:E8').CellStyleName. - Save the workbook with
workbook.SaveToFileand dispose of it withworkbook.Disposeto free resources.
The full code example below shows how to clone a named style and reuse it for different ranges in React:
function App() {
  const cloneNamedStyle = async () => {
    // get the Spire.XLS WASM module
    const xlsModule = window.wasmModule?.spirexls;

    // check that the module is ready
    if (!xlsModule) {
      alert('Spire.Xls is not ready yet');
      return;
    }

    // load the font and the test data file into the VFS
    await window.spire.FetchFileToVFS('ARIAL.TTF', '/Library/Fonts/', `${process.env.PUBLIC_URL}/font/`);
    const inputFileName = 'CopyCellStyle.xlsx';
    await window.spire.FetchFileToVFS(inputFileName, '', `${process.env.PUBLIC_URL}data/`);

    // load the workbook and take the first worksheet
    const workbook = new xlsModule.Workbook();
    workbook.LoadFromFile({ fileName: inputFileName });
    const sheet = workbook.Worksheets.get(0);

    // create a named style: white text on a steel blue fill, centred
    const headerStyle = workbook.Styles.Add('OrderHeader');
    headerStyle.Font.FontName = 'Arial';
    headerStyle.Font.Size = 11;
    headerStyle.Font.IsBold = true;
    headerStyle.Font.Color = xlsModule.Color.get_White();
    headerStyle.Color = xlsModule.Color.get_SteelBlue();
    headerStyle.FillPattern = xlsModule.ExcelPatternType.Solid;
    headerStyle.HorizontalAlignment = xlsModule.HorizontalAlignType.Center;

    // apply the named style to the header row
    sheet.Range.get('A1:E1').CellStyleName = headerStyle.Name;

    // clone it and change only the colours, giving the variant the total line needs
    const totalStyle = headerStyle.clone();
    totalStyle.Font.Color = xlsModule.Color.get_DarkBlue();
    totalStyle.Color = xlsModule.Color.get_LightYellow();

    // apply the cloned style to the total line
    sheet.Range.get('A8:E8').CellStyleName = totalStyle.Name;

    // save the workbook
    const outputFileName = 'CloneNamedStyle.xlsx';
    workbook.SaveToFile({ fileName: outputFileName, version: xlsModule.ExcelVersion.Version2016 });

    // dispose of the workbook to free resources
    workbook.Dispose();

    // read the result file from the VFS and start the download
    const fileArray = window.dotnetRuntime.Module.FS.readFile(outputFileName);
    const blob = new Blob([fileArray], { type: 'application/vnd.openxmlformats-officedocument.spreadsheetml.sheet' });
    const url = URL.createObjectURL(blob);
    const a = document.createElement('a');
    a.href = url;
    a.download = outputFileName;
    a.click();
    URL.revokeObjectURL(url);
  };

  return (
    <div style={{ textAlign: 'center', height: '300px' }}>
      <h1>Clone and Reuse a Named Style</h1>
      <button id="clone-named-style" onClick={cloneNamedStyle}>Clone and Reuse a Named Style</button>
    </div>
  );
}

export default App;
The worksheet after cloning a named style and reusing it:
FAQ
Copying the number format alone, without the fill or the border
Reason: A whole-cell copy takes the fill, font and border along with the number format, which is more than a change of display calls for.
Solution: Take NumberFormat from the source cell's style and assign that single property to the target cell's style, leaving the rest untouched:
// take the number format of the total line's quantity cell as the format to apply
const sourceStyle = sheet.Range.get('D8').Style;

// put only the number format onto the quantity column; the bold and the top border stay untouched
for (let row = 2; row <= 7; row++) {
  sheet.Range.get(`D${row}`).Style.NumberFormat = sourceStyle.NumberFormat;
}
Why a whole font object cannot be assigned to the target cell
Reason: Style.Font is a read-only property; it returns the font object the cell currently carries, so it cannot be replaced wholesale -- only the members hanging off it can be changed.
Solution: Set FontName, Size, Color, IsBold and the like one at a time. To bring the fill and the border across as well, assign the whole Style; to reuse a group of settings, register them as a named style and apply that style by name.
Does re-colouring a clone change the original style as well
Cause: clone() produces a copy that stands on its own, and once saved it takes a separate entry among the workbook's named styles; the name has a number appended to keep the two apart, so OrderHeader clones to OrderHeader1. Changing the text colour and the fill colour on the copy leaves the original where it was, still carrying the colours it had before the clone.
Solution: When several colour variants are needed, clone them all from the same base style and adjust each one separately; the definition of the base style never moves.
A named style or a plain Style assignment -- which one to use
Cause: Assigning a Style copies the source cell's current look onto the target cell in one go, which suits a one-off move; Range.CellStyleName applies a named style registered on the workbook, so a format used over and over is referred to by a single name in the code.
Solution: For a one-off move of the look, assign the whole Style; for a format reused in several places, build a named style with workbook.Styles.Add and apply it by name.
Get a Free License
Spire.XLS for JavaScript offers a 30-day full-featured free trial license with no functional limitations. Apply here to evaluate before purchasing.
Convert Excel to JSON with JavaScript in React
When a workbook has to be handed to a front-end program, JSON is the shape that fits APIs, caches and components alike: one array per worksheet, one object per row, and the column headers as the keys. Once the workbook is converted, the table data joins the data flow of the page without a backend parsing it first. Spire.XLS for JavaScript performs the conversion in the browser on WebAssembly, handling input and output files through a virtual file system (VFS) with no backend service.
This article covers four core feature points:
- Convert the Entire Workbook to JSON
- Convert a Specific Worksheet to JSON
- Convert a Specific Cell Range to JSON
- Customize the JSON Output Format
For installation and project setup, see Integrating Spire.XLS for JavaScript in a React Project. The examples below assume Spire.XLS is installed and the WebAssembly module has been initialised.
Convert the Entire Workbook to JSON
Every worksheet is a set of records that share a shape: the first row names the fields, and each row below it is one record. Handing over the whole workbook writes all of them at once, with the worksheet name as the key and the records as an array under it, so there is no need to call the conversion once per worksheet or to pick a range in advance. The sample workbook's three worksheets, the sales ledger, the customers and the notes, are written together, one top-level key each.
The whole-workbook conversion only has to name the target format when saving:
| Syntax | Result |
|---|---|
fileFormat: xlsModule.FileFormat.Json |
Writes the workbook as JSON, one top-level key per worksheet |
The steps are:
- Load the font and the test data file into the VFS with
window.spire.FetchFileToVFS. - Create a workbook with
new Workbook(), then load the input file withworkbook.LoadFromFile. - Save the workbook with
workbook.SaveToFile, namingxlsModule.FileFormat.JsoninfileFormat. - Dispose of the workbook with
workbook.Disposeto free resources.
The code below is the complete example of converting the entire workbook to JSON:
function App() {
  const workbookToJson = async () => {
    // get the Spire.XLS WASM module
    const xlsModule = window.wasmModule?.spirexls;

    // check that the module is ready
    if (!xlsModule) {
      alert('Spire.Xls is not ready yet');
      return;
    }

    // load the font and the test data file into the VFS
    await window.spire.FetchFileToVFS('ARIAL.TTF', '/Library/Fonts/', `${process.env.PUBLIC_URL}/font/`);
    const inputFileName = 'Sample.xlsx';
    await window.spire.FetchFileToVFS(inputFileName, '', `${process.env.PUBLIC_URL}data/`);

    // load the workbook
    const workbook = new xlsModule.Workbook();
    workbook.LoadFromFile({ fileName: inputFileName });

    // save the whole workbook as JSON
    const outputFileName = 'WorkbookToJson.json';
    workbook.SaveToFile({ fileName: outputFileName, fileFormat: xlsModule.FileFormat.Json });

    // dispose of the workbook to release its resources
    workbook.Dispose();

    // read the result back out of the VFS and trigger the download
    const fileArray = window.dotnetRuntime.Module.FS.readFile(outputFileName);
    const blob = new Blob([fileArray], { type: 'application/json' });
    const url = URL.createObjectURL(blob);
    const a = document.createElement('a');
    a.href = url;
    a.download = outputFileName;
    a.click();
    URL.revokeObjectURL(url);
  };

  return (
    <div style={{ textAlign: 'center', height: '300px' }}>
      <h1>Convert Excel to JSON</h1>
      <button id="workbook-to-json" onClick={workbookToJson}>Convert the Entire Workbook to JSON</button>
    </div>
  );
}

export default App;
The JSON file after converting the entire workbook:
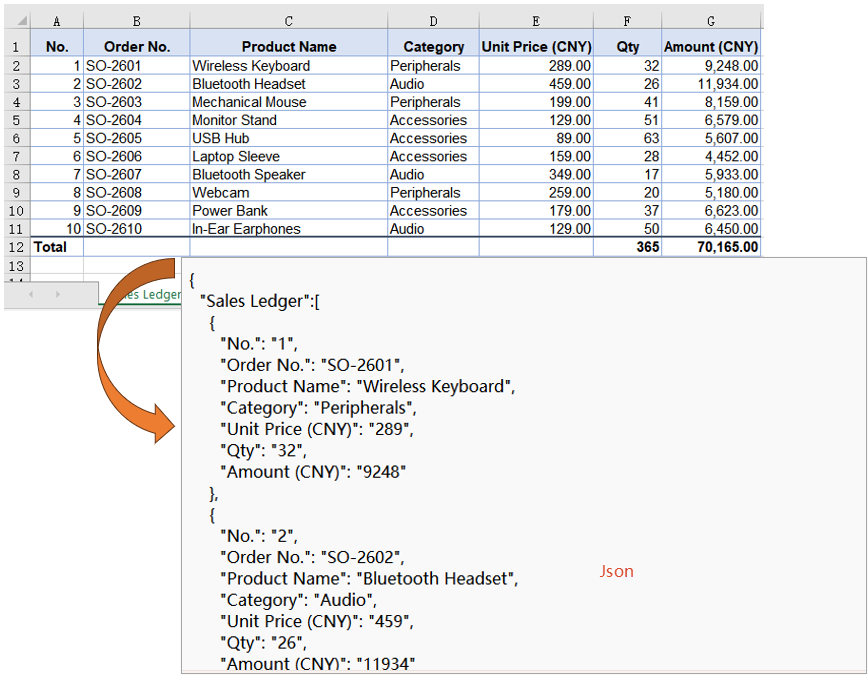
Convert a Specific Worksheet to JSON
Most of the time only one worksheet is meant for the front end, while the rest are internal ledgers or instructions. Writing them all out lengthens the response and leaves the caller to pick the right one. The way around it is to copy the worksheet into a new workbook that holds nothing else and save that, so the result carries this one worksheet only. In the example the third worksheet, the notes, is exported, and the sales ledger and customers worksheets stay out of the result.
Isolating one worksheet comes down to three operations on the Worksheets collection:
| Syntax | Result |
|---|---|
workbook.Worksheets.get(2) |
Takes the third worksheet by index, counting from 0 |
workbook.Worksheets.Clear() |
Clears the worksheets the workbook already holds |
workbook.Worksheets.AddCopy({ sheet }) |
Copies the whole source worksheet into the cleared workbook |
The steps are:
- Load the font and the test data file into the VFS with
window.spire.FetchFileToVFS. - Create the source workbook with
new Workbook()and load the input file withworkbook.LoadFromFile, then take the worksheet to export withWorksheets.get(2). - Create a second workbook with
new Workbook()and clear the three blank worksheets it starts with usingWorksheets.Clear(). - Copy the target worksheet in with
Worksheets.AddCopy({ sheet }), so that it is the only one left. - Save the new workbook with
SaveToFile, namingxlsModule.FileFormat.JsoninfileFormat. - Dispose of both workbook objects with
Dispose.
The code below is the complete example of converting a specific worksheet to JSON:
function App() {
  const worksheetToJson = async () => {
    // get the Spire.XLS WASM module
    const xlsModule = window.wasmModule?.spirexls;

    // check that the module is ready
    if (!xlsModule) {
      alert('Spire.Xls is not ready yet');
      return;
    }

    // load the font and the test data file into the VFS
    await window.spire.FetchFileToVFS('ARIAL.TTF', '/Library/Fonts/', `${process.env.PUBLIC_URL}/font/`);
    const inputFileName = 'Sample.xlsx';
    await window.spire.FetchFileToVFS(inputFileName, '', `${process.env.PUBLIC_URL}data/`);

    // load the source workbook and take the third worksheet
    const sourceWorkbook = new xlsModule.Workbook();
    sourceWorkbook.LoadFromFile({ fileName: inputFileName });
    const targetSheet = sourceWorkbook.Worksheets.get(2);

    // create a new workbook and clear the three worksheets it starts with
    const targetWorkbook = new xlsModule.Workbook();
    targetWorkbook.Worksheets.Clear();

    // copy the target worksheet in, so that it is the only one left
    targetWorkbook.Worksheets.AddCopy({ sheet: targetSheet });

    // save that worksheet alone
    const outputFileName = 'WorksheetToJson.json';
    targetWorkbook.SaveToFile({ fileName: outputFileName, fileFormat: xlsModule.FileFormat.Json });

    // dispose of the workbook to release its resources
    sourceWorkbook.Dispose();
    targetWorkbook.Dispose();

    // read the result back out of the VFS and trigger the download
    const fileArray = window.dotnetRuntime.Module.FS.readFile(outputFileName);
    const blob = new Blob([fileArray], { type: 'application/json' });
    const url = URL.createObjectURL(blob);
    const a = document.createElement('a');
    a.href = url;
    a.download = outputFileName;
    a.click();
    URL.revokeObjectURL(url);
  };

  return (
    <div style={{ textAlign: 'center', height: '300px' }}>
      <h1>Convert Excel to JSON</h1>
      <button id="worksheet-to-json" onClick={worksheetToJson}>Convert a Specific Worksheet to JSON</button>
    </div>
  );
}

export default App;
The JSON file after converting a specific worksheet:
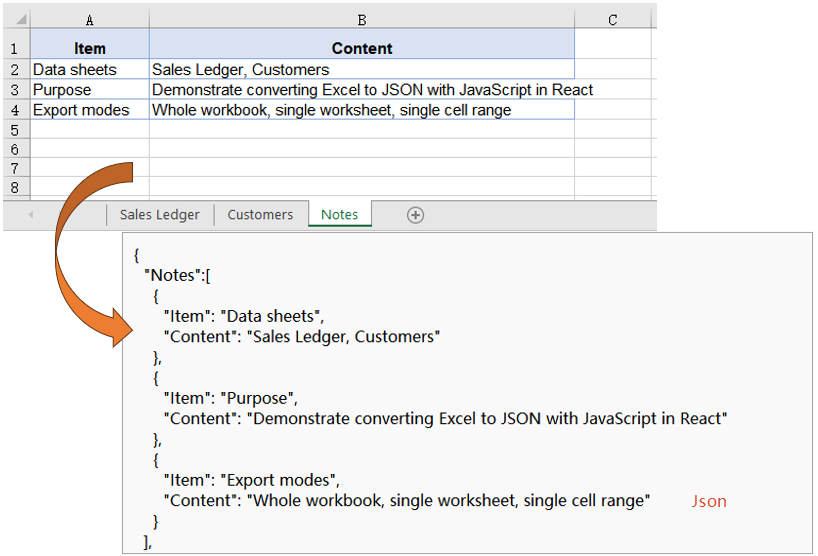
Convert a Specific Cell Range to JSON
A worksheet usually carries more than the records themselves: title rows, totals formulas, helper columns pasted in from somewhere else. Exporting the whole sheet takes all of that along, when the caller only wants the tidy block in the middle. Naming the range first keeps everything outside it out of the result. The example takes A1:D6 of the sales ledger, six rows by four columns, leaving the price, quantity and amount columns behind in the workbook.
A range export follows the same path as a worksheet export, with a block of cells standing in for the whole sheet:
| Syntax | Result |
|---|---|
sourceSheet.Range.get('A1:D6') |
Takes the source cell range by address |
workbook.Worksheets.Add('RangeData') |
Adds a worksheet called RangeData to the cleared workbook |
targetSheet.Range.get('A1:D6') |
Takes a destination range of the same size as the source |
sourceSheet.Copy({ sourceRange, destRange, copyStyle: true }) |
Copies the values and styles into the destination range; copyStyle set to true brings the styles along |
The steps are:
- Load the font and the test data file into the VFS with
window.spire.FetchFileToVFS. - Create the source workbook with
new Workbook()and load the input file withworkbook.LoadFromFile, then take the source worksheet withWorksheets.get(0). - Mark out the cell range to export with
sourceSheet.Range.get('A1:D6'). - Create a target workbook and clear its default worksheets with
Worksheets.Clear(), then add a worksheet to receive the range withWorksheets.Add('RangeData'). - Take a destination range of the same size with
targetSheet.Range.get('A1:D6')and copy the values and styles across withsourceSheet.Copy({ sourceRange, destRange, copyStyle: true }). - Save the new workbook with
SaveToFile, namingxlsModule.FileFormat.JsoninfileFormat, and dispose of both workbook objects.
The code below is the complete example of converting a specific cell range to JSON:
function App() {
  const rangeToJson = async () => {
    // get the Spire.XLS WASM module
    const xlsModule = window.wasmModule?.spirexls;

    // check that the module is ready
    if (!xlsModule) {
      alert('Spire.Xls is not ready yet');
      return;
    }

    // load the font and the test data file into the VFS
    await window.spire.FetchFileToVFS('ARIAL.TTF', '/Library/Fonts/', `${process.env.PUBLIC_URL}/font/`);
    const inputFileName = 'Sample.xlsx';
    await window.spire.FetchFileToVFS(inputFileName, '', `${process.env.PUBLIC_URL}data/`);

    // load the source workbook and take the first worksheet
    const sourceWorkbook = new xlsModule.Workbook();
    sourceWorkbook.LoadFromFile({ fileName: inputFileName });
    const sourceSheet = sourceWorkbook.Worksheets.get(0);

    // name the cell range to export
    const sourceRange = sourceSheet.Range.get('A1:D6');

    // create a new workbook, clear its default worksheets and add one to receive the range
    const targetWorkbook = new xlsModule.Workbook();
    targetWorkbook.Worksheets.Clear();
    const targetSheet = targetWorkbook.Worksheets.Add('RangeData');

    // copy the values and styles across; the destination range must match the source size
    const destRange = targetSheet.Range.get('A1:D6');
    sourceSheet.Copy({ sourceRange, destRange, copyStyle: true });

    // save the new workbook
    const outputFileName = 'RangeToJson.json';
    targetWorkbook.SaveToFile({ fileName: outputFileName, fileFormat: xlsModule.FileFormat.Json });

    // dispose of the workbook to release its resources
    sourceWorkbook.Dispose();
    targetWorkbook.Dispose();

    // read the result back out of the VFS and trigger the download
    const fileArray = window.dotnetRuntime.Module.FS.readFile(outputFileName);
    const blob = new Blob([fileArray], { type: 'application/json' });
    const url = URL.createObjectURL(blob);
    const a = document.createElement('a');
    a.href = url;
    a.download = outputFileName;
    a.click();
    URL.revokeObjectURL(url);
  };

  return (
    <div style={{ textAlign: 'center', height: '300px' }}>
      <h1>Convert Excel to JSON</h1>
      <button id="range-to-json" onClick={rangeToJson}>Convert a Specific Cell Range to JSON</button>
    </div>
  );
}

export default App;
The JSON file after converting a specific cell range:
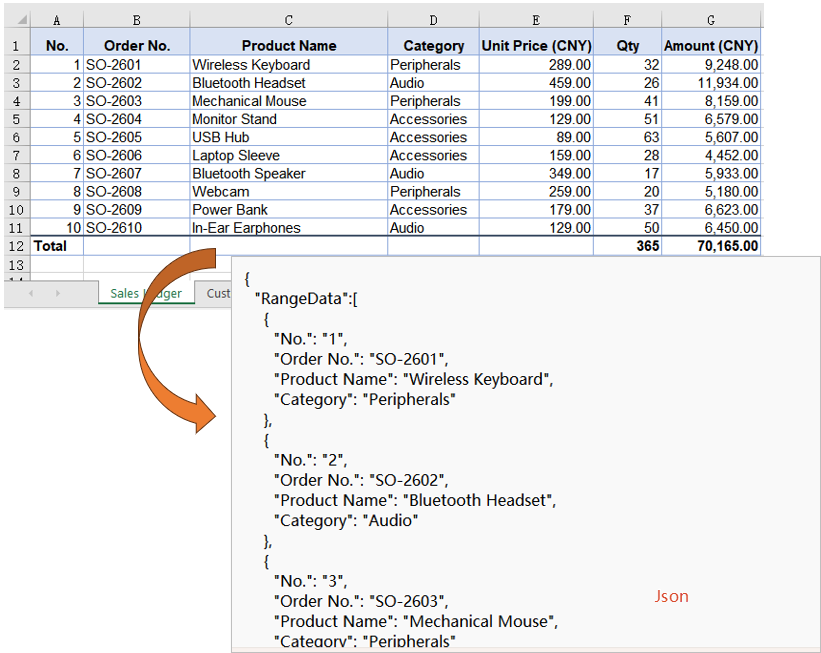
Customize the JSON Output Format
The three conversions above all produce a fixed shape: the field names are taken from the header row as they stand, every value is written as a string, an amount comes out as "186400", a boolean as "TRUE", a date in the runtime's own format rather than as yyyy-MM-dd, and a blank cell leaves its field out altogether. A result like that still has to be cleaned up before an API or a component binding can use it. Reading the cells one by one instead lets you decide the field names, the type of every value, and how a blank is represented.
Reading the cells yourself calls for the getters that return real types:
| Syntax | Result |
|---|---|
sheet.get(row, column) |
Takes a cell by row and column number, both counting from 1 |
sheet.LastRow / sheet.LastColumn |
The last row and column of the used range |
cell.Text |
The text in the cell; a blank cell returns an empty string |
cell.NumberValue |
The number in a numeric column, as a number; a blank cell returns null |
cell.BooleanValue |
The true or false of a boolean column, as a boolean |
cell.DateTimeValue |
The Date object of a date column, ready to be formatted |
JSON.stringify(records, null, 2) |
Serialises the records into JSON text indented by two spaces |
The steps are:
- Load the font and the test data file into the VFS with
window.spire.FetchFileToVFS, load the workbook withnew Workbook()andworkbook.LoadFromFile, and take the customers worksheet withWorksheets.get(1). - List the fields to keep in an array, each entry naming its column header, its output field name and how its value is read.
- Read the header row with
sheet.get(1, column)and, usingsheet.LastColumn, map each column header to its column number. - Walk the rows from row 2 to
sheet.LastRow, reading each value withcell.Text,cell.NumberValue,cell.BooleanValueorcell.DateTimeValueaccording to its field, and recording a blank cell asnull. - Build a
yyyy-MM-dddate from the year, month and day of theDateobject. - Serialise the records with
JSON.stringifyand a two-space indent, then write the text into the VFS withFS.writeFile. - Dispose of the workbook with
workbook.Disposeto free resources.
The code below is the complete example of customizing the JSON output format:
function App() {
  const customJsonFormat = async () => {
    // get the Spire.XLS WASM module
    const xlsModule = window.wasmModule?.spirexls;

    // check that the module is ready
    if (!xlsModule) {
      alert('Spire.Xls is not ready yet');
      return;
    }

    // load the font and the test data file into the VFS
    await window.spire.FetchFileToVFS('ARIAL.TTF', '/Library/Fonts/', `${process.env.PUBLIC_URL}/font/`);
    const inputFileName = 'Sample.xlsx';
    await window.spire.FetchFileToVFS(inputFileName, '', `${process.env.PUBLIC_URL}data/`);

    // load the workbook and take the customers worksheet
    const workbook = new xlsModule.Workbook();
    workbook.LoadFromFile({ fileName: inputFileName });
    const sheet = workbook.Worksheets.get(1);

    // the fields to keep: column header, output field name, how to read the value
    const fields = [
      { header: 'Customer ID', key: 'customerId', type: 'text' },
      { header: 'Customer Name', key: 'customerName', type: 'text' },
      { header: 'City', key: 'city', type: 'text' },
      { header: 'First Order Date', key: 'firstOrderDate', type: 'date' },
      { header: 'Renewed', key: 'renewed', type: 'boolean' },
      { header: 'Total Amount (CNY)', key: 'totalAmount', type: 'number' },
      { header: 'Remark', key: 'remark', type: 'text' },
    ];

    // read the header row and map each column header to its column number
    const columnOf = {};
    for (let column = 1; column <= sheet.LastColumn; column++) {
      columnOf[sheet.get(1, column).Text] = column;
    }

    // dates all go out as yyyy-MM-dd
    const pad = (value) => String(value).padStart(2, '0');
    const formatDate = (date) =>
      `${date.getFullYear()}-${pad(date.getMonth() + 1)}-${pad(date.getDate())}`;

    // walk the rows; a blank cell becomes null
    const records = [];
    for (let row = 2; row <= sheet.LastRow; row++) {
      const record = {};
      for (const field of fields) {
        const cell = sheet.get(row, columnOf[field.header]);
        if (field.type === 'number') {
          record[field.key] = cell.NumberValue;
        } else if (field.type === 'boolean') {
          record[field.key] = cell.BooleanValue;
        } else if (field.type === 'date') {
          record[field.key] = formatDate(cell.DateTimeValue);
        } else {
          const text = cell.Text;
          record[field.key] = text === '' ? null : text;
        }
      }
      records.push(record);
    }

    // write with a two-space indent so the result stays readable
    const json = JSON.stringify(records, null, 2);

    // write the JSON string into the VFS
    const outputFileName = 'CustomJsonFormat.json';
    window.dotnetRuntime.Module.FS.writeFile(outputFileName, new TextEncoder().encode(json));

    // dispose of the workbook to release its resources
    workbook.Dispose();

    // read the result back out of the VFS and trigger the download
    const fileArray = window.dotnetRuntime.Module.FS.readFile(outputFileName);
    const blob = new Blob([fileArray], { type: 'application/json' });
    const url = URL.createObjectURL(blob);
    const a = document.createElement('a');
    a.href = url;
    a.download = outputFileName;
    a.click();
    URL.revokeObjectURL(url);
  };

  return (
    <div style={{ textAlign: 'center', height: '300px' }}>
      <h1>Convert Excel to JSON</h1>
      <button id="custom-json-format" onClick={customJsonFormat}>Customize the JSON Output Format</button>
    </div>
  );
}

export default App;
The JSON file after applying the custom output format:
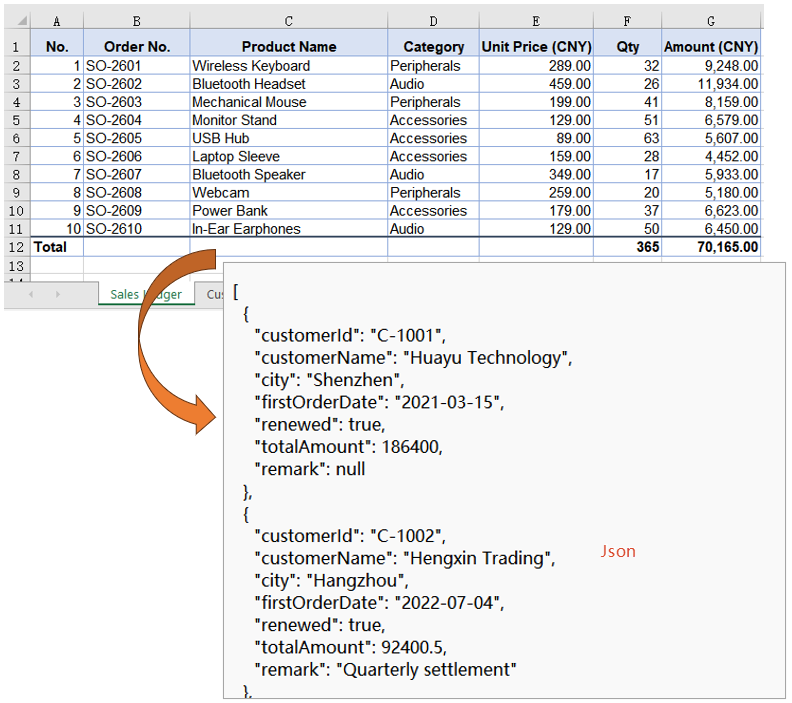
FAQ
Why are numbers, booleans and dates all strings in the exported JSON
Cause: SaveToFile writes the stored value of each cell. It neither applies the cell's number format nor infers a type, so an amount is written as "186400", a boolean as "TRUE", and a date in the runtime's own format instead of yyyy-MM-dd.
Solution: To get real types, read the cells yourself and take the value with cell.NumberValue, cell.BooleanValue or cell.DateTimeValue, then let JSON.stringify serialise the result.
Why do blank cells not appear in the JSON
Cause: Both the workbook and the worksheet conversion use the header row as the field names, and a blank cell produces no field at all, so that object ends up with fewer keys than the others.
Solution: If the caller needs every object to carry the same keys, read the cells yourself and write null whenever cell.Text comes back as an empty string.
Why is there an extra Evaluation Warning key at the top level of the JSON
Cause: The trial build adds an evaluation warning worksheet to the workbook, and in a whole-workbook conversion it becomes one more top-level key alongside the real worksheets.
Solution: Convert a specific worksheet or a specific cell range instead, and only the data you asked for is written; if the whole workbook has to be exported as it stands, contact sales for a temporary license that removes the evaluation message.
How do I export only a few columns
Cause: The workbook and worksheet conversions both write every column in the worksheet, while a range export can only take a consecutive block, so columns such as A, C and E cannot be expressed as a range.
Solution: Read the cells yourself the way the custom output format does and keep the fields you need; when the columns happen to be consecutive, a range export narrows the result just as well.
Get a Free License
Spire.XLS for JavaScript offers a 30-day full-featured free trial license with no functional limitations. Apply here to evaluate before purchasing.
Split Excel Data into Columns with JavaScript in React
A single column often packs several pieces of information into one cell: a contact's name, phone number and city written on one line, an order code joining the country code, the date and a serial number into one string. Such data can neither be sorted nor filtered by any one of those parts. Splitting text into columns takes a column of text apart by a given rule and drops the pieces into the columns to its right, leaving the original data where it is. Spire.XLS for JavaScript performs these operations in the browser through WebAssembly; the input and output files are managed by a virtual file system (VFS), with no backend service required.
This article covers two feature points:
For installation and project setup, see Integrating Spire.XLS for JavaScript in a React Project. The examples below assume Spire.XLS is installed and the WebAssembly module has been initialized.
Split on a separator
When every entry on a line is separated from the next by the same character, splitting on that character moves them into the columns to the right. Each kind of information then has a column of its own, ready for sorting, checking or grouping, while the original data stays where it is.
The split reads the text out of the first column, cuts it apart, and writes the pieces back into the columns on the right:
| Syntax | Result |
|---|---|
sheet.Range.get({ row, column: 1 }).Text |
Reads the raw text of the first column on that row |
.split(' ') |
Cuts the text apart on the space |
sheet.Range.get({ row, column: index + 2 }).Text = piece |
Writes the piece at index into the index + 1 column to its right |
sheet.AllocatedRange.AutoFitColumns() |
Sizes every column to its content |
The steps are:
- Load the font file and the test data file into the VFS with
window.spire.FetchFileToVFS. - Create a workbook with
new Workbook(), load the input file withworkbook.LoadFromFile, and take the target worksheet withworkbook.Worksheets.get(0). - Take the last data row with
sheet.LastRowand work row by row from row 2, skipping the header. - Read the raw text of the first column with
sheet.Range.get({ row, column: 1 }).Textand split it on the separator withsplit(' '). - Walk the pieces and write them back from the second column on with
sheet.Range.get({ row, column: index + 2 }).Text. - Size every column to its content with
sheet.AllocatedRange.AutoFitColumns(). - Save the workbook with
workbook.SaveToFileand dispose of it withworkbook.Disposeto free resources.
The full code example below shows how to split an Excel column on a separator in React:
function App() {
  const splitByDelimiter = async () => {
    // get the Spire.XLS WASM module
    const xlsModule = window.wasmModule?.spirexls;

    // check that the module is ready
    if (!xlsModule) {
      alert('Spire.Xls is not ready yet');
      return;
    }

    // load the font and the test data file into the VFS
    await window.spire.FetchFileToVFS('ARIAL.TTF', '/Library/Fonts/', `${process.env.PUBLIC_URL}/font/`);
    const inputFileName = 'SplitTextIntoColumns.xlsx';
    await window.spire.FetchFileToVFS(inputFileName, '', `${process.env.PUBLIC_URL}data/`);

    // load the workbook and take the first worksheet
    const workbook = new xlsModule.Workbook();
    workbook.LoadFromFile({ fileName: inputFileName });
    const sheet = workbook.Worksheets.get(0);

    // row by row, take the text in column A, split it on the space and write the pieces into the columns on the right
    const lastRow = sheet.LastRow;
    for (let row = 2; row <= lastRow; row++) {
      const pieces = sheet.Range.get({ row, column: 1 }).Text.split(' ');
      pieces.forEach((piece, index) => {
        sheet.Range.get({ row, column: index + 2 }).Text = piece;
      });
    }

    // size every column to its content
    sheet.AllocatedRange.AutoFitColumns();

    // save the workbook
    const outputFileName = 'SplitByDelimiter.xlsx';
    workbook.SaveToFile({ fileName: outputFileName, version: xlsModule.ExcelVersion.Version2016 });

    // dispose of the workbook to free resources
    workbook.Dispose();

    // read the result file from the VFS and start the download
    const fileArray = window.dotnetRuntime.Module.FS.readFile(outputFileName);
    const blob = new Blob([fileArray], { type: 'application/vnd.openxmlformats-officedocument.spreadsheetml.sheet' });
    const url = URL.createObjectURL(blob);
    const a = document.createElement('a');
    a.href = url;
    a.download = outputFileName;
    a.click();
    URL.revokeObjectURL(url);
  };

  return (
    <div style={{ textAlign: 'center', height: '300px' }}>
      <h1>Split Excel Data into Columns</h1>
      <button id="split-by-delimiter" onClick={splitByDelimiter}>Split by a Separator</button>
    </div>
  );
}

export default App;
The worksheet after splitting on a separator:
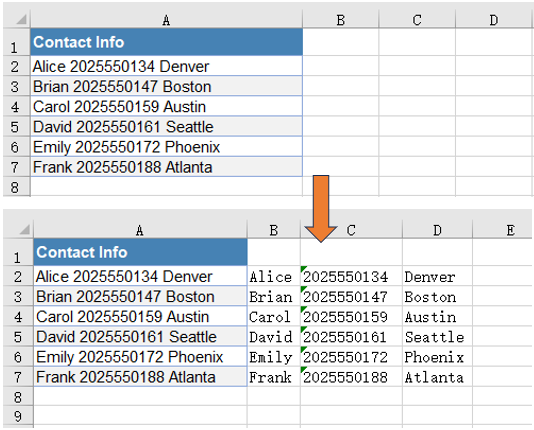
Split by fixed width
Other text is not divided by any character at all: every entry has a fixed length and they run end to end, as a code assembled from fields of known width. Such text is cut by the number of characters in each entry, carrying on from where the previous one ended.
The cut advances through the source text by the length of each entry and writes the pieces back into the columns on the right:
| Syntax | Result |
|---|---|
sheet.Range.get({ row, column: 1 }).Text |
Reads the raw code of the first column on that row |
code.substring(start, start + width) |
Cuts out width characters starting at start |
start += width |
Moves the cutting position past that entry, ready for the next |
sheet.Range.get({ row, column: index + 2 }).Text = piece |
Writes the piece at index into the index + 1 column to its right |
sheet.AllocatedRange.AutoFitColumns() |
Sizes every column to its content |
The steps are:
- Load the font file and the test data file into the VFS with
window.spire.FetchFileToVFS. - Create a workbook with
new Workbook(), load the input file withworkbook.LoadFromFile, and take the worksheet holding the text withworkbook.Worksheets.get(2). - Note down the number of characters in each entry in an array; the lengths should add up to that of the source text.
- Take the last data row with
sheet.LastRowand work row by row from row 2, skipping the header. - Cut one entry out with
code.substring(start, start + width), move the starting position on by that length, and write it back from the second column on withsheet.Range.get({ row, column: index + 2 }).Text. - Size every column to its content with
sheet.AllocatedRange.AutoFitColumns(). - Save the workbook with
workbook.SaveToFileand dispose of it withworkbook.Disposeto free resources.
The full code example below shows how to split an Excel column by fixed width in React:
function App() {
  const splitByFixedWidth = async () => {
    // get the Spire.XLS WASM module
    const xlsModule = window.wasmModule?.spirexls;

    // check that the module is ready
    if (!xlsModule) {
      alert('Spire.Xls is not ready yet');
      return;
    }

    // load the font and the test data file into the VFS
    await window.spire.FetchFileToVFS('ARIAL.TTF', '/Library/Fonts/', `${process.env.PUBLIC_URL}/font/`);
    const inputFileName = 'SplitTextIntoColumns.xlsx';
    await window.spire.FetchFileToVFS(inputFileName, '', `${process.env.PUBLIC_URL}data/`);

    // load the workbook and take the third worksheet
    const workbook = new xlsModule.Workbook();
    workbook.LoadFromFile({ fileName: inputFileName });
    const sheet = workbook.Worksheets.get(2);

    // row by row, take the code in column A and cut it at the fixed lengths into the columns on the right
    const widths = [2, 4, 2, 2, 3];
    const lastRow = sheet.LastRow;
    for (let row = 2; row <= lastRow; row++) {
      const code = sheet.Range.get({ row, column: 1 }).Text;
      let start = 0;
      widths.forEach((width, index) => {
        sheet.Range.get({ row, column: index + 2 }).Text = code.substring(start, start + width);
        start += width;
      });
    }

    // size every column to its content
    sheet.AllocatedRange.AutoFitColumns();

    // save the workbook
    const outputFileName = 'SplitByFixedWidth.xlsx';
    workbook.SaveToFile({ fileName: outputFileName, version: xlsModule.ExcelVersion.Version2016 });

    // dispose of the workbook to free resources
    workbook.Dispose();

    // read the result file from the VFS and start the download
    const fileArray = window.dotnetRuntime.Module.FS.readFile(outputFileName);
    const blob = new Blob([fileArray], { type: 'application/vnd.openxmlformats-officedocument.spreadsheetml.sheet' });
    const url = URL.createObjectURL(blob);
    const a = document.createElement('a');
    a.href = url;
    a.download = outputFileName;
    a.click();
    URL.revokeObjectURL(url);
  };

  return (
    <div style={{ textAlign: 'center', height: '300px' }}>
      <h1>Split Excel Data into Columns</h1>
      <button id="split-by-fixed-width" onClick={splitByFixedWidth}>Split by Fixed Width</button>
    </div>
  );
}

export default App;
The worksheet after splitting by fixed width:
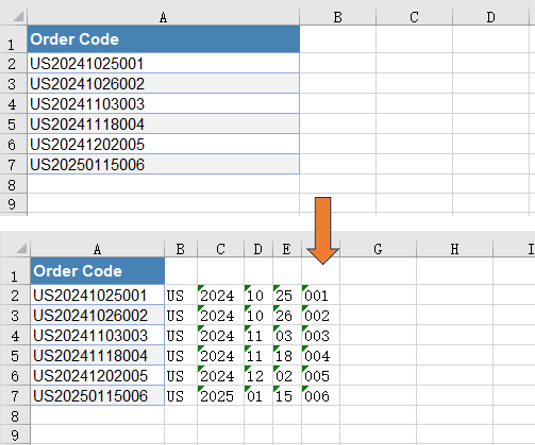
FAQ
The column uses more than one kind of separator, how can it be split in one pass
Reason: split(' ') cuts on a single character at a time; when a text mixes commas, slashes and the like, each separator has to be handled on its own, so the code keeps piling up and one of them is easily left out.
Solution: Put the separators you expect into a character class, and a single split covers them all -- the characters inside the brackets are alternatives, so any one of them counts as a split point. The sample workbook's address sheet separates the levels of an address with a comma or a slash, and this form splits it into three columns at once:
// a comma and a slash both count as split points, taken apart in one pass
const pieces = sheet.Range.get({ row, column: 1 }).Text.split(/[,/]/);
An empty column turns up in the middle of the split result
Reason: split(' ') cuts strictly on a single space, so two adjacent spaces in the raw text cut out an empty string between them, and that empty string lands on the sheet as a blank column.
Solution: Strip the leading and trailing spaces with trim() first, then split on /\s+/ -- a run of consecutive spaces counts as one split point, and no empty string is cut out in between:
// strip the surrounding spaces, then split on a run of whitespace so no empty piece is cut out
const pieces = sheet.Range.get({ row, column: 1 }).Text.trim().split(/\s+/);
Does splitting into columns overwrite what the columns on the right already hold
Cause: The pieces are written cell by cell with sheet.Range.get({ row, column: index + 2 }).Text = piece, so whatever the target column held on that row is replaced by the entry written into it. The text in the first column is untouched; on the right, the columns the pieces land in are overwritten, and any column beyond them keeps its old data.
Solution: To keep what is already on the right, write the result further out into empty columns, or into a separate worksheet instead; sheet.LastColumn tells you whether the right-hand side already holds anything before you write.
What happens when the entry lengths do not add up to the length of the source text
Cause: substring(start, start + width) only takes what the source text actually holds. When the lengths add up to less than the source text, the characters left at the end of it go into no column at all; when they add up to more, the overrun is cut to an empty string and leaves a blank column.
Solution: Check that the lengths add up to the length of the source text before cutting, and every entry lands in a column of its own.
Get a Free License
Spire.XLS for JavaScript offers a 30-day full-featured free trial license with no functional limitations. Apply here to evaluate before purchasing.
Convert Excel to XPS, OFD or PostScript in React
A workbook is made for editing, which does not always make it the right thing to hand over for archiving or printing. XPS, OFD and PostScript are all fixed-layout documents: the page size, the position of every piece of text and the fonts are pinned when the file is written, so the document looks the same on any machine that opens it. Spire.XLS for JavaScript performs all three conversions in the browser on WebAssembly, handling input and output files through a virtual file system (VFS) with no backend service.
This article covers three core feature points:
For installation and project setup, see Integrating Spire.XLS for JavaScript in a React Project. The examples below assume Spire.XLS is installed and the WebAssembly module has been initialised.
Convert Excel to XPS
XPS is a fixed-layout document format that ships with Windows, and saving a workbook as XPS gives it an archived copy that no longer rearranges itself to suit the program that opens it, which is what makes it fit for a report that has to be read on a machine without Excel installed. The conversion changes only the format the file is saved in: the page setup, the cell formatting and the fonts of the worksheet are all written out with it, and a fileFormat argument names the target.
The fileFormat argument of workbook.SaveToFile decides which of the formats is written:
| Syntax | Result |
|---|---|
workbook.LoadFromFile({ fileName: inputFileName }) |
Loads the workbook to convert from the VFS |
workbook.SaveToFile({ fileName: 'ExcelToXPS.xps', fileFormat: xlsModule.FileFormat.XPS }) |
Writes the workbook as XPS, pinning the page size, the text position and the fonts |
workbook.Dispose() |
Releases the resources held by the workbook object |
The steps are:
- Load the font and the test data file into the VFS with
window.spire.FetchFileToVFS. - Create a workbook with
new Workbook(), then load the Excel file withworkbook.LoadFromFile. - Save the workbook with
workbook.SaveToFile, namingxlsModule.FileFormat.XPSinfileFormat. - Dispose of the workbook with
workbook.Disposeto free resources.
The code below is the complete example of converting a workbook to XPS in React:
function App() {
  const excelToXps = async () => {
    // get the Spire.XLS WASM module
    const xlsModule = window.wasmModule?.spirexls;

    // check that the module is ready
    if (!xlsModule) {
      alert('Spire.Xls is not ready yet');
      return;
    }

    // load the font and the test data file into the VFS
    await window.spire.FetchFileToVFS('ARIAL.TTF', '/Library/Fonts/', `${process.env.PUBLIC_URL}/font/`);
    const inputFileName = 'SalesReport.xlsx';
    await window.spire.FetchFileToVFS(inputFileName, '', `${process.env.PUBLIC_URL}data/`);

    // load the workbook
    const workbook = new xlsModule.Workbook();
    workbook.LoadFromFile({ fileName: inputFileName });

    // save as XPS, naming the format with fileFormat
    const outputFileName = 'ExcelToXPS.xps';
    workbook.SaveToFile({ fileName: outputFileName, fileFormat: xlsModule.FileFormat.XPS });

    // dispose of the workbook to free resources
    workbook.Dispose();

    // read the result file from the VFS and start the download
    const fileArray = window.dotnetRuntime.Module.FS.readFile(outputFileName);
    const blob = new Blob([fileArray], { type: 'application/vnd.ms-xpsdocument' });
    const url = URL.createObjectURL(blob);
    const a = document.createElement('a');
    a.href = url;
    a.download = outputFileName;
    a.click();
    URL.revokeObjectURL(url);
  };

  return (
    <div style={{ textAlign: 'center', height: '300px' }}>
      <h1>Convert Excel to XPS, OFD or PostScript</h1>
      <button id="excel-to-xps" onClick={excelToXps}>Convert Excel to XPS</button>
    </div>
  );
}

export default App;
The document after converting Excel to XPS:
Convert Excel to OFD
OFD is the fixed-layout document format used by Chinese electronic official documents and e-invoices, describing a page in a national standard so that it can be kept for the long term. Saving a sales report as OFD hands other systems a page whose layout is already fixed, and it no longer matters whether that system has the fonts or applies the same row heights. The conversion runs exactly like the previous feature point, with OFD named as the format.
| Syntax | Result |
|---|---|
workbook.LoadFromFile({ fileName: inputFileName }) |
Loads the workbook to convert from the VFS |
workbook.SaveToFile({ fileName: 'ExcelToOFD.ofd', fileFormat: xlsModule.FileFormat.OFD }) |
Writes the workbook as OFD, describing the page in the national standard |
workbook.Dispose() |
Releases the resources held by the workbook object |
The steps are:
- Load the font and the test data file into the VFS with
window.spire.FetchFileToVFS. - Create a workbook with
new Workbook(), then load the Excel file withworkbook.LoadFromFile. - Save the workbook with
workbook.SaveToFile, namingxlsModule.FileFormat.OFDinfileFormat. - Dispose of the workbook with
workbook.Disposeto free resources.
The code below is the complete example of converting a workbook to OFD in React:
function App() {
  const excelToOfd = async () => {
    // get the Spire.XLS WASM module
    const xlsModule = window.wasmModule?.spirexls;

    // check that the module is ready
    if (!xlsModule) {
      alert('Spire.Xls is not ready yet');
      return;
    }

    // load the font and the test data file into the VFS
    await window.spire.FetchFileToVFS('ARIAL.TTF', '/Library/Fonts/', `${process.env.PUBLIC_URL}/font/`);
    const inputFileName = 'SalesReport.xlsx';
    await window.spire.FetchFileToVFS(inputFileName, '', `${process.env.PUBLIC_URL}data/`);

    // load the workbook
    const workbook = new xlsModule.Workbook();
    workbook.LoadFromFile({ fileName: inputFileName });

    // save as OFD, naming the format with fileFormat
    const outputFileName = 'ExcelToOFD.ofd';
    workbook.SaveToFile({ fileName: outputFileName, fileFormat: xlsModule.FileFormat.OFD });

    // dispose of the workbook to free resources
    workbook.Dispose();

    // read the result file from the VFS and start the download
    const fileArray = window.dotnetRuntime.Module.FS.readFile(outputFileName);
    const blob = new Blob([fileArray], { type: 'application/ofd' });
    const url = URL.createObjectURL(blob);
    const a = document.createElement('a');
    a.href = url;
    a.download = outputFileName;
    a.click();
    URL.revokeObjectURL(url);
  };

  return (
    <div style={{ textAlign: 'center', height: '300px' }}>
      <h1>Convert Excel to XPS, OFD or PostScript</h1>
      <button id="excel-to-ofd" onClick={excelToOfd}>Convert Excel to OFD</button>
    </div>
  );
}

export default App;
The document after converting Excel to OFD:
Convert Excel to PostScript
PostScript is the page description language used by printing devices and print workflows. The file is readable text that carries both the page description and the fonts embedded in it, so it can go straight to a PostScript printer or to typesetting software. When a report is headed for a print run, handing over PostScript is safer than handing over the original workbook. The usage matches the first two feature points, with PostScript named as the format.
| Syntax | Result |
|---|---|
workbook.LoadFromFile({ fileName: inputFileName }) |
Loads the workbook to convert from the VFS |
workbook.SaveToFile({ fileName: 'ExcelToPostScript.ps', fileFormat: xlsModule.FileFormat.PostScript }) |
Writes the workbook as PostScript, a readable page description |
workbook.Dispose() |
Releases the resources held by the workbook object |
The steps are:
- Load the font and the test data file into the VFS with
window.spire.FetchFileToVFS. - Create a workbook with
new Workbook(), then load the Excel file withworkbook.LoadFromFile. - Save the workbook with
workbook.SaveToFile, namingxlsModule.FileFormat.PostScriptinfileFormat. - Dispose of the workbook with
workbook.Disposeto free resources.
The code below is the complete example of converting a workbook to PostScript in React:
function App() {
  const excelToPostScript = async () => {
    // get the Spire.XLS WASM module
    const xlsModule = window.wasmModule?.spirexls;

    // check that the module is ready
    if (!xlsModule) {
      alert('Spire.Xls is not ready yet');
      return;
    }

    // load the font and the test data file into the VFS
    await window.spire.FetchFileToVFS('ARIAL.TTF', '/Library/Fonts/', `${process.env.PUBLIC_URL}/font/`);
    const inputFileName = 'SalesReport.xlsx';
    await window.spire.FetchFileToVFS(inputFileName, '', `${process.env.PUBLIC_URL}data/`);

    // load the workbook
    const workbook = new xlsModule.Workbook();
    workbook.LoadFromFile({ fileName: inputFileName });

    // save as PostScript, naming the format with fileFormat
    const outputFileName = 'ExcelToPostScript.ps';
    workbook.SaveToFile({ fileName: outputFileName, fileFormat: xlsModule.FileFormat.PostScript });

    // dispose of the workbook to free resources
    workbook.Dispose();

    // read the result file from the VFS and start the download
    const fileArray = window.dotnetRuntime.Module.FS.readFile(outputFileName);
    const blob = new Blob([fileArray], { type: 'application/postscript' });
    const url = URL.createObjectURL(blob);
    const a = document.createElement('a');
    a.href = url;
    a.download = outputFileName;
    a.click();
    URL.revokeObjectURL(url);
  };

  return (
    <div style={{ textAlign: 'center', height: '300px' }}>
      <h1>Convert Excel to XPS, OFD or PostScript</h1>
      <button id="excel-to-ps" onClick={excelToPostScript}>Convert Excel to PostScript</button>
    </div>
  );
}

export default App;
The document after converting Excel to PostScript:
FAQ
Why does the conversion fail with Cannot found font?
Cause: Writing XPS, OFD and PostScript means embedding every font the document uses, so a workbook whose text is not in the default Latin range needs the font file for it. If the font was never loaded into the VFS before the conversion, the module cannot find it and SaveToFile stops with a Cannot found font(...) installed on the system. error instead of writing a document.
Solution: Put the font file in public/font and load it into the VFS before loading the workbook, using the same file name the code refers to:
await window.spire.FetchFileToVFS('ARIAL.TTF', '/Library/Fonts/', `${process.env.PUBLIC_URL}/font/`);
Does the worksheet's page setup affect the converted document?
Cause: XPS, OFD and PostScript are all written page by page, and the size and the orientation of that page come from the worksheet's own page setup rather than from a decision the conversion makes on its own.
Solution: They carry over as they are. Taking the report in this example, the XPS page box is 794 x 1122 (portrait) while the report keeps its default orientation; set the first worksheet's sheet.PageSetup.Orientation to xlsModule.PageOrientationType.Landscape before converting, and the page box becomes 1122 x 794 (landscape). Paper size, margins and print area take effect on the way out in the same manner.
Why is the converted file much larger than the original workbook
Cause: Writing XPS, OFD and PostScript embeds every font the workbook uses, so the result comes out several times the size of a workbook that only holds cell data. That embedding is what lets a fixed-layout document be opened away from the machine it was made on.
Solution: This is normal and nothing needs fixing. To bring the size down, use a smaller font file, or check first that the report does not rely on several font files at once.
Get a Free License
Spire.XLS for JavaScript offers a 30-day full-featured free trial license with no functional limitations. Apply here to evaluate before purchasing.