Apply Cell Styles to an Excel Cell Range with JavaScript in React
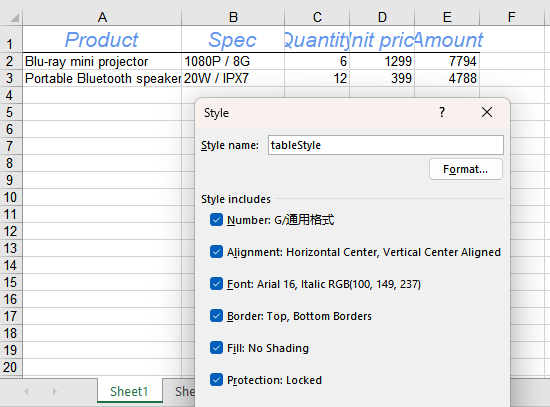
Formatting a cell range cell by cell means repeating the same group of properties down every column, and with enough columns one of them is easily missed; these formats also tend to be spread across fonts, borders and alignment, so each has to be set and then checked again on its own. Spire.XLS stores that group of formats as a named style, uses a flag object to state which of those formats should land this time, and then applies it to the target range: properties that were not ticked are not applied, and every other format on the range is left unchanged. Spire.XLS for JavaScript performs these operations in the browser through WebAssembly; the output file is managed by a virtual file system (VFS), with no backend service required.
This article covers two feature points:
For installation and project setup, see Integrating Spire.XLS for JavaScript in a React Project. The examples below assume Spire.XLS is installed and the WebAssembly module has been initialized.
Apply a named style to a cell range
Setting formats cell by cell means repeating the same block of code in every column, and with enough columns a cell is easily missed; fonts, borders and centring set separately would also mean working over the same block three times over. A named style stores a group of formats as an object that can be taken up repeatedly, and the flag object states which of those formats should land this time; together they apply the wanted parts to the whole range in a single call, leaving the range's other formatting unchanged. The steps are:
- Load the font file into the VFS, create a workbook, take the first worksheet and write the header and two data rows.
- Create a named style with
workbook.Styles.Addand give it the font colour, size and italic the header will use. - Set the top and bottom borders on that same style.
- Set horizontal and vertical centring on that same style.
- Create the flag object with
new xlsModule.CellStyleFlag()and tick the properties to land this time; the items left unticked are not written into the target cells. - Apply the style to the header range with
sheet.Range.get('A1:E1').ApplyStyle(tableStyle, flag); set the column widths so the header text displays in full, then save the workbook and dispose of it to free resources.
The full code example below shows how to apply cell styles to an Excel cell range in React:
function App() {
  const applyStyleToRange = async () => {
    // get the Spire.XLS WASM module
    const xlsModule = window.wasmModule?.spirexls;

    // check that the module is ready
    if (!xlsModule) {
      alert('Spire.Xls is not ready yet');
      return;
    }

    // load the font file into the VFS
    await window.spire.FetchFileToVFS('ARIAL.TTF', '/Library/Fonts/', `${process.env.PUBLIC_URL}/font/`);

    // create a new workbook and take the first worksheet
    const workbook = new xlsModule.Workbook();
    const sheet = workbook.Worksheets.get(0);

    // write the header and two data rows
    const columns = ['A', 'B', 'C', 'D', 'E'];
    const headers = ['Product', 'Spec', 'Quantity', 'Unit price', 'Amount'];
    headers.forEach((text, index) => {
      sheet.Range.get(`${columns[index]}1`).Value = text;
    });

    const rows = [
      ['Blu-ray mini projector', '1080P / 8G', '6', '1299', '7794'],
      ['Portable Bluetooth speaker', '20W / IPX7', '12', '399', '4788'],
    ];
    rows.forEach((row, rowIndex) => {
      columns.forEach((column, columnIndex) => {
        sheet.Range.get(`${column}${rowIndex + 2}`).Value = row[columnIndex];
      });
    });

    // create a named style
    const tableStyle = workbook.Styles.Add('tableStyle');

    // give the header its font colour, size and italic
    tableStyle.Font.Color = xlsModule.Color.get_CornflowerBlue();
    tableStyle.Font.Size = 16;
    tableStyle.Font.IsItalic = true;

    // set the top and bottom borders on the same style
    tableStyle.Borders.get(xlsModule.BordersLineType.EdgeTop).LineStyle = xlsModule.LineStyleType.Thin;
    tableStyle.Borders.get(xlsModule.BordersLineType.EdgeBottom).LineStyle = xlsModule.LineStyleType.Thin;

    // and set horizontal and vertical centring on the same style
    tableStyle.HorizontalAlignment = xlsModule.HorizontalAlignType.Center;
    tableStyle.VerticalAlignment = xlsModule.VerticalAlignType.Center;

    // create the flag object and tick the properties to land this time; unticked ones are not written to the target cells
    const flag = new xlsModule.CellStyleFlag();
    flag.FontColor = true;
    flag.FontSize = true;
    flag.FontItalic = true;
    flag.Borders = true;
    flag.HorizontalAlignment = true;
    flag.VerticalAlignment = true;

    // apply the style to the header range
    sheet.Range.get('A1:E1').ApplyStyle(tableStyle, flag);

    // set the column widths
    sheet.Columns.get(0).ColumnWidth = 22;
    sheet.Columns.get(1).ColumnWidth = 14;

    // save the workbook as an Excel file
    const outputFileName = 'ApplyStyleToRange.xlsx';
    workbook.SaveToFile({ fileName: outputFileName, version: xlsModule.ExcelVersion.Version2016 });

    // dispose of the workbook to free resources
    workbook.Dispose();

    // read the result file from the VFS and start the download
    const fileArray = window.dotnetRuntime.Module.FS.readFile(outputFileName);
    const blob = new Blob([fileArray], { type: 'application/vnd.openxmlformats-officedocument.spreadsheetml.sheet' });
    const url = URL.createObjectURL(blob);
    const a = document.createElement('a');
    a.href = url;
    a.download = outputFileName;
    a.click();
    URL.revokeObjectURL(url);
  };

  return (
    <div style={{ textAlign: 'center', height: '300px' }}>
      <h1>Apply cell styles to a cell range</h1>
      <button id="apply-style-to-range" onClick={applyStyleToRange}>Apply cell styles to the cell range</button>
    </div>
  );
}

export default App;
After running, the effect of applying the named style to the cell range:
Read and adjust the named style
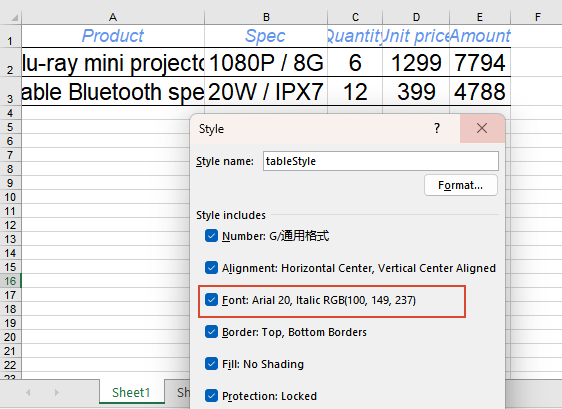
Once a style has been saved, later changes concern the values inside it rather than the whole set of formats, and no workbook has to be rebuilt: load the result file produced by feature point 1, read the named style by name, take the size already set in it, increase it, and apply the style to another range. The flag decides the scope here too: this time only the size, borders and centring are ticked, so the style's colour and italic are not written into the data range. Note that applying a style writes its properties into the cells as they stand at that moment, and the cells keep no reference to the style, so the range has to be applied again for the change to take effect. The steps are:
- Run the code of feature point 1 first, so that its result file
ApplyStyleToRange.xlsxstays in the VFS as this run's input file. - Load that input file with
workbook.LoadFromFileand take the first worksheet. - Read the named style feature point 1 created with
workbook.Styles.get('tableStyle')and take itsFont.Sizeas the baseline. - Raise the baseline size and write it back to the style, as the size the data range will use.
- Create the flag object and tick only the size, borders and centring; apply the adjusted style to the data range with
sheet.Range.get('A2:E3').ApplyStyle(readBack, flag), set the column widths so the larger font size still fits, then save the workbook and dispose of it to free resources.
The full code example below shows how to load a result file, read the named style and apply it after adjusting the size in React:
function App() {
  const readAndAdjustFontStyle = async () => {
    // get the Spire.XLS WASM module
    const xlsModule = window.wasmModule?.spirexls;

    // check that the module is ready
    if (!xlsModule) {
      alert('Spire.Xls is not ready yet');
      return;
    }

    // load the font file into the VFS
    await window.spire.FetchFileToVFS('ARIAL.TTF', '/Library/Fonts/', `${process.env.PUBLIC_URL}/font/`);

    // load the result file produced by feature point 1 as this run's input
    const workbook = new xlsModule.Workbook();
    workbook.LoadFromFile({ fileName: 'ApplyStyleToRange.xlsx' });
    const sheet = workbook.Worksheets.get(0);

    // read the named style feature point 1 created and take its current font size as the baseline
    const readBack = workbook.Styles.get('tableStyle');
    const baseSize = readBack.Font.Size;

    // raise the baseline size to get the size the data range will use
    readBack.Font.Size = baseSize + 4;

    // create the flag object: this time tick only the font size, borders and centring, so the style's colour and italic stay off the data range
    const flag = new xlsModule.CellStyleFlag();
    flag.FontSize = true;
    flag.Borders = true;
    flag.HorizontalAlignment = true;
    flag.VerticalAlignment = true;

    // apply the adjusted style to the data range
    sheet.Range.get('A2:E3').ApplyStyle(readBack, flag);

    // set the column widths so the larger font size still fits
    sheet.Columns.get(0).ColumnWidth = 30;
    sheet.Columns.get(1).ColumnWidth = 20;

    // save the workbook as an Excel file
    const outputFileName = 'ReadAndAdjustFontStyle.xlsx';
    workbook.SaveToFile({ fileName: outputFileName, version: xlsModule.ExcelVersion.Version2016 });

    // dispose of the workbook to free resources
    workbook.Dispose();

    // read the result file from the VFS and start the download
    const fileArray = window.dotnetRuntime.Module.FS.readFile(outputFileName);
    const blob = new Blob([fileArray], { type: 'application/vnd.openxmlformats-officedocument.spreadsheetml.sheet' });
    const url = URL.createObjectURL(blob);
    const a = document.createElement('a');
    a.href = url;
    a.download = outputFileName;
    a.click();
    URL.revokeObjectURL(url);
  };

  return (
    <div style={{ textAlign: 'center', height: '300px' }}>
      <h1>Read the style and adjust its size</h1>
      <button id="read-and-adjust-font-style" onClick={readAndAdjustFontStyle}>Read the named style, adjust it, then apply it</button>
    </div>
  );
}

export default App;
After running, the effect of reading the named style and adjusting its font size:
FAQ
Do the number formats already on the range change when I apply a style
Reason: No. Only the items ticked in the flag object are written into the target cells when the style is applied; the items left unticked take no part, so the number formats, borders and alignment already on the cells remain as they were.
Solution: Conversely, to apply number formats along with it, set the number format on the style as well and tick the matching item in the flag:
// give the style the number format first
tableStyle.NumberFormat = '0.00';

// tick the matching item in the flag
flag.NumberFormat = true;
sheet.Range.get('A1:E1').ApplyStyle(tableStyle, flag);
How do I apply a style to the whole worksheet
Reason: The examples above apply the style to one range at a time; a whole worksheet treated the same way would mean listing every range to cover. The worksheet object carries a method of the same name that covers the whole sheet in a single call.
Solution: Call ApplyStyle on the worksheet object to apply the whole style to the whole sheet:
sheet.ApplyStyle(tableStyle);
Get a Free License
Spire.XLS for JavaScript offers a 30-day full-featured free trial license with no functional limitations. Apply here to evaluate before purchasing.
Generate PDF Bookmarks and TOC in C# with Spire.Agent.Office
A PDF that runs to dozens or hundreds of pages — a product manual, a technical handbook, a project report, a conference proceedings — loses most of its usability when it has no bookmarks and no table of contents. To get from "Chapter 3" to "5.2 Interface Description", a reader has to scroll page by page or guess the page number from memory. Reviewers and archivists cannot jump to a chapter either.
Bookmarks and a table of contents exist to solve exactly this problem of navigation: bookmarks are the hierarchical structure in the PDF reader's side panel, where one click jumps to the matching chapter; a table of contents page is a single page of text placed before the body, listing chapter titles and page numbers so readers can grasp the structure at a glance or look things up in print. Yet these two things are usually the first to be lost: bookmarks generated when converting Word to PDF can drop out, scanned or reassembled documents have none at all, and adding them by hand means cross-checking titles against page numbers until a long document inevitably goes out of sync.
The PDF AI capability of Spire.Agent.Office lets you describe the bookmark hierarchy and the table of contents requirements in natural language. The AI agent understands the request and completes two kinds of work automatically: generating hierarchical bookmarks for a PDF, and generating a front-of-document contents page whose page numbers match the body and whose entries jump when clicked.
Comparison with Traditional SDK API
| Traditional Spire.Office for .NET API | Spire.Agent.Office | |
|---|---|---|
| Driving style | Write code that walks every page, matches headings by font size or numbering patterns, builds the bookmark tree and assigns each entry a page, controlling every step | Describe the bookmark hierarchy and TOC requirements in natural language; the AI understands them and orchestrates the execution path |
| Code size | Bookmark and TOC generation usually needs 150-300 lines of C# (page iteration, heading detection, hierarchy decisions, bookmark tree construction, page number calculation, TOC page layout and formatting, etc.) | About 10 lines of calling code + 1 natural-language instruction |
| Heading detection | You must define what text counts as a heading, and any change to font size or numbering format means changing the rules | The AI judges heading levels from numbering, font size and layout context; the rules are stated in one sentence in the instruction |
| Page number mapping | TOC page numbers are counted by hand and must be recounted whenever the body changes | The AI reads the actual page numbers from the body and fills them into the TOC |
| Requirement change | Change the bookmark hierarchy / TOC style → change code → compile → redeploy | Modify the instruction and it takes effect immediately |
This article shows how to use the Spire.Agent.Office PDF AI capability to generate bookmarks and a table of contents for PDF documents. Two cases demonstrate the two typical uses — "generating hierarchical bookmarks" and "generating a table of contents page":
- Case 1: Generate hierarchical bookmarks for a PDF
- Case 2: Generate a table of contents page for a PDF
For product installation and SpireToken configuration, please refer to Integrating Spire.Agent.Office in a .NET Project. The examples below assume that Spire.Agent.Office has been installed and SpireToken has been configured.
Case 1: Generate hierarchical bookmarks for a PDF
Documents such as product manuals and technical handbooks usually follow a fixed structure: the body is divided into large parts labelled "Chapter 1", "Chapter 2", and each chapter is broken down further into sections such as "1.1" and "1.2". The layout makes the hierarchy obvious at a glance through numbering and font size, but the PDF reader's navigation panel stays empty — jumping to one specific section means paging through the document yourself.
For that panel to be genuinely useful, the bookmarks must mirror the heading hierarchy exactly: top-level headings become top-level bookmarks, second-level headings become child bookmarks nested under their chapter, and clicking a bookmark jumps straight to the page where the heading appears. Adding them by hand means finding each heading page by page, creating an entry in the bookmark panel, then pointing that entry at the right destination — hundreds of headings in, mistakes are close to inevitable.
The example below uses the Spire.Agent.Office agent to read the chapter structure from the PDF body through a natural-language instruction and generate multi-level bookmarks by heading hierarchy:
using Spire.Agent.Office.AI;
using Spire.Agent.Office.Extensions;
using Spire.Pdf;

// PDF-related configuration
string inputPath = @"E:\manual.pdf";  // path to the PDF that needs bookmarks
string savePath = @"E:\output\manual-with-bookmarks.pdf";  // path of the result file
string key = "**************************";  // SpireToken key
string instruction =
    "Read the body of this PDF product manual and generate hierarchical bookmarks for it:" +
    "1. Detect the chapter headings in the body; headings starting with 'Chapter X' become top-level bookmarks, and headings starting with 'X.Y' become child bookmarks under the matching chapter;" +
    "2. List the bookmarks in the order they appear in the body, keep the hierarchy consistent with the heading structure, and keep each bookmark title identical to the heading text;" +
    "3. Each bookmark jumps to the page where its heading appears, so one click locates that chapter;" +
    "4. Ignore figure captions and headers/footers and do not create bookmarks for them;" +
    "5. Keep the original layout, fonts and page setup of the body unchanged;" +
    "Save the final result as a PDF file";

// Call the PDF document processing function
AIResult result = ExecuteDemoPDF(instruction, inputPath, savePath, key);


// Execute PDF AI processing
static AIResult ExecuteDemoPDF(string instruction, string inputPath, string savePath, string key)
{
    // Create the AIOptions configuration object
    AIOptions options = new AIOptions();
    options.SpireToken = key;  // set the SpireToken key

    // Process the PDF document using a PdfDocument object
    using (PdfDocument pdf = new PdfDocument())
    {
        // Load the PDF document from file
        if (!string.IsNullOrEmpty(inputPath) && File.Exists(inputPath))
        {
            pdf.LoadFromFile(inputPath);
        }
        // Create the AI document processor
        AIDocumentProcessor processor = pdf.AI(options);

        // Execute the AI instruction
        return processor.ExecuteInstruction(pdf, instruction, savePath);
    }
}
The PDF after hierarchical bookmarks were generated
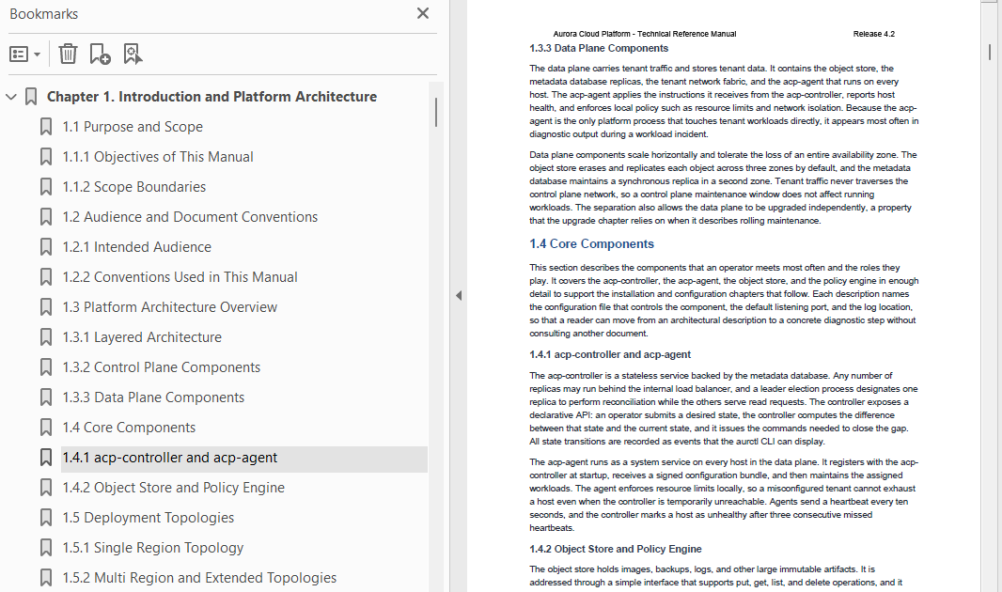
The generated bookmarks reproduce the chapter structure of the body completely: top-level chapters sit at the top of the panel, each section is nested beneath its chapter, and clicking any bookmark jumps to the page where that heading appears. The body layout, fonts and page setup stay exactly as they were — the navigation structure is simply added on top.
Case 2: Generate a table of contents page for a PDF
When a technical proposal, project report or collection of papers is delivered to reviewers or readers, it usually needs a table of contents on the very first page: chapter titles listed line by line, each with the page number where the chapter begins, so readers can see the whole structure before deciding where to start. A contents page is also part of the required style of a formal document, and documents of this kind normally carry a cover page, with the contents sitting after the cover and before the body.
Two things make a contents page awkward to build. The first is the page numbers: they must match the body exactly, and any added or removed chapter, or any change in pagination, means every number has to be recounted. The second is the jumping: a line reading "Section 5.2, page 27" still leaves the reader to find page 27 by hand; only when the entry itself is clickable does the contents page become genuinely useful.
The example below uses the Spire.Agent.Office agent to extract each chapter title with its page number through a natural-language instruction and insert a laid-out, clickable contents page after the cover page:
using Spire.Agent.Office.AI;
using Spire.Agent.Office.Extensions;
using Spire.Pdf;

// PDF-related configuration
string inputPath = @"E:\report.pdf";  // path to the PDF that needs a contents page
string savePath = @"E:\output\report-with-toc.pdf";  // path of the result file
string key = "**************************";  // SpireToken key
string instruction =
    "Read the body of this PDF and generate a table of contents page after the cover page:" +
    "1. Extract the title and page number of every chapter in the body, including both top-level and second-level headings;" +
    "2. Insert a 'Contents' page after the cover page and before the body, listing chapter titles with their page numbers line by line, titles left-aligned and page numbers right-aligned with dot leaders in between;" +
    "3. Make every entry in the contents a clickable link that jumps straight to the page where that chapter begins;" +
    "4. The page numbers shown in the contents must match the actual body pages after the contents page has been inserted; no number may be off by a page;" +
    "5. Centre the word 'Contents' as the title of the page, using the same font size as the top-level headings in the body;" +
    "6. Keep the original layout, fonts and page setup of the body unchanged;" +
    "Save the final result as a PDF file";

// Call the PDF document processing function
AIResult result = ExecuteDemoPDF(instruction, inputPath, savePath, key);


// Execute PDF AI processing
static AIResult ExecuteDemoPDF(string instruction, string inputPath, string savePath, string key)
{
    // Create the AIOptions configuration object
    AIOptions options = new AIOptions();
    options.SpireToken = key;  // set the SpireToken key

    // Process the PDF document using a PdfDocument object
    using (PdfDocument pdf = new PdfDocument())
    {
        // Load the PDF document from file
        if (!string.IsNullOrEmpty(inputPath) && File.Exists(inputPath))
        {
            pdf.LoadFromFile(inputPath);
        }
        // Create the AI document processor
        AIDocumentProcessor processor = pdf.AI(options);

        // Execute the AI instruction
        return processor.ExecuteInstruction(pdf, instruction, savePath);
    }
}
The PDF with a contents page generated after the cover
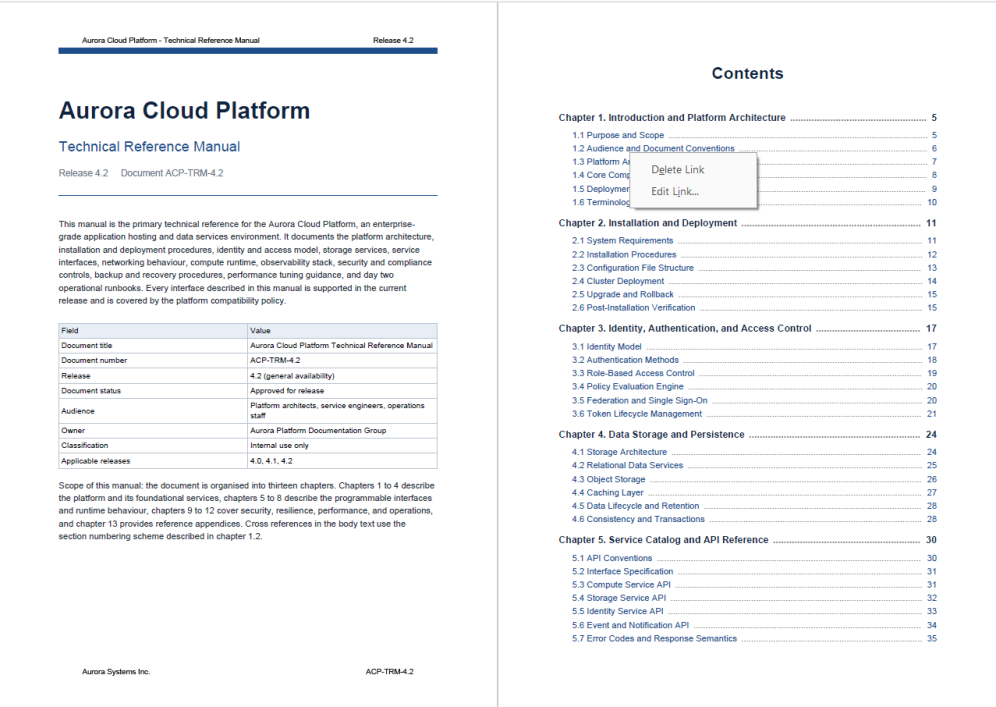
The contents page lists chapters by level, with dot leaders running from each title to its page number, matching the format of a published book. Every entry carries a jump link, so one click lands on the matching chapter — the page works as a reading aid and as a navigation tool at the same time. The body content and its original layout are untouched; the contents page is inserted as a page of its own after the cover.
FAQ
The generated bookmarks have no hierarchy and all headings sit on one level
Cause: The hierarchy in the body is conveyed by numbering format ("Chapter 1" versus "1.1") and font size. If the instruction does not state the rule, the AI may treat every heading it detects as a top-level bookmark.
Solution: State the hierarchy rule in the instruction, for example "headings starting with 'Chapter X' become top-level bookmarks and headings starting with 'X.Y' become child bookmarks under the matching chapter". When the numbering is unusual (such as "Part I" or "Appendix A"), include that rule in the instruction as well.
The page numbers in the contents do not match the actual body pages
Cause: Inserting the contents page in front of the body shifts every following page by one. If the page numbers are collected before the contents page is inserted, every number in the contents comes out one page too low.
Solution: State which numbering basis to use, for example "the page numbers in the contents must match the actual body pages after the contents page has been inserted". If the body already has its own numbering scheme (for instance a cover page and preface that are not numbered), describe that rule in the instruction so the AI counts by the same convention.
Getting a SpireToken Key
- Contact sales@e-iceblue.com or visit https://www.e-iceblue.com/TemLicense.html to obtain a trial/commercial API key
Configure it in your code:
AIOptions options = new AIOptions();
options.SpireToken = key;
Set Excel Cell Font Formatting with JavaScript in React
A table has only a few seconds to be understood, and the work is done not only by the numbers but by the fonts: a title big enough to stand out, a figure that matters found at a glance, a cancelled line spotted immediately. In Excel every one of those differences is carried by a font object belonging to a single cell -- font name, size, colour, bold, italic, underline, strikethrough; changing a cell touches only that cell. One cell can also hold several fonts at once, and switching a single word to another colour or size lifts it out of the sentence around it. Spire.XLS for JavaScript performs these operations in the browser through WebAssembly; the output file is managed by a virtual file system (VFS), with no backend service required.
This article covers two feature points:
For installation and project setup, see Integrating Spire.XLS for JavaScript in a React Project. The examples below assume Spire.XLS is installed and the WebAssembly module has been initialized.
Set the font formatting of a cell
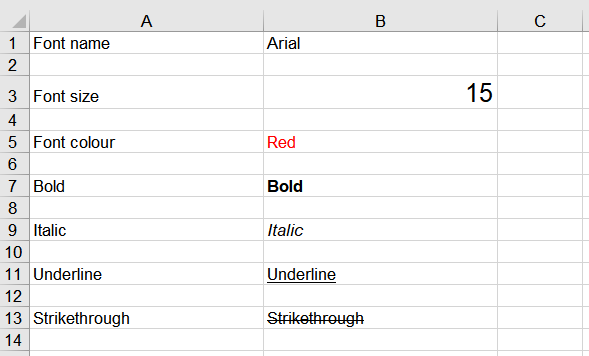
Every cell carries a font object of its own, and all seven properties -- font name, size, colour, bold, italic, underline and strikethrough -- hang off that object. To see what each one does, start a worksheet of its own, write the property's name and a sample of text row by row, and set the matching property on the cell that holds the sample: a change lands on that cell alone, and the description in column A keeps its own look. The steps are:
- Load the font file into the VFS with
window.spire.FetchFileToVFS. - Create a workbook with
new Workbook()and take the first worksheet withworkbook.Worksheets.get(0). - Write the properties out one per row with
sheet.Range.get: the name into column A and the sample text into column B, rows starting at 1 and going up by 2. - Set the matching format on each row's sample through
FontName,Size,Color,IsBold,IsItalic,UnderlineandIsStrikethroughonRange.Style.Font, taking the font colour fromxlsModule.Color.get_Red()and the underline fromxlsModule.FontUnderlineType.Single. - Set both columns to a width of 25 with
sheet.Columns.get(0).ColumnWidthandsheet.Columns.get(1).ColumnWidth. - Save the workbook with
workbook.SaveToFileand dispose of it withworkbook.Disposeto free resources.
The full code example below shows how to set font formatting for cells in React:
function App() {
  const setCellFont = async () => {
    // get the Spire.XLS WASM module
    const xlsModule = window.wasmModule?.spirexls;

    // check that the module is ready
    if (!xlsModule) {
      alert('Spire.Xls is not ready yet');
      return;
    }

    // load the font file into the VFS
    await window.spire.FetchFileToVFS('ARIAL.TTF', '/Library/Fonts/', `${process.env.PUBLIC_URL}/font/`);

    // create a new workbook and take the first worksheet
    const workbook = new xlsModule.Workbook();
    const sheet = workbook.Worksheets.get(0);

    // set the font name
    let row = 1;
    sheet.Range.get(`A${row}`).Value = 'Font name';
    sheet.Range.get(`B${row}`).Value = 'Arial';
    sheet.Range.get(`B${row}`).Style.Font.FontName = 'Arial';

    // set the font size
    row += 2;
    sheet.Range.get(`A${row}`).Value = 'Font size';
    sheet.Range.get(`B${row}`).Value = '15';
    sheet.Range.get(`B${row}`).Style.Font.Size = 15;

    // set the font colour
    row += 2;
    sheet.Range.get(`A${row}`).Value = 'Font colour';
    sheet.Range.get(`B${row}`).Value = 'Red';
    sheet.Range.get(`B${row}`).Style.Font.Color = xlsModule.Color.get_Red();

    // bold the text
    row += 2;
    sheet.Range.get(`A${row}`).Value = 'Bold';
    sheet.Range.get(`B${row}`).Value = 'Bold';
    sheet.Range.get(`B${row}`).Style.Font.IsBold = true;

    // italicise the text
    row += 2;
    sheet.Range.get(`A${row}`).Value = 'Italic';
    sheet.Range.get(`B${row}`).Value = 'Italic';
    sheet.Range.get(`B${row}`).Style.Font.IsItalic = true;

    // underline the text
    row += 2;
    sheet.Range.get(`A${row}`).Value = 'Underline';
    sheet.Range.get(`B${row}`).Value = 'Underline';
    sheet.Range.get(`B${row}`).Style.Font.Underline = xlsModule.FontUnderlineType.Single;

    // strike through the text
    row += 2;
    sheet.Range.get(`A${row}`).Value = 'Strikethrough';
    sheet.Range.get(`B${row}`).Value = 'Strikethrough';
    sheet.Range.get(`B${row}`).Style.Font.IsStrikethrough = true;

    // set the column widths
    sheet.Columns.get(0).ColumnWidth = 25;
    sheet.Columns.get(1).ColumnWidth = 25;

    // save the workbook as an Excel file
    const outputFileName = 'CellFont.xlsx';
    workbook.SaveToFile({ fileName: outputFileName, version: xlsModule.ExcelVersion.Version2016 });

    // dispose of the workbook to free resources
    workbook.Dispose();

    // read the result file from the VFS and start the download
    const fileArray = window.dotnetRuntime.Module.FS.readFile(outputFileName);
    const blob = new Blob([fileArray], { type: 'application/vnd.openxmlformats-officedocument.spreadsheetml.sheet' });
    const url = URL.createObjectURL(blob);
    const a = document.createElement('a');
    a.href = url;
    a.download = outputFileName;
    a.click();
    URL.revokeObjectURL(url);
  };

  return (
    <div style={{ textAlign: 'center', height: '300px' }}>
      <h1>Set Cell Font Formatting</h1>
      <button id="cell-font" onClick={setCellFont}>Set the font formatting of a cell</button>
    </div>
  );
}

export default App;
After running, the effect of setting font formatting for individual cells:
Mix several fonts inside one cell
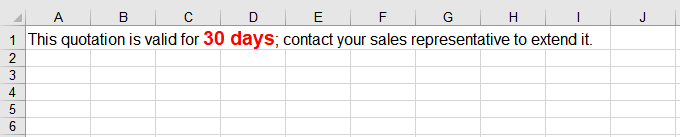
A cell's rich text object lets one run of text be cut at character positions and each piece given a different font, while the sentence still reads as a whole. The way to do it is to create the font objects first and then assign them range by range with SetFont -- each call overwrites one range, so every part of the sentence has to be covered. Ranges count from 0 and include both ends. The steps are:
- Load the font file into the VFS with
window.spire.FetchFileToVFS. - Create a workbook with
new Workbook()and take the first worksheet withworkbook.Worksheets.get(0). - Create two fonts with
workbook.CreateFont(): one for the whole sentence, and one that emphasises the key phrase throughIsBoldandKnownColor. - Take the cell that holds the sentence with
sheet.Range.get('A1'), and write the whole sentence into its rich text object throughRichText.Text. - Work out the start and end of the text that needs the new font within the sentence with
note.indexOf(key)andkey.length, then assign the fonts to the three parts -- before the key phrase, the key phrase itself and after it -- withRichText.SetFont. - Save the workbook with
workbook.SaveToFileand dispose of it withworkbook.Disposeto free resources.
The full code example below shows how to give part of the text in one cell a different font in React:
function App() {
  const setRichTextFonts = async () => {
    // get the Spire.XLS WASM module
    const xlsModule = window.wasmModule?.spirexls;

    // check that the module is ready
    if (!xlsModule) {
      alert('Spire.Xls is not ready yet');
      return;
    }

    // load the font file into the VFS
    await window.spire.FetchFileToVFS('ARIAL.TTF', '/Library/Fonts/', `${process.env.PUBLIC_URL}/font/`);

    // create a new workbook and take the first worksheet
    const workbook = new xlsModule.Workbook();
    const sheet = workbook.Worksheets.get(0);

    // create the first font, for the whole sentence
    const font1 = workbook.CreateFont();
    font1.FontName = 'Arial';
    font1.Size = 12;

    // create the second font, for the key phrase
    const font2 = workbook.CreateFont();
    font2.FontName = 'Arial';
    font2.Size = 14;
    font2.IsBold = true;
    font2.KnownColor = xlsModule.ExcelColors.Red;

    // take the cell's rich text object and write the whole sentence
    const note = 'This quotation is valid for 30 days; contact your sales representative to extend it.';
    const key = '30 days';
    const richText = sheet.Range.get('A1').RichText;
    richText.Text = note;

    // locate the character range the key phrase occupies
    const start = note.indexOf(key);
    const end = start + key.length - 1;

    // set the part before the key phrase to the first font
    richText.SetFont(0, start - 1, font1);

    // set the key phrase itself to the second font
    richText.SetFont(start, end, font2);

    // keep the part after the key phrase in the first font
    richText.SetFont(end + 1, note.length - 1, font1);

    // save the workbook as an Excel file
    const outputFileName = 'RichTextFont.xlsx';
    workbook.SaveToFile({ fileName: outputFileName, version: xlsModule.ExcelVersion.Version2016 });

    // dispose of the workbook to free resources
    workbook.Dispose();

    // read the result file from the VFS and start the download
    const fileArray = window.dotnetRuntime.Module.FS.readFile(outputFileName);
    const blob = new Blob([fileArray], { type: 'application/vnd.openxmlformats-officedocument.spreadsheetml.sheet' });
    const url = URL.createObjectURL(blob);
    const a = document.createElement('a');
    a.href = url;
    a.download = outputFileName;
    a.click();
    URL.revokeObjectURL(url);
  };

  return (
    <div style={{ textAlign: 'center', height: '300px' }}>
      <h1>Mix Several Fonts Inside One Cell</h1>
      <button id="rich-text-fonts" onClick={setRichTextFonts}>Give part of the text a different font</button>
    </div>
  );
}

export default App;
After running, the effect of mixing several fonts inside one cell:
FAQ
What value should SetFont's end position take
Reason: Both position arguments of SetFont count from 0 and include the end position itself, so passing a string's length directly lands one character past the end.
Solution: Pass "length minus one" as the end position. To cover a whole run of text, use the sentence's length minus one:
richText.SetFont(0, note.length - 1, font1);
Get a Free License
Spire.XLS for JavaScript offers a 30-day full-featured free trial license with no functional limitations. Apply here to evaluate before purchasing.
Insert Picture Comments in Excel with JavaScript in React
An Excel comment usually carries a paragraph of text, explaining a number or adding a note. When the thing to be explained is itself a picture -- a supplier mark, a product photo, a sketch of a part -- text alone will not do. Spire.XLS for JavaScript can fill a comment's background with a picture, so the image appears beside the cell without a separate floating picture object being placed on the sheet. A comment's background is controlled by its fill object, and switching to a solid colour likewise changes only that one object. Spire.XLS for JavaScript performs these operations in the browser through WebAssembly; input and output files are managed by a virtual file system (VFS), with no backend service required.
This article covers two feature points:
For installation and project setup, see Integrating Spire.XLS for JavaScript in a React Project. The examples below assume Spire.XLS is installed and the WebAssembly module has been initialized.
Insert a picture comment into a cell
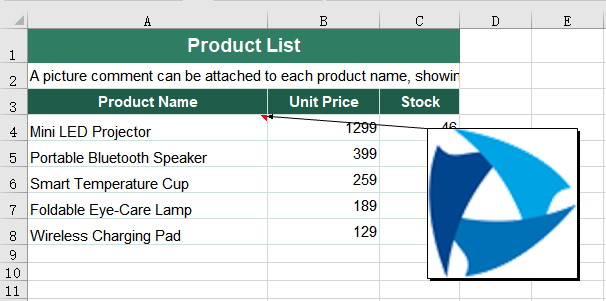
A comment is attached to a cell; giving one a picture means first obtaining the comment object on the target cell and then filling it. The picture becomes the comment box's background, replacing the default pale-yellow shading, and it is this picture that appears when the mouse moves over the cell or the file is opened. The picture is scaled to the size of the comment box, and the default box is a flat rectangle, so a square picture is stretched out of shape; after filling, the width and height must therefore be set so that the box matches the picture's proportions. Where the box sits on the sheet is decided by a separate pair of position properties, so it does not have to follow the cell border. The steps are:
- Load the font, the picture and the test data file into the VFS.
- Load the workbook with
workbook.LoadFromFile. - Take the cell the comment will be attached to with
sheet.Range.get('A4'). - Create a comment object on the cell with
range.AddComment(). - Fill the comment background with the picture using
comment.Fill.CustomPicture, passing the picture as a stream built bynew xlsModule.Stream('logo.png')and'None'for thenameargument. - Set
comment.Widthandcomment.Heightso the comment box is square, matching the square picture, which keeps the picture from being stretched. - Place the comment box relative to the top-left corner of the worksheet with
comment.Topandcomment.Left, so that it covers the content below without obscuring its own row. - Set
comment.Visibleto show the comment as soon as the file is opened. - Save the workbook with
workbook.SaveToFile. - Dispose of the workbook with
workbook.Disposeto free resources.
The complete code example below shows how to insert a picture comment into an Excel cell in React:
function App() {
  const addPictureComment = async () => {
    // get the Spire.XLS WASM module
    const xlsModule = window.wasmModule?.spirexls;

    // check that the module is ready
    if (!xlsModule) {
      alert('Spire.Xls is not ready yet');
      return;
    }

    // load the font, the picture and the test data file into the VFS
    await window.spire.FetchFileToVFS('ARIAL.TTF', '/Library/Fonts/', `${process.env.PUBLIC_URL}/font/`);
    await window.spire.FetchFileToVFS('logo.png', '', `${process.env.PUBLIC_URL}data/`);
    const inputFileName = 'ProductList.xlsx';
    await window.spire.FetchFileToVFS(inputFileName, '', `${process.env.PUBLIC_URL}data/`);

    // load the workbook
    const workbook = new xlsModule.Workbook();
    workbook.LoadFromFile({ fileName: inputFileName });

    // take the first worksheet and add a comment to cell A4, filled with the picture
    const sheet = workbook.Worksheets.get(0);
    const range = sheet.Range.get('A4');
    const comment = range.AddComment();
    comment.Fill.CustomPicture({ im: new xlsModule.Stream('logo.png'), name: 'None' });

    // set the width and height of the comment box
    comment.Width = 150;
    comment.Height = 150;

    // place the comment box relative to the top-left corner of the worksheet
    comment.Top = 100;
    comment.Left = 400;

    // make the comment show as soon as the file is opened
    comment.Visible = true;

    // save the workbook
    const outputFileName = 'PictureComment.xlsx';
    workbook.SaveToFile({ fileName: outputFileName, version: xlsModule.ExcelVersion.Version2010 });

    // dispose of the workbook to free resources
    workbook.Dispose();

    // read the result file from the VFS and start the download
    const fileArray = window.dotnetRuntime.Module.FS.readFile(outputFileName);
    const blob = new Blob([fileArray], { type: 'application/vnd.openxmlformats-officedocument.spreadsheetml.sheet' });
    const url = URL.createObjectURL(blob);
    const a = document.createElement('a');
    a.href = url;
    a.download = outputFileName;
    a.click();
    URL.revokeObjectURL(url);
  };

  return (
    <div style={{ textAlign: 'center', height: '300px' }}>
      <h1>Insert Comments with Pictures</h1>
      <button id="picture-comment" onClick={addPictureComment}>Insert a picture comment into a cell</button>
    </div>
  );
}

export default App;
After running, the effect of inserting a picture comment into a cell:
Fill a comment with a solid colour
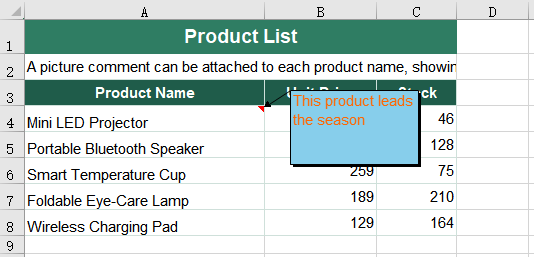
A comment background need not be a picture. When all that is needed is for one comment to stand out from the pale-yellow shading around it, specifying a solid colour is more straightforward than preparing an image. Filling with a picture and filling with a solid colour use the same comment.Fill object; only the fill type changes from picture to solid. The steps are:
- Load the font and the test data file into the VFS.
- Load the workbook with
workbook.LoadFromFile. - Take the cell the comment will be attached to with
sheet.Range.get('A4')and create the comment withrange.AddComment(). - Write the comment text with
comment.Text. - Create a font with
workbook.CreateFont()and set the whole text to it withcomment.RichText.SetFont. - Set
comment.Fill.FillTypeto the solid fill type,xlsModule.ShapeFillType.SolidColor. - Pick the colour with
comment.Fill.ForeColor. - Set
comment.Visibleto show the comment as soon as the file is opened. - Save the workbook with
workbook.SaveToFile. - Dispose of the workbook with
workbook.Disposeto free resources.
The complete code example below shows how to fill an Excel comment with a solid colour in React:
function App() {
  const fillCommentColor = async () => {
    // get the Spire.XLS WASM module
    const xlsModule = window.wasmModule?.spirexls;

    // check that the module is ready
    if (!xlsModule) {
      alert('Spire.Xls is not ready yet');
      return;
    }

    // load the font and the test data file into the VFS
    await window.spire.FetchFileToVFS('ARIAL.TTF', '/Library/Fonts/', `${process.env.PUBLIC_URL}/font/`);
    const inputFileName = 'ProductList.xlsx';
    await window.spire.FetchFileToVFS(inputFileName, '', `${process.env.PUBLIC_URL}data/`);

    // load the workbook
    const workbook = new xlsModule.Workbook();
    workbook.LoadFromFile({ fileName: inputFileName });

    // take the first worksheet and add a comment to cell A4
    const sheet = workbook.Worksheets.get(0);
    const range = sheet.Range.get('A4');

    // create the font the comment text will use
    const font = workbook.CreateFont();
    font.FontName = 'Arial';
    font.Size = 11;
    font.KnownColor = xlsModule.ExcelColors.Orange;

    // write the comment text and set the whole text to that font
    const commentText = 'This product leads the season';
    range.Comment.Text = commentText;
    range.Comment.RichText.SetFont(0, commentText.length - 1, font);

    // set the comment fill to a solid colour and pick the colour
    range.Comment.Fill.FillType = xlsModule.ShapeFillType.SolidColor;
    range.Comment.Fill.ForeColor = xlsModule.Color.get_SkyBlue();
    range.Comment.Visible = true;

    // save the workbook
    const outputFileName = 'CommentFillColor.xlsx';
    workbook.SaveToFile({ fileName: outputFileName, version: xlsModule.ExcelVersion.Version2010 });

    // dispose of the workbook to free resources
    workbook.Dispose();

    // read the result file from the VFS and start the download
    const fileArray = window.dotnetRuntime.Module.FS.readFile(outputFileName);
    const blob = new Blob([fileArray], { type: 'application/vnd.openxmlformats-officedocument.spreadsheetml.sheet' });
    const url = URL.createObjectURL(blob);
    const a = document.createElement('a');
    a.href = url;
    a.download = outputFileName;
    a.click();
    URL.revokeObjectURL(url);
  };

  return (
    <div style={{ textAlign: 'center', height: '300px' }}>
      <h1>Insert Comments with Pictures</h1>
      <button id="comment-fill-color" onClick={fillCommentColor}>Fill a comment with a solid colour</button>
    </div>
  );
}

export default App;
After running, the effect of filling a comment with a solid colour:
FAQ
Why does the picture comment not appear when the result file is opened
Reason: Comments are hidden by default and appear only when the mouse moves over the cell. If the comment was not set to visible before saving, reopening the file shows an ordinary worksheet, and the picture comment does not appear on its own.
Solution: Set comment.Visible to true, and the comment appears as soon as the file is opened:
comment.Visible = true;
Get a Free License
Spire.XLS for JavaScript offers a 30-day full-featured free trial license with no functional limitations. Apply here to evaluate before purchasing.
Add Hyperlinks to Shapes in Excel with JavaScript in React
A shape in Excel is usually there to point at something: the arrow on a diagram, the triangle that flags a number, the cloud that circles an area. Give it a hyperlink and the drawing becomes an entry point a reader can click. A shape, like a picture, is not a cell, and its hyperlink lives on the shape object itself, so both setting and reading one go through the worksheet's shape collection rather than its cell hyperlink collection. Spire.XLS for JavaScript does this in the browser on WebAssembly, handling input and output files through a virtual file system (VFS) with no backend service.
This article covers two core feature points:
For installation and project setup, see Integrating Spire.XLS for JavaScript in a React Project. The examples below assume Spire.XLS is installed and the WebAssembly module has been initialised.
Set a hyperlink on a shape
Setting a hyperlink on a shape is what turns a drawing into a clickable entry point: a reader who clicks the shape on the worksheet opens the address it points at. The link belongs to the shape itself rather than to a cell, so the shape has to be taken from the worksheet's shape collection first, and the address handed to its own link object. The steps are:
- Load the font and the test data file into the VFS.
- Load the workbook with
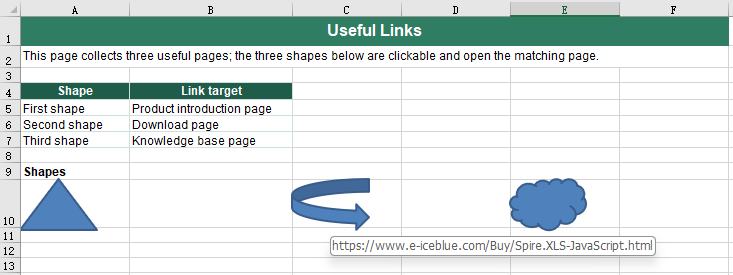
workbook.LoadFromFile. - Add the shapes into the space left for them with
sheet.PrstGeomShapes.AddPrstGeomShape. - Take the shape count from
sheet.PrstGeomShapes.Countand walk every shape on the worksheet with it. - Take each shape's link object from its
HyLinkproperty and write the address into itsAddress. - Save the workbook with
workbook.SaveToFile. - Dispose of the workbook with
workbook.Disposeto free resources.
The complete code example below shows how to set a hyperlink on a shape in Excel in React:
function App() {
  const shapeHyperlink = async () => {
    // get the Spire.XLS WASM module
    const xlsModule = window.wasmModule?.spirexls;

    // check that the module is ready
    if (!xlsModule) {
      alert('Spire.Xls is not ready yet');
      return;
    }

    // load the font and the test data file into the VFS
    await window.spire.FetchFileToVFS('ARIAL.TTF', '/Library/Fonts/', `${process.env.PUBLIC_URL}/font/`);
    const inputFileName = 'ShapeLink.xlsx';
    await window.spire.FetchFileToVFS(inputFileName, '', `${process.env.PUBLIC_URL}data/`);

    // load the workbook
    const workbook = new xlsModule.Workbook();
    workbook.LoadFromFile({ fileName: inputFileName });

    // take the first worksheet and add the three shapes into the space left for them
    const sheet = workbook.Worksheets.get(0);
    const shapes = sheet.PrstGeomShapes;
    shapes.AddPrstGeomShape(10, 1, 90, 60, xlsModule.PrstGeomShapeType.Triangle);
    shapes.AddPrstGeomShape(10, 3, 90, 60, xlsModule.PrstGeomShapeType.CurvedRightArrow);
    shapes.AddPrstGeomShape(10, 5, 90, 60, xlsModule.PrstGeomShapeType.Cloud);

    // set a hyperlink on each shape in turn
    const addresses = [
      'https://www.e-iceblue.com/Introduce/xls-for-javascript.html',
      'https://www.e-iceblue.com/Buy/Spire.XLS-JavaScript.html',
      'https://www.e-iceblue.com/Download/Spire-Office-JavaScript.html',
    ];
    for (let i = 0; i < shapes.Count; i++) {
      shapes.get(i).HyLink.Address = addresses[i];
    }

    // save the workbook
    const outputFileName = 'ShapeHyperlink.xlsx';
    workbook.SaveToFile({ fileName: outputFileName, fileFormat: xlsModule.FileFormat.Version2010 });

    // dispose of the workbook to free resources
    workbook.Dispose();

    // read the result file from the VFS and start the download
    const fileArray = window.dotnetRuntime.Module.FS.readFile(outputFileName);
    const blob = new Blob([fileArray], { type: 'application/vnd.openxmlformats-officedocument.spreadsheetml.sheet' });
    const url = URL.createObjectURL(blob);
    const a = document.createElement('a');
    a.href = url;
    a.download = outputFileName;
    a.click();
    URL.revokeObjectURL(url);
  };

  return (
    <div style={{ textAlign: 'center', height: '300px' }}>
      <h1>Add Hyperlinks to Shapes in Excel</h1>
      <button id="shape-hyperlink" onClick={shapeHyperlink}>Set a hyperlink on the shape</button>
    </div>
  );
}

export default App;
After running, the effect of setting a hyperlink on a shape:
Read the hyperlink from a shape
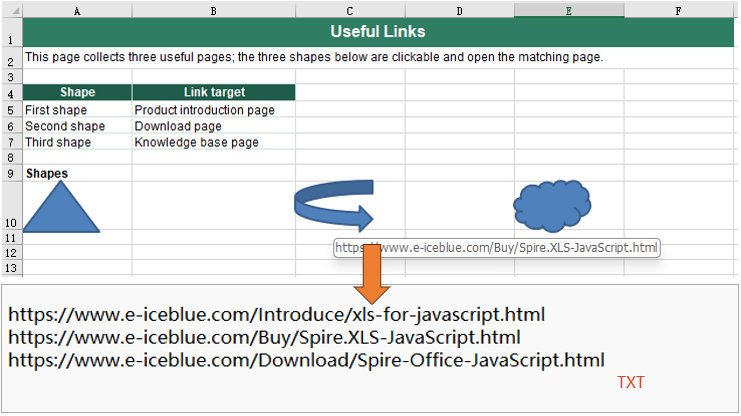
Reading the hyperlink off a shape is how a finished sheet is checked over: whether every shape carries a link, and whether they point at the right addresses. The addresses that come back are written out as a text file, which makes them easy to line up against a list of links. Shape hyperlinks are not kept in the cell hyperlink collection, so the shapes have to be taken from the worksheet one by one, and each one asked for its own link object. The steps are:
- Load the font and the test data file into the VFS.
- Load the workbook with
workbook.LoadFromFile. - Take the shape count from
sheet.PrstGeomShapes.Countand walk every shape on the worksheet with it. - Take this shape's link object from its
HyLinkproperty. - Read the target address from the link object's
Address, collecting the addresses as you go. - Write the collected addresses into a text file with
FS.writeFile, one address per line. - Dispose of the workbook with
workbook.Disposeto free resources.
The complete code example below shows how to read the hyperlink from a shape in Excel in React:
function App() {
  const readShapeHyperlink = async () => {
    // get the Spire.XLS WASM module
    const xlsModule = window.wasmModule?.spirexls;

    // check that the module is ready
    if (!xlsModule) {
      alert('Spire.Xls is not ready yet');
      return;
    }

    // load the font and the test data file into the VFS
    await window.spire.FetchFileToVFS('ARIAL.TTF', '/Library/Fonts/', `${process.env.PUBLIC_URL}/font/`);
    const inputFileName = 'ShapeHyperlinks.xlsx';
    await window.spire.FetchFileToVFS(inputFileName, '', `${process.env.PUBLIC_URL}data/`);

    // load the workbook
    const workbook = new xlsModule.Workbook();
    workbook.LoadFromFile({ fileName: inputFileName });

    // walk the shapes of the worksheet and read the hyperlink off each one
    const sheet = workbook.Worksheets.get(0);
    const shapes = sheet.PrstGeomShapes;
    const addresses = [];
    for (let i = 0; i < shapes.Count; i++) {
      addresses.push(shapes.get(i).HyLink.Address);
    }

    // write the addresses that were read into a text file
    const outputFileName = 'ReadShapeHyperlink.txt';
    window.dotnetRuntime.Module.FS.writeFile(outputFileName, addresses.join('\n'));

    // dispose of the workbook to free resources
    workbook.Dispose();

    // read the result file from the VFS and start the download
    const fileArray = window.dotnetRuntime.Module.FS.readFile(outputFileName);
    const blob = new Blob([fileArray], { type: 'text/plain' });
    const url = URL.createObjectURL(blob);
    const a = document.createElement('a');
    a.href = url;
    a.download = outputFileName;
    a.click();
    URL.revokeObjectURL(url);
  };

  return (
    <div style={{ textAlign: 'center', height: '300px' }}>
      <h1>Add Hyperlinks to Shapes in Excel</h1>
      <button id="read-shape-hyperlink" onClick={readShapeHyperlink}>Read the hyperlink from the shape</button>
    </div>
  );
}

export default App;
After running, the effect of reading the hyperlink from a shape:
FAQ
Why does a shape's hyperlink not show up in sheet.HyperLinks?
Cause: sheet.HyperLinks collects cell hyperlinks only. A shape is not a cell; it belongs to the worksheet's shape collection, and the link hangs on the shape object's HyLink.
Solution: Go through the shape collection. In this example, after a hyperlink was set on the shapes, sheet.HyperLinks.Count was still 0, and it was still 0 after the file was saved and opened again. Read a shape's link with sheet.PrstGeomShapes.get(i).HyLink.Address.
Get a Free License
Spire.XLS for JavaScript offers a 30-day full-featured free trial license with no functional limitations. Apply here to evaluate before purchasing.
Add Cross-Sheet and External File Links with JavaScript in React
Excel workbooks often need to tie scattered content together: one click on a summary page jumps to a detail worksheet, one click on a quote opens the source file kept beside it. That "jump elsewhere" ability belongs to cell hyperlinks, and the link type decides where the jump goes -- another worksheet inside the same workbook, or a file outside it. Spire.XLS for JavaScript does this in the browser through WebAssembly; input and output files are managed by a virtual file system (VFS), with no backend service required.
This article covers two feature points:
For installation and project setup, see Integrating Spire.XLS for JavaScript in a React Project. The examples below assume Spire.XLS is installed and the WebAssembly module has been initialized.
Add a link to another worksheet
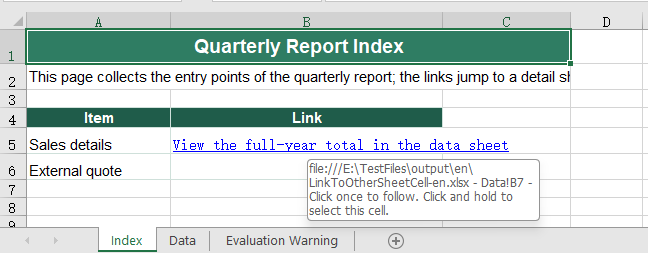
A cross-sheet link solves the "jump from here to there" problem inside one workbook: it strings the content scattered across worksheets into a clickable path, so that the reader does not have to hunt for the right sheet. A link sits on a cell, so the first move is to create a hyperlink object on the target cell and then say, in turn, where it jumps and what text it shows. The steps are:
- Load the font and the test data file into the VFS.
- Load the workbook with
workbook.LoadFromFile. - Create a hyperlink object on the target cell with
sheet.HyperLinks.Add. - Mark the type as a workbook-internal link with the hyperlink's
Typeproperty, set toxlsModule.HyperLinkType.Workbook. - Set the text shown on the cell with the
TextToDisplayproperty. - Write the jump target into the
Addressproperty, in the form "sheet name!cell", for exampleData!B7. - Style the link text blue and underlined so that it reads differently from ordinary text.
- Save the workbook with
workbook.SaveToFile. - Dispose of the workbook with
workbook.Disposeto free resources.
The complete code example below shows how to add a cross-sheet hyperlink to an Excel cell in React:
function App() {
  const linkToOtherSheet = async () => {
    // get the Spire.XLS WASM module
    const xlsModule = window.wasmModule?.spirexls;

    // check that the module is ready
    if (!xlsModule) {
      alert('Spire.Xls is not ready yet');
      return;
    }

    // load the font and the test data file into the VFS
    await window.spire.FetchFileToVFS('ARIAL.TTF', '/Library/Fonts/', `${process.env.PUBLIC_URL}/font/`);
    const inputFileName = 'SheetLink.xlsx';
    await window.spire.FetchFileToVFS(inputFileName, '', `${process.env.PUBLIC_URL}data/`);

    // load the workbook
    const workbook = new xlsModule.Workbook();
    workbook.LoadFromFile({ fileName: inputFileName });

    // take the first worksheet and add a hyperlink object to cell B5
    const sheet = workbook.Worksheets.get(0);
    const cell = sheet.Range.get('B5');
    const hyperlink = sheet.HyperLinks.Add({ range: cell });

    // mark it as a workbook-internal link that points at cell B7 of the second worksheet
    hyperlink.Type = xlsModule.HyperLinkType.Workbook;
    hyperlink.TextToDisplay = 'View the full-year total in the data sheet';
    hyperlink.Address = 'Data!B7';

    // colour the link text blue and underline it so that it reads as a link
    cell.Style.Font.Color = xlsModule.Color.get_Blue();
    cell.Style.Font.Underline = xlsModule.FontUnderlineType.Single;

    // save the workbook
    const outputFileName = 'LinkToOtherSheetCell.xlsx';
    workbook.SaveToFile({ fileName: outputFileName, fileFormat: xlsModule.FileFormat.Version2010 });

    // dispose of the workbook to free resources
    workbook.Dispose();

    // read the result file from the VFS and start the download
    const fileArray = window.dotnetRuntime.Module.FS.readFile(outputFileName);
    const blob = new Blob([fileArray], { type: 'application/vnd.openxmlformats-officedocument.spreadsheetml.sheet' });
    const url = URL.createObjectURL(blob);
    const a = document.createElement('a');
    a.href = url;
    a.download = outputFileName;
    a.click();
    URL.revokeObjectURL(url);
  };

  return (
    <div style={{ textAlign: 'center', height: '300px' }}>
      <h1>Add Cross-Sheet and External File Links in Excel</h1>
      <button id="link-to-other-sheet" onClick={linkToOtherSheet}>Add a link to another worksheet</button>
      <button id="link-to-external-file" onClick={linkToExternalFile}>Add a link to an external file</button>
    </div>
  );
}

export default App;
After running, the effect of adding a cross-sheet link:
Add a link to an external file
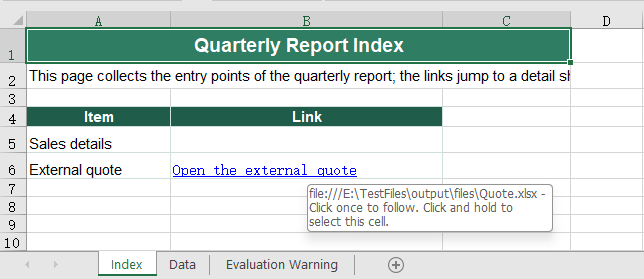
A cross-sheet link can only jump within the same workbook, so once the target falls outside it, the link has to become a file link. It differs from a cross-sheet link in just two places: the type is marked as a file link, and the jump target becomes a file path -- either a full path or a path relative to the current workbook. The steps are:
- Load the font and the test data file into the VFS.
- Load the workbook with
workbook.LoadFromFile. - Create a hyperlink object on the target cell with
sheet.HyperLinks.Add. - Mark the type as a file link with the
Typeproperty, set toxlsModule.HyperLinkType.File. - Set the text shown on the cell with the
TextToDisplayproperty. - Write the path of the external file into the
Addressproperty, for example../files/Quote.xlsx. - Style the link text blue and underlined so that it reads differently from ordinary text.
- Save the workbook with
workbook.SaveToFile. - Dispose of the workbook with
workbook.Disposeto free resources.
The complete code example below shows how to add an external-file hyperlink to an Excel cell in React:
function App() {
  const linkToExternalFile = async () => {
    // get the Spire.XLS WASM module
    const xlsModule = window.wasmModule?.spirexls;

    // check that the module is ready
    if (!xlsModule) {
      alert('Spire.Xls is not ready yet');
      return;
    }

    // load the font and the test data file into the VFS
    await window.spire.FetchFileToVFS('ARIAL.TTF', '/Library/Fonts/', `${process.env.PUBLIC_URL}/font/`);
    const inputFileName = 'SheetLink.xlsx';
    await window.spire.FetchFileToVFS(inputFileName, '', `${process.env.PUBLIC_URL}data/`);

    // load the workbook
    const workbook = new xlsModule.Workbook();
    workbook.LoadFromFile({ fileName: inputFileName });

    // take the first worksheet and add a hyperlink object to cell B6
    const sheet = workbook.Worksheets.get(0);
    const cell = sheet.Range.get('B6');
    const hyperlink = sheet.HyperLinks.Add({ range: cell });

    // mark it as a file link that points at a file outside the workbook
    hyperlink.Type = xlsModule.HyperLinkType.File;
    hyperlink.TextToDisplay = 'Open the external quote';
    hyperlink.Address = '../files/Quote.xlsx';

    // colour the link text blue and underline it so that it reads as a link
    cell.Style.Font.Color = xlsModule.Color.get_Blue();
    cell.Style.Font.Underline = xlsModule.FontUnderlineType.Single;

    // save the workbook
    const outputFileName = 'LinkToExternalFile.xlsx';
    workbook.SaveToFile({ fileName: outputFileName, fileFormat: xlsModule.FileFormat.Version2010 });

    // dispose of the workbook to free resources
    workbook.Dispose();

    // read the result file from the VFS and start the download
    const fileArray = window.dotnetRuntime.Module.FS.readFile(outputFileName);
    const blob = new Blob([fileArray], { type: 'application/vnd.openxmlformats-officedocument.spreadsheetml.sheet' });
    const url = URL.createObjectURL(blob);
    const a = document.createElement('a');
    a.href = url;
    a.download = outputFileName;
    a.click();
    URL.revokeObjectURL(url);
  };

  return (
    <div style={{ textAlign: 'center', height: '300px' }}>
      <h1>Add Cross-Sheet and External File Links in Excel</h1>
      <button id="link-to-other-sheet" onClick={linkToOtherSheet}>Add a link to another worksheet</button>
      <button id="link-to-external-file" onClick={linkToExternalFile}>Add a link to an external file</button>
    </div>
  );
}

export default App;
After running, the effect of adding an external-file link:
FAQ
Why does adding a link to a cell that already has text replace that text with the address
Reason: The text a cell shows is decided by TextToDisplay. Create a link without setting it and the address moves up to serve as the display text; the replacement happens the moment the link is added, so reading Range.Text afterwards returns the address rather than the original text.
Solution: Read the text before adding the link, then hand it back to TextToDisplay once the link is in place:
const cell = sheet.Range.get('B6');
const text = cell.Text;                  // keep the original text before adding the link
const hyperlink = sheet.HyperLinks.Add({ range: cell });
hyperlink.Type = xlsModule.HyperLinkType.File;
hyperlink.Address = '../files/Quote.xlsx';
hyperlink.TextToDisplay = text;          // hand the text back, so the cell still shows it
How do I remove a link but keep the text in the cell
Reason: The link and the text are two different things -- the link hangs on the cell, while the text is the cell's content. Range.ClearAll() clears the content, so using it to get rid of a link takes the text with it.
Solution: Remove the link by index with sheet.HyperLinks.RemoveAt, and the cell text stays as it was. For example, sheet.HyperLinks.RemoveAt(0) removes the first link; the text is still in the cell afterwards, it simply is no longer clickable.
Get a Free License
Spire.XLS for JavaScript offers a 30-day full-featured free trial license with no functional limitations. Apply here to evaluate before purchasing.
Add Hyperlinks to Pictures in Excel with JavaScript in React
A picture in Excel is more than decoration. Put a logo or a product shot on a worksheet and give it a hyperlink, and the file stops being a plain description and becomes something a reader can click through. A picture is not a cell, though, and its hyperlink lives on the picture object, so both setting and reading one go through the worksheet's picture collection rather than its cell hyperlink collection. Spire.XLS for JavaScript does this in the browser on WebAssembly, handling input and output files through a virtual file system (VFS) with no backend service.
This article covers two core feature points:
For installation and project setup, see Integrating Spire.XLS for JavaScript in a React Project. The examples below assume Spire.XLS is installed and the WebAssembly module has been initialised.
Set a hyperlink on a picture
Setting a hyperlink on a picture is what turns it into a clickable entry point: a reader who clicks the picture on the worksheet opens the address it points at. The link belongs to the picture itself rather than to a cell, so the picture object has to be taken from the worksheet's picture collection first, and the address handed to that object. The steps are:
- Load the font, the picture and the test data file into the VFS.
- Load the workbook with
workbook.LoadFromFile. - Insert the picture into the space left for it with
sheet.Pictures.Add. - Set the hyperlink on the picture with
picture.SetHyperLink, passingtrueas the second argument. - Save the workbook with
workbook.SaveToFile. - Dispose of the workbook with
workbook.Disposeto free resources.
The complete code example below shows how to set a hyperlink on a picture in Excel in React:
function App() {
  const pictureHyperlink = async () => {
    // get the Spire.XLS WASM module
    const xlsModule = window.wasmModule?.spirexls;

    // check that the module is ready
    if (!xlsModule) {
      alert('Spire.Xls is not ready yet');
      return;
    }

    // load the font, the picture and the test data file into the VFS
    await window.spire.FetchFileToVFS('ARIAL.TTF', '/Library/Fonts/', `${process.env.PUBLIC_URL}/font/`);
    await window.spire.FetchFileToVFS('logo.png', '', `${process.env.PUBLIC_URL}data/`);
    const inputFileName = 'PictureLink.xlsx';
    await window.spire.FetchFileToVFS(inputFileName, '', `${process.env.PUBLIC_URL}data/`);

    // load the workbook
    const workbook = new xlsModule.Workbook();
    workbook.LoadFromFile({ fileName: inputFileName });

    // take the first worksheet and drop the picture into the space left for it
    const sheet = workbook.Worksheets.get(0);
    const picture = sheet.Pictures.Add({ topRow: 10, leftColumn: 1, fileName: 'logo.png' });

    // set the hyperlink on the picture; the second argument being true means it points outside the workbook
    picture.SetHyperLink('https://www.e-iceblue.com/Misc/about-us.html', true);

    // save the workbook
    const outputFileName = 'PictureHyperlink.xlsx';
    workbook.SaveToFile({ fileName: outputFileName, fileFormat: xlsModule.FileFormat.Version2010 });

    // dispose of the workbook to free resources
    workbook.Dispose();

    // read the result file from the VFS and start the download
    const fileArray = window.dotnetRuntime.Module.FS.readFile(outputFileName);
    const blob = new Blob([fileArray], { type: 'application/vnd.openxmlformats-officedocument.spreadsheetml.sheet' });
    const url = URL.createObjectURL(blob);
    const a = document.createElement('a');
    a.href = url;
    a.download = outputFileName;
    a.click();
    URL.revokeObjectURL(url);
  };

  return (
    <div style={{ textAlign: 'center', height: '300px' }}>
      <h1>Add Hyperlinks to Pictures in Excel</h1>
      <button id="picture-hyperlink" onClick={pictureHyperlink}>Set a hyperlink on the picture</button>
    </div>
  );
}

export default App;
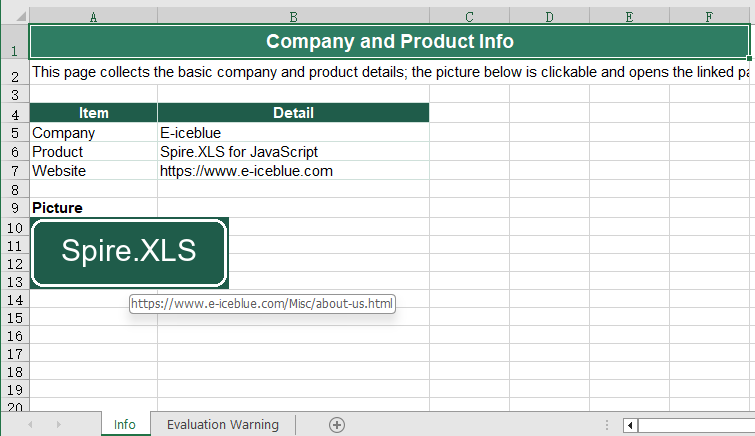
After running, the effect of setting a hyperlink on a picture:
Read the hyperlink from a picture
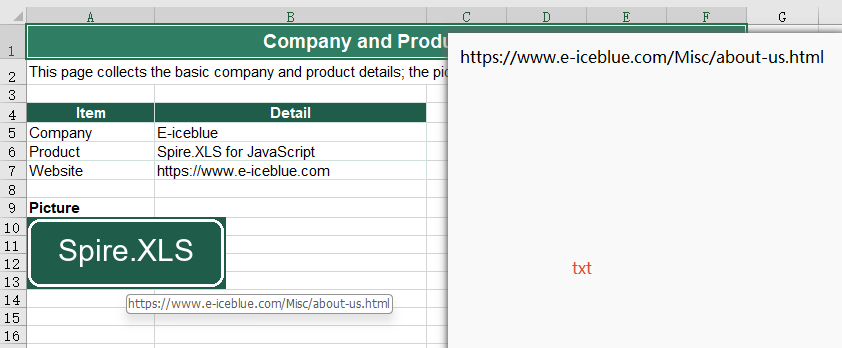
Reading the hyperlink off a picture is how a finished workbook is checked over: whether the links are all there, and whether they point at the right addresses. The addresses that come back are written out as a text file, which makes them easy to line up against a list of links. Picture hyperlinks are not kept in the cell hyperlink collection, so the pictures have to be taken from the worksheet one by one, and each one asked for its own link object. The steps are:
- Load the font and the test data file into the VFS.
- Load the workbook with
workbook.LoadFromFile. - Take the picture count from
sheet.Pictures.Countand walk every picture on the worksheet with it. - Take this picture's hyperlink object with
picture.GetHyperLink. - Read the target address from the link object's
Address, collecting the addresses as you go. - Write the collected addresses into a text file with
FS.writeFile, one address per line. - Dispose of the workbook with
workbook.Disposeto free resources.
The complete code example below shows how to read the hyperlink from a picture in Excel in React:
function App() {
  const readPictureHyperlink = async () => {
    // get the Spire.XLS WASM module
    const xlsModule = window.wasmModule?.spirexls;

    // check that the module is ready
    if (!xlsModule) {
      alert('Spire.Xls is not ready yet');
      return;
    }

    // load the font and the test data file into the VFS
    await window.spire.FetchFileToVFS('ARIAL.TTF', '/Library/Fonts/', `${process.env.PUBLIC_URL}/font/`);
    const inputFileName = 'PictureHyperlinks.xlsx';
    await window.spire.FetchFileToVFS(inputFileName, '', `${process.env.PUBLIC_URL}data/`);

    // load the workbook
    const workbook = new xlsModule.Workbook();
    workbook.LoadFromFile({ fileName: inputFileName });

    // walk the pictures of the worksheet and read the hyperlink off each one
    const sheet = workbook.Worksheets.get(0);
    const pictures = sheet.Pictures;
    const addresses = [];
    for (let i = 0; i < pictures.Count; i++) {
      const link = pictures.get(i).GetHyperLink();
      addresses.push(link.Address);
    }

    // write the addresses that were read into a text file
    const outputFileName = 'ReadPictureHyperlink.txt';
    window.dotnetRuntime.Module.FS.writeFile(outputFileName, addresses.join('\n'));

    // dispose of the workbook to free resources
    workbook.Dispose();

    // read the result file from the VFS and start the download
    const fileArray = window.dotnetRuntime.Module.FS.readFile(outputFileName);
    const blob = new Blob([fileArray], { type: 'text/plain' });
    const url = URL.createObjectURL(blob);
    const a = document.createElement('a');
    a.href = url;
    a.download = outputFileName;
    a.click();
    URL.revokeObjectURL(url);
  };

  return (
    <div style={{ textAlign: 'center', height: '300px' }}>
      <h1>Add Hyperlinks to Pictures in Excel</h1>
      <button id="read-picture-hyperlink" onClick={readPictureHyperlink}>Read the hyperlink from the picture</button>
    </div>
  );
}

export default App;
After running, the effect of reading the hyperlink from a picture:
FAQ
Why does a picture's hyperlink not show up in sheet.HyperLinks?
Cause: sheet.HyperLinks collects cell hyperlinks only. A picture is not a cell; it belongs to the worksheet's picture collection, and the link hangs on the picture object itself.
Solution: Go through the picture collection. In this example, after a hyperlink was set on the picture, sheet.HyperLinks.Count was still 0, and it was still 0 after the file was saved and opened again. Read a picture's link with sheet.Pictures.get(i).GetHyperLink(), then read the Address off the link object.
When should the second argument of SetHyperLink be false?
Cause: The second argument of picture.SetHyperLink(address, isExternal) says whether the target lies outside the workbook.
Solution: Pass true for a web page or an external file, and the link type comes out as HyperLinkType.Url; pass false for a position inside the same workbook, write the address as a cell reference such as Sheet1!A1, and the type comes out as HyperLinkType.Workbook. In this example both forms were saved, and after the file was opened again the Address and Type read back matched what had been set.
Get a Free License
Spire.XLS for JavaScript offers a 30-day full-featured free trial license with no functional limitations. Apply here to evaluate before purchasing.
Delete Excel Formulas but Keep Values in React with JavaScript
Once a report is final, the formulas inside it turn from helper into liability: a reference to another sheet, to another file, or to a row that has since been deleted, and any one of those changes can turn a whole column of numbers into #REF!. When the file is archived or sent outside the team, the safe move is to replace each formula with the result it has just calculated — the same numbers, no longer depending on anything else. The detail sheet, on the other hand, may still need its formulas in order to be maintained, so it cannot be stripped along with the rest. What really has to be decided is the scope: the whole workbook, or one range inside it. ClearContent in Spire.XLS for JavaScript clears the cell's contents and leaves its formatting alone, so writing the result back keeps the thousands separator in an amount and the display style of a date exactly as they were. Spire.XLS for JavaScript does all of this in the browser on WebAssembly, handling input and output files through a virtual file system (VFS) with no backend service.
This article covers two core feature points:
For installation and project setup, see Integrating Spire.XLS for JavaScript in a React Project. The examples below assume Spire.XLS is installed and the WebAssembly module has been initialised.
Delete the formulas of the whole workbook
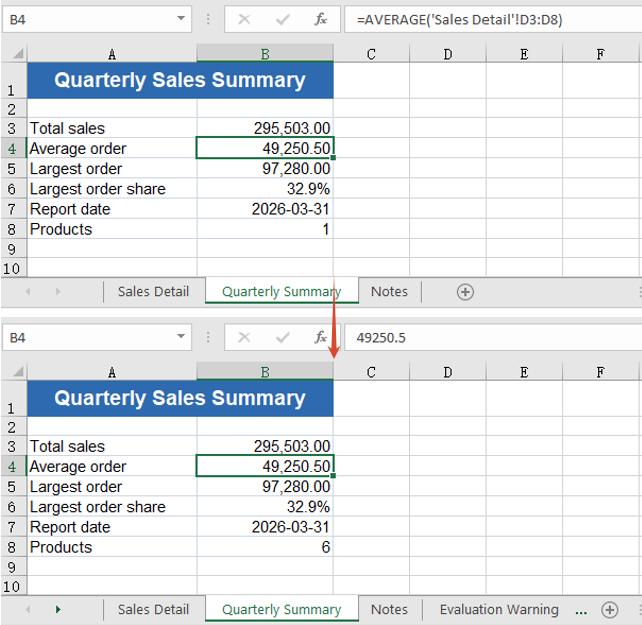
When a report is archived, sent out, or handed to someone who has no business seeing the logic behind it, the formulas are the liability: cross-sheet references, external links, rows deleted afterwards — any one of those changes can make the numbers go dead. Replacing each formula with the result it has just calculated turns the file into a snapshot that depends on nothing else and no longer changes: numbers, formatting and totals all still there, only each cell has been fixed in place. A whole-book delivery is the most common case, so the first approach walks every worksheet in the workbook. The steps are:
- Load the font and the test data file into the VFS.
- Load the workbook with
workbook.LoadFromFile. - Walk every worksheet using
workbook.Worksheets.Count. - Walk the cells of that worksheet with
sheet.Range.Cells, which covers the used range of the sheet. - Test whether the cell holds a formula with
cell.HasFormula. - If it does, take the result it has calculated with
cell.FormulaValue. - Clear the formula with
cell.Clear(xlsModule.ExcelClearOptions.ClearContent)— contents only, the formatting stays where it is. - Write the result taken in the previous step back into the cell with
cell.Value2. - Save the workbook with
workbook.SaveToFile.
The complete code example below shows how to delete the formulas of a whole workbook in React:
function App() {
  const removeAllFormulas = async () => {
    // get the Spire.XLS WASM module
    const xlsModule = window.wasmModule?.spirexls;

    // check that the module is ready
    if (!xlsModule) {
      alert('Spire.Xls is not ready yet');
      return;
    }

    // load the font and the test data file into the VFS
    await window.spire.FetchFileToVFS('ARIAL.TTF', '/Library/Fonts/', `${process.env.PUBLIC_URL}/font/`);
    const inputFileName = 'RemoveFormulas.xlsx';
    await window.spire.FetchFileToVFS(inputFileName, '', `${process.env.PUBLIC_URL}data/`);

    // load the workbook
    const workbook = new xlsModule.Workbook();
    workbook.LoadFromFile({ fileName: inputFileName });

    // walk every worksheet and every cell looking for formulas
    for (let i = 0; i < workbook.Worksheets.Count; i++) {
      const sheet = workbook.Worksheets.get(i);

      for (const cell of sheet.Range.Cells) {
        // only a formula cell needs work: take the result it has calculated, clear the cell, then write the result back
        if (cell.HasFormula) {
          const value = cell.FormulaValue;
          cell.Clear(xlsModule.ExcelClearOptions.ClearContent);
          cell.Value2 = value;
        }
      }
    }

    // save the workbook
    const outputFileName = 'RemoveAllFormulas.xlsx';
    workbook.SaveToFile({ fileName: outputFileName });

    // dispose of the workbook to free resources
    workbook.Dispose();

    // read the result file from the VFS and start the download
    const fileArray = window.dotnetRuntime.Module.FS.readFile(outputFileName);
    const blob = new Blob([fileArray], { type: 'application/vnd.openxmlformats-officedocument.spreadsheetml.sheet' });
    const url = URL.createObjectURL(blob);
    const a = document.createElement('a');
    a.href = url;
    a.download = outputFileName;
    a.click();
    URL.revokeObjectURL(url);
  };

  return (
    <div style={{ textAlign: 'center', height: '300px' }}>
      <h1>Delete Formulas but Keep the Values in Excel</h1>
      <button id="remove-all-formulas" onClick={removeAllFormulas}>Remove the formulas of the whole workbook</button>
    </div>
  );
}

export default App;
After running, deleting the formulas of a whole workbook and keeping the values:
Delete the formulas of one range
Within a single worksheet, some cells will never change again and are best frozen into values, while others have to follow whatever else moves and must keep their formulas. Narrowing the scope down to a range lets both needs live in the same sheet, and the formulas outside the range are untouched. The steps are:
- Load the font and the test data file into the VFS.
- Load the workbook with
workbook.LoadFromFile. - Take the first worksheet with
workbook.Worksheets.get(0). - Mark out the stretch to process with
sheet.Range.get('D3:D10'). - Walk the cells inside the range with
range.Cells; cells outside it never enter the loop. - Test whether the cell holds a formula with
cell.HasFormula. - If it does, take the result it has calculated with
cell.FormulaValue. - Clear the formula with
cell.Clear(xlsModule.ExcelClearOptions.ClearContent). - Write the result back into the cell with
cell.Value2. - Save the workbook with
workbook.SaveToFile.
The complete code example below shows how to delete the formulas of one range in React:
function App() {
  const removeFormulasInRange = async () => {
    // get the Spire.XLS WASM module
    const xlsModule = window.wasmModule?.spirexls;

    // check that the module is ready
    if (!xlsModule) {
      alert('Spire.Xls is not ready yet');
      return;
    }

    // load the font and the test data file into the VFS
    await window.spire.FetchFileToVFS('ARIAL.TTF', '/Library/Fonts/', `${process.env.PUBLIC_URL}/font/`);
    const inputFileName = 'RemoveFormulas.xlsx';
    await window.spire.FetchFileToVFS(inputFileName, '', `${process.env.PUBLIC_URL}data/`);

    // load the workbook
    const workbook = new xlsModule.Workbook();
    workbook.LoadFromFile({ fileName: inputFileName });

    // take the first worksheet and narrow the range down to the amount column
    const sheet = workbook.Worksheets.get(0);
    const range = sheet.Range.get('D3:D10');

    for (const cell of range.Cells) {
      if (cell.HasFormula) {
        const value = cell.FormulaValue;
        cell.Clear(xlsModule.ExcelClearOptions.ClearContent);
        cell.Value2 = value;
      }
    }

    // save the workbook
    const outputFileName = 'RemoveFormulasInRange.xlsx';
    workbook.SaveToFile({ fileName: outputFileName });

    // dispose of the workbook to free resources
    workbook.Dispose();

    // read the result file from the VFS and start the download
    const fileArray = window.dotnetRuntime.Module.FS.readFile(outputFileName);
    const blob = new Blob([fileArray], { type: 'application/vnd.openxmlformats-officedocument.spreadsheetml.sheet' });
    const url = URL.createObjectURL(blob);
    const a = document.createElement('a');
    a.href = url;
    a.download = outputFileName;
    a.click();
    URL.revokeObjectURL(url);
  };

  return (
    <div style={{ textAlign: 'center', height: '300px' }}>
      <h1>Delete Formulas but Keep the Values in Excel</h1>
      <button id="remove-formulas-in-range" onClick={removeFormulasInRange}>Remove the formulas of one range</button>
    </div>
  );
}

export default App;
After running, deleting the formulas of one range:
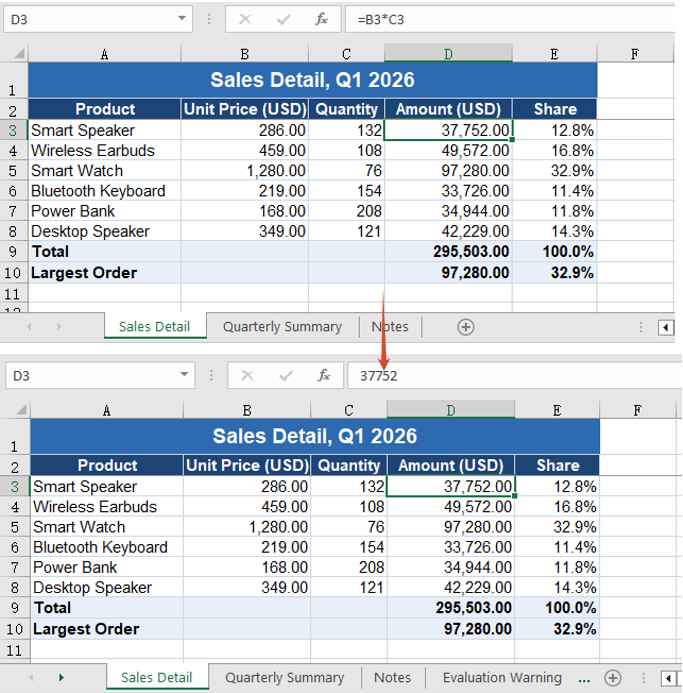
FAQ
Does clearing a formula also wipe the cell's number format and fill?
Cause: Clearing a cell goes through Clear, and what it clears is decided by the ExcelClearOptions passed in. ClearAll or ClearFormat wipes the formatting along with everything else; ClearContent clears the contents only.
Solution: Pass ClearContent. The number format, the font and the fill all stay where they were, and the value written back is still shown the way it was — an amount keeps its thousands separator and two decimals, and a date still reads 2026-03-31 rather than the serial number 46112.
Why does cell.Value not give me the result a formula calculated?
Cause: While a cell still carries a formula, cell.Value returns the formula itself rather than its result.
Solution: Read the result with FormulaValue, or with FormulaNumberValue when only the number is wanted. Once the formula has been cleared and replaced by a value, Value returns that number.
// a cell that still has its formula: Value is the formula text, the result is in
// FormulaValue / FormulaNumberValue
const formula = cell.Value;                 // "=B5*C5"
const result = cell.FormulaNumberValue;     // 97280
Get a Free License
Spire.XLS for JavaScript offers a 30-day full-featured free trial license with no functional limitations. Apply here to evaluate before purchasing.
Create a Custom (Combination) Chart in React with JavaScript
Drawing a single chart type per figure is Excel's default behaviour, not a rule anyone has to keep. A report usually has more than one thing to say, and each reading has a shape that suits it: height suits columns, movement suits a line, a running total suits an area. A custom (combination) chart exists for exactly this: within one chart, each series can be given a chart type of its own, and which types are put together is decided by the questions the figure has to answer side by side -- there is no fixed pairing. Columns with a line is the pairing most widely used in practice, because it accommodates both readings at once. The example below takes that pair, drawing sales as columns and the target as a line, so that what the reader compares is the line's position against the column tops. Two separate charts would need their category axes aligned first, before any comparison could be made; one chart, with a category axis the series share, keeps the months strictly aligned. A report also often holds a series that cannot be brought into the main data range, and such a series has to be added by hand. Spire.XLS for JavaScript performs all of this in the browser on top of WebAssembly, managing input and output files through a virtual file system (VFS), with no backend service required.
This article covers two key features:
For installation and project setup, see Integrating Spire.XLS for JavaScript in a React Project. The examples below assume Spire.XLS is installed and the WebAssembly module has been initialised.
Combine a column chart with a line chart
A pairing is not fixed: which types share one figure depends on which questions have to be answered side by side, and columns with a line is only the most widely used of them. In this example sales are best expressed as columns, where heights are compared at a glance, and the target is best expressed as a line, where what the reader compares is its position against the column tops. Once the two series have a type each, one figure carries both readings, and the category axis they share keeps the months strictly aligned, so no comparison across two figures is needed. Substituting clustered bars with a line, or columns with an area, works the same way. The steps are:
- Load the font and the test data file into the VFS.
- Load the workbook with
workbook.LoadFromFileand take the first worksheet. - Add a chart with
sheet.Charts.Add()and pointchart.DataRangeatA1:C7: the first row supplies the series names, the first column the category labels, and the next two columns become one series each. - Set
chart.SeriesDataFromRangetofalseso that each series keeps the values bound to it. - Place the chart on the sheet with
chart.LeftColumn,chart.TopRow,chart.RightColumnandchart.BottomRow. - Give
chart.Series.get(0).SerieTypeandchart.Series.get(1).SerieTypethe valuesExcelChartType.ColumnClusteredandExcelChartType.Line. Every series names its own type this way, so which types go together is yours to choose. - Set the title with
chart.ChartTitle, then save the workbook withworkbook.SaveToFile.
The complete code example below shows how to combine a column chart with a line chart in React:
function App() {
  const combineColumnAndLine = async () => {
    // get the Spire.XLS WASM module
    const xlsModule = window.wasmModule?.spirexls;

    // check that the module is ready
    if (!xlsModule) {
      alert('Spire.Xls is not ready yet');
      return;
    }

    // load the font and the test data file into the VFS
    await window.spire.FetchFileToVFS('ARIAL.TTF', '/Library/Fonts/', `${process.env.PUBLIC_URL}/font/`);
    const inputFileName = 'SalesReport.xlsx';
    await window.spire.FetchFileToVFS(inputFileName, '', `${process.env.PUBLIC_URL}data/`);

    // load the workbook
    const workbook = new xlsModule.Workbook();
    workbook.LoadFromFile({ fileName: inputFileName });

    // take the first worksheet
    const sheet = workbook.Worksheets.get(0);

    // add a chart and bind its data range to A1:C7: the first column becomes the category labels, the next two become one series each
    const chart = sheet.Charts.Add();
    chart.DataRange = sheet.Range.get('A1:C7');
    chart.SeriesDataFromRange = false;

    // place the chart
    chart.LeftColumn = 1;
    chart.TopRow = 10;
    chart.RightColumn = 9;
    chart.BottomRow = 26;

    // give the two series a chart type each: sales drawn as columns, target sales drawn as a line
    chart.Series.get(0).SerieType = xlsModule.ExcelChartType.ColumnClustered;
    chart.Series.get(1).SerieType = xlsModule.ExcelChartType.Line;

    chart.ChartTitle = 'Sales and Target Sales';

    // save the workbook
    const outputFileName = 'CombineColumnAndLine.xlsx';
    workbook.SaveToFile({ fileName: outputFileName });

    // dispose of the workbook to free resources
    workbook.Dispose();

    // read the result file from the VFS and start the download
    const fileArray = window.dotnetRuntime.Module.FS.readFile(outputFileName);
    const blob = new Blob([fileArray], { type: 'application/vnd.openxmlformats-officedocument.spreadsheetml.sheet' });
    const url = URL.createObjectURL(blob);
    const a = document.createElement('a');
    a.href = url;
    a.download = outputFileName;
    a.click();
    URL.revokeObjectURL(url);
  };

  return (
    <div style={{ textAlign: 'center', height: '300px' }}>
      <h1>Create a Custom (Combination) Chart</h1>
      <button id="combine-column-and-line" onClick={combineColumnAndLine}>Combine a column chart with a line chart</button>
    </div>
  );
}

export default App;
After running, the effect of combining a column chart with a line chart:
Add a series by hand
DataRange can only ever be one continuous rectangle, and that is a hard limit on how data gets bound. Reports commonly present two such cases: the main data occupies columns A to C while the reference values start a column further along, with an empty column in between; or the values to be plotted are derived by calculation and occupy no cell at all. Neither case can be bound in a single call, so the chart has to be built series by series instead. A hand-added series does not depend on DataRange: its range can point anywhere, and it still takes a chart type of its own, so the rules of a combination chart apply to it in full. Here last year's sales are added as a second column series, paired alongside the current year, with the target line running across both. The steps are:
- Load the font and the test data file into the VFS, load the workbook and take the first worksheet.
- Add a chart with
sheet.Charts.Add()and pointchart.DataRangeat the main block alone,A1:C7. - Give the two series of that block
ExcelChartType.ColumnClusteredandExcelChartType.Line. - Add a series with
chart.Series.Add({ name, serieType }), which takes the series name and its chart type in one call. - Bind the category labels and the values with
series.CategoryLabelsandseries.Values, each pointing at the range the data actually occupies. - Set the title with
chart.ChartTitle, then save the workbook withworkbook.SaveToFile.
The complete code example below shows how to add a series by hand in React:
function App() {
  const addSeriesManually = async () => {
    // get the Spire.XLS WASM module
    const xlsModule = window.wasmModule?.spirexls;

    // check that the module is ready
    if (!xlsModule) {
      alert('Spire.Xls is not ready yet');
      return;
    }

    // load the font and the test data file into the VFS
    await window.spire.FetchFileToVFS('ARIAL.TTF', '/Library/Fonts/', `${process.env.PUBLIC_URL}/font/`);
    const inputFileName = 'SalesReport.xlsx';
    await window.spire.FetchFileToVFS(inputFileName, '', `${process.env.PUBLIC_URL}data/`);

    // load the workbook
    const workbook = new xlsModule.Workbook();
    workbook.LoadFromFile({ fileName: inputFileName });

    // take the first worksheet
    const sheet = workbook.Worksheets.get(0);

    // add a chart and bind its data range to the main block, A1:C7
    const chart = sheet.Charts.Add();
    chart.DataRange = sheet.Range.get('A1:C7');
    chart.SeriesDataFromRange = false;

    // place the chart
    chart.LeftColumn = 1;
    chart.TopRow = 10;
    chart.RightColumn = 9;
    chart.BottomRow = 26;

    // the two series of the main block: sales as columns, target sales as a line
    chart.Series.get(0).SerieType = xlsModule.ExcelChartType.ColumnClustered;
    chart.Series.get(1).SerieType = xlsModule.ExcelChartType.Line;

    // last year's figures sit in column E, one empty column away from the main block, so they cannot come along with the data range; add a series by hand instead.
    // a hand-added series takes a chart type of its own too; here it is drawn as columns alongside sales
    const lastYear = chart.Series.Add({ name: 'Last Year Sales (K)', serieType: xlsModule.ExcelChartType.ColumnClustered });
    lastYear.CategoryLabels = sheet.Range.get('A2:A7');
    lastYear.Values = sheet.Range.get('E2:E7');

    chart.ChartTitle = 'Sales, Target Sales and Last Year Sales';

    // save the workbook
    const outputFileName = 'AddSeriesManually.xlsx';
    workbook.SaveToFile({ fileName: outputFileName });

    // dispose of the workbook to free resources
    workbook.Dispose();

    // read the result file from the VFS and start the download
    const fileArray = window.dotnetRuntime.Module.FS.readFile(outputFileName);
    const blob = new Blob([fileArray], { type: 'application/vnd.openxmlformats-officedocument.spreadsheetml.sheet' });
    const url = URL.createObjectURL(blob);
    const a = document.createElement('a');
    a.href = url;
    a.download = outputFileName;
    a.click();
    URL.revokeObjectURL(url);
  };

  return (
    <div style={{ textAlign: 'center', height: '300px' }}>
      <h1>Create a Custom (Combination) Chart</h1>
      <button id="add-series-manually" onClick={addSeriesManually}>Add a series by hand</button>
    </div>
  );
}

export default App;
After running, the effect of adding a series by hand:
FAQ
Can a hand-added series be used alongside DataRange?
Cause: Yes, and the two do not interfere. DataRange produces only the series that correspond to the columns of the main block; a hand-added series carries its own Values and CategoryLabels, which are unrelated to the range DataRange covers and need not lie within the same rectangle. In the second example above the chart holds both series of the main block and the hand-added last-year series at once.
Solution: Point DataRange at the main block, then add each extra series with chart.Series.Add({ name, serieType }). Note that a hand-added series does not inherit the category labels of the main block: CategoryLabels has to be assigned explicitly, and if it is pointed at the same column the series share one category axis.
// the two series of the main block come from DataRange; the hand-added one is bound separately
chart.DataRange = sheet.Range.get('A1:C7');

const lastYear = chart.Series.Add({ name: 'Last Year Sales (K)', serieType: xlsModule.ExcelChartType.ColumnClustered });
lastYear.CategoryLabels = sheet.Range.get('A2:A7');
lastYear.Values = sheet.Range.get('E2:E7');
What type does a series added without serieType get?
Cause: It takes the chart's own type. sheet.Charts.Add() is called with no arguments in the example, and the chart it builds defaults to ExcelChartType.ColumnClustered, which is the type a new series keeps as well.
Solution: For a new series to join a combination chart, name its type at the call, or change SerieType after adding it:
// named at the call
const serie = chart.Series.Add({ name: 'Last Year Sales (K)', serieType: xlsModule.ExcelChartType.ColumnClustered });

// or changed after adding
serie.SerieType = xlsModule.ExcelChartType.Line;
Get a Free License
Spire.XLS for JavaScript offers a 30-day full-featured free trial license with no functional limitations. Apply here to evaluate before purchasing.
Convert Between Excel and ET in React with JavaScript
ET is WPS Office's workbook format, and its files carry the .et extension. When workbooks are exchanged between office suites, format compatibility decides whether a file can be opened directly. Spire.XLS for JavaScript converts between Excel and ET both ways in the browser on WebAssembly, keeping the formulas, the merged areas and the number formats of the workbook, and handling input and output files through a virtual file system (VFS) with no backend service.
This article covers two core feature points:
For installation and project setup, see Integrating Spire.XLS for JavaScript in a React Project. The examples below assume Spire.XLS is installed and the WebAssembly module has been initialised.
Convert Excel to ET
Saving an Excel workbook as ET makes the workbook open directly in WPS. The conversion changes only the format the file is saved in: the content of the workbook is unchanged, the target format is named by a fileFormat argument on the way out, and the formulas, the merged areas and the number formats of the cells are all kept. The steps are:
- Load the font and the test data file into the VFS.
- Load the Excel workbook with
workbook.LoadFromFile. - Save the workbook with
workbook.SaveToFile, namingxlsModule.FileFormat.ETas thefileFormat. - Dispose of the workbook with
workbook.Disposeto free resources.
The complete code example below shows how to convert an Excel workbook to ET in React:
function App() {
  const excelToEt = async () => {
    // get the Spire.XLS WASM module
    const xlsModule = window.wasmModule?.spirexls;

    // check that the module is ready
    if (!xlsModule) {
      alert('Spire.Xls is not ready yet');
      return;
    }

    // load the font and the test data file into the VFS
    await window.spire.FetchFileToVFS('ARIAL.TTF', '/Library/Fonts/', `${process.env.PUBLIC_URL}/font/`);
    const inputFileName = 'ProductList.xlsx';
    await window.spire.FetchFileToVFS(inputFileName, '', `${process.env.PUBLIC_URL}data/`);

    // load the workbook
    const workbook = new xlsModule.Workbook();
    workbook.LoadFromFile({ fileName: inputFileName });

    // save as ET; the format is named by fileFormat
    const outputFileName = 'ExcelToEt.et';
    workbook.SaveToFile({ fileName: outputFileName, fileFormat: xlsModule.FileFormat.ET });

    // dispose of the workbook to free resources
    workbook.Dispose();

    // read the result file from the VFS and start the download
    const fileArray = window.dotnetRuntime.Module.FS.readFile(outputFileName);
    const blob = new Blob([fileArray], { type: 'application/vnd.wps-office.et' });
    const url = URL.createObjectURL(blob);
    const a = document.createElement('a');
    a.href = url;
    a.download = outputFileName;
    a.click();
    URL.revokeObjectURL(url);
  };

  return (
    <div style={{ textAlign: 'center', height: '300px' }}>
      <h1>Convert Between Excel and ET in React</h1>
      <button id="excel-to-et" onClick={excelToEt}>Convert Excel to ET</button>
    </div>
  );
}

export default App;
After running, the effect of converting an Excel workbook to an ET file:
Convert ET to Excel
Converting an ET file to Excel is the same operation in the other direction. ET and Excel hold the same workbook content and differ only in the file format, so loading the ET and writing it out as an Excel version is all it takes. The steps are:
- Load the font and the test data file into the VFS.
- Load the ET file with
workbook.LoadFromFile. - Save it as an Excel workbook with
workbook.SaveToFile, namingxlsModule.FileFormat.Version2010as thefileFormat. - Dispose of the workbook with
workbook.Disposeto free resources.
The complete code example below shows how to convert an ET file back to Excel in React:
function App() {
  const etToExcel = async () => {
    // get the Spire.XLS WASM module
    const xlsModule = window.wasmModule?.spirexls;

    // check that the module is ready
    if (!xlsModule) {
      alert('Spire.Xls is not ready yet');
      return;
    }

    // load the font and the test data file into the VFS
    await window.spire.FetchFileToVFS('ARIAL.TTF', '/Library/Fonts/', `${process.env.PUBLIC_URL}/font/`);
    const inputFileName = 'ProductList.et';
    await window.spire.FetchFileToVFS(inputFileName, '', `${process.env.PUBLIC_URL}data/`);

    // load the workbook
    const workbook = new xlsModule.Workbook();
    workbook.LoadFromFile({ fileName: inputFileName });

    // save as Excel, again naming the version through fileFormat
    const outputFileName = 'EtToExcel.xlsx';
    workbook.SaveToFile({ fileName: outputFileName, fileFormat: xlsModule.FileFormat.Version2010 });

    // dispose of the workbook to free resources
    workbook.Dispose();

    // read the result file from the VFS and start the download
    const fileArray = window.dotnetRuntime.Module.FS.readFile(outputFileName);
    const blob = new Blob([fileArray], { type: 'application/vnd.openxmlformats-officedocument.spreadsheetml.sheet' });
    const url = URL.createObjectURL(blob);
    const a = document.createElement('a');
    a.href = url;
    a.download = outputFileName;
    a.click();
    URL.revokeObjectURL(url);
  };

  return (
    <div style={{ textAlign: 'center', height: '300px' }}>
      <h1>Convert Between Excel and ET in React</h1>
      <button id="et-to-excel" onClick={etToExcel}>Convert ET to Excel</button>
    </div>
  );
}

export default App;
After running, the effect of converting an ET file back to an Excel workbook:
FAQ
Can a file be saved as ET by naming it .et and leaving fileFormat out?
Cause: fileFormat is an optional argument of SaveToFile. When it is not passed, the format is taken from the extension of the output file name, so a name the library recognises determines the format.
Solution: Leaving it out works. Saving a .xlsx with workbook.SaveToFile({ fileName: 'ProductList.et' }) writes an ET file all the same. Writing fileFormat out is still the clearer of the two, and it keeps the output from landing in some other format when the name carries no extension or the wrong one.
Do the formulas in the workbook turn into fixed values after converting to ET?
Cause: ET and Excel carry the same workbook object, and the conversion only changes the format; nothing goes near the contents of the cells.
Solution: The formulas are kept as they are. In this example, reading the ET file that was written back in, the amount cell still has HasFormula set to true, its Formula is still =C3*D3, and FormulaNumberValue gives 58880 as the result; the merged area is still five columns wide, and the #,##0.00 number format is still in place. Formulas, formatting and layout survive the conversion in both directions.
Get a Free License
Spire.XLS for JavaScript offers a 30-day full-featured free trial license with no functional limitations. Apply here to evaluate before purchasing.