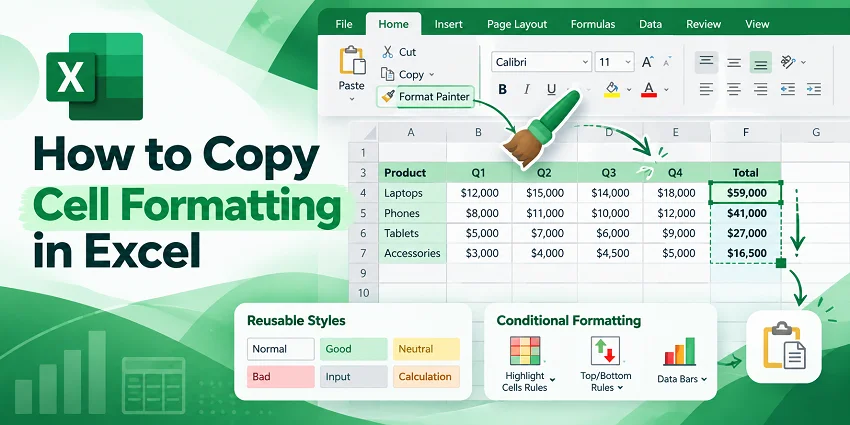
When a new section of an Excel worksheet needs to match existing cells, copying the formatting is faster than rebuilding it manually. You can reuse fonts, borders, fill colors, alignment, and number formats without recreating each style from scratch.
Excel offers several ways to copy cell formatting, including Format Painter, Paste Special, and the Fill Handle. You can also use Cell Styles to maintain consistent formatting throughout a workbook, copy or extend conditional formatting rules, or automate repetitive formatting tasks with C#.
Quick Comparison: Choose the Right Method
Use the comparison table below to select the best method for your workflow:
| Method | Best For | Key Advantage |
|---|---|---|
| Format Painter | Quickly copying formatting to a few cells or non-adjacent ranges. | Visual formatting with just a few clicks. |
| Paste Special (Formats) | Updating large ranges that already contain data or formulas. | Applies formatting without overwriting existing cell contents. |
| Fill Handle (Fill Formatting Only) | Extending formatting down a column or across a row. | Fast drag-and-drop formatting, with a double-click shortcut for filling down. |
| Cell Styles | Maintaining consistent formatting throughout a workbook. | Centralized management; updating a style updates cells using that style. |
| Format Painter or Manage Rules | Copying conditional formatting rules or extending them to new data ranges. | Reuses existing rules without recreating them. |
| C# Automation | Automating large-scale or repetitive formatting tasks. | Copies formatting programmatically without manually editing each workbook. |
Copy Cell Formatting with Format Painter
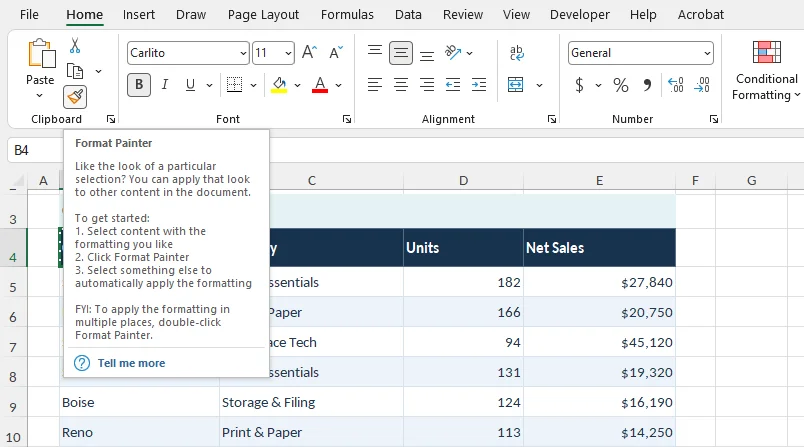
Format Painter copies formatting—such as fonts, fill colors, borders, alignment, and number formats—without changing the destination cell's content. It works well for quickly applying an existing style to a few cells or ranges.
Step-by-Step Instructions
- Select the cell or range with the formatting you want to copy.
- Go to Home > Format Painter in the Clipboard group.
- Click a destination cell, or drag across the range you want to format.
Pro Tips:
- Apply to multiple areas: Double-click Format Painter to keep it active. This lets you format multiple non-adjacent cells or ranges. Press Esc to turn it off when finished.
- Cross-workbook formatting: You can use Format Painter across different worksheets or workbooks. With both workbooks open in Excel, activate the tool, switch to the destination worksheet or workbook, and select the target cells.
For more details, see Microsoft's guide on copying cell formatting.
Copy Cell Formatting with Paste Special
Paste Special (Formats) also lets you copy fonts, fill colors, borders, alignment, and number formats from one cell or range to another without changing the destination cells' values or formulas.
This method is particularly useful when applying formatting to larger ranges or cells that already contain data.
Step-by-Step Instructions
-
Select the formatted source cells and press Ctrl + C (Windows) or Cmd + C (Mac).
-
Select the upper-left cell of the destination range. If copying one cell's formatting to multiple cells, select the entire destination range.
-
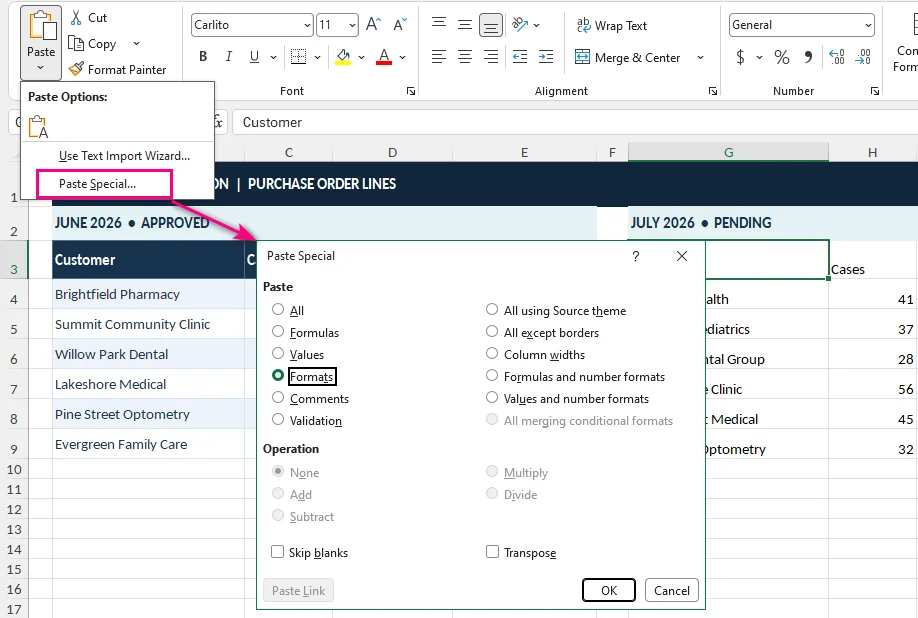
Go to Home, click the arrow under Paste, and select Paste Special.
-
Select Formats, then click OK.
Pro Tips:
-
Keyboard shortcuts:
- Windows: Press Ctrl + C, select the destination, then press Ctrl + Alt + V, T, and Enter.
- Mac: Press Cmd + C, select the destination, then press Ctrl + Cmd + V to open Paste Special. Select Formats and confirm.
- Cross-workbook usage: The same steps work across different worksheets and workbooks. Keep both Excel files open, copy the source cells, switch to the destination workbook, and apply Paste Special.
Important Considerations:
- Number formats may change: This copies number formats along with other formatting properties. For example, applying the General number format to a date cell may cause the date to appear as its underlying serial number. Check or reapply the appropriate number format afterward if needed.
- Workbook themes: When copying between different workbooks, the final appearance of fonts and colors may change if the destination workbook uses a different Office theme.
If you want to confirm that the destination formulas have been preserved, see how to view formulas in Excel.
Copy Cell Formatting with Fill Handle
When extending a table in Excel, you can use the Fill Handle to quickly copy an existing cell's formatting to adjacent rows or columns without manually recreating styles.
Step-by-Step Instructions
-
Select the source cell that contains the formatting you want to copy (for example, D2).
-
Move your cursor to the small square at the bottom-right corner of the cell until it changes to a black cross (+).
-
Drag the Fill Handle down or across to the destination range (for example, D3:D20).
-
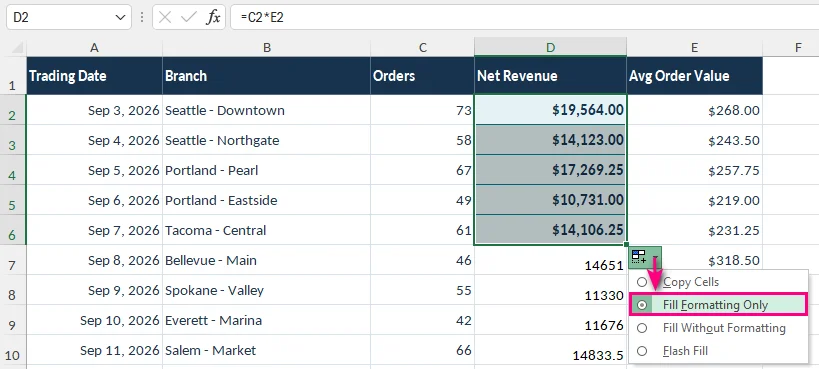
Click the Auto Fill Options button that appears after releasing the mouse.
-
Select Fill Formatting Only.
Tips and Best Practices:
- Fill large continuous ranges quickly: If an adjacent column has continuous data, double-click the Fill Handle to automatically fill down instead of dragging. Then select Fill Formatting Only from the Auto Fill Options menu.
- Use Paste Special for existing data: If the destination cells already contain important formulas or data, Paste Special (Formats) is safer because it applies formatting without copying values or formulas.
Important Note:
- Fill Handle may initially change cell contents: Dragging the Fill Handle may fill values or formulas as well as formatting, potentially replacing existing cell contents. If you only want to copy the formatting, select Fill Formatting Only immediately after filling.
Reuse Cell Formatting with Cell Styles
If you frequently apply the same formatting to report titles, headings, or subtotals, copying formatting from individual cells can become repetitive. Excel's Cell Styles feature lets you create reusable sets of formatting properties to maintain consistency throughout a workbook.
How to Create and Use a Custom Cell Style
-
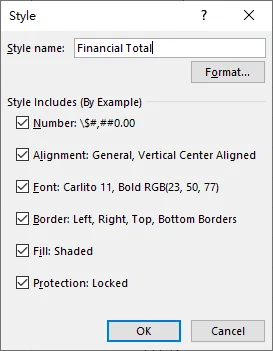
Go to Home > Cell Styles > New Cell Style.
-
Enter a descriptive style name, such as Report Header or Financial Total.
-
Click Format and configure the font, fill color, borders, alignment, and other formatting properties.
-
Under Style Includes, select the formatting attributes you want the style to control.
-
Click OK to save the new style.
-
Select the destination cells and apply the custom style from Home > Cell Styles.
Tips:
- Update multiple cells at once: When you modify an existing Cell Style, the changes are automatically applied to all cells using that style throughout the workbook.
- Preserve number formats: If destination cells contain different data types (such as dates, percentages, or currency values), uncheck Number under Style Includes in Step 4. This prevents the style from altering how those values are displayed.
- Reuse styles across workbooks: You can transfer custom styles to another workbook using Home > Cell Styles > Merge Styles. If both workbooks contain styles with the same name, Excel may ask whether to replace existing styles in the destination file.
Copy Conditional Formatting Rules in Excel
Conditional formatting changes how cells appear based on their values or formulas. For example, a financial report might display negative profits in red or highlight sales figures that exceed a target.
You can copy existing conditional formatting rules with Format Painter or extend the range covered by an existing rule using Manage Rules.
Copy Conditional Formatting with Format Painter
To apply existing conditional formatting rules to another cell or range:
- Select a cell containing the conditional formatting you want to copy.
- Go to Home > Format Painter.
- Select the destination cell or range.
The copied rules are evaluated based on the values and cell references they use.
Note: Format Painter copies regular cell formatting along with conditional formatting rules. If you only want to extend an existing rule without changing other formatting properties, use the following method.
Extend an Existing Conditional Formatting Rule Using Manage Rules
Suppose a conditional formatting rule highlights negative profits in D2:D10, and you've added more rows that should follow the same rule.
Instead of copying the rule repeatedly, you can expand its application range.
-
Go to Home > Conditional Formatting > Manage Rules.
-
Select the rule you want to modify. If necessary, set Show formatting rules for to This Worksheet.
-
In the Applies to field, change the range from
=$D$2:$D$10to=$D$2:$D$20.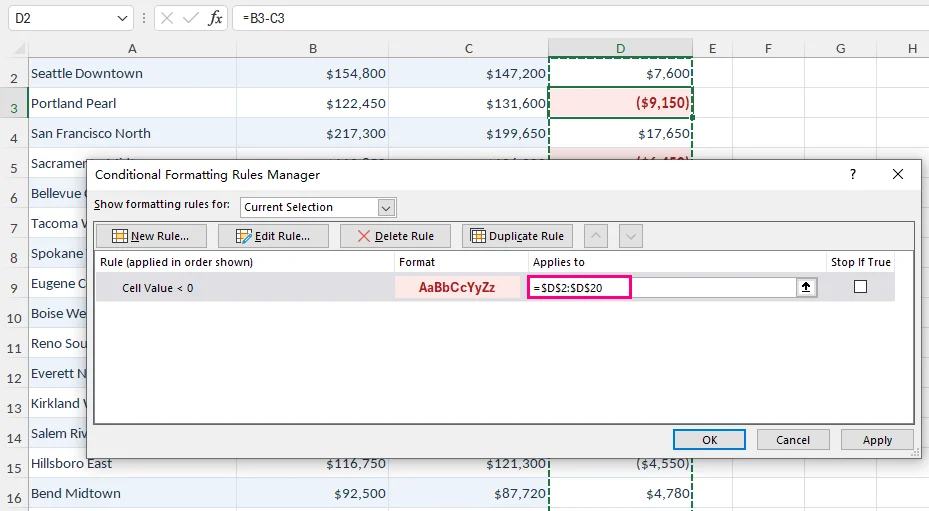
-
Click Apply, then OK.
The existing rule now covers the additional cells.
Tip: If a conditional formatting rule uses a formula, check its relative and absolute cell references when copying or extending the rule. Incorrect references may cause the formatting to behave differently in the new range.
You can also explore how to highlight blank cells in Excel with conditional formatting rules.
Automatically Copy Cell Formatting in Excel with C# (Best for Developers)
Excel's built-in tools work well when you're editing a few workbooks. However, if you regularly generate invoices, financial statements, or other reports, copying formatting across multiple files can become repetitive.
With C#, you can automate this process programmatically, without overwriting cell values or formulas.
Install the Required Library
This example uses Free Spire.XLS for .NET, a C# library that can read, modify, and save Excel workbooks without requiring Microsoft Excel to be installed.
In Visual Studio, open the NuGet Package Manager Console and run:
Install-Package FreeSpire.XLS
Copy Cell Formatting with C#
Suppose you want to copy the formatting from B2:E2 to B12:E12 in an Excel report without changing the existing values or formulas in the destination cells.
The following example copies each source cell's style to its corresponding destination cell.
Before running the code, make sure that MonthlyReport.xlsx exists in the application's working directory and that the first worksheet contains the source formatting in B2:E2.
using Spire.Xls;

class Program
{
    static void Main()
    {
        // Create a workbook and load an existing Excel file
        Workbook workbook = new Workbook();
        workbook.LoadFromFile("MonthlyReport.xlsx");

        // Get the first worksheet
        Worksheet sheet = workbook.Worksheets[0];

        // Specify the columns to format
        string[] columns = { "B", "C", "D", "E" };

        // Copy formatting from B2:E2 to B12:E12
        foreach (string column in columns)
        {
            // Get the source and destination cells
            CellRange sourceCell = sheet.Range[column + "2"];
            CellRange destinationCell = sheet.Range[column + "12"];

            // Copy the source style without changing destination data
            destinationCell.Style = sourceCell.Style;
        }

        // Save the workbook to a new Excel file
        workbook.SaveToFile(
            "MonthlyReport_Formatted.xlsx",
            ExcelVersion.Version2016
        );

        // Release workbook resources
        workbook.Dispose();
    }
}
The key operation is:
destinationCell.Style = sourceCell.Style;
This assigns the source cell's style to the destination cell, copying formatting properties such as fonts, borders, fill colors, alignment, and number formats.
Because the code changes the cell style rather than the cell contents, the existing values and formulas in the destination cells are preserved.
You can adapt the code to other ranges by updating the column names and row numbers. For an additional implementation reference, see the Spire.XLS C# tutorial on copying cell formatting.
Note: Cell styles do not include every worksheet property. Column widths, row heights, and conditional formatting rules may need to be handled separately. If you're processing multiple workbooks, it is also worth adding file validation and error handling to your script.
Troubleshooting Common Formatting Issues
Even when formatting is copied successfully, the destination cells may not always look as expected. Here are some common issues and how to resolve them.
1. Cell Values Look Different After Copying Formatting
Number formats control how Excel displays values.
For example, applying a percentage format to a cell containing 0.25 displays the value as 25%, even though the underlying number remains unchanged.
How to fix: Select the affected cells and check the number format under the Home tab. Restore the appropriate format if necessary.
2. The Destination Formatting Doesn't Match the Source
Existing conditional formatting rules can override manually applied colors and other formatting properties. Workbook themes may also affect fonts and theme colors.
How to fix: Check Home > Conditional Formatting > Manage Rules for any rules affecting the destination range. If the formatting was copied between workbooks, compare their themes as well.
3. Column Widths or Row Heights Are Not Copied
Cell formatting and worksheet dimensions are separate properties. Copying cell styles does not necessarily reproduce column widths or row heights.
How to fix: Use Paste Special > Column widths when you need matching column widths. To adjust row heights, go to Home > Format > Row Height.