
Java (485)
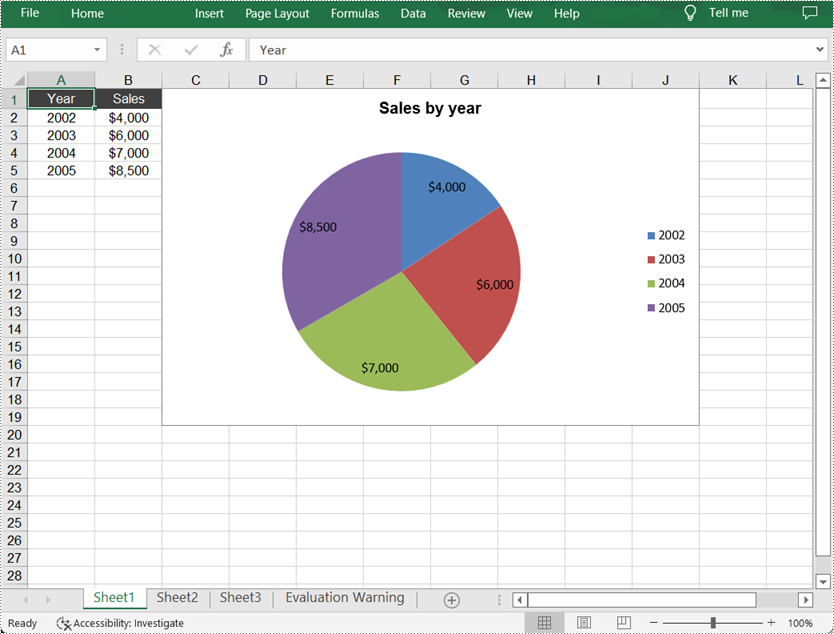
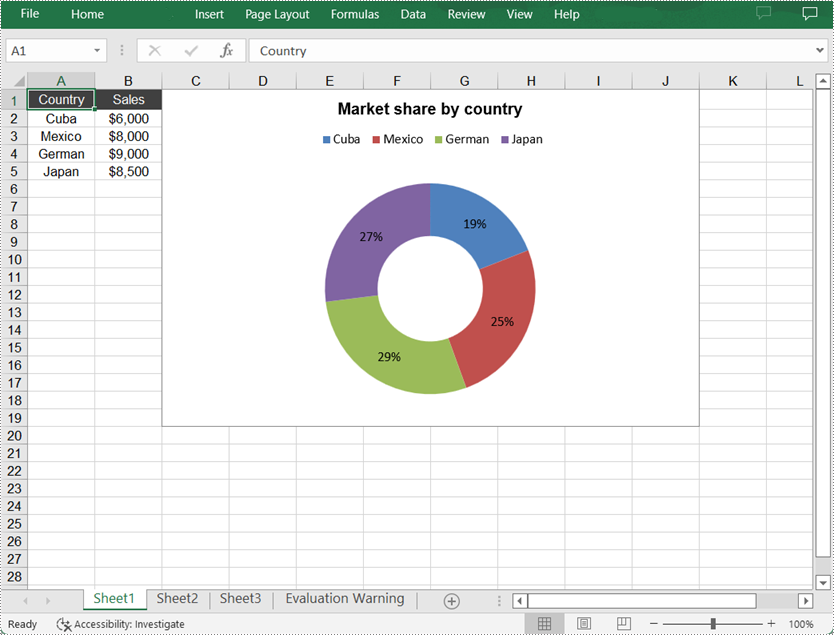
A pie chart is a circular chart divided into sectors, and each sector represents a proportionate part of the whole. It presents data in the form of graphs, which makes it easy for users to analyze and compare data. As for the doughnut chart, it performs the same function as the pie chart, except that it has a "hole" in the center. This article will demonstrate how to programmatically create a pie chart or a doughnut chart in Excel using Spire.XLS for Java.
Install Spire.XLS for Java
First of all, you're required to add the Spire.Xls.jar file as a dependency in your Java program. The JAR file can be downloaded from this link. If you use Maven, you can easily import the JAR file in your application by adding the following code to your project's pom.xml file.
<repositories>
    <repository>
        <id>com.e-iceblue</id>
        <name>e-iceblue</name>
        <url>https://repo.e-iceblue.com/nexus/content/groups/public/</url>
    </repository>
</repositories>
<dependencies>
    <dependency>
        <groupId>e-iceblue</groupId>
        <artifactId>spire.xls</artifactId>
        <version>16.8.4</version>
    </dependency>
</dependencies>
Create a Pie Chart in Excel
The detailed steps are as follows:
- Create a Workbook object.
- Get a specified worksheet using Workbook.getWorksheets().get() method.
- Add some data to specified cells and set the cell styles.
- Add a pie chart to the worksheet using Worksheet.getCharts().add(ExcelChartType.Pie) method.
- Set data range for the chart using Chart.setDataRange() method.
- Set the position and title of the chart.
- Get a specified series in the chart and set category labels and values for the series using ChartSerie.setCategoryLabels() and ChartSerie.setValues() methods.
- Show data labels for data points.
- Save the result file using Workbook.saveToFile() method.
- Java
import com.spire.xls.*;
import com.spire.xls.charts.ChartSerie;

import java.awt.*;

public class CreatePieChart {

    public static void main(String[] args) {

        //Create a Workbook object
        Workbook workbook = new Workbook();

        //Get the first worksheet
        Worksheet sheet = workbook.getWorksheets().get(0);

        //Insert data to specified cells
        sheet.getCellRange("A1").setValue("Year");
        sheet.getCellRange("A2").setValue("2002");
        sheet.getCellRange("A3").setValue("2003");
        sheet.getCellRange("A4").setValue("2004");
        sheet.getCellRange("A5").setValue("2005");

        sheet.getCellRange("B1").setValue("Sales");
        sheet.getCellRange("B2").setNumberValue(4000);
        sheet.getCellRange("B3").setNumberValue(6000);
        sheet.getCellRange("B4").setNumberValue(7000);
        sheet.getCellRange("B5").setNumberValue(8500);

        //Set cell styles
        sheet.getCellRange("A1:B1").setRowHeight(15);
        sheet.getCellRange("A1:B1").getCellStyle().setColor(Color.darkGray);
        sheet.getCellRange("A1:B1").getCellStyle().getExcelFont().setColor(Color.white);
        sheet.getCellRange("A1:B5").getCellStyle().setVerticalAlignment(VerticalAlignType.Center);
        sheet.getCellRange("A1:B5").getCellStyle().setHorizontalAlignment(HorizontalAlignType.Center);

        //Set number format
        sheet.getCellRange("B2:C5").getCellStyle().setNumberFormat("\"$\"#,##0");

        //Add a pie chart to the worksheet
        Chart chart = sheet.getCharts().add(ExcelChartType.Pie);

        //Set data range for the chart
        chart.setDataRange(sheet.getCellRange("B2:B5"));
        chart.setSeriesDataFromRange(false);

        //Set position of the chart
        chart.setLeftColumn(3);
        chart.setTopRow(1);
        chart.setRightColumn(11);
        chart.setBottomRow(20);

        //Set and format chart title
        chart.setChartTitle("Sales by year");
        chart.getChartTitleArea().isBold(true);
        chart.getChartTitleArea().setSize(12);

        //Get a specified series in the chart
        ChartSerie cs = chart.getSeries().get(0);

        //Set category labels for the series
        cs.setCategoryLabels(sheet.getCellRange("A2:A5"));

        //Set values for the series
        cs.setValues(sheet.getCellRange("B2:B5"));

        //Show data labels for data points
        cs.getDataPoints().getDefaultDataPoint().getDataLabels().hasValue(true);

        //Save the result file
        workbook.saveToFile("PieChart.xlsx", ExcelVersion.Version2016);
    }
}
Create a Doughnut Chart in Excel
The detailed steps are as follows:
- Create a Workbook object.
- Get a specified worksheet using Workbook.getWorksheets().get() method.
- Add some data to specified cells and set the cell styles.
- Add a doughnut chart to the worksheet using Worksheet.getCharts().add(ExcelChartType.Doughnut) method.
- Set data range for the chart using Chart.setDataRange() method.
- Set the position and title of the chart.
- Show data labels for data points.
- Set the legend position of the chart using Chart.getLegend().setPosition() method.
- Save the result file using Workbook.saveToFile() method.
- Java
import com.spire.xls.*;
import com.spire.xls.charts.ChartSerie;
import com.spire.xls.charts.ChartSeries;

import java.awt.*;

public class CreateDoughnutChart {

    public static void main(String[] args) {

        //Create a Workbook object
        Workbook workbook = new Workbook();

        //Get the first worksheet
        Worksheet sheet = workbook.getWorksheets().get(0);

        //Insert data to specified cells
        sheet.getCellRange("A1").setValue("Country");
        sheet.getCellRange("A2").setValue("Cuba");
        sheet.getCellRange("A3").setValue("Mexico");
        sheet.getCellRange("A4").setValue("German");
        sheet.getCellRange("A5").setValue("Japan");


        sheet.getCellRange("B1").setValue("Sales");
        sheet.getCellRange("B2").setNumberValue(6000);
        sheet.getCellRange("B3").setNumberValue(8000);
        sheet.getCellRange("B4").setNumberValue(9000);
        sheet.getCellRange("B5").setNumberValue(8500);

        //Set cell styles
        sheet.getCellRange("A1:B1").setRowHeight(15);
        sheet.getCellRange("A1:B1").getCellStyle().setColor(Color.darkGray);
        sheet.getCellRange("A1:B1").getCellStyle().getExcelFont().setColor(Color.white);
        sheet.getCellRange("A1:B5").getCellStyle().setVerticalAlignment(VerticalAlignType.Center);
        sheet.getCellRange("A1:B5").getCellStyle().setHorizontalAlignment(HorizontalAlignType.Center);

        //Set number format
        sheet.getCellRange("B2:C5").getCellStyle().setNumberFormat("\"$\"#,##0");

        //Add a doughnut chart to the worksheet
        Chart chart = sheet.getCharts().add(ExcelChartType.Doughnut);

        //Set data range for chart
        chart.setDataRange(sheet.getCellRange("A1:B5"));
        chart.setSeriesDataFromRange(false);

        //Set position of the chart
        chart.setLeftColumn(3);
        chart.setTopRow(1);
        chart.setRightColumn(11);
        chart.setBottomRow(20);

        //Set chart title
        chart.setChartTitle("Market share by country");
        chart.getChartTitleArea().isBold(true);
        chart.getChartTitleArea().setSize(12);

        //Show data labels for data points
        ChartSeries series = chart.getSeries();
        for (int i = 0 ; i < series.size() ; i++) {
            ChartSerie cs = series.get(i);
            cs.getDataPoints().getDefaultDataPoint().getDataLabels().hasPercentage(true);
        }

        //Set the legend position of the chart
        chart.getLegend().setPosition(LegendPositionType.Top);

        //Save the result file
        workbook.saveToFile("DoughnutChart.xlsx", ExcelVersion.Version2016);
    }
}
Apply for a Temporary License
If you'd like to remove the evaluation message from the generated documents, or to get rid of the function limitations, please request a 30-day trial license for yourself.
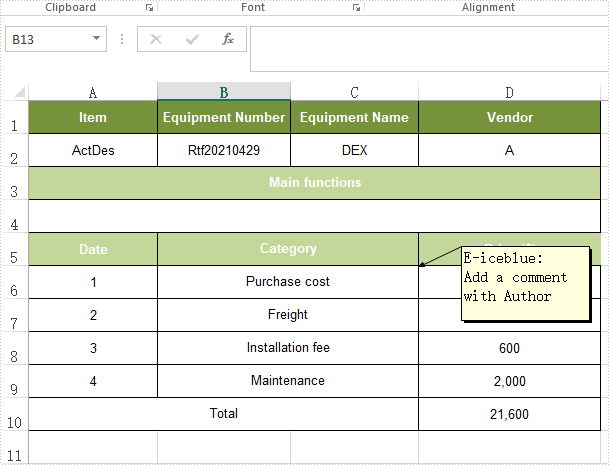
Comments in an Excel cell are commonly used for sharing extra information or reviews about the data inside the cell. Comments make it easy to remember, follow up, or reference the data in your worksheet. With Spire.XLS for Java, you can insert a comment to Excel as well as formatting a comment with easy. In this article, we will show you how to add a comment to your Excel spreadsheet in Java from the following three parts.
- Add Comments in an Excel Worksheet
- Apply Formatting to Comments in an Excel Worksheet
- Add Comment with Author in an Excel Worksheet
Install Spire.XLS for Java
First of all, you're required to add the Spire.Xls.jar file as a dependency in your Java program. The JAR file can be downloaded from this link. If you use Maven, you can easily import the JAR file in your application by adding the following code to your project's pom.xml file.
<repositories>
    <repository>
        <id>com.e-iceblue</id>
        <name>e-iceblue</name>
        <url>https://repo.e-iceblue.com/nexus/content/groups/public/</url>
    </repository>
</repositories>
<dependencies>
    <dependency>
        <groupId>e-iceblue</groupId>
        <artifactId>spire.xls</artifactId>
        <version>16.8.4</version>
    </dependency>
</dependencies>
Add Comments in an Excel Worksheet
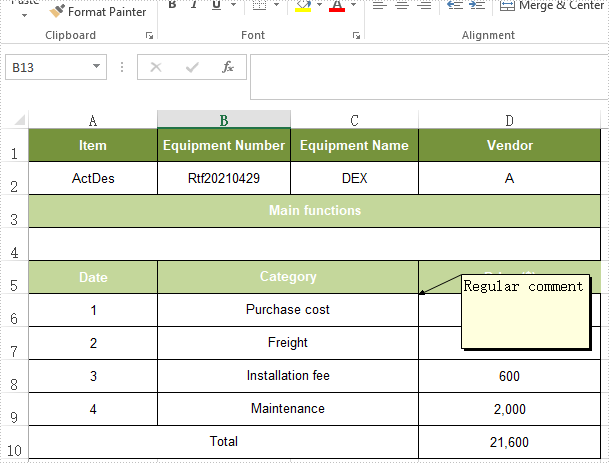
Spire.XLS offers the CellRange.addComment() method to insert the regular text comment to Excel worksheets.
- Create a Workbook instance.
- Load a sample Excel document using Workbook.loadFromFile() method.
- Get a specified worksheet using Workbook.getWorksheets().get() method.
- Add a comment in a specific cell range using CellRange.addComment() method and then set the comment text through the ExcelComment.setText() method.
- Save the document to another file using Workbook.saveToFile() method.
- Java
import com.spire.xls.*;

public class Excelcomment {
    public static void main(String[] args) throws Exception {

        //Load the sample document from file
        Workbook workbook = new Workbook();
        workbook.loadFromFile("Sample.xlsx");

        //Get the first worksheet
        Worksheet sheet = workbook.getWorksheets().get(0);

        //Add regular comment to specific cell range C6
        CellRange range = sheet.getCellRange("C6");
        ExcelComment comment = range.addComment();
        comment.setVisible(true);
        comment.setText("Regular comment");

        //Save the document to another file
        workbook.saveToFile("Addcomment.xlsx", ExcelVersion.Version2016);

    }
}
Apply Formatting to Comments in an Excel Worksheet
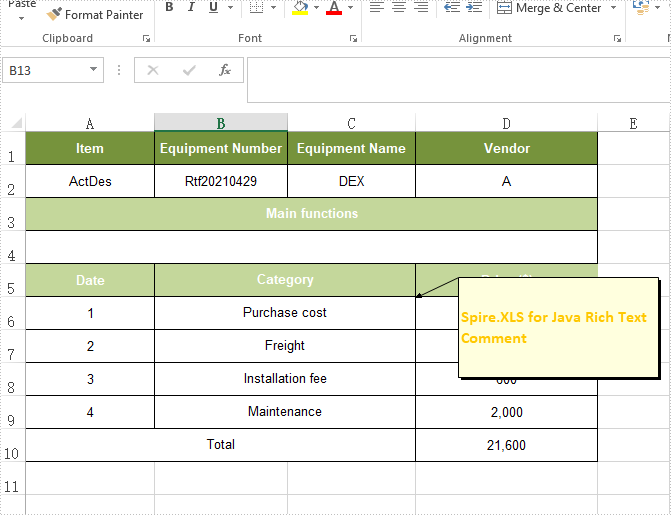
Spire.XLS offers the Comment.getRichText().setFont() method to apply font formatting for comments in Excel worksheets.
- Initialize an instance of Workbook class and load an Excel file using Workbook.loadFromFile() method.
- Get a specified worksheet using Workbook.getWorksheets().get() method.
- Add a comment in a specific cell range using CellRange.addComment() method and then set the comment text.
- Create an ExcelFont object and apply the font to the comment text using ExcelComment.getRichText.setFont() method.
- Save the document to another file using Workbook.saveToFile() method.
- Java
import com.spire.xls.*;

import java.awt.*;

public class Excelcomment {
    public static void main(String[] args) throws Exception {

        //Load the sample document from file
        Workbook workbook = new Workbook();
        workbook.loadFromFile("Sample.xlsx");

        //Get the first worksheet
        Worksheet sheet = workbook.getWorksheets().get(0);

        //Create font
        ExcelFont font = workbook.createFont();
        font.setFontName("Calibri");
        font.setSize(12);
        font.setColor(Color.orange);
        font.isBold(true);

        //Add regular comment to specific cell range C6
        CellRange range = sheet.getCellRange("C6");
        ExcelComment comment = range.addComment();
        comment.setVisible(true);
        comment.setHeight(100);
        comment.setWidth(200);
        comment.getRichText().setText("Spire.XLS for Java Rich Text Comment ");
        comment.getRichText().setFont(0, 40, font);
        comment.setTextRotation(TextRotationType.LeftToRight);

        //Set the alignment of text in Comment
        comment.setVAlignment(CommentVAlignType.Center);
        comment.setHAlignment(CommentHAlignType.Justified);


        //Save the document to another file
        workbook.saveToFile("AddRichTextcomment.xlsx", ExcelVersion.Version2016);

    }
}
Add Comment with Author in an Excel Worksheet
Spire.XLS offers the ExcelComment.setText() method to insert the comment with author to Excel worksheets.
- Create a Workbook instance.
- Load a sample Excel document using Workbook.loadFromFile() method.
- Get a specified worksheet using Workbook.getWorksheets().get() method.
- Add a comment in a specific cell range using CellRange.addComment() method.
- Define the comment text and author and then add them as the comment content through the ExcelComment.setText() method.
- Save the document to another file using Workbook.saveToFile() method.
- Java
import com.spire.xls.*;

public class Excelcomment {
    public static void main(String[] args) throws Exception {

        //Load the sample document from file
        Workbook workbook = new Workbook();
        workbook.loadFromFile("Sample.xlsx");

        //Get the first worksheet
        Worksheet sheet = workbook.getWorksheets().get(0);

        //Add regular comment to specific cell range C6
        CellRange range = sheet.getCellRange("C6");
        ExcelComment comment = range.addComment();
        comment.setVisible(true);

        //Set the author and comment content
        String text = "Add a comment with Author";
        String author = "E-iceblue:";
        comment.setText(author + "\r" + text);

        //Save the document to another file
        workbook.saveToFile("Addcomment.xlsx", ExcelVersion.Version2016);

    }
}
Apply for a Temporary License
If you'd like to remove the evaluation message from the generated documents, or to get rid of the function limitations, please request a 30-day trial license for yourself.
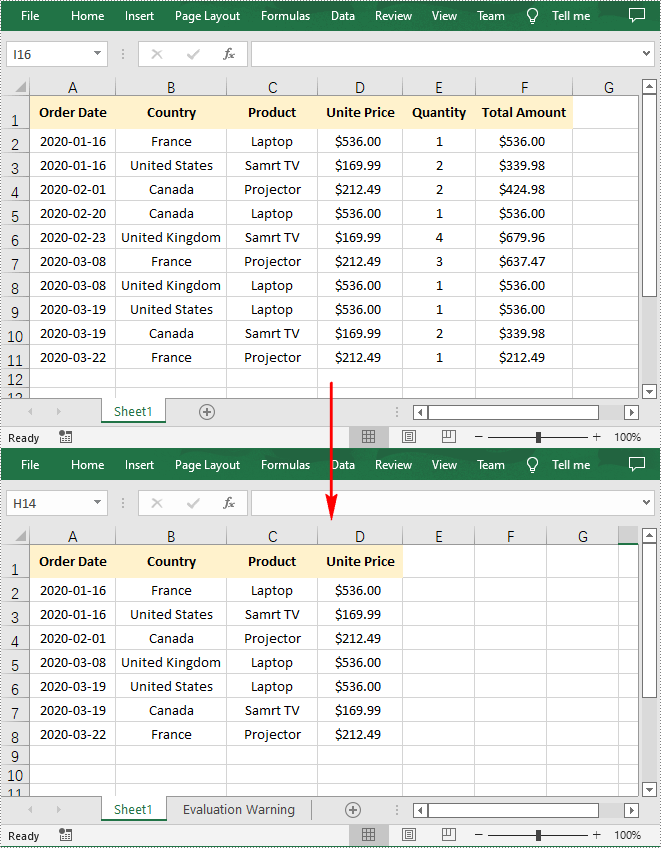
In MS Excel, rows arrange objects from left to right and are identified by row numbers. While columns, on the contrary, arrange objects from top to bottom and are identified by column headers. When processing data in Excel, sometimes you may need to insert additional columns and rows in the middle of your data table, or delete unwanted columns and rows. In this article, you will learn how to complete the below tasks programmatically using Spire.XLS for Java.
- Insert a Row and a Column in Excel
- Insert Multiple Rows and Columns in Excel
- Delete a Specific Row and Column in Excel
- Delete Multiple Rows and Columns in Excel
Install Spire.XLS for Java
First of all, you're required to add the Spire.Xls.jar file as a dependency in your Java program. The JAR file can be downloaded from this link. If you use Maven, you can easily import the JAR file in your application by adding the following code to your project's pom.xml file.
<repositories>
    <repository>
        <id>com.e-iceblue</id>
        <name>e-iceblue</name>
        <url>https://repo.e-iceblue.com/nexus/content/groups/public/</url>
    </repository>
</repositories>
<dependencies>
    <dependency>
        <groupId>e-iceblue</groupId>
        <artifactId>spire.xls</artifactId>
        <version>16.8.4</version>
    </dependency>
</dependencies>
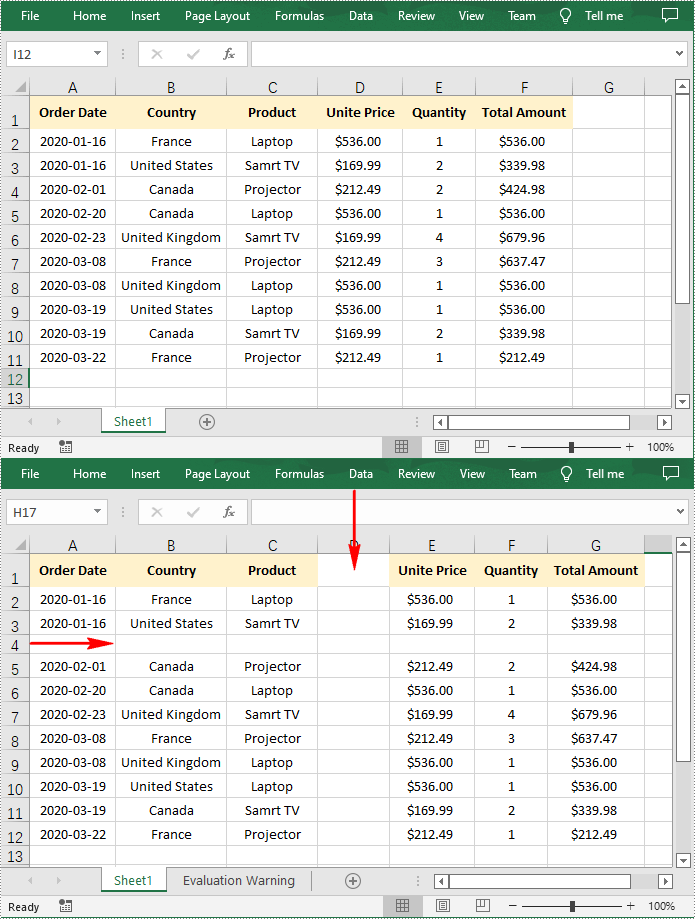
Insert a Row and a Column in Excel
Below are the steps to insert a blank row and a blank column in an Excel worksheet.
- Create a Workbook instance.
- Load a sample Excel file using Workbook.loadFromFile() method.
- Get a specified worksheet using Workbook.getWorksheets().get() method.
- Insert a row into the worksheet using Worksheet.insertRow(int rowIndex) method.
- Insert a column into the worksheet using Worksheet.insertColumn(int columnIndex) method.
- Save the result file using Workbook.saveToFile() method.
- Java
import com.spire.xls.*;

public class InsertRowandColumn {
    public static void main(String[] args) throws Exception {
        //Create a Workbook instance
        Workbook workbook = new Workbook();

        //Load a sample Excel file
        workbook.loadFromFile("Sample.xlsx");

        //Get the first worksheet
        Worksheet worksheet = workbook.getWorksheets().get(0);

        //Insert a row into the worksheet
        worksheet.insertRow(4);

        //Insert a column into the worksheet
        worksheet.insertColumn(4);

        //Save the result file
        workbook.saveToFile("InsertRowAndColumn.xlsx", ExcelVersion.Version2013);
    }
}
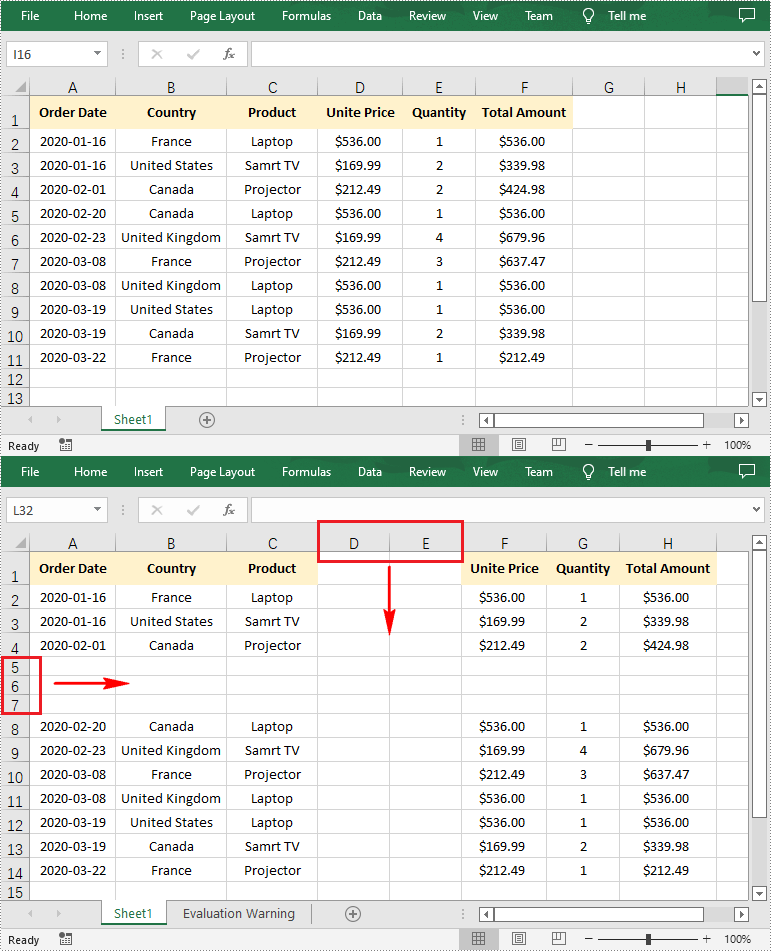
Insert Multiple Rows and Columns in Excel
Below are the steps to insert multiple blank rows and columns in an Excel worksheet.
- Create a Workbook instance.
- Load a sample Excel file using Workbook.loadFromFile() method.
- Get a specified worksheet using Workbook.getWorksheets().get() method.
- Insert multiple rows into the worksheet using Worksheet.insertRow((int rowIndex, int rowCount) method.
- Insert multiple columns into the worksheet using Worksheet.insertColumn(int columnIndex, int columnCount) method.
- Save the result file using Workbook.saveToFile() method.
- Java
import com.spire.xls.*;

public class InsertRowsandColumns {
    public static void main(String[] args) throws Exception {
        //Create a Workbook instance
        Workbook workbook = new Workbook();

        //Load a sample Excel file
        workbook.loadFromFile("Sample.xlsx");

        //Get the first worksheet
        Worksheet worksheet = workbook.getWorksheets().get(0);

        //Insert multiple rows into the worksheet.
        worksheet.insertRow(5, 3);

        //Insert multiple columns into the worksheet.
        worksheet.insertColumn(4, 2);

        //Save the result file
        workbook.saveToFile("InsertRowsAndColumns.xlsx", ExcelVersion.Version2013);
    }
}
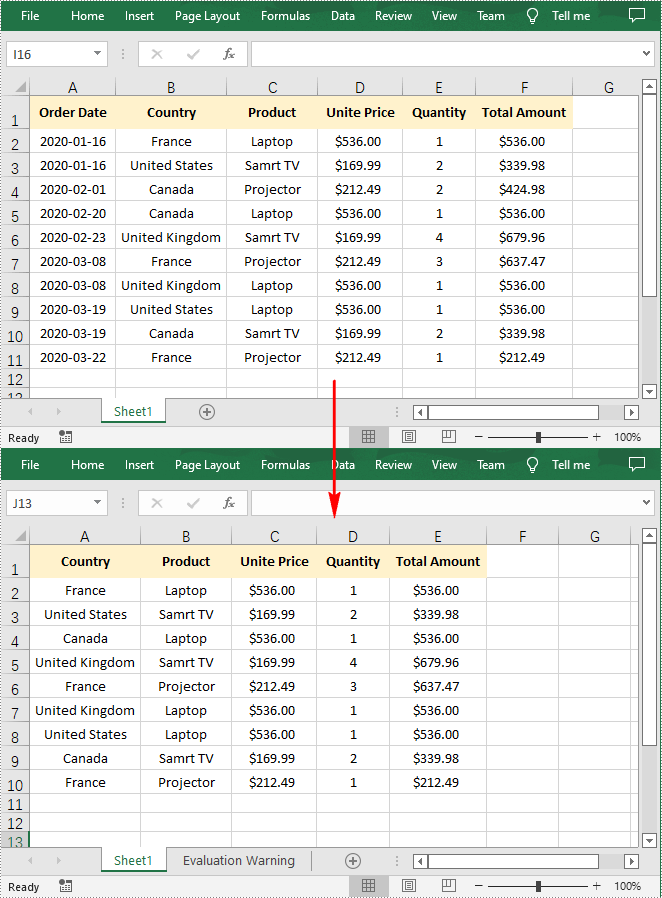
Delete a Specific Row and Column in Excel
Below are the steps to delete a specific row and column in an Excel worksheet.
- Create a Workbook instance.
- Load a sample Excel file using Workbook.loadFromFile() method.
- Get a specified worksheet using Workbook.getWorksheets().get() method.
- Delete a specific row from the worksheet using Worksheet.deleteRow(int index) method.
- Delete a specific column from the worksheet using Worksheet.deleteColumn(int columnIndex) method.
- Save the result file using Workbook.saveToFile() method.
- Java
import com.spire.xls.*;

public class DeleteRowColumn {
    public static void main(String[] args) throws Exception {
        //Create a Workbook instance
        Workbook workbook = new Workbook();

        //Load the sample Excel file
        workbook.loadFromFile("Sample.xlsx");

        //Get the first worksheet
        Worksheet worksheet = workbook.getWorksheets().get(0);

        //Delete a specific row from the worksheet
        worksheet.deleteRow(4);

        //Delete a specific column from the worksheet
        worksheet.deleteColumn(1);

        //Save to file.
        workbook.saveToFile("DeleteRowAndColumn.xlsx", ExcelVersion.Version2013);

    }
}
Delete Multiple Rows and Columns in Excel
Below are the steps to delete multiple rows and columns in an Excel worksheet.
- Create a Workbook instance.
- Load a sample Excel file using Workbook.loadFromFile() method.
- Get a specified worksheet using Workbook.getWorksheets().get() method.
- Delete multiple rows from the worksheet using Worksheet.deleteRow(int index, int count) method.
- Delete multiple columns from the worksheet using Worksheet.deleteColumn(int columnIndex, int count) method.
- Save the result file using Workbook.saveToFile() method.
- Java
import com.spire.xls.*;

public class DeleteRowColumn {
    public static void main(String[] args) throws Exception {
        //Create a Workbook instance
        Workbook workbook = new Workbook();

        //Load the sample Excel file
        workbook.loadFromFile("E:\\Files\\Sample.xlsx");

        //Get the first worksheet
        Worksheet worksheet = workbook.getWorksheets().get(0);

        //Delete multiple rows from the worksheet
        worksheet.deleteRow(5, 3);

        //Delete multiple columns from the worksheet
        worksheet.deleteColumn(5, 2);

        //Save to file.
        workbook.saveToFile("DeleteRowsAndColumns.xlsx", ExcelVersion.Version2013);

    }
}
Apply for a Temporary License
If you'd like to remove the evaluation message from the generated documents, or to get rid of the function limitations, please request a 30-day trial license for yourself.
