
JavaScript (260)
The font name, the font size and the text color are the most basic character-level formatting properties a Word document has, and also the ones you reach for most often: normalizing the font across a whole document, giving the headings a more striking face, or marking a key conclusion in a color that stands out. Spire.Doc for JavaScript performs all of this in the browser via WebAssembly, using a virtual file system (VFS) to manage input and output files — no backend server required.
This article covers two core features:
For installation and project setup, refer to Integrating Spire.Doc for JavaScript in a React Project. The examples below assume Spire.Doc is installed and the WebAssembly module is initialized.
Set the Font
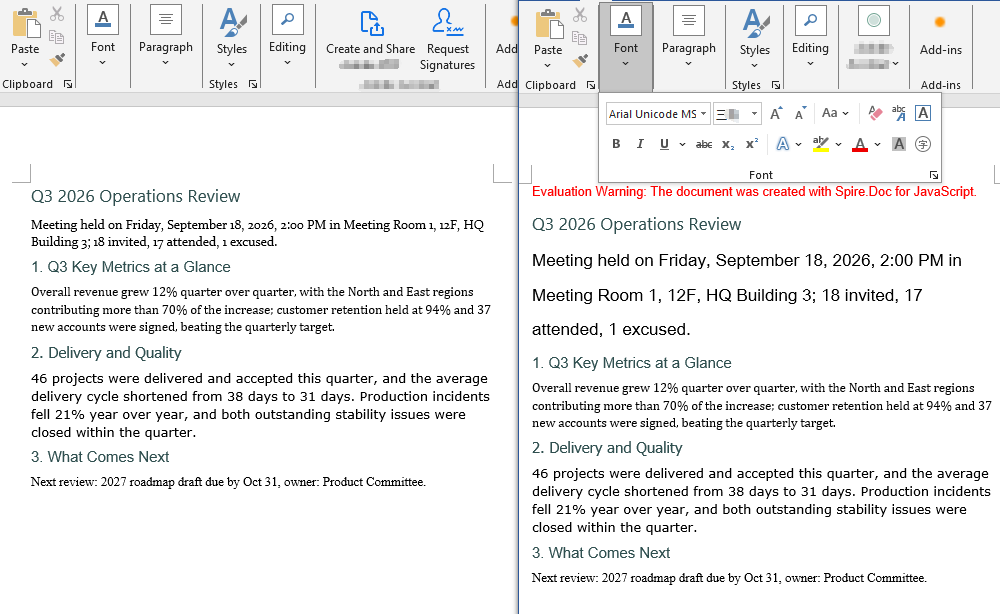
Setting the font involves three steps: first, load the font file and the target Word document into the WASM virtual file system via FetchFileToVFS; then instantiate a Document, load the document, create a CharacterFormat object and set its FontName and FontSize, walk through the child objects of the target paragraph and call ApplyCharacterFormat on every object whose type is TextRange; finally, read the saved file back from VFS, wrap it as a Blob and trigger a browser download.
One detail deserves attention: the CharacterFormat constructor must be passed the Document instance the format belongs to. That is the convention shared by every standalone format object in Spire.Doc.
function App() {
  const SetFont = async () => {
    const docModule = window.wasmModule?.spiredoc;
    if (!docModule) {
      alert('Spire.Doc is not ready yet');
      return;
    }

    // Load the font file into VFS
    await window.spire.FetchFileToVFS("ARIALUNI.TTF", "/Library/Fonts/", `${process.env.PUBLIC_URL}static/font/`);

    // Load the target Word document into VFS
    const inputFileName = "SetFont.docx";
    await window.spire.FetchFileToVFS(inputFileName, "", `${process.env.PUBLIC_URL}static/data/`);

    // Create a Document instance and load the document
    const doc = new docModule.Document();
    doc.LoadFromFile(inputFileName);

    // Get the second paragraph of the first section
    const p = doc.Sections.get_Item(0).Paragraphs.get_Item(1);

    // Create a CharacterFormat and set the font name and the font size
    const format = new docModule.CharacterFormat(doc);
    format.FontName = "Arial Unicode MS";
    format.FontSize = 16;

    // Walk through the child objects of the paragraph and apply the character format to the text ranges
    for (let i = 0; i < p.ChildObjects.Count; i++) {
      const childObj = p.ChildObjects.get_Item(i);
      if (childObj instanceof docModule.TextRange) {
        childObj.ApplyCharacterFormat(format);
      }
    }

    // Define the output file name
    const outputFileName = "SetFont_out.docx";

    // Save the document to VFS
    doc.SaveToFile({ fileName: outputFileName, fileFormat: docModule.FileFormat.Docx2013 });
    doc.Dispose();

    const modifiedFileArray = window.dotnetRuntime.Module.FS.readFile(outputFileName);
    const blob = new Blob([modifiedFileArray], { type: 'application/vnd.openxmlformats-officedocument.wordprocessingml.document' });
    const url = URL.createObjectURL(blob);
    const a = document.createElement('a');
    a.href = url;
    a.download = outputFileName;
    a.click();
    URL.revokeObjectURL(url);
  };

  return (
    <div style={{ textAlign: 'center', height: '300px' }}>
      <h1>Set the Font of a Word Document</h1>
      <button onClick={SetFont}>Generate</button>
    </div>
  );
}
export default App;
The document produced after the font has been set
Change the Font Color
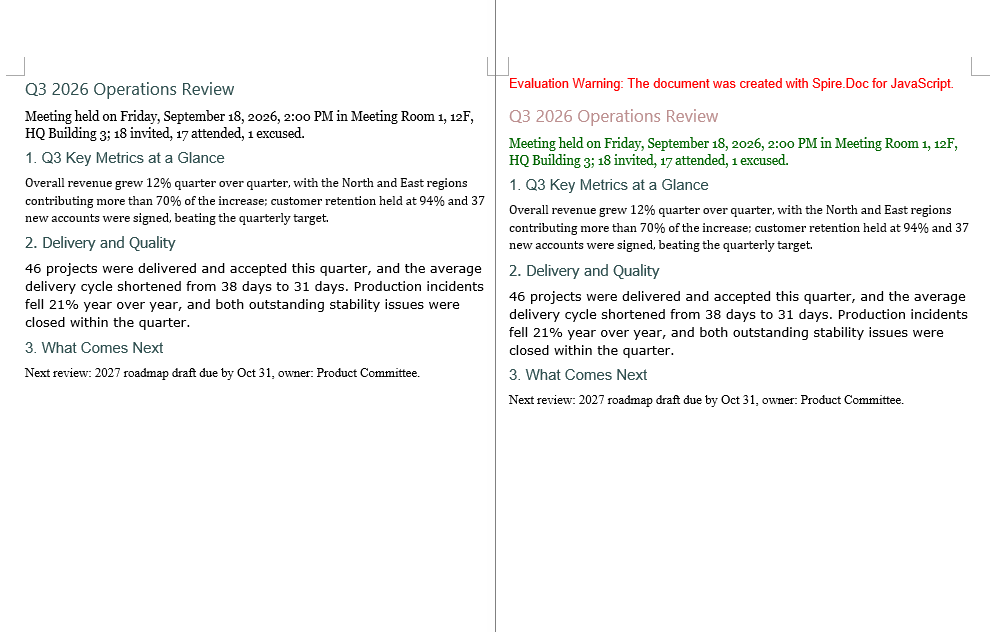
Changing the font color follows the same three steps as setting the font. The difference is that there is no need to create a separate CharacterFormat object: the color is a single property, so you assign to CharacterFormat.TextColor of the TextRange itself. The color values come from the predefined properties of Color, whose names match .NET's KnownColor — get_RosyBrown() and get_DarkGreen(), for example; when you need an exact color value, use Color.FromArgb(r, g, b) instead.
function App() {
  const ChangeFontColor = async () => {
    const docModule = window.wasmModule?.spiredoc;
    if (!docModule) {
      alert('Spire.Doc is not ready yet');
      return;
    }

    // Load the target Word document into VFS
    const inputFileName = "ChangeFontColor.docx";
    await window.spire.FetchFileToVFS(inputFileName, "", `${process.env.PUBLIC_URL}static/data/`);

    // Create a Document instance and load the document
    const doc = new docModule.Document();
    doc.LoadFromFile(inputFileName);

    // Get the first section
    const section = doc.Sections.get_Item(0);

    // Turn the text of the first paragraph rosy brown
    const p1 = section.Paragraphs.get_Item(0);
    for (let i = 0; i < p1.ChildObjects.Count; i++) {
      const childObj = p1.ChildObjects.get_Item(i);
      if (childObj instanceof docModule.TextRange) {
        childObj.CharacterFormat.TextColor = docModule.Color.get_RosyBrown();
      }
    }

    // Turn the text of the second paragraph dark green
    const p2 = section.Paragraphs.get_Item(1);
    for (let i = 0; i < p2.ChildObjects.Count; i++) {
      const childObj = p2.ChildObjects.get_Item(i);
      if (childObj instanceof docModule.TextRange) {
        childObj.CharacterFormat.TextColor = docModule.Color.get_DarkGreen();
      }
    }

    // Define the output file name
    const outputFileName = "ChangeFontColor_out.docx";

    // Save the document to VFS
    doc.SaveToFile({ fileName: outputFileName, fileFormat: docModule.FileFormat.Docx2013 });
    doc.Dispose();

    const modifiedFileArray = window.dotnetRuntime.Module.FS.readFile(outputFileName);
    const blob = new Blob([modifiedFileArray], { type: 'application/vnd.openxmlformats-officedocument.wordprocessingml.document' });
    const url = URL.createObjectURL(blob);
    const a = document.createElement('a');
    a.href = url;
    a.download = outputFileName;
    a.click();
    URL.revokeObjectURL(url);
  };

  return (
    <div style={{ textAlign: 'center', height: '300px' }}>
      <h1>Change the Font Color of a Word Document</h1>
      <button onClick={ChangeFontColor}>Generate</button>
    </div>
  );
}
export default App;
The document produced after the font color has been changed
FAQ
Only a few words in a paragraph need to change, not the whole paragraph
Cause: The examples above treat a paragraph as the smallest unit — they walk through every child object of the paragraph and assign unconditionally to anything that is a TextRange, so once a paragraph has been processed the whole paragraph ends up in the same color or the same font. To work at word level you first have to locate the TextRange that holds the target text, and then set its character format on its own.
Solution: Use FindAllString to find the text in the document. Every TextSelection it returns gives you the matching TextRange through GetAsOneRange(), so you can change just that one occurrence:
// Find every occurrence of "key conclusion"; the arguments are: search text, case sensitivity, whole-word matching
const selections = doc.FindAllString("key conclusion", false, true);

for (let i = 0; i < selections.length; i++) {
  // Only this short run of text gets the new color; the rest of the paragraph is untouched
  selections[i].GetAsOneRange().CharacterFormat.TextColor = docModule.Color.get_Red();
}
If only the first occurrence matters, replace FindAllString with FindString, which returns a single TextSelection object.
The font is set, but the document shows a different font on another computer
Cause: FontName only writes the font name into the character properties of the document; it does not bring the font file itself along with it. The font loaded by FetchFileToVFS only serves the rendering and the text measurement of this browser session. When the document is opened in Word on another machine and that font is not installed there, Word falls back to another font according to its own font substitution table, and the font size and the line spacing can change with it.
Solution: If the target font is a common one (Arial or Times New Roman, for example), there is usually nothing to do. If a particular font has to be used, embed the font file into the document together with the content, so that the document still renders correctly on machines where the font is not installed. See "Embed a Private Font" in the next article for the details.
Get a Free License
Spire.Doc for JavaScript offers a 30-day full-featured free trial license with no functional limitations. Apply here to evaluate before purchasing.
Get Used Fonts and Embed Private Fonts in Word with JavaScript in React
2026-09-30 08:16:24 Written by Amy ZhaoWhen a Word document has to travel between machines and environments, fonts are the part most likely to break: open a carefully laid out document on another computer and the glyph shapes, the font sizes and even the pagination can change. The safe approach is to first take stock of the fonts the document actually uses, then embed the fonts that must be preserved together with the document itself. Spire.Doc for JavaScript performs all of this in the browser via WebAssembly, using a virtual file system (VFS) to manage input and output files — no backend server required.
This article covers two core features:
For installation and project setup, refer to Integrating Spire.Doc for JavaScript in a React Project. The examples below assume Spire.Doc is installed and the WebAssembly module is initialized.
Get the List of Fonts Used in the Document
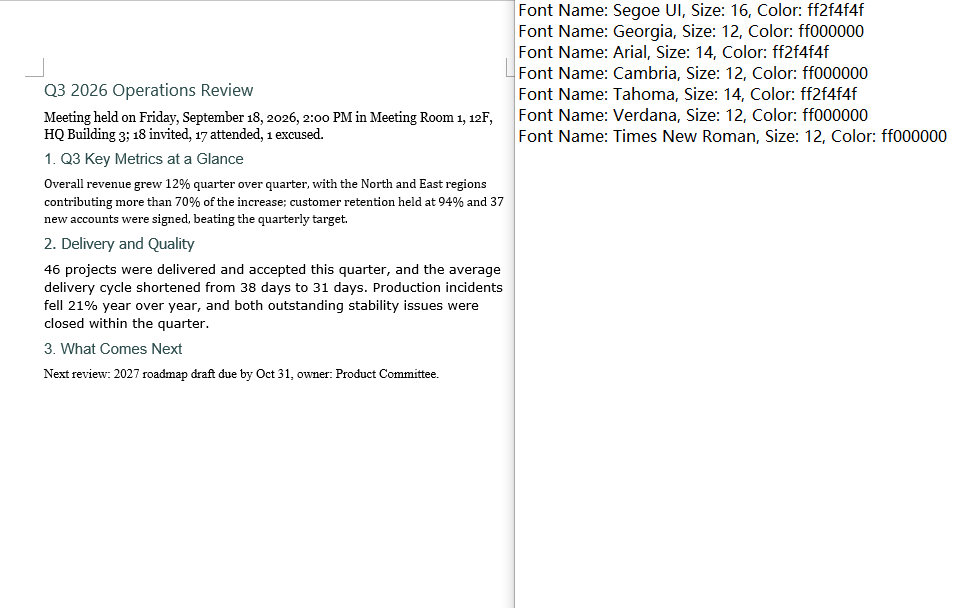
Listing the fonts involves three steps: first, load the target Word document into the WASM virtual file system via FetchFileToVFS; then instantiate a Document, load the document, walk down through section → paragraph → child object and read the font name, the font size and the text color from the CharacterFormat of every TextRange, de-duplicating on the combination of the three; finally, join the results into text and write it to VFS, read it back and wrap it as a Blob to trigger a browser download.
The de-duplication step deserves attention: a Map key has to be a primitive type that can be compared by value. Use an object such as { size, name } as the key and every iteration creates a brand-new reference, so Map never finds an existing entry and the de-duplication silently does nothing. The key here is therefore a string built from the font name, the font size and the color.
function App() {
  const GetListOfUsingFonts = async () => {
    const docModule = window.wasmModule?.spiredoc;
    if (!docModule) {
      alert('Spire.Doc is not ready yet');
      return;
    }

    // Load the target Word document into VFS
    const inputFileName = "GetListOfUsingFonts.docx";
    await window.spire.FetchFileToVFS(inputFileName, "", `${process.env.PUBLIC_URL}static/data/`);

    // Create a Document instance and load the document
    const doc = new docModule.Document();
    doc.LoadFromFile(inputFileName);

    // De-duplicate on "font name|size|color"
    const fontMap = new Map();

    // Walk through every section
    for (let i = 0; i < doc.Sections.Count; i++) {
      const section = doc.Sections.get_Item(i);

      // Walk through every paragraph in the section
      for (let j = 0; j < section.Body.Paragraphs.Count; j++) {
        const paragraph = section.Body.Paragraphs.get_Item(j);

        // Walk through every child object in the paragraph
        for (let k = 0; k < paragraph.ChildObjects.Count; k++) {
          const obj = paragraph.ChildObjects.get_Item(k);
          if (!(obj instanceof docModule.TextRange)) continue;

          const format = obj.CharacterFormat;
          const key = `${format.FontName}|${format.FontSize}|${format.TextColor.Name}`;

          fontMap.set(key, {
            name: format.FontName,
            size: format.FontSize,
            color: format.TextColor.Name
          });
        }
      }
    }

    // Build the output content
    const lines = [];
    for (const font of fontMap.values()) {
      lines.push(`Font Name: ${font.name}, Size: ${font.size}, Color: ${font.color}`);
    }

    // Define the output file name and write it to VFS
    const outputFileName = "GetListOfUsingFonts_out.txt";
    window.dotnetRuntime.Module.FS.writeFile(outputFileName, lines.join("\n"));

    const modifiedFileArray = window.dotnetRuntime.Module.FS.readFile(outputFileName);
    const blob = new Blob([modifiedFileArray], { type: 'text/plain' });
    const url = URL.createObjectURL(blob);
    const a = document.createElement('a');
    a.href = url;
    a.download = outputFileName;
    a.click();
    URL.revokeObjectURL(url);

    doc.Dispose();
  };

  return (
    <div style={{ textAlign: 'center', height: '300px' }}>
      <h1>Get the Fonts Used in a Word Document</h1>
      <button onClick={GetListOfUsingFonts}>Generate</button>
    </div>
  );
}
export default App;
The text file produced by the font list sample
Embed a Private Font
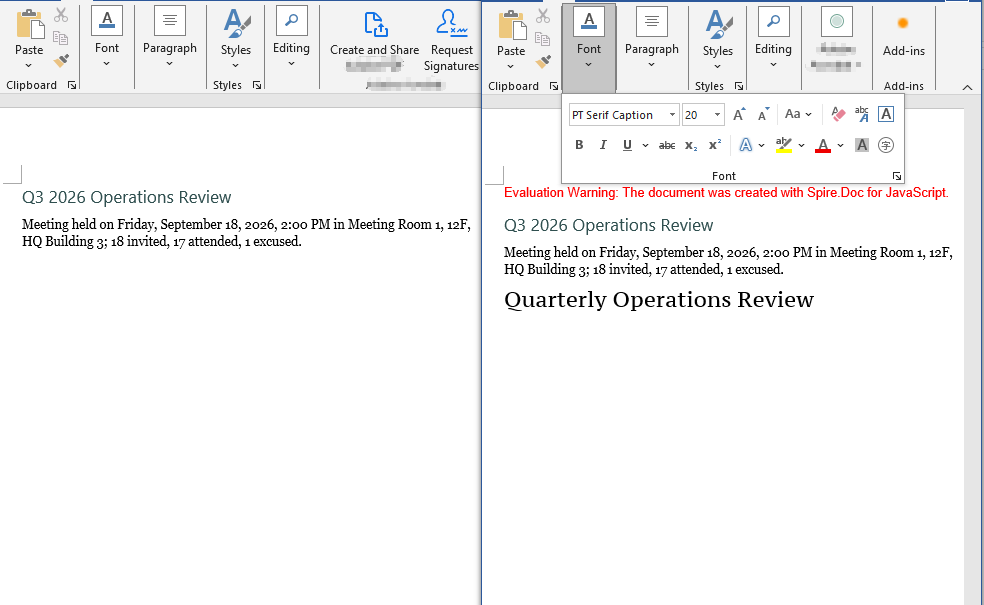
Embedding a private font also involves three steps: first, load the font file to embed together with the document into the WASM virtual file system via FetchFileToVFS; then instantiate a Document, load the document, write a run that uses the font, set EmbedFontsInFile to true and call AddPrivateFont to register the path and the registration name of the font file; finally, save the document, read it back from VFS and wrap it as a Blob to trigger a browser download.
EmbedFontsInFile and AddPrivateFont only take effect at save time and must both be called before SaveToFile. The first argument of PrivateFontPath is the name the font is registered under inside the document, and it has to match the value assigned to CharacterFormat.FontName exactly, or Word will not find a match.
function App() {
  const EmbedPrivateFont = async () => {
    const docModule = window.wasmModule?.spiredoc;
    if (!docModule) {
      alert('Spire.Doc is not ready yet');
      return;
    }

    // Load the private font file to embed into VFS
    await window.spire.FetchFileToVFS("PT Serif Caption.ttf", "/Library/Fonts/", `${process.env.PUBLIC_URL}static/font/`);

    // Load the target Word document into VFS
    const inputFileName = "EmbedPrivateFont.docx";
    await window.spire.FetchFileToVFS(inputFileName, "", `${process.env.PUBLIC_URL}static/data/`);

    // Create a Document instance and load the document
    const doc = new docModule.Document();
    doc.LoadFromFile(inputFileName);

    // Append a paragraph at the end of the first section and apply the private font
    const p = doc.Sections.get_Item(0).AddParagraph();
    const range = p.AppendText("Quarterly Operations Review");
    range.CharacterFormat.FontName = "PT Serif Caption";
    range.CharacterFormat.FontSize = 20;

    // Turn on font embedding and register the private font file with the document
    doc.EmbedFontsInFile = true;
    doc.AddPrivateFont(new docModule.PrivateFontPath("PT Serif Caption", "PT Serif Caption.ttf"));

    // Define the output file name
    const outputFileName = "EmbedPrivateFont_out.docx";

    // Save the document to VFS
    doc.SaveToFile({ fileName: outputFileName, fileFormat: docModule.FileFormat.Docx2013 });
    doc.Dispose();

    const modifiedFileArray = window.dotnetRuntime.Module.FS.readFile(outputFileName);
    const blob = new Blob([modifiedFileArray], { type: 'application/vnd.openxmlformats-officedocument.wordprocessingml.document' });
    const url = URL.createObjectURL(blob);
    const a = document.createElement('a');
    a.href = url;
    a.download = outputFileName;
    a.click();
    URL.revokeObjectURL(url);
  };

  return (
    <div style={{ textAlign: 'center', height: '300px' }}>
      <h1>Embed a Private Font in a Word Document</h1>
      <button onClick={EmbedPrivateFont}>Generate</button>
    </div>
  );
}
export default App;
The document produced after the private font has been embedded
FAQ
The same font appears many times in the output font list
Cause: If the code follows the pattern "store the font name and the font size in an object, then use that object as the Map key", the de-duplication never works. Objects are reference types in JavaScript and Map compares keys by reference rather than by value; every object created inside the loop is a fresh reference, so fontMap.has(font) always returns false. The list then ends up with one line for every TextRange in the document, and the same font repeats over and over.
Solution: Use a primitive type as the key instead — join the fields that take part in the de-duplication into a string (such as font name|size|color), so that fonts with identical content get the same key:
const format = obj.CharacterFormat;

// Use a string as the key: identical content means the same entry, so de-duplication works
const key = `${format.FontName}|${format.FontSize}|${format.TextColor.Name}`;
fontMap.set(key, {
  name: format.FontName,
  size: format.FontSize,
  color: format.TextColor.Name
});
If all you need is de-duplication at the level of font names, collect format.FontName in a Set instead.
The font is embedded, but another computer still shows a substitute
Cause: There are three common cases. The first is the timing of the call — AddPrivateFont only registers the font file with the in-memory document object, while the font table and the font parts are actually written into the docx during the save, so EmbedFontsInFile = true and AddPrivateFont(...) both have to come before SaveToFile; leave out EmbedFontsInFile and the font file is not written at all. The second is a font name mismatch — the first argument of PrivateFontPath is the registration name used inside the document and must match the value of CharacterFormat.FontName exactly, spaces and letter case included, or the match fails over a single character. The third is the embedding permission of the font file itself — the fsType bits in the OS/2 table of some commercial fonts forbid embedding, and Word simply ignores those fonts, in which case the only options are to use another font or a licensed version that permits embedding.
Solution: Keep every font embedding setting together before the save, and make sure the registration name matches the font name character for character:
// Keep the font name and the registration name exactly the same
const FONT_NAME = "PT Serif Caption";

const range = p.AppendText("Quarterly Operations Review");
range.CharacterFormat.FontName = FONT_NAME;
range.CharacterFormat.FontSize = 20;

// Turn on embedding and register the font file; both must come before SaveToFile
doc.EmbedFontsInFile = true;
doc.AddPrivateFont(new docModule.PrivateFontPath(FONT_NAME, "PT Serif Caption.ttf"));

doc.SaveToFile({ fileName: outputFileName, fileFormat: docModule.FileFormat.Docx2013 });
Get a Free License
Spire.Doc for JavaScript offers a 30-day full-featured free trial license with no functional limitations. Apply here to evaluate before purchasing.
Create, Modify and Copy Word Styles with JavaScript in React
2026-09-30 08:15:23 Written by Amy ZhaoStyles are the way Word reuses formatting: give a set of formatting — the font, the size, the colour, the paragraph spacing — a name and save it, and from then on every paragraph that carries that style name picks the whole set up automatically. Change the style definition and every paragraph that references it updates along with it, which is exactly what setting the formatting on a paragraph directly cannot do. Spire.Doc for JavaScript performs all of this in the browser via WebAssembly, using a virtual file system (VFS) to manage input and output files — no backend server required.
Structurally a paragraph style holds two parts at once: character formatting and paragraph formatting. Once a built-in style has been taken, ParagraphStyle.CharacterFormat changes the text-level properties and ParagraphStyle.ParagraphFormat changes the paragraph-level ones. The library maps this model onto the Document.Styles collection in full.
This article covers two core features:
For installation and project setup, refer to Integrating Spire.Doc for JavaScript in a React Project. The examples below assume Spire.Doc is installed and the WebAssembly module is initialized.
Modify the Built-in Styles
Word ships with a batch of built-in styles — Title, Normal, Heading 1 to Heading 9 and so on. document.AddStyle({ builtinStyle }) takes the named built-in style (creating it if it does not exist yet) and returns its object, and once you have it, it can be rewritten.
Note that the return type of AddStyle is the generic Style, so before changing the paragraph format you have to confirm that the object really is a paragraph style — instanceof wasmModule.ParagraphStyle is the check. Normal is the base style of the body text, and changing it also affects every style that inherits from it, so it is usually used only to unify the body font and the font size.
function App() {
  const Styles = async () => {
    const docModule = window.wasmModule?.spiredoc;
    if (!docModule) {
      alert('Spire.Doc is not ready yet');
      return;
    }

    await window.spire.FetchFileToVFS("ARIALUNI.TTF", "/Library/Fonts/", `${process.env.PUBLIC_URL}static/font/`);

    // Create the document and the section
    let doc = new docModule.Document();
    let sec = doc.AddSection();

    // Take the built-in Title style and rewrite it with a custom colour scheme:
    // a bottom border and left alignment
    let titleStyle = doc.AddStyle({ builtinStyle: docModule.BuiltinStyle.Title });

    // Check whether it is a paragraph style; if it is, set the paragraph format too
    if (titleStyle instanceof docModule.ParagraphStyle) {
      let ps = titleStyle;
      ps.CharacterFormat.FontName = "Arial Unicode MS";
      ps.CharacterFormat.FontSize = 28;
      ps.CharacterFormat.TextColor = docModule.Color.FromArgb(42, 123, 136);
      ps.ParagraphFormat.Borders.Bottom.BorderType = docModule.BorderStyle.Single;
      ps.ParagraphFormat.Borders.Bottom.Color = docModule.Color.FromArgb(42, 123, 136);
      ps.ParagraphFormat.Borders.Bottom.LineWidth = 1.5;
      ps.ParagraphFormat.HorizontalAlignment = docModule.HorizontalAlignment.Left;
    }

    // Body style: one font and one size for the body text
    let normalStyle = doc.AddStyle({ builtinStyle: docModule.BuiltinStyle.Normal });
    normalStyle.CharacterFormat.FontName = "Arial Unicode MS";
    normalStyle.CharacterFormat.FontSize = 11;

    // Heading 1 style
    let heading1Style = doc.AddStyle({ builtinStyle: docModule.BuiltinStyle.Heading1 });
    heading1Style.CharacterFormat.FontName = "Arial Unicode MS";
    heading1Style.CharacterFormat.FontSize = 14;
    heading1Style.CharacterFormat.Bold = true;
    heading1Style.CharacterFormat.TextColor = docModule.Color.FromArgb(42, 123, 136);

    // Heading 2 style
    let heading2Style = doc.AddStyle({ builtinStyle: docModule.BuiltinStyle.Heading2 });
    heading2Style.CharacterFormat.FontName = "Arial Unicode MS";
    heading2Style.CharacterFormat.FontSize = 12;
    heading2Style.CharacterFormat.Bold = true;

    // Custom bulleted list style
    let bulletList = doc.Styles.Add({ listType: docModule.ListType.Bulleted, name: "bulletList" });
    doc.Styles.Add({ style: bulletList });

    // Apply the styles: built-in styles by builtinStyle, custom styles by name
    let paragraph = sec.AddParagraph();
    paragraph.AppendText("Quarterly Operations Report");
    paragraph.ApplyStyle({ builtinStyle: docModule.BuiltinStyle.Title });

    paragraph = sec.AddParagraph();
    paragraph.AppendText("Prepared by: Operations Management Department | Date: September 2026");
    paragraph.ApplyStyle({ builtinStyle: docModule.BuiltinStyle.Normal });

    paragraph = sec.AddParagraph();
    paragraph.AppendText("Overall Progress");
    paragraph.ApplyStyle({ builtinStyle: docModule.BuiltinStyle.Heading1 });

    paragraph = sec.AddParagraph();
    paragraph.AppendText("All three product lines stayed on plan this quarter, and the overall delivery pace was steady.");
    paragraph.ApplyStyle({ builtinStyle: docModule.BuiltinStyle.Normal });

    paragraph = sec.AddParagraph();
    paragraph.AppendText("Key Items");
    paragraph.ApplyStyle({ builtinStyle: docModule.BuiltinStyle.Heading1 });

    paragraph = sec.AddParagraph();
    paragraph.AppendText("Key Milestones");
    paragraph.ApplyStyle({ builtinStyle: docModule.BuiltinStyle.Heading2 });

    paragraph = sec.AddParagraph();
    paragraph.AppendText("Core module integration testing completed");
    paragraph.ListFormat.ApplyStyle("bulletList");

    paragraph = sec.AddParagraph();
    paragraph.AppendText("Trial run phase started");
    paragraph.ListFormat.ApplyStyle("bulletList");

    paragraph = sec.AddParagraph();
    paragraph.AppendText("Pre-release review scheduled");
    paragraph.ListFormat.ApplyStyle("bulletList");

    paragraph = sec.AddParagraph();
    paragraph.AppendText("Resource Input");
    paragraph.ApplyStyle({ builtinStyle: docModule.BuiltinStyle.Heading2 });

    paragraph = sec.AddParagraph();
    paragraph.AppendText("Team capacity is tight at the moment; confirm the schedule early in the quarter.");
    paragraph.ListFormat.ApplyStyle("bulletList");

    // Define the output file name
    const outputFileName = "Styles-result.docx";

    // Save the document to the given path
    doc.SaveToFile({ fileName: outputFileName, fileFormat: docModule.FileFormat.Docx2013 });
    doc.Dispose();

    const modifiedFileArray = window.dotnetRuntime.Module.FS.readFile(outputFileName);
    const blob = new Blob([modifiedFileArray], { type: 'application/vnd.openxmlformats-officedocument.wordprocessingml.document' });
    const url = URL.createObjectURL(blob);
    const a = document.createElement('a');
    a.href = url;
    a.download = outputFileName;
    a.click();
    URL.revokeObjectURL(url);
  };

  return (
    <div style={{ textAlign: 'center', height: '300px' }}>
      <h1>Create Styles and Apply Them to Paragraphs</h1>
      <button onClick={Styles}>Generate</button>
    </div>
  );
}
export default App;
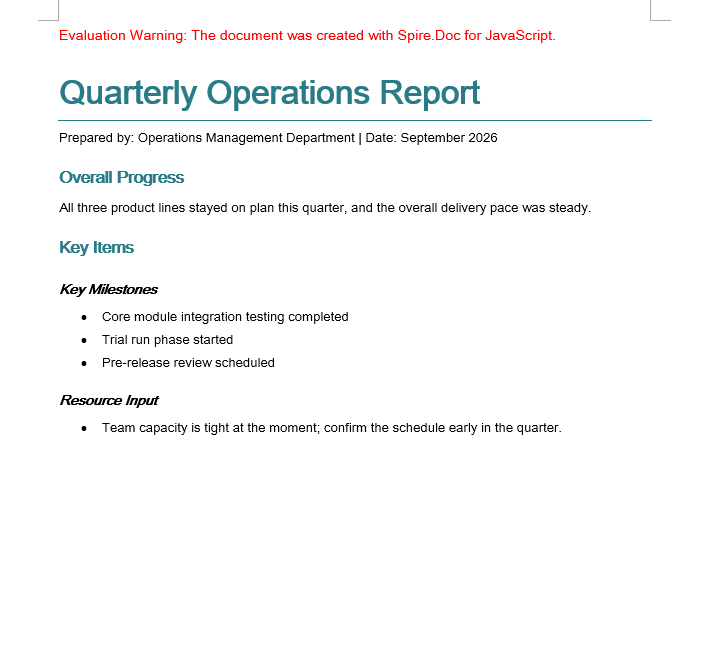
The built-in Title, Heading 1 and Heading 2 have been rewritten into one teal colour scheme, and the custom bulletList supplies the bullets
Copy Styles Between Documents
Companies often keep a "style master" document whose styles new documents have to follow. Rebuilding those styles one at a time by hand is slow and easy to miss something, so walk the Styles collection of the source document and add every style object to the target document instead.
document.Styles supports Count and get_Item(index), so the collection can be walked completely by index. Once the styles of the source document have been added to the target document, the paragraphs in the target that reference those style names immediately show the formatting of the source document.
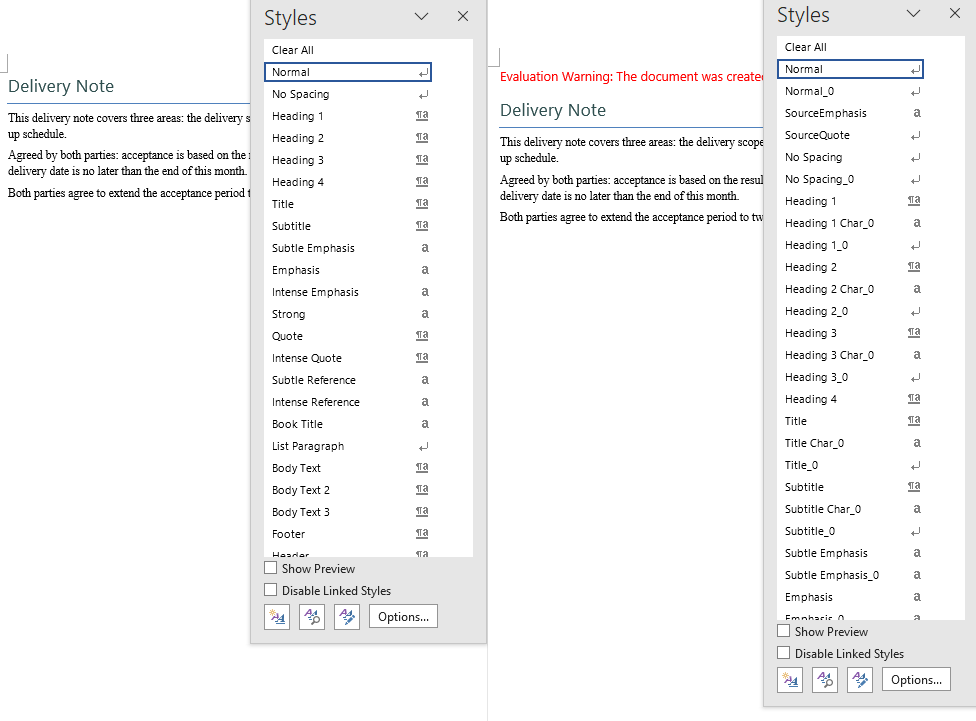
This example uses two sample documents: CopyDocumentStyles1.docx is the source document with custom styles, and CopyDocumentStyles2.docx is the target document — some of its paragraphs reference style names that only the source document defines, but it does not define them itself, so before the copy those paragraphs are displayed with the default formatting.
function App() {
  const CopyDocumentStyles = async () => {
    const docModule = window.wasmModule?.spiredoc;
    if (!docModule) {
      alert('Spire.Doc is not ready yet');
      return;
    }

    // Load the two sample files into the virtual file system (VFS)
    let inputFileName_1 = "CopyDocumentStyles1.docx";
    await window.spire.FetchFileToVFS(inputFileName_1, "", `${process.env.PUBLIC_URL}static/data/`);

    let inputFileName_2 = "CopyDocumentStyles2.docx";
    await window.spire.FetchFileToVFS(inputFileName_2, "", `${process.env.PUBLIC_URL}static/data/`);

    // Load the source document (with the custom styles)
    let srcDoc = new docModule.Document();
    srcDoc.LoadFromFile(inputFileName_1);

    // Load the target document (built-in styles only)
    let destDoc = new docModule.Document();
    destDoc.LoadFromFile(inputFileName_2);

    // Take the style collection of the source document
    let styles = srcDoc.Styles;

    // Add them to the target document one by one
    for (let i = 0; i < styles.Count; i++) {
      let style = styles.get_Item(i);
      destDoc.Styles.Add(style);
    }

    // Define the output file name
    const outputFileName = "CopyDocumentStyles_result.docx";

    // Save the document to the given path
    destDoc.SaveToFile({ fileName: outputFileName, fileFormat: docModule.FileFormat.Docx2013 });
    destDoc.Dispose();
    srcDoc.Dispose();

    const modifiedFileArray = window.dotnetRuntime.Module.FS.readFile(outputFileName);
    const blob = new Blob([modifiedFileArray], { type: 'application/vnd.openxmlformats-officedocument.wordprocessingml.document' });
    const url = URL.createObjectURL(blob);
    const a = document.createElement('a');
    a.href = url;
    a.download = outputFileName;
    a.click();
    URL.revokeObjectURL(url);
  };

  return (
    <div style={{ textAlign: 'center', height: '300px' }}>
      <h1>Copy the Styles of the Source Document into the Target Document</h1>
      <button onClick={CopyDocumentStyles}>Generate</button>
    </div>
  );
}
export default App;
After the copy the target document has the custom styles of the source document, and the paragraphs that "referenced a style without carrying its formatting" are displayed correctly again
FAQ
The Normal style was changed, but not every body paragraph followed
Cause: Only styles that inherit from Normal are affected by it. If a paragraph carries direct formatting of its own (a per-paragraph CharacterFormat.FontName, for example), the direct formatting has a higher priority than the style and covers up what the style sets.
Solution: Control the appearance through styles consistently and remove the direct formatting from the paragraphs and the runs. Normal is commonly used to unify the body font and the font size:
let normalStyle = document.AddStyle({ builtinStyle: wasmModule.BuiltinStyle.Normal });
normalStyle.CharacterFormat.FontName = "Arial Unicode MS";
normalStyle.CharacterFormat.FontSize = 11;
The number of styles in the target document doubled after the copy
Cause: The walk copies every style of the source document across, and that includes a large number of built-in styles. Those style names usually already exist in the target document, and adding them one at a time creates duplicate entries.
Solution: This is the actual behaviour of the sample (the style collection grows noticeably). If a real project only needs the custom styles, filter by name first and copy only the styles the target document does not have yet:
for (let i = 0; i < srcDoc.Styles.Count; i++) {
  let style = srcDoc.Styles.get_Item(i);

  // Check whether the target document already has a style with the same name
  let exists = false;
  for (let j = 0; j < destDoc.Styles.Count; j++) {
    if (destDoc.Styles.get_Item(j).Name === style.Name) {
      exists = true;
      break;
    }
  }

  // Only add the styles that the target document is missing
  if (!exists) {
    destDoc.Styles.Add(style);
  }
}
A custom style does not take effect when it is applied to a paragraph
Cause: ApplyStyle is called differently for built-in and custom styles — a built-in style takes a { builtinStyle } object, a custom style takes the style name as a string. Passing the wrong form is ignored silently.
Solution: Choose the form that matches where the style comes from:
// Built-in style
paragraph.ApplyStyle({ builtinStyle: wasmModule.BuiltinStyle.Heading1 });

// Custom style (the string name, which has to match the name used in Add)
paragraph.ListFormat.ApplyStyle("bulletList");
Get a Free License
Spire.Doc for JavaScript offers a 30-day full-featured free trial license with no functional limitations. Apply here to evaluate before purchasing.
How to Set or Get PDF Document Properties with JavaScript in React
2026-09-30 05:55:07 Written by Nina TangA PDF's properties panel records the title, author, subject, and keywords, and knowledge bases, archival systems, and full-text search all use them as the basis for classification. The files you actually receive tend to be the opposite: the title still carries the name left over from a previous template, the author field is empty, and keywords are missing altogether. Filling them in means typing into each field by hand in a reader, and checking the author or subject of a batch of documents means opening the properties dialog one file at a time — desktop software cannot do it in bulk, and uploading the files to a server means the content leaves the user's device.
This article uses Spire.PDF for JavaScript to set and get PDF document properties. It runs on WebAssembly to load, modify, and save PDFs directly in the browser, working through a virtual file system (VFS) with no backend required.
This article covers two core features:
For installation and project configuration, refer to Integrating Spire.PDF for JavaScript in a React Project. The examples below assume Spire.PDF is installed and the WebAssembly module has been initialized.
Set PDF Document Properties
Spire.PDF for JavaScript provides doc.DocumentInformation for writing the standard document properties — title, author, subject, and keywords each take one field, while Creator and Producer record who generated the file, all of them plain strings.
function App() {
  const setPdfProperties = async () => {
    // Get the Spire.PDF WASM module
    const pdfModule = window.wasmModule?.spirepdf;

    // Check that the module is ready
    if (!pdfModule) {
      alert('Spire.PDF is not ready yet');
      return;
    }

    // Load the PDF to be processed into the VFS
    const inputFileName = 'ProductOverview.pdf';
    await window.spire.FetchFileToVFS(inputFileName, '', `${process.env.PUBLIC_URL}/data/`);

    // Create a PdfDocument and load the PDF
    const doc = new pdfModule.PdfDocument();
    doc.LoadFromFile(inputFileName);

    // Write the standard document properties
    doc.DocumentInformation.Title = '2026 Product Overview';
    doc.DocumentInformation.Author = 'Marketing Department';
    doc.DocumentInformation.Subject = 'Product Line and Pricing';
    doc.DocumentInformation.Keywords = 'product overview, pricing, 2026';
    doc.DocumentInformation.Creator = 'Content Center';
    doc.DocumentInformation.Producer = 'Spire.PDF for JavaScript';

    const outputFileName = 'Properties-Set.pdf';
    doc.SaveToFile(outputFileName);
    doc.Close();

    // Read the generated file from the VFS and trigger the download
    const fileArray = window.dotnetRuntime.Module.FS.readFile(outputFileName);
    const blob = new Blob([fileArray], { type: 'application/pdf' });
    const url = URL.createObjectURL(blob);
    const a = document.createElement('a');
    a.href = url;
    a.download = outputFileName;
    a.click();
    URL.revokeObjectURL(url);
  };

  return (
    <div style={{ textAlign: 'center', height: '300px' }}>
      <h1>Set PDF Document Properties</h1>
      <button onClick={setPdfProperties}>
        Set Properties
      </button>
    </div>
  );
}

export default App;
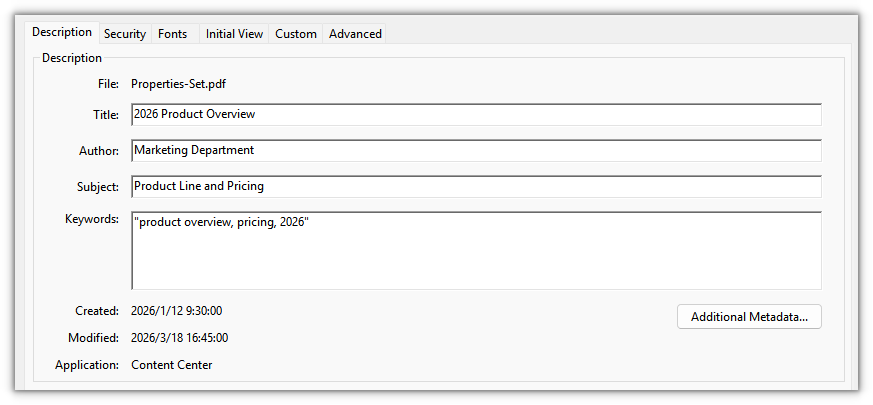
The standard fields shown in the reader's document properties panel after setting:
Get PDF Document Properties
Reading goes through the same DocumentInformation: the standard fields come back as strings. Joining the values you get into text and writing it out lets a batch pipeline compare or store them directly, without going through a reader's properties panel.
function App() {
  const getPdfProperties = async () => {
    // Get the Spire.PDF WASM module
    const pdfModule = window.wasmModule?.spirepdf;

    // Check that the module is ready
    if (!pdfModule) {
      alert('Spire.PDF is not ready yet');
      return;
    }

    // Load the PDF to be read into the VFS
    const inputFileName = 'Properties-Set.pdf';
    await window.spire.FetchFileToVFS(inputFileName, '', `${process.env.PUBLIC_URL}/data/`);

    // Create a PdfDocument and load the PDF
    const doc = new pdfModule.PdfDocument();
    doc.LoadFromFile(inputFileName);

    // Read the standard properties and the creation/modification dates one by one
    const info = doc.DocumentInformation;

    const lines = [
      `Title: ${info.Title}`,
      `Author: ${info.Author}`,
      `Subject: ${info.Subject}`,
      `Keywords: ${info.Keywords}`,
      `Creator: ${info.Creator}`,
      `Producer: ${info.Producer}`,
      `CreationDate: ${info.CreationDate.toString()}`,
      `ModificationDate: ${info.ModificationDate.toString()}`,
    ];

    // Write the result to a text file
    const outputFileName = 'Document-Properties.txt';
    window.dotnetRuntime.Module.FS.writeFile(outputFileName, lines.join('\n'));
    doc.Close();

    // Read the generated file from the VFS and trigger the download
    const fileArray = window.dotnetRuntime.Module.FS.readFile(outputFileName);
    const blob = new Blob([fileArray], { type: 'text/plain' });
    const url = URL.createObjectURL(blob);
    const a = document.createElement('a');
    a.href = url;
    a.download = outputFileName;
    a.click();
    URL.revokeObjectURL(url);
  };

  return (
    <div style={{ textAlign: 'center', height: '300px' }}>
      <h1>Get PDF Document Properties</h1>
      <button onClick={getPdfProperties}>
        Get Properties
      </button>
    </div>
  );
}

export default App;
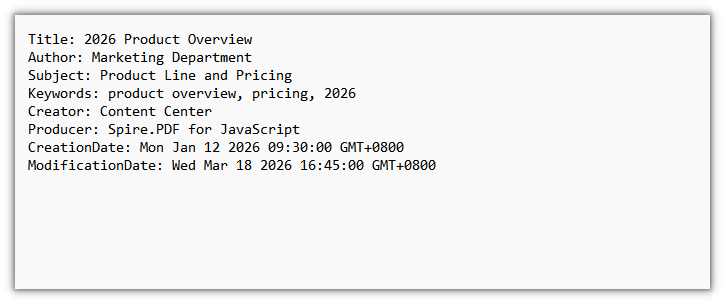
The exported text file lists the standard properties that were read, one per line:
FAQ
Why do my property changes disappear after I reopen the file
Reason: the fields on DocumentInformation change the document object in memory, and only calling SaveToFile writes them into the file. Assign the values and close the document right away, or open the original input file again, and you will of course still see the old values.
Solution: after assigning the values, save the document to a new output file, then open that result to check it:
doc.DocumentInformation.Title = '2026 Product Overview';
doc.DocumentInformation.Author = 'Marketing Department';

// Only after saving do the properties land in the file
doc.SaveToFile('Properties-Set.pdf');
Get a Free License
If you want to remove the evaluation message from the result documents or get rid of feature limitations, please contact sales to obtain a free 30-day temporary license.
Create a Table of Contents in PDF Using JavaScript in React
2026-09-29 09:46:36 Written by Nina TangSend out a manual or report of a few hundred pages and the complaint is rarely about the content — it's that readers can't find the chapter they want. They want a page-numbered list of chapters up front, and one click to jump there. Many PDFs are generated without one, so readers are left to the scrollbar or in-document search.
This article shows how to create a table of contents page and add navigation to its entries with Spire.PDF for JavaScript. It loads, edits and saves PDF documents directly in the browser through WebAssembly, reading and writing files through a virtual file system (VFS), so everything runs locally with no backend.
Two core features are covered:
For installation and project setup, see Integrate Spire.PDF for JavaScript in a React Project. The examples below assume Spire.PDF is installed and the WebAssembly module is initialized.
Create a Table of Contents Page
The contents page has to land at a specific position in the document. Pages.Insert({ index }) inserts a page and returns it, and the title, chapter entries, leader dots and page numbers are all drawn on that page with Canvas.DrawString. Each entry advances horizontally by its text width, and leader dots fill the gap from the end of the title to the start of the page number.
function App() {
  const createTocPage = async () => {
    // Get the Spire.PDF WASM module
    const pdfModule = window.wasmModule?.spirepdf;

    // Check whether the module is ready
    if (!pdfModule) {
      alert('Spire.PDF is not ready yet');
      return;
    }

    // Load the PDF to process into the VFS
    const inputFileName = 'Chapter_Document.pdf';
    await window.spire.FetchFileToVFS(inputFileName, '', `${process.env.PUBLIC_URL}/data/`);

    // Create a PdfDocument object and load the PDF
    let doc = new pdfModule.PdfDocument();
    doc.LoadFromFile(inputFileName);

    // Insert the contents page after the cover; the body pages shift down by one
    const tocPage = doc.Pages.Insert({ index: 1 });

    // Fonts for the title and the entries, using the built-in Helvetica (no font file to load)
    const titleFont = new pdfModule.PdfFont({ fontFamily: pdfModule.PdfFontFamily.Helvetica, size: 20, style: pdfModule.PdfFontStyle.Bold });
    const entryFont = new pdfModule.PdfFont({ fontFamily: pdfModule.PdfFontFamily.Helvetica, size: 14 });
    const centerFormat = new pdfModule.PdfStringFormat({ alignment: pdfModule.PdfTextAlignment.Center });

    // Draw the centered contents title
    const title = 'Contents';
    tocPage.Canvas.DrawString({
      s: title,
      font: titleFont,
      brush: pdfModule.PdfBrushes.get_Black(),
      point: new pdfModule.PointF(tocPage.Canvas.ClientSize.Width / 2, 50),
      format: centerFormat
    });

    // Chapter titles and their page numbers after the contents page is inserted
    const chapters = [
      { title: 'Chapter 1 Overview', page: 3 },
      { title: 'Chapter 2 Architecture', page: 4 },
      { title: 'Chapter 3 Deployment', page: 5 },
      { title: 'Chapter 4 Maintenance', page: 6 }
    ];

    const width = tocPage.Canvas.ClientSize.Width;
    let y = 110;
    for (const chapter of chapters) {
      // Entry text
      const titleSize = entryFont.MeasureString({ text: chapter.title });
      tocPage.Canvas.DrawString({ s: chapter.title, font: entryFont, brush: pdfModule.PdfBrushes.get_Black(), x: 40, y: y });

      // Right-aligned page number
      const pageText = chapter.page.toString();
      const pageSize = entryFont.MeasureString({ text: pageText });
      tocPage.Canvas.DrawString({ s: pageText, font: entryFont, brush: pdfModule.PdfBrushes.get_Black(), x: width - 40 - pageSize.Width, y: y });

      // Leader dots: fill from the end of the entry to the start of the page number
      const dotStart = 40 + titleSize.Width + 6;
      const dotEnd = width - 40 - pageSize.Width - 6;
      for (let x = dotStart; x < dotEnd; x += 6) {
        tocPage.Canvas.DrawString({ s: '.', font: entryFont, brush: pdfModule.PdfBrushes.get_Gray(), x: x, y: y });
      }

      y += 24;
    }

    // Define the output file name and save
    const outputFileName = 'Document-with-TOC.pdf';
    doc.SaveToFile(outputFileName);
    doc.Close();

    // Read the generated file from the VFS and trigger the download
    const fileArray = window.dotnetRuntime.Module.FS.readFile(outputFileName);
    const blob = new Blob([fileArray], { type: 'application/pdf' });
    const url = URL.createObjectURL(blob);
    const a = document.createElement('a');
    a.href = url;
    a.download = outputFileName;
    a.click();
    URL.revokeObjectURL(url);
  };

  return (
    <div style={{ textAlign: 'center', height: '300px' }}>
      <h1>Create a Table of Contents Page</h1>
      <button id="btn-1" onClick={createTocPage}>
        Create TOC
      </button>
    </div>
  );
}

export default App;
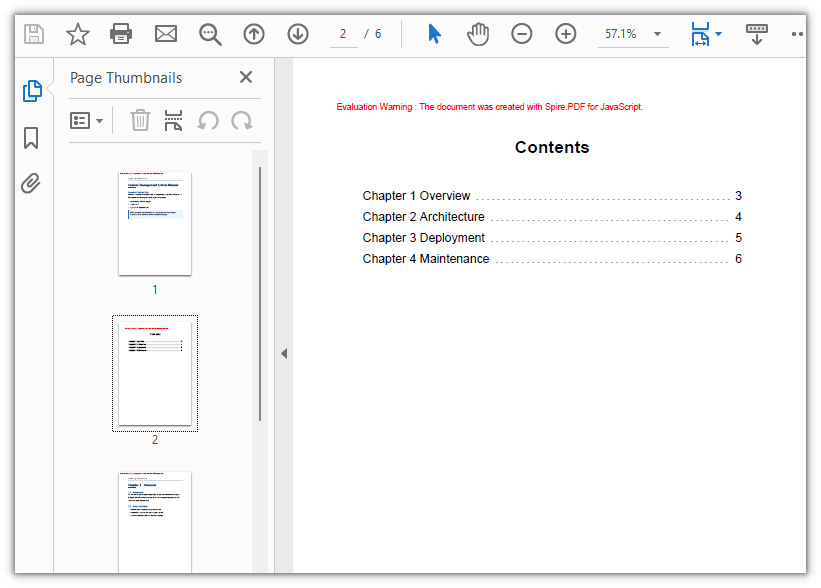
The document with a contents page: the page after the cover lists each chapter with its page number
Add Navigation to Table of Contents Entries
Once the contents page is drawn, each entry is still just a line of text. To make an entry clickable, cover it with a PdfActionAnnotation hit area and attach a PdfGoToAction carrying a PdfDestination that names the target page. There is no need to derive the hit area's position from line spacing — search the entry's text on the contents page with PdfTextFinder, and the rectangle it returns is where that line actually sits on the page, ready to use as the hit area.
function App() {
  const addTocNavigation = async () => {
    // Get the Spire.PDF WASM module
    const pdfModule = window.wasmModule?.spirepdf;

    // Check whether the module is ready
    if (!pdfModule) {
      alert('Spire.PDF is not ready yet');
      return;
    }

    // Load the document generated in the previous step
    const inputFileName = 'Document-with-TOC.pdf';
    await window.spire.FetchFileToVFS(inputFileName, '', `${process.env.PUBLIC_URL}/data/`);

    let doc = new pdfModule.PdfDocument();
    doc.LoadFromFile(inputFileName);

    // The contents page is page 2 of the document (index 1)
    const tocPage = doc.Pages.get_Item(1);

    // The entry text and the page each one should jump to
    const chapters = [
      { title: 'Chapter 1 Overview', page: 3 },
      { title: 'Chapter 2 Architecture', page: 4 },
      { title: 'Chapter 3 Deployment', page: 5 },
      { title: 'Chapter 4 Maintenance', page: 6 }
    ];

    // Search the contents page by keyword
    const finder = new pdfModule.PdfTextFinder(tocPage);

    for (const chapter of chapters) {
      const found = finder.Find(chapter.title);
      if (found.length === 0) {
        continue;
      }

      // Define the hit area based on the keyword position
      const lineBounds = found.get(0).Bounds[0];
      const bounds = new pdfModule.RectangleF({
        location: new pdfModule.PointF(0, lineBounds.Y),
        size: new pdfModule.SizeF({ width: tocPage.Canvas.ClientSize.Width, height: lineBounds.Height })
      });

      // The jump target is the chapter's page, aligned to the top-left corner of the body
      const targetPage = doc.Pages.get_Item(chapter.page - 1);
      const destination = new pdfModule.PdfDestination({
        page: targetPage,
        location: new pdfModule.PointF(0, 0)
      });

      // Attach the jump action and set the border width to 0
      const action = new pdfModule.PdfActionAnnotation(bounds, new pdfModule.PdfGoToAction({ destination }));
      action.Border = new pdfModule.PdfAnnotationBorder({ borderWidth: 0 });
      tocPage.Annotations.Add(action);
    }

    // Define the output file name and save
    const outputFileName = 'Clickable-TOC.pdf';
    doc.SaveToFile(outputFileName);
    doc.Close();

    // Read the generated file from the VFS and trigger the download
    const fileArray = window.dotnetRuntime.Module.FS.readFile(outputFileName);
    const blob = new Blob([fileArray], { type: 'application/pdf' });
    const url = URL.createObjectURL(blob);
    const a = document.createElement('a');
    a.href = url;
    a.download = outputFileName;
    a.click();
    URL.revokeObjectURL(url);
  };

  return (
    <div style={{ textAlign: 'center', height: '300px' }}>
      <h1>Add Navigation to Table of Contents Entries</h1>
      <button id="btn-2" onClick={addTocNavigation}>
        Add Navigation
      </button>
    </div>
  );
}

export default App;
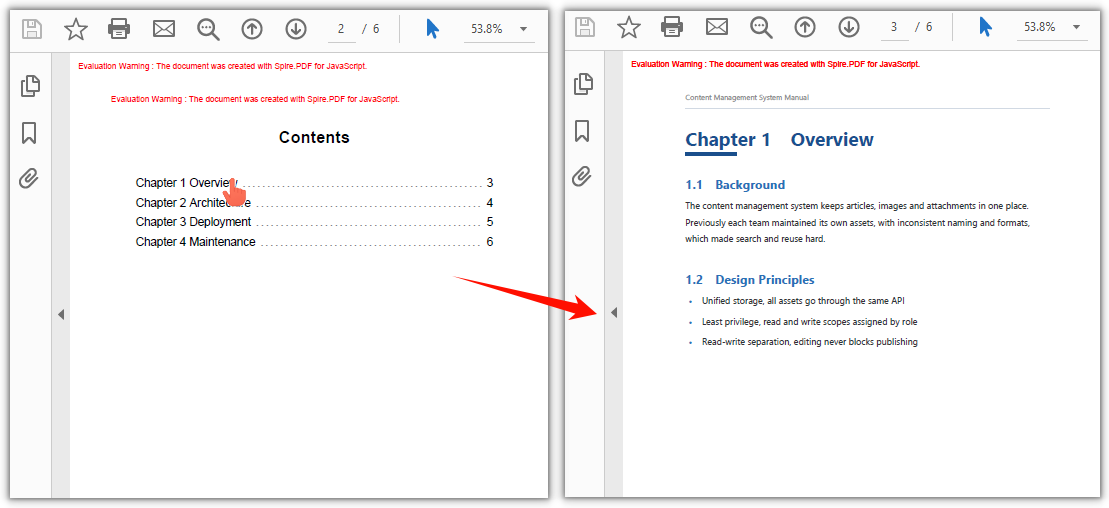
Clicking a chapter title in the contents page jumps to that page
FAQ
Table of contents page numbers don't match the actual pages
Cause: the contents page is inserted into the original document, so every page after the insertion point shifts down by one. If the page numbers keep the order from before the insertion, they will be off by one across the board.
Solution: write the page numbers as they appear after the insertion. For example, if the cover was page 1 and chapter 1 was page 2, then after inserting the contents page after the cover, chapter 1 falls on page 3, and that is what the contents should list.
Clicking a table of contents entry jumps to the wrong chapter, or does nothing
Cause: the entry is drawn with Canvas.DrawString, but the hit area has to be given in page coordinates. Deriving it from the drawing y plus the line spacing means any mismatch in font metrics, line spacing or page margins accumulates row by row, so the click lands on a different entry — or on nothing at all.
Solution: don't derive it — search the contents page for the entry's text (the keyword) and use the rectangle that comes back. PdfTextFinder already returns page coordinates, so no top margin has to be added; get page with doc.Pages.get_Item(...) so it is a real page object:
const finder = new pdfModule.PdfTextFinder(tocPage);
const found = finder.Find(chapter.title);
const lineBounds = found.get(0).Bounds[0];
const bounds = new pdfModule.RectangleF({
  location: new pdfModule.PointF(0, lineBounds.Y),
  size: new pdfModule.SizeF({ width: tocPage.Canvas.ClientSize.Width, height: lineBounds.Height })
});
const targetPage = doc.Pages.get_Item(chapter.page - 1);
const action = new pdfModule.PdfActionAnnotation(bounds, new pdfModule.PdfGoToAction({ destination }));
Get a Free License
To remove the evaluation message from the generated documents, or to get rid of the function limitations, please contact sales for a temporary license valid for 30 days.
Converting between Word documents and OpenXML is one of the most frequent needs in document processing: exporting a Word document to XML lifts the body content out of the binary package structure, which makes cross-system exchange, bulk extraction and archiving much easier, while turning XML back into a Word document lets you generate a standard document directly from structured data you already have. Spire.Doc for JavaScript performs the conversion in both directions in the browser via WebAssembly, using a virtual file system (VFS) to manage fonts and files — no backend server required. OpenXML flat files come in two formats: WordML for Word 2003 and WordXml (Flat OPC) for Word 2007 and later, so the one you save as depends on the target Word version.
This article covers three core features:
For installation and project setup, refer to Integrating Spire.Doc for JavaScript in a React Project. The examples below assume Spire.Doc is installed and the WebAssembly module is initialized.
Word to OpenXML (WordML)
Converting a Word document to OpenXML involves three steps: first, load the font files and the target Word document into the WASM virtual file system via FetchFileToVFS; then instantiate a Document, load the file and call SaveToFile with FileFormat.WordML to save the document as a Word 2003 XML flat file; finally, read the generated XML file from VFS, wrap it as a Blob and trigger a browser download.
function App() {
  const WordToWordML = async () => {
    const docModule = window.wasmModule?.spiredoc;
    if (!docModule) {
      alert('Spire.Doc is not ready yet');
      return;
    }

    // Load the sample file into VFS
    let inputFileName = 'WordToWordXML.docx';
    await window.spire.FetchFileToVFS(inputFileName, '', `${process.env.PUBLIC_URL}/static/data/`);

    // Create a document instance
    const doc = new docModule.Document();

    // Load the document from the virtual file system
    doc.LoadFromFile(inputFileName);

    // Define the output file name and save it as a Word 2003 OpenXML file
    const outputFileName = 'WordToWordXML-result.xml';
    doc.SaveToFile({ fileName: outputFileName, fileFormat: docModule.FileFormat.WordML });

    // Release resources
    doc.Dispose();

    const modifiedFileArray = window.dotnetRuntime.Module.FS.readFile(outputFileName);
    const blob = new Blob([modifiedFileArray], { type: 'application/vnd.openxmlformats-officedocument.wordprocessingml.document' });
    const url = URL.createObjectURL(blob);
    const a = document.createElement('a');
    a.href = url;
    a.download = outputFileName;
    a.click();
    URL.revokeObjectURL(url);
  };

 return (
    <div style={{ textAlign: 'center', height: '300px' }}>
      <h1>Convert Word To WordML</h1>
      <button onClick={WordToWordML}>Generate</button>
    </div>
  );
}
export default App;
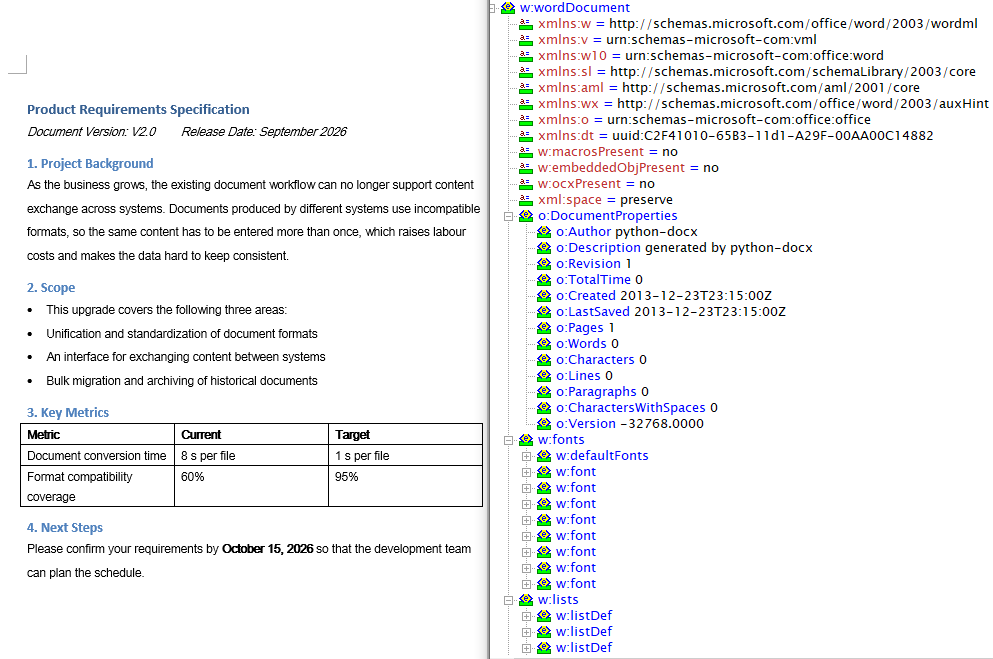
With FileFormat.WordML passed to SaveToFile, the Word document is converted into a Word 2003 XML flat file
Word to OpenXML (WordXml)
The flat file format of Word 2007 and later is called WordXml (Flat OPC): it packs the individual parts of the docx package — body, styles, relationships and so on — into a single XML file whose root element is <pkg:package>, and Word can open it directly just the same. The conversion flow is identical to WordML; only the save format differs. It again involves three steps: first, load the font files and the target Word document into the WASM virtual file system via FetchFileToVFS; then instantiate a Document, load the file and call SaveToFile with FileFormat.WordXml to save the document as a Word 2007 XML file; finally, read the generated XML file from VFS, wrap it as a Blob and trigger a browser download.
function App() {
  const WordToWordXml = async () => {
    const docModule = window.wasmModule?.spiredoc;
    if (!docModule) {
      alert('Spire.Doc is not ready yet');
      return;
    }

    // Load the sample file into VFS
    let inputFileName = 'WordToWordXML.docx';
    await window.spire.FetchFileToVFS(inputFileName, '', `${process.env.PUBLIC_URL}/static/data/`);

    // Create a document instance
    const doc = new docModule.Document();

    // Load the document from the virtual file system
    doc.LoadFromFile(inputFileName);

    // Define the output file name and save it as a Word 2007 OpenXML file
    const outputFileName = 'WordToWordXML-result-2007.xml';
    doc.SaveToFile({ fileName: outputFileName, fileFormat: docModule.FileFormat.WordXml });

    // Release resources
    doc.Dispose();

    const modifiedFileArray = window.dotnetRuntime.Module.FS.readFile(outputFileName);
    const blob = new Blob([modifiedFileArray], { type: 'application/vnd.openxmlformats-officedocument.wordprocessingml.document' });
    const url = URL.createObjectURL(blob);
    const a = document.createElement('a');
    a.href = url;
    a.download = outputFileName;
    a.click();
    URL.revokeObjectURL(url);
  };

 return (
    <div style={{ textAlign: 'center', height: '300px' }}>
      <h1>Convert Word To WordXml</h1>
      <button onClick={WordToWordXml}>Generate</button>
    </div>
  );
}
export default App;
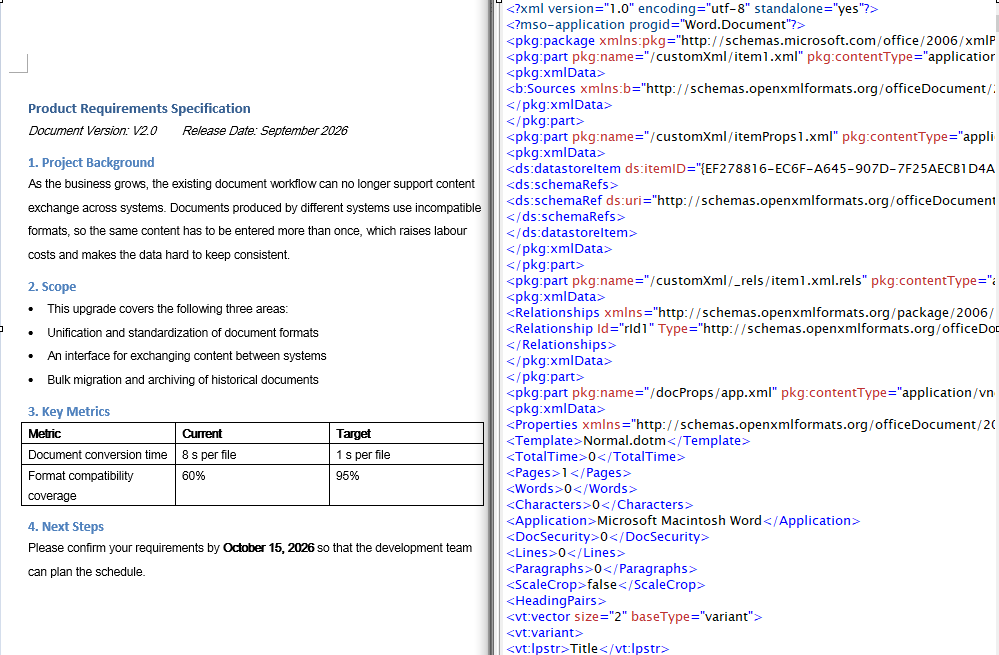
With FileFormat.WordXml passed to SaveToFile, the parts of the Word document are merged into a single Word 2007 Flat OPC XML file
OpenXML to Word
Converting OpenXML to Word involves three steps: first, load the font files and the target XML file into the WASM virtual file system via FetchFileToVFS; then instantiate a Document and load the XML file directly with LoadFromFile — Spire.Doc recognizes the WordML and WordXml formats from the file contents automatically — and call SaveToFile to save it as a Docx2013 Word document; finally, read the generated .docx file from VFS, wrap it as a Blob and trigger a browser download.
function App() {
  const XMLToWord = async () => {
    const docModule = window.wasmModule?.spiredoc;
    if (!docModule) {
      alert('Spire.Doc is not ready yet');
      return;
    }

    // Load the sample file into VFS
    let inputFileName = 'XMLToWord.xml';
    await window.spire.FetchFileToVFS(inputFileName, '', `${process.env.PUBLIC_URL}/static/data/`);

    // Create a document instance
    const doc = new docModule.Document();

    // Load the OpenXML file from the virtual file system
    doc.LoadFromFile(inputFileName);

    // Define the output file name and save it as a Word document
    const outputFileName = 'XMLToWord-result.docx';
    doc.SaveToFile({ fileName: outputFileName, fileFormat: docModule.FileFormat.Docx2013 });

    // Release resources
    doc.Dispose();

    const modifiedFileArray = window.dotnetRuntime.Module.FS.readFile(outputFileName);
    const blob = new Blob([modifiedFileArray], { type: 'application/vnd.openxmlformats-officedocument.wordprocessingml.document' });
    const url = URL.createObjectURL(blob);
    const a = document.createElement('a');
    a.href = url;
    a.download = outputFileName;
    a.click();
    URL.revokeObjectURL(url);
  };

 return (
    <div style={{ textAlign: 'center', height: '300px' }}>
      <h1>Convert XML To Word</h1>
      <button onClick={XMLToWord}>Generate</button>
    </div>
  );
}
export default App;
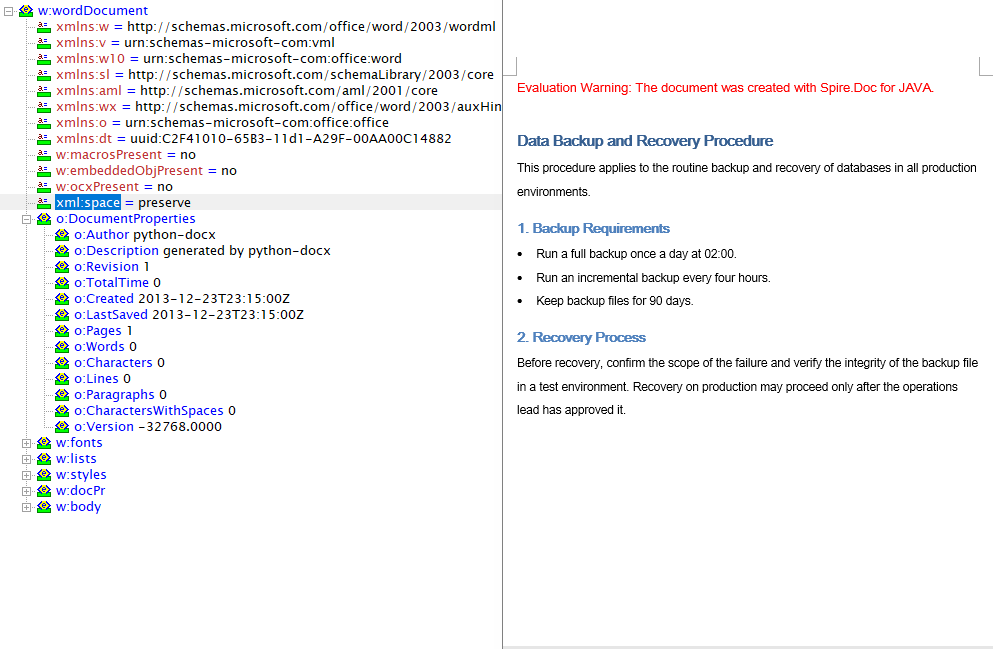
After the OpenXML file is loaded with LoadFromFile and saved as a Word document, the paragraphs, lists and tables it contains are restored in full
FAQ
The generated XML reports a format error when opened in Word
Cause: The save format does not match the target Word version. FileFormat.WordML maps to the Word 2003 XML format and FileFormat.WordXml to the Word 2007 and later Flat OPC format; the two have different structures, so opening a file saved in the newer format with an older version of Word fails.
Solution: Pick the enum value that matches the target Word version, and name the output file .xml:
// Word 2003 and earlier
doc.SaveToFile({ fileName: 'out.xml', fileFormat: wasmModule.FileFormat.WordML });

// Word 2007 and later
doc.SaveToFile({ fileName: 'out.xml', fileFormat: wasmModule.FileFormat.WordXml });
Loading the XML fails, or the converted document comes out empty
Cause: OpenXML to Word requires the input to be a complete WordprocessingML flat file; an ordinary custom data XML cannot be recognized by LoadFromFile.
Solution: Make sure the input XML was exported by Word or Spire.Doc — the root element of the WordML format is <w:wordDocument> and that of the WordXml format is <pkg:package>:
const doc = new wasmModule.Document();
doc.LoadFromFile('XMLToWord.xml');
Get a Free License
Spire.Doc for JavaScript offers a 30-day full-featured free trial license with no functional limitations. Apply here to evaluate before purchasing.
Plain text (TXT) is the lightest text carrier there is, commonly used for log export, data exchange and content archiving, while Word takes care of layout and formal delivery. Converting between the two in the browser is a common document-processing need: TXT to Word turns collected plain text into a well-formed document, and Word to TXT extracts body text that a program can keep processing. Spire.Doc for JavaScript performs the conversion in both directions in the browser via WebAssembly, using a virtual file system (VFS) to manage fonts and files — no backend server required.
It should be said up front that TXT is a plain-text format which carries no layout information of its own, so both directions only hold at the level of text: the styles, table structure and images on the Word side never reach the TXT file, and a Word document produced from TXT contains nothing but body paragraphs. Being clear about that boundary before you use the API keeps your expectations of the result realistic.
This article covers two core features:
For installation and project setup, refer to Integrating Spire.Doc for JavaScript in a React Project. The examples below assume Spire.Doc is installed and the WebAssembly module is initialized.
Convert TXT to Word
Converting TXT to Word involves three steps: first, load the font files and the target TXT file into the WASM virtual file system via FetchFileToVFS; then instantiate a Document and load the file with LoadFromFile — no fileFormat is passed here, so Spire.Doc identifies it as plain text from the file extension; finally, call SaveToFile to save the result as docx, read the generated file from VFS, wrap it as a Blob and trigger a browser download.
function App() {
  const TxtToWord = async () => {
    const docModule = window.wasmModule?.spiredoc;
    if (!docModule) {
      alert('Spire.Doc is not ready yet');
      return;
    }

    // Load the sample file into VFS
    let inputFileName = "TxtToWord.txt";
    await window.spire.FetchFileToVFS(inputFileName, "", `${process.env.PUBLIC_URL}/static/data/`);

    // Create a document instance
    const doc = new docModule.Document();

    // Load the document from the virtual file system
    doc.LoadFromFile(inputFileName);

    // Define the output file name
    const outputFileName = "TxtToWord-result.docx";

    // Save the document in the specified format
    doc.SaveToFile({fileName: outputFileName, fileFormat: docModule.FileFormat.Docx2013});

    // Release resources
    doc.Dispose();

    const modifiedFileArray = window.dotnetRuntime.Module.FS.readFile(outputFileName);
    const blob = new Blob([modifiedFileArray], { type: 'application/vnd.openxmlformats-officedocument.wordprocessingml.document' });
    const url = URL.createObjectURL(blob);
    const a = document.createElement('a');
    a.href = url;
    a.download = outputFileName;
    a.click();
    URL.revokeObjectURL(url);
  };

 return (
    <div style={{ textAlign: 'center', height: '300px' }}>
      <h1>Convert TXT To Word</h1>
      <button onClick={TxtToWord}>Generate</button>
    </div>
  );
}
export default App;
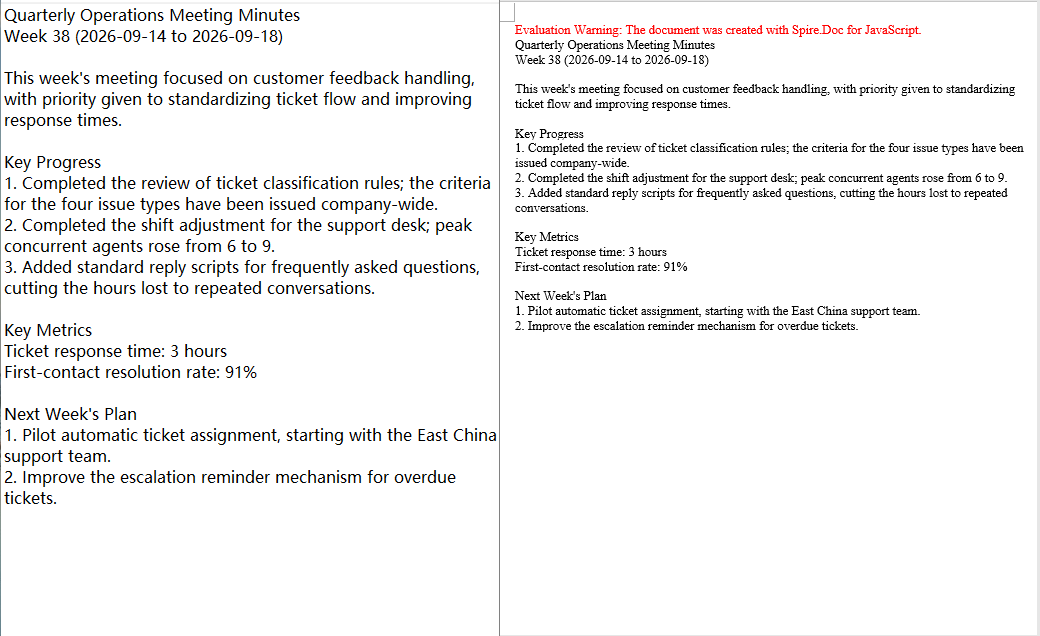
Because TXT carries no style information, the result is decided entirely by the default layout rules of Spire.Doc, and there are two things to keep in mind: every line break in the file is turned into a paragraph in Word, while blank lines are kept as empty paragraphs, so a file that ends with a line break gains an extra empty paragraph at the end; and every paragraph in the output uses the default Normal style, so headings, numbering and bullet levels are not created automatically — the 1., - and similar characters written in the TXT are kept as ordinary characters only.
After a TXT file is loaded with LoadFromFile and saved as a Word document, the text is restored to paragraphs line by line, all in the Normal style
Convert Word to TXT
Converting Word to TXT follows the same three steps as the other direction: load the font files and the target Word document into the virtual file system via FetchFileToVFS, then instantiate a Document and load the document with LoadFromFile. The difference is that FileFormat.Txt is specified when saving, so Spire.Doc extracts the document content by plain-text rules; finally, read the generated txt file from VFS, wrap it as a text/plain Blob and trigger a browser download.
function App() {
  const WordToTxt = async () => {
    const docModule = window.wasmModule?.spiredoc;
    if (!docModule) {
      alert('Spire.Doc is not ready yet');
      return;
    }

    // Load the sample file into VFS
    let inputFileName = "WordToTxt.docx";
    await window.spire.FetchFileToVFS(inputFileName, "", `${process.env.PUBLIC_URL}/static/data/`);

    // Create a document instance
    const doc = new docModule.Document();

    // Load the document from the virtual file system
    doc.LoadFromFile(inputFileName);

    // Define the output file name
    const outputFileName = "WordToTxt-result.txt";

    // Save the document as plain text
    doc.SaveToFile({fileName: outputFileName, fileFormat: docModule.FileFormat.Txt});

    // Release resources
    doc.Dispose();

    const modifiedFileArray = window.dotnetRuntime.Module.FS.readFile(outputFileName);
    const blob = new Blob([modifiedFileArray], { type: 'application/vnd.openxmlformats-officedocument.wordprocessingml.document' });
    const url = URL.createObjectURL(blob);
    const a = document.createElement('a');
    a.href = url;
    a.download = outputFileName;
    a.click();
    URL.revokeObjectURL(url);
  };

 return (
    <div style={{ textAlign: 'center', height: '300px' }}>
      <h1>Convert Word To TXT</h1>
      <button onClick={WordToTxt}>Generate</button>
    </div>
  );
}
export default App;
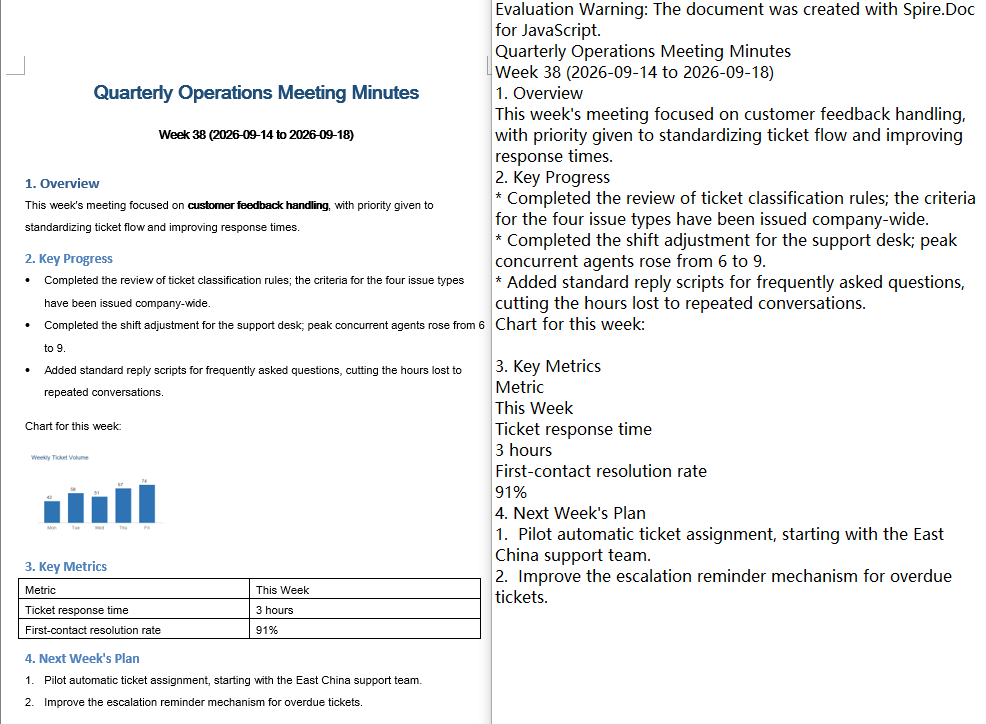
The FileFormat.Txt export follows a "text only" rule. Taking a Word document that contains a heading, a bullet list, a numbered list, a table and an image as the example, the exported result can be summed up as follows:
- The font, font size, colour and bold formatting of headings, body text and list items are all dropped, and everything is reduced to ordinary text lines;
- Bullet list items are written with a
*prefix and numbered items with a1.prefix, and the list level information is lost along with them; - The table is expanded cell by cell into separate lines, so the correspondence between rows and columns no longer holds;
- Images are not exported, and the paragraph that held one becomes an empty line.
In addition, the exported txt is UTF-8 encoded with a BOM and uses CRLF line breaks, so wrapping the Blob with the text/plain type is all that is needed.
With FileFormat.Txt passed to SaveToFile, the styles, tables and images of the Word document are not preserved and only the text content is written out in order
FAQ
Table columns shift and list markers turn into asterisks after converting Word to TXT
Cause: TXT has no concept of rows, columns or list structure, and FileFormat.Txt only extracts text: the table is written out line by line in cell order, bullets are replaced with * and numbering with the number text. This is a limitation of the format itself rather than a conversion failure.
Solution: If all the downstream consumer needs is readable text, restore the structure on the reading side using the rules above; if the table and list layout has to be preserved, use a format that can carry structure instead, such as HTML or OpenXML.
The converted Word document has no heading or list styles
Cause: TXT carries no style information, so when LoadFromFile loads plain text it can only write each line as a paragraph with the default Normal style — the 1., - and similar characters in the TXT are ordinary characters and are not parsed as headings or lists.
Solution: Set the styles of the paragraphs you care about again after the conversion; if setting them paragraph by paragraph is not acceptable, complete this step with an input format that already carries structure (such as HTML) instead.
Loading a TXT file reports that the file type cannot be detected
Cause: When LoadFromFile is called without fileFormat, the format is judged from the file extension. When the extension of the input file is not .txt (for example .log, .dat, or no extension at all), Spire.Doc cannot identify it and throws an exception such as Cannot detect current file type.
Solution: Specify the plain-text format explicitly:
doc.LoadFromFile({ fileName: inputFileName, fileFormat: wasmModule.FileFormat.Txt });
Get a Free License
Spire.Doc for JavaScript offers a 30-day full-featured free trial license with no functional limitations. Apply here to evaluate before purchasing.
HTML is the most universal carrier for presenting content on the web and for editing rich text, while Word remains the standard format for delivering and archiving documents. Converting between the two comes up frequently in scenarios such as report export, content archiving, and storing rich text in a database. Spire.Doc for JavaScript performs this conversion directly in the browser via WebAssembly, using a virtual file system (VFS) to manage input and output files — no backend server required.
This article covers two core features:
For installation and project setup, refer to Integrating Spire.Doc for JavaScript in a React Project. The examples below assume Spire.Doc is installed and the WebAssembly module is initialized.
HTML File to Word
Converting an HTML file to Word breaks down into three stages: first, load the font file and the target HTML file into the WASM virtual file system via FetchFileToVFS; then instantiate a Document and call LoadFromFile with FileFormat.Html, so that Spire.Doc parses the tags, lists, and table structures in the file; finally, call SaveToFile to save the result as a docx, read the generated file from VFS, wrap it in a Blob, and trigger a browser download.
function App() {
  const htmlFileToWord = async () => {
    const docModule = window.wasmModule?.spiredoc;
    if (!docModule) {
      alert('Spire.Doc is not ready yet');
      return;
    }

    const inputFileName = 'HtmlFileToWord.html';
    await window.spire.FetchFileToVFS(inputFileName, '', `${process.env.PUBLIC_URL}data/`);

    // Create a Document instance and load the file in HTML format
    const doc = new docModule.Document();
    doc.LoadFromFile({
      fileName: inputFileName,
      fileFormat: docModule.FileFormat.Html,
      validationType: docModule.XHTMLValidationType.None,
    });

    // Define the output file name and save it as Word
    const outputFileName = 'HtmlFileToWord-result.docx';
    doc.SaveToFile({ fileName: outputFileName, fileFormat: docModule.FileFormat.Docx });

    // Release resources
    doc.Dispose();

    const modifiedFileArray = window.dotnetRuntime.Module.FS.readFile(outputFileName);
    const blob = new Blob([modifiedFileArray], { type: 'application/vnd.openxmlformats-officedocument.wordprocessingml.document' });
    const url = URL.createObjectURL(blob);
    const a = document.createElement('a');
    a.href = url;
    a.download = outputFileName;
    a.click();
    URL.revokeObjectURL(url);
  };

 return (
    <div style={{ textAlign: 'center', height: '300px' }}>
      <h1>Convert an HTML File to a Word Document</h1>
      <button onClick={htmlFileToWord}>Generate</button>
    </div>
  );
}
export default App;
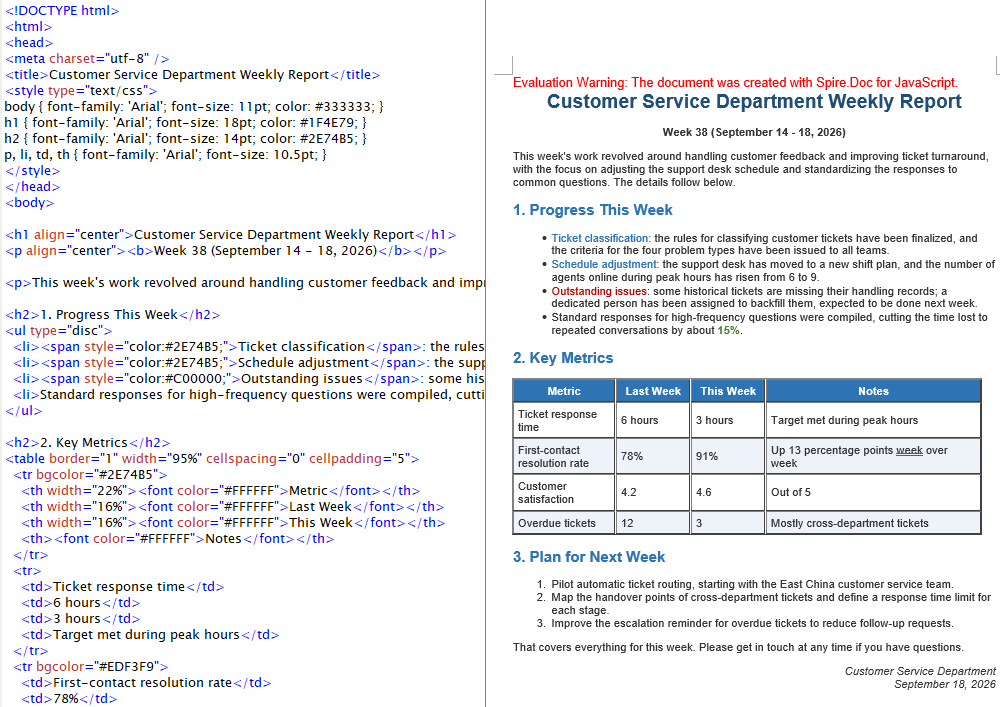
The Word document generated by converting an HTML file via LoadFromFile
HTML String to Word
In real projects the HTML waiting to be converted usually does not live on disk. It is the submitted result of a rich text editor, a fragment returned by a backend API, or a string assembled from a front-end template. Input like this does not need to be loaded from a file — appending the string to a paragraph is enough, and the rest of the flow matches HTML file to Word.
function App() {
  const htmlStringToWord = async () => {
    const docModule = window.wasmModule?.spiredoc;
    if (!docModule) {
      alert('Spire.Doc is not ready yet');
      return;
    }

    // Load the font into VFS
    await window.spire.FetchFileToVFS("ARIALUNI.TTF","/Library/Fonts/",`${process.env.PUBLIC_URL}static/font/`);

    // Define the HTML string to be converted
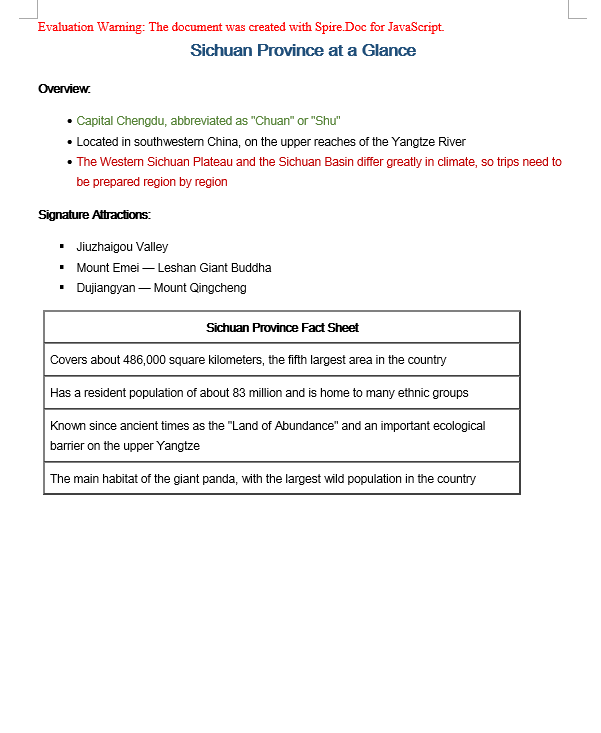
    let HTML = "<html><head><meta charset=\"utf-8\" /><style type=\"text/css\">body{font-family:'Arial Unicode MS';font-size:11pt;}h2{font-family:'Arial Unicode MS';font-size:16pt;color:#1F4E79;}p,li,td,th{font-family:'Arial Unicode MS';font-size:11pt;}</style></head><body>";
  HTML += "<h2 align=\"center\">Sichuan Province at a Glance</h2><p><b>Overview:</b></p> ";
  HTML += "<ul type=\"disc\"><li><span style='color:#548235;'>Capital Chengdu, abbreviated as \"Chuan\" or \"Shu\"</span></li><li>Located in southwestern China, on the upper reaches of the Yangtze River</li><li><span style='color:#C00000'>The Western Sichuan Plateau and the Sichuan Basin differ greatly in climate, so trips need to be prepared region by region</span></li></ul><p><b>Signature Attractions:</b></p>";
  HTML += "<ul type=\"square\"><li>Jiuzhaigou Valley</li><li>Mount Emei — Leshan Giant Buddha</li><li>Dujiangyan — Mount Qingcheng</li></ul>";
  HTML += "<table border=\"1\" width=\"90%\" cellspacing=\"0\" cellpadding=\"6\"><tr><th>Sichuan Province Fact Sheet</th></tr><tr><td>Covers about 486,000 square kilometers, the fifth largest area in the country</td></tr><tr><td>Has a resident population of about 83 million and is home to many ethnic groups</td></tr>";
  HTML += "<tr><td>Known since ancient times as the \"Land of Abundance\" and an important ecological barrier on the upper Yangtze</td></tr><tr><td>The main habitat of the giant panda, with the largest wild population in the country</td></tr></table></body></html>";
    // Create a document and add a section and a paragraph
    const doc = new docModule.Document();
    const section = doc.AddSection();
    const paragraph = section.AddParagraph();

    // Append the HTML string to the paragraph
    paragraph.AppendHTML(HTML);

    // Define the output file name and save it as Word
    const outputFileName = 'HtmlStringToWord-result.docx';
    doc.SaveToFile({ fileName: outputFileName, fileFormat: docModule.FileFormat.Docx2013 });

    // Release resources
    doc.Dispose();

    const modifiedFileArray = window.dotnetRuntime.Module.FS.readFile(outputFileName);
    const blob = new Blob([modifiedFileArray], { type: 'application/vnd.openxmlformats-officedocument.wordprocessingml.document' });
    const url = URL.createObjectURL(blob);
    const a = document.createElement('a');
    a.href = url;
    a.download = outputFileName;
    a.click();
    URL.revokeObjectURL(url);
  };

 return (
    <div style={{ textAlign: 'center', height: '300px' }}>
      <h1>Write an HTML String into a Word Document</h1>
      <button onClick={htmlStringToWord}>Generate</button>
    </div>
  );
}
export default App;
The Word document generated by converting an HTML string via AppendHTML
FAQ
Converted Word text displays as boxes or garbled characters
Cause: The font files required for rendering are missing from the WASM virtual file system. LoadFromFile matches fonts for the text while it parses the HTML, and content written by AppendHTML also needs glyphs looked up by font name — if the matching font is not present in VFS, non-ASCII characters such as Chinese will display as boxes or garbled text.
Solution: Load the font file into VFS via FetchFileToVFS before converting:
await window.spire.FetchFileToVFS(
  'ARIALUNI.TTF', '/Library/Fonts/', '/'
);
A validation-related exception is thrown when loading an HTML file
Cause: XHTMLValidationType is set too strictly. Real-world HTML files usually contain unclosed tags, inconsistently cased attributes, or non-standard markup, so they do not conform to the XHTML specification — strict validation throws during the parsing stage.
Solution: For HTML from uncontrolled sources, turn validation off with XHTMLValidationType.None:
wordDocument.LoadFromFile({
  fileName: inputFileName,
  fileFormat: docModule.FileFormat.Html,
  validationType: docModule.XHTMLValidationType.None,
});
Get a Free License
Spire.Doc for JavaScript offers a 30-day full-featured free trial license with no functional limitations. Apply here to evaluate before purchasing.
Worksheet data is rarely a tidy rectangle. Detail rows are interrupted by subtotal lines, group headings and notes, and the chart is meant to draw the detail alone; other numbers never reach a cell at all, because they come back from an API, are computed in code, or are simply a set of targets for this one report. Both cases defeat the usual routine of selecting a block and inserting a chart. Spire.XLS for JavaScript does this in the browser on top of WebAssembly, managing input and output files through a virtual file system (VFS), with no backend service required.
This article covers two key features:
For installation and project setup, see Integrating Spire.XLS for JavaScript in a React Project. The examples below assume Spire.XLS is installed and the WebAssembly module has been initialised.
Create a chart from a discontinuous data source
Subtotal rows, group headings and notes all cut a table of details into several blocks. Selecting the whole column and inserting a chart makes no distinction between them and the detail rows, so they are drawn as columns too: in the sample data a subtotal follows every two quarters, and reading the whole column turns six columns into nine and roughly doubles the height of every region. A series can be given its data as several non-adjacent blocks joined into a single reference, so the chart takes only the rows inside those blocks and skips over the rest. The table then needs no rearranging for the sake of the chart, and the subtotal rows can stay where they are. The steps are:
- Load the font and the test data file into the VFS.
- Load the workbook with
workbook.LoadFromFileand get the first worksheet withworkbook.Worksheets.get(0). - Add a column chart with
sheet.Charts.Addand setchart.SeriesDataFromRangetofalse, declaring that the series data is supplied block by block in code rather than taken fromchart.DataRange. - Add a series with
chart.Series.Addand setserie.Nameto theValueof the header cell. - Take each region's quarter rows with
Range.getand join them withAddCombinedRange, producing one reference for the category labels and one for the values. - Repeat the same joins for the second series so both share the same category labels, then save the workbook.
The complete code example below shows how to create a chart from a discontinuous data source in React:
function App() {
  const chartFromDiscontinuousData = async () => {
    // Get the Spire.XLS WASM module
    const xlsModule = window.wasmModule?.spirexls;

    // Check that the module is ready
    if (!xlsModule) {
      alert('Spire.Xls is not ready yet');
      return;
    }

    // Load the font and the sample workbook into the VFS
    await window.spire.FetchFileToVFS('ARIAL.TTF', '/Library/Fonts/', `${process.env.PUBLIC_URL}/font/`);
    const inputFileName = 'ChartSourceData.xlsx';
    await window.spire.FetchFileToVFS(inputFileName, '', `${process.env.PUBLIC_URL}data/`);

    // Load the workbook and get the first worksheet
    const workbook = new xlsModule.Workbook();
    workbook.LoadFromFile({ fileName: inputFileName });
    const sheet = workbook.Worksheets.get(0);

    // Add a column chart; the series data is given block by block in code, not as one range
    const chart = sheet.Charts.Add({ chartType: xlsModule.ExcelChartType.ColumnClustered });
    chart.ChartTitle = "Quarterly Sales by Region";
    chart.ChartTitleArea.Size = 12;
    chart.SeriesDataFromRange = false;

    // Place the chart on the worksheet
    chart.TopRow = 12;
    chart.BottomRow = 28;
    chart.LeftColumn = 1;
    chart.RightColumn = 10;

    // Join the three regions' quarter rows into one reference, skipping the subtotal rows
    const categoryLabels = sheet.Range.get("A2:A3")
      .AddCombinedRange(sheet.Range.get("A5:A6"))
      .AddCombinedRange(sheet.Range.get("A8:A9"));

    // Online series: the name comes from the header, the values are joined the same way
    const onlineSerie = chart.Series.Add();
    onlineSerie.Name = sheet.Range.get("B1").Value;
    onlineSerie.CategoryLabels = categoryLabels;
    onlineSerie.Values = sheet.Range.get("B2:B3")
      .AddCombinedRange(sheet.Range.get("B5:B6"))
      .AddCombinedRange(sheet.Range.get("B8:B9"));

    // In-store series: it shares the same category labels
    const storeSerie = chart.Series.Add();
    storeSerie.Name = sheet.Range.get("C1").Value;
    storeSerie.CategoryLabels = categoryLabels;
    storeSerie.Values = sheet.Range.get("C2:C3")
      .AddCombinedRange(sheet.Range.get("C5:C6"))
      .AddCombinedRange(sheet.Range.get("C8:C9"));

    // Save the workbook
    const outputFileName = "DiscontinuousData.xlsx";
    workbook.SaveToFile({ fileName: outputFileName });

    // Dispose of the workbook object to free resources
    workbook.Dispose();

    // Read the result file from the VFS and trigger the download
    const fileArray = window.dotnetRuntime.Module.FS.readFile(outputFileName);
    const blob = new Blob([fileArray], { type: 'application/vnd.openxmlformats-officedocument.spreadsheetml.sheet' });
    const url = URL.createObjectURL(blob);
    const a = document.createElement('a');
    a.href = url;
    a.download = outputFileName;
    a.click();
    URL.revokeObjectURL(url);
  };

  return (
    <div style={{ textAlign: 'center', height: '300px' }}>
      <h1>Discontinuous Data Chart</h1>
      <button id="discontinuous-data" onClick={chartFromDiscontinuousData}>Create a chart from a discontinuous source</button>
    </div>
  );
}

export default App;
After running, the chart created from a discontinuous data source:
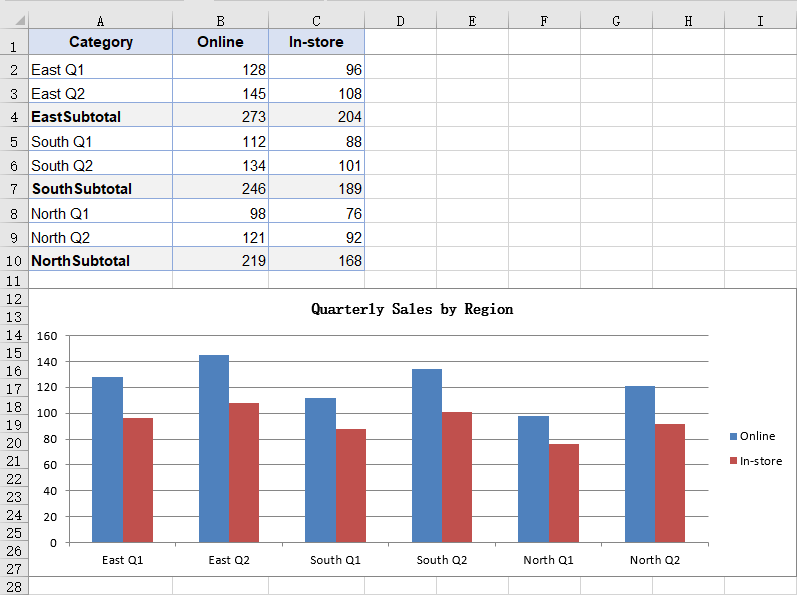
Create a chart without a data source
A chart normally takes its data from cells, but not always: a target may live in a configuration file, a summary figure may come back from an API, or the numbers may just be a set of constants for a demonstration. None of them has landed in the worksheet, so there is no range for the chart to point at. A series can carry its values inside itself instead, which lets the chart stand without any worksheet data behind it; the numbers follow the code and are regenerated with it, so no copy has to be maintained in the sheet for the sake of the chart. Because the values come from nowhere on the sheet, the chart carries no text categories either, and the horizontal axis is numbered 1, 2, 3. The steps are:
- Load the font and the test data file into the VFS.
- Load the workbook with
workbook.LoadFromFileand get the first worksheet withworkbook.Worksheets.get(0); the new chart still has to hang on an existing worksheet. - Add a column chart with
sheet.Charts.Add, and set the chart title and position. - Add a series with
chart.Series.Addand setserie.Nameto the series name. - Box each number with
xlsModule.Int32.Create, put them in order intoserie.EnteredDirectlyValues, and save the workbook.
The complete code example below shows how to create a chart without a data source in React:
function App() {
  const chartWithoutSourceData = async () => {
    // Get the Spire.XLS WASM module
    const xlsModule = window.wasmModule?.spirexls;

    // Check that the module is ready
    if (!xlsModule) {
      alert('Spire.Xls is not ready yet');
      return;
    }

    // Load the font and the sample workbook into the VFS
    await window.spire.FetchFileToVFS('ARIAL.TTF', '/Library/Fonts/', `${process.env.PUBLIC_URL}/font/`);
    const inputFileName = 'ChartSourceData.xlsx';
    await window.spire.FetchFileToVFS(inputFileName, '', `${process.env.PUBLIC_URL}data/`);

    // Load the workbook and get the first worksheet
    const workbook = new xlsModule.Workbook();
    workbook.LoadFromFile({ fileName: inputFileName });
    const sheet = workbook.Worksheets.get(0);

    // Add a column chart; this time the numbers come from no cell at all
    const chart = sheet.Charts.Add({ chartType: xlsModule.ExcelChartType.ColumnClustered });
    chart.ChartTitle = "Sales Target by Region";
    chart.ChartTitleArea.Size = 12;

    // Place the chart on the worksheet
    chart.TopRow = 12;
    chart.BottomRow = 28;
    chart.LeftColumn = 1;
    chart.RightColumn = 10;

    // Add a series and write the numbers into EnteredDirectlyValues one by one
    // No category labels are given, so the chart numbers them 1, 2, 3
    const targetSerie = chart.Series.Add();
    targetSerie.Name = "Sales Target";
    targetSerie.EnteredDirectlyValues = [
      xlsModule.Int32.Create(260),
      xlsModule.Int32.Create(210),
      xlsModule.Int32.Create(190),
    ];

    // Save the workbook
    const outputFileName = "NoSourceData.xlsx";
    workbook.SaveToFile({ fileName: outputFileName });

    // Dispose of the workbook object to free resources
    workbook.Dispose();

    // Read the result file from the VFS and trigger the download
    const fileArray = window.dotnetRuntime.Module.FS.readFile(outputFileName);
    const blob = new Blob([fileArray], { type: 'application/vnd.openxmlformats-officedocument.spreadsheetml.sheet' });
    const url = URL.createObjectURL(blob);
    const a = document.createElement('a');
    a.href = url;
    a.download = outputFileName;
    a.click();
    URL.revokeObjectURL(url);
  };

  return (
    <div style={{ textAlign: 'center', height: '300px' }}>
      <h1>Chart Without a Data Source</h1>
      <button id="no-source-data" onClick={chartWithoutSourceData}>Create a chart without a data source</button>
    </div>
  );
}

export default App;
After running, the chart created without a data source:
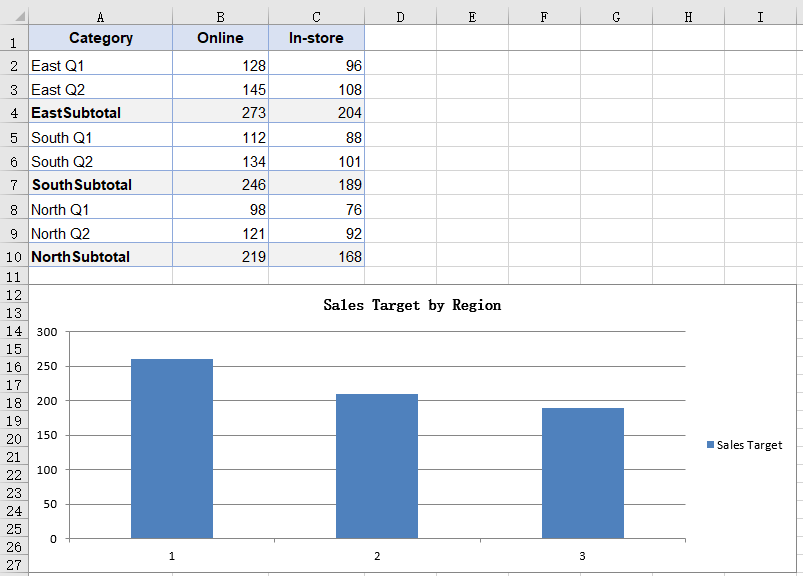
FAQ
Does the series name have to point at a cell?
Cause: serie.Name takes a plain string. Whatever you assign becomes the series name and is what the legend shows; after saving it sits in the series itself rather than in a reference to a cell. Reading the Value of a header cell is just another way to get there, not a requirement. The values and the category labels still have to come from a range — only the name can stand free of one.
Solution: assign the text straight to serie.Name:
const serie = chart.Series.Add();
serie.Name = "Sales Target";
serie.CategoryLabels = sheet.Range.get("A2:A3").AddCombinedRange(sheet.Range.get("A5:A6")).AddCombinedRange(sheet.Range.get("A8:A9"));
serie.Values = sheet.Range.get("B2:B3").AddCombinedRange(sheet.Range.get("B5:B6")).AddCombinedRange(sheet.Range.get("B8:B9"));
Do both series need their own category labels?
Cause: CategoryLabels belongs to the series itself. When a second series is added it does not pick up the setting from the one before it, so it has to be assigned again.
Solution: join the blocks once, keep the result in a variable and point each series at it, instead of writing AddCombinedRange out twice:
const labels = sheet.Range.get("A2:A3")
  .AddCombinedRange(sheet.Range.get("A5:A6"))
  .AddCombinedRange(sheet.Range.get("A8:A9"));

onlineSerie.CategoryLabels = labels;
storeSerie.CategoryLabels = labels;
Get a Free License
Spire.XLS for JavaScript offers a 30-day full-featured free trial license with no functional limitations. Apply here to evaluate before purchasing.
When a chart is inserted, Excel determines a scale automatically: the lower and upper bounds of the value axis and its intervals are all derived from the data range. These defaults are adequate in most cases, but they fall short in two situations. First, when the data is concentrated in a narrow band that sits well away from zero, the automatic scale lifts the bottom of the axis to just below the data, so a modest fluctuation is drawn as a near full-height swing and the differences between the columns bear no proportion to the differences between the values. Second, because the tick labels follow the formatting of the source cells, values carrying decimals fill the value axis with fractional digits, which are both harder to read and wider on the page. Axis formatting addresses both: setting the scale and the units keeps the axis from shifting with the data, holds the column heights in proportion to the values, and places every chart on the same measure, choosing the tick marks and the label position controls where the readings fall, rewriting the number format makes the labels easier to compare, and adding titles to both axes tells the reader what each direction represents. Spire.XLS for JavaScript does all of this in the browser on top of WebAssembly, managing input and output files through a virtual file system (VFS), with no backend service required.
This article covers two key features:
For installation and project setup, see Integrating Spire.XLS for JavaScript in a React Project. The examples below assume Spire.XLS is installed and the WebAssembly module has been initialised.
Format the value axis scale
An automatic scale is derived by Excel from the data range, and it is chosen to make the chart look even rather than to make the readings easy to compare. When the data is concentrated in a narrow band that sits well away from zero, that derivation lifts the bottom of the axis to just below the data: with the axis no longer starting at 0, the columns only show their differences from one another, and a modest fluctuation is drawn as a near full-height swing, out of proportion to the values behind it. The tick labels, too, follow the display format of the source cells by default, so data carrying decimals produces a run of fractional values along the value axis, which is both harder to read and wider on the page. Setting the value axis scale by hand addresses both at once: once the scale and the intervals are given by the code, the bottom and top of the axis no longer shift with the data, the column heights stay in proportion to the values, and a set of charts can be measured against the same ruler; once the label format is independent of the source cells, the readings are more even as well. The steps are:
- Load the font and the test data file into the VFS.
- Load the workbook with
workbook.LoadFromFileand get the first worksheet withworkbook.Worksheets.get(0). - Add a column chart with
sheet.Charts.Add, pointchart.DataRangeat the sales column, and assign the month column toserie.CategoryLabels. - On
chart.PrimaryValueAxis, set the scale withMinValueandMaxValue, and the steps of the major and minor divisions withMajorUnitandMinorUnit. - Set the types of the major and minor tick marks with
MajorTickMarkandMinorTickMark, and the position of the tick labels withTickLabelPosition. - Set
NumberFormatto#,##0for the label number format, setIsSourceLinkedtofalseto unlink the format from the source cells, and save the workbook.
The complete code example below shows how to format the value axis scale in React:
function App() {
  const formatValueAxis = async () => {
    // Get the Spire.XLS WASM module
    const xlsModule = window.wasmModule?.spirexls;

    // Check that the module is ready
    if (!xlsModule) {
      alert('Spire.Xls is not ready yet');
      return;
    }

    // Load the font and the sample workbook into the VFS
    await window.spire.FetchFileToVFS('ARIAL.TTF', '/Library/Fonts/', `${process.env.PUBLIC_URL}/font/`);
    const inputFileName = 'ChartAxisData.xlsx';
    await window.spire.FetchFileToVFS(inputFileName, '', `${process.env.PUBLIC_URL}data/`);

    // Load the workbook and get the first worksheet
    const workbook = new xlsModule.Workbook();
    workbook.LoadFromFile({ fileName: inputFileName });
    const sheet = workbook.Worksheets.get(0);

    // Add a column chart whose data range is the sales column
    const chart = sheet.Charts.Add({ chartType: xlsModule.ExcelChartType.ColumnClustered });
    chart.ChartTitle = "Monthly Sales";
    chart.ChartTitleArea.IsBold = true;
    chart.ChartTitleArea.Size = 12;
    chart.DataRange = sheet.Range.get("B1:B9");
    chart.SeriesDataFromRange = false;
    chart.PlotArea.Visible = false;

    // Place the chart on the worksheet
    chart.TopRow = 10;
    chart.BottomRow = 28;
    chart.LeftColumn = 2;
    chart.RightColumn = 10;

    // Take the series and use the month column as its category labels
    const serie = chart.Series.get(0);
    serie.CategoryLabels = sheet.Range.get("A2:A9");

    // Set the value axis bounds: 0 at the bottom, 5000 at the top
    const valueAxis = chart.PrimaryValueAxis;
    valueAxis.MinValue = 0;
    valueAxis.MaxValue = 5000;

    // Set the major unit to 1000 and the minor unit to 500
    valueAxis.MajorUnit = 1000;
    valueAxis.MinorUnit = 500;

    // Major tick marks outside the axis, minor tick marks inside
    valueAxis.MajorTickMark = xlsModule.TickMarkType.TickMarkOutside;
    valueAxis.MinorTickMark = xlsModule.TickMarkType.TickMarkInside;

    // Tick labels sit next to the axis, which the category axis crosses at 0
    valueAxis.TickLabelPosition = xlsModule.TickLabelPositionType.TickLabelPositionNextToAxis;
    valueAxis.CrossesAt = 0;

    // Give the tick labels a thousands separator and drop the decimals
    valueAxis.NumberFormat = "#,##0";

    // Unlink the source format so the tick labels follow NumberFormat
    valueAxis.IsSourceLinked = false;

    // Save the workbook
    const outputFileName = "AxisFormat.xlsx";
    workbook.SaveToFile({ fileName: outputFileName });

    // Dispose of the workbook object to free resources
    workbook.Dispose();

    // Read the result file from the VFS and trigger the download
    const fileArray = window.dotnetRuntime.Module.FS.readFile(outputFileName);
    const blob = new Blob([fileArray], { type: 'application/vnd.openxmlformats-officedocument.spreadsheetml.sheet' });
    const url = URL.createObjectURL(blob);
    const a = document.createElement('a');
    a.href = url;
    a.download = outputFileName;
    a.click();
    URL.revokeObjectURL(url);
  };

  return (
    <div style={{ textAlign: 'center', height: '300px' }}>
      <h1>Value Axis Scale</h1>
      <button onClick={formatValueAxis}>Start</button>
    </div>
  );
}

export default App;
After running, the effect of formatting the value axis scale:
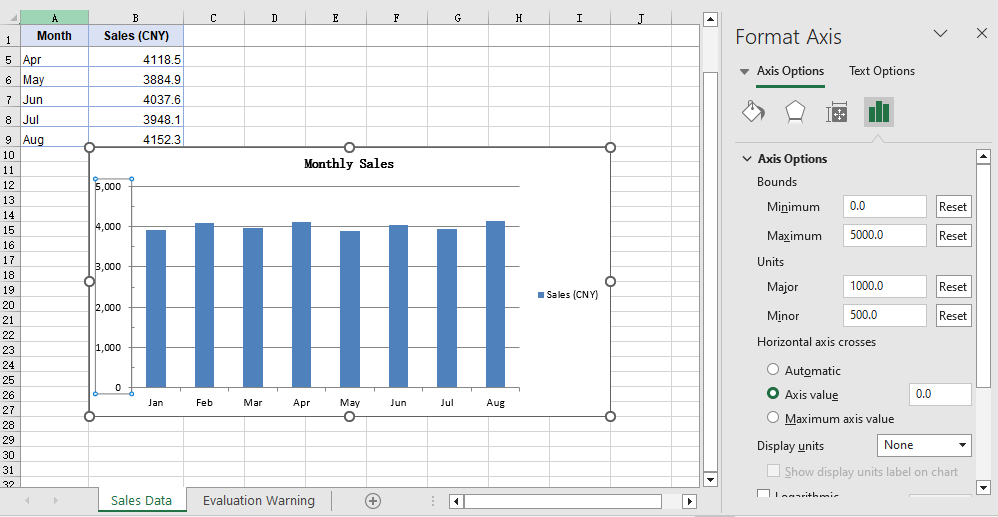
Add axis titles
The axes carry only their own divisions and categories, so the chart itself does not state what each data point represents or what unit the numbers are in; opening the file again after some time, a reader often has to check the chart title first to confirm the subject. Axis titles supply precisely that context: the category axis title states what each data point represents, the value axis title states the unit of the numbers, and together with the chart title they complete the chart so that it can be read without its surrounding context. The size of an axis title can also be adjusted separately, which keeps it distinct from the chart title. The steps are:
- Load the font and the test data file into the VFS.
- Load the workbook with
workbook.LoadFromFileand get the first worksheet withworkbook.Worksheets.get(0). - Add a column chart with
sheet.Charts.Add, pointchart.DataRangeat the sales column, and assign the month column toserie.CategoryLabels. - Assign the title text to
chart.PrimaryCategoryAxis.Titleandchart.PrimaryValueAxis.Titlerespectively. - Set both titles to size 12 through the
Font.Sizeof the two axis objects, and save the workbook.
The complete code example below shows how to add titles to the axes in React:
function App() {
  const setAxisTitle = async () => {
    // Get the Spire.XLS WASM module
    const xlsModule = window.wasmModule?.spirexls;

    // Check that the module is ready
    if (!xlsModule) {
      alert('Spire.Xls is not ready yet');
      return;
    }

    // Load the font and the sample workbook into the VFS
    await window.spire.FetchFileToVFS('ARIAL.TTF', '/Library/Fonts/', `${process.env.PUBLIC_URL}/font/`);
    const inputFileName = 'ChartAxisData.xlsx';
    await window.spire.FetchFileToVFS(inputFileName, '', `${process.env.PUBLIC_URL}data/`);

    // Load the workbook and get the first worksheet
    const workbook = new xlsModule.Workbook();
    workbook.LoadFromFile({ fileName: inputFileName });
    const sheet = workbook.Worksheets.get(0);

    // Add a column chart whose data range is the sales column
    const chart = sheet.Charts.Add({ chartType: xlsModule.ExcelChartType.ColumnClustered });
    chart.ChartTitle = "Monthly Sales";
    chart.ChartTitleArea.IsBold = true;
    chart.ChartTitleArea.Size = 12;
    chart.DataRange = sheet.Range.get("B1:B9");
    chart.SeriesDataFromRange = false;
    chart.PlotArea.Visible = false;

    // Place the chart on the worksheet
    chart.TopRow = 10;
    chart.BottomRow = 28;
    chart.LeftColumn = 2;
    chart.RightColumn = 10;

    // Take the series and use the month column as its category labels
    const serie = chart.Series.get(0);
    serie.CategoryLabels = sheet.Range.get("A2:A9");

    // Give the category axis and the value axis their titles
    chart.PrimaryCategoryAxis.Title = "Month";
    chart.PrimaryValueAxis.Title = "Sales (CNY)";

    // Set both axis titles to size 12
    chart.PrimaryCategoryAxis.Font.Size = 12;
    chart.PrimaryValueAxis.Font.Size = 12;

    // Save the workbook
    const outputFileName = "AxisTitle.xlsx";
    workbook.SaveToFile({ fileName: outputFileName });

    // Dispose of the workbook object to free resources
    workbook.Dispose();

    // Read the result file from the VFS and trigger the download
    const fileArray = window.dotnetRuntime.Module.FS.readFile(outputFileName);
    const blob = new Blob([fileArray], { type: 'application/vnd.openxmlformats-officedocument.spreadsheetml.sheet' });
    const url = URL.createObjectURL(blob);
    const a = document.createElement('a');
    a.href = url;
    a.download = outputFileName;
    a.click();
    URL.revokeObjectURL(url);
  };

  return (
    <div style={{ textAlign: 'center', height: '300px' }}>
      <h1>Axis Titles</h1>
      <button onClick={setAxisTitle}>Start</button>
    </div>
  );
}

export default App;
After running, the effect of adding axis titles:
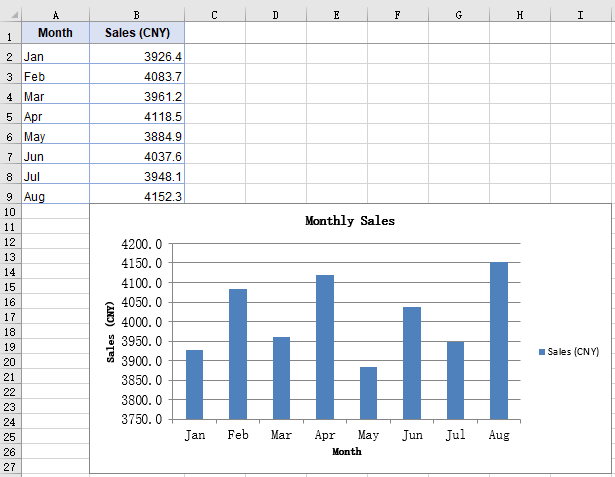
FAQ
MinorUnit is set but no minor tick marks show up
Cause: MinorUnit determines only the interval of the minor divisions — how many steps each major division is split into. Whether those steps are drawn as short strokes is decided by a separate property. MinorTickMark defaults to TickMarkNone, and in that state the interval is in effect but no strokes are drawn.
Fix: Set MinorTickMark at the same time, taking its value from TickMarkType:
const valueAxis = chart.PrimaryValueAxis;
valueAxis.MinorUnit = 500;
valueAxis.MinorTickMark = xlsModule.TickMarkType.TickMarkInside;
CrossesAt is set but the category axis does not move
Cause: CrossesAt determines where the category axis meets the value axis, and the move becomes visible only when it is set to a position on the scale other than the one the category axis already occupies. With the value axis starting at 0, the category axis already sits at the bottom of the axis line, so setting CrossesAt to 0 leaves it in place.
Fix: Set CrossesAt to another position on the value axis scale, 3000 for example, and the category axis moves up to that level:
const valueAxis = chart.PrimaryValueAxis;
valueAxis.MinValue = 0;
valueAxis.MaxValue = 5000;
valueAxis.CrossesAt = 3000;
Get a Free License
Spire.XLS for JavaScript offers a 30-day full-featured free trial license with no functional limitations. Apply here to evaluate before purchasing.
