
JavaScript (260)
Inserting a page break in a Word document is the most common way to control where a chapter begins and to keep a heading from being split from its body text across a page boundary; cleaning up the redundant page breaks in a document, on the other hand, is the key step in dealing with the blank pages left behind after content is copied from another document. Spire.Doc for JavaScript carries out these operations directly in the browser via WebAssembly, using a virtual file system (VFS) to manage input and output files — no backend server required.
This article covers two core features:
For installation and project setup, refer to Integrating Spire.Doc for JavaScript in a React Project. The examples below assume Spire.Doc is installed and the WebAssembly module is initialized.
Insert a Page Break
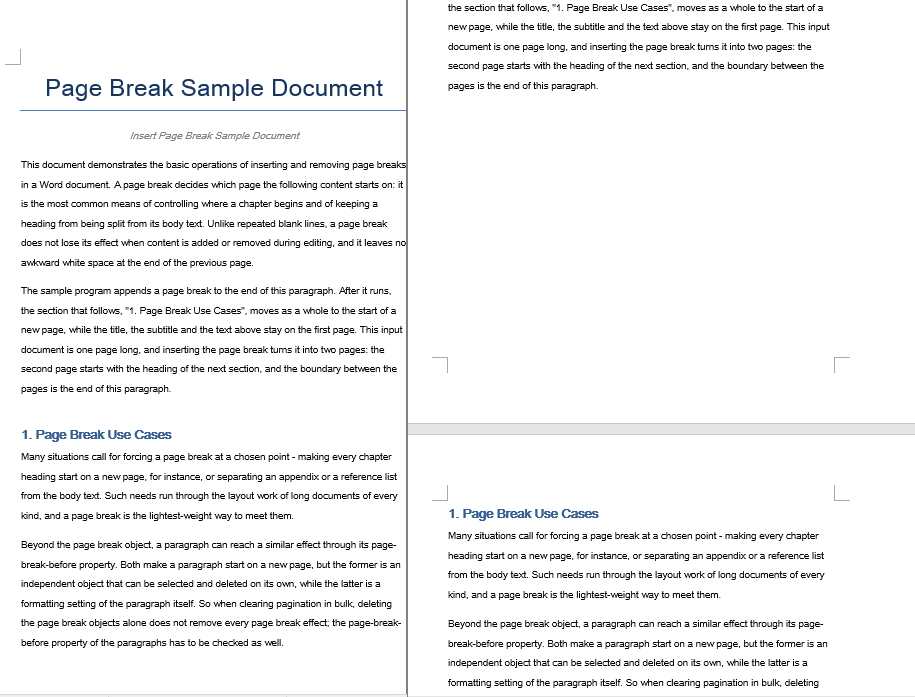
Inserting a page break involves three steps: first, load the font files and the target Word document into the WASM virtual file system via FetchFileToVFS; then instantiate a Document, load the document, locate the target paragraph and call AppendBreak with BreakType.PageBreak, which appends the page break to the end of that paragraph as one of its child objects; finally, read the saved file from VFS, wrap it as a Blob and trigger a browser download.
function App() {
  const InsertPageBreak = async () => {
    const docModule = window.wasmModule?.spiredoc;
    if (!docModule) {
      alert('Spire.Doc is not ready yet');
      return;
    }

    // Load the target Word document into VFS
    const inputFileName = "Template_Docx_1.docx";
    await window.spire.FetchFileToVFS(inputFileName, "", `${process.env.PUBLIC_URL}static/data/`);

    // Create a Document instance and load the document
    const doc = new docModule.Document();
    doc.LoadFromFile(inputFileName);

    // Locate the fourth paragraph of the first section and append a page break to its end
    doc.Sections.get_Item(0).Paragraphs.get_Item(3).AppendBreak(docModule.BreakType.PageBreak);

    // Define the output file name
    const outputFileName = "InsertPageBreak_out.docx";

    // Save the document to VFS
    doc.SaveToFile({ fileName: outputFileName, fileFormat: docModule.FileFormat.Docx2013 });

    doc.Dispose();

    const modifiedFileArray = window.dotnetRuntime.Module.FS.readFile(outputFileName);
    const blob = new Blob([modifiedFileArray], { type: 'application/vnd.openxmlformats-officedocument.wordprocessingml.document' });
    const url = URL.createObjectURL(blob);
    const a = document.createElement('a');
    a.href = url;
    a.download = outputFileName;
    a.click();
    URL.revokeObjectURL(url);
  };

 return (
    <div style={{ textAlign: 'center', height: '300px' }}>
      <h1>Insert a Page Break into a Word Document</h1>
      <button onClick={InsertPageBreak}>Generate</button>
    </div>
  );
}
export default App;
The document after a page break is appended to the end of the fourth paragraph
Remove Page Breaks
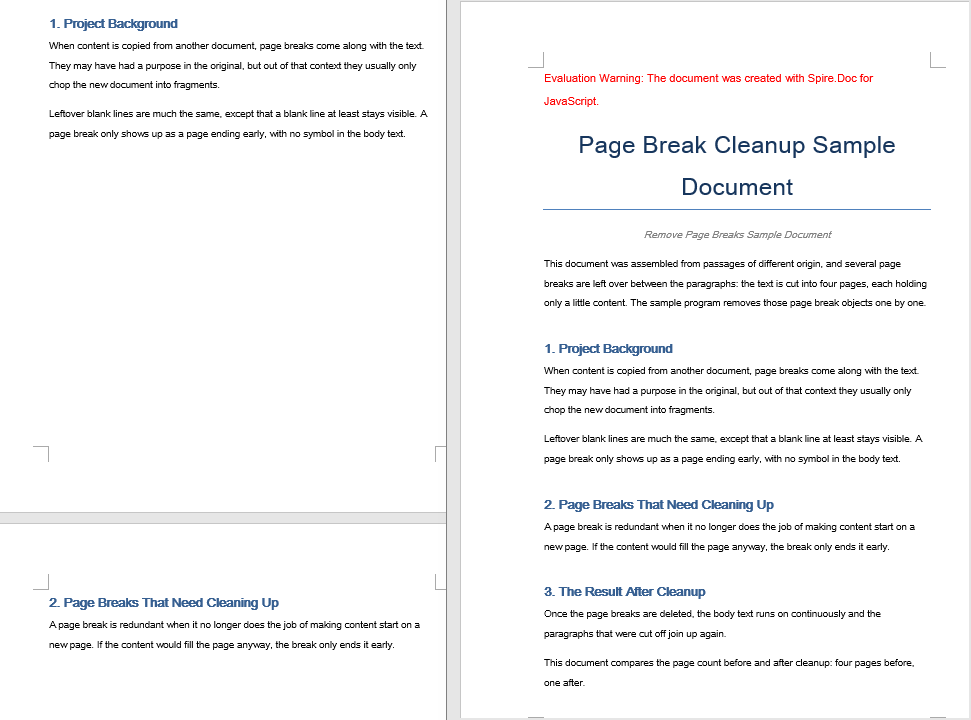
Removing page breaks also involves three steps: first, load the font files and the Word document that contains the page breaks into the WASM virtual file system via FetchFileToVFS; then instantiate a Document, load the document, walk through the child objects of every paragraph in each section, test with DocumentObjectType whether an object is a page break, and remove it with ChildObjects.Remove; finally, read the saved file from VFS, wrap it as a Blob and trigger a browser download.
function App() {
  const RemovePageBreaks = async () => {
    const docModule = window.wasmModule?.spiredoc;
    if (!docModule) {
      alert('Spire.Doc is not ready yet');
      return;
    }

    // Load the target Word document into VFS
    const inputFileName = "Template_Docx_4.docx";
    await window.spire.FetchFileToVFS(inputFileName, "", `${process.env.PUBLIC_URL}static/data/`);

    // Create a Document instance and load the document
    const doc = new docModule.Document();
    doc.LoadFromFile(inputFileName);

    // Get the first section
    const section = doc.Sections.get_Item(0);

    // Walk through every paragraph in the section
    for (let j = 0; j < section.Paragraphs.Count; j++) {
        const p = section.Paragraphs.get_Item(j);

        // Walk the paragraph's child objects backwards, so that removing an element does not shift the indices still to come
        for (let i = p.ChildObjects.Count - 1; i >= 0; i--) {
            const obj = p.ChildObjects.get_Item(i);

            // Test whether the object is a page break
            if (obj.DocumentObjectType == docModule.DocumentObjectType.Break
                && obj.BreakType == docModule.BreakType.PageBreak) {
                // Remove the page break from the paragraph
                p.ChildObjects.Remove(obj);
            }
        }
    }

    // Define the output file name
    const outputFileName = "RemovePageBreaks_out.docx";

    // Save the document to VFS
    doc.SaveToFile({ fileName: outputFileName, fileFormat: docModule.FileFormat.Docx2013 });
    doc.Dispose();

    const modifiedFileArray = window.dotnetRuntime.Module.FS.readFile(outputFileName);
    const blob = new Blob([modifiedFileArray], { type: 'application/vnd.openxmlformats-officedocument.wordprocessingml.document' });
    const url = URL.createObjectURL(blob);
    const a = document.createElement('a');
    a.href = url;
    a.download = outputFileName;
    a.click();
    URL.revokeObjectURL(url);
  };

 return (
    <div style={{ textAlign: 'center', height: '300px' }}>
      <h1>Remove Page Breaks from a Word Document</h1>
      <button onClick={RemovePageBreaks}>Generate</button>
    </div>
  );
}
export default App;
The document after every page break has been removed
FAQ
An extra blank line appears at the top of the new page after inserting a page break
Cause: AppendBreak appends the page break to the end of the target paragraph, so that paragraph's own spacing after it is carried over to the start of the new page along with the page break, which shows up as a strip of white space at the top of the new page. If the paragraph has automatic spacing enabled, the height of that strip also changes with the font size.
Solution: Clear the spacing after the target paragraph before inserting the page break:
const para = document.Sections.get_Item(0).Paragraphs.get_Item(3);

// Turn off automatic spacing after the paragraph and set the space after it to 0
para.Format.AfterAutoSpacing = false;
para.Format.AfterSpacing = 0;

// Then insert the page break
para.AppendBreak(wasmModule.BreakType.PageBreak);
The document is still paginated after the page breaks are removed
Cause: Not every page break in a document comes from a page break object. If a paragraph itself has the page-break-before property set, that paragraph will still start on a new page even after the page break objects have been removed; walking ChildObjects and deleting DocumentObjectType.Break objects alone cannot take that kind of pagination out.
Solution: Reset the paragraph's page-break-before property at the same time as the page break objects are removed:
const section = document.Sections.get_Item(0);

for (let j = 0; j < section.Paragraphs.Count; j++) {
  const p = section.Paragraphs.get_Item(j);

  // Clear the page-break-before property set on the paragraph
  if (p.Format.PageBreakBefore) {
    p.Format.PageBreakBefore = false;
  }
}
Get a Free License
Spire.Doc for JavaScript offers a 30-day full-featured free trial license with no functional limitations. Apply here to evaluate before purchasing.
Add and Set the Gutter Position in Word with JavaScript in React
2026-09-23 08:22:42 Written by Amy ZhaoA gutter is the extra white space a page sets aside for binding, so that the body text is not hidden by the staples or the glued spine once the document is printed and bound. Because it is part of the page setup, it has to be fixed when the document is generated and cannot be added later at the printing stage. Spire.Doc for JavaScript performs page setup directly in the browser via WebAssembly, using a virtual file system (VFS) to manage input and output files — no backend server required.
This article covers two core features:
For installation and project setup, refer to Integrating Spire.Doc for JavaScript in a React Project. The examples below assume Spire.Doc is installed and the WebAssembly module is initialized.
Add a Gutter
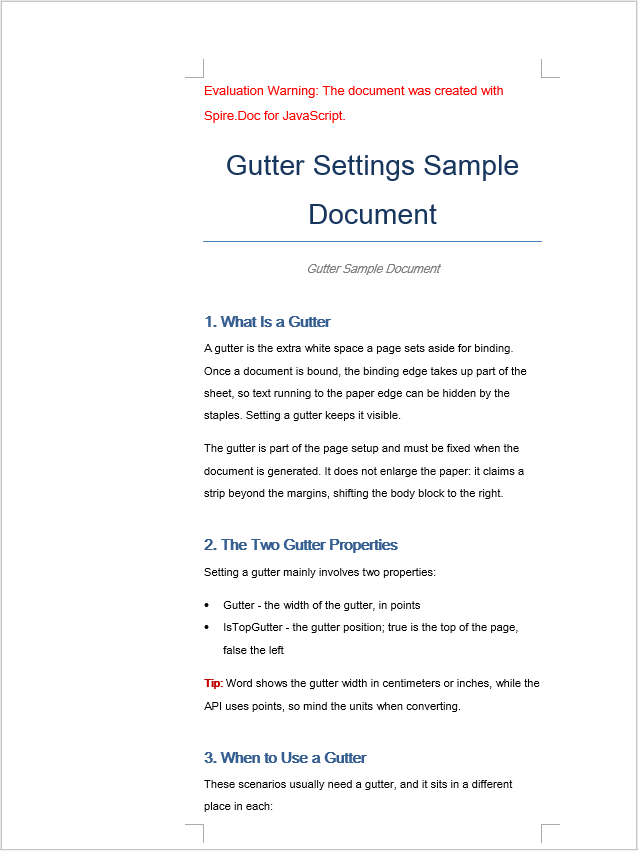
Adding a gutter involves three steps: first, load the font files and the target Word document into the WASM virtual file system via FetchFileToVFS; then instantiate a Document, load the document, get the target section and set the gutter width through PageSetup.Gutter — the value is in points and applies to the left side of the page by default; finally, read the saved file from VFS, wrap it as a Blob and trigger a browser download.
function App() {
  const AddGutter = async () => {
    const docModule = window.wasmModule?.spiredoc;
    if (!docModule) {
      alert('Spire.Doc is not ready yet');
      return;
    }

    // Load the target Word document into VFS
    const inputFileName = "GutterSample.docx";
    await window.spire.FetchFileToVFS(inputFileName, "", `${process.env.PUBLIC_URL}static/data/`);

    // Create a Document instance and load the document
    const doc = new docModule.Document();
    doc.LoadFromFile(inputFileName);

    // Get the first section
    const section = doc.Sections.get_Item(0);

    // Set the gutter width in points; it applies to the left side of the page by default
    section.PageSetup.Gutter = 100;

    // Define the output file name
    const outputFileName = "AddGutter_out.docx";

    // Save the document to VFS
    doc.SaveToFile({ fileName: outputFileName, fileFormat: docModule.FileFormat.Docx2013 });

    // Release resources
    doc.Dispose();

    const modifiedFileArray = window.dotnetRuntime.Module.FS.readFile(outputFileName);
    const blob = new Blob([modifiedFileArray], { type: 'application/vnd.openxmlformats-officedocument.wordprocessingml.document' });
    const url = URL.createObjectURL(blob);
    const a = document.createElement('a');
    a.href = url;
    a.download = outputFileName;
    a.click();
    URL.revokeObjectURL(url);
  };

 return (
    <div style={{ textAlign: 'center', height: '300px' }}>
      <h1>Add a Gutter to a Word Document</h1>
      <button onClick={AddGutter}>Generate</button>
    </div>
  );
}
export default App;
The document after a gutter has been added
Set the Gutter Position
The gutter position decides which side of the page the strip of white space is added to: PageSetup.IsTopGutter set to true means a top gutter, and false (the default) means a left gutter. The steps are the same three as before: first, load the font files and the target Word document into the WASM virtual file system via FetchFileToVFS; then instantiate a Document, load the document, get the target section and set PageSetup.IsTopGutter to true to turn on the top gutter, then set the gutter width through PageSetup.Gutter; finally, read the saved file from VFS, wrap it as a Blob and trigger a browser download.
function App() {
  const SetGutterPosition = async () => {
    const docModule = window.wasmModule?.spiredoc;
    if (!docModule) {
      alert('Spire.Doc is not ready yet');
      return;
    }

    // Load the target Word document into VFS
    const inputFileName = "GutterSample.docx";
    await window.spire.FetchFileToVFS(inputFileName, "", `${process.env.PUBLIC_URL}static/data/`);

    // Create a Document instance and load the document
    const doc = new docModule.Document();
    doc.LoadFromFile(inputFileName);

    // Get the first section
    const section = doc.Sections.get_Item(0);

    // Set the gutter position to the top
    section.PageSetup.IsTopGutter = true;

    // Set the gutter width in points
    section.PageSetup.Gutter = 100;

    // Define the output file name
    const outputFileName = "SetGutterPosition_out.docx";

    // Save the document to VFS
    doc.SaveToFile({ fileName: outputFileName, fileFormat: docModule.FileFormat.Docx2013 });

    // Release resources
    doc.Dispose();

    const modifiedFileArray = window.dotnetRuntime.Module.FS.readFile(outputFileName);
    const blob = new Blob([modifiedFileArray], { type: 'application/vnd.openxmlformats-officedocument.wordprocessingml.document' });
    const url = URL.createObjectURL(blob);
    const a = document.createElement('a');
    a.href = url;
    a.download = outputFileName;
    a.click();
    URL.revokeObjectURL(url);
  };

 return (
    <div style={{ textAlign: 'center', height: '300px' }}>
      <h1>Set the Gutter Position in a Word Document</h1>
      <button onClick={SetGutterPosition}>Generate</button>
    </div>
  );
}
export default App;
The document after the top gutter has been set

FAQ
The gutter width does not match the value shown in the Word interface
Cause: PageSetup.Gutter is measured in points, while the Word Page Setup dialog box displays centimeters or inches by default. Passing 100 directly, as the examples do, means 100 points — about 3.53 centimeters — which is noticeably wide on an A4 page.
Solution: Convert the unit before passing the value in. One point is 1/72 inch and one inch is 2.54 centimeters, so the formula for converting centimeters to points is points = centimeters ÷ 2.54 × 72:
// Convert a 1.5-centimeter gutter width to points
const gutterInPoints = (1.5 / 2.54) * 72;
section.PageSetup.Gutter = gutterInPoints;
The text area becomes too narrow after a gutter is set
Cause: The gutter claims space in addition to the margins; it does not enlarge the page but squeezes the text area inwards. If the existing margins were already generous, adding a gutter narrows the usable width further, leaving too few characters per line and making paragraphs wrap far more often.
Solution: Reduce the margin on the same side at the same time as the gutter is set, so that the usable text width is preserved:
const pageSetup = section.PageSetup;

// Set a 1.5-centimeter gutter (centimeters converted to points)
pageSetup.Gutter = (1.5 / 2.54) * 72;

// The gutter takes up space on the left, so reduce the left margin accordingly
pageSetup.Margins.Left = 60;
Get a Free License
Spire.Doc for JavaScript offers a 30-day full-featured free trial license with no functional limitations. Apply here to evaluate before purchasing.
Adding text to a PDF usually sits at the end of a generation pipeline: document numbers, review comments, annotations, or a line of pale text laid over a chart. Typing it in by hand is fine for a few pages, but once the text has to follow the data — a number that changes per copy, a note angled into the page corner, pale text sitting on top of a chart — manual layout stops keeping up.
This article shows how to use Spire.PDF for JavaScript to draw text on PDF pages, including text filled with a gradient, text laid out inside a rectangle, and text that is rotated, transformed, or semi-transparent. It runs on WebAssembly to create and save PDF documents directly in the browser, doing all the work locally and reading and writing files through a virtual file system (VFS) with no backend involved.
This article covers four core features:
For installation and project configuration, see Integrate Spire.PDF for JavaScript into a React Project. The examples below assume Spire.PDF is installed and the WebAssembly module is initialized.
Draw Text with a Color Gradient
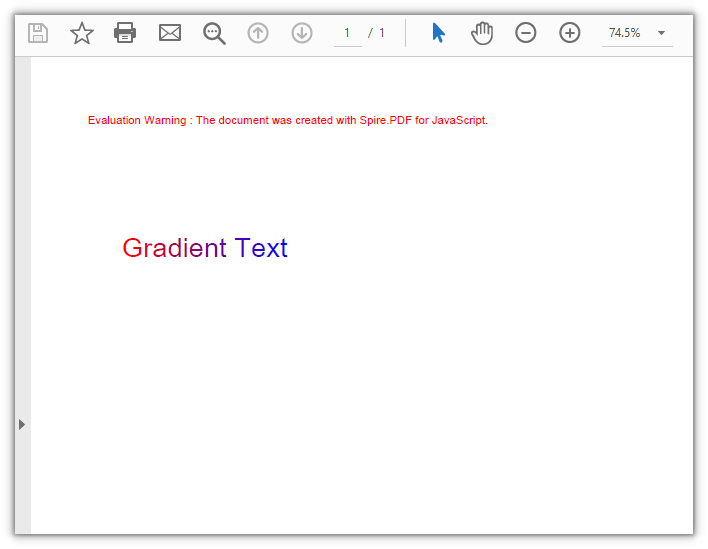
The color of text comes from the brush passed to DrawString. Swap in a gradient brush — PdfLinearGradientBrush — and the glyphs transition from one color to another along a given direction: mode sets the direction, and the rect on the brush bounds where the gradient starts and ends.
function App() {
  const drawGradientText = async () => {
    // Get the Spire.PDF WASM module
    const pdfModule = window.wasmModule?.spirepdf;

    // Check whether the module is ready
    if (!pdfModule) {
      alert('Spire.PDF is not ready yet');
      return;
    }

    // Load the font into the VFS
    await window.spire.FetchFileToVFS('ARIAL UNICODE MS.TTF', '/Library/Fonts/', `${process.env.PUBLIC_URL}/font/`);

    // Create a PDF document and add a blank page
    const doc = new pdfModule.PdfDocument();
    const page = doc.Pages.Add();

    const font = new pdfModule.PdfTrueTypeFont({ fontFile: '/Library/Fonts/ARIAL UNICODE MS.TTF', size: 24 });
    const text = 'Gradient Text';

    // Measure this line of text so the gradient spans exactly its width
    const textWidth = font.MeasureString({ text: text }).Width;

    // Horizontal gradient: from red to blue
    const gradient = new pdfModule.PdfLinearGradientBrush({
      rect: new pdfModule.RectangleF({ x: 40, y: 90, width: textWidth, height: 40 }),
      color1: new pdfModule.PdfRGBColor({ color: pdfModule.Color.get_Red() }),
      color2: new pdfModule.PdfRGBColor({ color: pdfModule.Color.get_Blue() }),
      mode: pdfModule.PdfLinearGradientMode.Horizontal,
    });

    // Align the text anchor with the left edge of the gradient rectangle so both colors sweep the whole line
    page.Canvas.DrawString({ s: text, font: font, brush: gradient, x: 40, y: 110 });

    // Define the output file name and save the document
    const outputFileName = 'GradientText.pdf';
    doc.SaveToFile(outputFileName);
    doc.Close();

    // Read the generated file from the VFS and trigger a download
    const fileArray = window.dotnetRuntime.Module.FS.readFile(outputFileName);
    const blob = new Blob([fileArray], { type: 'application/pdf' });
    const url = URL.createObjectURL(blob);
    const a = document.createElement('a');
    a.href = url;
    a.download = outputFileName;
    a.click();
    URL.revokeObjectURL(url);
  };

  return (
    <div style={{ textAlign: 'center', height: '300px' }}>
      <h1>Draw Text with a Color Gradient</h1>
      <button onClick={drawGradientText}>
        Draw
      </button>
    </div>
  );
}

export default App;
When the gradient rectangle matches the text width, red to blue sweeps across the entire line:
Draw Text Laid Out Inside a Rectangle
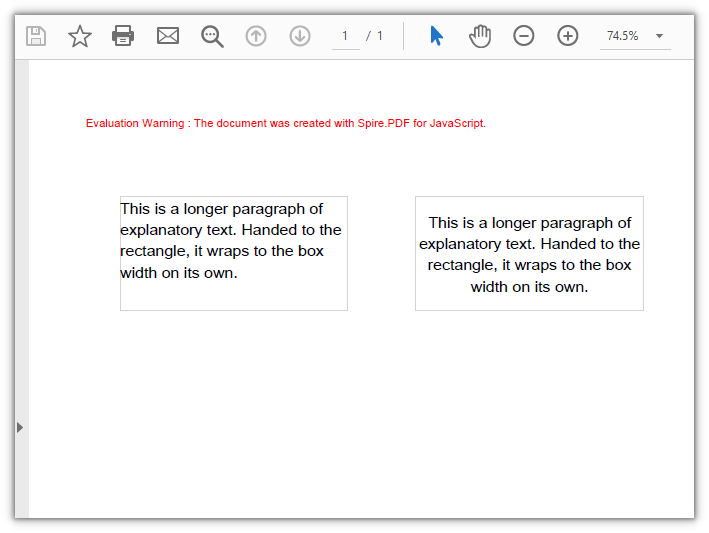
DrawString takes either a pair of coordinates or a layout rectangle, layoutRectangle. With a rectangle, the text wraps to the width of the box on its own, so you don't have to work out where each line breaks. Combined with alignment and lineAlignment from PdfStringFormat, you get more control over how the text is aligned.
function App() {
  const drawTextInRectangle = async () => {
    // Get the Spire.PDF WASM module
    const pdfModule = window.wasmModule?.spirepdf;

    // Check whether the module is ready
    if (!pdfModule) {
      alert('Spire.PDF is not ready yet');
      return;
    }

    // Load the font into the VFS for the page text
    await window.spire.FetchFileToVFS('ARIAL UNICODE MS.TTF', '/Library/Fonts/', `${process.env.PUBLIC_URL}/font/`);

    // Create a PDF document and add a blank page
    const doc = new pdfModule.PdfDocument();
    const page = doc.Pages.Add();

    const font = new pdfModule.PdfTrueTypeFont({ fontFile: '/Library/Fonts/ARIAL UNICODE MS.TTF', size: 14 });
    const brush = new pdfModule.PdfSolidBrush({ pdfRGBColor: new pdfModule.PdfRGBColor({ color: pdfModule.Color.get_Black() }) });
    const borderPen = new pdfModule.PdfPen({ pdfRGBColor: new pdfModule.PdfRGBColor({ color: pdfModule.Color.get_LightGray() }), width: 1 });

    const text = 'This is a longer paragraph of explanatory text. Handed to the rectangle, it wraps to the box width on its own.';

    // Left box: left-aligned wrapping by default, text starts at the top-left corner of the box
    const leftBox = new pdfModule.RectangleF({ x: 40, y: 80, width: 200, height: 100 });
    page.Canvas.DrawRectangle({ pen: borderPen, rectangle: leftBox });
    page.Canvas.DrawString({ s: text, font: font, brush: brush, layoutRectangle: leftBox });

    // Right box: the same text, centered horizontally and vertically inside the box
    const rightBox = new pdfModule.RectangleF({ x: 300, y: 80, width: 200, height: 100 });
    page.Canvas.DrawRectangle({ pen: borderPen, rectangle: rightBox });
    const center = new pdfModule.PdfStringFormat({
      alignment: pdfModule.PdfTextAlignment.Center,
      lineAlignment: pdfModule.PdfVerticalAlignment.Middle,
    });
    page.Canvas.DrawString({ s: text, font: font, brush: brush, layoutRectangle: rightBox, format: center });

    // Define the output file name and save the document
    const outputFileName = 'TextInRectangle.pdf';
    doc.SaveToFile(outputFileName);
    doc.Close();

    // Read the generated file from the VFS and trigger a download
    const fileArray = window.dotnetRuntime.Module.FS.readFile(outputFileName);
    const blob = new Blob([fileArray], { type: 'application/pdf' });
    const url = URL.createObjectURL(blob);
    const a = document.createElement('a');
    a.href = url;
    a.download = outputFileName;
    a.click();
    URL.revokeObjectURL(url);
  };

  return (
    <div style={{ textAlign: 'center', height: '300px' }}>
      <h1>Draw Text Laid Out Inside a Rectangle</h1>
      <button onClick={drawTextInRectangle}>
        Draw
      </button>
    </div>
  );
}

export default App;
The same paragraph wraps inside a 200-point-wide box, while the right box adds horizontal and vertical centering:
Draw Rotated and Transformed Text
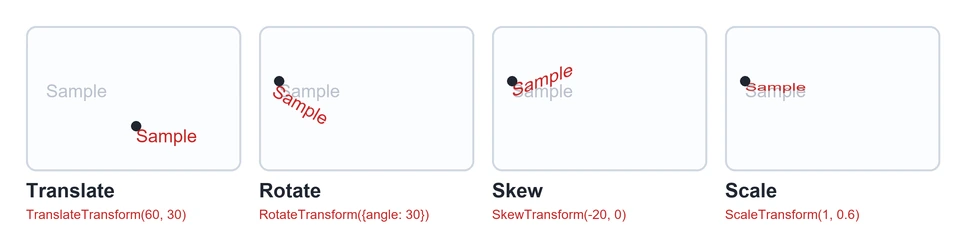
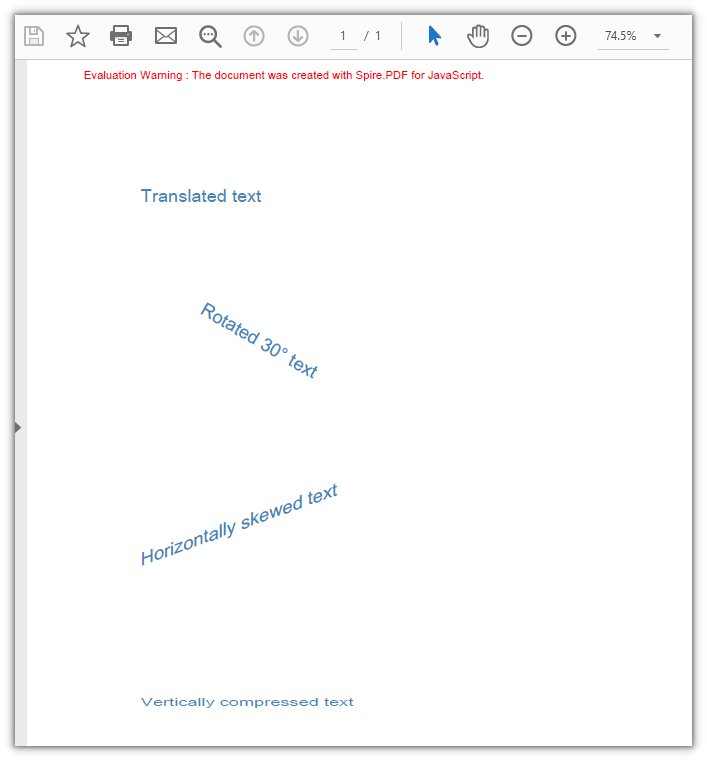
Rotation and deformation of text come from the canvas rather than from font parameters: you turn the canvas first, then draw on it. Four methods cover the common cases:
| API | Effect | Parameters and units |
|---|---|---|
TranslateTransform(dx, dy) |
Moves the canvas origin to the target position | Offset in points |
RotateTransform({ angle }) |
Rotates around the canvas origin | Angle; a positive value is clockwise on this canvas |
SkewTransform(angleX, angleY) |
Skews the axes so text runs along a slanted line | Skew angle; with (-20, 0) the right end of the line lifts |
ScaleTransform(scaleX, scaleY) |
Scales the canvas by a factor | Scale factors for both axes; (1, 0.6) compresses vertically to 0.6 |
The four transforms applied to the same sample line of text (gray is before the transform, red is after, and the dot marks the anchor point):
function App() {
  const drawTransformedText = async () => {
    // Get the Spire.PDF WASM module
    const pdfModule = window.wasmModule?.spirepdf;

    // Check whether the module is ready
    if (!pdfModule) {
      alert('Spire.PDF is not ready yet');
      return;
    }

    // Load the font into the VFS for the page text
    await window.spire.FetchFileToVFS('ARIAL UNICODE MS.TTF', '/Library/Fonts/', `${process.env.PUBLIC_URL}/font/`);

    // Create a PDF document and add a blank page
    const doc = new pdfModule.PdfDocument();
    const page = doc.Pages.Add();

    const font = new pdfModule.PdfTrueTypeFont({ fontFile: '/Library/Fonts/ARIAL UNICODE MS.TTF', size: 16 });
    const brush = new pdfModule.PdfSolidBrush({ pdfRGBColor: new pdfModule.PdfRGBColor({ color: pdfModule.Color.get_SteelBlue() }) });

    // Translation: move only the origin to the anchor point, shifting the text as a whole
    let state = page.Canvas.Save();
    page.Canvas.TranslateTransform(60, 110);
    page.Canvas.DrawString({ s: 'Translated text', font: font, brush: brush, x: 0, y: 0 });
    page.Canvas.Restore({ state: state });

    // Rotation: move the origin to the anchor point, then rotate 30°
    state = page.Canvas.Save();
    page.Canvas.TranslateTransform(120, 210);
    page.Canvas.RotateTransform({ angle: 30 });
    page.Canvas.DrawString({ s: 'Rotated 30° text', font: font, brush: brush, x: 0, y: 0 });
    page.Canvas.Restore({ state: state });

    // Skew: horizontal shear of -20°, lifting the right end of the line
    state = page.Canvas.Save();
    page.Canvas.TranslateTransform(60, 430);
    page.Canvas.SkewTransform(-20, 0);
    page.Canvas.DrawString({ s: 'Horizontally skewed text', font: font, brush: brush, x: 0, y: 0 });
    page.Canvas.Restore({ state: state });

    // Transform: compress vertically to 0.6, squashing the glyphs
    state = page.Canvas.Save();
    page.Canvas.TranslateTransform(60, 560);
    page.Canvas.ScaleTransform(1, 0.6);
    page.Canvas.DrawString({ s: 'Vertically compressed text', font: font, brush: brush, x: 0, y: 0 });
    page.Canvas.Restore({ state: state });

    // Define the output file name and save the document
    const outputFileName = 'TransformText.pdf';
    doc.SaveToFile(outputFileName);
    doc.Close();

    // Read the generated file from the VFS and trigger a download
    const fileArray = window.dotnetRuntime.Module.FS.readFile(outputFileName);
    const blob = new Blob([fileArray], { type: 'application/pdf' });
    const url = URL.createObjectURL(blob);
    const a = document.createElement('a');
    a.href = url;
    a.download = outputFileName;
    a.click();
    URL.revokeObjectURL(url);
  };

  return (
    <div style={{ textAlign: 'center', height: '300px' }}>
      <h1>Draw Rotated and Transformed Text</h1>
      <button onClick={drawTransformedText}>
        Transform
      </button>
    </div>
  );
}

export default App;
Text drawn with four canvas transforms: translation, rotation, horizontal skew, and vertical compression:
Draw Semi-Transparent Text
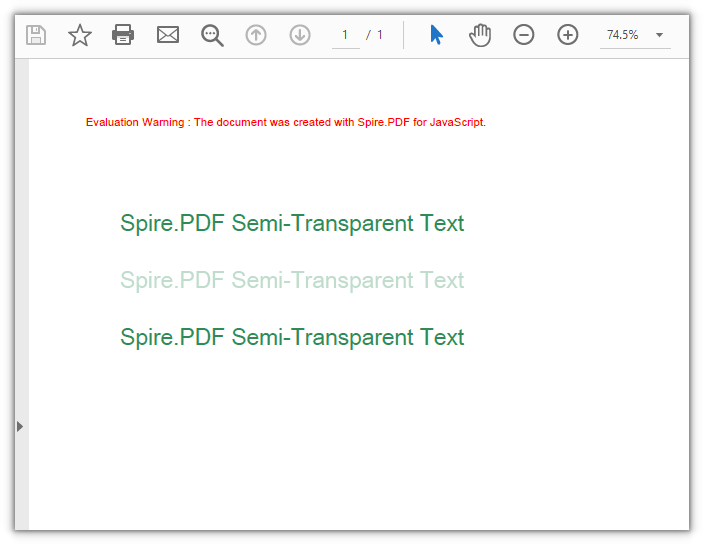
SetTransparency is set on the canvas: alphaBrush and alphaPen control how transparent the fill and the stroke are, taking a decimal between 0 and 1 (0 fully transparent, 1 opaque), and blendMode decides how the text composites with what lies underneath. It takes effect for everything drawn from the moment it is set, so wrap it in Save and Restore — otherwise the content that follows fades as well.
function App() {
  const drawTransparentText = async () => {
    // Get the Spire.PDF WASM module
    const pdfModule = window.wasmModule?.spirepdf;

    // Check whether the module is ready
    if (!pdfModule) {
      alert('Spire.PDF is not ready yet');
      return;
    }

    // Load the font into the VFS for the page text
    await window.spire.FetchFileToVFS('ARIAL UNICODE MS.TTF', '/Library/Fonts/', `${process.env.PUBLIC_URL}/font/`);

    // Create a PDF document and add a blank page
    const doc = new pdfModule.PdfDocument();
    const page = doc.Pages.Add();

    const font = new pdfModule.PdfTrueTypeFont({ fontFile: '/Library/Fonts/ARIAL UNICODE MS.TTF', size: 20 });
    const brush = new pdfModule.PdfSolidBrush({ pdfRGBColor: new pdfModule.PdfRGBColor({ color: pdfModule.Color.get_SeaGreen() }) });
    const text = 'Spire.PDF Semi-Transparent Text';

    // First line: opaque, as a reference
    page.Canvas.DrawString({ s: text, font: font, brush: brush, x: 40, y: 90 });

    // Turn on transparency: both the fill and the stroke alpha are set to 0.3
    const state = page.Canvas.Save();
    page.Canvas.SetTransparency({ alphaPen: 0.3, alphaBrush: 0.3, blendMode: pdfModule.PdfBlendMode.Normal });
    page.Canvas.DrawString({ s: text, font: font, brush: brush, x: 40, y: 140 });

    // Restore the canvas state so drawing outside this block goes back to opaque
    page.Canvas.Restore({ state: state });
    page.Canvas.DrawString({ s: text, font: font, brush: brush, x: 40, y: 190 });

    // Define the output file name and save the document
    const outputFileName = 'TransparentText.pdf';
    doc.SaveToFile(outputFileName);
    doc.Close();

    // Read the generated file from the VFS and trigger a download
    const fileArray = window.dotnetRuntime.Module.FS.readFile(outputFileName);
    const blob = new Blob([fileArray], { type: 'application/pdf' });
    const url = URL.createObjectURL(blob);
    const a = document.createElement('a');
    a.href = url;
    a.download = outputFileName;
    a.click();
    URL.revokeObjectURL(url);
  };

  return (
    <div style={{ textAlign: 'center', height: '300px' }}>
      <h1>Draw Semi-Transparent Text</h1>
      <button onClick={drawTransparentText}>
        Draw
      </button>
    </div>
  );
}

export default App;
The same line drawn three times: opaque, at alpha 0.3, and opaque again after Restore:
FAQ
Text lands outside the page, or its vertical position is reversed
Cause: The canvas origin sits at the top-left corner of the page (inset by the page margins), the y axis points down, and the unit is the point. The anchor marks the top-left corner of the line, not the text baseline. Working from the assumption that the origin is at the bottom-left with the y axis pointing up puts the text on the opposite side, or even outside the drawable area — the sample page is A4 with 40-point top and bottom margins, leaving a usable height of 762 points, and a line drawn below roughly y = 740 points is clipped.
Solution: Lay the text out from the top-left corner with y increasing downwards. To measure from the bottom of the page instead, subtract from the usable height:
// Height of the drawable area (762 points for A4 with 40-point margins)
const height = page.Canvas.ClientSize.Height;

// Draw 100 points above the bottom of the drawable area
page.Canvas.DrawString({ s: 'Text near the bottom of the page', font: font, brush: brush, x: 40, y: height - 100 });
Gradient text shows only a single color, or the transition is incomplete
Cause: The rect on a PdfLinearGradientBrush bounds where the gradient starts and ends, in absolute canvas coordinates, independent of the text anchor. When the rectangle does not cover the whole line, the text only lands on one segment of the gradient, which looks like a flat color. In a test with the rectangle starting at x = 0 and the text anchored at x = 40, the left edge of the text was already a third of the way through the gradient, and the red-to-blue transition was no longer complete.
Solution: Use MeasureString to get the text width, then make the rectangle the same width as the text and align its start with the anchor point, so the gradient sweeps across the whole line:
// Use the text width as the width of the gradient rectangle
const textWidth = font.MeasureString({ text: text }).Width;

const gradient = new pdfModule.PdfLinearGradientBrush({
  rect: new pdfModule.RectangleF({ x: 40, y: 90, width: textWidth, height: 40 }),
  color1: new pdfModule.PdfRGBColor({ color: pdfModule.Color.get_Red() }),
  color2: new pdfModule.PdfRGBColor({ color: pdfModule.Color.get_Blue() }),
  mode: pdfModule.PdfLinearGradientMode.Horizontal,
});

// Align the anchor with the left edge of the rectangle
page.Canvas.DrawString({ s: text, font: font, brush: gradient, x: 40, y: 110 });
Get a Free License
If you want to remove the evaluation message from the resulting documents, or lift the feature limits, contact sales for a temporary license valid for 30 days.
Find and Highlight Text in PDF Documents Using JavaScript in React
2026-09-23 02:11:57 Written by Nina TangA contract or a report of a few dozen pages lands on your desk, and you need to confirm where a certain clause or amount appears and how many times. Going through it page by page by eye is easy to get wrong. Marking the hits is the least effort, but find-and-highlight in a desktop application is hard to fit into a web workflow, and screenshotting every page to annotate it is not realistic either.
Spire.PDF for JavaScript loads, processes and saves PDF documents in the browser on WebAssembly, so finding and highlighting happen entirely locally, reading and writing files through a virtual file system (VFS) with no backend involved. This article uses PdfTextFinder to implement three ways of finding and highlighting: the whole document, a given area, and a regular expression.
This article covers three core features:
- Find and Highlight All Matches
- Find and Highlight Within an Area
- Find and Highlight by Regular Expression
For installation and project configuration, see Integrate Spire.PDF for JavaScript into a React Project. The examples below assume Spire.PDF is installed and the WebAssembly module is initialized.
Find and Highlight All Matches
PdfTextFinder locates given text in the text layer of a page. It works page by page: build one finder for each page of the document and you can find every match across the whole file at once. Each hit is highlighted by calling HighLight(), which is yellow by default; pass a color when different keywords have to be told apart.
function App() {
  const findAndHighlightAll = async () => {
    // Get the Spire.PDF WASM module
    const pdfModule = window.wasmModule?.spirepdf;

    // Check whether the module is ready
    if (!pdfModule) {
      alert('Spire.PDF is not ready yet');
      return;
    }

    // Load the PDF file to be processed into the VFS
    const inputFileName = 'Flowers.pdf';
    await window.spire.FetchFileToVFS(inputFileName, "", `${process.env.PUBLIC_URL}/data/`);

    // Create a PdfDocument object and load the PDF document
    let doc = new pdfModule.PdfDocument();
    doc.LoadFromFile(inputFileName);

    // Search page by page and highlight every hit
    for (let i = 0; i < doc.Pages.Count; i++) {
      const finder = new pdfModule.PdfTextFinder(doc.Pages.get_Item(i));
      finder.Options.Parameter = pdfModule.TextFindParameter.IgnoreCase;
      const finds = finder.Find('Ornamental');
      for (let j = 0; j < finds.length; j++) {
        finds.get(j).HighLight();
      }
    }

    // Save the document
    const outputFileName = 'FindAndHighlight.pdf';
    doc.SaveToFile(outputFileName);
    doc.Close();

    // Read the generated file from the VFS and trigger the download
    const fileArray = window.dotnetRuntime.Module.FS.readFile(outputFileName);
    const blob = new Blob([fileArray], { type: 'application/pdf' });
    const url = URL.createObjectURL(blob);
    const a = document.createElement('a');
    a.href = url;
    a.download = outputFileName;
    a.click();
    URL.revokeObjectURL(url);
  };

  return (
    <div style={{ textAlign: 'center', height: '300px' }}>
      <h1>Find and Highlight All Matches</h1>
      <button onClick={findAndHighlightAll}>
        Find and Highlight
      </button>
    </div>
  );
}

export default App;
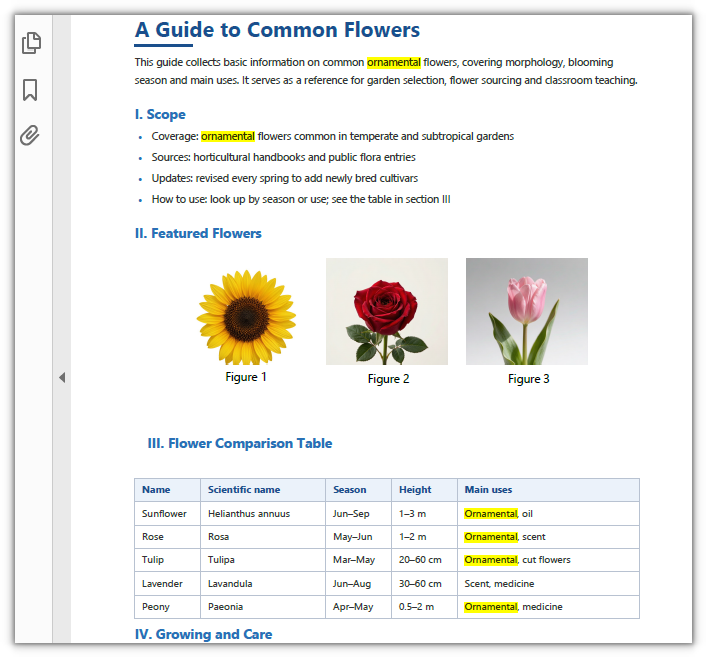
Every Ornamental in the document is highlighted:
Find and Highlight Within an Area
Text that reads the same on a page is often only partly worth marking. PdfTextFinder also provides Options.Area, which narrows the search to a rectangle; matches that fall outside it are not returned, and therefore not highlighted. The rectangle is described in page coordinates, with the origin at the top-left corner of the page and units in points.
function App() {
  const findAndHighlightInArea = async () => {
    // Get the Spire.PDF WASM module
    const pdfModule = window.wasmModule?.spirepdf;

    // Check whether the module is ready
    if (!pdfModule) {
      alert('Spire.PDF is not ready yet');
      return;
    }

    // Load the PDF file to be processed into the VFS
    const inputFileName = 'Flowers.pdf';
    await window.spire.FetchFileToVFS(inputFileName, "", `${process.env.PUBLIC_URL}/data/`);

    // Create a PdfDocument object and load the PDF document
    let doc = new pdfModule.PdfDocument();
    doc.LoadFromFile(inputFileName);

    // Set the search range: page coordinates, origin at the top-left, units in points
    const area = new pdfModule.RectangleF({ x: 60, y: 488, width: 420, height: 160 });

    const finder = new pdfModule.PdfTextFinder(doc.Pages.get_Item(0));
    finder.Options.Parameter = pdfModule.TextFindParameter.IgnoreCase;
    finder.Options.Area = area;

    // Only matches that fall inside the rectangle are returned
    const finds = finder.Find('Ornamental');
    for (let j = 0; j < finds.length; j++) {
      finds.get(j).HighLight();
    }

    // Save the document
    const outputFileName = 'HighlightInArea.pdf';
    doc.SaveToFile(outputFileName);
    doc.Close();

    // Read the generated file from the VFS and trigger the download
    const fileArray = window.dotnetRuntime.Module.FS.readFile(outputFileName);
    const blob = new Blob([fileArray], { type: 'application/pdf' });
    const url = URL.createObjectURL(blob);
    const a = document.createElement('a');
    a.href = url;
    a.download = outputFileName;
    a.click();
    URL.revokeObjectURL(url);
  };

  return (
    <div style={{ textAlign: 'center', height: '300px' }}>
      <h1>Find and Highlight Within an Area</h1>
      <button onClick={findAndHighlightInArea}>
        Find and Highlight
      </button>
    </div>
  );
}

export default App;
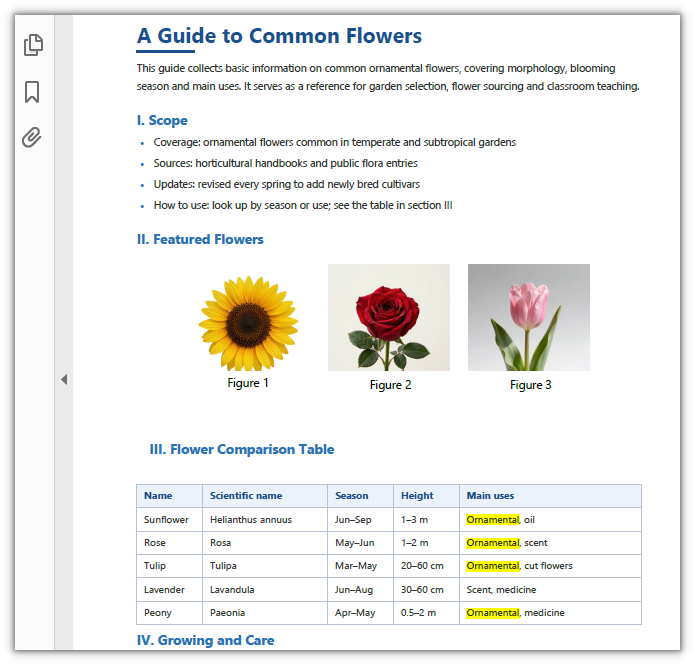
Only the Ornamental inside the comparison table is highlighted; the body text and the list stay as they are:
Find and Highlight by Regular Expression
The target is not necessarily a fixed set of characters. Options.Parameter decides the matching rule; set it to Regex and the argument to Find() becomes a regular expression, so targets that share a shape but differ in content can be circled in one pattern. The default value matches by substring, which is what the previous two sections do, and the same enumeration also offers IgnoreCase and WholeWord.
function App() {
  const findAndHighlightByRegex = async () => {
    // Get the Spire.PDF WASM module
    const pdfModule = window.wasmModule?.spirepdf;

    // Check whether the module is ready
    if (!pdfModule) {
      alert('Spire.PDF is not ready yet');
      return;
    }

    // Load the PDF file to be processed into the VFS
    const inputFileName = 'Flowers.pdf';
    await window.spire.FetchFileToVFS(inputFileName, "", `${process.env.PUBLIC_URL}/data/`);

    // Create a PdfDocument object and load the PDF document
    let doc = new pdfModule.PdfDocument();
    doc.LoadFromFile(inputFileName);

    // Match page by page with a regular expression and highlight every hit
    for (let i = 0; i < doc.Pages.Count; i++) {
      const finder = new pdfModule.PdfTextFinder(doc.Pages.get_Item(i));
      finder.Options.Parameter = pdfModule.TextFindParameter.Regex;
      const finds = finder.Find('Figure\\s*\\d');
      for (let j = 0; j < finds.length; j++) {
        finds.get(j).HighLight({ color: pdfModule.Color.get_Orange() });
      }
    }

    // Save the document
    const outputFileName = 'HighlightByRegex.pdf';
    doc.SaveToFile(outputFileName);
    doc.Close();

    // Read the generated file from the VFS and trigger the download
    const fileArray = window.dotnetRuntime.Module.FS.readFile(outputFileName);
    const blob = new Blob([fileArray], { type: 'application/pdf' });
    const url = URL.createObjectURL(blob);
    const a = document.createElement('a');
    a.href = url;
    a.download = outputFileName;
    a.click();
    URL.revokeObjectURL(url);
  };

  return (
    <div style={{ textAlign: 'center', height: '300px' }}>
      <h1>Find and Highlight by Regular Expression</h1>
      <button onClick={findAndHighlightByRegex}>
        Find and Highlight
      </button>
    </div>
  );
}

export default App;
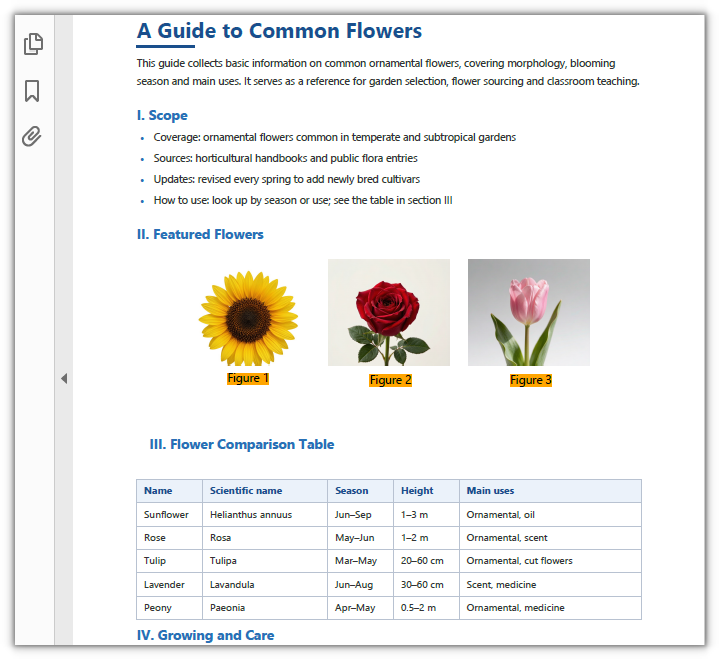
The three figure captions are matched by the pattern and highlighted in orange:
FAQ
The highlight works, but it is missing from the reader's comments panel
Cause: HighLight() writes into the page content, not into PDF annotations. The highlight block is written to the page's content stream when the document is saved, so the file grows by roughly 2 KB, and no annotation object is added to the output — reading it back with PyMuPDF gives an empty set from page.annots().
Fix: Treat the highlight as page graphics. It displays the same way as an annotation; it simply has no annotation identity, so it cannot be selected, deleted or recolored one by one in the reader. When highlights have to be managed as annotations, record the hit positions before saving and keep that list on the application side.
The search area is set, but nothing is highlighted
Cause: Options.Area uses page coordinates (origin at the top-left corner of the page, units in points). If the rectangle is too small or mispositioned, every match falls outside it. It also takes effect on the current page only — in a multi-page document, apply the same rectangle to the finder of the page you want.
Fix: Measure the target region in whole-page coordinates first, then narrow it down. In the sample below the comparison table falls within x≈60–480 and y≈488–648, so RectangleF({ x: 60, y: 488, width: 420, height: 160 }) frames it exactly, and the body text and list outside the rectangle are not matched:
// Search the current page only, and match inside this rectangle only
const finder = new pdfModule.PdfTextFinder(doc.Pages.get_Item(0));
finder.Options.Area = new pdfModule.RectangleF({ x: 60, y: 488, width: 420, height: 160 });
When the coordinates are uncertain, run the search once without Area and read the actual position from each hit's finds.get(i).Bounds[0] to work back to the rectangle.
The same regex matches a Chinese document but fails on a Japanese one
Cause: A regular expression matches the actual characters in the PDF text layer, not meanings. The dash that separates the ranges is not the same across the three samples: Chinese and English use – (U+2013), while Japanese uses the full-width tilde ~ (U+FF5E), so a pattern with only one of them hits only one kind of document.
Fix: Put the dashes in a character class so that both spellings work at once:
// Number ranges: 6–9 / 1–3 m / 6~9月 all match
finder.Options.Parameter = pdfModule.TextFindParameter.Regex;
const finds = finder.Find('[0-9]+\\s*[–-~]\\s*[0-9]+');
Get a Free License
If you want to remove the evaluation message from the result document, or get past the feature limits, contact sales for a 30-day temporary license.
A product list or an order detail table rarely keeps one format per cell. A description note has to be split over several lines, only a few words of a promotion line deserve to stand out, and a stock warning needs to be picked out in red. Doing that by hand means double-clicking every cell, selecting the fragment and adjusting the font one by one, which does not scale past a handful of rows. An HTML string describes exactly this kind of content — one piece of text whose parts are styled differently — and Spire.XLS for JavaScript exposes the HtmlString property, which renders a piece of HTML straight into a cell: line breaks, bold, italic, underline, color and font size all follow the tags, so a batch is one assignment inside a loop. It runs entirely in the browser on WebAssembly, managing input and output files with a virtual file system (VFS) and requiring no backend service.
This article covers two feature points:
For installation and project setup, see Integrating Spire.XLS for JavaScript in a React Project. The examples below assume Spire.XLS is installed and the WebAssembly module has been initialized.
Write HTML text with line breaks into a cell
Breaking a line inside a cell normally means pressing Alt+Enter while editing it. When the data comes from a database or a form, that manual step cannot be batched, and the <br> tag in HTML means precisely "break the line here". HtmlString parses <br>, <div> and <p> into line breaks inside the cell, so a single string written into one cell becomes several lines. The steps are as follows:
- Load the font into the VFS.
- Create a workbook, take its first worksheet and widen column A.
- Build an HTML string for each entry, splitting the parts with
<br>. - Write them into the cells of column A with
HtmlString. - Save the workbook.
The complete code example below shows how to write HTML text with line breaks into an Excel cell in React:
function App() {
  const setMultilineText = async () => {
    // Get the Spire.XLS WASM module
    const xlsModule = window.wasmModule?.spirexls;

    // Check that the module is ready
    if (!xlsModule) {
      alert('Spire.Xls is not ready yet');
      return;
    }

    // Load the font into the VFS
    await window.spire.FetchFileToVFS('ARIAL.TTF', '/Library/Fonts/', `${process.env.PUBLIC_URL}/font/`);

    // Create a workbook, take the first worksheet and widen column A so a single line stays on one line
    const workbook = new xlsModule.Workbook();
    const sheet = workbook.Worksheets.get(0);
    sheet.Range.get('A1:A5').ColumnWidth = 30;

    // Each description has three parts, separated by <br> inside the same cell
    const notes = [
      'Bluetooth 5.3 dual pairing<br>30-hour battery<br>USB-C fast charge',
      'Silent micro switches<br>Built-in 800 mAh battery<br>2.4G wireless',
      'Dual-mic noise cancelling<br>6 hours per charge<br>Magnetic charging case',
      '1080P resolution<br>780 g lightweight<br>Single USB-C cable',
      'Wooden enclosure<br>Bluetooth 5.0<br>Remote control included',
    ];

    // Write the HTML strings into column A, three lines inside one cell
    notes.forEach((html, index) => {
      sheet.Range.get(`A${index + 1}`).HtmlString = html;
    });

    // Save the workbook
    const outputFileName = 'MultilineHtmlText.xlsx';
    workbook.SaveToFile({ fileName: outputFileName });

    // Release the resources
    workbook.Dispose();

    // Read the result file out of the VFS and trigger the download
    const fileArray = window.dotnetRuntime.Module.FS.readFile(outputFileName);
    const blob = new Blob([fileArray], { type: 'application/vnd.openxmlformats-officedocument.spreadsheetml.sheet' });
    const url = URL.createObjectURL(blob);
    const a = document.createElement('a');
    a.href = url;
    a.download = outputFileName;
    a.click();
    URL.revokeObjectURL(url);
  };

  return (
    <div style={{ textAlign: 'center', height: '300px' }}>
      <h1>Excel HTML rich text</h1>
      <button onClick={setMultilineText}>Multiline HTML text</button>
    </div>
  );
}

export default App;
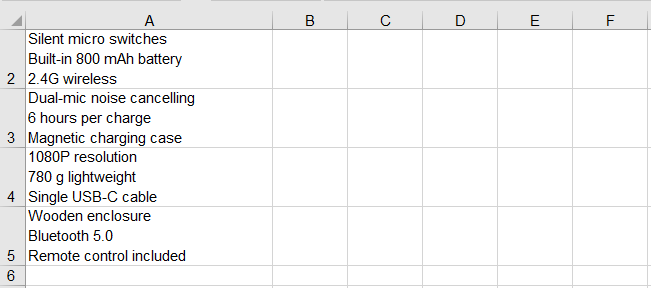
After running, the effect of writing HTML text with line breaks into a cell:
Format part of the text in a cell
Text inside one cell does not have to share one format. Within a single run of text, only part of it usually needs to stand out, while the rest can stay at the regular weight. HtmlString supports the <b>, <i> and <u> tags, and takes color and font size in a style attribute on a <span>. Every fragment wrapped in a tag becomes its own run of formatting without affecting the others, and the tags themselves never appear in the cell. The steps are as follows:
- As in the previous section, load the font into the VFS, create a workbook, take the first worksheet and widen column A.
- Mark the text to emphasize with
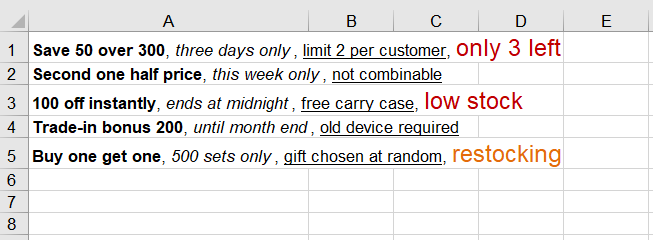
<b>,<i>and<u>, and wrap the text to highlight in<span style="color:#C00000;font-size:14pt">, giving the color as a hexadecimal value and the size in points. - Write the strings into column A; the rest of the text in the same cell keeps its original format.
- Save the workbook.
The complete code example below shows how to format part of the text in an Excel cell in React:
function App() {
  const setPartialFormatting = async () => {
    // Get the Spire.XLS WASM module
    const xlsModule = window.wasmModule?.spirexls;

    // Check that the module is ready
    if (!xlsModule) {
      alert('Spire.Xls is not ready yet');
      return;
    }

    // Load the font into the VFS
    await window.spire.FetchFileToVFS('ARIAL.TTF', '/Library/Fonts/', `${process.env.PUBLIC_URL}/font/`);

    // Create a workbook, take the first worksheet and widen column A so a single line stays on one line
    const workbook = new xlsModule.Workbook();
    const sheet = workbook.Worksheets.get(0);
    sheet.Range.get('A1:A5').ColumnWidth = 30;

    // Each part of a promotion line gets its own <b>, <i>, <u> or styled <span>;
    // bold, italic, underline, color and font size apply only to the wrapped text
    const promotions = [
      '<b>Save 50 over 300</b>, <i>three days only</i>, <u>limit 2 per customer</u>, <span style="color:#C00000;font-size:14pt">only 3 left</span>',
      '<b>Second one half price</b>, <i>this week only</i>, <u>not combinable</u>',
      '<b>100 off instantly</b>, <i>ends at midnight</i>, <u>free carry case</u>, <span style="color:#C00000;font-size:14pt">low stock</span>',
      '<b>Trade-in bonus 200</b>, <i>until month end</i>, <u>old device required</u>',
      '<b>Buy one get one</b>, <i>500 sets only</i>, <u>gift chosen at random</u>, <span style="color:#E36C0A;font-size:14pt">restocking</span>',
    ];

    // Write the HTML strings into column A
    promotions.forEach((html, index) => {
      sheet.Range.get(`A${index + 1}`).HtmlString = html;
    });

    // Save the workbook
    const outputFileName = 'PartialFormattingHtml.xlsx';
    workbook.SaveToFile({ fileName: outputFileName });

    // Release the resources
    workbook.Dispose();

    // Read the result file out of the VFS and trigger the download
    const fileArray = window.dotnetRuntime.Module.FS.readFile(outputFileName);
    const blob = new Blob([fileArray], { type: 'application/vnd.openxmlformats-officedocument.spreadsheetml.sheet' });
    const url = URL.createObjectURL(blob);
    const a = document.createElement('a');
    a.href = url;
    a.download = outputFileName;
    a.click();
    URL.revokeObjectURL(url);
  };

  return (
    <div style={{ textAlign: 'center', height: '300px' }}>
      <h1>Excel HTML rich text</h1>
      <button onClick={setPartialFormatting}>Partial formatting</button>
    </div>
  );
}

export default App;
After running, the effect of formatting part of the text in a cell as bold, italic, underlined, colored or larger:
FAQ
Does the HTML parser swallow runs of spaces?
Cause: A browser collapses consecutive spaces into one when it renders HTML, which makes it easy to assume Spire does the same and to reach for to build any padding.
Solution: It does not. A B is still five spaces when read back out of the cell, and leading spaces survive as well. works too, but ordinary alignment does not need it.
Does writing rich text wipe out the alignment the cell already had?
Cause: HtmlString does change the cell's font properties, so it is fair to wonder whether it resets the alignment set earlier along with them.
Solution: The alignment is untouched. Set Style.HorizontalAlignment first and write the HtmlString afterwards, and the alignment reads back unchanged — setting the format before the content is safe.
const cell = sheet.Range.get('A1');
cell.Style.HorizontalAlignment = xlsModule.HorizontalAlignType.Center;
cell.HtmlString = '<b>Centered</b>';
Get a Free License
Spire.XLS for JavaScript offers a 30-day full-featured free trial license with no functional limitations. Apply here to evaluate before purchasing.
A chart makes the trend behind one set of numbers visible, but it is far less good at showing the trends behind dozens of sets at once. Sparklines are built for exactly that: each one compresses a trend into a single cell, with no axes and no legend, so a whole column of trends can be taken in at a glance. Give every region's quarterly sales figures their own sparkline and you can see which row is climbing and which one turned back long before you could read it out of a column of numbers. Spire.XLS for JavaScript performs this directly in the browser through WebAssembly, managing input and output files with a virtual file system (VFS) and requiring no backend service.
This article covers three feature points:
- Add line sparklines
- Add column sparklines and highlight the high and low points
- Clear sparklines from a worksheet
For installation and project setup, see Integrating Spire.XLS for JavaScript in a React Project. The examples below assume Spire.XLS is installed and the WebAssembly module has been initialized.
Add Line Sparklines
A line sparkline joins a row of values in order into a single thin line, making the rise and fall of the trend immediately readable. It occupies no cell of its own and hides none of the numbers underneath, so a single narrow column can carry the trends of dozens of rows at once, and which one is climbing and which one turned back is there at a glance. A sparkline cannot exist outside a sparkline group, and the group decides the type, colors and marker settings shared by the whole batch. The steps are:
- Load the font and the sample data file into the VFS.
- Load the workbook and get the first worksheet.
- Create a line sparkline group with
SparklineGroups.AddGroup()and set the line weight and marker color. - Get the group's sparkline collection with
Add()and add one sparkline per data row in column F. - Save the workbook.
The following is the complete code example, showing how to add line sparklines to Excel data in React:
function App() {
  const addLineSparkline = async () => {
    // Get the Spire.XLS WASM module
    const xlsModule = window.wasmModule?.spirexls;

    // Check if the module is ready
    if (!xlsModule) {
      alert('Spire.Xls is not ready yet');
      return;
    }

    // Load the font and the sample data file into the VFS
    await window.spire.FetchFileToVFS('ARIAL.TTF', '/Library/Fonts/', `${process.env.PUBLIC_URL}/font/`);
    const inputFileName = 'SparklineData.xlsx';
    await window.spire.FetchFileToVFS(inputFileName, '', `${process.env.PUBLIC_URL}data/`);

    // Load the workbook and get the first worksheet
    const workbook = new xlsModule.Workbook();
    workbook.LoadFromFile({ fileName: inputFileName });
    const sheet = workbook.Worksheets.get(0);

    // Create a line sparkline group on the worksheet
    const sparklineGroup = sheet.SparklineGroups.AddGroup({ sparklineType: xlsModule.SparklineType.Line });

    // Style the line: thicker stroke and visible data point markers
    sparklineGroup.LineWeight = 1.5;
    sparklineGroup.ShowMarkers = true;
    sparklineGroup.MarkersColor = xlsModule.Color.get_Red();

    // Get the sparkline collection of the group
    const sparklines = sparklineGroup.Add();

    // Add one sparkline per data row in column F
    for (let row = 2; row <= 9; row++) {
      sparklines.Add({
        dataRange: sheet.Range.get(`B${row}:E${row}`),
        referenceRange: sheet.Range.get(`F${row}`),
      });
    }

    // Save the workbook
    const outputFileName = 'AddLineSparkline.xlsx';
    workbook.SaveToFile({ fileName: outputFileName });

    // Dispose of the workbook object to free resources
    workbook.Dispose();

    // Read the result file from the VFS and trigger the download
    const fileArray = window.dotnetRuntime.Module.FS.readFile(outputFileName);
    const blob = new Blob([fileArray], { type: 'application/vnd.openxmlformats-officedocument.spreadsheetml.sheet' });
    const url = URL.createObjectURL(blob);
    const a = document.createElement('a');
    a.href = url;
    a.download = outputFileName;
    a.click();
    URL.revokeObjectURL(url);
  };

  return (
    <div style={{ textAlign: 'center', height: '300px' }}>
      <h1>Line Sparkline</h1>
      <button onClick={addLineSparkline}>Start</button>
    </div>
  );
}

export default App;
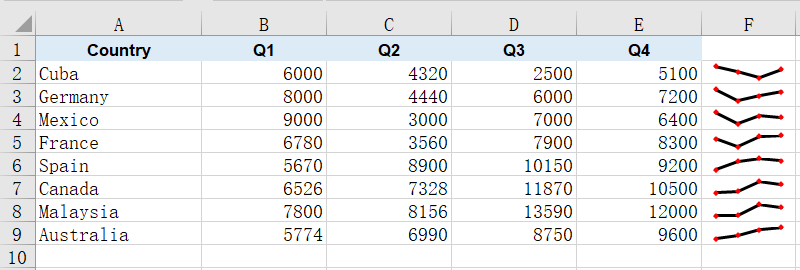
After running, the effect of adding line sparklines:
Add Column Sparklines and Highlight the High and Low Points
A column sparkline represents values as a row of thin bars, which reads more directly than a line when you are comparing several numbers within the same row. It works the same way as the line sparkline, except that the color lands on each bar itself rather than on a connecting stroke.
What really makes column sparklines useful is the high and low point markers: the strongest and the weakest quarter in each row are picked out and colored on their own, so you no longer have to compare the numbers by eye to see where a row peaked and where it fell away. The steps are:
- Load the font and the sample data file into the VFS.
- Load the workbook and get the first worksheet.
- Create a column sparkline group with
SparklineGroups.AddGroup()(passingSparklineType.Column) and set the series color withSparklineColor. - Turn on
ShowHighPointandShowLowPoint, and give each its own color withHighPointColorandLowPointColor. - Get the group's sparkline collection with
Add(), add one sparkline per data row in column G and save the workbook.
The following is the complete code example, showing how to add column sparklines to Excel data and highlight the high and low points in React:
function App() {
  const addColumnSparkline = async () => {
    // Get the Spire.XLS WASM module
    const xlsModule = window.wasmModule?.spirexls;

    // Check if the module is ready
    if (!xlsModule) {
      alert('Spire.Xls is not ready yet');
      return;
    }

    // Load the font and the sample data file into the VFS
    await window.spire.FetchFileToVFS('ARIAL.TTF', '/Library/Fonts/', `${process.env.PUBLIC_URL}/font/`);
    const inputFileName = 'SparklineData.xlsx';
    await window.spire.FetchFileToVFS(inputFileName, '', `${process.env.PUBLIC_URL}data/`);

    // Load the workbook and get the first worksheet
    const workbook = new xlsModule.Workbook();
    workbook.LoadFromFile({ fileName: inputFileName });
    const sheet = workbook.Worksheets.get(0);

    // Create a column sparkline group
    const sparklineGroup = sheet.SparklineGroups.AddGroup({ sparklineType: xlsModule.SparklineType.Column });

    // Set the color of the sparkline itself
    sparklineGroup.SparklineColor = xlsModule.Color.get_CadetBlue();

    // Turn on the high and low point markers and give each its own color
    sparklineGroup.ShowHighPoint = true;
    sparklineGroup.HighPointColor = xlsModule.Color.get_Red();
    sparklineGroup.ShowLowPoint = true;
    sparklineGroup.LowPointColor = xlsModule.Color.get_Purple();

    const sparklines = sparklineGroup.Add();

    // Add one sparkline per data row in column G
    for (let row = 2; row <= 9; row++) {
      sparklines.Add({
        dataRange: sheet.Range.get(`B${row}:E${row}`),
        referenceRange: sheet.Range.get(`G${row}`),
      });
    }

    // Save the workbook
    const outputFileName = 'AddColumnSparkline.xlsx';
    workbook.SaveToFile({ fileName: outputFileName });

    // Dispose of the workbook object to free resources
    workbook.Dispose();

    // Read the result file from the VFS and trigger the download
    const fileArray = window.dotnetRuntime.Module.FS.readFile(outputFileName);
    const blob = new Blob([fileArray], { type: 'application/vnd.openxmlformats-officedocument.spreadsheetml.sheet' });
    const url = URL.createObjectURL(blob);
    const a = document.createElement('a');
    a.href = url;
    a.download = outputFileName;
    a.click();
    URL.revokeObjectURL(url);
  };

  return (
    <div style={{ textAlign: 'center', height: '300px' }}>
      <h1>Column Sparkline</h1>
      <button onClick={addColumnSparkline}>Start</button>
    </div>
  );
}

export default App;
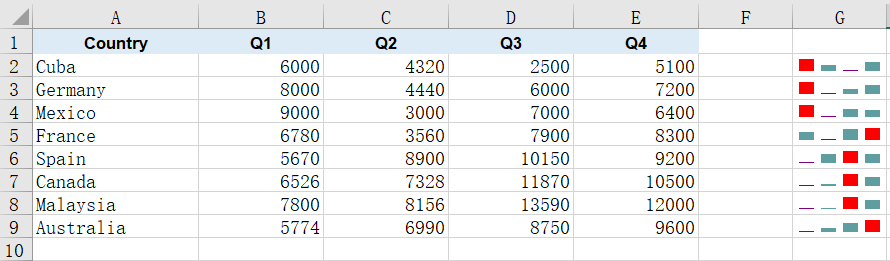
After running, the effect of adding column sparklines and highlighting the high and low points:
Clear Sparklines from a Worksheet
When a report is revised or the figures are restated, the sparklines drawn beside the old numbers may no longer apply and need to be removed and drawn again. Sparkline groups are held by the worksheet, and once they are gone the cells return to their ordinary state, with their data and other formatting untouched. The steps are:
- Load the font and the sample data file into the VFS.
- Load the workbook and get the second worksheet, which already carries a line sparkline group.
- Clear all sparkline groups on that worksheet with
SparklineGroups.Clear(). - Save the workbook.
The following is the complete code example, showing how to clear sparklines from a worksheet in React:
function App() {
  const clearSparklines = async () => {
    // Get the Spire.XLS WASM module
    const xlsModule = window.wasmModule?.spirexls;

    // Check if the module is ready
    if (!xlsModule) {
      alert('Spire.Xls is not ready yet');
      return;
    }

    // Load the font and the sample data file into the VFS
    await window.spire.FetchFileToVFS('ARIAL.TTF', '/Library/Fonts/', `${process.env.PUBLIC_URL}/font/`);
    const inputFileName = 'SparklineData.xlsx';
    await window.spire.FetchFileToVFS(inputFileName, '', `${process.env.PUBLIC_URL}data/`);

    // Load the workbook and get the second worksheet
    const workbook = new xlsModule.Workbook();
    workbook.LoadFromFile({ fileName: inputFileName });
    const sheet = workbook.Worksheets.get(1);

    // Clear all sparkline groups on that worksheet
    sheet.SparklineGroups.Clear();

    // Save the workbook
    const outputFileName = 'ClearSparklines.xlsx';
    workbook.SaveToFile({ fileName: outputFileName });

    // Dispose of the workbook object to free resources
    workbook.Dispose();

    // Read the result file from the VFS and trigger the download
    const fileArray = window.dotnetRuntime.Module.FS.readFile(outputFileName);
    const blob = new Blob([fileArray], { type: 'application/vnd.openxmlformats-officedocument.spreadsheetml.sheet' });
    const url = URL.createObjectURL(blob);
    const a = document.createElement('a');
    a.href = url;
    a.download = outputFileName;
    a.click();
    URL.revokeObjectURL(url);
  };

  return (
    <div style={{ textAlign: 'center', height: '300px' }}>
      <h1>Clear Sparklines</h1>
      <button onClick={clearSparklines}>Start</button>
    </div>
  );
}

export default App;
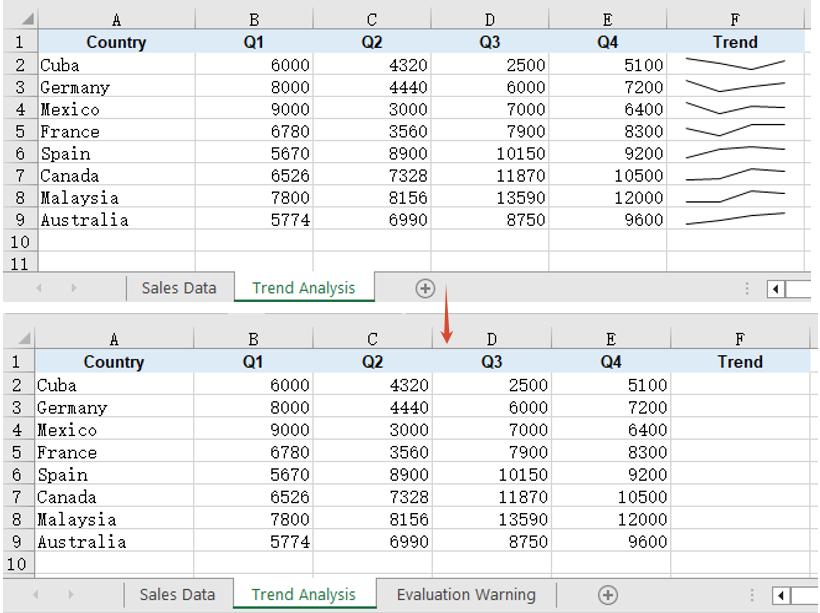
After running, the effect of clearing sparklines from a worksheet:
FAQ
Reading the cells back does not show the sparklines
Cause: A sparkline is not cell content. It belongs to a sparkline group on the worksheet and is drawn over its anchor cell, while its data and settings are written into the worksheet's extension block, so walking the cells returns an empty value for the anchor column and no cell-level call can tell you whether a sparkline is there.
Solution: Read it from the worksheet-level SparklineGroups instead. get_Item(0) returns the first group, and its SparklineType tells you whether the batch is a line or a column one; the color settings are read from the same place:
const group = sheet.SparklineGroups.get_Item(0);
console.log(group.SparklineType);   // SparklineType.Line or SparklineType.Column
Setting the line weight and markers on a column sparkline has no effect
Cause: LineWeight and ShowMarkers apply to line sparklines only. A column sparkline represents values as bars, so it has neither a connecting stroke nor data point markers, and although the assignment succeeds, neither property is written to the result file.
Solution: If you need a stroke and markers, create the sparkline group as a line type and set them there:
const sparklineGroup = sheet.SparklineGroups.AddGroup({ sparklineType: xlsModule.SparklineType.Line });
sparklineGroup.LineWeight = 1.5;
sparklineGroup.ShowMarkers = true;
sparklineGroup.MarkersColor = xlsModule.Color.get_Red();
Get a Free License
Spire.XLS for JavaScript offers a 30-day full-featured free trial license with no functional limitations. Apply here to evaluate before purchasing.
Detect PDF Page Orientation and Rotation with JavaScript in React
2026-09-23 02:03:56 Written by Nina TangBefore printing, imposing or watermarking pages, you need to know whether each page is landscape or portrait: a document that mixes the two leaves blank edges when printed directly, and lands out of place when imposed. A page may also have been rotated as a whole, in which case the recorded page size no longer matches the direction you see. Picking those pages out before batch processing means flipping through them one at a time in desktop software.
This article shows how to detect PDF page rotation and display orientation with Spire.PDF for JavaScript. It is built on WebAssembly and loads and parses PDF documents directly in the browser, all locally, reading and writing files through a virtual file system (VFS) with no backend involved.
Two features are covered:
For installation and project setup, see Integrate Spire.PDF for JavaScript in a React project. The examples below assume Spire.PDF is installed and the WebAssembly module is initialized.
Detect page rotation
PdfPageBase.Rotation reads the angle a page has been rotated by; the value falls within the PdfPageRotateAngle enumeration of 0°, 90°, 180° and 270°.
function App() {
  const detectPageRotation = async () => {
    // Get the Spire.PDF WASM module
    const pdfModule = window.wasmModule?.spirepdf;

    // Check whether the module is ready
    if (!pdfModule) {
      alert('Spire.PDF is not ready yet');
      return;
    }

    // Load the PDF file to inspect into the VFS
    const inputFileName = 'PageOrientationSample.pdf';
    await window.spire.FetchFileToVFS(inputFileName, '', `${process.env.PUBLIC_URL}/data/`);

    // Create a PdfDocument object and load the PDF document
    const doc = new pdfModule.PdfDocument();
    doc.LoadFromFile(inputFileName);

    // The enumeration values are indices rather than angles, so map indices to degrees first
    const DEGREES = {
      [pdfModule.PdfPageRotateAngle.RotateAngle0.value]: 0,
      [pdfModule.PdfPageRotateAngle.RotateAngle90.value]: 90,
      [pdfModule.PdfPageRotateAngle.RotateAngle180.value]: 180,
      [pdfModule.PdfPageRotateAngle.RotateAngle270.value]: 270,
    };

    // Read the rotation angle page by page
    const lines = [];
    for (let i = 0; i < doc.Pages.Count; i++) {
      const page = doc.Pages.get_Item(i);
      lines.push(`Page ${i + 1}: rotation angle ${DEGREES[page.Rotation.value]}°`);
    }

    // Write the detection result into the VFS
    const outputFileName = 'PageRotationResult.txt';
    window.dotnetRuntime.Module.FS.writeFile(outputFileName, lines.join('\r\n'));
    doc.Close();

    // Read the generated file back from the VFS and trigger the download
    const fileArray = window.dotnetRuntime.Module.FS.readFile(outputFileName);
    const blob = new Blob([fileArray], { type: 'text/plain' });
    const url = URL.createObjectURL(blob);
    const a = document.createElement('a');
    a.href = url;
    a.download = outputFileName;
    a.click();
    URL.revokeObjectURL(url);
  };

  return (
    <div style={{ textAlign: 'center', height: '300px' }}>
      <h1>Detect Page Rotation</h1>
      <button onClick={detectPageRotation}>
        Start Detection
      </button>
    </div>
  );
}

export default App;
Detection result with the rotation angle recorded page by page:
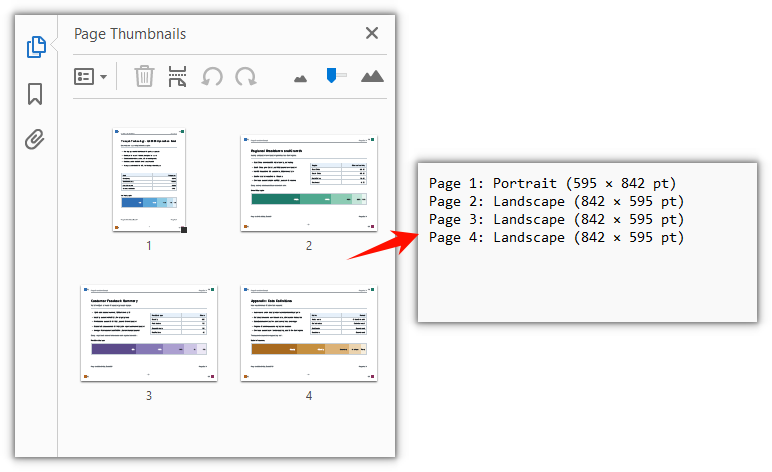
Detect page orientation
Whether a page is landscape or portrait cannot be told from its size alone: PdfPageBase.Size gives the width and height of the visible page box and does not include the rotation; when a page is rotated by 90° or 270°, the width and height have to be swapped to get the direction the page actually shows.
function App() {
  const detectPageOrientation = async () => {
    // Get the Spire.PDF WASM module
    const pdfModule = window.wasmModule?.spirepdf;

    // Check whether the module is ready
    if (!pdfModule) {
      alert('Spire.PDF is not ready yet');
      return;
    }

    // Load the PDF file to inspect into the VFS
    const inputFileName = 'PageOrientationSample.pdf';
    await window.spire.FetchFileToVFS(inputFileName, '', `${process.env.PUBLIC_URL}/data/`);

    // Create a PdfDocument object and load the PDF document
    const doc = new pdfModule.PdfDocument();
    doc.LoadFromFile(inputFileName);

    const { RotateAngle90, RotateAngle270 } = pdfModule.PdfPageRotateAngle;

    // Judge the display orientation page by page
    const lines = [];
    for (let i = 0; i < doc.Pages.Count; i++) {
      const page = doc.Pages.get_Item(i);
      const pageSize = page.Size;

      // Size excludes rotation: at 90° or 270° the width and height swap to give the displayed size
      const quarterTurn = page.Rotation === RotateAngle90 || page.Rotation === RotateAngle270;
      const width = quarterTurn ? pageSize.Height : pageSize.Width;
      const height = quarterTurn ? pageSize.Width : pageSize.Height;
      const orientation = width >= height ? 'Landscape' : 'Portrait';

      lines.push(`Page ${i + 1}: ${orientation} (${width.toFixed(0)} × ${height.toFixed(0)} pt)`);
    }

    // Write the detection result into the VFS
    const outputFileName = 'PageOrientationResult.txt';
    window.dotnetRuntime.Module.FS.writeFile(outputFileName, lines.join('\r\n'));
    doc.Close();

    // Read the generated file back from the VFS and trigger the download
    const fileArray = window.dotnetRuntime.Module.FS.readFile(outputFileName);
    const blob = new Blob([fileArray], { type: 'text/plain' });
    const url = URL.createObjectURL(blob);
    const a = document.createElement('a');
    a.href = url;
    a.download = outputFileName;
    a.click();
    URL.revokeObjectURL(url);
  };

  return (
    <div style={{ textAlign: 'center', height: '300px' }}>
      <h1>Detect Page Display Orientation</h1>
      <button onClick={detectPageOrientation}>
        Start Detection
      </button>
    </div>
  );
}

export default App;
Detection result after judging each page by its display orientation:
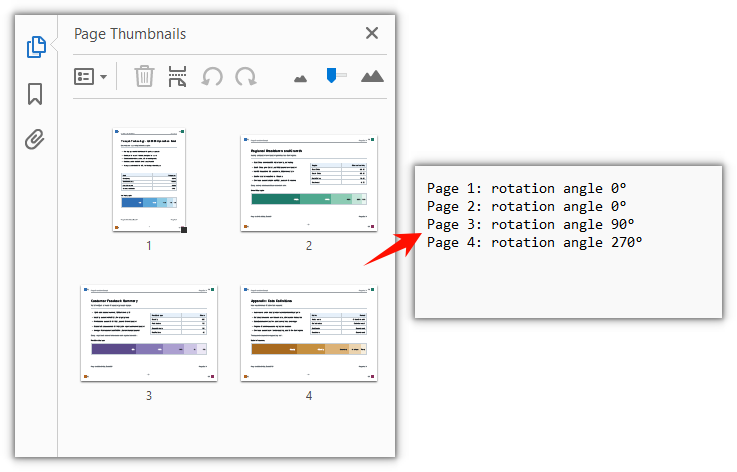
FAQ
page.Rotation.value returns 0, 1, 2, 3 instead of 0, 90, 180, 270
Cause: The four members of PdfPageRotateAngle — RotateAngle0, RotateAngle90, RotateAngle180, RotateAngle270 — carry the values 0, 1, 2, 3 in the WebAssembly binding, and .value returns that index rather than the angle. Writing page.Rotation.value === 90 is always false.
Solution: Build an index-to-angle map before using the value. Rotation is corrected with an index too — page.Rotation takes an index, so passing 90 is read as index 2 and writes 180° into the document:
// Index → angle
const DEGREES = {
  [pdfModule.PdfPageRotateAngle.RotateAngle0.value]: 0,
  [pdfModule.PdfPageRotateAngle.RotateAngle90.value]: 90,
  [pdfModule.PdfPageRotateAngle.RotateAngle180.value]: 180,
  [pdfModule.PdfPageRotateAngle.RotateAngle270.value]: 270,
};

// Set the current page to 90° — .value is the index
page.Rotation = pdfModule.PdfPageRotateAngle.RotateAngle90.value;
page.Size returns portrait dimensions for a page that clearly shows as landscape
Cause: PdfPageBase.Size and ActualSize return the width and height of the page's visible box — the CropBox if one was set, otherwise the MediaBox — and that value does not follow /Rotate. Page 3 of the sample document has a page box of 595 × 842 pt with /Rotate at 90°, so it renders as an 842 × 595 landscape page while Size still returns 595 × 842.
Solution: After reading Rotation, swap the width and height yourself:
const { RotateAngle90, RotateAngle270 } = pdfModule.PdfPageRotateAngle;
const quarterTurn = page.Rotation === RotateAngle90 || page.Rotation === RotateAngle270;

const width = quarterTurn ? page.Size.Height : page.Size.Width;
const height = quarterTurn ? page.Size.Width : page.Size.Height;
doc.Sections is empty in a loaded PDF, and PageSettings.Orientation cannot be read
Cause: Sections holds page settings, and LoadFromFile does not rebuild sections for pages that already exist, so doc.Sections.Count is 0 and a following doc.Sections.get_Item(0) throws Arg_IndexOutOfRangeException. PageSettings.Orientation describes the layout intent for a newly created page, not the direction recorded in the file.
Solution: For existing pages, read page-level properties only — doc.Pages.get_Item(i) followed by Rotation and Size. Leave PageSettings.Orientation for new pages added through Sections.Add():
// Inspecting existing pages
const page = doc.Pages.get_Item(0);
const angle = DEGREES[page.Rotation.value];

// Orientation only comes into play when creating a new page
const section = doc.Sections.Add();
section.PageSettings.Orientation = pdfModule.PdfPageOrientation.Landscape;
Get a Free License
If you want to remove the evaluation message from the result documents, or lift the feature limits, contact sales for a 30-day temporary license.
Scanned pages, drawings and electronic invoices often carry a wide white margin while the page size stays at its original spec; the opposite also happens, where only a small block of a page matters and the rest does not need to appear. Removing the extra part used to mean framing each page by hand in desktop software, or sending the file to a server — the first is hard to fit into a web workflow, the second means the document leaves the user's device.
This article shows how to crop PDF pages with Spire.PDF for JavaScript. It is built on WebAssembly and loads, modifies and saves PDF documents directly in the browser, all locally, reading and writing files through a virtual file system (VFS) with no backend involved. The steps are demonstrated on a two-page sample document.
For installation and project setup, see Integrate Spire.PDF for JavaScript in a React project. The examples below assume Spire.PDF is installed and the WebAssembly module is initialized.
Crop a PDF Page
Cropping a page is done through page.CropBox, a RectangleF whose x and y are measured from the top-left corner of the page, while width and height decide how much is kept; content outside the box no longer shows up. Cropping the whole document by one uniform margin means walking doc.Pages and, for each page, giving up the distance on all four sides of its MediaBox.
function App() {
  const cropPdfPage = async () => {
    // Get the Spire.PDF WASM module
    const pdfModule = window.wasmModule?.spirepdf;

    // Check whether the module is ready
    if (!pdfModule) {
      alert('Spire.PDF is not ready yet');
      return;
    }

    // Load the PDF file to be cropped into the VFS
    const inputFileName = 'ToCrop.pdf';
    await window.spire.FetchFileToVFS(inputFileName, "", `${process.env.PUBLIC_URL}/data/`);

    // Create a PdfDocument object and load the PDF document
    let doc = new pdfModule.PdfDocument();
    doc.LoadFromFile(inputFileName);

    // Trim 60 points off every side
    const margin = 60;

    for (let i = 0; i < doc.Pages.Count; i++) {
      const page = doc.Pages.get_Item(i);

      // MediaBox gives the full extent of the page, from which the crop box is derived
      // (x and y are measured from the top-left corner of the page)
      const width = page.MediaBox.Width;
      const height = page.MediaBox.Height;

      page.CropBox = new pdfModule.RectangleF({
        x: margin,
        y: margin,
        width: width - margin * 2,
        height: height - margin * 2,
      });
    }

    const outputFileName = 'CropByMargins.pdf';
    doc.SaveToFile(outputFileName);
    doc.Close();

    // Read the generated file from the VFS and trigger the download
    const fileArray = window.dotnetRuntime.Module.FS.readFile(outputFileName);
    const blob = new Blob([fileArray], { type: 'application/pdf' });
    const url = URL.createObjectURL(blob);
    const a = document.createElement('a');
    a.href = url;
    a.download = outputFileName;
    a.click();
    URL.revokeObjectURL(url);
  };

  return (
    <div style={{ textAlign: 'center', height: '300px' }}>
      <h1>Crop PDF Pages</h1>
      <button onClick={cropPdfPage}>
        Crop PDF
      </button>
    </div>
  );
}

export default App;
Both pages are cropped by a 60-point margin, so the white margin and the frame around the page are removed:
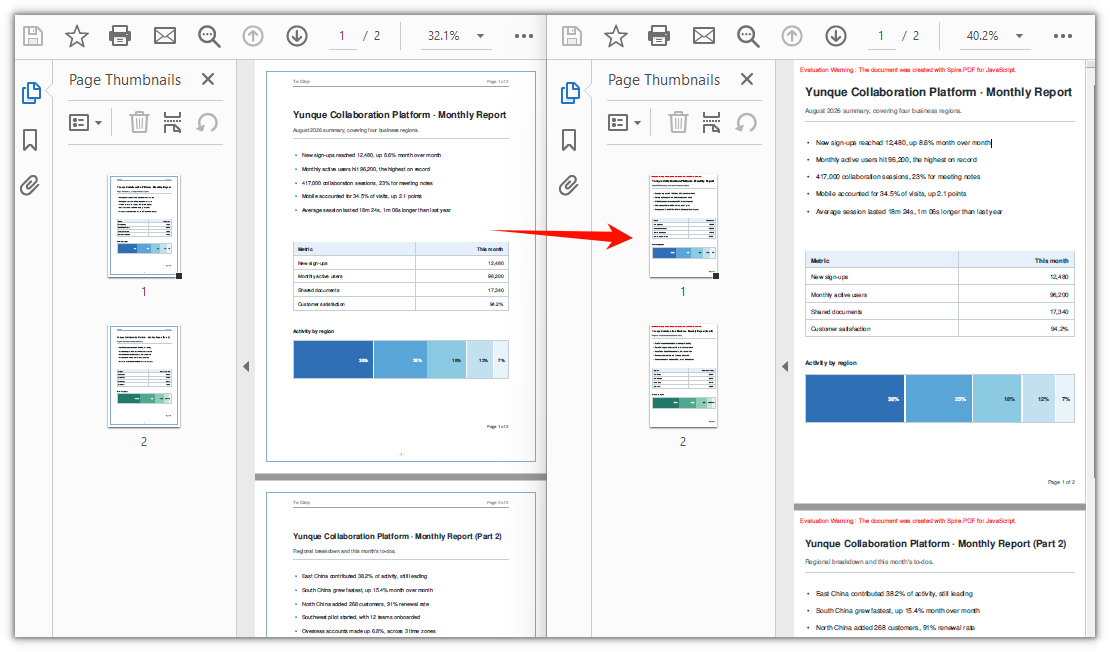
FAQ
Can I crop a single page instead of the whole document
Why: CropBox is a page-level property; there is no "whole document" interface. The loop above exists only so that every page gets the same margin.
Solution: To crop one page only, drop the loop and assign to the target page directly. x and y are likewise measured from the top-left corner of the page:
// Crop page 1 only: keep a 400 x 500 point block starting at (80, 80) from the top-left corner
const page = doc.Pages.get_Item(0);
page.CropBox = new pdfModule.RectangleF({ x: 80, y: 80, width: 400, height: 500 });
How do I undo a crop
Why: CropBox changes the page box in place, and the document keeps no record of the original one. The instinct is to assign page.MediaBox back, but that has no effect — the coordinates are applied on top of the origin of the current visible area, so only the size changes and the origin stays put. After a 60-point crop, assigning MediaBox back still leaves the visible area starting at (60, 60).
Solution: If the original document is still around, loading it again is the simplest route. When only the cropped file is left, offset the origin back to the top-left corner with negative values and give the full page size:
// Undo when the crop offset was (offsetX, offsetY)
page.CropBox = new pdfModule.RectangleF({
  x: -offsetX,
  y: -offsetY,
  width: page.MediaBox.Width,
  height: page.MediaBox.Height,
});
The file didn't get smaller and the cropped content is still searchable
Why: CropBox is a soft crop — it only changes the visible box of the page, while content outside it stays in the file and can still be picked up by text search or copy.
Solution: If the goal is to actually remove the content from the page, setting CropBox is not enough; the page has to be rebuilt — create a new document of the same size, take the content out with page.CreateTemplate(), draw it onto a new page, and save to a new file.
Get a Free License
If you want to remove the evaluation message from the result document, or lift the feature limitations, contact sales for a temporary license valid for 30 days.
Adding the cover of a product manual to the front of a project description, merging pages 2 and 3 of a quotation into a contract, combining several reports into one summary — all of it comes down to moving pages from one PDF into another. Desktop software means opening two windows and dragging back and forth, and one wrong drop means starting over; with more pages, the resulting order is easy to get wrong. A different kind of trouble is mismatched page sizes: the cover is A5 and the target document is A4, so moving the page across as-is leaves a band of white space around it.
Spire.PDF for JavaScript loads, modifies and saves PDF documents directly in the browser based on WebAssembly, so the whole copying process runs locally and reads and writes files through a virtual file system (VFS), with no backend service required.
This article covers four core features. The first three move whole pages, carrying the source page's size, rotation and margins over as they are; the fourth takes only the page content, and how large a page it is drawn onto is up to you.
Move whole pages
- Copy a Single Page to a Specific Position
- Copy a Range of Pages to the End of a Document
- Copy Every Page of a Whole Document
Copy content (templates)
For installation and project configuration, refer to Integrating Spire.PDF for JavaScript in a React Project. The following examples assume Spire.PDF is installed and the WebAssembly module has been initialized.
Copy a Single Page to a Specific Position
Spire.PDF for JavaScript provides the PdfDocument.InsertPage method, which copies a page from another document into the current one and lets you choose which position it lands at. Leave the target index out and the page is appended to the end.
function App() {
  const copyPageAtPosition = async () => {
    // Get the Spire.PDF WASM module
    const pdfModule = window.wasmModule?.spirepdf;

    // Check whether the module is ready
    if (!pdfModule) {
      alert('Spire.PDF is not ready yet');
      return;
    }

    // Load both the source and the target document into the VFS
    const sourceFileName = 'SourceDocument.pdf';
    const targetFileName = 'TargetDocument.pdf';
    await window.spire.FetchFileToVFS(sourceFileName, "", `${process.env.PUBLIC_URL}/data/`);
    await window.spire.FetchFileToVFS(targetFileName, "", `${process.env.PUBLIC_URL}/data/`);

    // Load the two documents
    const sourceDoc = new pdfModule.PdfDocument();
    sourceDoc.LoadFromFile(sourceFileName);
    const targetDoc = new pdfModule.PdfDocument();
    targetDoc.LoadFromFile(targetFileName);

    // Copy page 1 of the source document to the front of the target document
    // pageIndex comes from the source document, resultPageIndex is where the copy lands
    targetDoc.InsertPage({ ldDoc: sourceDoc, pageIndex: 0, resultPageIndex: 0 });

    // Save the result document
    const outputFileName = 'CopyPageAtPosition.pdf';
    targetDoc.SaveToFile(outputFileName);
    sourceDoc.Close();
    targetDoc.Close();

    // Read the generated file from the VFS and trigger the download
    const fileArray = window.dotnetRuntime.Module.FS.readFile(outputFileName);
    const blob = new Blob([fileArray], { type: 'application/pdf' });
    const url = URL.createObjectURL(blob);
    const a = document.createElement('a');
    a.href = url;
    a.download = outputFileName;
    a.click();
    URL.revokeObjectURL(url);
  };

  return (
    <div style={{ textAlign: 'center', height: '300px' }}>
      <h1>Copy Page at Position</h1>
      <button onClick={copyPageAtPosition}>
        Start
      </button>
    </div>
  );
}

export default App;
resultPageIndexis the only place among the four features where you control where the page lands: 0 puts it first, 1 puts it second, and passing the current page count is the same as appending it.
Page 1 of the source document now sits in front of the target document, which goes from 2 pages to 3:
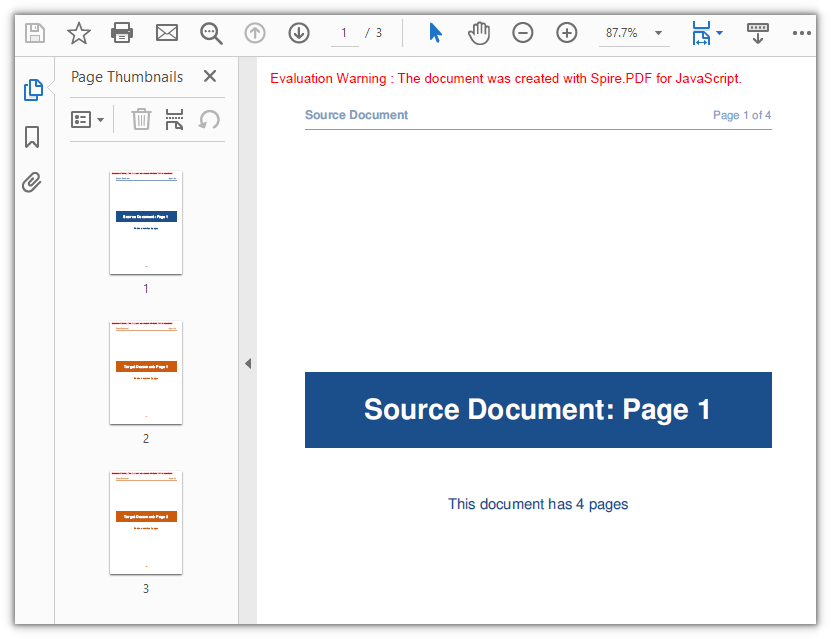
Copy a Range of Pages to the End of a Document
Spire.PDF for JavaScript also provides the PdfDocument.InsertPageRange method, which copies a run of consecutive pages from the source document. It takes the source document plus a start and an end index, has no parameter for a target position, and always appends the result to the end of the current document.
function App() {
  const appendPageRange = async () => {
    // Get the Spire.PDF WASM module
    const pdfModule = window.wasmModule?.spirepdf;

    // Check whether the module is ready
    if (!pdfModule) {
      alert('Spire.PDF is not ready yet');
      return;
    }

    // Load both the source and the target document into the VFS
    const sourceFileName = 'SourceDocument.pdf';
    const targetFileName = 'TargetDocument.pdf';
    await window.spire.FetchFileToVFS(sourceFileName, "", `${process.env.PUBLIC_URL}/data/`);
    await window.spire.FetchFileToVFS(targetFileName, "", `${process.env.PUBLIC_URL}/data/`);

    // Load the two documents
    const sourceDoc = new pdfModule.PdfDocument();
    sourceDoc.LoadFromFile(sourceFileName);
    const targetDoc = new pdfModule.PdfDocument();
    targetDoc.LoadFromFile(targetFileName);

    // Append pages 2 to 3 of the source document to the end of the target document
    // Note: these are positional arguments, not an object; endIndex is inclusive
    targetDoc.InsertPageRange(sourceDoc, 1, 2);

    // Save the result document
    const outputFileName = 'CopyPageRange.pdf';
    targetDoc.SaveToFile(outputFileName);
    sourceDoc.Close();
    targetDoc.Close();

    // Read the generated file from the VFS and trigger the download
    const fileArray = window.dotnetRuntime.Module.FS.readFile(outputFileName);
    const blob = new Blob([fileArray], { type: 'application/pdf' });
    const url = URL.createObjectURL(blob);
    const a = document.createElement('a');
    a.href = url;
    a.download = outputFileName;
    a.click();
    URL.revokeObjectURL(url);
  };

  return (
    <div style={{ textAlign: 'center', height: '300px' }}>
      <h1>Copy Page Range</h1>
      <button onClick={appendPageRange}>
        Copy pages 2-3
      </button>
    </div>
  );
}

export default App;
After pages 2 and 3 of the source document are appended, the document has 4 pages:
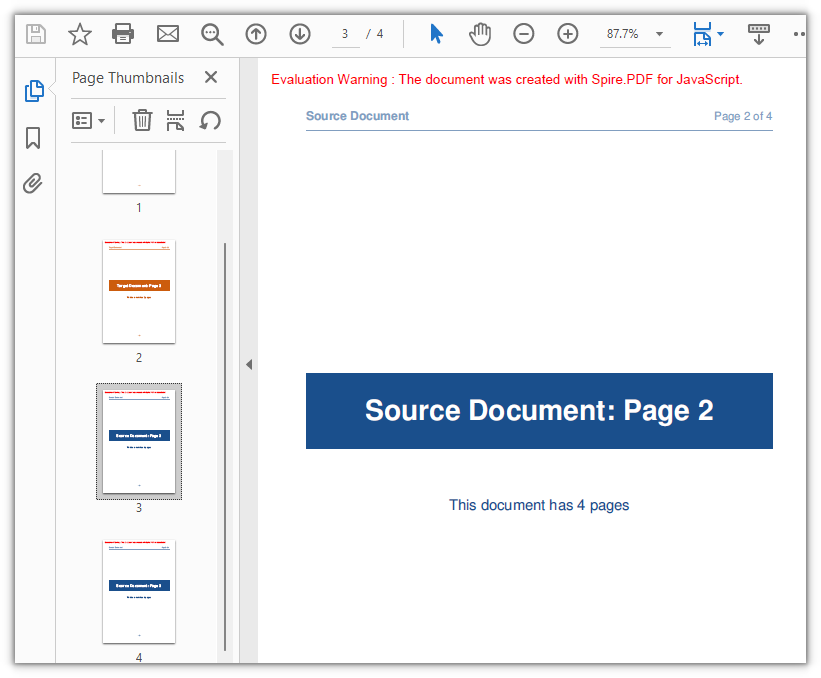
Copy Every Page of a Whole Document
When an entire document has to move, there is no need to work out the indices first: PdfDocument.AppendPage takes the source document object and appends all of its pages to the end of the current document in their original order. For merging several documents or attaching material to a report, just pass the documents in one after another.
function App() {
  const appendWholeDocument = async () => {
    // Get the Spire.PDF WASM module
    const pdfModule = window.wasmModule?.spirepdf;

    // Check whether the module is ready
    if (!pdfModule) {
      alert('Spire.PDF is not ready yet');
      return;
    }

    // Load both the source and the target document into the VFS
    const sourceFileName = 'SourceDocument.pdf';
    const targetFileName = 'TargetDocument.pdf';
    await window.spire.FetchFileToVFS(sourceFileName, "", `${process.env.PUBLIC_URL}/data/`);
    await window.spire.FetchFileToVFS(targetFileName, "", `${process.env.PUBLIC_URL}/data/`);

    // Load the two documents
    const sourceDoc = new pdfModule.PdfDocument();
    sourceDoc.LoadFromFile(sourceFileName);
    const targetDoc = new pdfModule.PdfDocument();
    targetDoc.LoadFromFile(targetFileName);

    // Use AppendPage when the whole document has to be copied; all pages are appended in order
    targetDoc.AppendPage({ doc: sourceDoc });

    // Save the result document
    const outputFileName = 'CopyAllPages.pdf';
    targetDoc.SaveToFile(outputFileName);
    sourceDoc.Close();
    targetDoc.Close();

    // Read the generated file from the VFS and trigger the download
    const fileArray = window.dotnetRuntime.Module.FS.readFile(outputFileName);
    const blob = new Blob([fileArray], { type: 'application/pdf' });
    const url = URL.createObjectURL(blob);
    const a = document.createElement('a');
    a.href = url;
    a.download = outputFileName;
    a.click();
    URL.revokeObjectURL(url);
  };

  return (
    <div style={{ textAlign: 'center', height: '300px' }}>
      <h1>Copy Whole Document</h1>
      <button onClick={appendWholeDocument}>
        Start
      </button>
    </div>
  );
}

export default App;
After all 4 pages of the source document are appended, the document has 6 pages:
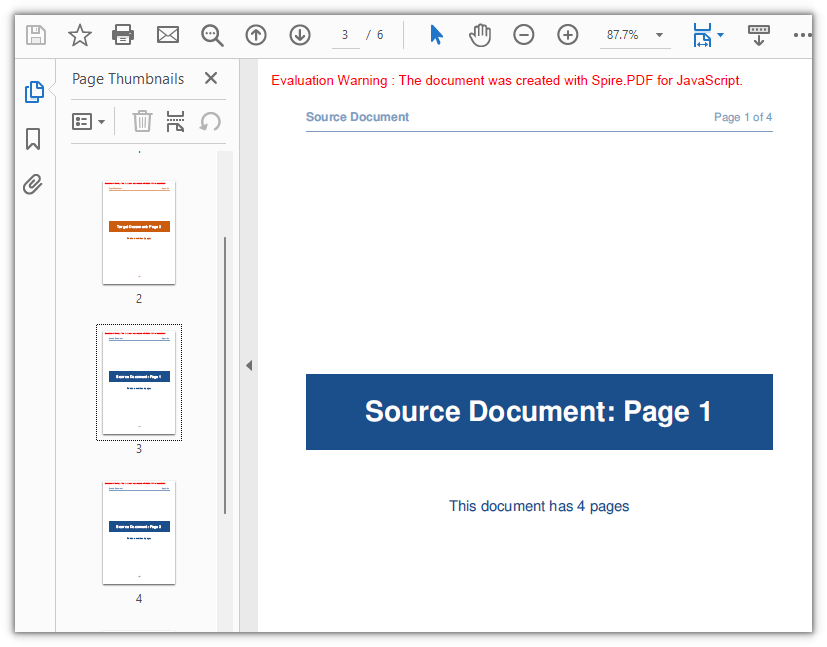
Copy Page Content with a Page Template
Spire.PDF for JavaScript also provides the PdfPageBase.CreateTemplate method, which takes the content of one page as a PdfTemplate that Canvas.DrawTemplate then draws onto a newly created page. The first three methods move whole pages, so the new page inherits the source page's size; a template takes the content instead, leaving the page size, the drawing position and the number of times you draw it entirely up to you — the same template can be reused again and again.
function App() {
  const copyPageWithTemplate = async () => {
    // Get the Spire.PDF WASM module
    const pdfModule = window.wasmModule?.spirepdf;

    // Check whether the module is ready
    if (!pdfModule) {
      alert('Spire.PDF is not ready yet');
      return;
    }

    // Load the PDF file to work on into the VFS
    const inputFileName = 'SourceDocument.pdf';
    await window.spire.FetchFileToVFS(inputFileName, "", `${process.env.PUBLIC_URL}/data/`);

    // Load the document
    const doc = new pdfModule.PdfDocument();
    doc.LoadFromFile(inputFileName);

    // Take the page to be reused and turn it into a template: read the content once, draw it many times
    const sourcePage = doc.Pages.get_Item(0);
    const template = sourcePage.CreateTemplate();

    // First placement: insert an A4 page at position 2, a different size from the source,
    // and draw the content scaled to 297.6 x 421.6 at (80, 80)
    const page1 = doc.Pages.Insert(1, new pdfModule.SizeF(595.0, 842.0), new pdfModule.PdfMargins({ margin: 0.0 }));
    page1.Canvas.DrawTemplate(template, new pdfModule.PointF(80.0, 80.0), new pdfModule.SizeF(297.6, 421.6));

    // Second placement: insert another A4 page, drawing the same template smaller in the lower right
    const page2 = doc.Pages.Insert(2, new pdfModule.SizeF(595.0, 842.0), new pdfModule.PdfMargins({ margin: 0.0 }));
    page2.Canvas.DrawTemplate(template, new pdfModule.PointF(320.0, 460.0), new pdfModule.SizeF(200.0, 283.3));

    // Save the result document
    const outputFileName = 'CopyPageWithTemplate.pdf';
    doc.SaveToFile(outputFileName);
    doc.Close();

    // Read the generated file from the VFS and trigger the download
    const fileArray = window.dotnetRuntime.Module.FS.readFile(outputFileName);
    const blob = new Blob([fileArray], { type: 'application/pdf' });
    const url = URL.createObjectURL(blob);
    const a = document.createElement('a');
    a.href = url;
    a.download = outputFileName;
    a.click();
    URL.revokeObjectURL(url);
  };

  return (
    <div style={{ textAlign: 'center', height: '300px' }}>
      <h1>Copy Page with Template</h1>
      <button onClick={copyPageWithTemplate}>
        Start
      </button>
    </div>
  );
}

export default App;
When the third argument of DrawTemplate is omitted, the template is drawn at its original coordinates without scaling — the new page is larger than the source, so the content occupies only one corner of it. Both the size of the new page and its margins come from Pages.Insert; in the example the margins are 0 on all four sides, which is what makes the drawing origin the top-left corner of the page.
The content of page 1 in the source document is scaled onto two new A4 pages, taking the document from 4 pages to 6:
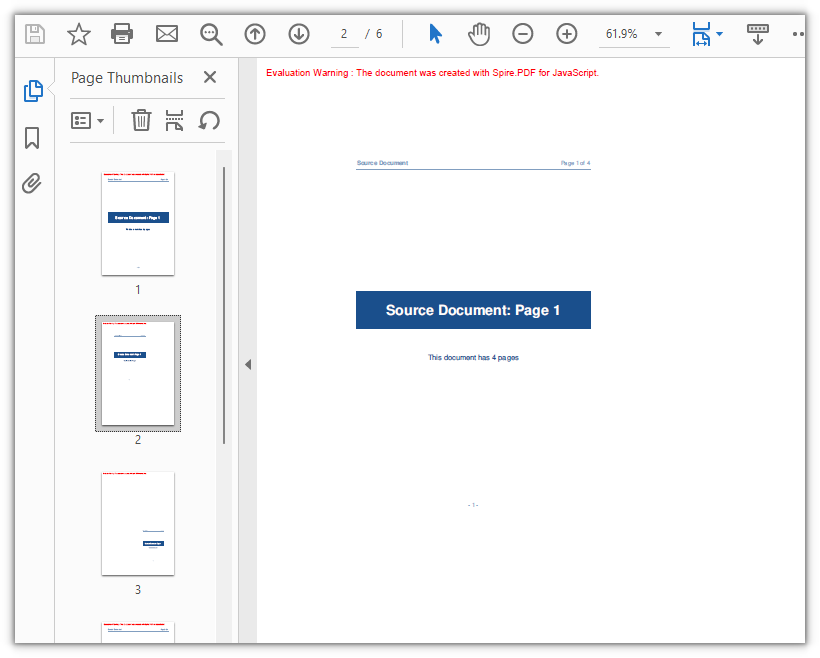
Frequently Asked Questions
Creating a page with new PdfMargins(0.0) throws Arg_NullReferenceException
Cause: The PdfMargins constructor treats a single numeric argument as an internal handle, so new pdfModule.PdfMargins(0.0) does not give you a margins object — reading its Left or Top throws Arg_NullReferenceException, and using it to create a page does not produce the margins you expect.
Solution: Pass the margins as an object; for 0 on all four sides write { margin: 0.0 }:
// Zero margins on all four sides
const margins = new pdfModule.PdfMargins({ margin: 0.0 });

// Or set each side separately
const custom = new pdfModule.PdfMargins({ left: 20.0, top: 20.0, right: 20.0, bottom: 20.0 });
An out-of-range or reversed-range error is thrown when copying pages
Cause: Page indices start at 0 and endIndex is inclusive, so the valid range is 0 to Pages.Count - 1. Going outside it throws Index out of range, and a startIndex greater than endIndex throws The start index is greater then the end index.
Solution: Clamp the upper bound with Pages.Count before passing it in:
// To copy pages 2 to 4: start = 1, end = 3, with the page count as the upper bound
const start = 1;
const end = Math.min(3, sourceDoc.Pages.Count - 1);
targetDoc.InsertPageRange(sourceDoc, start, end);
A rotated page comes out with the wrong orientation after copying
Cause: CreateTemplate() takes the page content, and the page's rotation angle (/Rotate) is not part of the template. When the source page is rotated, the template's coordinate system no longer lines up with the target page — drawing it straight onto a new page with DrawTemplate puts the content outside the visible area, and the copy's Rotation is 0.
Solution: When the source page is rotated, use a whole-page copy instead; the content and the rotation angle travel together:
// Whole-page copy: the rotation angle comes with the page
targetDoc.InsertPage({ ldDoc: sourceDoc, pageIndex: 0, resultPageIndex: 1 });
If the template approach is required, temporarily zero the source page's rotation before taking the template, then restore the angle on both the source page and the copy:
const rotation = sourcePage.Rotation.value;

// Zero it temporarily so the template exports at the page's real coordinates
sourcePage.Rotation = 0;
const newPage = doc.Pages.Insert(1, sourcePage.Size, new pdfModule.PdfMargins({ margin: 0.0 }));
newPage.Canvas.DrawTemplate(sourcePage.CreateTemplate(), new pdfModule.PointF(0.0, 0.0));

// Restore the source page and give the copy the same angle
sourcePage.Rotation = rotation;
newPage.Rotation = rotation;
Get a Free License
If you would like to remove the evaluation message from the result documents or lift the feature limits, contact sales for a temporary 30-day license.
Setting a page background for a Word document is one of the most common ways to polish contracts, official papers and brand materials: a soft base color, or a background image that matches the corporate visual identity, is enough to give the whole document a consistent visual tone. Spire.Doc for JavaScript performs this setting directly in the browser via WebAssembly, using a virtual file system (VFS) to manage input and output files — no backend server required.
This article covers three core features:
For installation and project setup, refer to Integrating Spire.Doc for JavaScript in a React Project. The examples below assume Spire.Doc is installed and the WebAssembly module is initialized.
Set a Solid Color Background
The solid color background involves three stages: first, load the font files and the target Word file into the WASM virtual file system via FetchFileToVFS; then instantiate a Document and load the file, set Background.Type to BackgroundType.Color, and assign a built-in color value to Background.Color; finally, save the document to the VFS with SaveToFile, read the generated docx file from it, wrap it as a Blob, and trigger a browser download.
function App() {
  const SetSolidColorBackground = async () => {
    const docModule = window.wasmModule?.spiredoc;
    if (!docModule) {
      alert('Spire.Doc is not ready yet');
      return;
    }
    // Load the sample file into the virtual file system (VFS)
    let inputFileName = "ScienceTemplate.docx";
    await window.spire.FetchFileToVFS(inputFileName, "", `${process.env.PUBLIC_URL}static/data/`);

    // Create Word document
    let doc = new docModule.Document();

    // Load the file
    doc.LoadFromFile(inputFileName);

    // Set the background type as Color
    doc.Background.Type = docModule.BackgroundType.Color;

    // Set the background color
    doc.Background.Color = docModule.Color.get_LightYellow();

    // Define the output file name
    const outputFileName = "SetSolidColorBackground_out.docx";

    // Save the document to the specified path
    doc.SaveToFile({ fileName: outputFileName, fileFormat: docModule.FileFormat.Docx2013 });

    doc.Dispose();

    const modifiedFileArray = window.dotnetRuntime.Module.FS.readFile(outputFileName);
    const blob = new Blob([modifiedFileArray], { type: 'application/vnd.openxmlformats-officedocument.wordprocessingml.document' });
    const url = URL.createObjectURL(blob);
    const a = document.createElement('a');
    a.href = url;
    a.download = outputFileName;
    a.click();
    URL.revokeObjectURL(url);
  };

 return (
    <div style={{ textAlign: 'center', height: '300px' }}>
      <h1>Set a Solid Color Background for a Word Document</h1>
      <button onClick={SetSolidColorBackground}>Generate</button>
    </div>
  );
}
export default App;
After Background.Color has been applied, the whole page is filled with the built-in LightYellow background color.
Set a Gradient Background
A gradient background follows the same flow as a solid color background; only the middle stage differs. Set Background.Type to BackgroundType.Gradient, retrieve the background gradient object through Background.Gradient, set the start color Color1 and the end color Color2 separately, and then use ShadingStyle and ShadingVariant to control the direction of the gradient and the way it transitions.
function App() {
  const SetGradientBackground = async () => {
    const docModule = window.wasmModule?.spiredoc;
    if (!docModule) {
      alert('Spire.Doc is not ready yet');
      return;
    }
    // Load the sample file into the virtual file system (VFS)
    let inputFileName = "ScienceTemplate.docx";
    await window.spire.FetchFileToVFS(inputFileName, "", `${process.env.PUBLIC_URL}static/data/`);

    // Create Word document
    let doc = new docModule.Document();

    // Load the file
    doc.LoadFromFile(inputFileName);

    // Set the background type as Gradient
    doc.Background.Type = docModule.BackgroundType.Gradient;
    let gradient = doc.Background.Gradient;

    // Set the start color and the end color of the gradient
    gradient.Color1 = docModule.Color.get_White();
    gradient.Color2 = docModule.Color.get_LightBlue();

    // Set the shading style and variant of the gradient
    gradient.ShadingVariant = docModule.GradientShadingVariant.ShadingDown;
    gradient.ShadingStyle = docModule.GradientShadingStyle.Horizontal;

    // Define the output file name
    const outputFileName = "SetGradientBackground_out.docx";

    // Save the document to the specified path
    doc.SaveToFile({ fileName: outputFileName, fileFormat: docModule.FileFormat.Docx2013 });

    doc.Dispose();

    const modifiedFileArray = window.dotnetRuntime.Module.FS.readFile(outputFileName);
    const blob = new Blob([modifiedFileArray], { type: 'application/vnd.openxmlformats-officedocument.wordprocessingml.document' });
    const url = URL.createObjectURL(blob);
    const a = document.createElement('a');
    a.href = url;
    a.download = outputFileName;
    a.click();
    URL.revokeObjectURL(url);
  };

 return (
    <div style={{ textAlign: 'center', height: '300px' }}>
      <h1>Set a Gradient Background for a Word Document</h1>
      <button onClick={SetGradientBackground}>Generate</button>
    </div>
  );
}
export default App;
After Background.Gradient has been applied, the page background is filled with a white and light blue gradient.
Set a Picture Background
A picture background is similar to the two backgrounds above; the difference lies in how the resources are prepared and assigned. At the loading stage the background image has to be loaded into the VFS together with the font files and the target Word file; then set Background.Type to BackgroundType.Picture and call Background.SetPicture with the path of the image inside the VFS to tile the image across the whole page as the background.
function App() {
  const SetImageBackground = async () => {
    const docModule = window.wasmModule?.spiredoc;
    if (!docModule) {
      alert('Spire.Doc is not ready yet');
      return;
    }
    // Load the sample file into the virtual file system (VFS)
    let inputFileName1 = "ScienceTemplate.docx";
    await window.spire.FetchFileToVFS(inputFileName1, "", `${process.env.PUBLIC_URL}static/data/`);

    // Load the background image into the virtual file system (VFS)
    let inputFileName2 = "Background.png";
    await window.spire.FetchFileToVFS(inputFileName2, "", `${process.env.PUBLIC_URL}static/data/`);

    // Load a Word document
    let doc = new docModule.Document();
    doc.LoadFromFile(inputFileName1);

    // Set the background type as Picture
    doc.Background.Type = docModule.BackgroundType.Picture;

    // Set the background picture
    doc.Background.SetPicture(inputFileName2);

    // Define the output file name
    const outputFileName = "SetImageBackground_out.docx";

    // Save the document to the specified path
    doc.SaveToFile({ fileName: outputFileName, fileFormat: docModule.FileFormat.Docx2013 });

    doc.Dispose();

    const modifiedFileArray = window.dotnetRuntime.Module.FS.readFile(outputFileName);
    const blob = new Blob([modifiedFileArray], { type: 'application/vnd.openxmlformats-officedocument.wordprocessingml.document' });
    const url = URL.createObjectURL(blob);
    const a = document.createElement('a');
    a.href = url;
    a.download = outputFileName;
    a.click();
    URL.revokeObjectURL(url);
  };

 return (
    <div style={{ textAlign: 'center', height: '300px' }}>
      <h1>Set a Picture Background in a Word Document</h1>
      <button onClick={SetImageBackground}>Generate</button>
    </div>
  );
}
export default App;
After Background.SetPicture has been applied, the image is tiled across the whole page as the background.
FAQ
The background does not appear in print
Cause: Word does not print page background colors or background pictures by default. This is a printing setting of the Word client, not a lost background setting in the document. The background displays normally while the document is open and is only ignored in the printed output.
Solution: To keep the background in a printed copy, select Print background colors and images under File > Options > Display in Word before printing. If the background has to be output in every environment, use a full-page shape in the header or a watermark to simulate it instead.
The picture background has no effect
Cause: Background.Type was not set to BackgroundType.Picture before SetPicture was called, or the background image was not loaded into the VFS via FetchFileToVFS, so SetPicture cannot find the image file.
Solution: Set the background type first, then pass the name of the image that has already been loaded into the VFS:
document.Background.Type = wasmModule.BackgroundType.Picture;
document.Background.SetPicture("Background.png");
Get a Free License
Spire.Doc for JavaScript offers a 30-day full-featured free trial license with no functional limitations. Apply here to evaluate before purchasing.
