
.NET (1327)
Children categories
This section is designed to introduce a simple method to clearly convert text to PDF for WPF. During the text to PDF conversion task, font, font color, line space and other text format also can be quickly set according to your own need via a WPF PDF component Spire.PDF for WPF.
Spire.PDF for WPF will display a solution of two key steps to realize text to PDF task as well as customize text in PDF. Compared with some text to PDF converters, Spire.PDF for WPF not only has the function of convert HTML, text and image to PDF, but also owns the ability to read, write and manipulate PDF document without Adobe Acrobat or any third party component library.
Below screenshot gives you a clear view of the text to PDF conversion effect:
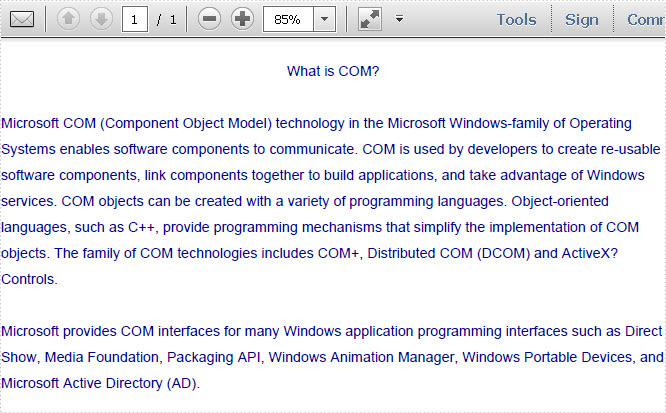
Please download Spire.PDF for WPF on system. Then, perform your text to PDF by below key steps.
Step1: Read all text information to s string
In this step, you need to read all the text from a text file to a string.
string text = File.ReadAllText(@"..\texttopdf.txt");
Dim text As String = File.ReadAllText("..\texttopdf.txt")
Step2: Draw string to PDF document with custom layout.
This step allows you to set the text font, font color, text format and position in PDF document at your own will by below code:
  PdfPageBase page = section.Pages.Add();
            PdfFont font = new PdfFont(PdfFontFamily.Helvetica, 11);
            PdfStringFormat format = new PdfStringFormat();
            format.LineSpacing = 20f;
            float pageWidth = page.Canvas.ClientSize.Width;
            PdfBrush brush = PdfBrushes.DarkBlue;
            float y = 30;
            PdfStringLayouter textLayouter = new PdfStringLayouter();
            PdfStringLayoutResult result
                = textLayouter.Layout(text, font, format, new SizeF(pageWidth, 0));
            foreach (LineInfo line in result.Lines)
            {
                page.Canvas.DrawString(line.Text, font, brush, 0, y, format);
                y = y + result.LineHeight;
            }
Dim page As PdfPageBase = section.Pages.Add()
	Dim font As New PdfFont(PdfFontFamily.Helvetica, 11)
	Dim format As New PdfStringFormat()
	format.LineSpacing = 20F
	Dim pageWidth As Single = page.Canvas.ClientSize.Width
	Dim brush As PdfBrush = PdfBrushes.DarkBlue
	Dim y As Single = 30
	Dim textLayouter As New PdfStringLayouter()
	Dim result As PdfStringLayoutResult = textLayouter.Layout(text, font, format, New SizeF(pageWidth, 0))

	For Each line As LineInfo In result.Lines
		page.Canvas.DrawString(line.Text, font, brush, 0, y, format)
		y = y + result.LineHeight
	Next
Now that is all the core codes for draw text in PDF. Apart from converting text to PDF, Spire.PDF for WPF also can extract PDF text.
Word watermark can be text or image, which appears behind document contents and will not influence integrity of document body. It often adds interest or identifies document status, for example, marking document as private or important. This is the guide you are looking for about how to insert text watermark in Word with WPF.
Spire.Doc for WPF, a professional WPF component on manipulating Word document, enables users to insert text watermark in Word document and set format for this watermark. Comparing with “Insert Watermark” Command in Microsoft Word, Spire.Doc for WPF provides a Spire.Doc.TextWatermark class. Firstly initialize a new instance of Textwatermark with TextWatermark TXTWatermark = new TextWatermark() and then set text watermark as document watermark type by code:document.Watermark = TXTWatermark.
Besides, TextWatermark class includes several parameters for watermark formatting setting, including text, font style, layout etc. The following screenshot is the document without watermark. After the code below, you will find a result screenshot with text watermark being adding at the bottom of the page.

Download Spire.Doc for WPF and install it on your system. After adding button in MainWindow, double click this button to use the following code to insert text watermark in Word with WPF.
using System.Windows;
using System.Drawing;
using Spire.Doc;
using Spire.Doc.Documents;

namespace Doc_x_Watermark
{
   public partial class MainWindow : Window
    {
        public MainWindow()
        {
            InitializeComponent();
        }

        private void button1_Click(object sender, RoutedEventArgs e)
        {
            //Load Document
            Document document = new Document();
            document.LoadFromFile(@"E:\work\Documents\New Zealand.docx");

            //Insert Text Watermark and Set Format
            TextWatermark TXTWatermark = new TextWatermark();
            TXTWatermark.Text = "NZ Brief Introduction ";
            TXTWatermark.FontSize = 45;
            TXTWatermark.FontName = "Broadway BT";
            TXTWatermark.Layout = WatermarkLayout.Diagonal;
            TXTWatermark.Color = Color.Purple;
            document.Watermark = TXTWatermark;

            //Save and Launch
            document.SaveToFile("TXTWatermark.docx", FileFormat.Docx);
            System.Diagnostics.Process.Start("TXTWatermark.docx");
        }
    }
}
Imports System.Windows
Imports System.Drawing
Imports Spire.Doc
Imports Spire.Doc.Documents

Class MainWindow

    Private Sub Button1_Click(sender As System.Object, e As System.Windows.RoutedEventArgs) Handles Button1.Click
        'Load Document
        Dim document As New Document()
        document.LoadFromFile("E:\work\Documents\New Zealand.docx")

        'Insert Text Watermark and Set Format
        Dim TXTWatermark As New TextWatermark()
        TXTWatermark.Text = "NZ Brief Introduction"
        TXTWatermark.FontSize = 45
        TXTWatermark.FontName = "Broadway BT"
        TXTWatermark.Layout = WatermarkLayout.Diagonal
        TXTWatermark.Color = Color.Purple
        document.Watermark = TXTWatermark

        'Save and Launch
        document.SaveToFile("TXTWatermark.docx", FileFormat.Docx)
        System.Diagnostics.Process.Start("TXTWatermark.docx")

    End Sub
End Class
After running, you can get the result as following:

Spire.Doc is a Microsoft Word component which enables users to perform a wide range of Word document processing tasks directly, such as generate, read, write and modify Word document in WPF, .NET and Silverlight.
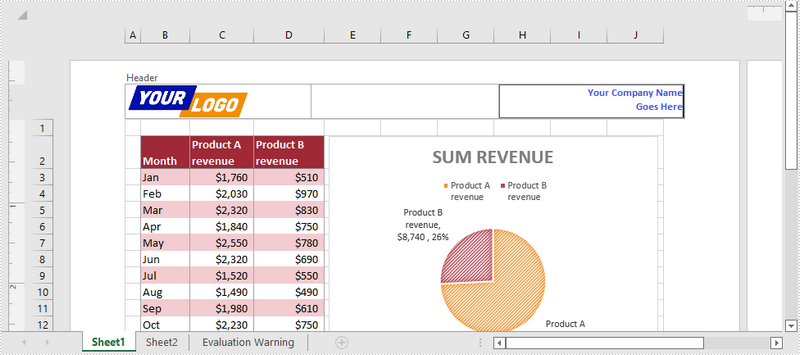
In Excel files, headers and footers provide rich content at the top and bottom of worksheet pages. The content can include a logo, company name, page number, date, and time, etc. This article shows you how to add text, images, as well as fields (like page numbers) to Excel headers or footers using Spire.XLS for .NET.
- Add an Image and Formatted Text to Excel Header
- Add the Current Date and Page Numbers to Excel Footer
Spire.XLS for .NET provides the PageSetup class to work with the page setup in Excel including headers and footers. Specifically, it contains LeftHeader property, CenterHeader property, RightHeader property, LeftFooter property, etc. to represent the left section, center section and right section of a header or footer. To add fields to headers or footers, or to apply formatting to text, you’ll need to use the scripts listed in the following table.
| Script | Description |
| &P | The current page numbers. |
| &N | The total number of pages. |
| &D | The current data. |
| &T | The current time. |
| &G | A picture. |
| &A | The worksheet name. |
| &F | The file name. |
| &B | Make text bold. |
| &I | Italicize text. |
| &U | Underline text. |
| &"font name" | Represents a font name, for example, &"Arial". |
| & + Integer | Represents font size, for example, &12. |
| &K + Hex color code | Represents font color, for example, &KFF0000. |
Install Spire.XLS for .NET
To begin with, you need to add the DLL files included in the Spire.XLS for.NET package as references in your .NET project. The DLL files can be either downloaded from this link or installed via NuGet.
PM> Install-Package Spire.XLS
Add an Image and Formatted Text to Excel Header
The following are the steps to add an image and formatted text to the header of an existing Excel document using Spire.XLS for .NET.
- Create a Workbook object, and load a sample Excel file using Workbook.LoadFromFile() method.
- Get a specific worksheet through the Workbook.Worksheets[index] property.
- Load an image, scale it and set it as the image source of the left header through the PageSetup.LeftHeaderImage property.
- Display image in the left header section by setting the PageSetup.LeftHeader property to “&G”.
- Save the workbook to another Excel file using Workbook.SaveToFile() method.
- C#
- VB.NET
using Spire.Xls;
using System.Drawing;

namespace AddImageAndTextToHeader
{
    class Program
    {
        static void Main(string[] args)
        {
            //Create a Workbook object
            Workbook wb = new Workbook();

            //Load an existing Excel file
            wb.LoadFromFile(@"C:\Users\Administrator\Desktop\sample.xlsx");

            //Get the first worksheet
            Worksheet sheet = wb.Worksheets[0];

            //Load an image
            Image image = Image.FromFile(@"C:\Users\Administrator\Desktop\your-logo.png");

            //Scale the image
            Bitmap bitmap = new Bitmap(image, new Size(image.Width / 2, image.Height / 2));

            //Add image to header’s left section
            sheet.PageSetup.LeftHeaderImage = bitmap;
            sheet.PageSetup.LeftHeader = "&G";

            //Add formatted text to header’s right section
            sheet.PageSetup.RightHeader = "&\"Calibri\"&B&10&K4253E2Your Company Name \n Goes Here";

            //Save the file
            wb.SaveToFile("Header.xlsx", ExcelVersion.Version2016);
        }
    }
}
Add the Current Date and Page Numbers to Excel Footer
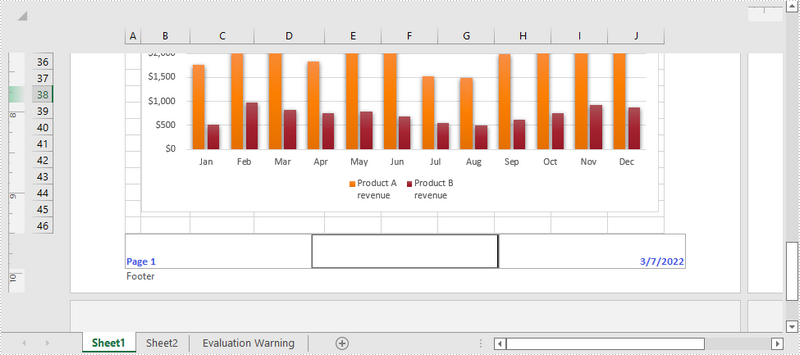
The following are the steps to add the current date and page numbers to the footer of an existing Excel document using Spire.XLS for .NET.
- Create a Workbook object, and load a sample Excel file using Workbook.LoadFromFile() method.
- Get a specific worksheet through the Workbook.Worksheets[index] property.
- Add page numbers with formatting to the left footer section by setting the PageSetup.LeftFooter property to “&\"Calibri\"&B&10&K4253E2Page &P”. You can customize the page numbers’ formatting according to your preference.
- Add the current date to the right footer section by setting the PageSetup.RightFooter property to “&\"Calibri\"&B&10&K4253E2&D”. Likewise, you can change the appearance of the date string as desired.
- Save the workbook to another Excel file using Workbook.SaveToFile() method.
- C#
- VB.NET
using Spire.Xls;

namespace AddDateAndPageNumberToFooter
{
    class Program
    {
        static void Main(string[] args)
        {
            //Create a Workbook object
            Workbook wb = new Workbook();

            //Load an exsting Excel file
            wb.LoadFromFile(@"C:\Users\Administrator\Desktop\sample.xlsx");

            //Get the first worksheet
            Worksheet sheet = wb.Worksheets[0];

            //Add page number to footer's left section
            sheet.PageSetup.LeftFooter = "&\"Calibri\"&B&10&K4253E2Page &P";

            //Add current date to footer's right section
            sheet.PageSetup.RightFooter = "&\"Calibri\"&B&10&K4253E2&D";

            //Save the file
            wb.SaveToFile("Footer.xlsx", ExcelVersion.Version2016);
        }
    }
}
Apply for a Temporary License
If you'd like to remove the evaluation message from the generated documents, or to get rid of the function limitations, please request a 30-day trial license for yourself.
During software development, developers may need to convert Word to HTML. Different from many available ways on Internet, in this example, the solution for converting Word to HTML enables WPF developers load a predefined Doc, Docx, or RTF document, fill it with data, convert the document to HTML.
Spire.Doc for WPF is a professional component specializing in manipulating Word document for WPF. To convert a Word to HTML simply in WPF, developers need to invoke document.LoadFromFile(), which is used to load document and document.SaveToFile(), which is used to convert document.
The following screenshot shows parts of contents of original Word document. The target HTML is at the bottom after this coding. It is shown in Firefox, same as the original document.

Download and install Spire.Doc for WPF on your system. Then, add a button in MainWindow and double click it to use the following code to convert Word to HTML in WPF
using Spire.Doc;
using System.Windows;

namespace WpfApplication1
{
    public partial class MainWindow : Window
    {
        public MainWindow()
        {
            InitializeComponent();
        }
        private void button1_Click(object sender, RoutedEventArgs e)
        {
            //Load Document
            Document document = new Document();
            document.LoadFromFile(@"E:\work\Documents\Humor Them.docx");

            //Convert to HTML
            document.SaveToFile("ToHTML.html", FileFormat.Html);

            //Launch Document
            System.Diagnostics.Process.Start("ToHTML.html");

        }


    }
}
Imports Spire.Doc
Imports System.Windows

Namespace WpfApplication1
	Public Partial Class MainWindow
		Inherits Window
		Public Sub New()
			InitializeComponent()
		End Sub
		Private Sub button1_Click(sender As Object, e As RoutedEventArgs)
			'Load Document
			Dim document As New Document()
			document.LoadFromFile("E:\work\Documents\Humor Them.docx")

			'Convert to HTML
			document.SaveToFile("ToHTML.html", FileFormat.Html)

			'Launch Document
			System.Diagnostics.Process.Start("ToHTML.html")

		End Sub


	End Class
End Namespace
After running, you can get the result as following:

Spire.Doc is an Microsoft Word component which enables users to perform a wide range of Word document processing tasks directly, such as generate, read, write and modify Word document in WPF, .NET and Silverlight.
Software developers are often asked to find a way to convert Microsoft Excel into PDF as PDF files are widely used for exchanging documents between organizations, government sectors and individuals. This solution demonstrates a way of converting Excel to PDF for WPF developers and maintains high visual fidelity in the conversion.
Spire.XLS for WPF is a WPF Excel component which enables your WPF applications to fast generate, read, write and modify Excel document without Microsoft Office Excel Automation. It also fully supports converting files from Excel to PDF, Excel to HTML, Excel to CSV, Excel to Text, Excel to Image and Excel to XML. All the conversion is independent of any other software.
Any kind of trial and evaluation is always welcomed. Please feel free to download Spire.XLS for WPF to have a trial and convert your Excel to PDF for personal use. Below is a screenshot of the source Excel file we load in this demo. At the end, a screenshot of PDF will be demonstrated for comparison with the source Excel file.
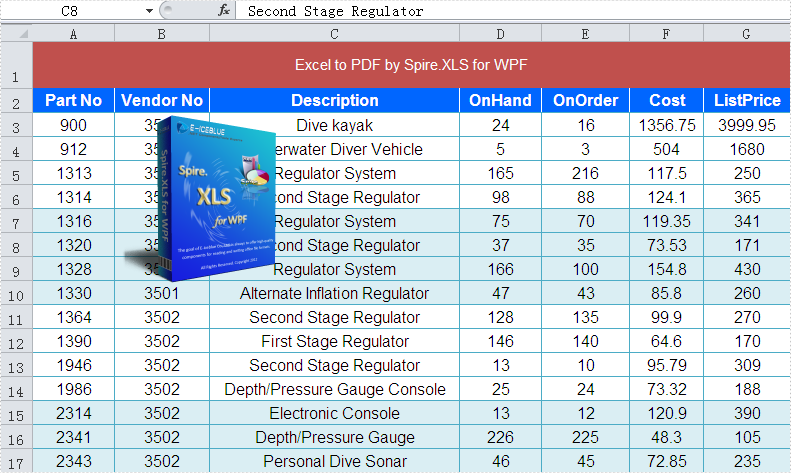
Now this is the key procedure for converting Excel to PDF in WPF.
Step 1: Load Excel file or Create Excel from scratch.
In this step, instantiate an object of the Workbook class by calling its empty constructor and then you may open/load an existing template file or skip this step if you are creating the workbook from scratch.
// load Excel file
Workbook workbook = new Workbook();
workbook.LoadFromFile("D:\\test.xlsx");
[VB.NET]
' load Excel file
Dim workbook As New Workbook()
workbook.LoadFromFile("D:\test.xlsx")
Step 2: Set PDF template.
In this step, we will set PDF template which will be used below.
// Set PDF template
PdfDocument pdfDocument = new PdfDocument();
pdfDocument.PageSettings.Orientation = PdfPageOrientation.Landscape;
pdfDocument.PageSettings.Width = 970;
pdfDocument.PageSettings.Height = 850;
' Set PDF template
Dim pdfDocument As New PdfDocument()
pdfDocument.PageSettings.Orientation = PdfPageOrientation.Landscape
pdfDocument.PageSettings.Width = 970
pdfDocument.PageSettings.Height = 850
Step 3: Convert Excel to PDF in WPF.
Now we will use the template which we have already set above to convert Excel to PDF in WPF.
//Convert Excel to PDF using the template above
PdfConverter pdfConverter = new PdfConverter(workbook);
PdfConverterSettings settings = new PdfConverterSettings();
settings.TemplateDocument = pdfDocument;
pdfDocument = pdfConverter.Convert(settings);
'Convert Excel to PDF using the template above
Dim pdfConverter As New PdfConverter(workbook)
Dim settings As New PdfConverterSettings()
settings.TemplateDocument = pdfDocument
pdfDocument = pdfConverter.Convert(settings)
Step 4: Save and preview PDF.
Please use the codes below to save and preview PDF.
// Save and preview PDF
pdfDocument.SaveToFile("sample.pdf");
System.Diagnostics.Process.Start("sample.pdf");
' Save and preview PDF
pdfDocument.SaveToFile("sample.pdf")
System.Diagnostics.Process.Start("sample.pdf")
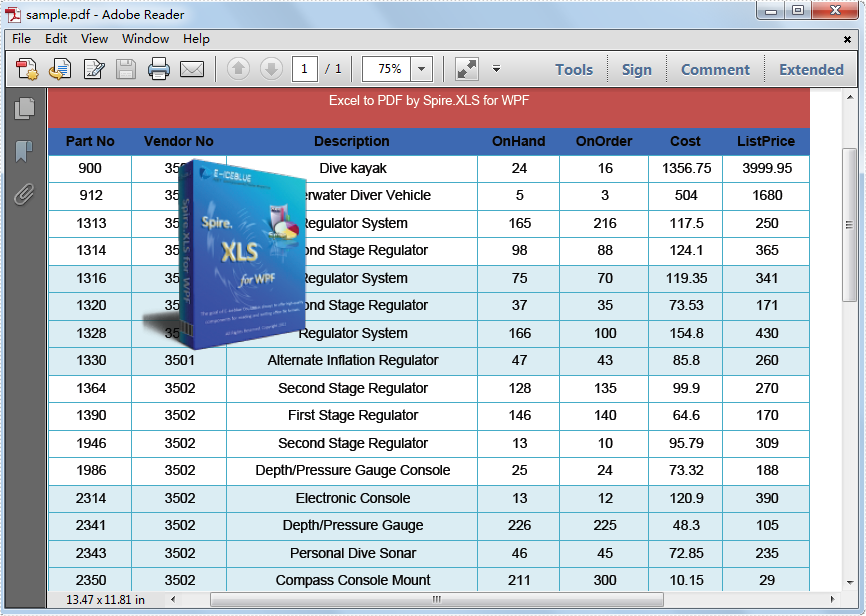
The picture below is a screenshot of the PDF, Please see:

doc.LoadFromFile(@"..\Sample.pdf");
System.Drawing.Image image = System.Drawing.Image.FromFile(@"..\MS.jpg");
doc.LoadFromFile("..\Sample.pdf")
Dim image As System.Drawing.Image = System.Drawing.Image.FromFile("..\MS.jpg")
//adjust image size
int width = image.Width;
int height = image.Height;
float schale = 0.7f;
System.Drawing.Size size = new System.Drawing.Size((int)(width * schale), (int)(height * schale));
Bitmap schaleImage = new Bitmap(image, size);
//draw image into the first PDF page at specific position
PdfImage pdfImage = PdfImage.FromImage(schaleImage);
PdfPageBase page0 = doc.Pages[0];
PointF position = new PointF((page0.Canvas.ClientSize.Width - schaleImage.Width) / 8, 10);
page0.Canvas.DrawImage(pdfImage, position);
'adjust image size
Dim width As Integer = image.Width
Dim height As Integer = image.Height
Dim schale As Single = 0.7F
Dim size As New System.Drawing.Size(CInt(Math.Truncate(width * schale)), CInt(Math.Truncate(height * schale)))
Dim schaleImage As New Bitmap(image, size)
'draw image into the first PDF page at specific position
Dim pdfImage__1 As PdfImage = PdfImage.FromImage(schaleImage)
Dim page0 As PdfPageBase = doc.Pages(0)
Dim position As New PointF((page0.Canvas.ClientSize.Width - schaleImage.Width) / 8, 10)
page0.Canvas.DrawImage(pdfImage__1, position)
It is not an easy task for WPF developers moving worksheet to another location in a workbook, as calculations or charts that are based on worksheet data might become inaccurate if you move the worksheet in WPF application. Here presents a solution that saves you from these worries. Apply Spire.Xls for WPF in your application, and you easily can move worksheet in your WPF application.
Spire.XLS for WPF is a professional Excel component which enables developers/programmers to fast generate, read, write and modify Excel document in WPF applications. Spire.XLS for .NET embed a method - Spire.Xls.WorkShee.MoveWorksheet(int destIndex) in its class design used to move a worksheet to another location in the spreadsheet. The method takes the target worksheet index as a parameter and lead no inaccuracy on these calculations or charts.
Now Feel free to download Spire.XLS for WPF and use the code samples below to move worksheet in WPF application.
using Spire.Xls;
using System.Windows;

namespace WpfApplication1
{
    public partial class MainWindow : Window
    {
        public MainWindow()
        {
            InitializeComponent();
        }
        private void button2_Click(object sender, RoutedEventArgs e)
        {
            //open Excel
            Workbook mywbk = new Workbook();
            mywbk.LoadFromFile(@"..\test.xls");

            // Locate the Worksheet
            Worksheet mysht = mywbk.Worksheets[0];

            //Move Worksheet
            mysht.MoveWorksheet(2);

            //Save and Launch
            mywbk.SaveToFile("result.xls");
            System.Diagnostics.Process.Start("result.xls");

        }
    }
}
Imports Spire.Xls
Imports System.Windows

Namespace WpfApplication1
	Public Partial Class MainWindow
		Inherits Window
		Public Sub New()
			InitializeComponent()
		End Sub
		Private Sub button2_Click(sender As Object, e As RoutedEventArgs)
			'open Excel
			Dim mywbk As New Workbook()
			mywbk.LoadFromFile("..\test.xls")

			' Locate the Worksheet
			Dim mysht As Worksheet = mywbk.Worksheets(0)

			'Move Worksheet
			mysht.MoveWorksheet(2)

			'Save and Launch
			mywbk.SaveToFile("result.xls")
			System.Diagnostics.Process.Start("result.xls")

		End Sub
	End Class
End Namespace
When working with Excel files that contain multiple worksheets, you may sometimes find that some of the worksheets are no longer necessary or need to be organized in a different way. In these cases, you have the option of moving or deleting the worksheets to better manage your spreadsheet. In this article, you will learn how to move or delete worksheets in Excel in C# using Spire.XLS for .NET.
Install Spire.XLS for .NET
To begin with, you need to add the DLL files included in the Spire.XLS for .NET package as references in your .NET project. The DLL files can be either downloaded from this link or installed via NuGet.
PM> Install-Package Spire.XLS
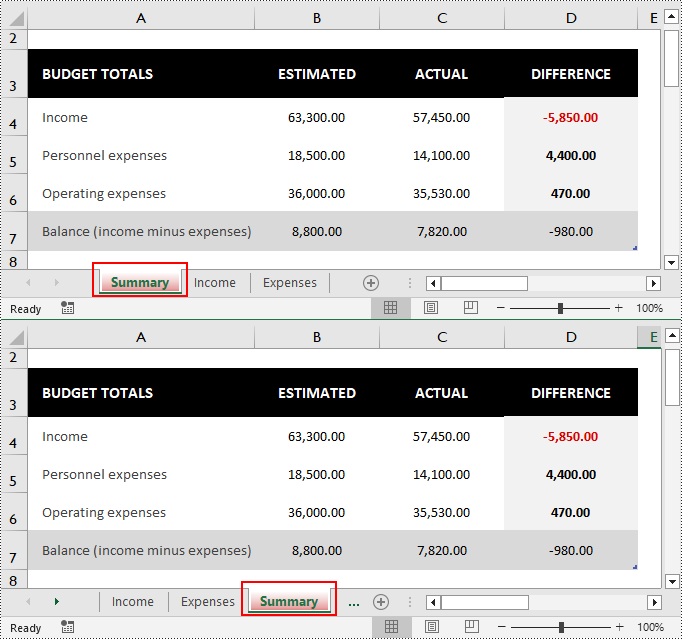
Move a Worksheet in Excel in C#
Spire.XLS for .NET provides the Worksheet.MoveWorksheet(int destIndex) method to move an Excel worksheet to a desired position by specifying the index. The following are the detailed steps:
- Create a Workbook instance.
- Load an Excel file using Workbook.LoadFromFile() method.
- Get a specific worksheet using Workbook.Worksheet[] property.
- Move the worksheet to another position using Worksheet.MoveWorksheet() method.
- Save the result file using Workbook.SaveToFile() method.
- C#
using Spire.Xls;

namespace MoveSheet
{
    class Program
    {
        static void Main(string[] args)
        {
            //Create a Workbook instance
            Workbook workbook = new Workbook();

            //Load an Excel file
            workbook.LoadFromFile("Budget.xlsx");

            //Get the first worksheet
            Worksheet sheet = workbook.Worksheets[0];

            //Move the worksheet to the 3rd position
            sheet.MoveWorksheet(2);

            //Save the result file
            workbook.SaveToFile("MoveWorksheet.xlsx", ExcelVersion.Version2016);
        }
    }
}
Delete a Worksheet in Excel in C#
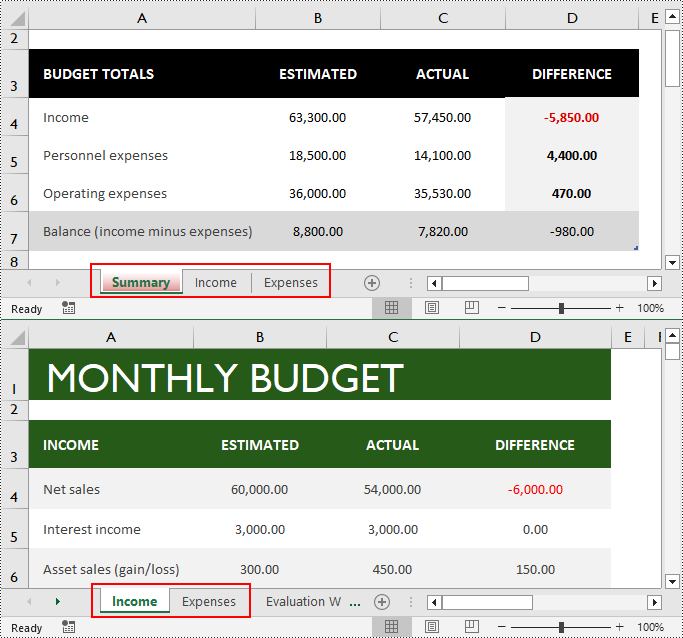
You can remove a specific worksheet from Excel by sheet index or name using the Workbook.Worksheets.RemoveAt(int index) or Workbook.Worksheets.Remove(string sheetName) method. The following are the detailed steps:
- Create a Workbook instance.
- Load an Excel file using Workbook.LoadFromFile() method.
- Delete a specific worksheet from the file using Workbook.Worksheets.RemoveAt() or Workbook.Worksheets.Remove() method.
- Save the result file using Workbook.SaveToFile() method.
- C#
using Spire.Xls;

namespace RemoveSheet
{
    class Program
    {
        static void Main(string[] args)
        {
            //Create a Workbook instance
            Workbook workbook = new Workbook();

            //Load an Excel file
            workbook.LoadFromFile("Budget.xlsx");

            //Remove a specific worksheet by index
            workbook.Worksheets.RemoveAt(0);
            //Remove a specific worksheet by name
            //workbook.Worksheets.Remove("Summary");

            //Save the result file
            workbook.SaveToFile("DeleteWorksheet.xlsx", ExcelVersion.Version2016);

        }
    }
}
Apply for a Temporary License
If you'd like to remove the evaluation message from the generated documents, or to get rid of the function limitations, please request a 30-day trial license for yourself.
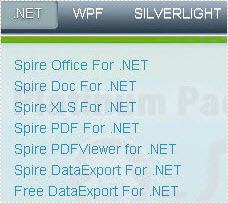
Before we start our topic, let us first play a game. At the top of this page, there are nine categories. When we move our mouse on .NET, a dropdown list which shows all e-iceblue .NET products is displayed as the picture below:
Imagine, if we demonstrate every product on .NET out of the dropdown list on the top, what will this page be? The webpage will be rambling and disordered. As a result, visitors will hardly search what they want and finally have to leave disappointedly.
By the same token, if we do not merge PDF files of similar content to one document, all the information of various classes will mix together. We have no choice but to spend much time on finding the right files. While our work turns more efficient when we use PDF merge function. Furthermore, opening more PDF files at the same time always annoys people in that the windows are mistakenly switched. Finally, merge PDF does not mean gathering tens of PDF files into one. More reasonable choice is to amalgamate PDF files of few pages into single one. Those of numerous pages should be combined with merged PDF files in one folder for the convenience of reading.
Spire.PDF for WPF, as a professional PDF component, is a best hand for users to merge multiple PDF files on WPF application with C#, VB.NET. The whole procedure can be performed by below three simple steps.
Step 1. Create a C#/VB.NET Project
- Free download and correctly install Spire.PDF for WPF on system.
- Create “PDF merge” project in WPF Application with C#/VB.NET.
- Add a button in MainWindow.
- Add Spire.Pdf.Wpf.dll and System.Drawing as references.
Step 2 Merge PDF Files into One
            //pdf document list
            String[] files = new String[]
            {
                @"D:\e-iceblue\Spire.PDF\Demos\Data\DigitalSignature.pdf",
                @"D:\e-iceblue\Spire.PDF\Demos\Data\Sample2.pdf",
                @"D:\e-iceblue\Spire.PDF\Demos\Data\ImageWaterMark.pdf"
            };
'pdf document list
Dim files As [String]() = New [String]() {"D:\e-iceblue\Spire.PDF\Demos\Data\DigitalSignature.pdf", "D:\e-iceblue\Spire.PDF\Demos\Data\Sample2.pdf", "D:\e-iceblue\Spire.PDF\Demos\Data\ImageWaterMark.pdf"}
Step 2. Open the three PDF files in a new document and import all pages into a new one
           //open pdf documents
            PdfDocument[] docs = new PdfDocument[files.Length];
            for (int i = 0; i < files.Length; i++)
            {
                docs[i] = new PdfDocument(files[i]);
            }
            //append document
            docs[0].AppendPage(docs[1]);
            //import pages
            for (int i = 0; i < docs[2].Pages.Count; i = i + 2)
            {
                docs[0].InsertPage(docs[2], i);
            }
	'open pdf documents
	Dim docs As PdfDocument() = New PdfDocument(files.Length - 1) {}
	For i As Integer = 0 To files.Length - 1
		docs(i) = New PdfDocument(files(i))
	Next
	'append document
	docs(0).AppendPage(docs(1))
	'import pages
	Dim i As Integer = 0
	While i < docs(2).Pages.Count
		docs(0).InsertPage(docs(2), i)
		i = i + 2
	End While
Step 3. Save and Preview the Merged PDF File
            docs[0].SaveToFile("MergeDocuments.pdf");
            foreach (PdfDocument doc in docs)
            {
                doc.Close();
            }
            PDFDocumentViewer("MergeDocuments.pdf");
docs(0).SaveToFile("MergeDocuments.pdf")
For Each doc As PdfDocument In docs
	doc.Close()
Next
PDFDocumentViewer("MergeDocuments.pdf")
Effective Screeshot

Spire.PDF is a PDF document creation component that enables your .NET/Silverlight/WPF applications to read, write and manipulate PDF documents without using Adobe Acrobat.
Hyperlinks in PDF are a valuable feature that enables readers to effortlessly access a given webpage. By including hyperlinks in a PDF, it becomes easier to offer readers supplementary information about the document or direct them to relevant resources. When a reader clicks on a hyperlink, the corresponding page opens immediately in the browser. In this article, we will demonstrate how to add hyperlinks to existing text in a PDF document through .NET programs using Spire.PDF for .NET.
Install Spire.PDF for .NET
To begin with, you need to add the DLL files included in the Spire.PDF for.NET package as references in your .NET project. The DLL files can be either downloaded from this link or installed via NuGet.
PM> Install-Package Spire.PDF
Insert a Hyperlink to Existing Text in PDF with C#/VB.NET
Hyperlinks in PDF documents are inserted to the page as annotation elements. Adding a hyperlink to existing text in a PDF document requires locating the text first. Once the location has been obtained, an object of PdfUriAnnotation class with the link can be created and added to the position. The detailed steps are as follows:
- Create an object of PdfDocument class and load a PDF file using PdfDocument.LoadFromFile() method.
- Get the first page using PdfDocument.Pages property.
- Create an object of PdfTextFinder class and set the finder options using PdfTextFinder.Options.Parameter property.
- Find the specified text in the page using PdfTextFinder.Find() method and get the third occurrence.
- Loop through the text bounds of the specified occurrence (because the text being searched may span multiple lines and have more than one bound, the retrieved text bounds are stored in a list to accommodate this variability).
- Create an object of PdfUriAnnotation class within the text bound and set the URL, border, and border color using properties under PdfUriAnnotation class.
- Insert the hyperlink to the page annotations using PdfPageBase.AnnotationsWidget.Add(PdfUriAnnotation) method.
- Save the PDF file using PdfDocument.SaveToFile() method.
- C#
- VB.NET
using Spire.Pdf;
using Spire.Pdf.Annotations;
using Spire.Pdf.Texts;
using System.Collections.Generic;
using System.Drawing;
using TextFindParameter = Spire.Pdf.Texts.TextFindParameter;

namespace ChangeHyperlink
{
    internal class Program
    {
        static void Main(string[] args)
        {
            //Create an object of PdfDocument class
            PdfDocument pdf = new PdfDocument();

            //Load a PDF file
            pdf.LoadFromFile("Sample.pdf");

            //Get the first page
            PdfPageBase page = pdf.Pages[0];

            //Create an object of PdfTextFinder and set the finder options
            PdfTextFinder finder = new PdfTextFinder(page);
            finder.Options.Parameter = TextFindParameter.IgnoreCase;

            //Find the specified text in the page and get the third occurrence
            List<PdfTextFragment> collection = finder.Find("climate change");
            PdfTextFragment fragment = collection[2];

            //Loop through the text bounds of the specified occurrence
            foreach (RectangleF bounds in fragment.Bounds)
            {
                //Create a hyperlink annotation
                PdfUriAnnotation url = new PdfUriAnnotation(bounds);
                //Set the URL of the hyperlink
                url.Uri = "https://en.wikipedia.org/wiki/Climate_change";
                //Set the border of the hyperlink annotation
                url.Border = new PdfAnnotationBorder(1f);
                //Set the color of the border
                url.Color = Color.Blue;
                //Add the hyperlink annotation to the page
                page.Annotations.Add(url);
            }

            //Save the PDF file
            pdf.SaveToFile("AddHyperlinks.pdf");
            pdf.Dispose();
        }
    }
}

Apply for a Temporary License
If you'd like to remove the evaluation message from the generated documents, or to get rid of the function limitations, please request a 30-day trial license for yourself.
