
.NET (1327)
Children categories
In Excel, a page break is a separator that divides a worksheet into several different pages/segments for the purpose of better printing. By inserting page breaks where necessary, you can avoid misalignment of data and ensure a desired print result, which is especially useful when working with a large data set. This article will demonstrate how to programmatically insert horizontal or vertical page breaks in Excel using Spire.XLS for .NET.
- Insert Horizontal Page Breaks in an Excel Worksheet
- Insert Vertical Page Breaks in an Excel Worksheet
Install Spire.XLS for .NET
To begin with, you need to add the DLL files included in the Spire.XLS for .NET package as references in your .NET project. The DLL files can be either downloaded from this link or installed via NuGet.
PM> Install-Package Spire.XLS
Insert Horizontal Page Breaks in an Excel Worksheet
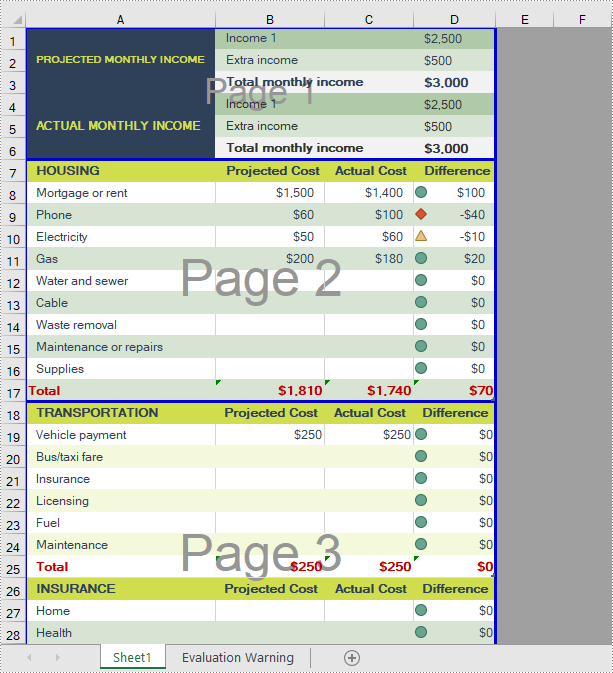
A horizontal page break is inserted between a selected row and the row above it. After insertion, the selected row will become the top row of the new page. With Spire.XLS for .NET, developers are allowed to use the Worksheet.HPageBreaks.Add(CellRange) method to insert horizontal page breaks. The detailed steps are as follows.
- Create a Workbook instance.
- Load a sample Excel file using Workbook.LoadFromFile() method.
- Get a specified worksheet using Workbook.Worksheets[sheetIndex] property.
- Add horizontal page break to a specified cell range using Worksheet.HPageBreaks.Add(CellRange) method.
- Set view mode to Preview mode using Worksheet.ViewMode property.
- Save the result file using Workbook.SaveToFile() method.
- C#
- VB.NET
using Spire.Xls;

namespace EditExcelComment
{
    class Program
    {
        static void Main(string[] args)
        {
            //Create a Workbook instance
            Workbook workbook = new Workbook();

            //Load a sample Excel document
            workbook.LoadFromFile("input.xlsx");

            //Get the first worksheet
            Worksheet sheet = workbook.Worksheets[0];

            //Set Excel page break horizontally
            sheet.HPageBreaks.Add(sheet.Range["A7"]);
            sheet.HPageBreaks.Add(sheet.Range["A18"]);

            //Set view mode to Preview mode
            sheet.ViewMode = ViewMode.Preview;

            //Save the result document
            workbook.SaveToFile("SetHorizontalPageBreak.xlsx");
        }
    }
}
Insert Vertical Page Breaks in an Excel Worksheet
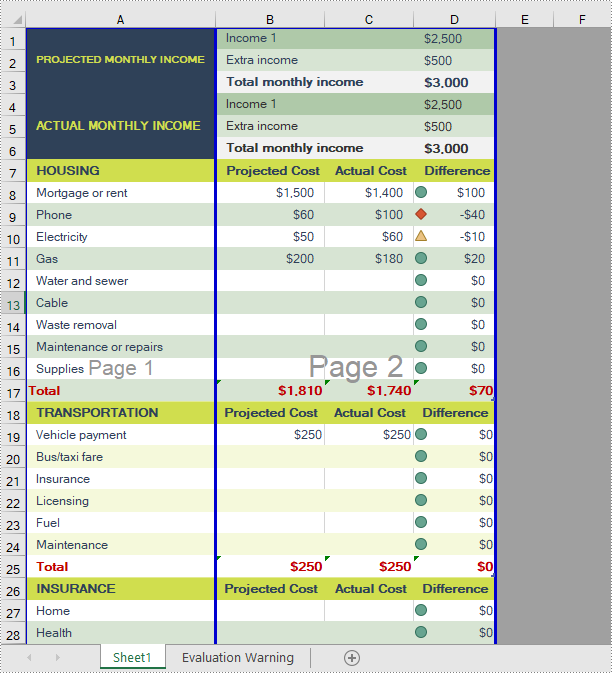
A vertical page break is inserted between a selected column and the column to its left. After insertion, the selected column will become the left most column of the new page. To insert vertical page breaks, developers can use the Worksheet.VPageBreaks.Add(CellRange) method offered by Spire.XLS for .NET offers. The detailed steps are as follows.
- Create a Workbook instance.
- Load a sample Excel file using Workbook.LoadFromFile() method.
- Get a specified worksheet using Workbook.Worksheets[sheetIndex] property.
- Add vertical page break to a specified cell range using Worksheet.VPageBreaks.Add(CellRange) method.
- Set view mode to Preview mode using Worksheet.ViewMode property.
- Save the result file using Workbook.SaveToFile() method.
- C#
- VB.NET
using Spire.Xls;

namespace EditExcelComment
{
    class Program
    {
        static void Main(string[] args)
        {
            //Create a Workbook instance
            Workbook workbook = new Workbook();

            //Load a sample Excel document
            workbook.LoadFromFile("input.xlsx");

            //Get the first worksheet
            Worksheet sheet = workbook.Worksheets[0];

            //Set Excel page break vertically
            sheet.VPageBreaks.Add(sheet.Range["B1"]);

            //Set view mode to Preview mode
            sheet.ViewMode = ViewMode.Preview;

            //Save the result document
            workbook.SaveToFile("SetVerticalPageBreak.xlsx");
        }
    }
}
Apply for a Temporary License
If you'd like to remove the evaluation message from the generated documents, or to get rid of the function limitations, please request a 30-day trial license for yourself.
Converting HTML to images enables the transformation of dynamic web content-such as text, graphics, and layouts-into static formats like PNG or JPEG. This process is ideal for capturing web pages for documentation, generating thumbnails, or ensuring visually consistent content across platforms, providing both accuracy and versatility.
In this article, you'll learn how to convert HTML files and strings to images using C# with Spire.Doc for .NET.
Install Spire.Doc for .NET
To begin with, you need to add the DLL files included in the Spire.Doc for .NET package as references in your .NET project. The DLL files can be either downloaded from this link or installed via NuGet.
PM> Install-Package Spire.Doc
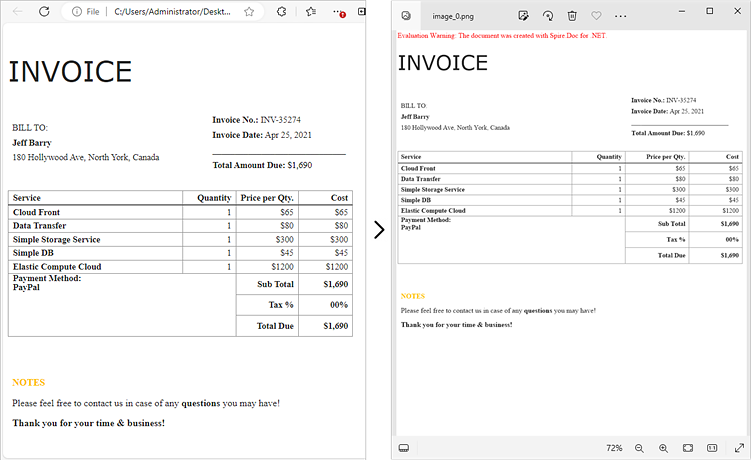
Convert an HTML File to Image in C#
Using Spire.Doc for .NET, you can directly load an HTML file by utilizing the Document.LoadFromFile() method. Once loaded, you can convert the document into Bitmap images with the Document.SaveToImages() method. Afterward, you can loop through the generated images and save each one in widely-used image formats such as PNG, JPG, or BMP.
The following are the steps to convert an HTML file to images using Spire.Doc in C#:
- Create a Document object.
- Load an HTML file using the Document.LoadFromFile() method.
- Adjust properties such as margins, which will affect the output image's layout.
- Call the Document.SaveToImages() method to convert the loaded document into an array of Bitmap images.
- Iterate through the images and save each one to your desired output format.
- C#
using Spire.Doc;
using Spire.Doc.Documents;
using System.Drawing;
using System.Drawing.Imaging;

namespace ConvertHtmlFileToPng
{
    class Program
    {
        static void Main(string[] args)
        {
            // Create a Document object
            Document document = new Document();

            // Load an HTML file
            document.LoadFromFile(@"C:\Users\Administrator\Desktop\MyHtml.html", FileFormat.Html, XHTMLValidationType.None);

            // Get the first section
            Section section = document.Sections[0];

            // Set the page margins
            section.PageSetup.Margins.All = 2;

            // Convert the document to an array of bitmap images
            Image[] images = document.SaveToImages(ImageType.Bitmap);

            // Iterate through the images
            for (int index = 0; index < images.Length; index++)
            {
                // Specify the output file name
                string fileName = string.Format(@"C:\Users\Administrator\Desktop\Output\image_{0}.png", index);

                // Save each image as a PNG file
                images[index].Save(fileName, ImageFormat.Png);

            }

            // Dispose resources
            document.Dispose();
        }
    }
}
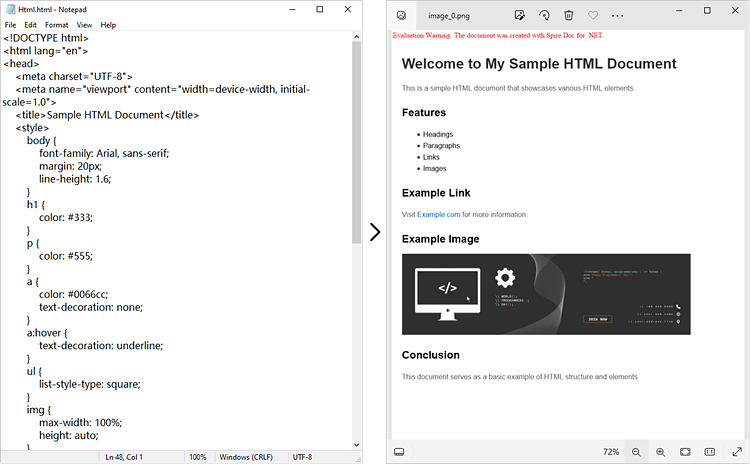
Convert an HTML String to Image in C#
In certain scenarios, you might need to convert an HTML string directly into an image. This approach is especially beneficial for handling dynamically generated content or when you prefer not to depend on external HTML files.
Here is how you can convert an HTML string to images using Spire.Doc in C#:
- Create a Document object.
- Add a section and a paragraph to the document.
- Adjust properties such as margins, which will affect the output image's layout.
- Read the HTML string from a file or define it directly in the script.
- Use the Paragraph.AppendHTML() method to render the HTML content in the document.
- Call the Document.SaveToImages() method to convert the document into an array of Bitmap images.
- Iterate through the images and save each one to your desired output format.
- C#
using Spire.Doc;
using Spire.Doc.Documents;
using System.Drawing;
using System.Drawing.Imaging;

namespace ConvertHtmlStringToPng
{
    class Program
    {
        static void Main(string[] args)
        {
            // Create a Document object
            Document document = new Document();

            // Add a section to the document
            Section section = document.AddSection();

            // Set the page margins
            section.PageSetup.Margins.All = 2;

            // Add a paragraph to the section
            Paragraph paragraph = section.AddParagraph();

            // Read HTML string from a file
            string htmlFilePath = @"C:\Users\Administrator\Desktop\Html.html";
            string htmlString = File.ReadAllText(htmlFilePath, System.Text.Encoding.UTF8);

            // Append the HTML string to the paragraph
            paragraph.AppendHTML(htmlString);

            // Convert the document to an array of bitmap images
            Image[] images = document.SaveToImages(ImageType.Bitmap);

            // Iterate through the images
            for (int index = 0; index < images.Length; index++)
            {
                // Specify the output file name
                string fileName = string.Format(@"C:\Users\Administrator\Desktop\Output\image_{0}.png", index);

                // Save each image as a PNG file
                images[index].Save(fileName, ImageFormat.Png);

            }

            // Dispose resources
            document.Dispose();
        }
    }
}
Apply for a Temporary License
If you'd like to remove the evaluation message from the generated documents, or to get rid of the function limitations, please request a 30-day trial license for yourself.
Excel's Find and Replace feature is an indispensable tool for users when editing large Excel spreadsheets. It allows users to search for specific values within a worksheet or cell range and update them with new values quickly and accurately. With this feature, users don't need to perform manual searches, which significantly improves their working efficiency. In this article, we will introduce how to programmatically find and replace data in Excel in C# and VB.NET using Spire.XLS for .NET library.
- Find and Replace Data in a Worksheet in Excel
- Find and Replace Data in a Specific Cell Range in Excel
Install Spire.XLS for .NET
To begin with, you need to add the DLL files included in the Spire.XLS for .NET package as references in your .NET project. The DLL files can be either downloaded from this link or installed via NuGet.
PM> Install-Package Spire.XLS
Find and Replace Data in a Worksheet in Excel in C# and VB.NET
Spire.XLS for .NET offers the Worksheet.FindAllString(string stringValue, bool formula, bool formulaValue) method which enables you to find the cells containing specific data values in an Excel worksheet. Once the cells are found, you can use the CellRange.Text property to update their values with new values. The detailed steps are as follows:
- Initialize an instance of the Workbook class.
- Load an Excel file using the Workbook.LoadFromFile(string fileName) method.
- Get a specific worksheet of the file using the Workbook.Worksheets[int index] property.
- Find the cells containing a specific value in the worksheet using the Worksheet.FindAllString(string stringValue, bool formula, bool formulaValue) method.
- Iterate through the found cells.
- Update the value of each cell with another value using the CellRange.Text property.
- Set a background for the cell so you can easily find the updated cells using the CellRange.Style.Color property.
- Save the result file to a specific location using the Workbook.SaveToFile(string fileName, ExcelVersion version) method.
- C#
- VB.NET
using Spire.Xls;
using System.Drawing;

namespace ReplaceDataInWorksheet
{
    internal class Program
    {
        static void Main(string[] args)
        {
            //Initialize an instance of the Workbook class
            Workbook workbook = new Workbook();
            //Load an Excel file
            workbook.LoadFromFile(@"Sample.xlsx");

            //Get the first worksheet
            Worksheet worksheet = workbook.Worksheets[0];

            //Find the cells with the specific string value “Total” in the worksheet
            CellRange[] cells = worksheet.FindAllString("Total", true, true);

            //Iterate through the found cells
            foreach (CellRange cell in cells)
            {
                //Replace the value of the cell with another value
                cell.Text = "Sum";
                //Set a background color for the cell
                cell.Style.Color = Color.Yellow;
            }

            //Save the result file to a specific location
            workbook.SaveToFile("ReplaceDataInWorksheet.xlsx", ExcelVersion.Version2016);
            workbook.Dispose();
        }
    }
}
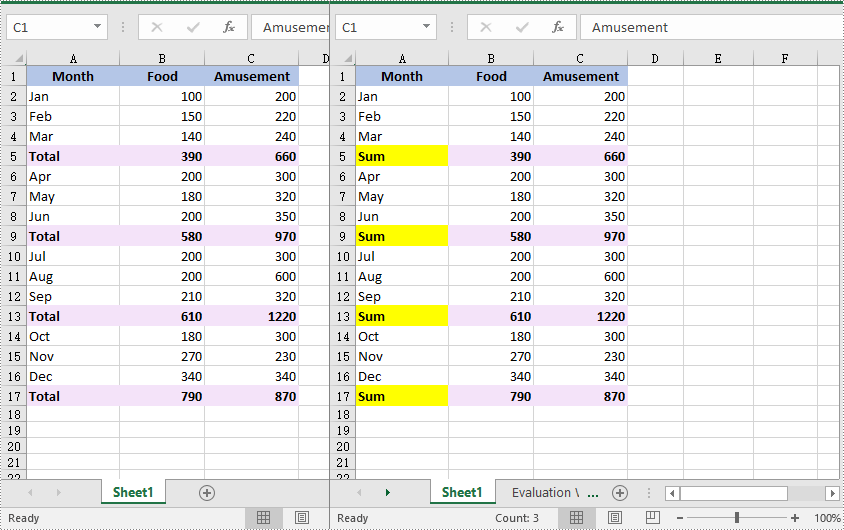
Find and Replace Data in a Specific Cell Range in Excel in C# and VB.NET
You can find the cells containing a specific value in a cell range using the CellRange.FindAllString(string stringValue, bool formula, bool formulaValue) method. Then you can update the value of each found cell with another value using the CellRange.Text property. The detailed steps are as follows:
- Initialize an instance of the Workbook class.
- Load an Excel file using the Workbook.LoadFromFile(string fileName) method.
- Get a specific worksheet of the file using the Workbook.Worksheets[int index] property.
- Get a specific cell range of the worksheet using the Worksheet.Range[string rangeName] property.
- Find the cells with a specific value in the cell range using the CellRange.FindAllString(string stringValue, bool formula, bool formulaValue) method.
- Iterate through the found cells.
- Update the value of each found cell to another value using the CellRange.Text property.
- Set a background for the cell so you can easily find the updated cells using the CellRange.Style.Color property.
- Save the result file to a specific location using the Workbook.SaveToFile(string fileName, ExcelVersion version) method.
- C#
- VB.NET
using Spire.Xls;
using System.Drawing;

namespace ReplaceDataInCellRange
{
    internal class Program
    {
        static void Main(string[] args)
        {
            //Initialize an instance of the Workbook class
            Workbook workbook = new Workbook();
            //Load an Excel file
            workbook.LoadFromFile(@"Sample.xlsx");

            //Get the first worksheet
            Worksheet worksheet = workbook.Worksheets[0];

            //Get a specific cell range
            CellRange range = worksheet.Range["A1:C9"];

            //Find the cells with the specific value "Total" in the cell range
            CellRange[] cells = range.FindAllString("Total", true, true);

            //Iterate through the found cells
            foreach (CellRange cell in cells)
            {
                //Replace the value of the cell with another value
                cell.Text = "Sum";
                //Set a background color for the cell
                cell.Style.Color = Color.Yellow;
            }

            //Save the result file to a specific location
            workbook.SaveToFile("ReplaceDataInCellRange.xlsx", ExcelVersion.Version2016);
            workbook.Dispose();
        }
    }
}

Apply for a Temporary License
If you'd like to remove the evaluation message from the generated documents, or to get rid of the function limitations, please request a 30-day trial license for yourself.
Textboxes in Excel are versatile tools that allow users to add annotations, labels, or any additional information to their spreadsheets. Whether you want to highlight important data, provide explanations, or create visually appealing reports, managing textboxes is essential.
In this article, you will learn how to add a textbox, extract content from an existing textbox, and remove a textbox in Excel using C# and Spire.XLS for .NET.
Install Spire.XLS for .NET
To begin with, you need to add the DLL files included in the Spire.XLS for .NET package as references in your .NET project. The DLL files can be either downloaded from this link or installed via NuGet.
PM> Install-Package Spire.XLS
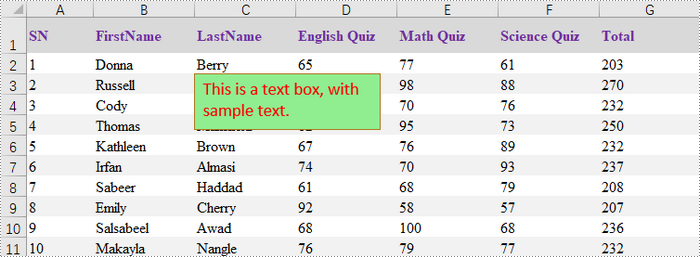
Add a Textbox to Excel in C#
A textbox can be added to a worksheet using the Worksheet.TextBoxes.AddTextBox() method. This method returns an ITextBoxShape object, which contains properties such as Text, HAlignment, and Fill, for configuring the text and formatting of the textbox.
The steps to add a textbox with customized text and formatting to Excel are as follows:
- Create a Workbook object.
- Load an Excel file from the specified file path.
- Get a specific worksheet from the workbook.
- Add a textbox to the worksheet at the specified location using Worksheet.TextBoxes.AddTextBox() method.
- Set the text of the textbox using ITextBoxShape.Text property.
- Customize the appearance of the textbox using other properties of the ITextBoxShape object.
- Save the workbook to a different Excel file.
- C#
using Spire.Xls;
using Spire.Xls.Core;
using System.Drawing;

namespace AddTextbox
{
    class Program
    {
        static void Main(string[] args)
        {
            // Create a Workbook object
            Workbook workbook = new Workbook();

            // Load an Excel document
            workbook.LoadFromFile("C:\\Users\\Administrator\\Desktop\\Input.xlsx");

            // Get a specific sheet
            Worksheet sheet = workbook.Worksheets[0];

            // Add a textbox to the specified location
            ITextBoxShape textBoxShape = sheet.TextBoxes.AddTextBox(3, 3, 60, 200);

            // Set text of the textbox
            textBoxShape.Text = "This is a text box, with sample text.";

            // Create a font
            ExcelFont font = workbook.CreateFont();
            font.FontName = "Calibri";
            font.Size = 14;
            font.Color = Color.Red;

            // Apply font to the text
            textBoxShape.RichText.SetFont(0, textBoxShape.Text.Length - 1, font);

            // Set horizontal alignment
            textBoxShape.HAlignment = CommentHAlignType.Left;

            // Set the fill color of the shape
            textBoxShape.Fill.FillType = ShapeFillType.SolidColor;
            textBoxShape.Fill.ForeColor = Color.LightGreen;

            // Save the Excel file
            workbook.SaveToFile("output/AddTextBox.xlsx", ExcelVersion.Version2010);

            // Dispose resources
            workbook.Dispose();
        }
    }
}
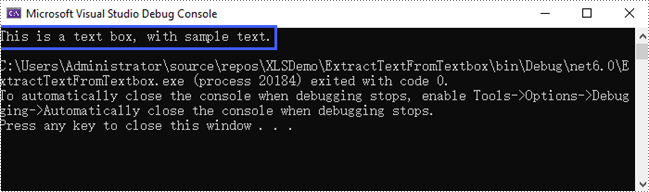
Extract Text from a Textbox in Excel in C#
A specific textbox can be accessed using the Worksheet.TextBoxes[index] property. Once retrieved, the textbox's text can be accessed through the ITextBox.Text property.
The steps to extract text from a textbox in Excel are as follows:
- Create a Workbook object.
- Load an Excel file from the specified file path.
- Get a specific worksheet from the workbook.
- Get the text of a specific textbox using Worksheet.TextBoxes[index] property.
- Get the text of the textbox using ITextBox.Text property.
- C#
using Spire.Xls;
using Spire.Xls.Core;

namespace ExtractTextFromTextbox
{
    class Program
    {
        static void Main(string[] args)
        {
            // Create a Workbook object
            Workbook workbook = new Workbook();

            // Load an Excel file
            workbook.LoadFromFile("C:\\Users\\Administrator\\Desktop\\TextBox.xlsx");

            // Get a specific worksheet
            Worksheet sheet = workbook.Worksheets[0];

            // Get a specific textbox
            ITextBox textBox = sheet.TextBoxes[0];

            // Get text from the textbox
            String text = textBox.Text;

            // Print out result
            Console.WriteLine(text);
        }
    }
}
Remove a Textbox from Excel in C#
To remove a specific textbox from a worksheet, use the Worksheet.TextBoxes[index].Remove() method. To clear all textboxes, retrieve the count with the Worksheet.TextBoxes.Count property and iterate through the collection, removing each textbox individually.
The steps to remove a textbox from Excel are as follows:
- Create a Workbook object.
- Load an Excel file from the specified file path.
- Get a specific worksheet from the workbook.
- Remove a specific textbox using Worksheet.TextBoxes[index].Remove() method.
- Save the workbook to a different Excel file.
- C#
using Spire.Xls;

namespace RemoveTextbox
{
    class Program
    {
        static void Main(string[] args)
        {
            // Create a Workbook object
            Workbook workbook = new Workbook();

            // Load an Excel file
            workbook.LoadFromFile("C:\\Users\\Administrator\\Desktop\\TextBox.xlsx");

            // Get a specific worksheet
            Worksheet sheet = workbook.Worksheets[0];

            // Remove a specific textbox
            sheet.TextBoxes[0].Remove();

            // Save the updated document to a different Excel file
            workbook.SaveToFile("output/RemoveTextbox.xlsx", ExcelVersion.Version2016);

            // Dispose resources
            workbook.Dispose();
        }
    }
}
Apply for a Temporary License
If you'd like to remove the evaluation message from the generated documents, or to get rid of the function limitations, please request a 30-day trial license for yourself.
Hyperlinks are an essential element in Excel that allows users to reference external data sources, navigate between worksheets, or provide additional information about specific cells. When working with an Excel file, you may need to manipulate hyperlinks for various reasons. For example, you may need to extract all the hyperlinks from the file to perform an analysis, modify an outdated hyperlink to ensure accuracy or remove a broken hyperlink to improve the document's usability. In this article, we will explain how to extract, modify and remove hyperlinks in Excel in C# and VB.NET using Spire.XLS for .NET.
- Extract Hyperlinks from Excel in C# and VB.NET
- Modify Hyperlinks in Excel in C# and VB.NET
- Remove Hyperlinks from Excel in C# and VB.NET
Install Spire.XLS for .NET
To begin with, you need to add the DLL files included in the Spire.XLS for .NET package as references in your .NET project. The DLL files can be either downloaded from this link or installed via NuGet.
PM> Install-Package Spire.XLS
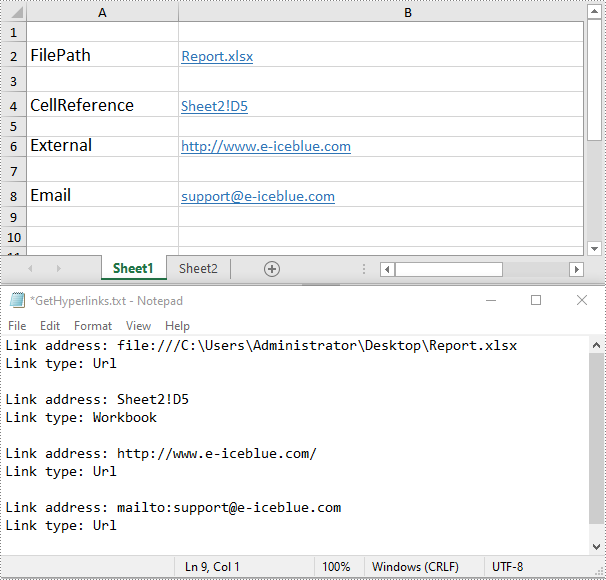
Extract Hyperlinks from Excel in C# and VB.NET
If you are migrating data from an Excel workbook to another system (such as a database) and need to preserve the hyperlinks associated with that data, extracting hyperlinks from the Excel file beforehand is necessary.
The following steps demonstrate how to extract hyperlinks from an Excel file in C# and VB.NET using Spire.XLS for .NET:
- Initialize an instance of the Workbook class.
- Load an Excel file using the Workbook.LoadFromFile() method.
- Get a specific worksheet using the Workbook.Worksheets[int index] property.
- Get the collection of all hyperlinks in the worksheet using the Worksheet.Hyperlinks property.
- Initialize an instance of the StringBuilder class to store the extracted hyperlink information.
- Iterate through the hyperlinks in the hyperlinks collection.
- Get the address and type of each hyperlink using the XlsHyperlink.Address and XlsHyperlink.Type properties.
- Append the address and type to the StringBuilder instance.
- Write the content of the StringBuilder instance into a text file using the File.WriteAllText() method.
- C#
- VB.NET
using Spire.Xls;
using Spire.Xls.Collections;
using Spire.Xls.Core.Spreadsheet;
using System.IO;
using System.Text;

namespace ExtractHyperlinks
{
    internal class Program
    {
        static void Main(string[] args)
        {
            //Initialize an instance of the Workbook class
            Workbook workbook = new Workbook();
            //Load an Excel file
            workbook.LoadFromFile("Hyperlinks1.xlsx");

            //Get the first worksheet
            Worksheet sheet = workbook.Worksheets[0];

            //Get the collection of all hyperlinks in the worksheet
            HyperLinksCollection hyperLinks = sheet.HyperLinks;

            //Initialize an instance of the StringBuilder class
            StringBuilder sb = new StringBuilder();

            //Iterate through the hyperlinks in the collection
            foreach (XlsHyperLink hyperlink in hyperLinks)
            {
                //Get the address of the hyperlink
                string address = hyperlink.Address;
                //Get the type of the hyperlink
                HyperLinkType type = hyperlink.Type;
                //Append the address and type of the hyperlink to the StringBuilder instance
                sb.AppendLine("Link address: " + address);
                sb.AppendLine("Link type: " + type.ToString());
                sb.AppendLine();
            }

            //Write the content of the StringBuilder instance to a text file
            File.WriteAllText("GetHyperlinks.txt", sb.ToString());
            workbook.Dispose();
        }
    }
}
Modify Hyperlinks in Excel in C# and VB.NET
If you've accidentally linked to the wrong resource or entered an incorrect URL when creating a hyperlink, you may need to modify the hyperlink to correct the mistake.
The following steps demonstrate how to modify an existing hyperlink in an Excel file:
- Initialize an instance of the Workbook class.
- Load an Excel file using the Workbook.LoadFromFile() method.
- Get a specific worksheet using the Workbook.Worksheets[int index] property.
- Get the collection of all hyperlinks in the worksheet using the Worksheet.Hyperlinks property.
- Get the first hyperlink in the collection.
- Modify the display text and address of the hyperlink using the XlsHyperlink.TextToDisplay and XlsHyperlink.Address properties.
- Save the result file using the Workbook.SaveToFile() method.
- C#
- VB.NET
using Spire.Xls;
using Spire.Xls.Collections;
using Spire.Xls.Core.Spreadsheet;
namespace ModifyHyperlinks
{
internal class Program
{
static void Main(string[] args)
{
//Initialize an instance of the Workbook class
Workbook workbook = new Workbook();
//Load an Excel file
workbook.LoadFromFile("Hyperlinks2.xlsx");
//Get the first worksheet
Worksheet sheet = workbook.Worksheets[0];
//Get the collection of all hyperlinks in the worksheet
HyperLinksCollection links = sheet.HyperLinks;
//Get the first hyperlink in the collection
XlsHyperLink hyperLink = links[0];
//Modify the display text and the address of the hyperlink
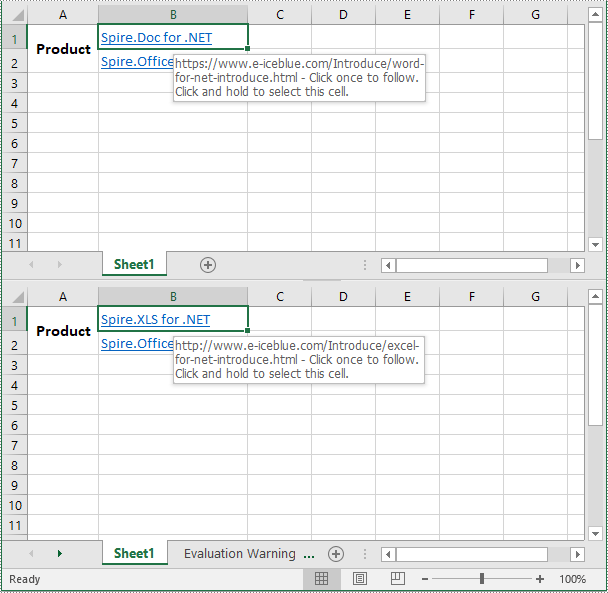
hyperLink.TextToDisplay = "Spire.XLS for .NET";
hyperLink.Address = "http://www.e-iceblue.com/Introduce/excel-for-net-introduce.html";
//Save the result file
workbook.SaveToFile("ModifyHyperlink.xlsx", ExcelVersion.Version2013);
workbook.Dispose();
}
}
}
Remove Hyperlinks from Excel in C# and VB.NET
Removing the irrelevant hyperlinks can help make your worksheet neater and more professional-looking.
The following steps demonstrate how to remove a specific hyperlink from an Excel file:
- Initialize an instance of the Workbook class.
- Load an Excel file using the Workbook.LoadFromFile() method.
- Get a specific worksheet using the Workbook.Worksheets[int index] property.
- Remove a specific hyperlink from the worksheet using the Worksheet.Hyperlinks.RemoveAt(int index) method.
- Save the result file using the Workbook.SaveToFile() method.
- C#
- VB.NET
using Spire.Xls;

namespace RemoveHyperlinks
{
    internal class Program
    {
        static void Main(string[] args)
        {
            //Initialize an instance of the Workbook class
            Workbook workbook = new Workbook();
            //Load an Excel file
            workbook.LoadFromFile("Hyperlinks2.xlsx");

            //Get the first worksheet
            Worksheet sheet = workbook.Worksheets[0];

            //Remove the first hyperlink and keep its display text
            sheet.HyperLinks.RemoveAt(0);

            //Remove all content from the cell
            //sheet.Range["B2"].ClearAll();

            //Save the result file
            workbook.SaveToFile("RemoveHyperlink.xlsx", ExcelVersion.Version2013);
            workbook.Dispose();
        }
    }
}

Apply for a Temporary License
If you'd like to remove the evaluation message from the generated documents, or to get rid of the function limitations, please request a 30-day trial license for yourself.
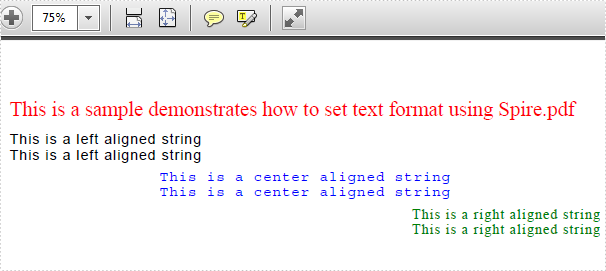
The sample demonstrates how to Set PDF Text Format for Silverlight via Spire.PDF.
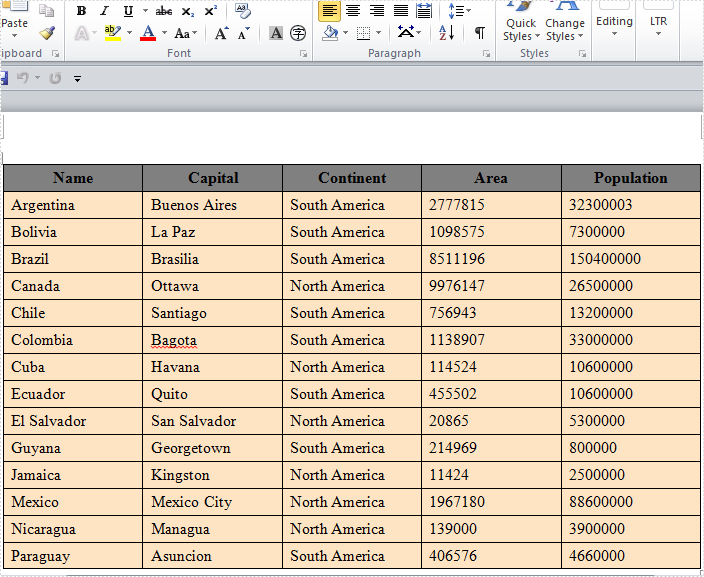
The sample demonstrates how to Create Table in Word for Silverlight via Spire.Doc.
The sample demonstrates how to Edit Excel in Silverlight via Spire.XLS.

Effortlessly Automate PDF Text Extraction Using C# .NET: A Complete Guide
2022-07-29 06:33:00 Written by Koohji
Manually extracting text from PDF files can be tedious, error-prone, and inefficient—especially when working with large volumes of documents or complex layouts. PDFs store content based on coordinates rather than linear text flow, making it difficult to retrieve structured or readable text without specialized tools.
For developers working in C# .NET, automating PDF text extraction is essential for streamlining workflows such as document processing, content indexing, data migration, and digital archiving.
This comprehensive guide shows you how to read text from PDF using C# and Spire.PDF for .NET, a powerful library for reading and processing PDF documents. You’ll learn how to:
- Extract full-text content from entire documents
- Retrieve text from individual pages
- Capture content within defined regions
- Obtain position and font metadata for advanced use cases
Whether you're building a PDF parser, developing an automated document management system, or migrating PDF data into structured formats, this article provides ready-to-use C# code examples and best practices to help you extract text from PDFs quickly, accurately, and at scale.
Table of Contents
- Why Use Spire.PDF for Text Extraction in .NET?
- Extract Text from PDF (Basic Example)
- Advanced Text Extraction Options
- Conclusion
- FAQs
Why Use Spire.PDF for Text Extraction in .NET?
Spire.PDF for .NET is a feature-rich and developer friendly library that supports seamless text extraction from PDFs in .NET applications. Here's why it stands out:
- Precise Layout Preservation: Maintains original layout, spacing, and reading order.
- Detailed Extraction: Retrieve text along with its metadata like position and size.
- No Adobe Dependency: Works independently of Adobe Acrobat or other third-party tools.
- Quick Integration: Clean API and extensive documentation for faster development.
Installation
Before getting started, install the library in your project via NuGet:
Install-Package Spire.PDF
Or download the DLL and manually reference it in your solution.
Extract Text from PDF (Basic Example)
Extract full text content from a PDF is crucial for capturing all information for analysis or processing.
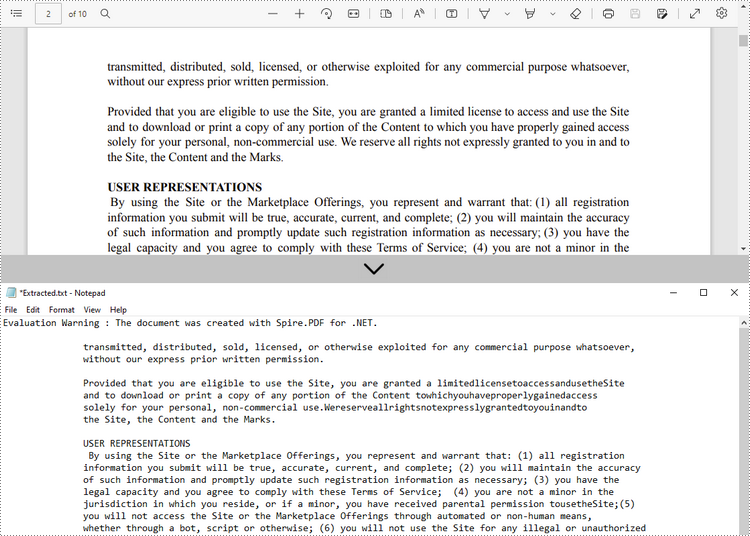
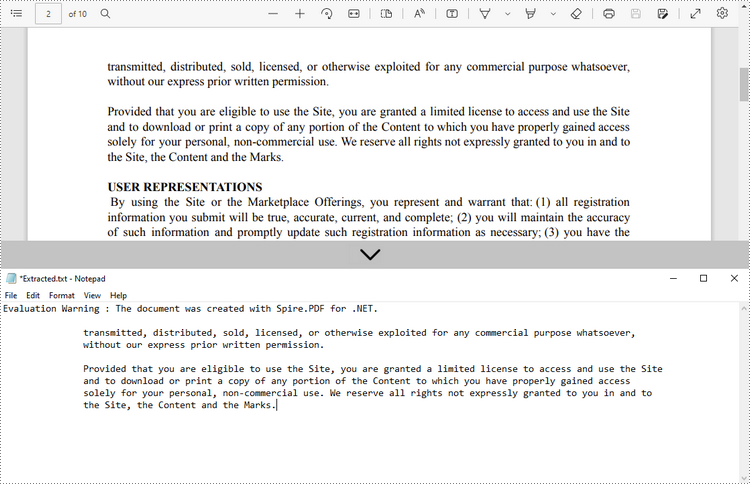
This basic example extracts all text content from a PDF file uses the PdfTextExtractor class and saves it to a text file with the original spacing, line breaks and layout preserved.
using Spire.Pdf;
using Spire.Pdf.Texts;
using System.IO;
using System.Text;

namespace ExtractAllTextFromPDF
{
    internal class Program
    {
        static void Main(string[] args)
        {
            // Create a PDF document instance
            PdfDocument pdf = new PdfDocument();
            // Load the PDF file
            pdf.LoadFromFile("Sample.pdf");

            // Initialize a StringBuilder to hold the extracted text
            StringBuilder extractedText = new StringBuilder();
            // Loop through each page in the PDF
            foreach (PdfPageBase page in pdf.Pages)
            {
                // Create a PdfTextExtractor for the current page
                PdfTextExtractor extractor = new PdfTextExtractor(page);
                // Set extraction options
                PdfTextExtractOptions option = new PdfTextExtractOptions
                {
                    IsExtractAllText = true
                };
                // Extract text from the current page
                string text = extractor.ExtractText(option);
                // Append the extracted text to the StringBuilder
                extractedText.AppendLine(text);
            }

            // Save the extracted text to a text file
            File.WriteAllText("ExtractedText.txt", extractedText.ToString());
            // Close the PDF document
            pdf.Close();
        }
    }
}
Advanced Text Extraction Options
Spire.PDF offers more than basic full-document extraction. It supports advanced scenarios like retrieving text from specific pages, extracting content from defined areas, and accessing text layout details such as position and dimensions. This section explores these capabilities with practical examples.
Retrieve Text from Individual PDF Pages
Sometimes, you only need text from a particular page—for example, when processing a specific section of a multi-page document. You can access the desired page from the Pages collection of the document and then apply the extraction logic to it.
using Spire.Pdf;
using Spire.Pdf.Texts;
using System.IO;

namespace ExtractTextFromIndividualPages
{
    internal class Program
    {
        static void Main(string[] args)
        {
            // Create a PDF document instance
            PdfDocument pdf = new PdfDocument();
            // Load the PDF file
            pdf.LoadFromFile("Sample.pdf");

            // Access the page to extract text from (e.g., index 1 = the second page)
            PdfPageBase page = pdf.Pages[1];

            // Create a PdfTextExtractor for the selected page
            PdfTextExtractor extractor = new PdfTextExtractor(page);
            // Set extraction options
            PdfTextExtractOptions option = new PdfTextExtractOptions
            {
                IsExtractAllText = true
            };
            // Extract text from the specified page
            string text = extractor.ExtractText(option);

            // Save the extracted text to a text file
            File.WriteAllText("IndividualPage.txt", text);
            // Close the PDF document
            pdf.Close();
        }
    }
}
Read Text within a Defined Area on a PDF Page
If you're interested in text within a specific rectangular area (e.g., header or footer), you can set a rectangular extraction region via PdfTextExtractOptions.ExtractArea to limit the extraction scope.
using Spire.Pdf;
using Spire.Pdf.Texts;
using System.IO;
using System.Drawing;

namespace ExtractTextFromDefinedArea
{
    internal class Program
    {
        static void Main(string[] args)
        {
            // Create a PDF document instance
            PdfDocument doc = new PdfDocument();
            // Load the PDF file
            doc.LoadFromFile("Sample.pdf");

            // Get the second page
            PdfPageBase page = doc.Pages[1];

            // Create a PdfTextExtractor for the selected page
            PdfTextExtractor textExtractor = new PdfTextExtractor(page);
            // Set extraction options with a defined rectangular area
            PdfTextExtractOptions extractOptions = new PdfTextExtractOptions
            {
                ExtractArea = new RectangleF(0, 0, 890, 170)
            };

            // Extract text from the specified rectangular area
            string text = textExtractor.ExtractText(extractOptions);

            // Save the extracted text to a text file
            File.WriteAllText("Extracted.txt", text);

            // Close the PDF document
            doc.Close();
        }
    }
}
Get Text Position and Size Information for Advanced Processing
For advanced tasks like annotation or content overlay, accessing the position and size of each text fragment is crucial. You can obtain this information using PdfTextFinder and PdfTextFragment.
using Spire.Pdf;
using Spire.Pdf.Texts;
using System;
using System.Collections.Generic;
using System.Drawing;

namespace ExtractTextWithPositionAndSize
{
    class Program
    {
        static void Main(string[] args)
        {
            // Load the PDF document
            PdfDocument pdf = new PdfDocument();
            pdf.LoadFromFile("Sample.pdf");

            // Iterate through each page of the document
            for (int i = 0; i < pdf.Pages.Count; i++)
            {
                PdfPageBase page = pdf.Pages[i];

                // Create a PdfTextFinder object for the current page
                PdfTextFinder finder = new PdfTextFinder(page);

                // Find all text fragments on the page
                List<PdfTextFragment> fragments = finder.FindAllText();

                Console.WriteLine($"Page {i + 1}:");

                // Iterate over each text fragment
                foreach (PdfTextFragment fragment in fragments)
                {
                    // Extract text content
                    string text = fragment.Text;

                    // Get bounding rectangles with position and size
                    RectangleF[] rects = fragment.Bounds;

                    Console.WriteLine($"Text: \"{text}\"");

                    // Iterate through each rectangle for this fragment
                    foreach (var rect in rects)
                    {
                        Console.WriteLine($"Position: ({rect.X}, {rect.Y}), Size: ({rect.Width} x {rect.Height})");
                    }
                    Console.WriteLine();
                }
            }
        }
    }
}
Conclusion
Whether you're performing simple extraction or building advanced document automation tools, Spire.PDF for .NET provides versatile and accurate methods to extract and manipulate PDF text:
- Full-text extraction for complete documents
- Page-level control to isolate relevant sections
- Area-based targeting for structured or repeated patterns
- Precise layout data for custom rendering and analysis
By combining these techniques, you can create powerful and flexible PDF processing workflows tailored to your application's needs.
FAQs
Q1: Can Spire.PDF extract text from password-protected PDFs?
A1: Yes, by providing the correct password when loading the documents, Spire.PDF can open and extract text from secured PDFs.
Q2: Does Spire.PDF support batch extraction?
A2: Absolutely. You can iterate over a directory of PDF files and apply the same extraction logic programmatically.
Q3: Can it extract font styles and sizes?
A3: Yes. Spire.PDF allows you to retrieve font-related details such as font name, size, style.
Q4: Can I extract images or tables as well?
A4: While text extraction is the focus of this guide, Spire.PDF can also extract images and supports table detection with additional logic.
Q5: Can Spire.PDF extract text from scanned (image-based) PDFs?
A5: Scanned PDFs require OCR (Optical Character Recognition). Spire.PDF doesn't provide built-in OCR, but you can combine it with an OCR library - Spire.OCR for image-to-text conversion.
Get a Free License
To fully experience the capabilities of Spire.PDF for .NET without any evaluation limitations, you can request a free 30-day trial license.
After searching so much information about PDF merge, it is easy to find that whether you merge PDF files online or use C#/VB.NET to realize this task, you never escape worrying some important points such as the safety of your PDF file, so much time it costs or whether the merged file supports to print page number and so on. However, as long as you come here, these troubles will not appear. This section will specifically introduce you a secure solution to merge PDF files into one with C#, VB.NET via a .NET PDF component Spire.PDF for .NET.
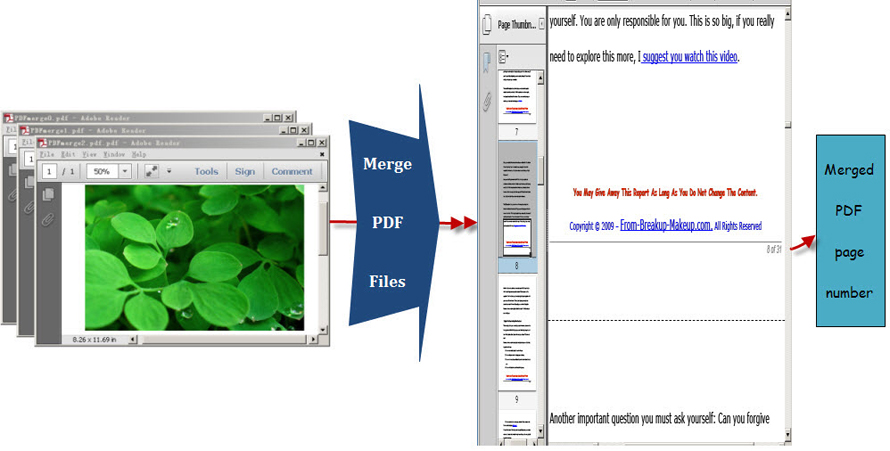
Spire.PDF for .NET, built from scratch in C#, enables programmers and developers to create, read, write and manipulate PDF documents in .NET applications without using Adobe Acrobat or any external libraries. Using Spire.PDF for .NET, you not only can quickly merge PDF files but also enables you to print PDF page with page number. Now please preview the effective screenshot below:
Before following below procedure, please download Spire.PDF for .NET and install it on system.
Step1: You can use the String array to save the names of the three PDF files which will be merged into one PDF and demonstrate Spire.Pdf.PdfDocument array. Then, load three PDF files and select the first PdfDocument for the purpose of merging the second and third PDF file to it. In order to import all pages from the second PDF file to the first PDF file, you need to call the method public void AppendPage(PdfDocument doc). Also by calling another method public PdfPageBase InsertPage(PdfDocument doc, int pageIndex),every page of the third PDF file can be imported to the first PDF file.
private void button1_Click(object sender, EventArgs e)
        {
            //pdf document list
            String[] files = new String[]
            {
                @"..\PDFmerge0.pdf",
                @"..\ PDFmerge1.pdf",
                @"..\ PDFmerge2.pdf"
            };
            //open pdf documents
            PdfDocument[] docs = new PdfDocument[files.Length];
            for (int i = 0; i < files.Length; i++)
            {
                docs[i] = new PdfDocument(files[i]);
            }
            //append document
            docs[0].AppendPage(docs[1]);

            //import PDF pages
            for (int i = 0; i < docs[2].Pages.Count; i = i + 2)
            {
                docs[0].InsertPage(docs[2], i);
            }
 Private Sub button1_Click(sender As Object, e As EventArgs)
	'pdf document list
	Dim files As [String]() = New [String]() {"..\PDFmerge0.pdf", "..\ PDFmerge1.pdf", "..\ PDFmerge2.pdf"}
	'open pdf documents
	Dim docs As PdfDocument() = New PdfDocument(files.Length - 1) {}
	For i As Integer = 0 To files.Length - 1
		docs(i) = New PdfDocument(files(i))
	Next

	'append document
	docs(0).AppendPage(docs(1))

	'import PDF pages
	Dim j As Integer = 0
	While j < docs(2).Pages.Count
		docs(0).InsertPage(docs(2), j)
		j = j + 2
	End While"
Step2: Draw page number in the first PDF file. In this step, you can set PDF page number margin by invoking the class Spire.Pdf.Graphics. PdfMargins. Then, Call the custom method DrawPageNumber(PdfPageCollection pages, PdfMargins margin, int startNumber, int pageCount) to add page number in the bottom of every page in the first PDF. Please see the detail code below:
//set PDF margin
            PdfUnitConvertor unitCvtr = new PdfUnitConvertor();
            PdfMargins margin = new PdfMargins();
            margin.Top = unitCvtr.ConvertUnits(2.54f, PdfGraphicsUnit.Centimeter, PdfGraphicsUnit.Point);
            margin.Bottom = margin.Top;
            margin.Left = unitCvtr.ConvertUnits(3.17f, PdfGraphicsUnit.Centimeter, PdfGraphicsUnit.Point);
            margin.Right = margin.Left;
            this.DrawPageNumber(docs[0].Pages, margin, 1, docs[0].Pages.Count);

          private void DrawPageNumber(PdfPageCollection pages, PdfMargins margin, int startNumber, int pageCount)
          {
            foreach (PdfPageBase page in pages)
            {
                page.Canvas.SetTransparency(0.5f);
                PdfBrush brush = PdfBrushes.Black;
                PdfPen pen = new PdfPen(brush, 0.75f);
                PdfTrueTypeFont font = new PdfTrueTypeFont(new Font("Arial", 9f, System.Drawing.FontStyle.Italic), true);
                PdfStringFormat format = new PdfStringFormat(PdfTextAlignment.Right);
                format.MeasureTrailingSpaces = true;
                float space = font.Height * 0.75f;
                float x = margin.Left;
                float width = page.Canvas.ClientSize.Width - margin.Left - margin.Right;
                float y = page.Canvas.ClientSize.Height - margin.Bottom + space;
                page.Canvas.DrawLine(pen, x, y, x + width, y);
                y = y + 1;
                String numberLabel
                    = String.Format("{0} of {1}", startNumber++, pageCount);
                page.Canvas.DrawString(numberLabel, font, brush, x + width, y, format);
                page.Canvas.SetTransparency(1);
            }
        }
       'set PDF margin
	Dim unitCvtr As New PdfUnitConvertor()
	Dim margin As New PdfMargins()
	margin.Top = unitCvtr.ConvertUnits(2.54F, PdfGraphicsUnit.Centimeter, PdfGraphicsUnit.Point)
	margin.Bottom = margin.Top
	 margin.Left = unitCvtr.ConvertUnits(3.17F, PdfGraphicsUnit.Centimeter, PdfGraphicsUnit.Point)
	margin.Right = margin.Left
	Me.DrawPageNumber(docs(0).Pages, margin, 1, docs(0).Pages.Count)

       Private Sub DrawPageNumber(pages As PdfPageCollection, margin As PdfMargins, startNumber As Integer, pageCount As Integer)
	For Each page As PdfPageBase In pages
		page.Canvas.SetTransparency(0.5F)
		Dim brush As PdfBrush = PdfBrushes.Black
		Dim pen As New PdfPen(brush, 0.75F)
		Dim font As New PdfTrueTypeFont(New Font("Arial", 9F, System.Drawing.FontStyle.Italic), True)
		Dim format As New PdfStringFormat(PdfTextAlignment.Right)
		format.MeasureTrailingSpaces = True
		Dim space As Single = font.Height * 0.75F
		Dim x As Single = margin.Left
		Dim width As Single = page.Canvas.ClientSize.Width - margin.Left - margin.Right
		Dim y As Single = page.Canvas.ClientSize.Height - margin.Bottom + space
		page.Canvas.DrawLine(pen, x, y, x + width, y)
		y = y + 1
		Dim numberLabel As [String] = [String].Format("{0} of {1}", System.Math.Max(System.Threading.Interlocked.Increment(startNumber),startNumber - 1), pageCount)
		page.Canvas.DrawString(numberLabel, font, brush, x + width, y, format)
		page.Canvas.SetTransparency(1)
	Next
End Sub
The PDF merge code can be very long when you view it at first sight, actually, if you do not need to add page number in your merged PDF, steps two should be avoided. However, in many cases, page number brings great convenience for users to read PDF as well as print it. Spire.PDF for .NET can satisfy both your requirements of merging PDF files and adding page numbers in the merged PDF file.
