
.NET (1327)
Children categories
Export PDF Document to Images without PDFConverter via PDFViewer
2012-06-08 05:47:24 Written by KoohjiPDF format, beyond all doubt, provides great convenience for people in daily work. But sometimes, the character of requiring an external application like Acrobat Reader makes things more complex. For example, images can be easily and quickly presented on browsers as long as you have image addresses or load them from your system. While for PDF document, it has to be presented by an external application. Besides, loading images can save much time compared with loading a PDF file since images can be loaded one by one, while PDF file is only available after the complete PDF document is downloaded. Furthermore, images are more likely to handle by Office applications. That is why people need to export PDF document pages to images.
When it comes to the conversion or transformation from this document format to another, people subconsciously think about conversion software. But for Spire.PDF Viewer, you do not need any PDF converter and can realize the PDF to image task in two ways. Moreover, you can export the PDF pages to any image format such as png, jpg, bmp and so on. Finally, except exporting PDF pages to images, Spire.PDFViewer is a totally independent .NET library and has other functions such as open and read encrypted PDF files, view embedded PDF file with hyperlinks and so on.
Two solutions will be displayed to finish this task. The first solution is more complicated than the second one but it has more functions. So both methods have their own advantages. You can choose any one according to your own need.
Export PDF to Images Solution 1
This method requires two forms. One is to load PDF document and the other is to display images which are exported from PDF file. You can export any page or pages to save as images. Details can be shown in the below procedure.
Step 1: Create a new project
- Create a new project in Windows Forms Application.
- Set the Target Framework to be .NET Framework 2 or above in Properties.
- Set the target Framework in this project Properties to be .NET Framework 2.0 or above.
Step 2: Design two Forms
- Add a toolScript and PdfDocumentViewer in Form1.
- Add three Buttons, two Labels and two ComboBoxes in Form1 from the toolScript dropdown list.
- Set the Properties of the Buttons, Labels, ComboBoxes and PdfDocumentViewer as below table.

- Add another Form in Windows Form from Add item by right clicking the project. I name this Form to be FormImages.
- In FormImages, I add a FlowLayoutPanel to it and set its Name to be panelImages1, the Dock property to be Fill.
Step 3: Export PDF file pages to images
Click Form1, add Spire.PDFViewer Forms dll as reference from your downloaded Spire.PDFViewer. Then, add namespaces to the top of the method.
using System.IO;
using Spire.PdfViewer.Forms;
Imports System.IO
Imports Spire.PdfViewer.Forms
Load a PDF file from system and open it. This step also enables you to open another PDF from your system by clicking the "Open" button in Form1.
private void Form1_Load(object sender, EventArgs e)
        {
            string pdfDoc = @"D:\michelle\e-iceblue\Spire.PDFViewer\Demos\Data\PDFViewer.pdf";
            if (File.Exists(pdfDoc))
            {
                this.pdfDocumentViewer1.LoadFromFile(pdfDoc);
            }
        }
private void btnOpen_Click(object sender, EventArgs e)
       {
            OpenFileDialog dialog = new OpenFileDialog();
            dialog.Filter = "PDF document (*.pdf)|*.pdf";
            DialogResult result = dialog.ShowDialog();
            if (result == DialogResult.OK)
            {
                try
                {
                    string pdfFile = dialog.FileName;
                    this.pdfDocumentViewer1.LoadFromFile(pdfFile);
                }
                catch (Exception exe)
                {
                    MessageBox.Show(exe.Message, "Spire.PdfViewer Demo", MessageBoxButtons.OK, MessageBoxIcon.Error);
                }

            }
        }
Private Sub Form1_Load(sender As Object, e As EventArgs)
		Dim pdfDoc As String = "D:\michelle\e-iceblue\Spire.PDFViewer\Demos\Data\PDFViewer.pdf"
		If File.Exists(pdfDoc) Then
			Me.pdfDocumentViewer1.LoadFromFile(pdfDoc)
		End If
End Sub

Private Sub btnOpen_Click(sender As Object, e As EventArgs)
	Dim dialog As New OpenFileDialog()
	dialog.Filter = "PDF document (*.pdf)|*.pdf"
	Dim result As DialogResult = dialog.ShowDialog()
	If result = DialogResult.OK Then
		Try
			Dim pdfFile As String = dialog.FileName
		Me.pdfDocumentViewer1.LoadFromFile(pdfFile)
		Catch exe As Exception
			MessageBox.Show(exe.Message, "Spire.PdfViewer Demo", MessageBoxButtons.OK, MessageBoxIcon.[Error])

		End Try
	End If
End Sub
Load the PDF document and use the "this.pdfDocumentViewer1.SaveAsImage(currentPage - 1)" to save the current PDF page as image.
private void pdfDocumentViewer1_PdfLoaded(object sender, EventArgs args)
{
            this.comBoxFrom.Items.Clear();
            this.comboxTo.Items.Clear();

            int totalPage = this.pdfDocumentViewer1.PageCount;
            for (int i = 1; i <= totalPage; i++)
            {
                this.comBoxFrom.Items.Add(i.ToString());
                this.comboxTo.Items.Add(i.ToString());


            }
            this.comBoxFrom.SelectedIndex = 0;
            this.comboxTo.SelectedIndex = 0;

 }
private void btnExport_Click(object sender, EventArgs e)
 {
            if (this.pdfDocumentViewer1.PageCount > 0)
            {
                SaveFileDialog dialog = new SaveFileDialog();
                dialog.Filter = "JPG Format(*.jpg)|*.jpg|BMP Format(*.bmp)|*.bmp|PNG Format(*.png)|*.png|GIF Format(*.gif)|*.gif";
                DialogResult result = dialog.ShowDialog();
                string fileName = dialog.FileName;
                if (result == DialogResult.OK)
                {

                    int currentPage = this.pdfDocumentViewer1.CurrentPageNumber;
                    Bitmap image = this.pdfDocumentViewer1.SaveAsImage(currentPage - 1);
                    image.Save(fileName);
                    MessageBox.Show("You have exported current page to an image:\n" + fileName, "Spire.PdfViewer Demo", MessageBoxButtons.OK, MessageBoxIcon.Information);


                    Dictionary dictionaryImages = new Dictionary();
                    dictionaryImages.Add(fileName, image);

                    this._formImages = new FormImages();
                    this._formImages.DictionaryImages = dictionaryImages;
                    this._formImages.Show();

                  }
              }
  }
Private Sub pdfDocumentViewer1_PdfLoaded(sender As Object, args As EventArgs)
	Me.comBoxFrom.Items.Clear()
	Me.comboxTo.Items.Clear()
	Dim totalPage As Integer = Me.pdfDocumentViewer1.PageCount
	For i As Integer = 1 To totalPage
		Me.comBoxFrom.Items.Add(i.ToString())
		Me.comboxTo.Items.Add(i.ToString())
	Next
	Me.comBoxFrom.SelectedIndex = 0
	Me.comboxTo.SelectedIndex = 0
End Sub
Private Sub btnExport_Click(sender As Object, e As EventArgs)
	If Me.pdfDocumentViewer1.PageCount > 0 Then
		Dim dialog As New SaveFileDialog()
		dialog.Filter = "JPG Format(*.jpg)|*.jpg|BMP Format(*.bmp)|*.bmp|PNG Format(*.png)|*.png|GIF Format(*.gif)|*.gif"
		Dim result As DialogResult = dialog.ShowDialog()
		Dim fileName As String = dialog.FileName
		If result = DialogResult.OK Then
			Dim currentPage As Integer = Me.pdfDocumentViewer1.CurrentPageNumber
			Dim image As Bitmap = Me.pdfDocumentViewer1.SaveAsImage(currentPage - 1)
			image.Save(fileName)
			MessageBox.Show("You have exported current page to an image:" & vbLf & fileName, "Spire.PdfViewer Demo", MessageBoxButtons.OK, MessageBoxIcon.Information)
			Dim dictionaryImages As New Dictionary(Of String, Image)()
			dictionaryImages.Add(fileName, image)
			Me._formImages = New FormImages()
			Me._formImages.DictionaryImages = dictionaryImages
			Me._formImages.Show()
		End If
	End If
End Sub
Save multiple pages as images by selecting the PDF export range from the start page to the end page. And use the "this.pdfDocumentViewer1.SaveAsImage(fromPage, toPage)" method to save the images.
private void btnMultiExport_Click(object sender, EventArgs e)
{
            if (this.pdfDocumentViewer1.PageCount <= 0)
            {
                return;
            }

            int fromPage = this.comBoxFrom.SelectedIndex;
            int toPage = this.comboxTo.SelectedIndex;
            if (fromPage > toPage)
            {
                MessageBox.Show("End page number must be not less than started page number!", "Spire.PdfViewer Demo", MessageBoxButtons.OK, MessageBoxIcon.Warning);
                return;
            }
            else
            {
                FolderBrowserDialog dialog = new FolderBrowserDialog();


                DialogResult result = dialog.ShowDialog();
                if (result == DialogResult.OK)
                {

                    string path = dialog.SelectedPath;
                    Bitmap[] images = this.pdfDocumentViewer1.SaveAsImage(fromPage, toPage);
                    Dictionary dictionaryImages = new Dictionary();
                    for (int i = 0; i < images.Length; i++)
                    {
                        string name = "image" + (i + 1 + fromPage).ToString() + ".bmp";
                        string fileName = path + "\\" + name;
                        images[i].Save(fileName);
                        dictionaryImages.Add(fileName, images[i]);

                    }
                    string message = "You have exported " + (fromPage + 1).ToString() + "-" + (toPage + 1).ToString() + " pages as images to:\n"
                       + path;
                    MessageBox.Show(message, "Spire.PdfViewer Demo", MessageBoxButtons.OK, MessageBoxIcon.Information);

                    this._formImages = new FormImages();
                    this._formImages.DictionaryImages = dictionaryImages;
                    this._formImages.Show();

                }
            }
   }
Private Sub btnMultiExport_Click(sender As Object, e As EventArgs)
		If Me.pdfDocumentViewer1.PageCount <= 0 Then
			Return
		End If

		Dim fromPage As Integer = Me.comBoxFrom.SelectedIndex
		Dim toPage As Integer = Me.comboxTo.SelectedIndex
		If fromPage > toPage Then
			MessageBox.Show("End page number must be not less than started page number!", "Spire.PdfViewer Demo", MessageBoxButtons.OK, MessageBoxIcon.Warning)
			Return
		Else
			Dim dialog As New FolderBrowserDialog()
			Dim result As DialogResult = dialog.ShowDialog()
			If result = DialogResult.OK Then
				Dim path As String = dialog.SelectedPath
				Dim images As Bitmap() = Me.pdfDocumentViewer1.SaveAsImage(fromPage, toPage)
				Dim dictionaryImages As Dictionary(Of [String], Image) = New Dictionary(Of String, Image)()
				For i As Integer = 0 To images.Length - 1
					Dim name As String = "image" & (i + 1 + fromPage).ToString() & ".bmp"
					Dim fileName As String = path & "\" & name
					images(i).Save(fileName)
					dictionaryImages.Add(fileName, images(i))
				Next
				Dim message As String = "You have exported " & (fromPage + 1).ToString() & "-" & (toPage + 1).ToString() & " pages as images to:" & vbLf & path
				MessageBox.Show(message, "Spire.PdfViewer Demo", MessageBoxButtons.OK, MessageBoxIcon.Information)
				Me._formImages = New FormImages()
				Me._formImages.DictionaryImages = dictionaryImages
				Me._formImages.Show()
			End If
		End If
	End Sub
Display the images in the second Form: FormImages.
using System;
using System.Collections.Generic;
using System.Drawing;
using System.IO;
using System.Windows.Forms;
using Spire.PdfViewer.Forms;

namespace  pdf2images1
{
    public partial class FormImages : Form
    {

        private Dictionary _dictionaryImags;

        public Dictionary DictionaryImages
        {
            get { return this._dictionaryImags; }
            set
            {
                this._dictionaryImags = value;
                this.ViewImages();
            }
        }
        public FormImages()
        {
            InitializeComponent();
        }

        public void ViewImages()
        {
            if (this.DictionaryImages != null && this.DictionaryImages.Count > 0)
            {
                this.panelImages1.Controls.Clear();
                String image_name = "";
                int panelHeight = 0;
                int panelWidth = 0;

                foreach (KeyValuePair pair in this.DictionaryImages)
                {
                    image_name = pair.Key;

                    Panel panelImage = new Panel();
                    panelImage.AutoSize = true;


                    PictureBox ptrBox = new PictureBox();
                    ptrBox.Height = 150;
                    ptrBox.Width = 200;

                    ptrBox.SizeMode = PictureBoxSizeMode.Zoom;

                    ptrBox.Image = pair.Value;
                    ptrBox.Cursor = Cursors.Hand;

                    panelImage.Controls.Add(ptrBox);

                    LinkLabel lbl = new LinkLabel();
                    String imageName = Path.GetFileName(pair.Key);
                    lbl.Text = imageName;
                    int x = (Int32)(ptrBox.Width / 2 - lbl.Width / 2);
                    int y = ptrBox.Height;
                    lbl.Left = x;
                    lbl.Top = y;
                    panelImage.Controls.Add(lbl);

                    this.panelImages1.Controls.Add(panelImage);

                    this.SetClickEventHandler(ptrBox, lbl, image_name);
                    panelHeight = panelImage.Height;
                    panelWidth = panelImage.Width;

                }
                int nimages = this._dictionaryImags.Count;
                if (nimages >= 4)
                {

                    int n = (Int32)Math.Ceiling(Math.Sqrt(nimages));

                    this.Width = panelWidth * n + 20 * (n - 1) + 40;
                    this.Height = panelHeight * n + 20 * (n - 1) + 40;
                }
            }
        }
        private void SetClickEventHandler(PictureBox ptrBox, LinkLabel lbl, string imageName)
        {
            ptrBox.Click += new EventHandler(delegate(Object sender, EventArgs args)
            {
                System.Diagnostics.Process process = new System.Diagnostics.Process();
                System.Diagnostics.ProcessStartInfo info = new System.Diagnostics.ProcessStartInfo(imageName);
                process.StartInfo = info;
                process.Start();
            });

            lbl.Click += new EventHandler(delegate(Object sender, EventArgs args)
            {
                System.Diagnostics.Process process = new System.Diagnostics.Process();
                System.Diagnostics.ProcessStartInfo info = new System.Diagnostics.ProcessStartInfo(imageName);
                process.StartInfo = info;
                process.Start();
            });

        }
    }
}
Imports System.Collections.Generic
Imports System.Drawing
Imports System.IO
Imports System.Windows.Forms

Namespace pdf2images1
	Public Partial Class FormImages
		Inherits Form
		Private _dictionaryImags As Dictionary(Of [String], Image)
		Public Property DictionaryImages() As Dictionary(Of [String], Image)
			Get
				Return Me._dictionaryImags
			End Get
			Set
				Me._dictionaryImags = value
				Me.ViewImages()
			End Set
		End Property
		Public Sub New()
			InitializeComponent()
		End Sub

		Public Sub ViewImages()
			If Me.DictionaryImages IsNot Nothing AndAlso Me.DictionaryImages.Count > 0 Then
				Me.panelImages1.Controls.Clear()
				Dim image_name As [String] = ""
				Dim panelHeight As Integer = 0
				Dim panelWidth As Integer = 0

				For Each pair As KeyValuePair(Of [String], Image) In Me.DictionaryImages
					image_name = pair.Key

					Dim panelImage As New Panel()
					panelImage.AutoSize = True


					Dim ptrBox As New PictureBox()
					ptrBox.Height = 150
					ptrBox.Width = 200

					ptrBox.SizeMode = PictureBoxSizeMode.Zoom

					ptrBox.Image = pair.Value
					ptrBox.Cursor = Cursors.Hand

					panelImage.Controls.Add(ptrBox)

					Dim lbl As New LinkLabel()
					Dim imageName As [String] = Path.GetFileName(pair.Key)
					lbl.Text = imageName
					Dim x As Integer = CType(ptrBox.Width \ 2 - lbl.Width \ 2, Int32)
					Dim y As Integer = ptrBox.Height
					lbl.Left = x
					lbl.Top = y
					panelImage.Controls.Add(lbl)

					Me.panelImages1.Controls.Add(panelImage)

					Me.SetClickEventHandler(ptrBox, lbl, image_name)
					panelHeight = panelImage.Height

					panelWidth = panelImage.Width
				Next
				Dim nimages As Integer = Me._dictionaryImags.Count
				If nimages >= 4 Then

					Dim n As Integer = CType(Math.Truncate(Math.Ceiling(Math.Sqrt(nimages))), Int32)

					Me.Width = panelWidth * n + 20 * (n - 1) + 40
					Me.Height = panelHeight * n + 20 * (n - 1) + 40
				End If
			End If
		End Sub
		Private Sub SetClickEventHandler(ptrBox As PictureBox, lbl As LinkLabel, imageName As String)
			AddHandler ptrBox.Click, New EventHandler(Function(sender As [Object], args As EventArgs) Do
				Dim process As New System.Diagnostics.Process()
				Dim info As New System.Diagnostics.ProcessStartInfo(imageName)
				process.StartInfo = info
				process.Start()
			End Function)

			AddHandler lbl.Click, New EventHandler(Function(sender As [Object], args As EventArgs) Do
				Dim process As New System.Diagnostics.Process()
				Dim info As New System.Diagnostics.ProcessStartInfo(imageName)
				process.StartInfo = info
				process.Start()
			End Function)
		End Sub
	End Class
End Namespace
Step 4: Debug the project
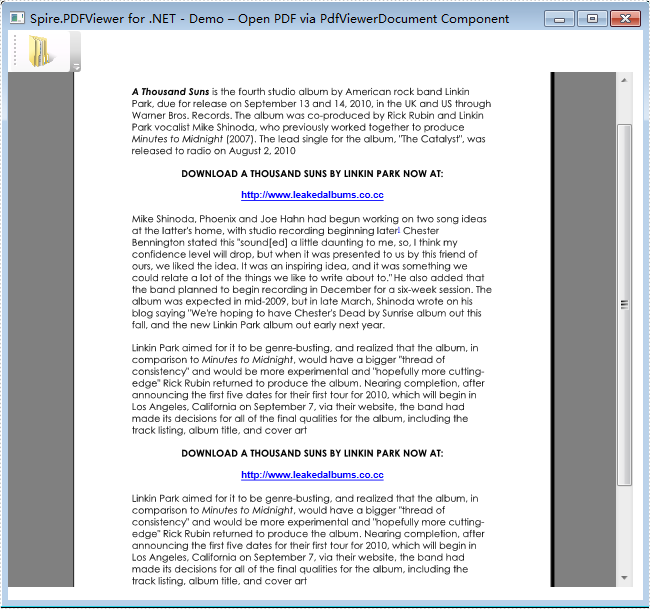
Click the Debug or Press F5 to launch the project. You can preview as below.
Export Page 4-7

Display Image 4-7

Export PDF to Image Solution 2
This method is much simple and it needs a Form generated dynamically. Two buttons are provided. One is for exporting the current PDF page, the other is for exporting multiple pages. The difference between the first method and the second lies in you can choose any export range in the first method. For example, you can choose page 4-7 to save as images, but when you use method two, you have to save all the pages from 1-7 since it only support to save page from 1 to current page as images. Please look at the procedure.
Step 1: Create a new project
- Create a new project in Console Application.
- Set the target Framework to be .NET Framework 2 or above.
- Add System. Drawing and Spire.PdfViewer.Forms. dll as references and add the below namespaces at the top of the method.
using System;
using System.Drawing;
using System.IO;
using System.Windows.Forms;
using Spire.PdfViewer.Forms;
Imports System.Drawing
Imports System.IO
Imports System.Windows.Forms
Imports Spire.PdfViewer.Forms
Step 2: Export PDF file pages to images
Load a PDF file from system
viewer = new PdfDocumentViewer();
viewer.LoadFromFile(@"D:\michelle\e-iceblue\Spire.PDFViewer\Demos\Data\PDFViewer.pdf");
viewer = New PdfDocumentViewer()
viewer.LoadFromFile("D:\michelle\e-iceblue\Spire.PDFViewer\Demos\Data\PDFViewer.pdf")
Create a new Form and design it. Except setting the properties of this Form, two buttons are added also. One is for exporting one page, and the other multiple pages.
            //form and child components
            Form mainForm = new Form();
            mainForm.Text = "Spire.PdfView Demo - Export";
            mainForm.Size = new System.Drawing.Size(800, 600);
            mainForm.StartPosition = FormStartPosition.CenterScreen;

            TableLayoutPanel table = new TableLayoutPanel();
            table.ColumnCount = 3;
            table.ColumnStyles.Add(new ColumnStyle(SizeType.Percent, 50));
            table.ColumnStyles.Add(new ColumnStyle(SizeType.Absolute, 20));
            table.ColumnStyles.Add(new ColumnStyle(SizeType.Percent, 50));
            table.RowCount = 2;
            table.RowStyles.Add(new RowStyle(SizeType.Percent, 100));
            table.RowStyles.Add(new RowStyle(SizeType.Absolute, 30));

            table.Controls.Add(viewer, 0, 0);
            table.SetColumnSpan(viewer, 3);
            viewer.Dock = DockStyle.Fill;

            //Export current page to one image
            Button button = new Button();
            button.Text = "Export to one image";
            button.Size = new Size(180, 24);
            button.TextAlign = ContentAlignment.MiddleCenter;
            table.Controls.Add(button, 0, 1);
            button.Dock = DockStyle.Right;
            button.Click += ExportToOneImage;

            //Export current pdf document to multiple images
            button = new Button();
            button.Text = "Export to multiple images";
            button.Size = new Size(180, 24);
            button.TextAlign = ContentAlignment.MiddleCenter;
            table.Controls.Add(button, 2, 1);
            button.Dock = DockStyle.Left;
            button.Click += ExportToMultipleImages;

            mainForm.Controls.Add(table);
            table.Dock = DockStyle.Fill;

            Application.Run(mainForm);
	'form and child components
	Dim mainForm As New Form()
	mainForm.Text = "Spire.PdfView Demo - Export"
	mainForm.Size = New System.Drawing.Size(800, 600)
	mainForm.StartPosition = FormStartPosition.CenterScreen

	Dim table As New TableLayoutPanel()
	table.ColumnCount = 3
	table.ColumnStyles.Add(New ColumnStyle(SizeType.Percent, 50))
	table.ColumnStyles.Add(New ColumnStyle(SizeType.Absolute, 20))
	table.ColumnStyles.Add(New ColumnStyle(SizeType.Percent, 50))
	table.RowCount = 2
	table.RowStyles.Add(New RowStyle(SizeType.Percent, 100))
	table.RowStyles.Add(New RowStyle(SizeType.Absolute, 30))

	table.Controls.Add(viewer, 0, 0)
	table.SetColumnSpan(viewer, 3)
	viewer.Dock = DockStyle.Fill

	'Export current page to one image
	Dim button As New Button()
	button.Text = "Export to one image"
	button.Size = New Size(180, 24)
	button.TextAlign = ContentAlignment.MiddleCenter
	table.Controls.Add(button, 0, 1)
	button.Dock = DockStyle.Right
	AddHandler button.Click, AddressOf ExportToOneImage

	'Export current pdf document to multiple images
	button = New Button()
	button.Text = "Export to multiple images"
	button.Size = New Size(180, 24)
	button.TextAlign = ContentAlignment.MiddleCenter
	table.Controls.Add(button, 2, 1)
	button.Dock = DockStyle.Left
	AddHandler button.Click, AddressOf ExportToMultipleImages

	mainForm.Controls.Add(table)
	table.Dock = DockStyle.Fill

	Application.Run(mainForm)
Save the current PDF page as one image.
private static void ExportToOneImage(object sender, EventArgs e)
      {
         if (viewer.PageCount > 0)
          {
                SaveFileDialog dialog = new SaveFileDialog();
                dialog.Filter = "PNG Format(*.png)|*.png";
                if (dialog.ShowDialog() == DialogResult.OK)
                {
                    int currentPage = viewer.CurrentPageNumber;
                    Bitmap image = viewer.SaveAsImage(currentPage - 1);
                    image.Save(dialog.FileName);
                    MessageBox.Show("You have exported current page to an image:\n" + dialog.FileName, "Spire.PdfViewer Demo", MessageBoxButtons.OK, MessageBoxIcon.Information);
                }
            }
        }
Private Shared Sub ExportToOneImage(sender As Object, e As EventArgs)
	If viewer.PageCount > 0 Then
		Dim dialog As New SaveFileDialog()
		dialog.Filter = "PNG Format(*.png)|*.png"
		If dialog.ShowDialog() = DialogResult.OK Then
			Dim currentPage As Integer = viewer.CurrentPageNumber
			Dim image As Bitmap = viewer.SaveAsImage(currentPage - 1)
			image.Save(dialog.FileName)
			MessageBox.Show("You have exported current page to an image:" & vbLf & dialog.FileName, "Spire.PdfViewer Demo", MessageBoxButtons.OK, MessageBoxIcon.Information)
		End If
	End If
End Sub
Save multiple PDF pages to images.
private static void ExportToMultipleImages(object sender, EventArgs e)
        {
            if (viewer.PageCount > 0)
            {
                FolderBrowserDialog dialog = new FolderBrowserDialog();
                if (dialog.ShowDialog() == DialogResult.OK)
                {
                    int currentPage = viewer.CurrentPageNumber;
                    Bitmap[] images = viewer.SaveAsImage(0, currentPage - 1);
                    for (int i = 0; i < images.Length; i++)
                    {
                        String fileName = Path.Combine(dialog.SelectedPath, String.Format("PDFViewer-{0}.png", i));
                        images[i].Save(fileName);
                    }
                    string message = "You have exported 1" + "-" + currentPage.ToString() + " pages as images to:\n" + dialog.SelectedPath;
                    MessageBox.Show(message, "Spire.PdfViewer Demo", MessageBoxButtons.OK, MessageBoxIcon.Information);
                }
            }
        }
Private Shared Sub ExportToMultipleImages(sender As Object, e As EventArgs)
	If viewer.PageCount > 0 Then
		Dim dialog As New FolderBrowserDialog()
		If dialog.ShowDialog() = DialogResult.OK Then
			Dim currentPage As Integer = viewer.CurrentPageNumber
			Dim images As Bitmap() = viewer.SaveAsImage(0, currentPage - 1)
			For i As Integer = 0 To images.Length - 1
				Dim fileName As [String] = Path.Combine(dialog.SelectedPath, [String].Format("PDFViewer-{0}.png", i))
				images(i).Save(fileName)
			Next
			Dim message As String = "You have exported 1" & "-" & currentPage.ToString() & " pages as images to:" & vbLf & dialog.SelectedPath
			MessageBox.Show(message, "Spire.PdfViewer Demo", MessageBoxButtons.OK, MessageBoxIcon.Information)
		End If
	End If
End Sub
Step 3: Debug the project
Press F5 or click Debug to launch the project. Then, preview the effect.
Form

Export Multiple PDF Pages

Obviously, the second method is easier than the first one. But if you have a PDF document with hundreds of pages, solution 1 can exporting the specified pages in a fast speed and, to a large extent, it escapes the trouble of saving numerous PDF pages as images. While, for some PDF file with a few pages, solution 2 is more convenient.
Spire.PDFViewer is a powerful PDF Viewer component performed on .NET and WPF. It enables developers to load PDF document from stream, file and byte array. Also it is available on viewing PDF/A-1B, PDF/X1A and enables to open and read encrypted PDF files Click to know more
As its read only characteristic, PDF enjoys great popularity among business field. Especially, when sign contracts or send invoices, almost all the business contacts and invoices must be printed. Thus, printing PDF document pages becomes an unavoidable process, which requires a well knowledge of print PDF document in a quick way.
This program guide aims at introducing a method to print PDF document via PDF Viewer component Spire.PDFViewer with C#, VB.NET.
This method enables you not only to print PDF document pages but also to open any PDF document on system via Spire.PDFViewer. That is to say, one method can open and print many PDF files. Please look at the procedure below.
Step 1: Create a new project
- Create a new project in Visual Studio. Please note that this project needs a Form
- Set the Target framework of this project to be .NET Framework 2 or above in Properties
Step 2: Add reference and Set up the Form
- Add Spire.PDFViewer Form Dll as reference from your downloaded Spire.PDFViewer.
- Add a toolScript and pdfDocumentViewer in the default Form "Form1".
- Add two buttons and a ComboBox in Form1 from toolScript dropdown list.
- Set the "Name", "Display Style", "Text" and "ToolTipText" of button1 in Properties to be "btnOpen", "Text", "Open" and "Open PDF document" and button2 to be "btnPrint", "Text", "Print" and "Print PDF document".
- Set the Dock property of pdfDocumentViewer in order to view PDF file page in enough space.
Step 3: Print PDF Document Pages via PDF Viewer
Add below namespaces at the top of the method.
using System.IO;
using Spire.PdfViewer.Forms;
Imports System.IO
Imports Spire.PdfViewer.Forms
Load a PDF document from system
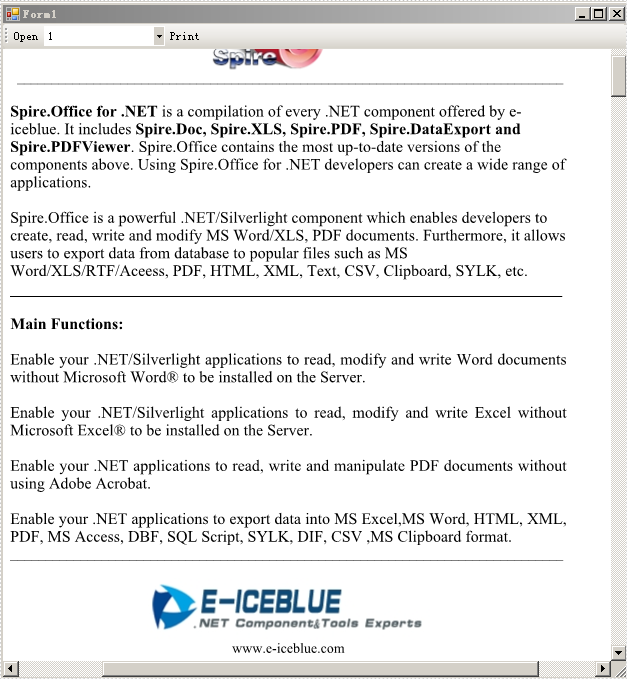
        private void Form1_Load(object sender, EventArgs e)
        {
            string pdfDoc = @"D:\e-iceblue\Spire.PDFViewer\Demos\Data\Spire.Office.pdf";
            if (File.Exists(pdfDoc))
            {
                this.pdfDocumentViewer1.LoadFromFile(pdfDoc);
            }

        }
	Private Sub Form1_Load(sender As Object, e As EventArgs)
	   Dim pdfDoc As String = "D:\e-iceblue\Spire.PDFViewer\Demos\Data\Spire.Office.pdf"
	        If File.Exists(pdfDoc) Then
	            Me.pdfDocumentViewer1.LoadFromFile(pdfDoc)
	        End If

	End Sub
Open the PDF document
        private void btnOpen_Click(object sender, EventArgs e)
        {
            OpenFileDialog dialog = new OpenFileDialog();
            dialog.Filter = "PDF document (*.pdf)|*.pdf";
            DialogResult result = dialog.ShowDialog();
            if (result == DialogResult.OK)
            {

                string pdfFile = dialog.FileName;
                this.pdfDocumentViewer1.LoadFromFile(pdfFile);
            }
        }
	Private Sub btnOpen_Click(sender As Object, e As EventArgs)
		Dim dialog As New OpenFileDialog()
		dialog.Filter = "PDF document (*.pdf)|*.pdf"
		Dim result As DialogResult = dialog.ShowDialog()
	         If result = DialogResult.OK Then

		Dim pdfFile As String = dialog.FileName
		Me.pdfDocumentViewer1.LoadFromFile(pdfFile)
		End If
	End Sub
Print PDF document pages via PDF Viewer
        private void btnPrint_Click(object sender, EventArgs e)
        {
            if (this.pdfDocumentViewer1.PageCount > 0)
            {
                this.pdfDocumentViewer1.Print();
            }
        }


        private void pdfDocumentViewer1_PdfLoaded(object sender, EventArgs args)
        {
            this.comBoxPages.Items.Clear();
            int totalPage = this.pdfDocumentViewer1.PageCount;

            for (int i = 1; i <= totalPage; i++)
            {
                this.comBoxPages.Items.Add(i.ToString());
            }

            this.comBoxPages.SelectedIndex = 0;
        }

        private void pdfDocumentViewer1_PageNumberChanged(object sender, EventArgs args)
        {
            if (this.comBoxPages.Items.Count <= 0)
                return;
            if (this.pdfDocumentViewer1.CurrentPageNumber != this.comBoxPages.SelectedIndex + 1)
            {
                this.comBoxPages.SelectedIndex = this.pdfDocumentViewer1.CurrentPageNumber - 1;
            }
        }

        private void comBoxPages_SelectedIndexChanged(object sender, EventArgs e)
        {
            int soucePage = this.pdfDocumentViewer1.CurrentPageNumber;
            int targetPage = this.comBoxPages.SelectedIndex + 1;
            if (soucePage != targetPage)
            {
                this.pdfDocumentViewer1.GoToPage(targetPage);
            }
        }
	Private Sub btnPrint_Click(sender As Object, e As EventArgs)
		If Me.pdfDocumentViewer1.PageCount > 0 Then
			Me.pdfDocumentViewer1.Print()
		End If
	End Sub


	Private Sub pdfDocumentViewer1_PdfLoaded(sender As Object, args As EventArgs)
	         Me.comBoxPages.Items.Clear()
		Dim totalPage As Integer = Me.pdfDocumentViewer1.PageCount

		For i As Integer = 1 To totalPage
			Me.comBoxPages.Items.Add(i.ToString())
		Next

		Me.comBoxPages.SelectedIndex = 0
		End Sub

	Private Sub pdfDocumentViewer1_PageNumberChanged(sender As Object, args As EventArgs)
		If Me.comBoxPages.Items.Count <= 0 Then
			Return
		End If
		If Me.pdfDocumentViewer1.CurrentPageNumber <> Me.comBoxPages.SelectedIndex + 1 Then
			Me.comBoxPages.SelectedIndex = Me.pdfDocumentViewer1.CurrentPageNumber - 1
		End If
	End Sub

	Private Sub comBoxPages_SelectedIndexChanged(sender As Object, e As EventArgs)
		Dim soucePage As Integer = Me.pdfDocumentViewer1.CurrentPageNumber
		Dim targetPage As Integer = Me.comBoxPages.SelectedIndex + 1
		If soucePage <> targetPage Then
			Me.pdfDocumentViewer1.GoToPage(targetPage)
		End If
	End Sub
Step 4: Press F5 or debug the project
After debugging, you can preview the effect.
The First Page
The Fourth Page

When you click the "Open" button, there will be a dialog box appears and then you can open another PDF document from system. Also, you can select any page in the dropdown list of the ComboBox and click "Print" button to print it.
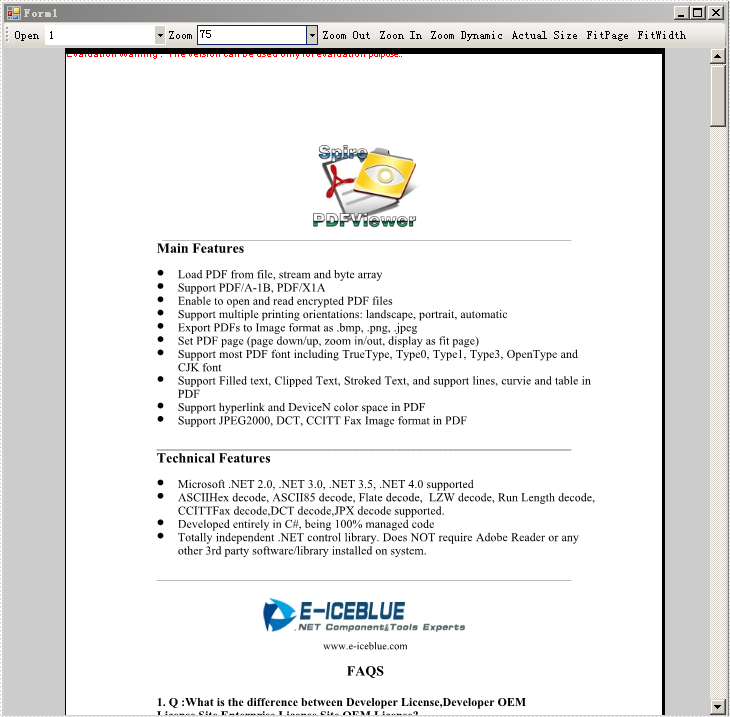
Zoom function in PDF file can help people change the text size of PDF document page according to their view preference or need. When you want to increase the percentage of the PDF file text, you can click the button of Zoom Out or choose the percentage number directly as well as scroll down your mouse. And also if you want to zoom back to the original text size, you can click the Actual Size button. Actually, you can completely control the text percentage of the PDF document, which is much more convenient than the zoom of Excel and Word files. Now it is time to learn how to zoom PDF file via PDF Viewer with C#, VB.NET.
In this article, I will introduce seven kinds of zoom to control PDF file text size by using a Spire.PDFViewer. Spire.PDFViewer does NOT require Adobe Reader or any other 3rd party software/library installed on system. You can have a Freely Trial of Spire.PDFViewer. The whole procedure can be finished by below steps.
Step 1: Create a new project
- Create a new project in Windows Forms Application.
- Set the Target Framework to be .NET Framework 2 or above in Properties.
- Add a toolScript and pdfDocumentViewer in Form1 from Toolbox. Then, add seven buttons, two ComboBoxes and a label from the toolScript dropdown list in Form1.
- Set the Properties of the tools respectively. Such as the "Name", "Display Style", "Text" and "ToolTipText" of buttons, ComboBoxes and label. You can set the Dock property of pdfDocumentViewer in its Properties in order to view the PDF in enough space.
Step 2: Methods to zoom PDF file via Spire.PDFViewer
- Add Spire. PDFViewer.Forms dll as reference.
- Add below namespace at the top of the method.
using System.IO;
using System.Windows.Forms;
using Spire.PdfViewer.Forms;
Imports System.IO
Imports System.Windows.Forms
Imports Spire.PdfViewer.Forms
Zoom PDF file. In this step, I have seven kinds of zoom functions to control the PDF text size. They are:
- Zoom: Manually choose the percentage.
- Zoom Out: Decrease the PDF text size.
- Zoom In: Increase the PDF text size.
- Zoom Dynamic: Scroll down/up the mouse directly to change the text size. A second click can cancel zoom dynamic.
- Actual Size: When you click it, the document text changes to the original size.
- Fit Page: Fit Page controls the PDF page not going across the PDF page height and margin.
- Fit Width: When you click the Fit Width button, the margin of PDF document disappears and you only see the PDF text content.
Main Code:
namespace pdfzoom
{
    public partial class Form1 : Form
    {
        public Form1()
        {
            InitializeComponent();
        }

        //private bool _isZoomout = true;

        private int _zoom = 100;
        private bool _isZoomDynamic = false;

        private void Form1_Load(object sender, EventArgs e)
        {
            string pdfDoc = @"D:\michelle\e-iceblue\Spire.PDFViewer\Demos\Data\PDFViewer.pdf";
            if (File.Exists(pdfDoc))
            {
                this.pdfDocumentViewer1.LoadFromFile(pdfDoc);
            }

            //add zoom values to combox
            int[] intZooms = new Int32[] { 25, 50, 75, 100, 125, 150, 200, 300, 400, 500, 600, 700, 800, 900, 1000 };
            foreach (int zoom in intZooms)
            {
                this.comBoxZoom.Items.Add(zoom.ToString());
            }
            this.comBoxZoom.SelectedIndex = 3;

            //pdfDocumentViewer mouseWheel event

            this.pdfDocumentViewer1.MouseWheel += new MouseEventHandler(this.pdfDocumentViewer1_MouseWheel);
            this.pdfDocumentViewer1.LostFocus += new EventHandler(this.pdfDocumentViewer_LostFocus);

        }
        private void pdfDocumentViewer_LostFocus(Object sender, EventArgs args)
        {
            this._isZoomDynamic = false;
            this._zoom = 100;
        }

        private void pdfDocumentViewer1_MouseWheel(Object sender, MouseEventArgs args)
        {
            if (this._isZoomDynamic)
            {
                int wheelValue = (Int32)args.Delta / 24;


                this._zoom += wheelValue;

                if (this._zoom < 0)
                    this._zoom = 0;
                this.pdfDocumentViewer1.ZoomTo(this._zoom);
            }

        }

        private void btnOPen_Click(object sender, EventArgs e)
        {
            OpenFileDialog dialog = new OpenFileDialog();
            dialog.Filter = "PDF document (*.pdf)|*.pdf";

            DialogResult result = dialog.ShowDialog();
            if (result == DialogResult.OK)
            {
                try
                {
                    string pdfFile = dialog.FileName;
                    this.pdfDocumentViewer1.LoadFromFile(pdfFile);

                }
                catch (Exception exe)
                {
                    MessageBox.Show(exe.Message, "Spire.PdfViewer Demo", MessageBoxButtons.OK, MessageBoxIcon.Error);
                }

            }
        }

        private void comBoxZoom_SelectedIndexChanged(object sender, EventArgs e)
        {
            if (this.pdfDocumentViewer1.PageCount > 0)
            {
                int zoomValue = Int32.Parse(this.comBoxZoom.SelectedItem.ToString());
                this.pdfDocumentViewer1.ZoomTo(zoomValue);
            }
        }

        private void btnZoomOut_Click(object sender, EventArgs e)
        {
            if (this.pdfDocumentViewer1.PageCount > 0)
            {
                int delta = 10;
                this._zoom += delta;
                this.pdfDocumentViewer1.ZoomTo(this._zoom);
            }
        }

        private void btnZoonIn_Click(object sender, EventArgs e)
        {
            if (this.pdfDocumentViewer1.PageCount > 0)
            {
                int delta = 5;
                this._zoom -= delta;
                if (this._zoom < 0)
                    this._zoom = 0;
                this.pdfDocumentViewer1.ZoomTo(this._zoom);
            }
        }

        private void btnActural_Click(object sender, EventArgs e)
        {
            this._zoom = 100;
            this._isZoomDynamic = false;
            this.btnDynamic.Text = "Zoom Dynamic";
            if (this.pdfDocumentViewer1.PageCount > 0)
            {
                this.pdfDocumentViewer1.ZoomTo(100);
                this.comBoxZoom.SelectedIndex = 3;
            }
        }

        private void btnFitPage_Click(object sender, EventArgs e)
        {
            if (this.pdfDocumentViewer1.PageCount > 0)
            {
                this.pdfDocumentViewer1.ZoomTo(ZoomMode.FitPage);
            }
        }

        private void btnFitWidth_Click(object sender, EventArgs e)
        {
            if (this.pdfDocumentViewer1.PageCount > 0)
            {
                this.pdfDocumentViewer1.ZoomTo(ZoomMode.FitWidth);
            }
        }

        private void btnDynamic_Click(object sender, EventArgs e)
        {
            this._isZoomDynamic = !this._isZoomDynamic;
            if (this._isZoomDynamic)
            {

                this.btnDynamic.Text = "Cancel dynamic zoom";
                this.btnDynamic.ToolTipText = "Cancel dynamic zoom";
            }

            else
            {
                this.btnDynamic.Text = "Zoom dynamic";
                this.btnDynamic.ToolTipText = "Zoom dynamic";
            }

        }

        private void pdfDocumentViewer1_PdfLoaded(object sender, EventArgs args)
        {
            this.btnDynamic.Enabled = true;
            this.comBoxPages.Items.Clear();
            int totalPage = this.pdfDocumentViewer1.PageCount;

            for (int i = 1; i <= totalPage; i++)
            {
                this.comBoxPages.Items.Add(i.ToString());
            }

            this.comBoxPages.SelectedIndex = 0;
        }

        private void pdfDocumentViewer1_PageNumberChanged(object sender, EventArgs args)
        {
            if (this.comBoxPages.Items.Count <= 0)
                return;
            if (this.pdfDocumentViewer1.CurrentPageNumber != this.comBoxPages.SelectedIndex + 1)
            {
                this.comBoxPages.SelectedIndex = this.pdfDocumentViewer1.CurrentPageNumber - 1;
            }
        }

        private void comBoxPages_SelectedIndexChanged(object sender, EventArgs e)
        {
            int soucePage = this.pdfDocumentViewer1.CurrentPageNumber;
            int targetPage = this.comBoxPages.SelectedIndex + 1;
            if (soucePage != targetPage)
            {
                this.pdfDocumentViewer1.GoToPage(targetPage);
            }
        }

        private void comBoxPages_Click(object sender, EventArgs e)
        {

        }

    }
}
Namespace pdfzoom
	Public Partial Class Form1
		Inherits Form
		Public Sub New()
			InitializeComponent()
		End Sub

		'private bool _isZoomout = true;

		Private _zoom As Integer = 100
		Private _isZoomDynamic As Boolean = False

		Private Sub Form1_Load(sender As Object, e As EventArgs)
			Dim pdfDoc As String = "D:\michelle\e-iceblue\Spire.PDFViewer\Demos\Data\PDFViewer.pdf"
			If File.Exists(pdfDoc) Then
				Me.pdfDocumentViewer1.LoadFromFile(pdfDoc)
			End If

			'add zoom values to combox
			Dim intZooms As Integer() = New Int32() {25, 50, 75, 100, 125, 150, _
				200, 300, 400, 500, 600, 700, _
				800, 900, 1000}
			For Each zoom As Integer In intZooms
				Me.comBoxZoom.Items.Add(zoom.ToString())
			Next
			Me.comBoxZoom.SelectedIndex = 3

			'pdfDocumentViewer mouseWheel event

			Me.pdfDocumentViewer1.MouseWheel += New MouseEventHandler(AddressOf Me.pdfDocumentViewer1_MouseWheel)
			Me.pdfDocumentViewer1.LostFocus += New EventHandler(AddressOf Me.pdfDocumentViewer_LostFocus)

		End Sub
		Private Sub pdfDocumentViewer_LostFocus(sender As [Object], args As EventArgs)
			Me._isZoomDynamic = False
			Me._zoom = 100
		End Sub

		Private Sub pdfDocumentViewer1_MouseWheel(sender As [Object], args As MouseEventArgs)
			If Me._isZoomDynamic Then
				Dim wheelValue As Integer = DirectCast(args.Delta, Int32) / 24


				Me._zoom += wheelValue

				If Me._zoom < 0 Then
					Me._zoom = 0
				End If
				Me.pdfDocumentViewer1.ZoomTo(Me._zoom)
			End If

		End Sub

		Private Sub btnOPen_Click(sender As Object, e As EventArgs)
			Dim dialog As New OpenFileDialog()
			dialog.Filter = "PDF document (*.pdf)|*.pdf"

			Dim result As DialogResult = dialog.ShowDialog()
			If result = DialogResult.OK Then
				Try
					Dim pdfFile As String = dialog.FileName

					Me.pdfDocumentViewer1.LoadFromFile(pdfFile)
				Catch exe As Exception
					MessageBox.Show(exe.Message, "Spire.PdfViewer Demo", MessageBoxButtons.OK, MessageBoxIcon.[Error])

				End Try
			End If
		End Sub

		Private Sub comBoxZoom_SelectedIndexChanged(sender As Object, e As EventArgs)
			If Me.pdfDocumentViewer1.PageCount > 0 Then
				Dim zoomValue As Integer = Int32.Parse(Me.comBoxZoom.SelectedItem.ToString())
				Me.pdfDocumentViewer1.ZoomTo(zoomValue)
			End If
		End Sub

		Private Sub btnZoomOut_Click(sender As Object, e As EventArgs)
			If Me.pdfDocumentViewer1.PageCount > 0 Then
				Dim delta As Integer = 10
				Me._zoom += delta
				Me.pdfDocumentViewer1.ZoomTo(Me._zoom)
			End If
		End Sub

		Private Sub btnZoonIn_Click(sender As Object, e As EventArgs)
			If Me.pdfDocumentViewer1.PageCount > 0 Then
				Dim delta As Integer = 5
				Me._zoom -= delta
				If Me._zoom < 0 Then
					Me._zoom = 0
				End If
				Me.pdfDocumentViewer1.ZoomTo(Me._zoom)
			End If
		End Sub

		Private Sub btnActural_Click(sender As Object, e As EventArgs)
			Me._zoom = 100
			Me._isZoomDynamic = False
			Me.btnDynamic.Text = "Zoom Dynamic"
			If Me.pdfDocumentViewer1.PageCount > 0 Then
				Me.pdfDocumentViewer1.ZoomTo(100)
				Me.comBoxZoom.SelectedIndex = 3
			End If
		End Sub

		Private Sub btnFitPage_Click(sender As Object, e As EventArgs)
			If Me.pdfDocumentViewer1.PageCount > 0 Then
				Me.pdfDocumentViewer1.ZoomTo(ZoomMode.FitPage)
			End If
		End Sub

		Private Sub btnFitWidth_Click(sender As Object, e As EventArgs)
			If Me.pdfDocumentViewer1.PageCount > 0 Then
				Me.pdfDocumentViewer1.ZoomTo(ZoomMode.FitWidth)
			End If
		End Sub

		Private Sub btnDynamic_Click(sender As Object, e As EventArgs)
			Me._isZoomDynamic = Not Me._isZoomDynamic
			If Me._isZoomDynamic Then

				Me.btnDynamic.Text = "Cancel dynamic zoom"
				Me.btnDynamic.ToolTipText = "Cancel dynamic zoom"
			Else

				Me.btnDynamic.Text = "Zoom dynamic"
				Me.btnDynamic.ToolTipText = "Zoom dynamic"
			End If

		End Sub

		Private Sub pdfDocumentViewer1_PdfLoaded(sender As Object, args As EventArgs)
			Me.btnDynamic.Enabled = True
			Me.comBoxPages.Items.Clear()
			Dim totalPage As Integer = Me.pdfDocumentViewer1.PageCount

			For i As Integer = 1 To totalPage
				Me.comBoxPages.Items.Add(i.ToString())
			Next

			Me.comBoxPages.SelectedIndex = 0
		End Sub

		Private Sub pdfDocumentViewer1_PageNumberChanged(sender As Object, args As EventArgs)
			If Me.comBoxPages.Items.Count <= 0 Then
				Return
			End If
			If Me.pdfDocumentViewer1.CurrentPageNumber <> Me.comBoxPages.SelectedIndex + 1 Then
				Me.comBoxPages.SelectedIndex = Me.pdfDocumentViewer1.CurrentPageNumber - 1
			End If
		End Sub

		Private Sub comBoxPages_SelectedIndexChanged(sender As Object, e As EventArgs)
			Dim soucePage As Integer = Me.pdfDocumentViewer1.CurrentPageNumber
			Dim targetPage As Integer = Me.comBoxPages.SelectedIndex + 1
			If soucePage <> targetPage Then
				Me.pdfDocumentViewer1.GoToPage(targetPage)
			End If
		End Sub

		Private Sub comBoxPages_Click(sender As Object, e As EventArgs)

		End Sub

	End Class
End Namespace
Note:
- If you click the buttons and they cannot operate the zoom functions, please check the click event of each button.
- When the ComboBox cannot show page number in the dropdown list, please check the SelectedIndexChanged event of it.
Preview:
Form 1

Dynamic Zoom

Fit Width

As above picture, you can easily control the whole PDF document pages by the methods that I introduced by using Spire.PDF Viewer.
Spire.PDFViewer not only enables you to open a PDF document that you load from system in the code, but also allows you to open any other PDF file by clicking the Open button in Form1, and then, choose it from a dialog box. You also can choose which page you want to view or read in the dropdown list. Why not give it a try?
Why Save PDF File via PDF Viewer?
Both PDF and PDF Viewer can save a PDF file. The main difference is that people cannot view that PDF file when save a PDF document by PDF. While using PDF Viewer, you can save any PDF file from your system as well as open and view it in Windows Forms. Furthermore, tasks such as print, zoom, page, export PDF to images all can be realized by PDF Viewer. Thus, save a PDF file via Spire. PDFViewer is rather helpful and useful in people's daily work.
How to Save PDF file via Spire.PDFViewer with C#, VB.NET
Spire. PDFViewer for .NET, as a powerful PDF Viewer component, allows you to finish the whole PDF saving task quickly with the below procedure.
Step 1: Create a new project
- Create a new project in Windows Forms Application.
- Set the target Framework to in Properties of this project to be .NET Framework 2 or above.
Step 2: Add reference and Set up the Form
- Add Spire.PDFViewer Forms dll as reference from Spire.PDFViewer
- Add a toolScript and pdfDocumentViewer in the default Form” Form1”.
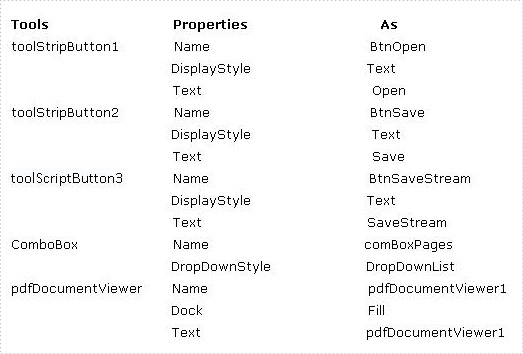
- Add three buttons and a ComboBox in Form1 from toolScript dropdown list by right clicking it.
- Set the properties of three buttons and ComboBox as picture below
Step 3: Save PDF file by PDF Viewer
Add below namespaces at the top of the method.
using System.IO;
using Spire.PdfViewer.Forms;
Imports System.IO
Imports Spire.PdfViewer.Forms
Load a PDF file from system and open it. This step allows you to choose a PDF Document directly from system in a dialog box.
        private void Form1_Load(object sender, EventArgs e)
        {
        }
        private void BtnOpen_Click(object sender, EventArgs e)
        {
            OpenFileDialog dialog = new OpenFileDialog();
            dialog.Filter = "PDF document (*.pdf)|*.pdf";
            DialogResult result = dialog.ShowDialog();
            if (result == DialogResult.OK)
            {
                try
                {
                    string pdfFile = dialog.FileName;
                    this.pdfDocumentViewer1.LoadFromFile(pdfFile);
                }
                catch (Exception exe)
                {
                    MessageBox.Show(exe.Message, "Spire.PdfViewer Demo", MessageBoxButtons.OK, MessageBoxIcon.Error);
                }

            }
        }
	Private Sub Form1_Load(sender As Object, e As EventArgs)
	End Sub
	Private Sub BtnOpen_Click(sender As Object, e As EventArgs)
		Dim dialog As New OpenFileDialog()
		dialog.Filter = "PDF document (*.pdf)|*.pdf"
		Dim result As DialogResult = dialog.ShowDialog()
		If result = DialogResult.OK Then
			Try
				Dim pdfFile As String = dialog.FileName
			Me.pdfDocumentViewer1.LoadFromFile(pdfFile)
			Catch exe As Exception
				MessageBox.Show(exe.Message, "Spire.PdfViewer Demo", MessageBoxButtons.OK, MessageBoxIcon.[Error])

			End Try
		End If
	End Sub
Save the PDF file. This step enables you not only to save the PDF file but also to view the PDF Document page by selecting the page number in ComboBox dropdown list. And the page number will automatically change to the page that you view when you scroll your mouse up and down.
        private void BtnSave_Click(object sender, EventArgs e)
        {
            if (this.pdfDocumentViewer1.PageCount > 0)
            {
                SaveFileDialog dialog = new SaveFileDialog();
                dialog.Filter = "PDF document (*.pdf)|*.pdf";
                DialogResult result = dialog.ShowDialog();
                string fileName = dialog.FileName;
                if (result == DialogResult.OK)
                {
                    pdfDocumentViewer1.SaveToFile(fileName);
                    MessageBox.Show("You have saved this PdfDocuemnt as:\n" + fileName, "Spire.PdfViewer Demo", MessageBoxButtons.OK, MessageBoxIcon.Information);
                }
            }
        }
        private void BtnSaveStream_Click(object sender, EventArgs e)
        {
            if (this.pdfDocumentViewer1.PageCount > 0)
            {
                SaveFileDialog dialog = new SaveFileDialog();
                dialog.Filter = "PDF document (*.pdf)|*.pdf";
                DialogResult result = dialog.ShowDialog();
                string fileName = dialog.FileName;
                if (result == DialogResult.OK)
                {
                    MemoryStream stream = new MemoryStream();
                    pdfDocumentViewer1.SaveToFile(stream);
                    byte[] fileBytes = stream.ToArray();
                    FileStream fileStream = new FileStream(fileName, FileMode.Create, FileAccess.ReadWrite);
                    fileStream.Write(fileBytes, 0, fileBytes.Length);
                    fileStream.Flush();
                    fileStream.Close();
                    stream.Close();
                    MessageBox.Show("You have first saved this PDF docuemnt as memory stream,\nthen write the memory stream in a file :\n" + fileName, "Spire.PdfViewer Demo", MessageBoxButtons.OK, MessageBoxIcon.Information);
                }
            }
        }
        private void pdfDocumentViewer1_PdfLoaded(object sender, EventArgs args)
        {
            this.comBoxPages.Items.Clear();
            int totalPage = this.pdfDocumentViewer1.PageCount;
            for (int i = 1; i <= totalPage; i++)
            {
                this.comBoxPages.Items.Add(i.ToString());
            }
            this.comBoxPages.SelectedIndex = 0;
        }
        private void pdfDocumentViewer1_PageNumberChanged(object sender, EventArgs args)
        {
            if (this.comBoxPages.Items.Count <= 0)
                return;
            if (this.pdfDocumentViewer1.CurrentPageNumber != this.comBoxPages.SelectedIndex + 1)
            {
                this.comBoxPages.SelectedIndex = this.pdfDocumentViewer1.CurrentPageNumber - 1;
            }
        }
        private void comBoxPages_SelectedIndexChanged(object sender, EventArgs e)
        {
            int soucePage = this.pdfDocumentViewer1.CurrentPageNumber;
            int targetPage = this.comBoxPages.SelectedIndex + 1;
            if (soucePage != targetPage)
            {
                this.pdfDocumentViewer1.GoToPage(targetPage);
            }
        }
	Private Sub BtnSave_Click(sender As Object, e As EventArgs)
		If Me.pdfDocumentViewer1.PageCount > 0 Then
			Dim dialog As New SaveFileDialog()
			dialog.Filter = "PDF document (*.pdf)|*.pdf"
			Dim result As DialogResult = dialog.ShowDialog()
			Dim fileName As String = dialog.FileName
			If result = DialogResult.OK Then
				pdfDocumentViewer1.SaveToFile(fileName)
				MessageBox.Show("You have saved this PdfDocuemnt as:" & vbLf & fileName, "Spire.PdfViewer Demo", MessageBoxButtons.OK, MessageBoxIcon.Information)
			End If
		End If
	End Sub

	Private Sub BtnSaveStream_Click(sender As Object, e As EventArgs)
		If Me.pdfDocumentViewer1.PageCount > 0 Then
			Dim dialog As New SaveFileDialog()
			dialog.Filter = "PDF document (*.pdf)|*.pdf"
			Dim result As DialogResult = dialog.ShowDialog()
			Dim fileName As String = dialog.FileName
			If result = DialogResult.OK Then

				Dim stream As New MemoryStream()
				pdfDocumentViewer1.SaveToFile(stream)
				Dim fileBytes As Byte() = stream.ToArray()
				Dim fileStream As New FileStream(fileName, FileMode.Create, FileAccess.ReadWrite)
				fileStream.Write(fileBytes, 0, fileBytes.Length)
				fileStream.Flush()
				fileStream.Close()
				stream.Close()

				MessageBox.Show("You have first saved this PDF docuemnt as memory stream," & vbLf & "then write the memory stream in a file :" & vbLf & fileName, "Spire.PdfViewer Demo", MessageBoxButtons.OK, MessageBoxIcon.Information)
			End If
		End If
	End Sub

	Private Sub pdfDocumentViewer1_PdfLoaded(sender As Object, args As EventArgs)
		Me.comBoxPages.Items.Clear()
		Dim totalPage As Integer = Me.pdfDocumentViewer1.PageCount
		For i As Integer = 1 To totalPage
			Me.comBoxPages.Items.Add(i.ToString())
		Next

		Me.comBoxPages.SelectedIndex = 0
	End Sub
	Private Sub pdfDocumentViewer1_PageNumberChanged(sender As Object, args As EventArgs)
		If Me.comBoxPages.Items.Count <= 0 Then
			Return
		End If
		If Me.pdfDocumentViewer1.CurrentPageNumber <> Me.comBoxPages.SelectedIndex + 1 Then
			Me.comBoxPages.SelectedIndex = Me.pdfDocumentViewer1.CurrentPageNumber - 1
		End If
	End Sub
	Private Sub comBoxPages_SelectedIndexChanged(sender As Object, e As EventArgs)
	        Dim soucePage As Integer = Me.pdfDocumentViewer1.CurrentPageNumber
	        Dim targetPage As Integer = Me.comBoxPages.SelectedIndex + 1
	        If soucePage <> targetPage Then
			Me.pdfDocumentViewer1.GoToPage(targetPage)
	        End If
	End Sub
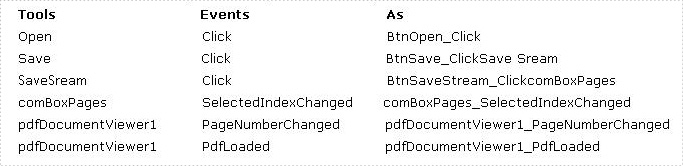
Check the Events of your buttons, comBoBox and pdfDocumentViewer.
Step 4: Debug the project
After debugging, you can preview the effect.
Besides, if you need to perform other tasks such as export PDF pages to images of different popular formats, read encrypted PDF files, display PDF pages in various ways and so on, you still can realize them by using Spire.PDFViewer.
The sample demonstrates how to get started with Spire.PDFViewer for WPF.
The sample demonstrates how to get started with Spire.PDF for WPF.

This article is designed to give you a detailed description about how to write a "HelloWorld" demo of Spire.XLS for WPF by Visual Studio. You can follow the below procedure step by step to finish this task. But first of all, please make sure that Spire.XLS for WPF and Visual Studio 2010 are correctly installed on system.
Step 1. Create a new project.
1. Create a new project by choosing WPF Application in Visual Studio and name the project "HelloWorld". If you want to create a C# project, select Visual C#, WPF Application, if you want to build a Visual Basic project, please choose Visual Basic, WPF Application. The detail process is:
Click File → New → Project → WPF Application → Name → OK
2. Set the Target framework property of the HelloWorld project in Solution Explorer to be .NET Framework 4.The process is:
Click Solution Explorer-> HelloWorld (The project that you already built) -> Properties (right click HelloWorld)->Target framework->.NET Framework 4
3. Add a button in MainWindow. The default button name is "button1". You can set button1 Content property to be "Run" in its properties by right clicking it. Thus, it shows "Run" in the MainWindow. You can perform as below:
Click View → Toolbox → Button → Properties (right click button1) → Content → set the Content to be "Run"
Step 2. Add reference and project namespaces.
1. Add Spire.XLS. Wpf.dll as reference in Project. The Default location of Spire.Doc for WPF is “C:\Program Files\e-iceblue\Spire.XLS for WPF”. Details are:
Click Project → Add Reference → Browse → Choose the folder contains Spire.XLS for WPF → Bin → WPF 4.0 → Spire.XLS.Wpf.dll
2. Double click the "Run" button, you can see the following method has been added automatically:
namespace HelloWorld
{
    ///
    /// Interaction logic for MainWindow.xaml
    ///
    public partial class MainWindow : Window
    {
        public MainWindow()
        {
            InitializeComponent();
        }

        private void button1_Click(object sender, RoutedEventArgs e)
        {
        }
    }
}
Namespace HelloWorld
	'''
	''' Interaction logic for MainWindow.xaml
	'''
	Public Partial Class MainWindow
		Inherits Window
		Public Sub New()
			InitializeComponent()
		End Sub

		Private Sub button1_Click(sender As Object, e As RoutedEventArgs)
                           End Sub
	 End Class
End Namespace
3. Add the below namespaces at the top of the method.
using Spire.Xls;
Imports Spire.Xls
Step 3. Write "Hello, World!" in the method.
Add the following code to the method button1_click
           //create a new excel workbook
            Workbook workbook = new Workbook();

            //edit the first worksheet of the workbook
            Worksheet sheet = workbook.Worksheets[0];
            sheet.Range["A1"].Text = "Hello, World!";

            //save the workbook
            workbook.SaveToFile(@"..\..\sample.xls", ExcelVersion.Version97to2003);

            //launch the workbook
            System.Diagnostics.Process.Start(@"..\..\sample.xls");
	  'create a new excel workbook
	   Dim workbook As New Workbook()

	  'edit the first worksheet of the workbook
	   Dim sheet As Worksheet = workbook.Worksheets(0)
	   sheet.Range("A1").Text = "Hello, World!"

	   'save the workbook
	    workbook.SaveToFile("..\..\sample.xls", ExcelVersion.Version97to2003)

	   'launch the workbook
	    System.Diagnostics.Process.Start("..\..\sample.xls")
Step 4. Debug the project
Right click the project HelloWorld in Solution Explorer → Debug → Start new instance → Click Run in MainWindow, an Excel Document will be created, edited and opened. The string "Hello, World!" is drawn in the first cell A1 of sheet 1.
Preview

This document aims at clearly introducing a simple “HelloWorld” demo about Spire.Doc for WPF by using Visual Studio. The below procedure will help you realize this task step by step. Before getting started, please make sure that Spire.Doc for WPF and Visual Studio are correctly installed on system.
Step 1. Create a new project.
1. Create a new project by choosing WPF Application in Visual Studio and name the project "HelloWorld". If you want to create a C# project, select Visual C#, WPF Application, if you want to build a Visual Basic project, please choose Visual Basic, WPF Application. The detail process is:
Click File → New → Project → WPF Application → Name → OK
2. Set the Target framework property of the HelloWorld project in Solution Explorer to be .NET Framework 4.The process is:
Click Solution Explorer → HelloWorld (The project that you already built) → Properties(right click HelloWorld) → Target framework → .NET Framework 4
3. Add a button in MainWindow. The default button name is "button1". You can set button1 Content property to be "Run" in its properties by right clicking it. Thus, it shows "Run" in the MainWindow. You can perform as below:
Click View → Toolbox → Button → Properties (right click button1) → Content → set the Content to be "Run"
Step 2. Add reference and project namespaces.
1. Add Spire.Doc. Wpf.dll as reference in Project. The Default location of Spire.Doc for WPF is “C:\Program Files\e-iceblue\Spire.Doc for WPF”. Details are:
Click Project → Add Reference → Browse → Choose the folder contains Spire.Doc for WPF → Bin → WPF 4.0 → Spire.Doc.Wpf.dll
2. Double click the "Run" button, you can see the following method has been added automatically:
namespace HelloWorld
{
    ///
    /// Interaction logic for MainWindow.xaml
    ///
    public partial class MainWindow : Window
    {
        public MainWindow()
        {
            InitializeComponent();
        }

private void button1_Click(object sender, RoutedEventArgs e)
        {
        }
    }
}
Namespace HelloWorld
	'''
	''' Interaction logic for MainWindow.xaml
	'''
	Public Partial Class MainWindow
		Inherits Window
		Public Sub New()
			InitializeComponent()
		End Sub

		Private Sub button1_Click(sender As Object, e As RoutedEventArgs)
                End Sub
	End Class
End Namespace
3. Add the below namespaces at the top of the method.
using Spire.Doc;
using Spire.Doc.Documents;
Imports Spire.Doc
Imports Spire.Doc.Documents
Step 3. Write "Hello, World!” in the method.
Add the following code to the method button1_click
            //create a new document using spire.Doc
            Document document = new Document();

            //add one paragraph
            Paragraph paragraph = document.AddSection().AddParagraph();
            paragraph.AppendText("Hello, World!");

            //save the document
            document.SaveToFile(@"..\..\sample.doc", FileFormat.Doc);

            //launch the document
            System.Diagnostics.Process.Start(@"..\..\sample.doc");
	  'create a new document using spire.Doc
	   Dim document As New Document()

	  'add one paragraph
	   Dim paragraph As Paragraph = document.AddSection().AddParagraph()
	   paragraph.AppendText("Hello, World!")

	  'save the document
	   document.SaveToFile("..\..\sample.doc", FileFormat.Doc)

	   'launch the document
	   System.Diagnostics.Process.Start("..\..\sample.doc")
Step 4. Debug the project
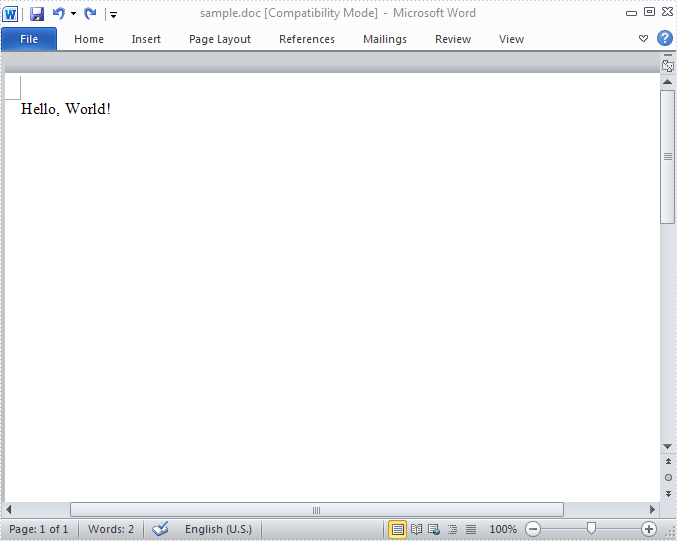
Right click the project HelloWorld in Solution Explorer → Debug-> Start new instance → Click Run in MainWindow, a Word Document will be created, edited and opened. The string “Hello, World!” is drawn in the first line of page1.
Preview

Adding watermarks to PDF documents is a common requirement for protecting sensitive information, indicating document status, or branding files. Watermarks can enhance the security of your documents by discouraging unauthorized copying or distribution. In this article, we'll explore how to add text watermarks to PDFs in C# using Spire.PDF for .NET, a powerful library designed for PDF manipulation.
- Getting Started with Spire.PDF for .NET
- Understanding the Coordinate System
- Step-by-Step Guide: Adding a Text Watermark to PDF in C#
- Conclusion
- FAQs
Getting Started with Spire.PDF for .NET
Spire.PDF for .NET is a robust API that allows developers to create, edit, and manipulate PDF documents programmatically. It supports a wide range of features, including:
- PDF generation and conversion
- Text and image extraction
- Digital signatures
- Watermarking
Before proceeding, ensure you have installed the Spire.PDF NuGet package. You can install it via the NuGet Package Manager in Visual Studio:
Install-Package Spire.PDF
Alternatively, download it from our official website and reference the DLL file mannually.
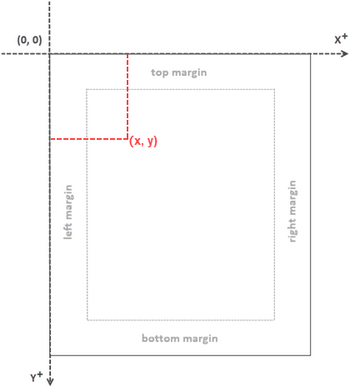
Understanding the Coordinate System
Before writing code, it's crucial to understand how PDFs handle coordinates. In Spire.PDF:
- The origin (0, 0) is at the top-left corner of the page.
- The X-axis increases from left to right.
- The Y-axis increases from top to bottom.
- Measurements are in points (72 points = 1inch).
This coordinate system is essential when positioning watermarks, text, or images on a PDF page.
Step-by-Step Guide: Adding a Text Watermark to PDF in C#
Let’s break down the process of adding a watermark to a PDF document using Spire.PDF.
Step 1: Import Namespaces
First, include the necessary namespaces. These namespaces provide the essential classes needed for PDF manipulation and graphics rendering, enabling you to work with PDF files in your C# application.
using Spire.Pdf;
using Spire.Pdf.Graphics;
using System.Drawing;
Step 2: Load the PDF Document
This step involves initializing a new PdfDocument object and loading the PDF file you want to modify, making it ready for further operations.
PdfDocument doc = new PdfDocument();
doc.LoadFromFile("C:\\Users\\Administrator\\Desktop\\Input.pdf");
Step 3: Customize a Function to Add Watermaks
Define a helper function to apply a watermark to a single page. This function is designed to position and draw the watermark text on the page, ensuring it is centered and visually appealing, while also applying transparency for a subtle effect.
private static void AddWatermark(PdfPageBase page, string watermarkText, PdfTrueTypeFont font, PdfBrush brush, float opacity)
{
    page.Canvas.SetTransparency(opacity);
    SizeF textSize = font.MeasureString(watermarkText);
    float pageWidth = page.ActualSize.Width;
    float pageHeight = page.ActualSize.Height;
    float x = (pageWidth - textSize.Width) / 2;
    float y = (pageHeight - textSize.Height) / 2;
    page.Canvas.DrawString(watermarkText, font, brush, x, y);
}
Step 4: Apply the Watermark to All Pages
In this step, you set up the font, color, and opacity for the watermark. The loop iterates through each page in the document, applying the watermark consistently across all pages.
PdfTrueTypeFont font = new PdfTrueTypeFont(new Font("Arial Black", 50f), true);
PdfBrush brush = PdfBrushes.Blue;
string watermarkText = "DO NOT COPY";
float opacify = 0.6f;
foreach (PdfPageBase page in doc.Pages)
{
    AddWatermark(page, watermarkText, font, brush, opacify);
}
Step 5: Save the Modifyed PDF
Finally, save the document under a new filename, ensuring that your watermark is preserved in the final output.
doc.SaveToFile("Watermark.pdf");
Result:
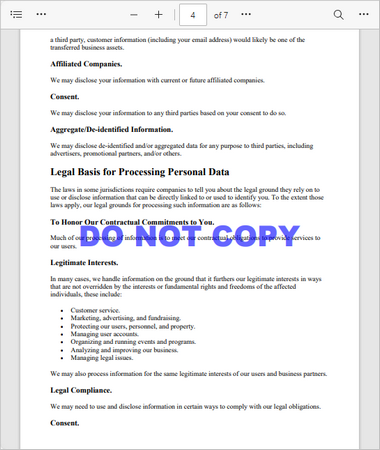
Conclusion
Adding watermarks to PDFs in C# is straightforward with Spire.PDF for .NET . By understanding the coordinate system and using the library’s drawing capabilities, you can customize watermarks with different fonts, colors, and transparency levels. This method is useful for document security, branding, or marking drafts.
FAQs:
Q1. How do I rotate the watermark?
To add a diagonal watermark to a PDF in C#, you can rotate the coordinate system before drawing the text. Here is the code for your reference:
page.Canvas.RotateTransform(-45);
page.Canvas.DrawString(watermarkText, font, brush, x, y);
Q2. How can I adjust the watermark position?
Change the x and y values in DrawString() to reposition the watermark.
Q3. Can I add an image watermark instead of text?
Yes, you can add an image watermark instead of text. Use PdfPage.Canvas.DrawImage() for rendering the image directly on the page. Alternatively, set a background image for each page using the PdfPageBase.BackgroundImage property.
Q4: How do I add handwritten text to a PDF?
You can create an image of your handwritten text, and then draw it on each page as an image watermark.
Get a Free License
To fully experience the capabilities of Spire.PDF for .NET without any evaluation limitations, you can request a free 30-day trial license.
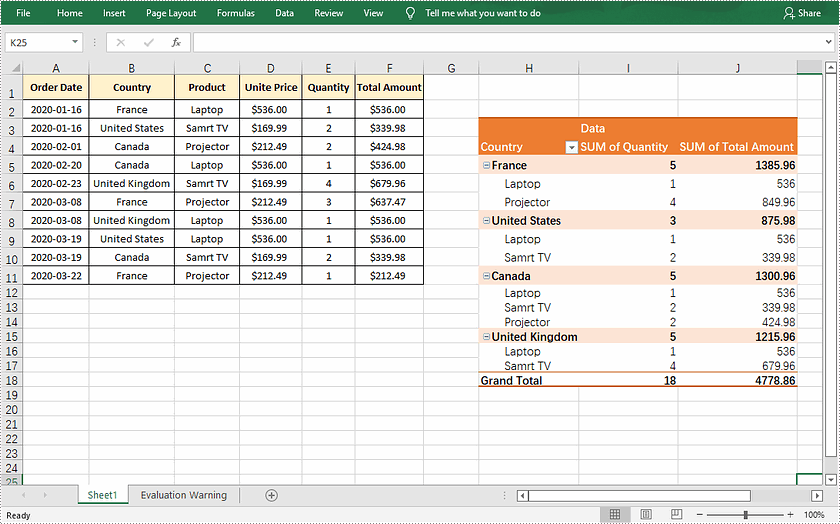
Pivot table is a kind of interactive table that is capable of quickly calculating, summarizing and analyzing large amounts of data. As one of the most powerful tools in Excel, it enables users to view static data from different perspectives, and also makes the comparisons between data more intuitive. In this article, you will learn how to programmatically create a pivot table in Excel using Spire.XLS for .NET.
Install Spire.XLS for .NET
To begin with, you need to add the DLL files included in the Spire.XLS for .NET package as references in your .NET project. The DLL files can be either downloaded from this link or installed via NuGet.
PM> Install-Package Spire.XLS
Create a Pivot Table in Excel
The detailed steps are as follows.
- Create a Workbook object.
- Load a sample Excel document using Workbook.LoadFromFile() method.
- Get a specified worksheet using Workbook.Worksheets[] property.
- Select the data source range using Worksheet.Range[] property, and then create a PivotCache to save the data information using Workbook.PivotCaches.Add (CellRange) method.
- Add a pivot table to the specified worksheet and set the location and cache of it using Worksheet.PivotTables.Add(String, CellRange, PivotCache) method.
- Define row labels of the pivot table and then add fields to the data area to calculate data using PivotTable.DataFields.Add(IPivotField, String, SubtotalTypes) method.
- Set the pivot table style using PivotTable.BuiltInStyle property.
- Save the result document using Workbook.SaveToFile() method.
- C#
- VB.NET
using Spire.Xls;

namespace createPivotTable
{
    class Program
    {
        static void Main(string[] args)
        {
            //Create a Workbook object
            Workbook workbook = new Workbook();

            //Load a sample Excel document
            workbook.LoadFromFile(@"E:\Files\sample.xlsx");

            //Get the first worksheet
            Worksheet sheet = workbook.Worksheets[0];

            //Select the data source range
            CellRange dataRange = sheet.Range["B1:F11"];
            PivotCache cache = workbook.PivotCaches.Add(dataRange);

            //Add a PivotTable to the worksheet and set the location and cache of it
            PivotTable pt = sheet.PivotTables.Add("Pivot Table", sheet.Range["H3"], cache);

            //Define row labels
            PivotField r1 = pt.PivotFields["Country"] as PivotField;
            r1.Axis = AxisTypes.Row;
            pt.Options.RowHeaderCaption = "Country";

            PivotField r2 = pt.PivotFields["Product"] as PivotField;
            r2.Axis = AxisTypes.Row;

            //Add data fields to calculate data
            pt.DataFields.Add(pt.PivotFields["Quantity"], "SUM of Quantity", SubtotalTypes.Sum);
            pt.DataFields.Add(pt.PivotFields["Total Amount"], "SUM of Total Amount", SubtotalTypes.Sum);

            //Set pivot table style
            pt.BuiltInStyle = PivotBuiltInStyles.PivotStyleMedium10;

            //Save the document
            workbook.SaveToFile("CreatePivotTable.xlsx", ExcelVersion.Version2010);

        }
    }
}
Apply for a Temporary License
If you'd like to remove the evaluation message from the generated documents, or to get rid of the function limitations, please request a 30-day trial license for yourself.
