
.NET (1327)
Children categories
Circles can be defined as the curves traced out by points that move so that its distance from a given point is constant. They are also look as special ellipses in which the two foci are coincident and the eccentricity is “0”. Whatever they are, they are indispensable in PDF document. This section will introduce a solution to draw circles and set their size and position in PDF file via a .NET PDF component Spire.PDF for .NET in C#, VB.NET.
When we draw circles in PDF, we only need to call one method in Spire.PDF: Spire.Pdf.PdfPageBase.Canvas.DrawPie(PdfPen pen, float x, float y, float width, float height, float startAngle, float sweepAngle); Here there are seven parameters in this method. The first one is the class Spire.Pdf.Graphics.PdfPen which can define the color and the outline of the circle. If we change this parameter to be another class Spire.Pdf.Graphics.PdfBrush, we can easily fill the circle with a certain color. The second and third parameters determine the exact distance between the PDF margin and the circle. "float x" decides the distance of left margin with circle, while "float y" means the distance between the top margin with the circle. By setting the fourth and fifth parameters, we can decide the circle width and height. The last two parameters are the start angle and sweep angle when drawing circles. Now please view the circles in PDF as below picture:
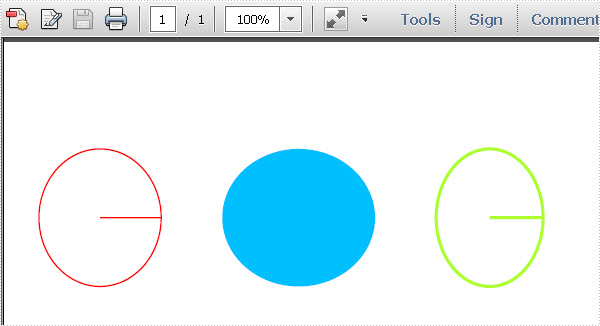
Here we can quickly download Spire.PDF for .NET . After adding Spire.Pdf dll in the download Bin folder, we can draw circles in PDF file via Spire.PDF by below code.
using System.Drawing;
using Spire.Pdf;
using Spire.Pdf.Graphics;

namespace pdf_circles
{
    class Program
    {
        static void Main(string[] args)
        {
            //Create a pdf document.
            PdfDocument doc = new PdfDocument();
            // Create one page
            PdfPageBase page = doc.Pages.Add();
            //save graphics state
            PdfGraphicsState state = page.Canvas.Save();
            PdfPen pen = new PdfPen(Color.Red, 1f);
            PdfPen pen1 = new PdfPen(Color.GreenYellow, 2f);
            PdfBrush brush = new PdfSolidBrush(Color.DeepSkyBlue);
            page.Canvas.DrawPie(pen, 30, 30, 80, 90, 360, 360);
            page.Canvas.DrawPie(brush, 150, 30, 100, 90, 360, 360);
            page.Canvas.DrawPie(pen1,290, 30, 70, 90, 360, 360);
            //restor graphics
            page.Canvas.Restore(state);
            doc.SaveToFile("Circles.pdf");
            System.Diagnostics.Process.Start("Circles.pdf");
        }
    }
}
Imports System.Drawing
Imports Spire.Pdf
Imports Spire.Pdf.Graphics

Namespace pdf_circles
	Class Program
		Private Shared Sub Main(args As String())
			'Create a pdf document.
			Dim doc As New PdfDocument()
			' Create one page
			Dim page As PdfPageBase = doc.Pages.Add()
			'save graphics state
			Dim state As PdfGraphicsState = page.Canvas.Save()
			Dim pen As New PdfPen(Color.Red, 1F)
			Dim pen1 As New PdfPen(Color.GreenYellow, 2F)
			Dim brush As PdfBrush = New PdfSolidBrush(Color.DeepSkyBlue)
			page.Canvas.DrawPie(pen, 30, 30, 80, 90, 360, _
				360)
			page.Canvas.DrawPie(brush, 150, 30, 100, 90, 360, _
				360)
			page.Canvas.DrawPie(pen1, 290, 30, 70, 90, 360, _
				360)
			'restor graphics
			page.Canvas.Restore(state)
			doc.SaveToFile("Circles.pdf")
			System.Diagnostics.Process.Start("Circles.pdf")
		End Sub
	End Class
End Namespace
Spire.PDF for .NET is a PDF component that enables users to draw different kinds of shapes in PDF document in C#, VB.NET.
In Euclidean plane geometry, a rectangle is any quadrilateral with four right angles. The term "oblong" is occasionally used to refer to a non-square rectangle. A rectangle with vertices ABCD would be denoted as ABCD. It’s simple for people to draw rectangles in paper. While how about drawing rectangles in PDF document? This section will show you the exact answer. This section will introduce a solution to draw rectangles and set the size and position of rectangles in PDF via a .NET PDF component Spire.PDF for .NET with C#, VB.NET.
In Spire.PDF, there are two classes: Spire.Pdf.Graphics.PdfPen and Spire.Pdf.Granphics.PdfBrush. By using the first class, we can set the color and decide the outline of the PDF rectangle. While the second class can quickly help us fill the rectangles with a color we want. Now let us see this method: Spire.Pdf.PdfPageBase.Canvas.DrawRectangle(PdfPen pen, RectangleF rectangle); There are two parameters passed. One is the PdfPen which I referred above. The other represents the location and size of a rectangle. By calling this method, we can draw rectangles and set their size and position very quickly. Now let us view the rectangles as below picture:
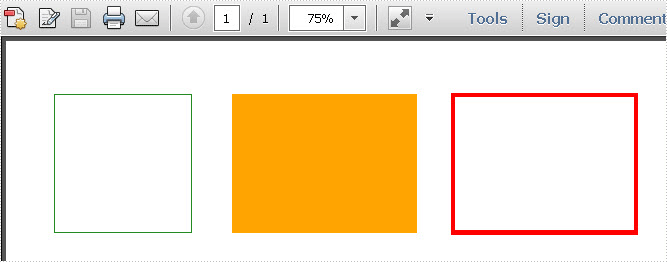
Here we can download Spire.PDF for .NET and install it on system. After adding Spire.Pdf dll, we can draw rectangle in our PDF document as below code:
using System.Drawing;
using Spire.Pdf;
using Spire.Pdf.Graphics;

namespace PDF_rectangles
{
    class Program
    {
        static void Main(string[] args)
        {
            //create a PDF
            PdfDocument pdfDoc = new PdfDocument();
            PdfPageBase page = pdfDoc.Pages.Add();
            //save graphics state
            PdfGraphicsState state = page.Canvas.Save();
            //draw rectangles
            PdfPen pen = new PdfPen(Color.ForestGreen, 0.1f);
            PdfPen pen1 = new PdfPen(Color.Red, 3f);
            PdfBrush brush = new PdfSolidBrush(Color.Orange);
            page.Canvas.DrawRectangle(pen, new Rectangle(new Point(2, 7), new Size(120, 120)));
            page.Canvas.DrawRectangle(pen1, new Rectangle(new Point(350, 7), new Size(160, 120)));
            page.Canvas.DrawRectangle(brush, new RectangleF(new Point(158, 7), new SizeF(160, 120)));
            //restor graphics
            page.Canvas.Restore(state);
            pdfDoc.SaveToFile("Rectangles.pdf");
            System.Diagnostics.Process.Start("Rectangles.pdf");
        }
    }
}
Imports System.Drawing
Imports Spire.Pdf
Imports Spire.Pdf.Graphics

Namespace PDF_rectangles
	Class Program
		Private Shared Sub Main(args As String())
			'create a PDF
			Dim pdfDoc As New PdfDocument()
			Dim page As PdfPageBase = pdfDoc.Pages.Add()
			'save graphics state
			Dim state As PdfGraphicsState = page.Canvas.Save()
			'draw rectangles
			Dim pen As New PdfPen(Color.ForestGreen, 0.1F)
			Dim pen1 As New PdfPen(Color.Red, 3F)
			Dim brush As PdfBrush = New PdfSolidBrush(Color.Orange)
			page.Canvas.DrawRectangle(pen, New Rectangle(New Point(2, 7), New Size(120, 120)))
			page.Canvas.DrawRectangle(pen1, New Rectangle(New Point(350, 7), New Size(160, 120)))
			page.Canvas.DrawRectangle(brush, New RectangleF(New Point(158, 7), New SizeF(160, 120)))
			'restor graphics
			page.Canvas.Restore(state)
			pdfDoc.SaveToFile("Rectangles.pdf")
			System.Diagnostics.Process.Start("Rectangles.pdf")
		End Sub
	End Class
End Namespace
Spire.PDF for .NET is a .NET PDF component that can draw different kinds of shapes in PDF document such as Circles, Arcs. Ellipse and Five-pointed Star.
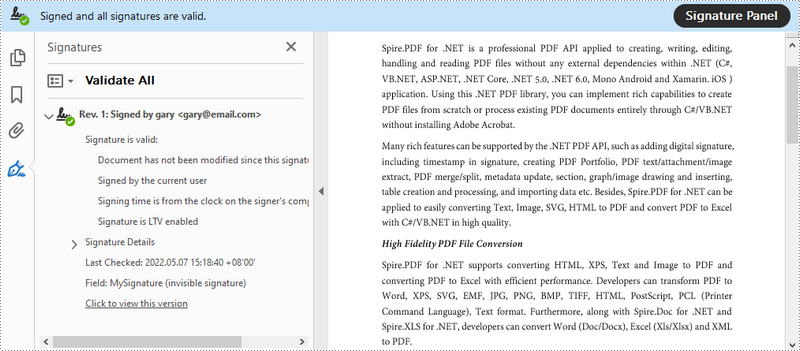
As PDF documents become increasingly popular in business, ensuring their authenticity has become a key concern. Signing PDFs with a certificate-based signature can protect the content and also let others know who signed or approved the document. In this article, you will learn how to digitally sign PDF with an invisible or a visible signature, and how to remove digital signatures from PDF by using Spire.PDF for .NET.
- Add an Invisible Digital Signature to PDF
- Add a Visible Digital Signature to PDF
- Remove Digital Signatures from PDF
Install Spire.PDF for .NET
To begin with, you need to add the DLL files included in the Spire.PDF for.NET package as references in your .NET project. The DLLs files can be either downloaded from this link or installed via NuGet.
PM> Install-Package Spire.PDF
Add an Invisible Digital Signature to PDF
The following are the steps to add an invisible digital signature to PDF using Spire.PDF for .NET.
- Create a PdfDocument object.
- Load a sample PDF file using PdfDocument.LoadFromFile() method.
- Load a pfx certificate file while initializing the PdfCertificate object.
- Create a PdfSignature object based on the certificate.
- Set the document permissions through the PdfSignature object.
- Save the document to another PDF file using PdfDocument.SaveToFile() method.
- C#
- VB.NET
using Spire.Pdf;
using Spire.Pdf.Security;

namespace AddInvisibleSignature
{
    class Program
    {
        static void Main(string[] args)
        {
            //Create a PdfDocument object
            PdfDocument doc = new PdfDocument();

            //Load a sample PDF file
            doc.LoadFromFile("C:\\Users\\Administrator\\Desktop\\sample.pdf");

            //Load the certificate
            PdfCertificate cert = new PdfCertificate("C:\\Users\\Administrator\\Desktop\\MyCertificate.pfx", "e-iceblue");

            //Create a PdfSignature object
            PdfSignature signature = new PdfSignature(doc, doc.Pages[doc.Pages.Count - 1], cert, "MySignature");

            //Set the document permission to forbid changes but allow form fill
             signature.DocumentPermissions = PdfCertificationFlags.ForbidChanges Or PdfCertificationFlags.AllowFormFill

            //Save to another PDF file
            doc.SaveToFile("InvisibleSignature.pdf");
            doc.Close();
        }
    }
}
Add a Visible Digital Signature to PDF
The following are the steps to add a visible digital signature to PDF using Spire.PDF for .NET.
- Create a PdfDocument object.
- Load a sample PDF file using PdfDocument.LoadFromFile() method.
- Load a pfx certificate file while initializing the PdfCertificate object.
- Create a PdfSignature object and specify its position and size on the document.
- Set the signature details including date, name, location, reason, handwritten signature image, and document permissions.
- Save the document to another PDF file using PdfDocument.SaveToFile() method.
- C#
- VB.NET
using System;
using System.Drawing;
using Spire.Pdf;
using Spire.Pdf.Security;
using Spire.Pdf.Graphics;

namespace AddVisibleSignature
{
    class Program
    {
        static void Main(string[] args)
        {
            //Create a PdfDocument object
            PdfDocument doc = new PdfDocument();

            //Load a sample PDF file
            doc.LoadFromFile("C:\\Users\\Administrator\\Desktop\\sample.pdf");

            //Load the certificate
            PdfCertificate cert = new PdfCertificate("C:\\Users\\Administrator\\Desktop\\MyCertificate.pfx", "e-iceblue");

            //Create a PdfSignature object and specify its position and size
            PdfSignature signature = new PdfSignature(doc, doc.Pages[doc.Pages.Count - 1], cert, "MySignature");
            RectangleF rectangleF = new RectangleF(doc.Pages[0].ActualSize.Width - 260 - 54, 200, 260, 110);
            signature.Bounds = rectangleF;
            signature.Certificated = true;

            //Set the graphics mode to ImageAndSignDetail
            signature.GraphicsMode = GraphicMode.SignImageAndSignDetail;

            //Set the signature content
            signature.NameLabel = "Signer:";
            signature.Name = "Gary";
            signature.ContactInfoLabel = "Phone:";
            signature.ContactInfo = "0123456";
            signature.DateLabel = "Date:";
            signature.Date = DateTime.Now;
            signature.LocationInfoLabel = "Location:";
            signature.LocationInfo = "USA";
            signature.ReasonLabel = "Reason:";
            signature.Reason = "I am the author";
            signature.DistinguishedNameLabel = "DN:";
            signature.DistinguishedName = signature.Certificate.IssuerName.Name;

            //Set the signature image source
            signature.SignImageSource = PdfImage.FromFile("C:\\Users\\Administrator\\Desktop\\handwrittingSignature.png");

            //Set the signature font
            signature.SignDetailsFont = new PdfTrueTypeFont(new Font("Arial Unicode MS", 12f, FontStyle.Regular));

            //Set the document permission to forbid changes but allow form fill
            signature.DocumentPermissions = PdfCertificationFlags.ForbidChanges | PdfCertificationFlags.AllowFormFill;

            //Save to file
            doc.SaveToFile("VisiableSignature.pdf");
            doc.Close();
        }
    }
}

Remove Digital Signatures from PDF
The following are the steps to remove digital signatures from PDF using Spire.PDF for .NET.
- Create a PdfDocument object.
- Get form widgets from the document through PdfDocument.Form property.
- Loop through the widgets and determine if a specific widget is a PdfSignatureFieldWidget.
- Remove the signature widget using PdfFieldCollection.RemoveAt() method.
- Save the document to another PDF file using PdfDocument.SaveToFile() method.
- C#
- VB.NET
using Spire.Pdf;
using Spire.Pdf.Widget;

namespace RemoveSignature
{
    class Program
    {
        static void Main(string[] args)
        {
            //Create a PdfDocument object
            PdfDocument doc = new PdfDocument("C:\\Users\\Administrator\\Desktop\\VisiableSignature.pdf");

            //Get form widgets from the document
            PdfFormWidget widgets = doc.Form as PdfFormWidget;

            //Loop through the widgets
            for (int i = 0; i < widgets.FieldsWidget.List.Count; i++)
            {
                //Get the specific widget
                PdfFieldWidget widget = widgets.FieldsWidget.List[i] as PdfFieldWidget;

                //Determine if the widget is a PdfSignatureFieldWidget
                if (widget is PdfSignatureFieldWidget)
                {
                    //Remove the widget
                    widgets.FieldsWidget.RemoveAt(i);
                }
            }

            //Save the document to another PDF file
            doc.SaveToFile("RemoveSignatures.pdf");
        }
    }
}
Apply for a Temporary License
If you'd like to remove the evaluation message from the generated documents, or to get rid of the function limitations, please request a 30-day trial license for yourself.
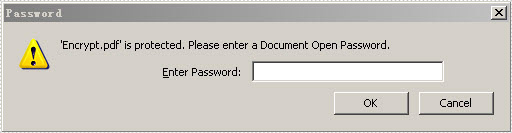
Encrypting PDF is a way people commonly used to protect PDF. Whether for a company or for individual, using PDF encryption to place some certain restrictions is indispensable. In order to make the PDF document available to read but unable to modify by unauthorized users, two passwords are required for an encrypted PDF document: owner password and user password. This section will particularly introduce a simple solution to quickly encrypt PDF with C#, VB.NET via Spire.PDF for .NET.
Spire.PDF for .NET as a .NET PDF component, can encrypt your PDF by owner and user password. Owner password is provided to fully access to PDF file such as reset password and restrictions. While user password allows users to open the document as well as subject to the restrictions placed by owner.
In the encryption solution, an object of the PDFSecurity class which is included in the namespace Spire.PDFDocument.Security is used to set the owner and user password. Please feel free to download Spire.PDF for .NET and load your PDF file and then protect it.
Protect PDF by setting password and specify document restrictions.
Step 1: Set PDF key size by the enum."Spire.Pdf.Security.PdfEncryptionKeySize".Three kinds of key size are available here: Key128Bit, Key256Bit and Key40Bit, you can use any one among the three.
doc.Security.KeySize = PdfEncryptionKeySize.Key256Bit;
doc.Security.KeySize = PdfEncryptionKeySize.Key256Bit
Step 2: Encrypt PDF file by setting owner and user password. The password size you set should not be over the key size.
doc.Security.OwnerPassword = "e-iceblue";
doc.Security.UserPassword = "pdfcomponent";
doc.Security.OwnerPassword = "e-iceblue"
doc.Security.UserPassword = "pdfcomponent"
Step 3: Specify access restrictions of user password. There are nine permissions are available in the solution. You can see them as below picture.
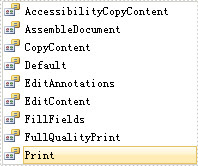
doc.Security.Permissions = PdfPermissionsFlags.Print | PdfPermissionsFlags.CopyContent;
doc.Security.Permissions = PdfPermissionsFlags.Print Or PdfPermissionsFlags. CopyContent
After running your project, you will be requested a password when you open this encrypted PDF file. Please look at the effective screenshot below:
Introduction
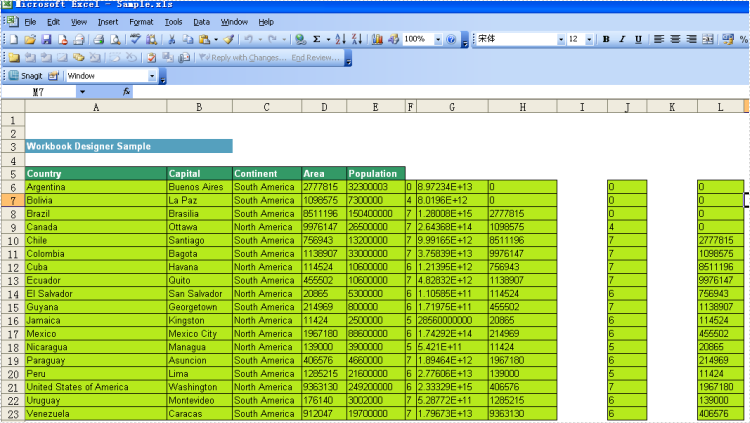
A Marker Designer represents a single data point or value that gives a mean to Spire.XLS to place relevant data into different cells of the worksheet in a workbook. We make use of Designer spreadsheets in which we write marker designers into different cells. Normally a marker designer consists of DataSource and a Field Name and starts with "&=". The DataSource can be a DataSet, DataTable, DataView or an Object variable etc. You can also make use of dynamic formulas that allows you to insert MS Excel's formulas into cells even when the formula must reference rows that will be inserted during the export process. Moreover, you may calculate totals and sub totals of any data field too.
Marker designer is a way to let Spire.XLS know that what information you wish to place in an Excel designer spreadsheet. Marker designers allow you to create templates that contain only relevant information and are formatted to meet your needs.
Designer Spreadsheet and Marker Designers
Designer spreadsheets are standard Excel files that contain the visual formatting, formulas and marker designers. They can contain marker designers that reference one or more data sources such as information from a project and information for related contacts. Marker designers are written into cells where you want information to be filled in.
All marker designers start with "&=", without the quotes. An example of a data marker is &=Party.FullName. If the data marker results in more than one item, i.e. row then following rows will be moved down automatically to make room for all of the new information. Thus sub-totals and totals can be placed on the following row after the data marker to make calculations based on inserted data. In order to make calculations on the rows that are inserted, you must use Dynamic Formulas.
Marker designers consist of the Data Source and Field Name parts for most information. Special information may also be passed with variables and variable arrays. Variables always fill only one cell whereas variable arrays may fill several ones. You may only use one data marker per cell. Unused marker designers will be removed.
Marker designer may also contain parameters. Parameters allow you to modify how the information will be laid out. They are appended to the end of marker designer in parenthesis as a comma separated list.
Marker designer Options
&=DataSource.FieldName
&=[Data Source].[Field Name]
&=VariableName
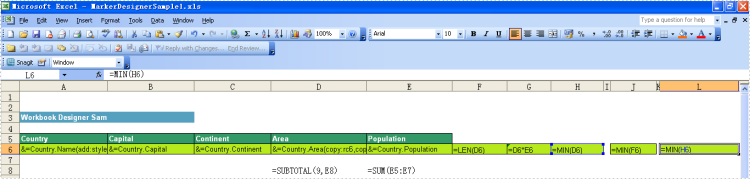
Formulas
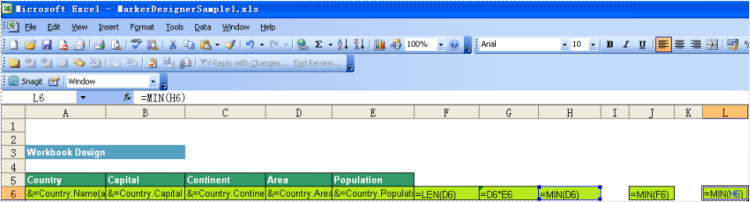
Formulas allow you to insert Excel's formulas into cells even when the formula must reference rows that will be inserted during the export process. And they can repeat for each inserted row or use only the cell where the data marker is placed for it.
If value of a cell referred to other cells, such as (copy:rc6), it means the value of the cell will be referred by cells of column 6. Multiple refer can be used like this: (copy:rc5,copy:rc7).
Note: Separate them with comma
Cell "G6" contains the formula = D6*E6, cell "G7" contains = D7*E7 and cell "G8" contains = D8*E8, etc.
The following illustrates a repeating dynamic formula and the resulting Excel worksheet.
Result:
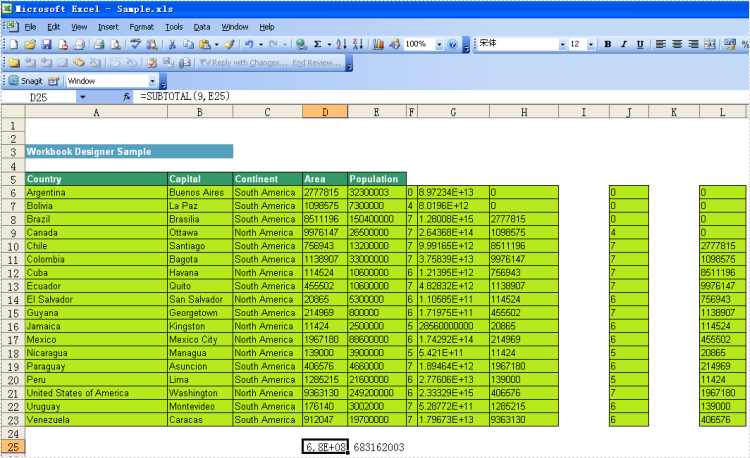
Sum and Subtotal
Below is showing you how to use these 2 formulas:
Result:
Code:
          Workbook workbook = new Workbook();

            workbook.LoadFromFile(@"..\..\..\..\..\..\Data\MarkerDesignerSample1.xls");
			DataTable dt = (DataTable)dataGrid1.DataSource;

			Worksheet sheet = workbook.Worksheets[0];
            //fill parameter
            workbook.MarkerDesigner.AddParameter("Variable1", 1234.5678);
            //fill DataTable
			workbook.MarkerDesigner.AddDataTable("Country",dt);
			workbook.MarkerDesigner.Apply();

            //AutoFit
			sheet.AllocatedRange.AutoFitRows();
			sheet.AllocatedRange.AutoFitColumns();

			workbook.SaveToFile("Sample.xls",ExcelVersion.Version97to2003);
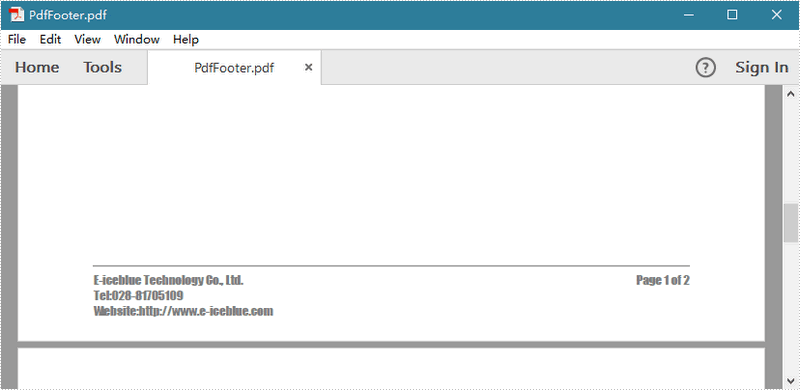
A PDF header or footer presents consistent information (For example: a date, page numbering, the title of the overall document, or author’s name) in the page margins throughout a PDF. In this article, you will learn to add text and automatic page numbering to footer space when creating a PDF document from scratch.
Spire.PDF has a class named PdfPageTemplateElement, which represents a page template element that can be used as header, footer, watermark or stamp. The template can contain text, image as well as dynamic fields like PdfPageCountField, PdfPageNumberField, etc.
Step 1: Define a custom function CreateFooterTemplate() to create a page template element that servers as footer, and return a PdfPageDocumentElement object.
static PdfPageTemplateElement CreateFooterTemplate(PdfDocument doc, PdfMargins margins)
{
    //get page size
    SizeF pageSize = doc.PageSettings.Size;

    //create a PdfPageTemplateElement object which works as footer space
    PdfPageTemplateElement footerSpace = new PdfPageTemplateElement(pageSize.Width, margins.Bottom);
    footerSpace.Foreground = false;

    //declare two float variables
    float x = margins.Left;
    float y = 0;

    //draw line in footer space
    PdfPen pen = new PdfPen(PdfBrushes.Gray, 1);
    footerSpace.Graphics.DrawLine(pen, x, y, pageSize.Width - x, y);

    //draw text in footer space
    y = y + 5;
    PdfTrueTypeFont font = new PdfTrueTypeFont(new Font("Impact", 10f), true);
    PdfStringFormat format = new PdfStringFormat(PdfTextAlignment.Left);
    String footerText = "E-iceblue Technology Co., Ltd.\nTel:028-81705109\nWebsite:http://www.e-iceblue.com";
    footerSpace.Graphics.DrawString(footerText, font, PdfBrushes.Gray, x, y, format);

    //draw dynamic field in footer space
    PdfPageNumberField number = new PdfPageNumberField();
    PdfPageCountField count = new PdfPageCountField();
    PdfCompositeField compositeField = new PdfCompositeField(font, PdfBrushes.Gray, "Page {0} of {1}", number, count);
    compositeField.StringFormat = new PdfStringFormat(PdfTextAlignment.Right, PdfVerticalAlignment.Top);
    SizeF size = font.MeasureString(compositeField.Text);
    compositeField.Bounds = new RectangleF(pageSize.Width - x , y, size.Width, size.Height);
    compositeField.Draw(footerSpace.Graphics);

    //return footerSpace
    return footerSpace;
}
Step 2: Create a PDF document, call the method CreateFooterTemplate() to create a footer template and apply it to the document.
static void Main(string[] args)
{
    //create a PDF document
    PdfDocument doc = new PdfDocument();
    doc.PageSettings.Size = PdfPageSize.A4;

    //reset the default margins to 0
    doc.PageSettings.Margins = new PdfMargins(0);

    //create a PdfMargins object, the parameters indicate the page margins you want to set
    PdfMargins margins = new PdfMargins(60, 60, 60, 60);

    //create a footer template with content and apply it to bottom page template
    doc.Template.Bottom = CreateFooterTemplate(doc, margins);

    //apply blank templates to other parts of page template
    doc.Template.Top = new PdfPageTemplateElement(doc.PageSettings.Size.Width, margins.Top);
    doc.Template.Left = new PdfPageTemplateElement(margins.Left, doc.PageSettings.Size.Height);
    doc.Template.Right = new PdfPageTemplateElement(margins.Right, doc.PageSettings.Size.Height);

    //add two pages in the document
    doc.Pages.Add();
    doc.Pages.Add();

    //save the file
    doc.SaveToFile("PdfFooter.pdf");
}
Output:
Full Code:
using Spire.Pdf;
using Spire.Pdf.AutomaticFields;
using Spire.Pdf.Graphics;
using System;
using System.Drawing;


namespace AddPDFFooter
{
    class Program
    {
        static void Main(string[] args)
        {
            //create a PDF document
            PdfDocument doc = new PdfDocument();
            doc.PageSettings.Size = PdfPageSize.A4;

            //reset the default margins to 0
            doc.PageSettings.Margins = new PdfMargins(0);

            //create a PdfMargins object, the parameters indicate the page margins you want to set
            PdfMargins margins = new PdfMargins(60, 60, 60, 60);

            //create a footer template with content and apply it to page template
            doc.Template.Bottom = CreateFooterTemplate(doc, margins);

            //apply blank templates to other parts of page template
            doc.Template.Top = new PdfPageTemplateElement(doc.PageSettings.Size.Width, margins.Top);
            doc.Template.Left = new PdfPageTemplateElement(margins.Left, doc.PageSettings.Size.Height);
            doc.Template.Right = new PdfPageTemplateElement(margins.Right, doc.PageSettings.Size.Height);

            //add two pages in the document
            doc.Pages.Add();
            doc.Pages.Add();

            //save the file
            doc.SaveToFile("PdfFooter.pdf");
        }
        static PdfPageTemplateElement CreateFooterTemplate(PdfDocument doc, PdfMargins margins)
        {
            //get page size
            SizeF pageSize = doc.PageSettings.Size;

            //create a PdfPageTemplateElement object which works as footer space
            PdfPageTemplateElement footerSpace = new PdfPageTemplateElement(pageSize.Width, margins.Bottom);
            footerSpace.Foreground = false;

            //declare two float variables
            float x = margins.Left;
            float y = 0;

            //draw line in footer space
            PdfPen pen = new PdfPen(PdfBrushes.Gray, 1);
            footerSpace.Graphics.DrawLine(pen, x, y, pageSize.Width - x, y);

            //draw text in footer space
            y = y + 5;
            PdfTrueTypeFont font = new PdfTrueTypeFont(new Font("Impact", 10f), true);
            PdfStringFormat format = new PdfStringFormat(PdfTextAlignment.Left);
            String footerText = "E-iceblue Technology Co., Ltd.\nTel:028-81705109\nWebsite:http://www.e-iceblue.com";
            footerSpace.Graphics.DrawString(footerText, font, PdfBrushes.Gray, x, y, format);

            //draw dynamic field in footer space
            PdfPageNumberField number = new PdfPageNumberField();
            PdfPageCountField count = new PdfPageCountField();
            PdfCompositeField compositeField = new PdfCompositeField(font, PdfBrushes.Gray, "Page {0} of {1}", number, count);
            compositeField.StringFormat = new PdfStringFormat(PdfTextAlignment.Right, PdfVerticalAlignment.Top);
            SizeF size = font.MeasureString(compositeField.Text);
            compositeField.Bounds = new RectangleF(pageSize.Width - x, y, size.Width, size.Height);
            compositeField.Draw(footerSpace.Graphics);

            //return footerSpace
            return footerSpace;
        }
    }
}
Imports Spire.Pdf
Imports Spire.Pdf.AutomaticFields
Imports Spire.Pdf.Graphics
Imports System.Drawing


Namespace AddPDFFooter
	Class Program
		Private Shared Sub Main(args As String())
			'create a PDF document
			Dim doc As New PdfDocument()
			doc.PageSettings.Size = PdfPageSize.A4

			'reset the default margins to 0
			doc.PageSettings.Margins = New PdfMargins(0)

			'create a PdfMargins object, the parameters indicate the page margins you want to set
			Dim margins As New PdfMargins(60, 60, 60, 60)

			'create a footer template with content and apply it to page template
			doc.Template.Bottom = CreateFooterTemplate(doc, margins)

			'apply blank templates to other parts of page template
			doc.Template.Top = New PdfPageTemplateElement(doc.PageSettings.Size.Width, margins.Top)
			doc.Template.Left = New PdfPageTemplateElement(margins.Left, doc.PageSettings.Size.Height)
			doc.Template.Right = New PdfPageTemplateElement(margins.Right, doc.PageSettings.Size.Height)

			'add two pages in the document
			doc.Pages.Add()
			doc.Pages.Add()

			'save the file
			doc.SaveToFile("PdfFooter.pdf")
		End Sub
		Private Shared Function CreateFooterTemplate(doc As PdfDocument, margins As PdfMargins) As PdfPageTemplateElement
			'get page size
			Dim pageSize As SizeF = doc.PageSettings.Size

			'create a PdfPageTemplateElement object which works as footer space
			Dim footerSpace As New PdfPageTemplateElement(pageSize.Width, margins.Bottom)
			footerSpace.Foreground = False

			'declare two float variables
			Dim x As Single = margins.Left
			Dim y As Single = 0

			'draw line in footer space
			Dim pen As New PdfPen(PdfBrushes.Gray, 1)
			footerSpace.Graphics.DrawLine(pen, x, y, pageSize.Width - x, y)

			'draw text in footer space
			y = y + 5
			Dim font As New PdfTrueTypeFont(New Font("Impact", 10F), True)
			Dim format As New PdfStringFormat(PdfTextAlignment.Left)
			Dim footerText As [String] = "E-iceblue Technology Co., Ltd." & vbLf & "Tel:028-81705109" & vbLf & "Website:http://www.e-iceblue.com"
			footerSpace.Graphics.DrawString(footerText, font, PdfBrushes.Gray, x, y, format)

			'draw dynamic field in footer space
			Dim number As New PdfPageNumberField()
			Dim count As New PdfPageCountField()
			Dim compositeField As New PdfCompositeField(font, PdfBrushes.Gray, "Page {0} of {1}", number, count)
			compositeField.StringFormat = New PdfStringFormat(PdfTextAlignment.Right, PdfVerticalAlignment.Top)
			Dim size As SizeF = font.MeasureString(compositeField.Text)
			compositeField.Bounds = New RectangleF(pageSize.Width - x, y, size.Width, size.Height)
			compositeField.Draw(footerSpace.Graphics)

			'return footerSpace
			Return footerSpace
		End Function
	End Class
End Namespace
Spire.PDF for .NET is a professional PDF API applied to creating, writing, editing, handling and reading PDF files without any external dependencies within .NET (C#, VB.NET, ASP.NET, .NET Core, .NET 5.0, .NET 6.0, .NET 7.0, MonoAndroid and Xamarin.iOS) application. Using this .NET PDF library, you can implement rich capabilities to create PDF files from scratch or process existing PDF documents entirely through C#/VB.NET without installing Adobe Acrobat.
Many rich features can be supported by the .NET PDF API, such as adding digital signature, including timestamp in signature, adding dynamic/image stamp, adding text/image watermark, creating PDF Portfolio, extracting text/attachment/images, PDF merging/spliting, metadata updating, section, graph/image drawing and inserting, table creation and processing, cropping pages, copying pages, and importing data etc.
