
.NET (1327)
Children categories
A pie chart is a circular chart for visually representation of data. It divides a circular statistical graph into sectors or slices and each sector represents a specific portion of the total percentage. In this article, you will learn how to programmatically create a pie chart in Excel using Spire.XLS for .NET.
Install Spire.XLS for .NET
To begin with, you need to add the DLL files included in the Spire.XLS for .NET package as references in your .NET project. The DLL files can be either downloaded from this link or installed via NuGet.
PM> Install-Package Spire.XLS
Create a Pie Chart in Excel
The detailed steps are as follows:
- Create a Workbook instance.
- Get a specified worksheet using Workbook.Worksheets[sheetIndex] property.
- Add some data to specified cells and set the cell styles and borders.
- Add a pie chart to the worksheet using Worksheet.Charts.Add(ExcelChartType.Pie) method.
- Set data range for the chart using Chart.DataRange property.
- Set the position and title of the chart.
- Get a specified series in the chart and set category labels and values for the series using ChartSerie.CategoryLabels and ChartSerie.Values properties.
- Show data labels for data points by setting the ChartSerie.DataPoints.DefaultDataPoint.DataLabels.HasValue property as true.
- Save the result file using Workbook.SaveToFile() method.
- C#
- VB.NET
using Spire.Xls;
using Spire.Xls.Charts;
using System.Drawing;

namespace CreatePieChart
{
    class Program
    {
        static void Main(string[] args)
        {
            //Create a Workbook instance
            Workbook workbook = new Workbook();

            //Get the first worksheet
            Worksheet sheet = workbook.Worksheets[0];

            //Set sheet name
            sheet.Name = "Chart data";

            //Add data to specified cells
            sheet.Range["A1"].Value = "Year";
            sheet.Range["A2"].Value = "2002";
            sheet.Range["A3"].Value = "2003";
            sheet.Range["A4"].Value = "2004";
            sheet.Range["A5"].Value = "2005";

            sheet.Range["B1"].Value = "Sales";
            sheet.Range["B2"].NumberValue = 4000;
            sheet.Range["B3"].NumberValue = 6000;
            sheet.Range["B4"].NumberValue = 7000;
            sheet.Range["B5"].NumberValue = 8500;

            //Set cell styles
            sheet.Range["A1:B1"].Style.Font.IsBold = true;
            sheet.Range["A1:B1"].Style.KnownColor = ExcelColors.Black;
            sheet.Range["A1:B1"].Style.Font.Color = Color.White;
            sheet.Range["A1:B5"].Style.HorizontalAlignment = HorizontalAlignType.Center;
            sheet.Range["A1:B5"].Style.VerticalAlignment = VerticalAlignType.Center;

            //Set number format
            sheet.Range["B2:C5"].Style.NumberFormat = "\"$\"#,##0";

            //Set cell borders
            sheet.Range["A1:B5"].Style.Borders[BordersLineType.EdgeTop].Color = Color.FromArgb(0, 0, 128);
            sheet.Range["A1:B5"].Style.Borders[BordersLineType.EdgeTop].LineStyle = LineStyleType.Thin;
            sheet.Range["A1:B5"].Style.Borders[BordersLineType.EdgeBottom].Color = Color.FromArgb(0, 0, 128);
            sheet.Range["A1:B5"].Style.Borders[BordersLineType.EdgeBottom].LineStyle = LineStyleType.Thin;
            sheet.Range["A1:B5"].Style.Borders[BordersLineType.EdgeLeft].Color = Color.FromArgb(0, 0, 128);
            sheet.Range["A1:B5"].Style.Borders[BordersLineType.EdgeLeft].LineStyle = LineStyleType.Thin;
            sheet.Range["A1:B5"].Style.Borders[BordersLineType.EdgeRight].Color = Color.FromArgb(0, 0, 128);
            sheet.Range["A1:B5"].Style.Borders[BordersLineType.EdgeRight].LineStyle = LineStyleType.Thin;

            //Add a pie chart to the worksheet
            Chart chart = sheet.Charts.Add(ExcelChartType.Pie);

            //Set data range for the chart
            chart.DataRange = sheet.Range["B2:B5"];
            chart.SeriesDataFromRange = false;

            //Set position of the chart
            chart.LeftColumn = 1;
            chart.TopRow = 7;
            chart.RightColumn = 9;
            chart.BottomRow = 28;

            //Set and format chart title
            chart.ChartTitle = "Sales by Year";
            chart.ChartTitleArea.IsBold = true;
            chart.ChartTitleArea.Size = 14;

            // Get a specified series in the chart
            ChartSerie cs = chart.Series[0];

            //Set category labels for the series
            cs.CategoryLabels = sheet.Range["A2:A5"];

            //Set values for the series
            cs.Values = sheet.Range["B2:B5"];

            // Show data labels for data points
            cs.DataPoints.DefaultDataPoint.DataLabels.HasValue = true;

            //Save the result file
            workbook.SaveToFile("PieChart.xlsx", ExcelVersion.Version2016);
        }
    }
}

Apply for a Temporary License
If you'd like to remove the evaluation message from the generated documents, or to get rid of the function limitations, please request a 30-day trial license for yourself.
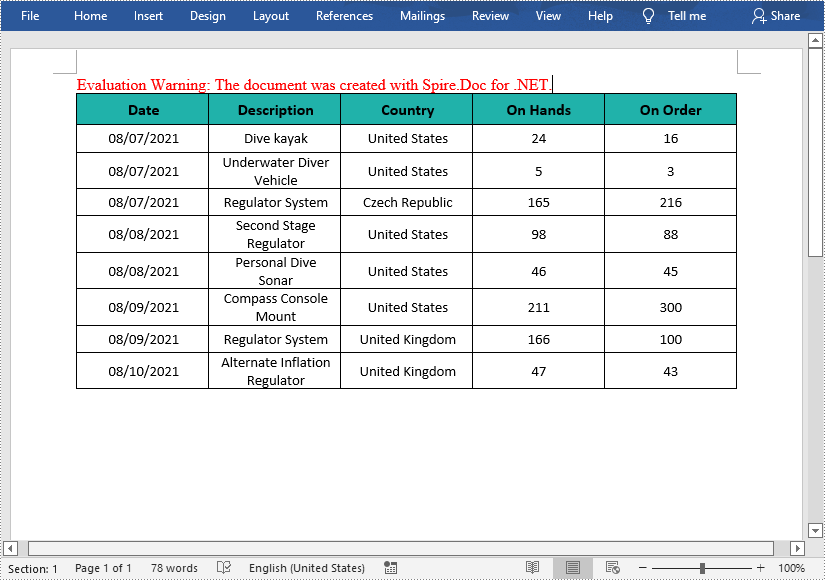
In MS Word, the tables can organize and present data in rows and columns, which makes the information easier to understand and analyze. In this article, you will learn how to programmatically create a table with data in a Word document using Spire.Doc for .NET.
Install Spire.Doc for .NET
To begin with, you need to add the DLL files included in the Spire.Doc for.NET package as references in your .NET project. The DLL files can be either downloaded from this link or installed via NuGet.
PM> Install-Package Spire.Doc
Create a Simple Table in Word
Below are some of the core classes and methods provided by Spire.Doc for .NET for creating and formatting tables in Word.
| Name | Description |
| Table Class | Represents a table in a Word document. |
| TableRow Class | Represents a row in a table. |
| TableCell Class | Represents a specific cell in a table. |
| Section.AddTbale() Method | Adds a new table to the specified section. |
| Table.ResetCells() Method | Resets row number and column number. |
| Table.Rows Property | Gets the table rows. |
| TableRow.Height Property | Sets the height of the specified row. |
| TableRow.Cells Property | Returns the cells collection. |
| TableRow.RowFormat Property | Gets the format of the specified row. |
The detailed steps are as follows
- Create a Document object and add a section to it.
- Prepare the data for the header row and other rows, storing them in a one-dimensional string array and a two-dimensional string array respectively.
- Add a table to the section using Section.AddTable() method.
- Insert data to the header row, and set the row formatting, including row height, background color, and text alignment.
- Insert data to the rest of the rows and apply formatting to these rows.
- Save the document to another file using Document.SaveToFile() method.
- C#
- VB.NET
using System;
using System.Drawing;
using Spire.Doc;
using Spire.Doc.Documents;
using Spire.Doc.Fields;

namespace WordTable
{
    class Program
    {
        static void Main(string[] args)
        {
            //Create a Document object
            Document doc = new Document();
            //Add a section
            Section s = doc.AddSection();

            //Define the data for the table
            String[] Header = { "Date", "Description", "Country", "On Hands", "On Order" };
            String[][] data = {
                                  new String[]{ "08/07/2021","Dive kayak","United States","24","16"},
                                  new String[]{ "08/07/2021","Underwater Diver Vehicle","United States","5","3"},
                                  new String[]{ "08/07/2021","Regulator System","Czech Republic","165","216"},
                                  new String[]{ "08/08/2021","Second Stage Regulator","United States","98","88"},
                                  new String[]{ "08/08/2021","Personal Dive Sonar","United States","46","45"},
                                  new String[]{ "08/09/2021","Compass Console Mount","United States","211","300"},
                                  new String[]{ "08/09/2021","Regulator System","United Kingdom","166","100"},
                                  new String[]{ "08/10/2021","Alternate Inflation Regulator","United Kingdom","47","43"},
                              };
            //Add a table
            Table table = s.AddTable(true);
            table.ResetCells(data.Length + 1, Header.Length);

            //Set the first row as table header
            TableRow FRow = table.Rows[0];
            FRow.IsHeader = true;

            //Set the height and color of the first row
            FRow.Height = 23;
            FRow.Cells[i].CellFormat.Shading.BackgroundPatternColor = Color.LightSeaGreen;
            for (int i = 0; i < Header.Length; i++)
            {
                //Set alignment for cells
                Paragraph p = FRow.Cells[i].AddParagraph();
                FRow.Cells[i].CellFormat.VerticalAlignment = VerticalAlignment.Middle;
                p.Format.HorizontalAlignment = HorizontalAlignment.Center;

                //Set data format
                TextRange TR = p.AppendText(Header[i]);
                TR.CharacterFormat.FontName = "Calibri";
                TR.CharacterFormat.FontSize = 12;
                TR.CharacterFormat.Bold = true;
            }

            //Add data to the rest of rows and set cell format
            for (int r = 0; r < data.Length; r++)
            {
                TableRow DataRow = table.Rows[r + 1];
                DataRow.Height = 20;
                for (int c = 0; c < data[r].Length; c++)
                {
                    DataRow.Cells[c].CellFormat.VerticalAlignment = VerticalAlignment.Middle;
                    Paragraph p2 = DataRow.Cells[c].AddParagraph();
                    TextRange TR2 = p2.AppendText(data[r][c]);
                    p2.Format.HorizontalAlignment = HorizontalAlignment.Center;

                    //Set data format
                    TR2.CharacterFormat.FontName = "Calibri";
                    TR2.CharacterFormat.FontSize = 11;
                }
            }

            //Save the document
            doc.SaveToFile("WordTable.docx", FileFormat.Docx2013);
        }
    }
}
Apply for a Temporary License
If you'd like to remove the evaluation message from the generated documents, or to get rid of the function limitations, please request a 30-day trial license for yourself.
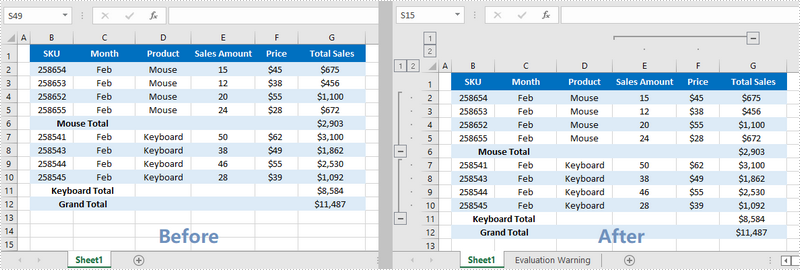
Grouping rows and columns in an Excel worksheet can separate data into groups, and each group presents information about one item. You can then expand or collapse certain groups to display only the most important information. In this article, you'll learn how to group or ungroup Excel rows and columns using Spire.XLS for .NET in C# and VB.NET.
Install Spire.XLS for .NET
To begin with, you need to add the DLL files included in the Spire.XLS for .NET package as references in your .NET project. The DLL files can be either downloaded from this link or installed via NuGet.
PM> Install-Package Spire.XLS
Group Rows and Columns
The following are the steps to group rows and columns using Spire.XLS for .NET.
- Create a Workbook object.
- Load a sample Excel file using Workbook.LoadFromFile() method.
- Get the specific sheet through Workbook.Worksheets[index] property.
- Group rows using Worksheet.GroupByRows() method.
- Group columns using Worksheet.GroupByColumns() method.
- Save the result to another Excel file using Workbook.SaveToFile() method.
- C#
- VB.NET
using Spire.Xls;

namespace GroupRowsAndColumns
{
    class Program
    {
        static void Main(string[] args)
        {
            //Create a Workbook object
            Workbook workbook = new Workbook();

            //Load a sample Excel file
            workbook.LoadFromFile(@"C:\Users\Administrator\Desktop\sample.xlsx");

            //Get the first worksheet
            Worksheet sheet = workbook.Worksheets[0];

            //Group rows
            sheet.GroupByRows(2, 5, false);
            sheet.GroupByRows(7, 10, false);

            //Group columns
            sheet.GroupByColumns(5, 6, false);

            //Save to another Excel file
            workbook.SaveToFile("GroupRowsAndColumns.xlsx", ExcelVersion.Version2016);
        }
    }
}
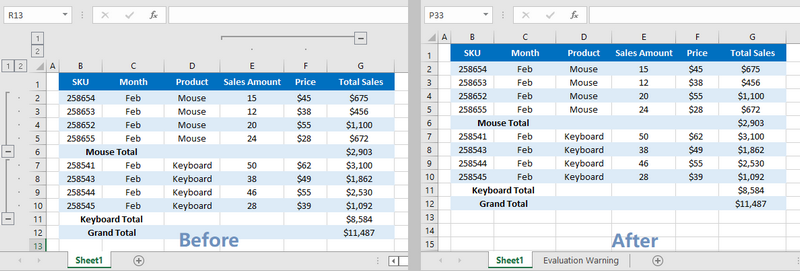
Ungroup Rows and Columns
The following are the steps to ungroup rows and columns using Spire.XLS for .NET.
- Create a Workbook object.
- Load a sample Excel file using Workbook.LoadFromFile() method.
- Get the specific sheet through Workbook.Worksheets[index] property.
- Ungroup rows using Worksheet.UngroupByRows() method.
- Ungroup columns using Worksheet.UngroupByColumns() method.
- Save the result to another Excel file using Workbook.SaveToFile() method.
- C#
- VB.NET
using Spire.Xls;

namespace UngroupRowsAndColumns
{
    class Program
    {
        static void Main(string[] args)
        {
            //Create a Workbook object
            Workbook workbook = new Workbook();

            //Load a sample Excel file
            workbook.LoadFromFile(@"C:\Users\Administrator\Desktop\sample.xlsx");

            //Get the first worksheet
            Worksheet sheet = workbook.Worksheets[0];

            //Ungroup rows
            sheet.UngroupByRows(2, 5);
            sheet.UngroupByRows(7, 10);

            //Ungroup columns
            sheet.UngroupByColumns(5, 6);

            //Save to a different Excel file
            workbook.SaveToFile("UngroupRowsAndColumns.xlsx", ExcelVersion.Version2016);
        }
    }
}
Apply for a Temporary License
If you'd like to remove the evaluation message from the generated documents, or to get rid of the function limitations, please request a 30-day trial license for yourself.
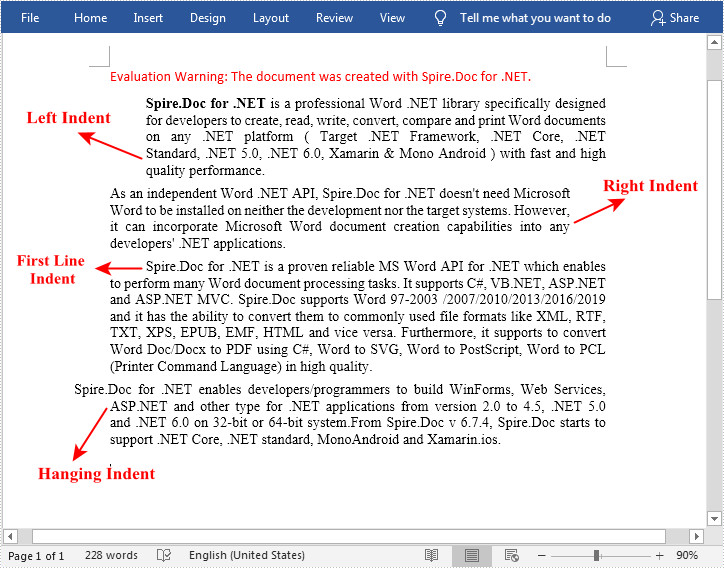
In Word documents, indentation is a paragraph format used to adjust the distance between paragraph body and page margin. It includes left indent, right indent, first line indent and hanging indent. Left indent and right indent can be applied to all lines of a paragraph, while first line indent can only be applied to first line of a paragraph. As for the hanging indent, it can be applied to every line of the paragraph except the first one. This article introduces how to programmatically set paragraph indents in a Word document using Spire.Doc for .NET.
Install Spire.Doc for .NET
To begin with, you need to add the DLL files included in the Spire.Doc for .NET package as references in your .NET project. The DLL files can be either downloaded from this link or installed via NuGet.
PM> Install-Package Spire.Doc
Set Paragraph Indents in Word
The table below lists some of the core classes and properties that are used to set different paragraph indents in a Word document.
| Name | Description |
| ParagraphFormat Class | Represents the format of a paragraph. |
| ParagraphFormat.LeftIndent Property | Returns or sets the value that represents the left indent for paragraph. |
| ParagraphFormat.RightIndent Property | Returns or sets the value that represents the right indent for paragraph. |
| ParagraphFormat.FirstLineIndent Property | Gets or sets the value for first line or hanging indent. Positive value represents first-line indent, and Negative value represents hanging indent. |
The detailed steps are as follows:
- Create a Document instance.
- Load a sample Word document using Document.LoadFromFile() method.
- Get a specified section using Document.Sections[] property.
- Get a specified paragraph using Section.Paragraphs[] property.
- Get the paragraph format using Paragraph.Format property, and then set the paragraph indent using the above listed properties of ParagraphFormat class.
- Save the document to another file using Document.SaveToFile() method.
- C#
- VB.NET
using Spire.Doc;
using Spire.Doc.Documents;

namespace WordIndent
{
    class Program
    {
        static void Main(string[] args)
        {
            //Create a Document instance
            Document doc = new Document();

            //Load a sample Word document
            doc.LoadFromFile("sample.docx");

            //Get the first paragraph and set left indent
            Paragraph para1 = doc.Sections[0].Paragraphs[0];
            para1.Format.LeftIndent = 30;

            //Get the second paragraph and set right indent
            Paragraph para2 = doc.Sections[0].Paragraphs[1];
            para2.Format.RightIndent = 30;

            //Get the third paragraph and set first line indent
            Paragraph para3 = doc.Sections[0].Paragraphs[2];
            para3.Format.FirstLineIndent = 30;

            //Get the fourth paragraph and set hanging indent
            Paragraph para4 = doc.Sections[0].Paragraphs[3];
            para4.Format.FirstLineIndent = -30;

            //Save the document to file
            doc.SaveToFile("Indent.docx", FileFormat.Docx2010);
        }
    }
}
Apply for a Temporary License
If you'd like to remove the evaluation message from the generated documents, or to get rid of the function limitations, please request a 30-day trial license for yourself.
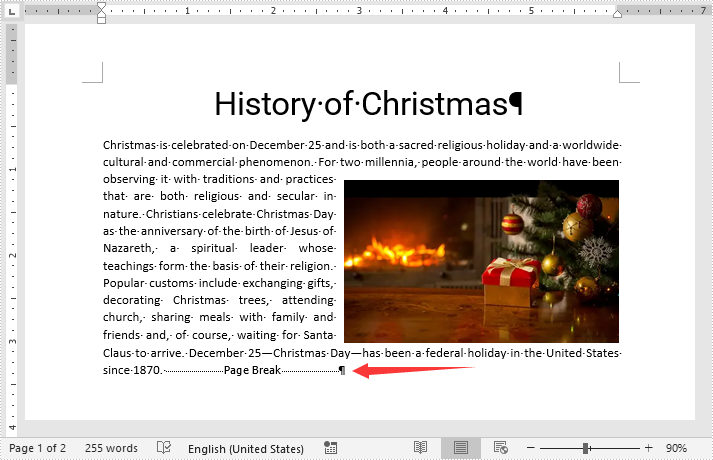
A page break is a marker that controls where one page ends and where a new page begins. If you want to move the content after a certain place to the next page in your Word document, you can insert a page break. In this article, you will learn how to insert page break into Word documents in C# and VB.NET using Spire.Doc for .NET library.
Install Spire.Doc for .NET
To begin with, you need to add the DLL files included in the Spire.Doc for .NET package as references in your .NET project. The DLL files can be either downloaded from this link or installed via NuGet.
PM> Install-Package Spire.Doc
Insert Page Break after a Specific Paragraph
The following are the steps to insert page break after a specific paragraph:
- Create a Document instance.
- Load a Word document using Document.LoadFromFile() method.
- Get the desired section using Document.Sections[sectionIndex] property.
- Get the desired paragraph using Section.Paragraphs[paragraphIndex] property.
- Add a page break to the paragraph using Paragraph.AppendBreak(BreakType.PageBreak) method.
- Save the result document using Document.SaveToFile() method.
- C#
- VB.NET
using Spire.Doc;
using Spire.Doc.Documents;

namespace InsertPageBreakAfterParagraph
{
    class Program
    {
        static void Main(string[] args)
        {
            //Create a Document instance
            Document document = new Document();
            //Load a Word document
            document.LoadFromFile("Sample.docx");

            //Get the first section
            Section section = document.Sections[0];
            //Get the 2nd paragraph in the section
            Paragraph paragraph = section.Paragraphs[1];

            //Append a page break to the paragraph
            paragraph.AppendBreak(BreakType.PageBreak);

            //Save the result document
            document.SaveToFile("InsertPageBreak.docx", FileFormat.Docx2013);
        }
    }
}
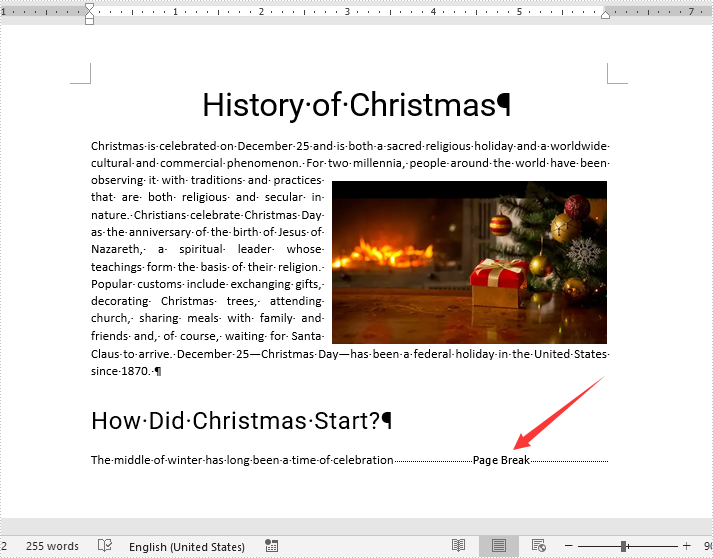
Insert Page Break after a Specific Text
The following are the steps to insert a page break after a specific text:
- Create a Document instance.
- Load a Word document using Document.LoadFromFile() method.
- Find a specific text using Document.FindString() method.
- Access the text range of the searched text using TextSelection.GetAsOneRange() method.
- Get the paragraph where the text range is located using ParagraphBase.OwnerParagraph property.
- Get the position index of the text range in the paragraph using Paragraph.ChildObjects.IndexOf() method.
- Initialize an instance of Break class to create a page break.
- Insert the page break after the searched text using Paragraph.ChildObjects.Insert() method.
- Save the result document using Document.SaveToFile() method.
- C#
- VB.NET
using Spire.Doc;
using Spire.Doc.Documents;
using Spire.Doc.Fields;
using System;

namespace InsertPageBreakAfterText
{
    class Program
    {
        static void Main(string[] args)
        {
            //Create a Document instance
            Document document = new Document();

            //Load a Word document
            document.LoadFromFile("Sample.docx");

            //Search a specific text
            TextSelection selection = document.FindString("celebration", true, true);
            //Get the text range of the seached text
            TextRange range = selection.GetAsOneRange();
            //Get the paragraph where the text range is located
            Paragraph paragraph = range.OwnerParagraph;
            //Get the position index of the text range in the paragraph
            int index = paragraph.ChildObjects.IndexOf(range);

            //Create a page break
            Break pageBreak = new Break(document, BreakType.PageBreak);
            //Insert the page break after the searched text
            paragraph.ChildObjects.Insert(index + 1, pageBreak);

            //Save the result document
            document.SaveToFile("InsertPageBreakAfterText.docx", FileFormat.Docx2013);
        }
    }
}
Apply for a Temporary License
If you'd like to remove the evaluation message from the generated documents, or to get rid of the function limitations, please request a 30-day trial license for yourself.
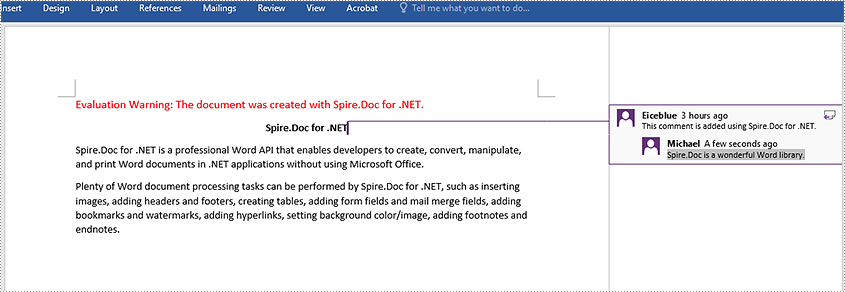
The comment feature in Microsoft Word provides an excellent way for people to add their insights or opinions to a Word document without having to change or interrupt the content of the document. If someone comments on a document, the document author or other users can reply to the comment to have a discussion with him, even if they're not viewing the document at the same time. This article will demonstrate how to add, reply to or delete comments in Word in C# and VB.NET using Spire.Doc for .NET library.
- Add a Comment to Paragraph in Word in C# and VB.NET
- Add a Comment to Text in Word in C# and VB.NET
- Reply to a Comment in Word in C# and VB.NET
- Delete Comments in Word in C# and VB.NET
Install Spire.Doc for .NET
To begin with, you need to add the DLL files included in the Spire.Doc for.NET package as references in your .NET project. The DLL files can be either downloaded from this link or installed via NuGet.
PM> Install-Package Spire.Doc
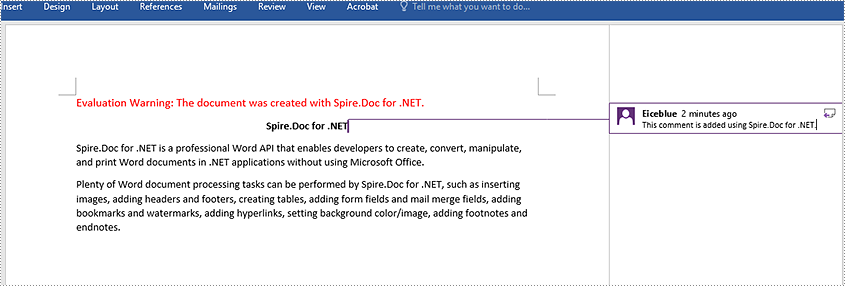
Add a Comment to Paragraph in Word in C# and VB.NET
Spire.Doc for .NET provides the Paragraph.AppendComment() method to add a comment to a specific paragraph. The following are the detailed steps:
- Initialize an instance of the Document class.
- Load a Word document using Document.LoadFromFile() method.
- Access a specific section in the document by its index through Document.Sections[int] property.
- Access a specific paragraph in the section by its index through Section.Paragraphs[int] property.
- Add a comment to the paragraph using Paragraph.AppendComment() method.
- Set the author of the comment through Comment.Format.Author property.
- Save the result document using Document.SaveToFile() method.
- C#
- VB.NET
using Spire.Doc;
using Spire.Doc.Documents;
using Spire.Doc.Fields;

namespace AddComments
{
    internal class Program
    {
        static void Main(string[] args)
        {
            //Initialize an instance of the Document class
            Document document = new Document();
            //Load a Word document
            document.LoadFromFile(@"Sample.docx");

            //Get the first section in the document
            Section section = document.Sections[0];

            //Get the first paragraph in the section
            Paragraph paragraph = section.Paragraphs[0];
            //Add a comment to the paragraph
            Comment comment = paragraph.AppendComment("This comment is added using Spire.Doc for .NET.");
            //Set comment author
            comment.Format.Author = "Eiceblue";
            comment.Format.Initial = "CM";

            //Save the result document
            document.SaveToFile("AddCommentToParagraph.docx", FileFormat.Docx2013);
            document.Close();
        }
    }
}
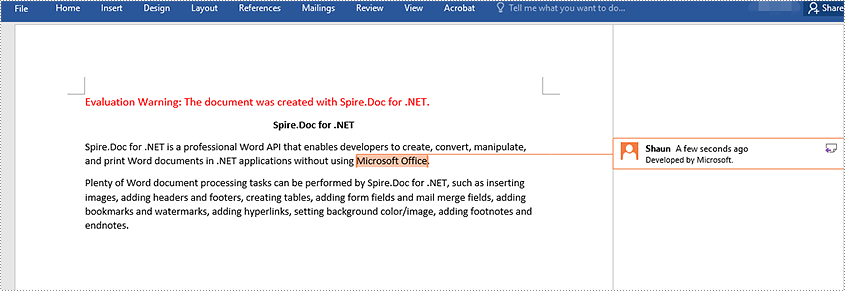
Add a Comment to Text in Word in C# and VB.NET
The Paragraph.AppendComment() method is used to add comments to an entire paragraph. By default, the comment marks will be placed at the end of the paragraph. To add a comment to a specific text, you need to search for the text using Document.FindString() method, then place the comment marks at the beginning and end of the text. The following are the detailed steps:
- Initialize an instance of the Document class.
- Load a Word document using Document.LoadFromFile() method.
- Find the specific text in the document using Document.FindString() method.
- Create a comment start mark and a comment end mark, which will be placed at the beginning and end of the found text respectively.
- Initialize an instance of the Comment class to create a new comment. Then set the content and author for the comment.
- Get the owner paragraph of the found text. Then add the comment to the paragraph as a child object.
- Insert the comment start mark before the text range and the comment end mark after the text range.
- Save the result document using Document.SaveToFile() method.
- C#
- VB.NET
using Spire.Doc;
using Spire.Doc.Documents;
using Spire.Doc.Fields;

namespace AddCommentsToText
{
    internal class Program
    {
        static void Main(string[] args)
        {
            //Initialize an instance of the Document class
            Document document = new Document();
            //Load a Word document
            document.LoadFromFile(@"CommentTemplate.docx");

            //Find a specific string
            TextSelection find = document.FindString("Microsoft Office", false, true);

            //Create the comment start mark and comment end mark
            CommentMark commentmarkStart = new CommentMark(document);
            commentmarkStart.Type = CommentMarkType.CommentStart;
            CommentMark commentmarkEnd = new CommentMark(document);
            commentmarkEnd.Type = CommentMarkType.CommentEnd;

            //Create a comment and set its content and author
            Comment comment = new Comment(document);
            comment.Body.AddParagraph().Text = "Developed by Microsoft.";
            comment.Format.Author = "Shaun";

            //Get the found text as a single text range
            TextRange range = find.GetAsOneRange();

            //Get the owner paragraph of the text range
            Paragraph para = range.OwnerParagraph;

            //Add the comment to the paragraph
            para.ChildObjects.Add(comment);

            //Get the index of text range in the paragraph
            int index = para.ChildObjects.IndexOf(range);

            //Set comment ID for the comment mark start and comment mark end
            commentmarkStart.CommentId = comment.Format.CommentId;
            commentmarkEnd.CommentId = comment.Format.CommentId;

            //Insert the comment start mark before the text range
            para.ChildObjects.Insert(index, commentmarkStart);
            //Insert the comment end mark after the text range
            para.ChildObjects.Insert(index + 2, commentmarkEnd);

            //Save the result document
            document.SaveToFile("AddCommentForText.docx", FileFormat.Docx2013);
            document.Close();
        }
    }
}
Reply to a Comment in Word in C# and VB.NET
To add a reply to an existing comment, you can use the Comment.ReplyToComment() method. The following are the detailed steps:
- Initialize an instance of the Document class.
- Load a Word document using Document.LoadFromFile() method.
- Get a specific comment in the document through Document.Comments[int] property.
- Initialize an instance of the Comment class to create a new comment. Then set the content and author for the comment.
- Add the new comment as a reply to the specific comment using Comment.ReplyToComment() method.
- Save the result document using Document.SaveToFile() method.
- C#
- VB.NET
using Spire.Doc;
using Spire.Doc.Fields;

namespace ReplyToComments
{
    internal class Program
    {
        static void Main(string[] args)
        {
            //Initialize an instance of the Document class
            Document document = new Document();
            //Load a Word document
            document.LoadFromFile(@"AddCommentToParagraph.docx");

            //Get the first comment in the document
            Comment comment1 = document.Comments[0];

            //Create a new comment and specify its author and content
            Comment replyComment1 = new Comment(document);
            replyComment1.Format.Author = "Michael";
            replyComment1.Body.AddParagraph().AppendText("Spire.Doc is a wonderful Word library.");

            //Add the comment as a reply to the first comment
            comment1.ReplyToComment(replyComment1);

            //Save the result document
            document.SaveToFile("ReplyToComment.docx", FileFormat.Docx2013);
            document.Close();
        }
    }
}
Delete Comments in Word in C# and VB.NET
Spire.Doc for .NET offers the Document.Comments.RemoveAt(int) method to remove a specific comment from a Word document and the Document.Comments.Clear() method to remove all comments from a Word document. The following are the detailed steps:
- Initialize an instance of the Document class.
- Load a Word document using Document.LoadFromFile() method.
- Delete a specific comment or all comments in the document using Document.Comments.RemoveAt(int) method or Document.Comments.Clear() method.
- Save the result document using Document.SaveToFile() method.
- C#
- VB.NET
using Spire.Doc;

namespace DeleteComments
{
    internal class Program
    {
        static void Main(string[] args)
        {
            //Initialize an instance of the Document class
            Document document = new Document();
            //Load a Word document
            document.LoadFromFile(@"AddCommentToParagraph.docx");

            //Delete the first comment in the document
            document.Comments.RemoveAt(0);

            //Delete all comments in the document
            //document.Comments.Clear();

            //Save the result document
            document.SaveToFile("DeleteComment.docx", FileFormat.Docx2013);
            document.Close();
        }
    }
}
Apply for a Temporary License
If you'd like to remove the evaluation message from the generated documents, or to get rid of the function limitations, please request a 30-day trial license for yourself.
Word Decryption is a process to decode encrypted Word document. It requires a password or secret key. If readers want to open and read a protected Word, they need to decrypt this Word document firstly. This guide demonstrates an easy and convenient solution to decrypt Word in C# and VB.NET via Spire.Doc for .NET.
Spire.Doc for .NET, specially developed for programmers to manipulate Word without Word Automation, provides users a method Document.LoadFromFile(String fileName, FileFormat fileFormat, String password) of Document class to open encrypted Word document. It also provides another method Document.RemoveEncryption() to decrypt Word without any protection. Through these two methods, users can decrypt Word easily with Spire.Doc for .NET. Download and install Spire.Doc for .NET. Then follow the code to decrypt.
using Spire.Doc;

namespace DecryptWord
{
    class Decryption
    {
        static void Main(string[] args)
        {
            //Load Encrypted Word
            Document document = new Document();
            document.LoadFromFile(@"E:\Work\Documents\Student Transcript.docx", FileFormat.Docx,"123456");

            //Decrypt
            document.RemoveEncryption();

            //Save and Launch
            document.SaveToFile("decryption.docx", FileFormat.Docx);
            System.Diagnostics.Process.Start("decryption.docx");
        }
    }
}
Imports Spire.Doc

Namespace DecryptWord
    Friend Class Decryption
        Shared Sub Main(ByVal args() As String)
            'Load Encrypted Word
            Dim document As New Document()
            document.LoadFromFile("E:\Work\Documents\Student Transcript.docx", FileFormat.Docx, "123456")

            'Decrypt
            document.RemoveEncryption()

            'Save and Launch
            document.SaveToFile("decryption.docx", FileFormat.Docx)
            System.Diagnostics.Process.Start("decryption.docx")
        End Sub
    End Class
End Namespace
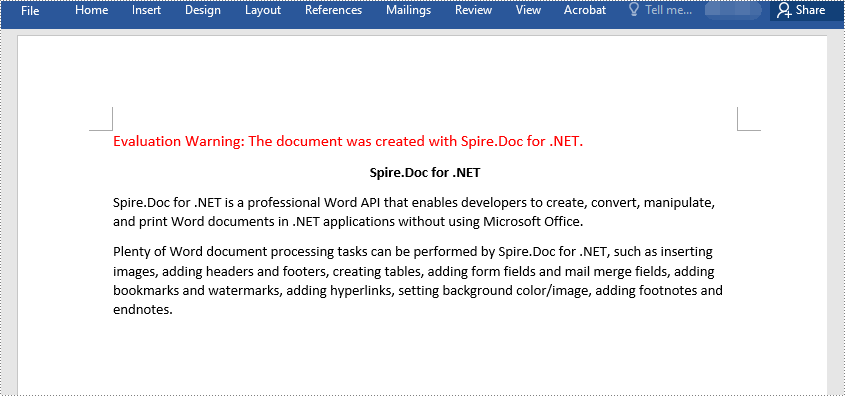
Spire.Doc, professional Word component, is specially designed for developers to fast generate, write, modify and save Word documents in .NET, Silverlight and WPF with C# and VB.NET. Also, it supports conversion between Word and other popular formats, such as PDF, HTML, Image, Text and so on, in .NET and WPF platform.
Before going through the detailed steps, watch this quick video demonstrating how to convert Word files to PDF using a simple .NET approach.
Converting Word documents to PDF is a common requirement in many C# applications, but relying on Microsoft Office Interop can be cumbersome and inefficient. Fortunately, third-party libraries like Spire.Doc for .NET provide a powerful and seamless alternative for high-quality conversions without Interop dependencies. Whether you need to preserve formatting, secure PDFs with passwords, or optimize file size, Spire.Doc offers a flexible solution with minimal code.
In this guide, we’ll explore how to convert Word to PDF in C# using Spire.Doc, covering basic conversions, advanced customization, and best practices for optimal results.
- C# .NET Library for Converting Word to PDF
- Basic DOCX to PDF Conversion Example
- Advanced Word to PDF Conversion Options
- Adjust Word Documents for Optimal Conversion
- Conclusion
- FAQs
C# .NET Library for Converting Word to PDF
Spire.Doc for .NET is a robust API that enables developers to create, edit, and convert Word documents programmatically. It supports converting Word (DOC, DOCX) to PDF while preserving formatting, images, hyperlinks, and other elements.
With Spire.Doc, you can benefit from:
- High-fidelity conversion with minimal formatting loss
- Support for password-protected PDFs
- Customizable PDF settings (PDF/A compliance, font embedding, etc.)
- Batch conversion of multiple Word files
To get started, download Spire.Doc from the official website and reference the DLLs in your project. Or, you can install it via NuGet through the following command:
PM> Install-Package Spire.DocBasic DOCX to PDF Conversion Example
Converting Word documents to PDFs using Spire.Doc is a simple process that requires minimal code. The following example demonstrates how to load a DOCX file and save it as a PDF with default settings.
- C#
using Spire.Doc;

namespace ConvertWordToPdf
{
    class Program
    {
        static void Main(string[] args)
        {
            // Create a Document object
            Document doc = new Document();

            // Load a Word document
            doc.LoadFromFile("C:\\Users\\Administrator\\Desktop\\Input.docx");

            // Save the document to PDF
            doc.SaveToFile("ToPDF.pdf", FileFormat.PDF);

            // Dispose resources
            doc.Dispose();
        }
    }
}
In this example:
- A Document object is instantiated to manage the Word file.
- The LoadFromFile method loads the DOCX file from the specified path.
- The SaveToFile method converts and saves the document in PDF format.
- Finally, the Dispose method is called to release resources used by the Document object.
This straightforward approach allows for quick and efficient conversion of DOCX files into PDFs with just a few lines of code.
Result:

Advanced Word to PDF Conversion Options
To gain greater control over the conversion process, Spire.Doc offers the ToPdfParameterList class. With this class, you can:
- Convert to PDF/A (a standardized archival format)
- Apply password protection and permission restrictions
- Embed fonts to ensure consistent rendering
- Preserve bookmarks for better navigation
- Disable hyperlinks if necessary
Here’s a summary of available options:
| Option | Implemented by |
| Convert to PDF/A | PdfConformanceLevel |
| Protect PDF with a passoword | PdfSecurity |
| Restrict permessions (e.g., printing) | PdfSecurity |
| Embed all fonts | IsEmbeddedAllFonts |
| Embed specific fonts | EmbeddedFontNameList |
| Preserve bookmarks | CreateWordsBookmarks |
| Create bookmarks from headings | CreateWordBookmarksUsingHeadings |
| Disable hyperlinks | DisableLink |
Example 1: Convert Word to Password-Protected PDF
When sharing confidential Word documents as PDFs, a simple conversion isn't enough. Spire.Doc lets you add military-grade password protection by using the PdfSecurity.Encrypt method, preventing unauthorized access while maintaining perfect formatting.
The following code encrypts the generated PDF document with an open password:
- C#
using Spire.Doc;

namespace ConvertWordToPasswordProtectedPdf
{
    class Program
    {
        static void Main(string[] args)
        {
            // Create a Document object
            Document doc = new Document();

            // Load a Word document
            doc.LoadFromFile("C:\\Users\\Administrator\\Desktop\\Input.docx");

            // Create a ToPdfParameterList object
            ToPdfParameterList parameters = new ToPdfParameterList();

            // Set an open password
            parameters.PdfSecurity.Encrypt("openPsd");

            // Save the Word to PDF with options
            doc.SaveToFile("PasswordProtected.pdf", parameters);

            // Dispose resources
            doc.Dispose();
        }
    }
}
Advanced Contol:
Want even more control? Combine with document permessions:
- C#
parameters.PdfSecurity.Encrypt("openPsd", "permissionPsd", PdfPermissionsFlags.Print, PdfEncryptionKeySize.Key128Bit);
doc.SaveToFile("PasswordProtected.pdf", parameters);
Example 2: Ensure Consistent Text Rendering by Embedding Fonts in PDF
When converting Word to PDF, fonts may appear differently (or even as gibberish) if the viewer’s system lacks the original fonts used in your document. Spire.Doc solves this by embedding fonts directly into the PDF, guaranteeing that text displays exactly as intended—regardless of the device or software used to open the file.
The following code embeds all fonts when converting Word to PDF in C#:
- C#
using Spire.Doc;

namespace EmbedFonts
{
    class Program
    {
        static void Main(string[] args)
        {
            // Create a Document object
            Document doc = new Document();

            // Load a Word document
            doc.LoadFromFile("C:\\Users\\Administrator\\Desktop\\Sample.docx");

            // Create a ToPdfParameterList object
            ToPdfParameterList parameters = new ToPdfParameterList();

            // Embed all the fonts used in Word in the generated PDF
            parameters.IsEmbeddedAllFonts = true;

            // Save the document to PDF
            doc.SaveToFile("EmbedFonts.pdf", parameters);

            // Dispose resources
            doc.Dispose();
        }
    }
}
Advanced Contol:
To reduce file size, you can selectively embed fonts (e.g., only your custom font, not common ones like Arial):
- C#
parameters.PrivateFontPaths = new List()
 {
     new PrivateFontPath("YourCustomFont", "FontPath"),
     new PrivateFontPath("AnotherFont", "FontPath")
 };
 doc.SaveToFile("EmbedCustomFonts.pdf", parameters);
Adjust Word Documents for Optimal Conversion
To achieve the best PDF output, you may need to prepare your Word document before conversion. Consider the following adjustments:
- Change page size or margins for better layout
- Enhance document security by adding watermarks
- Compress images to reduce file size
Example: Reduce PDF Size by Compressing Images
Large image-heavy Word documents often create bloated PDFs that are difficult to share. With Spire.Doc, you can automatically optimize images during conversion, dramatically reducing file size while maintaining acceptable quality.
The following code reduces image quality to 50%, resulting in a smaller PDF:
- C#
using Spire.Doc;

namespace SetImageQualityWhenConverting
{
    class Program
    {
        static void Main(string[] args)
        {
            // Create a Document object
            Document doc = new Document();

            // Load a Word document
            doc.LoadFromFile("C:\\Users\\Administrator\\Desktop\\Input.docx");

            // Reduce image quality to 50%
            doc.JPEGQuality = 50;

            // Save the document to PDF
            doc.SaveToFile("CompressImage.pdf", FileFormat.PDF);

            // Dispose resources
            doc.Dispose();
        }
    }
}
Conclusion
Converting Word documents to PDF in C# doesn’t have to be complicated—Spire.Doc for .NET simplifies the process and offers extensive customization options, from basic conversions to advanced features like PDF encryption, font embedding, and image compression, all without Interop.
By following the techniques outlined in this guide, you can efficiently integrate Word-to-PDF functionality into your applications. For further assistance, explore Spire.Doc’s documentation or leverage its free trial to test its capabilities.
FAQs
Q1: How do I convert multiple Word files to PDFs in C#?
A: You can create a loop in your code to process multiple files at once. For example:
- C#
string[] files = Directory.GetFiles("input_folder", "*.docx");
foreach (string file in files)
{
    Document document = new Document();
    document.LoadFromFile(file);
    document.SaveToPDF(Path.ChangeExtension(file, ".pdf"), FileFormat.PDF);
    document.Dispose();
}
Q2: How to merge multiple Word files into a single PDF?
A: You can merge Word files first (using Spire.Doc), and then convert the combined document to PDF. For example:
- C#
Document mergedDoc = new Document();
string[] filesToMerge = Directory.GetFiles("input_folder ", "*.docx");
foreach (string file in filesToMerge)
{
    mergedDoc.InsertTextFromFile(file, FileFormat.Docx);
}
mergedDoc.SaveToFile("Merged.pdf", FileFormat.PDF);
mergedDoc.Dispose();
Q3: Why is my converted PDF missing text or formatting?
A: This issue may arise from missing custom fonts on your system. To resolve it, install the required fonts on the machine performing the conversion. Alternatively, you can embed the fonts directly into the PDF using Spire.Doc during the conversion process.
Q4: Is Spire.Doc free for Word-to-PDF conversion?
A: No, Spire.Doc is a paid library. However, a free version is available with limited functionality, allowing users to convert only the first three pages of a Word document to PDF. This option is ideal for small projects or personal use.
Get a Free License
To fully experience the capabilities of Spire.Doc for .NET without any evaluation limitations, you can request a free 30-day trial license.
Word header and footer presents additional information of Word document, which can be text, image or page number. This guide focuses on introducing how to insert image header and footer for Word document in C# and VB.NET.
Header/Footer plays an important role in Word document, which uses text, image or page number to demonstrate some additional information about this document. The information can be company name, logo, author name, document title etc. This guide will demonstrate detailed process to insert image header/footer in Word with C# and VB.NET via Spire.Doc for .NET. The following screenshot displays Word image header/footer result after programming.

Spire.Doc for .NET provides a HeaderFooter. class to enable developers to generate a new header or footer. Firstly, initialize a header instance of HeaderFooter class and then invoke AddParagraph() method to add a paragraph body for this header/footer instance. Next, invoke Paragraph.AppendPicture(Image image) method to append a picture for header/footer paragraph. If you want to add text for paragraph as well, please invoke Paragraph.AppendText(string text) method. Also, you can set format for header/footer paragraph, appended image and text to have a better layout. Code as following:
using System.Drawing;
using Spire.Doc;
using Spire.Doc.Documents;
using Spire.Doc.Fields;

namespace ImageHeaderFooter
{
    class Program
    {
        static void Main(string[] args)
        {
            //Load Document
            Document document = new Document();
            document.LoadFromFile(@"E:\Work\Documents\Spire.Doc for .NET.docx");

            //Initialize a Header Instance
            HeaderFooter header = document.Sections[0].HeadersFooters.Header;
            //Add Header Paragraph and Format
            Paragraph paragraph = header.AddParagraph();
            paragraph.Format.HorizontalAlignment = HorizontalAlignment.Right;
            //Append Picture for Header Paragraph and Format
            DocPicture headerimage = paragraph.AppendPicture(Image.FromFile(@"E:\Logo\doclog.png"));
            headerimage.VerticalAlignment = ShapeVerticalAlignment.Bottom;

            //Initialize a Footer Instance
            HeaderFooter footer = document.Sections[0].HeadersFooters.Footer;
            //Add Footer Paragraph and Format
            Paragraph paragraph2 = footer.AddParagraph();
            paragraph2.Format.HorizontalAlignment = HorizontalAlignment.Left;
            //Append Picture and Text for Footer Paragraph
            DocPicture footerimage = paragraph2.AppendPicture(Image.FromFile(@"E:\Logo\logo.jpeg"));
            TextRange TR = paragraph2.AppendText("Copyright © 2013 e-iceblue. All Rights Reserved.");
            TR.CharacterFormat.FontName = "Arial";
            TR.CharacterFormat.FontSize = 10;
            TR.CharacterFormat.TextColor = Color.Black;

            //Save and Launch
            document.SaveToFile("ImageHeaderFooter.docx", FileFormat.Docx);
            System.Diagnostics.Process.Start("ImageHeaderFooter.docx");
        }
    }
}
Imports System.Drawing
Imports Spire.Doc
Imports Spire.Doc.Documents
Imports Spire.Doc.Fields

Namespace ImageHeaderFooter
    Friend Class Program
        Shared Sub Main(ByVal args() As String)
            'Load Document
            Dim document As New Document()
            document.LoadFromFile("E:\Work\Documents\Spire.Doc for .NET.docx")

            'Initialize a Header Instance
            Dim header As HeaderFooter = document.Sections(0).HeadersFooters.Header
            'Add Header Paragraph and Format
            Dim paragraph As Paragraph = header.AddParagraph()
            paragraph.Format.HorizontalAlignment = HorizontalAlignment.Right
            'Append Picture for Header Paragraph and Format
            Dim headerimage As DocPicture = paragraph.AppendPicture(Image.FromFile("E:\Logo\doclog.png"))
            headerimage.VerticalAlignment = ShapeVerticalAlignment.Bottom

            'Initialize a Footer Instance
            Dim footer As HeaderFooter = document.Sections(0).HeadersFooters.Footer
            'Add Footer Paragraph and Format
            Dim paragraph2 As Paragraph = footer.AddParagraph()
            paragraph2.Format.HorizontalAlignment = HorizontalAlignment.Left
            'Append Picture and Text for Footer Paragraph
            Dim footerimage As DocPicture = paragraph2.AppendPicture(Image.FromFile("E:\Logo\logo.jpeg"))
            Dim TR As TextRange = paragraph2.AppendText("Copyright © 2013 e-iceblue. All Rights Reserved.")
            TR.CharacterFormat.FontName = "Arial"
            TR.CharacterFormat.FontSize = 10
            TR.CharacterFormat.TextColor = Color.Black

            'Save and Launch
            document.SaveToFile("ImageHeaderFooter.docx", FileFormat.Docx)
            System.Diagnostics.Process.Start("ImageHeaderFooter.docx")
        End Sub
    End Class
End Namespace
Spire.Doc, an easy-to-use component to perform Word tasks, allows developers to fast generate, write, edit and save Word (Word 97-2003, Word 2007, Word 2010) in C# and VB.NET for .NET, Silverlight and WPF.
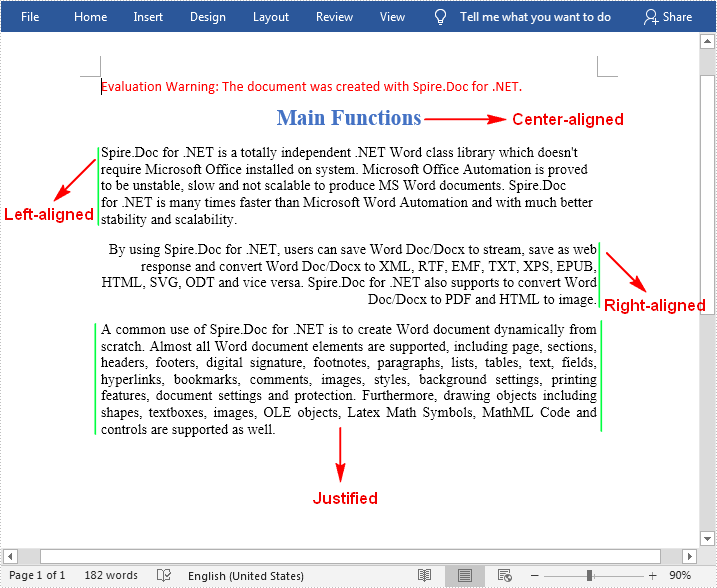
Text alignment is a paragraph formatting attribute that determines the appearance of the text in a whole paragraph. There are four types of text alignments available in Microsoft Word: left-aligned, center-aligned, right-aligned, and justified. In this article, you will learn how to programmatically set different text alignments for paragraphs in a Word document using Spire.Doc for .NET.
Install Spire.Doc for .NET
To begin with, you need to add the DLL files included in the Spire.Doc for .NET package as references in your .NET project. The DLL files can be either downloaded from this link or installed via NuGet.
PM> Install-Package Spire.Doc
Align Text in Word
The detailed steps are as follows:
- Create a Document instance.
- Load a sample Word document using Document.LoadFromFile() method.
- Get a specified section using Document.Sections[] property.
- Get a specified paragraph using Section.Paragraphs[] property.
- Get the paragraph format using Paragraph.Format property
- Set text alignment for the specified paragraph using ParagraphFormat.HorizontalAlignment property.
- Save the document to another file using Document.SaveToFile() method.
- C#
- VB.NET
using Spire.Doc;
using Spire.Doc.Documents;

namespace AlignText
{
    class Program
    {
        static void Main(string[] args)
        {
            //Create a Document instance
            Document doc = new Document();

            //Load a sample Word document
            doc.LoadFromFile(@"D:\Files\sample.docx");

            //Get the first section
            Section section = doc.Sections[0];

            //Get the first paragraph and make it center-aligned
            Paragraph p = section.Paragraphs[0];
            p.Format.HorizontalAlignment = HorizontalAlignment.Center;

            //Get the second paragraph and make it left-aligned
            Paragraph p1 = section.Paragraphs[1];
            p1.Format.HorizontalAlignment = HorizontalAlignment.Left;

            //Get the third paragraph and make it right-aligned
            Paragraph p2 = section.Paragraphs[2];
            p2.Format.HorizontalAlignment = HorizontalAlignment.Right;

            //Get the fourth paragraph and make it justified
            Paragraph p3 = section.Paragraphs[3];
            p3.Format.HorizontalAlignment = HorizontalAlignment.Justify;

            //Save the document
            doc.SaveToFile("WordAlignment.docx", FileFormat.Docx);
        }
    }
}
Apply for a Temporary License
If you'd like to remove the evaluation message from the generated documents, or to get rid of the function limitations, please request a 30-day trial license for yourself.
