
Knowledgebase (2370)
Children categories
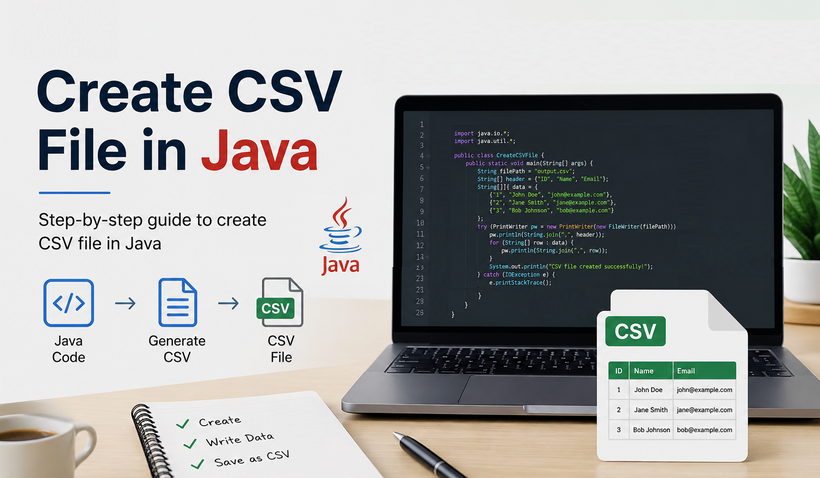
CSV remains a ubiquitous, lightweight data format in Java development, powering report exports, data migration, and cross-platform data interchange. But despite its apparent simplicity, building production-grade CSV files requires handling special characters, encodings, and strict formatting rules – all of which add unnecessary development and testing overhead.
Spire.XLS for Java streamlines this workflow with a clean, robust API that automatically handles all low-level formatting and encoding details. This guide shows you how to use Java to create CSV files – covering basic CSV generation, structured batch exports, Excel-to-CSV conversion, special character support, and advanced delimiter configuration.
- Why Choose Spire.XLS for Java to Create CSV Files
- Creating CSV Files from Scratch with Java
- Create Structured CSV from Arrays in Java
- Create CSV from Excel in Java
- Advanced CSV Generation Techniques
- Frequently Asked Questions
Why Choose Spire.XLS for Java to Create CSV Files
Compared to native Java IO, Apache POI, or any other CSV Java library, Spire.XLS for Java offers distinct advantages:
- Simplified API: Create and write CSV files in just a few lines of code, with no manual stream operations or low-level formatting work.
- Automatic Format Handling: Automatically escapes special characters (commas, double quotes, line breaks) that break standard CSV syntax.
- Full Encoding Support: Natively supports UTF-8, UTF-16, GB2312, and other encodings to avoid Chinese and special text garbling.
- Dual Format Compatibility: Supports both Excel (XLS/XLSX) and CSV formats, enabling bidirectional conversion between spreadsheets and delimited text.
- No Dependencies Bloat: Lightweight library with no third-party dependency conflicts, suitable for Java web, desktop, and microservice projects.
Prerequisites: Install Spire.XLS for Java
To start using Java to write CSV files, you first need to integrate the library into your project. We provide Maven and manual JAR installation methods.
1. Maven Dependency Configuration (Recommended)
Add the following repository and dependency to your project’s pom.xml file:
<repositories>
    <repository>
        <id>com.e-iceblue</id>
        <name>e-iceblue</name>
        <url>https://repo.e-iceblue.com/nexus/content/groups/public/</url>
    </repository>
</repositories>
<dependency>
    <groupId>e-iceblue</groupId>
    <artifactId>spire.xls</artifactId>
    <version>16.4.1</version>
</dependency>
2. Manual JAR Installation
For non-Maven projects, download the Spire.XLS for Java JAR file from the official website and add it to your project’s build path.
Create CSV Files from Scratch with Java
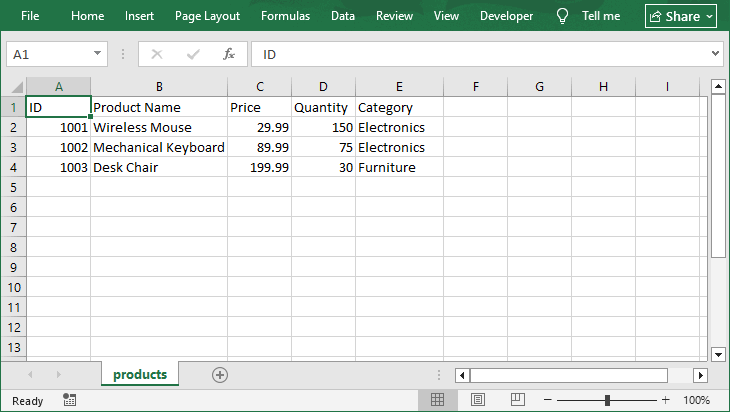
This example demonstrates how to create a blank CSV file from scratch, write custom row and column data, and save the file with standard comma delimiters and UTF-8 encoding. This is the most common basic scenario to generate CSV in Java.
import com.spire.xls.*;
import java.nio.charset.Charset;

public class CreateBasicCSV {
    public static void main(String[] args) {
        // Create Workbook instance
        Workbook workbook = new Workbook();

        // Get the first worksheet (index 0)
        Worksheet sheet = workbook.getWorksheets().get(0);

        // Write header row
        sheet.getCellRange("A1").setValue("ID");
        sheet.getCellRange("B1").setValue("Product Name");
        sheet.getCellRange("C1").setValue("Price");
        sheet.getCellRange("D1").setValue("Quantity");
        sheet.getCellRange("E1").setValue("Category");

        // Write data rows
        sheet.getCellRange("A2").setNumberValue(1001);
        sheet.getCellRange("B2").setValue("Wireless Mouse");
        sheet.getCellRange("C2").setNumberValue(29.99);
        sheet.getCellRange("D2").setNumberValue(150);
        sheet.getCellRange("E2").setValue("Electronics");

        sheet.getCellRange("A3").setNumberValue(1002);
        sheet.getCellRange("B3").setValue("Mechanical Keyboard");
        sheet.getCellRange("C3").setNumberValue(89.99);
        sheet.getCellRange("D3").setNumberValue(75);
        sheet.getCellRange("E3").setValue("Electronics");

        sheet.getCellRange("A4").setNumberValue(1003);
        sheet.getCellRange("B4").setValue("Desk Chair");
        sheet.getCellRange("C4").setNumberValue(199.99);
        sheet.getCellRange("D4").setNumberValue(30);
        sheet.getCellRange("E4").setValue("Furniture");

        // Save worksheet as CSV file (comma delimiter + UTF-8 encoding)
        sheet.saveToFile("products.csv", ",", Charset.forName("UTF-8"));

        // Release resources
        workbook.dispose();
    }
}
Key API Methods Explained
- setValue(): Writes text or string values into a cell.
- setNumberValue(): Writes numeric values (integers and decimals) into a cell.
- saveToFile(filename, separator, charset): Exports the worksheet to CSV with specified delimiter and encoding.
Open the generated CSV in Excel:
Bonus Tip: Beyond generating CSV files from scratch, Spire.XLS also allows you to read a CSV file in Java, enabling full bidirectional data processing within a single library.
Create Structured CSV from Arrays in Java
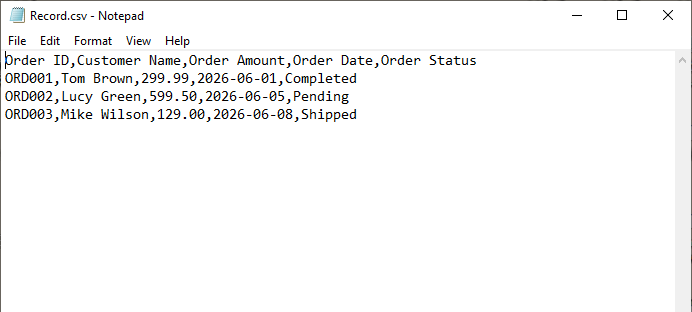
For practical development, you usually need to batch write business data (e.g., user lists, order records) to CSV files. This example shows how to create a standardized CSV file with fixed headers and batch structured data from 1D & 2D arrays.
import com.spire.xls.*;
import java.nio.charset.Charset;

public class CreateStructuredCSV {
    public static void main(String[] args) {
        Workbook workbook = new Workbook();
        Worksheet sheet = workbook.getWorksheets().get(0);

        // Define CSV header row
        String[] headers = {"Order ID", "Customer Name", "Order Amount", "Order Date", "Order Status"};
        for (int i = 0; i < headers.length; i++) {
            sheet.getCellRange(1, i + 1).setValue(headers[i]);
        }

        // Batch write order data
        String[][] orderData = {
                {"ORD001", "Tom Brown", "299.99", "2026-06-01", "Completed"},
                {"ORD002", "Lucy Green", "599.50", "2026-06-05", "Pending"},
                {"ORD003", "Mike Wilson", "129.00", "2026-06-08", "Shipped"}
        };

        // Traverse and write batch data
        int rowNum = 2;
        for (String[] rowData : orderData) {
            for (int col = 0; col < rowData.length; col++) {
                sheet.getCellRange(rowNum, col + 1).setValue(rowData[col]);
            }
            rowNum++;
        }

        // Save structured CSV file
        sheet.saveToFile("Record.csv", ",", Charset.forName("UTF-8"));
        workbook.dispose();
    }
}
Unlike the previous example where we populated each cell individually, this approach loops through arrays or collections. And the same pattern can be easily adapted to List<List<String>> or other dynamic data sources.
Output:
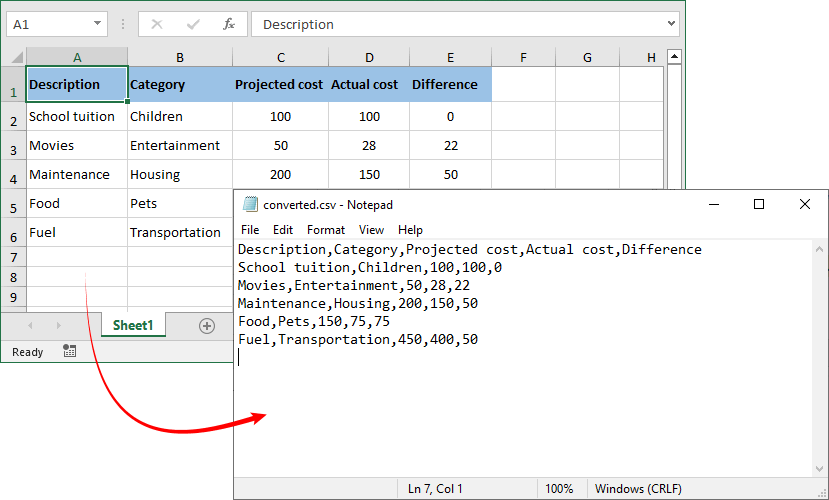
Create CSV from Excel in Java
When you need to convert Excel to CSV in Java, Spire.XLS makes this process incredibly simple with only a few lines of code.
import com.spire.xls.*;
import java.nio.charset.Charset;

public class ExcelToCSV {
    public static void main(String[] args) {
        // Load Excel file
        Workbook workbook = new Workbook();
        workbook.loadFromFile("sample.xlsx");

        // Get the first worksheet
        Worksheet sheet = workbook.getWorksheets().get(0);

        // Save worksheet as CSV
        sheet.saveToFile("converted.csv", ",", Charset.forName("UTF-8"));

        workbook.dispose();
    }
}
The core logic is straightforward: load the Excel file → target the specific worksheet → call the conversion API to save as CSV.
Excel to CSV Result:
The reverse operation – turning a CSV file into an Excel workbook – is equally valuable when you need to apply styles, formulas, or multiple worksheets to raw exported data.
Advanced CSV Generation Techniques
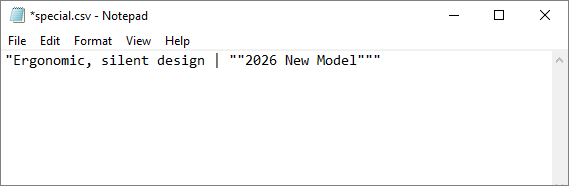
1. Handle Special Characters
When your data contains commas or double quotes, proper escaping is critical. Spire.XLS automatically wraps affected fields in double quotes per RFC 4180 standards, ensuring compatibility with Excel, WPS, and all standard text editors.
Example:
sheet.getCellRange("A1").setValue("Ergonomic, silent design | \"2026 New Model\"");
2. Custom Delimiters and Encoding
Spire.XLS for Java supports custom delimiters beyond the standard comma, accommodating regional and format-specific requirements.
// Using semicolon as delimiter and UTF-16 as encoding
sheet.saveToFile("european_data.csv", ";", Charset.forName("UTF-16"));

// Using tab as delimiter for TSV files
sheet.saveToFile("tab_separated.txt", "\t", Charset.forName("UTF-8"));
Frequently Asked Questions
Q1. Does Spire.XLS for Java require Microsoft Excel?
No. The library works completely independently without any Office dependencies.
Q2. Can I append data to the end of an existing CSV file?
Spire.XLS loads full CSV content into a worksheet for editing. To append data, load the existing file, locate the last used row, write new records starting from the next row index, then save the file back.
Q3. Can multiple worksheets be exported to a single CSV file?
No. CSV is a plain-text, single-sheet format by definition. Each saveToFile() call exports exactly one worksheet to one CSV file. To export multiple sheets, call the save method separately for each worksheet to output individual CSV files.
Q4. What about licensing?
Spire.XLS for Java offers both commercial and free versions. While the free version carries certain usage limitations, it fully supports fundamental CSV operations and lightweight spreadsheet processing tasks.
Conclusion
Generating CSV files is a routine yet critical task in Java development. The quality and reliability of your CSV output directly impact downstream processes such as reporting, system migration, and data analysis. To ensure error‑free CSV generation, you need a library that handles formatting, encoding, and special characters automatically.
Spire.XLS for Java provides exactly that. By following the step‑by‑step code examples in this article, you can quickly integrate robust CSV generation into your Java projects, improving development efficiency while eliminating common formatting flaws and encoding errors.
For more advanced features (e.g., converting CSV to PDF), explore the Spire.XLS for Java Documentation.
Add, Remove, and Move Excel Worksheets with JavaScript in React
2026-06-15 03:56:24 Written by Lisa LiManaging worksheets — adding, removing, and reordering them — is one of the most fundamental and frequently used operations in Excel document processing. Spire.XLS for JavaScript handles these operations entirely in the browser via WebAssembly, using a virtual file system (VFS) to manage input and output files — no backend server required.
This article covers three core features:
For installation and project setup, refer to Integrating Spire.XLS for JavaScript in a React Project. The examples below assume Spire.XLS is installed and the WebAssembly module is initialized.
Add Worksheet
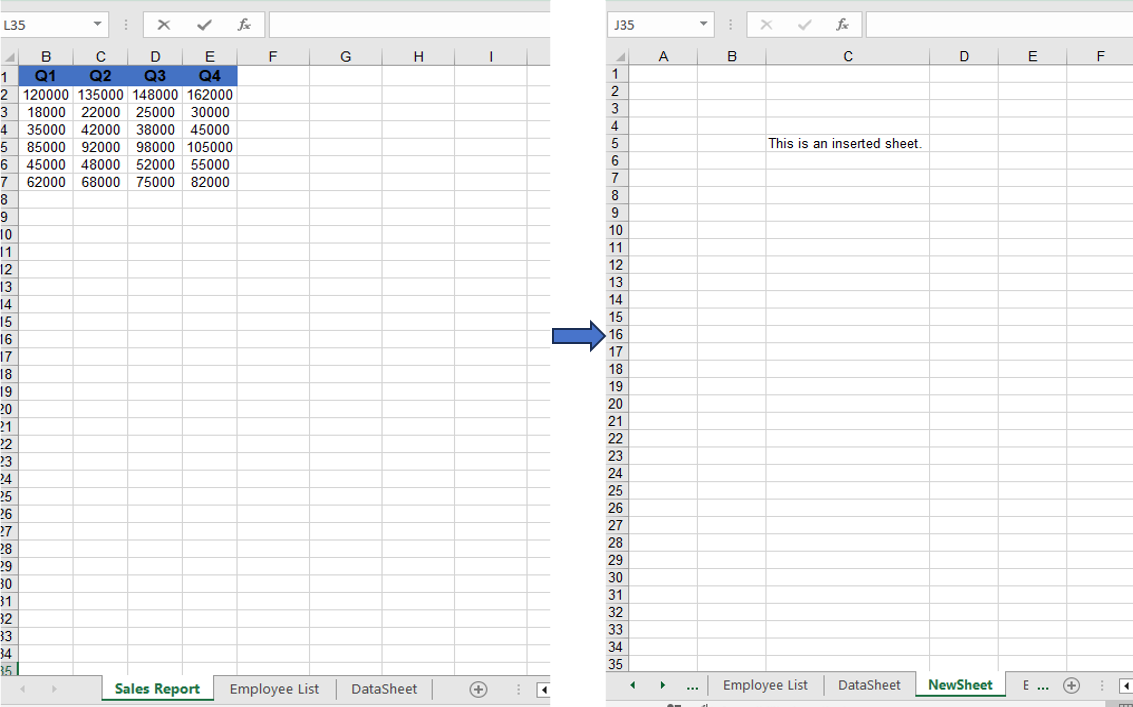
Adding new worksheets to a workbook is a common requirement in daily development. Spire.XLS for JavaScript provides the Add method to create a new worksheet and give it a name. After adding, you can write data to the new sheet's cells and save the workbook.
function App() {
  const startProcessing = async () => {
    // Get the Spire.XLS WASM module
    const xlsModule = window.wasmModule?.spirexls;
    if (!xlsModule) {
      alert('Spire.Xls is not ready yet');
      return;
    }

    // Load fonts and the Excel file into VFS
    await window.spire.FetchFileToVFS('ARIAL.TTF', '/Library/Fonts/', `${process.env.PUBLIC_URL}/font/`);
    const inputFileName = 'AddWorksheet.xlsx';
    await window.spire.FetchFileToVFS(inputFileName, '', `${process.env.PUBLIC_URL}/data/`);

    // Create a workbook instance and load the file
    const workbook = new xlsModule.Workbook();
    workbook.LoadFromFile({ fileName: inputFileName });

    // Add a new worksheet named "NewSheet"
    const sheet = workbook.Worksheets.Add("NewSheet");
    sheet.Range.get("C5").Text = "This is an inserted sheet.";

    // Auto-fit columns
    sheet.AllocatedRange.AutoFitColumns();

    // Save the workbook
    const outputFileName = "AddWorksheet_output.xlsx";
    workbook.SaveToFile({ fileName: outputFileName });

    // Release resources
    workbook.Dispose();

    // Read the output file from VFS, wrap it as a Blob, and trigger download
    const modifiedFileArray = window.dotnetRuntime.Module.FS.readFile(outputFileName);
    const blob = new Blob([modifiedFileArray], { type: "application/vnd.openxmlformats-officedocument.spreadsheetml.sheet" });
    const url = URL.createObjectURL(blob);
    const a = document.createElement('a');
    a.href = url;
    a.download = outputFileName;
    a.click();
    URL.revokeObjectURL(url);
  };

  return (
    <div style={{ textAlign: 'center', height: '300px' }}>
      <h1>Add Worksheet</h1>
      <button onClick={startProcessing}>
        Start
      </button>
    </div>
  );
}

export default App;
Adding a new worksheet after the existing ones via the Add method.
Remove Worksheet
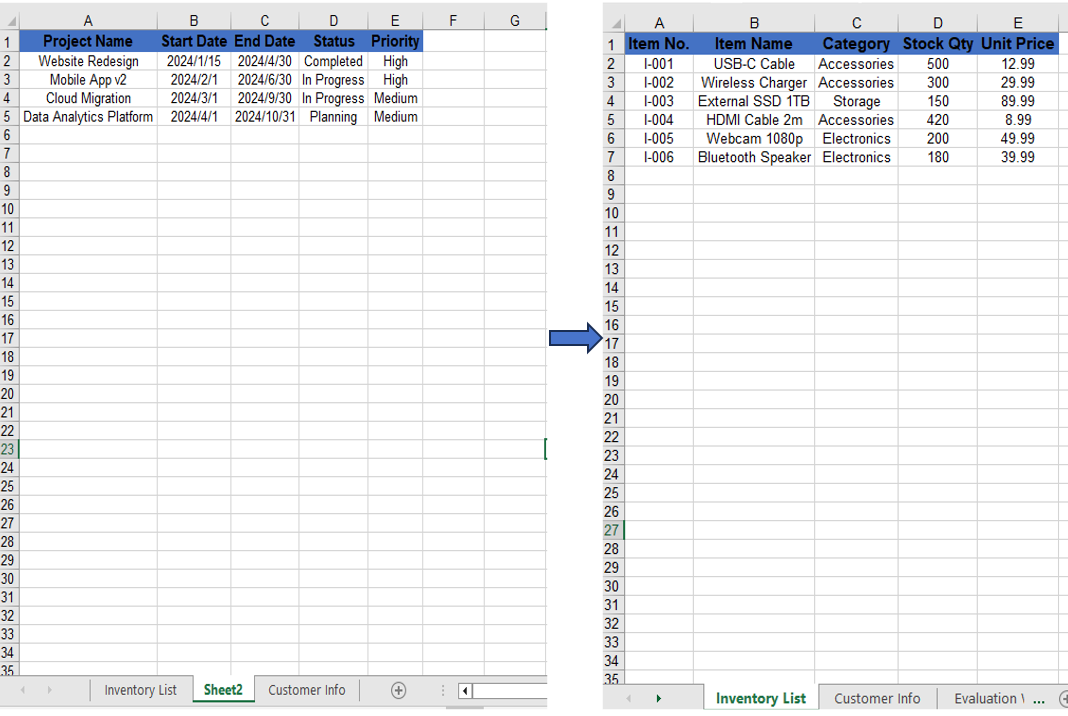
When you need to clean up unwanted worksheets from a workbook, you can remove them directly by name. Spire.XLS for JavaScript's Remove method precisely locates and removes the target worksheet.
function App() {
  const startProcessing = async () => {
    // Get the Spire.XLS WASM module
    const xlsModule = window.wasmModule?.spirexls;
    if (!xlsModule) {
      alert('Spire.Xls is not ready yet');
      return;
    }

    // Load fonts and the Excel file into VFS
    await window.spire.FetchFileToVFS('ARIAL.TTF', '/Library/Fonts/', `${process.env.PUBLIC_URL}/font/`);
    const inputFileName = 'RemoveWorksheet.xlsx';
    await window.spire.FetchFileToVFS(inputFileName, '', `${process.env.PUBLIC_URL}/data/`);

    // Create a workbook instance and load the file
    const workbook = new xlsModule.Workbook();
    workbook.LoadFromFile({ fileName: inputFileName });

    // Remove a worksheet by name
    const sheet = workbook.Worksheets.get("Sheet2");
    workbook.Worksheets.Remove(sheet);
    // Remove by index
    //workbook.Worksheets.RemoveAt(1);

    // Save the workbook
    const outputFileName = "RemoveWorksheet_output.xlsx";
    workbook.SaveToFile({ fileName: outputFileName });

    // Release resources
    workbook.Dispose();

    // Read the output file from VFS, wrap it as a Blob, and trigger download
    const modifiedFileArray = window.dotnetRuntime.Module.FS.readFile(outputFileName);
    const blob = new Blob([modifiedFileArray], { type: "application/vnd.openxmlformats-officedocument.spreadsheetml.sheet" });
    const url = URL.createObjectURL(blob);
    const a = document.createElement('a');
    a.href = url;
    a.download = outputFileName;
    a.click();
    URL.revokeObjectURL(url);
  };

  return (
    <div style={{ textAlign: 'center', height: '300px' }}>
      <h1>Remove Worksheet</h1>
      <button onClick={startProcessing}>
        Start
      </button>
    </div>
  );
}

export default App;
Using Remove to delete a worksheet by name.
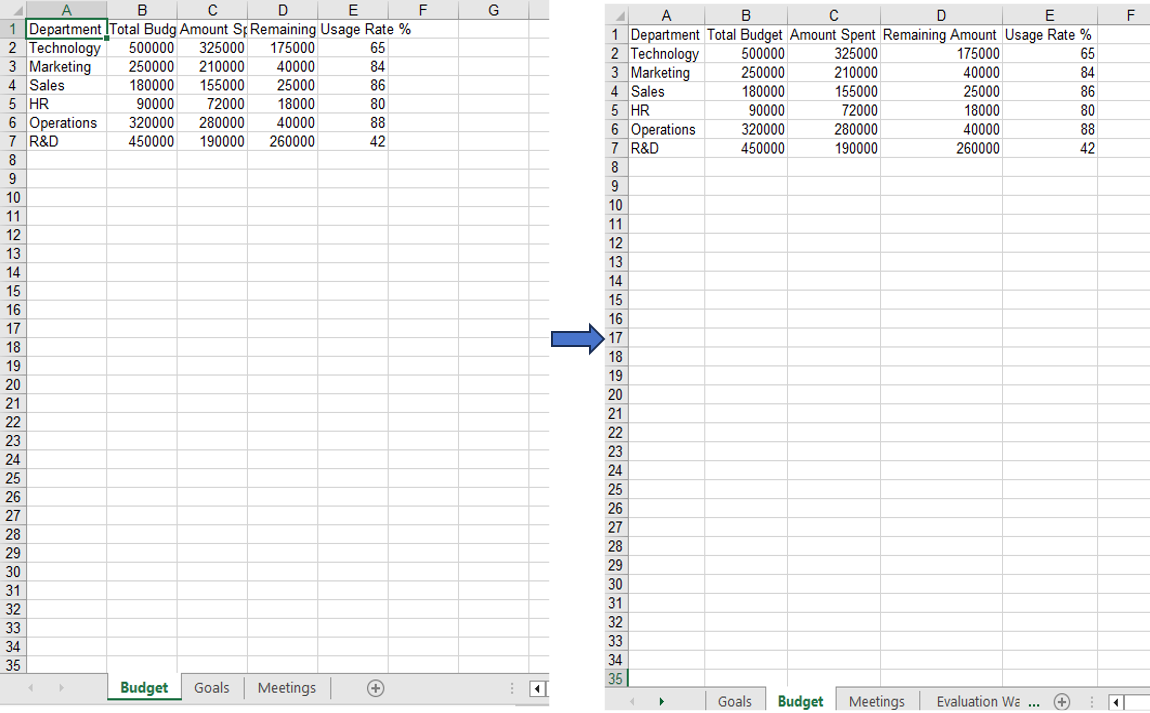
Move and Reorder Worksheets
Reordering worksheets is a common task when organizing an Excel document. With Spire.XLS for JavaScript's MoveWorksheet method, you can move a worksheet to a target index position, effectively reordering the sheets within the workbook.
function App() {
  const startProcessing = async () => {
    // Get the Spire.XLS WASM module
    const xlsModule = window.wasmModule?.spirexls;
    if (!xlsModule) {
      alert('Spire.Xls is not ready yet');
      return;
    }

    // Load fonts and the Excel file into VFS
    await window.spire.FetchFileToVFS('ARIAL.TTF', '/Library/Fonts/', `${process.env.PUBLIC_URL}/font/`);
    const inputFileName = 'Sample.xlsx';
    await window.spire.FetchFileToVFS(inputFileName, '', `${process.env.PUBLIC_URL}/data/`);

    // Create a workbook instance and load the file
    const workbook = new xlsModule.Workbook();
    workbook.LoadFromFile({ fileName: inputFileName });

    // Get the first worksheet and move it to index 1
    const sheet = workbook.Worksheets.get(0);
    sheet.MoveWorksheet(1);

    // Save the workbook
    const outputFileName = "MoveWorksheet_output.xlsx";
    workbook.SaveToFile({ fileName: outputFileName });

    // Release resources
    workbook.Dispose();

    // Read the output file from VFS, wrap it as a Blob, and trigger download
    const modifiedFileArray = window.dotnetRuntime.Module.FS.readFile(outputFileName);
    const blob = new Blob([modifiedFileArray], { type: "application/vnd.openxmlformats-officedocument.spreadsheetml.sheet" });
    const url = URL.createObjectURL(blob);
    const a = document.createElement('a');
    a.href = url;
    a.download = outputFileName;
    a.click();
    URL.revokeObjectURL(url);
  };

  return (
    <div style={{ textAlign: 'center', height: '300px' }}>
      <h1>Move Worksheet</h1>
      <button onClick={startProcessing}>
        Start
      </button>
    </div>
  );
}

export default App;
Moving the first worksheet to the second sheet position via the MoveWorksheet method.
FAQ
Index out of range when operating on worksheets
Cause: The index parameter is outside the range of the current worksheet collection in the workbook.
Solution: Verify the total number of worksheets before performing the operation, ensuring the index is within 0 to worksheets.Count-1. Use workbook.Worksheets.Count to get the current total:
const count = workbook.Worksheets.Count;
Worksheet not found when removing by name
Cause: The specified worksheet name does not exactly match the actual name in the workbook.
Solution: Iterate through the worksheet names to confirm before removal:
for (let i = 0; i < workbook.Worksheets.Count; i++) {
  let name = workbook.Worksheets.get(i).Name;
  console.log(name);
}
Get a Free License
Spire.XLS for JavaScript offers a 30-day full-featured free trial license with no functional limitations. Apply here to evaluate before purchasing.

JSON is one of the most common formats for exchanging structured data between applications, APIs, and databases. In many business scenarios, however, JSON data needs to be transformed into human-readable Word documents such as reports, invoices, summaries, contracts, or exported records.
Converting JSON to Word is not a simple file format conversion. JSON has no inherent Word structure, so the process requires parsing the JSON data and mapping its elements to appropriate Word document components such as paragraphs, tables, and headings.
This article demonstrates how to convert JSON data into Word documents in Python using Spire.Doc for Python. We'll cover multiple approaches, including exporting JSON as formatted text, creating Word tables from JSON arrays, and generating structured reports from nested JSON data.
Content Overview
- Understanding JSON-to-Word Conversion
- Install Spire.Doc for Python
- Method 1: Convert JSON to Word as Formatted Text
- Method 2: Convert JSON Arrays to Word Tables
- Method 3: Generate Structured Word Reports from JSON
- Handle Nested JSON Objects
- Handle Missing or Optional Fields
- Convert JSON Files to Word Documents
- Why Use Spire.Doc for JSON-to-Word Conversion
- FAQ
- Conclusion
1. Understanding JSON-to-Word Conversion
JSON and Word documents serve fundamentally different purposes. JSON is a structured data format designed for data exchange and machine processing, while Word documents are intended for human consumption with rich formatting, visual hierarchy, and page layout.
As a result, converting JSON to Word is not a direct format transformation. The JSON data must first be parsed and mapped to appropriate document elements before a Word document can be generated.
The conversion process typically follows this workflow:
JSON Data
      ↓
Parse JSON (json.loads)
      ↓
Map Data Structure
      ↓
Spire.Doc for Python
      ↓
Paragraphs / Tables / Headings
      ↓
DOCX Document
In Python, the built-in json module is commonly used to parse JSON data, while Spire.Doc for Python handles document generation. After the JSON structure is analyzed and mapped, Spire.Doc can create paragraphs, tables, headings, images, and other Word elements programmatically, producing a fully formatted DOCX document.
The table below shows common mappings between JSON structures and Word elements:
| JSON Structure | Word Element | Example |
|---|---|---|
| Key-Value Pair | Paragraph | "Name": "John" → Name: John |
| Array | Table | [{...}, {...}] → rows and columns |
| Object | Section | Nested object → grouped content |
| Title Field | Heading | "title": "Report" → Heading 1 |
| URL/Image Path | Image | "logo": "img.png" → embedded image |
Understanding these mappings is important because the same JSON data can be presented in different ways depending on the document's purpose. For example, simple key-value data may be exported as paragraphs, while collections of records are usually easier to read when rendered as tables. With Spire.Doc for Python, these mappings can be implemented programmatically to generate professional Word documents from structured JSON data.
2. Install Spire.Doc for Python
Before converting JSON to Word, you need to install Spire.Doc for Python in your development environment.
Install via pip (Recommended)
pip install spire.doc
Alternatively, you can download Spire.Doc for Python and integrate it manually.
After installation, import the library in your project:
from spire.doc import *
from spire.doc.common import *
3. Method 1: Convert JSON to Word as Formatted Text
This method is the simplest approach for converting JSON to Word. It works well for API responses, configuration files, and simple JSON exports where each key-value pair maps to a paragraph.
Sample JSON
{
  "Name": "John Smith",
  "Department": "Sales",
  "Country": "USA"
}
Python Code
import json
from spire.doc import Document, FileFormat, HorizontalAlignment

json_data = '{"Name": "John Smith", "Department": "Sales", "Country": "USA"}'
data = json.loads(json_data)

document = Document()
section = document.AddSection()

for key, value in data.items():
    paragraph = section.AddParagraph()
    text_range = paragraph.AppendText(f"{key}: {value}")
    text_range.CharacterFormat.FontSize = 12
    paragraph.Format.AfterSpacing = 6

document.SaveToFile("json_to_text.docx", FileFormat.Docx)
document.Close()
Output
The following Word document shows how JSON key-value pairs can be converted into formatted paragraphs.

When to Use This Approach
This method is best suited for:
- Simple key-value JSON objects
- API response exports
- Configuration file documentation
- Quick data snapshots
It is not ideal for large datasets or tabular data, where Method 2 (tables) provides better readability.
If your goal is to analyze, filter, or manipulate structured JSON data in a spreadsheet, you may also be interested in our guide on converting JSON to Excel in Python.
4. Method 2: Convert JSON Arrays to Word Tables
When JSON data contains arrays of objects, tables provide the most effective way to present the data in a Word document. This is the most common scenario for converting JSON to Word, as many APIs and databases return data as JSON arrays.
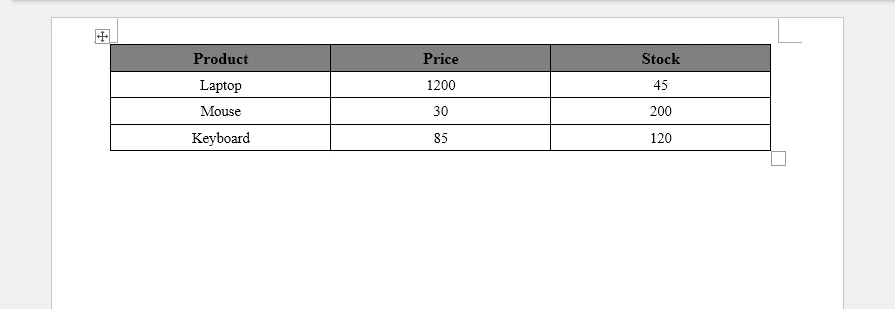
Sample JSON
[
  {"Product": "Laptop", "Price": 1200, "Stock": 45},
  {"Product": "Mouse", "Price": 30, "Stock": 200},
  {"Product": "Keyboard", "Price": 85, "Stock": 120}
]
Python Code
import json
from spire.doc import (
    Document, FileFormat, HorizontalAlignment,
    VerticalAlignment, TableRowHeightType, Color
)

json_data = '''[
  {"Product": "Laptop", "Price": 1200, "Stock": 45},
  {"Product": "Mouse", "Price": 30, "Stock": 200},
  {"Product": "Keyboard", "Price": 85, "Stock": 120}
]'''
data = json.loads(json_data)

document = Document()
section = document.AddSection()

if data:
    headers = list(data[0].keys())
    table = section.AddTable(True)
    table.ResetCells(len(data) + 1, len(headers))

    header_row = table.Rows[0]
    header_row.IsHeader = True
    header_row.Height = 20
    header_row.HeightType = TableRowHeightType.Exactly

    for col_index, header in enumerate(headers):
        header_row.Cells[col_index].CellFormat.Shading.BackgroundPatternColor = Color.get_Gray()
        header_row.Cells[col_index].CellFormat.VerticalAlignment = VerticalAlignment.Middle
        paragraph = header_row.Cells[col_index].AddParagraph()
        paragraph.Format.HorizontalAlignment = HorizontalAlignment.Center
        text_range = paragraph.AppendText(header)
        text_range.CharacterFormat.Bold = True
        text_range.CharacterFormat.FontSize = 12

    for row_index, record in enumerate(data):
        data_row = table.Rows[row_index + 1]
        data_row.Height = 20
        data_row.HeightType = TableRowHeightType.Exactly
        for col_index, key in enumerate(headers):
            data_row.Cells[col_index].CellFormat.VerticalAlignment = VerticalAlignment.Middle
            paragraph = data_row.Cells[col_index].AddParagraph()
            paragraph.Format.HorizontalAlignment = HorizontalAlignment.Center
            text_range = paragraph.AppendText(str(record.get(key, "")))
            text_range.CharacterFormat.FontSize = 11

document.SaveToFile("json_to_table.docx", FileFormat.Docx)
document.Close()
Output
The following screenshot shows the generated Word table created from the JSON array.
Why Use Tables for JSON Arrays
Tables are the natural fit for JSON array data because:
- Each JSON object maps to a table row
- Each key maps to a column header
- Data is aligned for easy scanning and comparison
- Tables are the standard format for reports, inventory lists, and exported database records
Enhancing JSON Tables with Formatting
Unlike plain text exports, Spire.Doc allows JSON data to be rendered as professionally formatted Word tables. Beyond basic table creation, you can apply:
- Table styles – Use
DefaultTableStyleorApplyStylefor consistent, polished table appearances - Borders and shading – Control cell borders, background colors, and alternating row colors
- Alignment – Set horizontal and vertical alignment at the cell, row, or table level
- Custom formatting – Apply font size, bold, and color to individual cells or ranges
- Auto-fit behavior – Use
AutoFitto adjust column widths to content or window size
These formatting capabilities transform raw JSON data into professional report layouts suitable for business documents, client deliverables, and automated reporting pipelines.
If you need to create more sophisticated Word tables, such as merged cells, custom table layouts, or advanced formatting, see our guide on creating and formatting tables in Word documents using Python.
5. Method 3: Generate Structured Word Reports from JSON
Real-world JSON data often contains a mix of metadata, summary text, and tabular data. This method combines headings, paragraphs, and tables to generate a complete structured Word report from JSON.
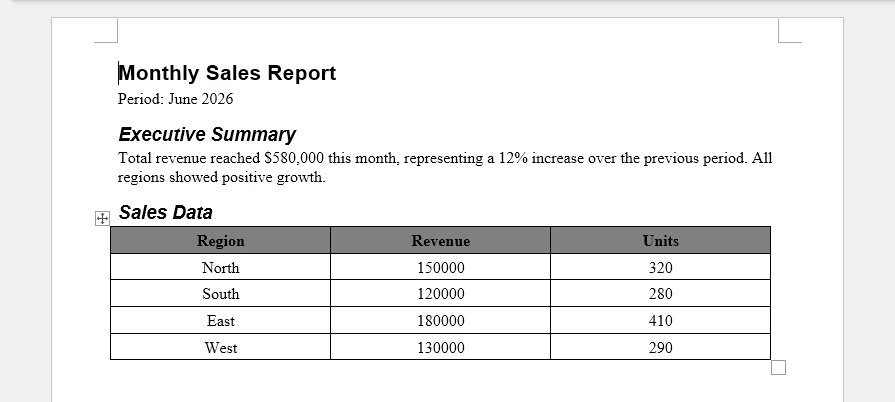
Sample JSON
{
  "title": "Monthly Sales Report",
  "period": "June 2026",
  "summary": "Total revenue reached $580,000 this month, representing a 12% increase over the previous period. All regions showed positive growth.",
  "sales": [
    {"Region": "North", "Revenue": 150000, "Units": 320},
    {"Region": "South", "Revenue": 120000, "Units": 280},
    {"Region": "East", "Revenue": 180000, "Units": 410},
    {"Region": "West", "Revenue": 130000, "Units": 290}
  ]
}
Python Code
import json
from spire.doc import (
    Document, FileFormat, HorizontalAlignment,
    VerticalAlignment, TableRowHeightType, Color,
    BuiltinStyle
)

json_data = '''{
  "title": "Monthly Sales Report",
  "period": "June 2026",
  "summary": "Total revenue reached $580,000 this month, representing a 12% increase over the previous period. All regions showed positive growth.",
  "sales": [
    {"Region": "North", "Revenue": 150000, "Units": 320},
    {"Region": "South", "Revenue": 120000, "Units": 280},
    {"Region": "East", "Revenue": 180000, "Units": 410},
    {"Region": "West", "Revenue": 130000, "Units": 290}
  ]
}'''
data = json.loads(json_data)

document = Document()
section = document.AddSection()

heading_style = document.AddStyle(BuiltinStyle.Heading1)
subheading_style = document.AddStyle(BuiltinStyle.Heading2)

title_para = section.AddParagraph()
title_para.ApplyStyle(heading_style.Name)
title_para.AppendText(data.get("title", "Report"))

period_para = section.AddParagraph()
period_para.AppendText(f"Period: {data.get('period', 'N/A')}")
period_para.Format.AfterSpacing = 12

summary_heading = section.AddParagraph()
summary_heading.ApplyStyle(subheading_style.Name)
summary_heading.AppendText("Executive Summary")

summary_para = section.AddParagraph()
summary_para.AppendText(data.get("summary", ""))
summary_para.Format.AfterSpacing = 12

sales_heading = section.AddParagraph()
sales_heading.ApplyStyle(subheading_style.Name)
sales_heading.AppendText("Sales Data")

sales = data.get("sales", [])
if sales:
    headers = list(sales[0].keys())
    table = section.AddTable(True)
    table.ResetCells(len(sales) + 1, len(headers))

    header_row = table.Rows[0]
    header_row.IsHeader = True
    header_row.Height = 20
    header_row.HeightType = TableRowHeightType.Exactly

    for col_index, header in enumerate(headers):
        header_row.Cells[col_index].CellFormat.Shading.BackgroundPatternColor = Color.get_Gray()
        header_row.Cells[col_index].CellFormat.VerticalAlignment = VerticalAlignment.Middle
        paragraph = header_row.Cells[col_index].AddParagraph()
        paragraph.Format.HorizontalAlignment = HorizontalAlignment.Center
        text_range = paragraph.AppendText(header)
        text_range.CharacterFormat.Bold = True

    for row_index, record in enumerate(sales):
        data_row = table.Rows[row_index + 1]
        data_row.Height = 20
        data_row.HeightType = TableRowHeightType.Exactly
        for col_index, key in enumerate(headers):
            data_row.Cells[col_index].CellFormat.VerticalAlignment = VerticalAlignment.Middle
            paragraph = data_row.Cells[col_index].AddParagraph()
            paragraph.Format.HorizontalAlignment = HorizontalAlignment.Center
            paragraph.AppendText(str(record.get(key, "")))

document.SaveToFile("json_report.docx", FileFormat.Docx)
document.Close()
Output
The generated Word document combines headings, descriptive text, and tabular data into a structured report, making the JSON data easier to read and share.
Key Techniques
This example demonstrates several important techniques for generating Word reports from JSON:
- Headings – Use
BuiltinStyle.Heading1andHeading2for document structure and table-of-contents compatibility - Paragraphs – Add summary and descriptive text between headings
- Tables – Render JSON arrays as tabular data within the report
- Combinations – Mix multiple Word element types in a single document
Why Structured Reports Matter
In business environments, JSON data rarely exists in isolation. It typically comes from APIs, databases, or reporting systems and needs to be transformed into documents that decision-makers can read, share, and archive. Common scenarios include:
- Sales reports – Revenue, units, and regional breakdowns from CRM or ERP systems
- Inventory reports – Stock levels, reorder alerts, and warehouse summaries
- Customer summaries – Contact details, order history, and account status
- Compliance reports – Audit logs, access records, and policy status
- Automated reporting systems – Scheduled jobs that generate documents from JSON data and distribute them via email or document management systems
Spire.Doc makes it possible to transform structured JSON data into polished business documents automatically, combining headings, paragraphs, and tables in a single output.
If you need to build more sophisticated document layouts, such as multi-section reports, cover pages, tables of contents, headers, footers, or custom document templates, see our guide on creating structured Word documents in Python.
6. Handle Nested JSON Objects
Many real-world JSON responses contain nested objects. For example, a customer record may include an address object with its own fields. Handling these nested structures is essential for complete JSON-to-Word conversion.
Example JSON
{
  "customer": {
    "name": "Tom Wilson",
    "email": "tom@example.com",
    "address": {
      "street": "123 Main St",
      "city": "Springfield",
      "state": "IL"
    }
  }
}
Python Code
import json
from spire.doc import Document, FileFormat, HorizontalAlignment

def add_nested_object(section, obj, indent_level=0):
    for key, value in obj.items():
        if isinstance(value, dict):
            heading_para = section.AddParagraph()
            heading_text = "  " * indent_level + key.capitalize()
            text_range = heading_para.AppendText(heading_text)
            text_range.CharacterFormat.Bold = True
            text_range.CharacterFormat.FontSize = 12 - indent_level
            heading_para.Format.AfterSpacing = 4
            add_nested_object(section, value, indent_level + 1)
        else:
            paragraph = section.AddParagraph()
            label = "  " * indent_level + f"{key}: {value}"
            text_range = paragraph.AppendText(label)
            text_range.CharacterFormat.FontSize = 11
            paragraph.Format.AfterSpacing = 2

json_data = '''{
  "customer": {
    "name": "Tom Wilson",
    "email": "tom@example.com",
    "address": {
      "street": "123 Main St",
      "city": "Springfield",
      "state": "IL"
    }
  }
}'''
data = json.loads(json_data)

document = Document()
section = document.AddSection()

add_nested_object(section, data)

document.SaveToFile("json_nested.docx", FileFormat.Docx)
document.Close()
Output
The following screenshot shows the hierarchical Word document generated from the nested JSON structure.
Nested JSON objects can be represented as hierarchical sections in a Word document, making complex data structures easier to read and navigate.
How It Works
The add_nested_object function recursively traverses the JSON structure:
- When it encounters a dict value, it creates a bold heading for the key and recurses into the nested object
- When it encounters a scalar value, it creates a paragraph with the key-value pair
- The
indent_levelparameter controls indentation and font size to create a visual hierarchy
This recursive approach handles arbitrarily deep nesting and produces a readable hierarchical layout in the Word document.
7. Handle Missing or Optional JSON Fields
In real-world applications, JSON data from APIs and databases often contains missing or optional fields. Records may have inconsistent keys, and some fields may be absent entirely. Handling these cases gracefully prevents errors and ensures the generated Word document remains complete.
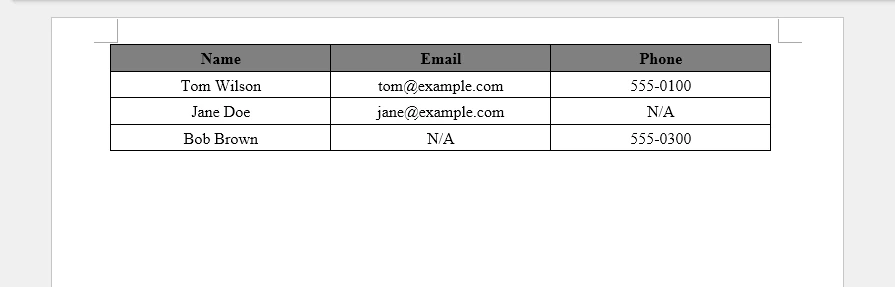
Example JSON with Missing Fields
[
  {"Name": "Tom Wilson", "Email": "tom@example.com", "Phone": "555-0100"},
  {"Name": "Jane Doe", "Email": "jane@example.com"},
  {"Name": "Bob Brown", "Phone": "555-0300"}
]
Python Code
import json
from spire.doc import (
    Document, FileFormat, HorizontalAlignment,
    VerticalAlignment, TableRowHeightType, Color
)

json_data = '''[
  {"Name": "Tom Wilson", "Email": "tom@example.com", "Phone": "555-0100"},
  {"Name": "Jane Doe", "Email": "jane@example.com"},
  {"Name": "Bob Brown", "Phone": "555-0300"}
]'''
data = json.loads(json_data)

document = Document()
section = document.AddSection()

if data:
    all_keys = []
    for record in data:
        for key in record.keys():
            if key not in all_keys:
                all_keys.append(key)

    table = section.AddTable(True)
    table.ResetCells(len(data) + 1, len(all_keys))

    header_row = table.Rows[0]
    header_row.IsHeader = True
    header_row.Height = 20
    header_row.HeightType = TableRowHeightType.Exactly

    for col_index, header in enumerate(all_keys):
        header_row.Cells[col_index].CellFormat.Shading.BackgroundPatternColor = Color.get_Gray()
        header_row.Cells[col_index].CellFormat.VerticalAlignment = VerticalAlignment.Middle
        paragraph = header_row.Cells[col_index].AddParagraph()
        paragraph.Format.HorizontalAlignment = HorizontalAlignment.Center
        text_range = paragraph.AppendText(header)
        text_range.CharacterFormat.Bold = True

    for row_index, record in enumerate(data):
        data_row = table.Rows[row_index + 1]
        data_row.Height = 20
        data_row.HeightType = TableRowHeightType.Exactly
        for col_index, key in enumerate(all_keys):
            data_row.Cells[col_index].CellFormat.VerticalAlignment = VerticalAlignment.Middle
            paragraph = data_row.Cells[col_index].AddParagraph()
            paragraph.Format.HorizontalAlignment = HorizontalAlignment.Center
            paragraph.AppendText(str(record.get(key, "N/A")))

document.SaveToFile("json_missing_fields.docx", FileFormat.Docx)
document.Close()
Output
The following screenshot shows the generated Word table, where missing fields are automatically filled with placeholder values to maintain a consistent document structure.
Key Techniques
dict.get(key, "N/A")– Returns a default value when a key is missing, preventingKeyErrorexceptions- Dynamic column collection – Iterates all records to build a complete set of column headers, ensuring no field is missed even when it appears in only some records
- Consistent table structure – All rows have the same number of columns regardless of which fields are present in each record
This approach is essential for production use cases where API responses may vary in structure across different records or over time.
8. Convert JSON Files to Word Documents
In practice, JSON data often originates from files rather than inline strings. API export results, configuration files, database dumps, data exchange files, and log data are all commonly stored as .json files that need to be converted to Word documents.
The conversion process for JSON files follows this workflow:
JSON File (.json)
        ↓
Load JSON (json.load)
        ↓
Generate Word Document (Spire.Doc)
        ↓
DOCX Document
Python Code
import json
from spire.doc import Document, FileFormat

with open("data.json", "r", encoding="utf-8") as f:
    data = json.load(f)

document = Document()
section = document.AddSection()

# Process the loaded JSON data
# using any of the techniques shown in Methods 1–3
# (formatted text, tables, or structured reports)

document.SaveToFile("data_report.docx", FileFormat.Docx)
document.Close()
Key Points
json.load()reads and parses a JSON file directly, unlikejson.loads()which parses a stringencoding="utf-8"ensures proper handling of non-ASCII characters in JSON files- Once the JSON file is loaded into a Python dictionary or list, Spire.Doc for Python can generate paragraphs, tables, or structured reports from the parsed data using any of the methods described earlier in this article
For complete examples of processing the loaded data, refer to Method 1 for formatted text, Method 2 for tables, or Method 3 for structured reports.
9. Why Use Spire.Doc for JSON-to-Word Conversion
Converting JSON to Word involves several practical challenges that go beyond simple data parsing. Generating properly formatted tables, applying consistent styles, creating structured reports with headings and paragraphs, and handling nested or incomplete data all require a capable document generation API.
Challenges of JSON-to-Word Conversion
- Table generation – JSON arrays must be mapped to Word tables with headers, rows, and cell formatting
- Document formatting – Raw data exports lack the visual hierarchy that makes Word documents readable
- Structured reports – Combining headings, paragraphs, and tables in a single document requires coordinating multiple element types
- Nested data – Deeply nested JSON objects need recursive traversal and hierarchical layout
- Large documents – Generating multi-page reports from large JSON datasets demands efficient resource management
Benefits of Spire.Doc for Python
Spire.Doc for Python addresses these challenges with a straightforward API:
- Create Word documents without Microsoft Word – No Office installation or Interop dependencies required
- Generate paragraphs, tables, images, headers, and footers – Full coverage of Word document elements
- Apply built-in and custom styles – Consistent formatting across documents using
BuiltinStyleandParagraphStyle - Automate report generation – Programmatically build structured reports from any JSON data source
- Export to DOCX and other formats – Save to DOCX, PDF, HTML, RTF, and more using
FileFormat
With Spire.Doc, the JSON-to-Word conversion process becomes a structured mapping from parsed data to Word elements, rather than manual string formatting or template manipulation.
10. FAQ
How do I convert JSON to Word in Python?
Parse the JSON data using Python's built-in json module, then use Spire.Doc for Python to create a Word document. Map JSON key-value pairs to paragraphs, JSON arrays to tables, and use headings for structure. See Method 1 for a basic example and Method 3 for a complete report.
Can JSON arrays be converted into Word tables?
Yes. JSON arrays of objects map naturally to Word tables, where each object becomes a row and each key becomes a column. See Method 2 for a complete code example that creates a formatted table from a JSON array.
How do I create a DOCX report from API JSON responses?
Fetch the API response as JSON, parse it, and use Spire.Doc for Python to generate the report. Combine headings for titles, paragraphs for summaries, and tables for data arrays. See Method 3 for a structured report example.
Can nested JSON objects be exported to Word?
Yes. Use a recursive function to traverse nested JSON objects, creating headings for object keys and paragraphs for scalar values. See Section 6 for a detailed example of handling nested structures with visual hierarchy.
How do I convert a JSON file to a Word document?
Use Python's json.load() to read the JSON file, then process the parsed data with Spire.Doc for Python. See Section 8 for a code example.
What is the best way to generate Word documents from JSON data?
The best approach depends on the JSON structure. For simple key-value data, use formatted paragraphs. For arrays, use tables. For complex nested data with mixed content, combine headings, paragraphs, and tables as shown in Method 3.
11. Conclusion
Generating Word documents from JSON data is a common requirement in reporting, document automation, and data export workflows. With Spire.Doc for Python, you can create paragraphs, tables, and structured document layouts directly from JSON, making it easier to produce professional DOCX files from application data.
The same approach can be extended to API responses, database records, configuration files, and other structured data sources, helping automate document generation in both small projects and enterprise systems.
For scenarios involving large documents or document conversion requirements, a licensed version is required.
