
Knowledgebase (2370)
Children categories
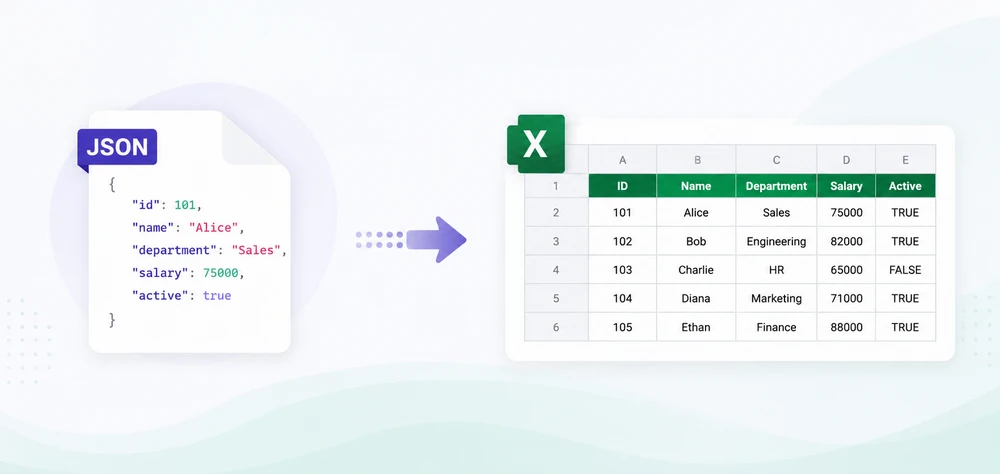
JSON is widely used for data exchange in REST APIs, web services, and enterprise applications. However, business users often prefer Excel for reporting, filtering, and data analysis. As a result, developers frequently need to convert JSON to Excel in Java when exporting API responses, generating reports, or sharing structured data with non-technical users.
While Java provides several JSON libraries, transforming data into a well-structured Excel file requires handling column headers, cell types, row iteration, and output formats — all of which become tedious without the right tool. Spire.XLS for Java simplifies this with a clean API that creates Excel workbooks without relying on Microsoft Office.
In this article, you'll learn how to convert JSON to Excel in Java using Spire.XLS for Java and Jackson. We'll cover JSON array conversion, nested JSON handling, JSON file processing, XLSX and XLS export, auto-fitting, formatting, and best practices for working with large datasets.
Quick Navigation
- Why Convert JSON to Excel in Java
- Install Spire.XLS for Java
- Prepare JSON Data
- Convert JSON to Excel in Java — Step by Step
- Complete Java Code to Convert JSON to Excel
- Export JSON to XLSX in Java
- Convert Nested JSON to Excel in Java
- Convert a JSON File to Excel
- Auto-Fit Rows and Columns in Excel
- Apply Formatting to the Exported Excel File
- Common Challenges When Converting JSON to Excel
- Why Use Spire.XLS for Java
- Conclusion
- FAQ
1. Why Convert JSON to Excel in Java
JSON is widely used for data exchange in REST APIs, web services, and enterprise applications because it is lightweight and easy for machines to process. However, business users often need Excel files for reporting, filtering, visualization, and further analysis.
Converting JSON to Excel in Java helps bridge the gap between backend systems and business workflows. Common use cases include:
Export API Data
Many REST APIs return JSON responses. Converting these responses into Excel allows users to review, filter, and analyze data without manually processing raw JSON.
Generate Reports
Java applications can transform JSON data from APIs, databases, or other sources into structured Excel reports with headers, formatting, and organized tables.
Share Structured Data
Excel files are easier to distribute and analyze using tools such as charts, formulas, and pivot tables. Exporting JSON data to Excel gives non-technical users direct access to these features.
2. Install Spire.XLS for Java
Before converting JSON to Excel in Java, set up the following dependencies in your project.
Maven Dependency
Spire.XLS for Java is available through the e-iceblue Maven repository. Add the repository and dependency to your pom.xml:
<repositories>
    <repository>
        <id>com.e-iceblue</id>
        <name>e-iceblue</name>
        <url>https://repo.e-iceblue.com/nexus/content/groups/public/</url>
    </repository>
</repositories>

<dependency>
    <groupId>e-iceblue</groupId>
    <artifactId>spire.xls</artifactId>
    <version>16.6.5</version>
</dependency>
You can also download Spire.XLS for Java and add the JAR to your project manually.
Add a JSON Library
Java does not include built-in JSON support. This guide uses Jackson, the most widely adopted JSON processing library in the Java ecosystem:
<dependency>
    <groupId>com.fasterxml.jackson.core</groupId>
    <artifactId>jackson-databind</artifactId>
    <version>2.17.2</version>
</dependency>
Import Required Classes
Include the following imports in your Java source file:
import com.spire.xls.*;
import com.spire.xls.core.spreadsheet.collections.AutoFitType;
import com.fasterxml.jackson.databind.JsonNode;
import com.fasterxml.jackson.databind.ObjectMapper;
import com.fasterxml.jackson.databind.node.ArrayNode;
import com.fasterxml.jackson.databind.node.ObjectNode;
import java.io.File;
import java.io.IOException;
import java.util.Iterator;
import java.util.Map;
3. Prepare JSON Data
To illustrate the conversion process, we will use a simple JSON array where each object represents a row and each property represents a column. This is the most common JSON structure encountered in REST API responses and data export workflows.
Example: Simple JSON Array
[
  {
    "ID": 1,
    "Name": "Alice",
    "Department": "Sales",
    "Salary": 75000,
    "HireDate": "2022-03-15"
  },
  {
    "ID": 2,
    "Name": "Bob",
    "Department": "Marketing",
    "Salary": 68000,
    "HireDate": "2021-07-01"
  },
  {
    "ID": 3,
    "Name": "Carol",
    "Department": "Engineering",
    "Salary": 92000,
    "HireDate": "2023-01-10"
  }
]
The mapping between JSON and Excel is straightforward:
- Each JSON object becomes a row in the spreadsheet
- Each property key becomes a column header
- Each property value becomes a cell value in the corresponding row and column
Understanding this mapping is essential for following the code examples in the next sections.
4. Convert JSON to Excel in Java — Step by Step
The conversion process involves five steps: creating a workbook, accessing a worksheet, parsing JSON data, writing column headers, and populating cell values. This section walks through each step individually before presenting the complete code.
Step 1: Create a Workbook
The Workbook class represents an Excel file. Instantiate it to create a new, empty workbook:
Workbook workbook = new Workbook();
Step 2: Create a Worksheet
A workbook contains one or more worksheets. Access the first worksheet (created by default) and optionally rename it:
Worksheet sheet = workbook.getWorksheets().get(0);
sheet.setName("EmployeeData");
Step 3: Read JSON Data
Use Jackson's ObjectMapper to parse the JSON string into a JsonNode tree. If the root element is a JSON array, cast it to ArrayNode for iteration:
ObjectMapper mapper = new ObjectMapper();
JsonNode rootNode = mapper.readTree(jsonString);

if (!rootNode.isArray()) {
    throw new IllegalArgumentException("Expected a JSON array at the root level");
}
ArrayNode jsonArray = (ArrayNode) rootNode;
Step 4: Write JSON Keys as Column Headers
Extract the field names from the first JSON object and write them to the first row of the worksheet. Spire.XLS uses 1-based row and column indices:
JsonNode firstObject = jsonArray.get(0);
int col = 1;
for (Iterator<Map.Entry<String, JsonNode>> it = firstObject.fields(); it.hasNext(); ) {
    Map.Entry<String, JsonNode> entry = it.next();
    sheet.get(1, col).setValue(entry.getKey());
    col++;
}
Step 5: Write JSON Values to Excel Cells
Iterate through each JSON object in the array and write its values to the corresponding row. Start from row 2 since row 1 contains the headers:
for (int i = 0; i < jsonArray.size(); i++) {
    JsonNode record = jsonArray.get(i);
    int dataRow = i + 2;
    int dataCol = 1;
    for (Iterator<Map.Entry<String, JsonNode>> it = record.fields(); it.hasNext(); ) {
        Map.Entry<String, JsonNode> entry = it.next();
        JsonNode value = entry.getValue();
        if (value.isNumber()) {
            sheet.get(dataRow, dataCol).setNumberValue(value.doubleValue());
        } else if (value.isBoolean()) {
            sheet.get(dataRow, dataCol).setBooleanValue(value.booleanValue());
        } else {
            sheet.get(dataRow, dataCol).setValue(value.asText());
        }
        dataCol++;
    }
}
This approach preserves data types — numbers and booleans are written as typed cell values rather than strings, which ensures that numeric sorting, filtering, and formula calculations work correctly in the generated Excel file.
5. Complete Java Code to Convert JSON to Excel
Here is the full, runnable program that reads a JSON string and converts it to an Excel file. This example demonstrates the complete Java code to convert JSON to Excel from start to finish:
import com.spire.xls.*;
import com.fasterxml.jackson.databind.JsonNode;
import com.fasterxml.jackson.databind.ObjectMapper;
import com.fasterxml.jackson.databind.node.ArrayNode;
import java.io.File;
import java.util.Iterator;
import java.util.Map;

public class JsonToExcelConverter {

    public static void main(String[] args) {

        // Sample JSON data — an array of employee records
        String jsonString = "["
            + "{\"ID\":1,\"Name\":\"Alice\",\"Department\":\"Sales\",\"Salary\":75000,\"HireDate\":\"2022-03-15\"},"
            + "{\"ID\":2,\"Name\":\"Bob\",\"Department\":\"Marketing\",\"Salary\":68000,\"HireDate\":\"2021-07-01\"},"
            + "{\"ID\":3,\"Name\":\"Carol\",\"Department\":\"Engineering\",\"Salary\":92000,\"HireDate\":\"2023-01-10\"}"
            + "]";

        try {
            // Parse the JSON string into a JsonNode tree
            ObjectMapper mapper = new ObjectMapper();
            JsonNode rootNode = mapper.readTree(jsonString);

            if (!rootNode.isArray()) {
                throw new IllegalArgumentException("Expected a JSON array at the root level");
            }
            ArrayNode jsonArray = (ArrayNode) rootNode;

            // Create a new workbook and access the first worksheet
            Workbook workbook = new Workbook();
            Worksheet sheet = workbook.getWorksheets().get(0);
            sheet.setName("EmployeeData");

            // Write column headers from the first JSON object's keys
            JsonNode firstObject = jsonArray.get(0);
            int col = 1;
            for (Iterator<Map.Entry<String, JsonNode>> it = firstObject.fields(); it.hasNext(); ) {
                Map.Entry<String, JsonNode> entry = it.next();
                sheet.get(1, col).setValue(entry.getKey());
                col++;
            }

            // Write data rows from JSON values
            for (int i = 0; i < jsonArray.size(); i++) {
                JsonNode record = jsonArray.get(i);
                int dataRow = i + 2;
                int dataCol = 1;

                for (Iterator<Map.Entry<String, JsonNode>> it = record.fields(); it.hasNext(); ) {
                    Map.Entry<String, JsonNode> entry = it.next();
                    JsonNode value = entry.getValue();

                    // Preserve data types: numbers and booleans as typed cells
                    if (value.isNumber()) {
                        sheet.get(dataRow, dataCol).setNumberValue(value.doubleValue());
                    } else if (value.isBoolean()) {
                        sheet.get(dataRow, dataCol).setBooleanValue(value.booleanValue());
                    } else {
                        sheet.get(dataRow, dataCol).setValue(value.asText());
                    }
                    dataCol++;
                }
            }

            // Auto-fit columns for readability
            sheet.getAllocatedRange().autoFitColumns();

            // Save the workbook as an XLSX file
            workbook.saveToFile("EmployeeData.xlsx", ExcelVersion.Version2016);
            System.out.println("JSON converted to Excel successfully.");

            // Release resources
            workbook.dispose();

        } catch (Exception e) {
            System.err.println("Error during JSON to Excel conversion: " + e.getMessage());
            e.printStackTrace();
        }
    }
}
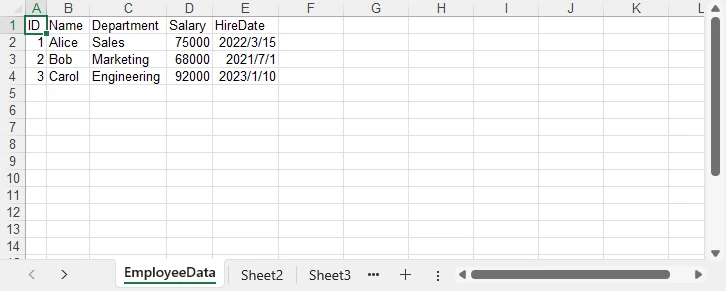
After running the program, the JSON data is converted into an Excel worksheet. The generated EmployeeData.xlsx file contains the employee records with preserved data types and automatically adjusted column widths:
Key Spire.XLS Classes and Methods
- Workbook — Represents an Excel file. Handles creation, worksheet management, and file saving.
- Worksheet — Represents a single sheet within a workbook. Provides access to cells, rows, and columns.
get(int row, int column)— Returns aCellRangeobject for the specified cell. Row and column indices are 1-based.setValue(String)— Sets a cell's value as a string. Used for text and headers.setNumberValue(double)— Sets a cell's value as a number, preserving numeric type for calculations.setBooleanValue(boolean)— Sets a cell's value as a boolean (TRUE/FALSE).saveToFile(String, ExcelVersion)— Saves the workbook to a file in the specified Excel format.dispose()— Releases unmanaged resources held by the workbook.
If you also need to convert Excel files back to JSON format, see our guide on how to convert Excel to JSON in Java using Spire.XLS for Java.
6. Export JSON to XLSX in Java
Spire.XLS for Java supports both the modern XLSX format (Excel 2007 and later) and the legacy XLS format (Excel 97–2003). You can control the output format by passing the appropriate ExcelVersion enum to saveToFile().
Save as XLSX
// Export to modern Excel format (.xlsx)
workbook.saveToFile("EmployeeData.xlsx", ExcelVersion.Version2016);
Save as XLS
// Export to legacy Excel format (.xls)
workbook.saveToFile("EmployeeData.xls", ExcelVersion.Version97to2003);
| Format | Description | Use Case |
|---|---|---|
| XLSX | Modern Excel format (Excel 2007+) | Default choice; smaller file, full features |
| XLS | Legacy Excel format (Excel 97–2003) | Compatibility with older systems |
The same workbook object can be saved to either format — no code changes are needed beyond the file extension and version parameter. This is particularly useful when your application needs to support both modern and legacy environments.
You can also learn how to convert between XLS and XLSX formats in Java for scenarios where format migration or legacy upgrade is required.
7. Convert Nested JSON to Excel in Java
Real-world JSON data often contains nested objects and arrays. To write nested JSON to Excel, you need to flatten the hierarchical structure into a tabular format where each nested field becomes its own column.
Consider the following JSON containing employee records with nested contact information:
[
  {
    "ID": 1,
    "Name": "Alice",
    "Department": "Sales",
    "Contact": {
      "Email": "alice@company.com",
      "Phone": "555-0101"
    }
  },
  {
    "ID": 2,
    "Name": "Bob",
    "Department": "Marketing",
    "Contact": {
      "Email": "bob@company.com",
      "Phone": "555-0102"
    }
  }
]
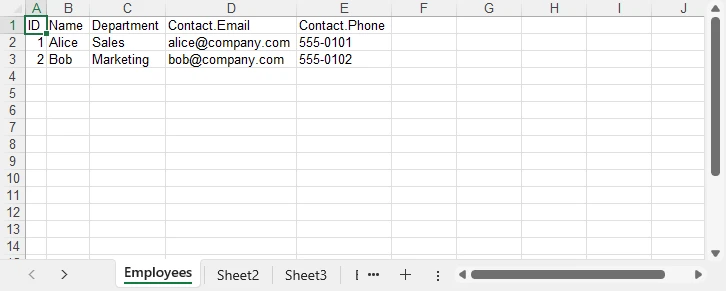
The goal is to flatten the Contact object so that Email and Phone become individual columns:
| ID | Name | Department | Contact.Email | Contact.Phone |
|---|---|---|---|---|
| 1 | Alice | Sales | alice@company.com | 555-0101 |
| 2 | Bob | Marketing | bob@company.com | 555-0102 |
The following code uses a recursive flattening approach to handle arbitrary nesting depth:
import com.spire.xls.*;
import com.fasterxml.jackson.databind.JsonNode;
import com.fasterxml.jackson.databind.ObjectMapper;
import com.fasterxml.jackson.databind.node.ArrayNode;
import java.util.Iterator;
import java.util.LinkedHashMap;
import java.util.Map;

public class NestedJsonToExcel {

    public static void main(String[] args) {

        String jsonString = "["
            + "{\"ID\":1,\"Name\":\"Alice\",\"Department\":\"Sales\","
            + "\"Contact\":{\"Email\":\"alice@company.com\",\"Phone\":\"555-0101\"}},"
            + "{\"ID\":2,\"Name\":\"Bob\",\"Department\":\"Marketing\","
            + "\"Contact\":{\"Email\":\"bob@company.com\",\"Phone\":\"555-0102\"}}"
            + "]";

        try {
            ObjectMapper mapper = new ObjectMapper();
            ArrayNode jsonArray = (ArrayNode) mapper.readTree(jsonString);

            Workbook workbook = new Workbook();
            Worksheet sheet = workbook.getWorksheets().get(0);
            sheet.setName("Employees");

            // Flatten the first object to extract all column headers (including nested keys)
            LinkedHashMap<String, String> firstFlat = flattenJson(jsonArray.get(0), "");
            int col = 1;
            for (String key : firstFlat.keySet()) {
                sheet.get(1, col).setValue(key);
                col++;
            }

            // Write data rows
            for (int i = 0; i < jsonArray.size(); i++) {
                LinkedHashMap<String, String> flat = flattenJson(jsonArray.get(i), "");
                int dataRow = i + 2;
                int dataCol = 1;
                for (String key : firstFlat.keySet()) {
                    String value = flat.getOrDefault(key, "");
                    sheet.get(dataRow, dataCol).setValue(value);
                    dataCol++;
                }
            }

            sheet.getAllocatedRange().autoFitColumns();
            workbook.saveToFile("NestedEmployees.xlsx", ExcelVersion.Version2016);
            System.out.println("Nested JSON converted to Excel successfully.");
            workbook.dispose();

        } catch (Exception e) {
            System.err.println("Error: " + e.getMessage());
        }
    }

    /**
     * Recursively flattens a JSON object into key-value pairs.
     * Nested keys are joined with a dot (e.g., "Contact.Email").
     */
    private static LinkedHashMap<String, String> flattenJson(JsonNode node, String prefix) {
        LinkedHashMap<String, String> flat = new LinkedHashMap<>();
        if (node.isObject()) {
            for (Iterator<Map.Entry<String, JsonNode>> it = node.fields(); it.hasNext(); ) {
                Map.Entry<String, JsonNode> entry = it.next();
                String newPrefix = prefix.isEmpty() ? entry.getKey() : prefix + "." + entry.getKey();
                flat.putAll(flattenJson(entry.getValue(), newPrefix));
            }
        } else {
            flat.put(prefix, node.asText());
        }
        return flat;
    }
}
The flattenJson method recursively traverses each JSON object. When it encounters a nested object, it prepends the parent key with a dot separator (e.g., Contact.Email). When it reaches a leaf value, it stores the full dotted key and its value in the map. This ensures that all fields — at any nesting depth — are represented as columns in the resulting Excel sheet.
8. Convert a JSON File to Excel
In production applications, JSON data typically comes from a file on disk rather than an inline string. The conversion steps remain the same — only the JSON source changes. Jackson's ObjectMapper can read directly from a File object:
import com.spire.xls.*;
import com.fasterxml.jackson.databind.JsonNode;
import com.fasterxml.jackson.databind.ObjectMapper;
import com.fasterxml.jackson.databind.node.ArrayNode;
import java.io.File;
import java.util.Iterator;
import java.util.Map;

public class JsonFileToExcel {

    public static void main(String[] args) {

        try {
            // Step 1: Read and parse the JSON file
            ObjectMapper mapper = new ObjectMapper();
            JsonNode rootNode = mapper.readTree(new File("employees.json"));

            if (!rootNode.isArray()) {
                throw new IllegalArgumentException("Expected a JSON array at the root level");
            }
            ArrayNode jsonArray = (ArrayNode) rootNode;

            // Step 2: Create a workbook
            Workbook workbook = new Workbook();
            Worksheet sheet = workbook.getWorksheets().get(0);
            sheet.setName("Employees");

            // Step 3: Write headers from the first object
            JsonNode firstObject = jsonArray.get(0);
            int col = 1;
            for (Iterator<Map.Entry<String, JsonNode>> it = firstObject.fields(); it.hasNext(); ) {
                Map.Entry<String, JsonNode> entry = it.next();
                sheet.get(1, col).setValue(entry.getKey());
                col++;
            }

            // Step 4: Write data rows
            for (int i = 0; i < jsonArray.size(); i++) {
                JsonNode record = jsonArray.get(i);
                int dataRow = i + 2;
                int dataCol = 1;
                for (Iterator<Map.Entry<String, JsonNode>> it = record.fields(); it.hasNext(); ) {
                    Map.Entry<String, JsonNode> entry = it.next();
                    JsonNode value = entry.getValue();
                    if (value.isNumber()) {
                        sheet.get(dataRow, dataCol).setNumberValue(value.doubleValue());
                    } else if (value.isBoolean()) {
                        sheet.get(dataRow, dataCol).setBooleanValue(value.booleanValue());
                    } else {
                        sheet.get(dataRow, dataCol).setValue(value.asText());
                    }
                    dataCol++;
                }
            }

            // Step 5: Export to Excel
            sheet.getAllocatedRange().autoFitColumns();
            workbook.saveToFile("EmployeesFromJson.xlsx", ExcelVersion.Version2016);
            System.out.println("JSON file converted to Excel successfully.");
            workbook.dispose();

        } catch (Exception e) {
            System.err.println("Error reading JSON file: " + e.getMessage());
            e.printStackTrace();
        }
    }
}
This approach handles large JSON files efficiently because Jackson processes the file as a streaming tree model. For very large JSON files (hundreds of megabytes), consider using Jackson's JsonParser in streaming mode to read records incrementally rather than loading the entire tree into memory at once.
9. Auto-Fit Rows and Columns in Excel
When JSON data is written to Excel cells, the default column width may not be wide enough to display all content. Text values such as email addresses, URLs, or long descriptions get truncated visually. Spire.XLS provides auto-fit methods that adjust column widths and row heights to match their content:
// Auto-fit all columns and rows in the used range
sheet.getAllocatedRange().autoFitColumns();
sheet.getAllocatedRange().autoFitRows();
Add these lines after writing all data but before saving the workbook. The getAllocatedRange() method returns the range of cells that contain data, so only populated cells are affected.
For more granular control, you can auto-fit individual columns:
// Auto-fit a specific column (e.g., column 3)
sheet.getAllocatedRange().getColumns()[2].autoFitColumns();
Auto-fitting produces a more professional, readable spreadsheet — especially when the JSON data contains variable-length text fields. The screenshot below shows the difference between a raw export and one with auto-fit applied.
10. Apply Formatting to the Exported Excel File
Raw data exports often need formatting to meet business reporting standards. Spire.XLS for Java provides a rich set of cell formatting APIs that let you style the header row, format numbers, and apply date formats — all programmatically.
Format the Header Row
Apply bold text and a background color to the first row to distinguish headers from data:
import com.spire.xls.core.spreadsheet.styles.CellStyle;
import java.awt.Color;

// Apply formatting to the header row
CellRange headerRange = sheet.getAllocatedRange().getRows()[0];
headerRange.getStyle().setFont(new ExcelFont(true));
headerRange.getStyle().setColor(Color.decode("#4472C4"));
headerRange.getStyle().getFont().setColor(Color.WHITE);
headerRange.setStyle(headerRange.getStyle());
Format Numbers
Apply currency or percentage formatting to numeric columns:
// Format the Salary column (column 4) as currency
CellRange salaryColumn = sheet.getAllocatedRange().getColumns()[3];
salaryColumn.setNumberFormat("$#,##0.00");
Format Dates
If your JSON contains date strings, you can format the corresponding column to display them in a consistent format:
// Format the HireDate column (column 5) as a date
CellRange dateColumn = sheet.getAllocatedRange().getColumns()[4];
dateColumn.setNumberFormat("yyyy-mm-dd");
The formatting techniques above can be combined to create professional Excel reports. For a complete Java example covering advanced Excel formatting features, refer to How to Create and Format Excel Files in Java Using Spire.XLS.
11. Common Challenges When Converting JSON to Excel
Real-world JSON data is rarely as clean as tutorial examples. Here are the most common challenges developers face when converting JSON to Excel, along with practical solutions.
Missing Fields Across Objects
Different JSON objects in the same array may have inconsistent fields. One record might include a Phone field while another omits it entirely. If your code assumes all objects share the same keys, missing fields cause index misalignment in the Excel output.
Solution: Collect all unique keys across all objects first, then write each object's values using the unified key list:
// Collect all unique keys from all JSON objects
LinkedHashSet<String> allKeys = new LinkedHashSet<>();
for (JsonNode record : jsonArray) {
    record.fieldNames().forEachRemaining(allKeys::add);
}

// Write headers from the complete key set
int col = 1;
for (String key : allKeys) {
    sheet.get(1, col).setValue(key);
    col++;
}

// Write values, using empty string for missing fields
for (int i = 0; i < jsonArray.size(); i++) {
    JsonNode record = jsonArray.get(i);
    int dataRow = i + 2;
    int dataCol = 1;
    for (String key : allKeys) {
        JsonNode value = record.get(key);
        String cellValue = (value != null && !value.isNull()) ? value.asText() : "";
        sheet.get(dataRow, dataCol).setValue(cellValue);
        dataCol++;
    }
}
Nested Objects
JSON objects can contain arbitrarily deep nesting. Writing nested objects directly to cells produces unreadable output like [object Object] or serialized JSON strings.
Solution: Use the recursive flattening approach demonstrated in Section 7. The flattenJson method traverses the entire object tree and produces flat key-value pairs where nested keys are joined with dot notation.
Large JSON Files
Parsing very large JSON files (hundreds of megabytes or more) into a single in-memory tree can cause OutOfMemoryError in Java. Additionally, writing tens of thousands of rows one cell at a time can be slow.
Solution: Use Jackson's streaming API (JsonParser) to read JSON records one at a time, and write each record to Excel immediately before moving to the next. This keeps memory usage constant regardless of file size:
import com.fasterxml.jackson.core.JsonFactory;
import com.fasterxml.jackson.core.JsonParser;
import com.fasterxml.jackson.core.JsonToken;

JsonFactory factory = new JsonFactory();
try (JsonParser parser = factory.createParser(new File("large_data.json"))) {
    int dataRow = 2;
    while (parser.nextToken() != JsonToken.END_ARRAY) {
        // Parse one object at a time
        JsonNode record = mapper.readTree(parser);
        // Write to Excel...
        dataRow++;
    }
}
Data Type Conversion
JSON supports strings, numbers, booleans, null values, arrays, and objects. Excel cells support text, numbers, booleans, dates, and errors. Mismatched types — for example, storing a numeric value as a string — prevent Excel sorting and formulas from working correctly.
Solution: Check each JSON value's type before writing it to a cell. Use setNumberValue() for numbers, setBooleanValue() for booleans, and setValue() for text. Handle null values by writing an empty string or a placeholder. For date strings, parse them into Date objects and use setDateTimeValue() to write them as Excel date cells:
if (value == null || value.isNull()) {
    sheet.get(dataRow, dataCol).setValue("");
} else if (value.isNumber()) {
    sheet.get(dataRow, dataCol).setNumberValue(value.doubleValue());
} else if (value.isBoolean()) {
    sheet.get(dataRow, dataCol).setBooleanValue(value.booleanValue());
} else {
    sheet.get(dataRow, dataCol).setValue(value.asText());
}
12. Why Use Spire.XLS for Java for JSON-to-Excel Conversion
Several characteristics make Spire.XLS for Java well-suited for JSON-to-Excel conversion in enterprise Java applications.
No Microsoft Excel Required
Spire.XLS for Java is a standalone library that does not depend on Microsoft Office or any other external software. It runs on any system with a Java Runtime Environment, including Linux servers, Docker containers, and cloud platforms where Office is not available.
Supports XLS and XLSX
The library handles both the legacy XLS format (Excel 97–2003) and the modern XLSX format (Excel 2007+). You can export to either format by changing a single parameter, making it easy to support diverse downstream environments.
Rich Formatting Features
Beyond basic cell value writing, Spire.XLS provides comprehensive formatting capabilities — cell styles, number formats, fonts, colors, borders, conditional formatting, charts, and pivot tables. This allows you to generate professional-grade Excel files directly from JSON data without any post-processing in Excel.
Easy API
The API follows an intuitive object model: Workbook contains Worksheets, each Worksheet contains CellRanges, and each CellRange supports value setting, styling, and formatting. Developers familiar with the Excel object model can become productive quickly.
Suitable for Enterprise Applications
Spire.XLS for Java is designed for server-side and enterprise use cases. It handles large files efficiently, supports multi-threaded access patterns, and integrates cleanly with Spring Boot, Jakarta EE, and other Java frameworks commonly used in enterprise environments.
You can apply for a 30-day free license to evaluate all features in your projects.
13. Conclusion
In this article, we explored how to convert JSON to Excel in Java using Spire.XLS for Java and Jackson. By parsing JSON data, writing values into Excel worksheets, and exporting the workbook as XLSX or XLS files, developers can efficiently transform structured JSON data into readable spreadsheets.
Spire.XLS for Java provides a simple and flexible way to generate Excel files from JSON data without requiring Microsoft Office or external dependencies. It also supports advanced features such as formatting, auto-fitting, and handling complex data structures for professional Excel reports.
14. FAQ
How do I convert JSON to Excel in Java?
Parse the JSON data using Jackson's ObjectMapper, create a Workbook and Worksheet using Spire.XLS for Java, write the JSON keys as column headers in the first row, then iterate through the JSON array to populate each data row. Save the workbook using saveToFile() with the desired ExcelVersion. The complete code example is shown in Section 5.
Can I convert JSON to XLSX in Java without Microsoft Excel installed?
Yes. Spire.XLS for Java is a standalone library that does not require Microsoft Office or any other software. It can create, read, and write XLSX files entirely in Java, making it suitable for server-side applications running on Linux, Docker, or cloud platforms.
How do I handle nested JSON objects when converting to Excel?
Use a recursive flattening function that traverses the JSON object tree and produces flat key-value pairs. Nested keys are joined with a dot separator (e.g., Contact.Email). The flattened keys become column headers in the Excel sheet. See Section 7 for the complete implementation.
What is the difference between setValue() and setNumberValue() in Spire.XLS?
setValue(String) writes a string value to a cell, while setNumberValue(double) writes a numeric value that Excel treats as a number. Using setNumberValue() for numeric JSON fields ensures that sorting, filtering, and formula calculations work correctly. Similarly, setBooleanValue(boolean) writes typed boolean values.
How do I convert a large JSON file to Excel without running out of memory?
For large JSON files, use Jackson's streaming API (JsonParser) to read and process one JSON record at a time instead of loading the entire file into memory. Write each record to the Excel worksheet immediately after parsing it. This keeps memory usage constant regardless of the file size.
Is Spire.XLS for Java free?
Spire.XLS for Java is a commercial library. A free version, Free Spire.XLS for Java, is available with limitations on worksheet count and features. You can also apply for a 30-day free license to evaluate the full feature set before purchasing.
Insert Images and Tables into a Word Textbox with JavaScript in React
2026-07-08 06:32:11 Written by Amy ZhaoIn practical document layout, a textbox is an ideal container for standalone content — it can be positioned freely without being constrained by the page flow, making it perfect for sidebars, pull quotes, product diagrams, and more. Inserting images or tables into a textbox is a common requirement for achieving rich layouts. Spire.Doc for JavaScript processes Word documents directly in the browser via WebAssembly, using a virtual file system (VFS) to manage fonts and file resources — no backend server required.
This article covers two core features:
For installation and project setup, refer to Integrating Spire.Doc for JavaScript in a React Project. The examples below assume Spire.Doc is installed and the WebAssembly module is initialized.
Insert Image into Textbox
Filling a textbox with a picture is a common technique for creating product labels, business cards, or promotional materials. Spire.Doc creates a textbox via the AppendTextBox method, then fills its background with a picture using FillEfects.SetPicture. The core process involves three steps: first, load font files and the target image into the WASM virtual file system via FetchFileToVFS; then create a document, add a textbox with position properties, and apply the picture to the textbox through fill effects; finally, save the document, read the generated file from VFS, wrap it as a Blob, and trigger a browser download.
function App() {
  const InsertImageIntoTextBox = async () => {
    // Get the Spire.Doc WASM module
    const docModule = window.wasmModule?.spiredoc;

    // Check if the module is ready
    if (!docModule) {
      alert('Spire.Doc is not ready yet');
      return;
    }

    // Load fonts and the image file into VFS
    const imageFileName = 'Spire.Doc.png';
    await window.spire.FetchFileToVFS(imageFileName, '', `${process.env.PUBLIC_URL}/data/`);

    // Create a document
    const doc = new docModule.Document();

    // Add a section
    let section = doc.AddSection();

    // Add a paragraph
    let paragraph = section.AddParagraph();

    // Append a 220x220 textbox to the paragraph
    let tb = paragraph.AppendTextBox(220, 220);

    // Set textbox position
    tb.Format.HorizontalOrigin = docModule.HorizontalOrigin.Page;
    tb.Format.HorizontalPosition = 50;
    tb.Format.VerticalOrigin = docModule.VerticalOrigin.Page;
    tb.Format.VerticalPosition = 50;

    // Set the textbox fill type to Picture
    tb.Format.FillEfects.Type = docModule.BackgroundType.Picture;

    // Fill the textbox with the image
    tb.Format.FillEfects.SetPicture(imageFileName);

    // Define output file name and save
    const outputFileName = "InsertImageIntoTextBox_output.docx";
    doc.SaveToFile({ fileName: outputFileName, fileFormat: docModule.FileFormat.Docx2013 });

    // Release resources
    doc.Close();
    doc.Dispose();

    // Read the generated file from VFS and trigger download
    const modifiedFileArray = window.dotnetRuntime.Module.FS.readFile(outputFileName);
    const blob = new Blob([modifiedFileArray], { type: 'application/vnd.openxmlformats-officedocument.wordprocessingml.document'});
    const url = URL.createObjectURL(blob);
    const a = document.createElement('a');
    a.href = url;
    a.download = outputFileName;
    a.click();
    URL.revokeObjectURL(url);
  };

  return (
    <div style={{ textAlign: 'center', height: '300px' }}>
      <h1>Insert Image into a Word Textbox</h1>
      <button onClick={InsertImageIntoTextBox}>
        Generate
      </button>
    </div>
  );
}

export default App;
Image filled into the textbox, automatically scaled to fit
Insert Table into Textbox
Embedding structured table data in sidebars or reference areas is a common requirement in technical documents and reports. Spire.Doc supports creating tables within a textbox and adding them directly to the textbox body via the textbox.Body.AddTable method. Compared to creating tables in the main document body, tables inside a textbox can be positioned independently without being affected by page layout. The core process involves three steps: first, load font files into the WASM virtual file system via FetchFileToVFS; then create a document and a textbox, add a table via textbox.Body.AddTable with specified row and column counts, fill data row by row, and apply styles; finally, save the document, read the generated file from VFS, wrap it as a Blob, and trigger a browser download.
function App() {
const InsertTableIntoTextBox = async () => {
// Get the Spire.Doc WASM module
const docModule = window.wasmModule?.spiredoc;
// Check if the module is ready
if (!docModule) {
alert('Spire.Doc is not ready yet');
return;
}
// Load font files into VFS
await window.spire.FetchFileToVFS('msyh.ttc', '/Library/Fonts/', `${process.env.PUBLIC_URL}/font/`);
// Create a document
const doc = new docModule.Document();
// Add a section
let section = doc.AddSection();
// Add a paragraph
let paragraph = section.AddParagraph();
// Add a 300x150 textbox
let textbox = paragraph.AppendTextBox(300, 150);
// Set textbox position
textbox.Format.HorizontalOrigin = docModule.HorizontalOrigin.Page;
textbox.Format.HorizontalPosition = 140;
textbox.Format.VerticalOrigin = docModule.VerticalOrigin.Page;
textbox.Format.VerticalPosition = 50;
// Add a title paragraph in the textbox
let textboxParagraph = textbox.Body.AddParagraph();
let textboxRange = textboxParagraph.AppendText("Table 1");
textboxRange.CharacterFormat.FontName = "Microsoft YaHei";
// Insert a table into the textbox
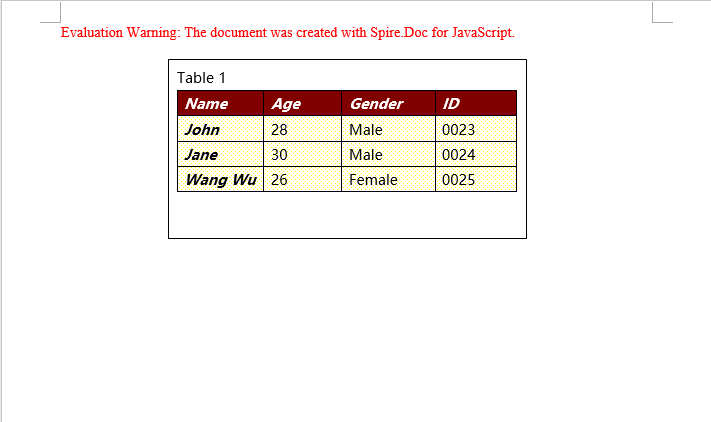
let table = textbox.Body.AddTable({ showBorder: true });
// Specify the number of rows and columns
table.ResetCells(4, 4);
let data = [
["Name", "Age", "Gender", "ID"],
["John", "28", "Male", "0023"],
["Jane", "30", "Male", "0024"],
["Wang Wu", "26", "Female", "0025"]
];
// Populate data into the table
for (let i = 0; i < 4; i++) {
for (let j = 0; j < 4; j++) {
let tableRange = table.Rows.get_Item(i).Cells.get_Item(j).AddParagraph().AppendText(data[i][j]);
tableRange.CharacterFormat.FontName = "Microsoft YaHei";
}
}
// Apply table style
table.ApplyStyle({ builtinTableStyle: docModule.DefaultTableStyle.TableColorful2 });
// Define output file name and save
const outputFileName = "InsertTableIntoTextBox_output.docx";
doc.SaveToFile({ fileName: outputFileName, fileFormat: docModule.FileFormat.Docx2013 });
// Release resources
doc.Close();
doc.Dispose();
// Read the generated file from VFS and trigger download
const modifiedFileArray = window.dotnetRuntime.Module.FS.readFile(outputFileName);
const blob = new Blob([modifiedFileArray], { type: 'application/vnd.openxmlformats-officedocument.wordprocessingml.document'});
const url = URL.createObjectURL(blob);
const a = document.createElement('a');
a.href = url;
a.download = outputFileName;
a.click();
URL.revokeObjectURL(url);
};
return (
<div style={{ textAlign: 'center', height: '300px' }}>
<h1>Insert Table into a Word Textbox</h1>
<button onClick={InsertTableIntoTextBox}>
Generate
</button>
</div>
);
}
export default App;
Table created inside the textbox, contained within the textbox and freely positionable
FAQ
Image in the textbox is truncated or not fully displayed
Cause: The textbox size does not match the image aspect ratio, so the dimensions specified when creating the textbox cannot fully accommodate the image.
Solution: Adjust the textbox size to match the image proportions, or choose an image that fits the textbox dimensions:
let tb = paragraph.AppendTextBox(400, 300);
Table in the textbox has no visible borders
Cause: The showBorder parameter was not set or was set to false when creating the table, resulting in a borderless table.
Solution: Confirm the showBorder parameter is set to true when creating the table:
let table = textbox.Body.AddTable({ showBorder: true });
Textbox position is not as expected after saving
Cause: The HorizontalOrigin or VerticalOrigin values were configured incorrectly, causing the positioning reference point to differ from what was expected.
Solution: Choose the appropriate origin type based on your requirements, and fine-tune the position using HorizontalPosition / VerticalPosition:
tb.Format.HorizontalOrigin = docModule.HorizontalOrigin.Page;
tb.Format.HorizontalPosition = 50;
tb.Format.VerticalOrigin = docModule.VerticalOrigin.Page;
tb.Format.VerticalPosition = 50;
Get a Free License
Spire.Doc for JavaScript offers a 30-day full-featured free trial license with no functional limitations. Apply here to evaluate before purchasing.
Splitting Excel files into separate files by worksheet, by row, or by column is a common requirement for data distribution and management. Spire.XLS for JavaScript performs the splitting process entirely in the browser via WebAssembly, using a virtual file system (VFS) to manage input and output files — no backend server required.
This article covers three core features:
For installation and project setup, refer to Integrating Spire.XLS for JavaScript in a React Project. The examples below assume Spire.XLS is installed and the WebAssembly module is initialized.
Split by Worksheet
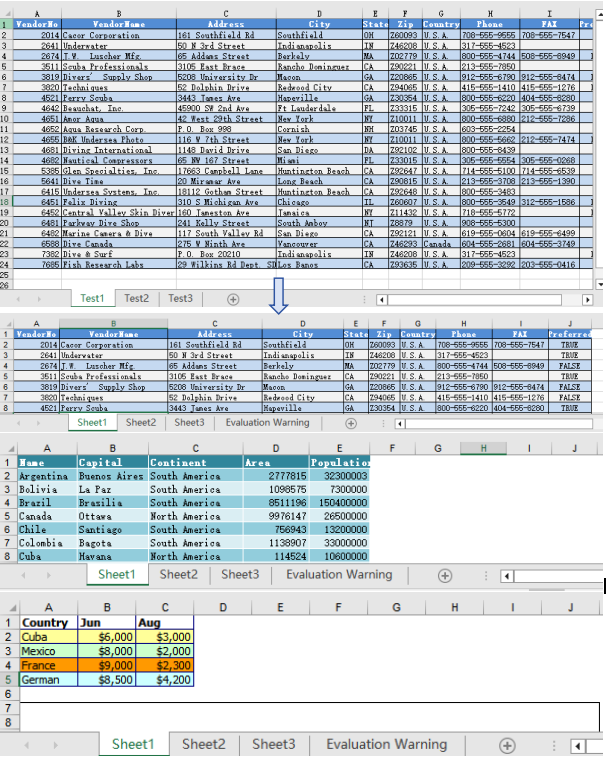
Splitting by worksheet exports each sheet in a multi-sheet workbook as an independent Excel file. When a workbook contains multiple worksheets, each representing different data such as separate departments or months, you can split each worksheet into its own file. Spire.XLS accomplishes this by iterating through all worksheets in the source file, creating new workbooks, and copying each sheet. The steps are as follows:
- Create a
Workbookobject and load the source Excel document withLoadFromFile(). - Iterate through all worksheets in the source document.
- Create a new
Workbookobject. - Copy the source worksheet to the default worksheet of the new workbook using the
CopyFrommethod. - Get the worksheet name via
sheet.Nameas the output file name. - Save the new workbook as an Excel file with
SaveToFile().
Below is a complete code example demonstrating how to split worksheets into separate Excel files:
function App() {
  const splitByWorksheet = async () => {
    // Get the Spire.XLS WASM module
    const xlsModule = window.wasmModule?.spirexls;

    // Check if the module is ready
    if (!xlsModule) {
      alert('Spire.Xls is not ready yet');
      return;
    }

    // Load fonts and the Excel file into VFS
    await window.spire.FetchFileToVFS('arial.ttf', '/Library/Fonts/', `${process.env.PUBLIC_URL}/font/`);
    const inputFileName = 'Sample.xlsx';
    await window.spire.FetchFileToVFS(inputFileName, '', `${process.env.PUBLIC_URL}data/`);

    // Load the workbook
    const workbook = new xlsModule.Workbook();
    workbook.LoadFromFile({ fileName: inputFileName });

    // Iterate through each worksheet and export it as a separate file
    for (let i = 0; i < workbook.Worksheets.Count; i++) {
      let sheet = workbook.Worksheets.get(i);

      // Create a new workbook and copy the current worksheet
      let newWorkbook = new xlsModule.Workbook();
      let newSheet = newWorkbook.Worksheets.get(0);
      newSheet.CopyFrom(sheet);

      // Use the worksheet name as the output file name
      const outputFileName = `${sheet.Name}.xlsx`;
      newWorkbook.SaveToFile({ fileName: outputFileName, version: xlsModule.ExcelVersion.Version2010 });
      newWorkbook.Dispose();

      // Read the split file from VFS and trigger a browser download
      const fileArray = window.dotnetRuntime.Module.FS.readFile(outputFileName);
      const blob = new Blob([fileArray], { type: 'application/vnd.openxmlformats-officedocument.spreadsheetml.sheet' });
      const url = URL.createObjectURL(blob);
      const a = document.createElement('a');
      a.href = url;
      a.download = outputFileName;
      a.click();
      URL.revokeObjectURL(url);
    }

    // Release resources
    workbook.Dispose();
  };

  return (
    <div style={{ textAlign: 'center', height: '300px' }}>
      <h1>Split Excel By Worksheet</h1>
      <button onClick={splitByWorksheet}>
        Generate
      </button>
    </div>
  );
}

export default App;
After splitting by worksheet, each resulting file contains a single worksheet from the original workbook
Split by Row
Splitting by row is suitable for breaking up large tables into multiple smaller files by a fixed number of rows, making pagination and distribution easier. When a worksheet contains a large amount of data rows that need to be split into multiple files, Spire.XLS accomplishes this by copying source rows one by one into a new workbook. The steps are as follows:
- Create a
Workbookobject, load the source Excel document withLoadFromFile(), and retrieve the first worksheet. - Create a new
Workbookobject. - Use a loop to call the
Copymethod row by row, copying specified rows from the source worksheet to the new worksheet. - Copy the column widths from the source worksheet to the new worksheet.
- Save the new workbook as an Excel file with
SaveToFile(). - Repeat the steps above to create more split files, copying the header row separately when needed.
Below is a complete code example demonstrating how to split a worksheet into multiple Excel files by row:
function App() {
  const splitByRow = async () => {
    // Get the Spire.XLS WASM module
    const xlsModule = window.wasmModule?.spirexls;

    // Check if the module is ready
    if (!xlsModule) {
      alert('Spire.Xls is not ready yet');
      return;
    }

    // Load fonts and the Excel file into VFS
    await window.spire.FetchFileToVFS('arial.ttf', '/Library/Fonts/', `${process.env.PUBLIC_URL}/font/`);
    const inputFileName = 'Sample.xlsx';
    await window.spire.FetchFileToVFS(inputFileName, '', `${process.env.PUBLIC_URL}data/`);

    // Load the workbook and get the first worksheet
    const workbook = new xlsModule.Workbook();
    workbook.LoadFromFile({ fileName: inputFileName });
    const sheet = workbook.Worksheets.get(0);

    // Create a new workbook (comes with one default worksheet)
    let newWorkbook1 = new xlsModule.Workbook();
    let newSheet1 = newWorkbook1.Worksheets.get(0);

    // Copy rows 1-5 to the target file
    let destRow = 1;
    for (let i = 0; i < 5; i++) {
      sheet.Copy({
        sourceRange: sheet.Rows[i],
        worksheet: newSheet1,
        destRow: destRow,
        destColumn: 1,
        copyStyle: true
      });
      destRow++;
    }

    // Copy column widths
    for (let c = 0; c < sheet.Columns.length; c++) {
      newSheet1.SetColumnWidth(c + 1, sheet.GetColumnWidth(c + 1));
    }

    // Save the first split file
    const outputFileName1 = "Rows1-5.xlsx";
    newWorkbook1.SaveToFile({ fileName: outputFileName1, version: xlsModule.ExcelVersion.Version2010 });
    newWorkbook1.Dispose();

    // Read file data from VFS
    const fileData1 = window.dotnetRuntime.Module.FS.readFile(outputFileName1);

    // Create a second new workbook
    let newWorkbook2 = new xlsModule.Workbook();
    let newSheet2 = newWorkbook2.Worksheets.get(0);

    destRow = 1;

    // Copy the header row
    sheet.Copy({
      sourceRange: sheet.Rows[0],
      worksheet: newSheet2,
      destRow: destRow,
      destColumn: 1,
      copyStyle: true
    });
    destRow++;

    // Copy rows 6-10 to the second target file
    for (let i = 5; i < 10; i++) {
      sheet.Copy({
        sourceRange: sheet.Rows[i],
        worksheet: newSheet2,
        destRow: destRow,
        destColumn: 1,
        copyStyle: true
      });
      destRow++;
    }

    // Copy column widths
    for (let c = 0; c < sheet.Columns.length; c++) {
      newSheet2.SetColumnWidth(c + 1, sheet.GetColumnWidth(c + 1));
    }

    // Save the second split file
    const outputFileName2 = "Rows6-10.xlsx";
    newWorkbook2.SaveToFile({ fileName: outputFileName2, version: xlsModule.ExcelVersion.Version2010 });
    newWorkbook2.Dispose();

    // Read file data from VFS
    const fileData2 = window.dotnetRuntime.Module.FS.readFile(outputFileName2);

    // Package the split files into a ZIP for download
    const zip = new JSZip();
    zip.file(outputFileName1, fileData1);
    zip.file(outputFileName2, fileData2);
    const zipBlob = await zip.generateAsync({ type: 'blob' });
    const zipUrl = URL.createObjectURL(zipBlob);
    const a = document.createElement('a');
    a.href = zipUrl;
    a.download = "SplitByRows.zip";
    a.click();
    URL.revokeObjectURL(zipUrl);

    // Release resources
    workbook.Dispose();
  };

  return (
    <div style={{ textAlign: 'center', height: '300px' }}>
      <h1>Split Excel By Row</h1>
      <button onClick={splitByRow}>
        Generate
      </button>
    </div>
  );
}

export default App;
After splitting by row, each file contains the header row and the specified number of data rows

Split by Column
Splitting by column is suitable for breaking up wide tables into multiple files by column groups, making the data structure clearer. When a worksheet contains many columns and you need to split different column groups into separate files, Spire.XLS accomplishes this by copying source columns one by one into a new workbook. The steps are as follows:
- Create a
Workbookobject, load the source Excel document withLoadFromFile(), and retrieve the first worksheet. - Create a new
Workbookobject. - Use a loop to call the
Copymethod column by column, copying specified columns from the source worksheet to the new worksheet. - Copy the column widths from the source worksheet to the new worksheet.
- Save the new workbook as an Excel file with
SaveToFile(). - Repeat the steps above to create more split files.
Below is a complete code example demonstrating how to split a worksheet into multiple Excel files by column:
function App() {
  const splitByColumn = async () => {
    // Get the Spire.XLS WASM module
    const xlsModule = window.wasmModule?.spirexls;

    // Check if the module is ready
    if (!xlsModule) {
      alert('Spire.Xls is not ready yet');
      return;
    }

    // Load fonts and the Excel file into VFS
    await window.spire.FetchFileToVFS('arial.ttf', '/Library/Fonts/', `${process.env.PUBLIC_URL}/font/`);
    const inputFileName = 'Sample.xlsx';
    await window.spire.FetchFileToVFS(inputFileName, '', `${process.env.PUBLIC_URL}data/`);

    // Load the workbook and get the first worksheet
    const workbook = new xlsModule.Workbook();
    workbook.LoadFromFile({ fileName: inputFileName });
    const sheet = workbook.Worksheets.get(0);

    // Create a new workbook and copy columns 1-2 (columns A-B) to the new file
    let newWorkbook1 = new xlsModule.Workbook();
    let newSheet1 = newWorkbook1.Worksheets.get(0);

    for (let i = 1; i <= 2; i++) {
      sheet.Copy({
        sourceRange: sheet.Columns[i - 1],
        worksheet: newSheet1,
        destRow: 1,
        destColumn: i,
        copyStyle: true
      });
    }

    // Copy column widths
    for (let i = 1; i <= 2; i++) {
      newSheet1.SetColumnWidth(i, sheet.GetColumnWidth(i));
    }

    // Save the first split file
    const outputFileName1 = "ColumnsAB.xlsx";
    newWorkbook1.SaveToFile({ fileName: outputFileName1, version: xlsModule.ExcelVersion.Version2010 });
    newWorkbook1.Dispose();

    // Read file data from VFS
    const fileData1 = window.dotnetRuntime.Module.FS.readFile(outputFileName1);

    // Create a second new workbook and copy columns 3-4 (columns C-D) to the new file
    let newWorkbook2 = new xlsModule.Workbook();
    let newSheet2 = newWorkbook2.Worksheets.get(0);

    for (let i = 3; i <= 4; i++) {
      sheet.Copy({
        sourceRange: sheet.Columns[i - 1],
        worksheet: newSheet2,
        destRow: 1,
        destColumn: i - 2,
        copyStyle: true
      });
    }

    // Copy column widths
    for (let i = 3; i <= 4; i++) {
      newSheet2.SetColumnWidth(i - 2, sheet.GetColumnWidth(i));
    }

    // Save the second split file
    const outputFileName2 = "ColumnsCD.xlsx";
    newWorkbook2.SaveToFile({ fileName: outputFileName2, version: xlsModule.ExcelVersion.Version2010 });
    newWorkbook2.Dispose();

    // Read file data from VFS
    const fileData2 = window.dotnetRuntime.Module.FS.readFile(outputFileName2);

    // Package the split files into a ZIP for download
    const zip = new JSZip();
    zip.file(outputFileName1, fileData1);
    zip.file(outputFileName2, fileData2);
    const zipBlob = await zip.generateAsync({ type: 'blob' });
    const zipUrl = URL.createObjectURL(zipBlob);
    const a = document.createElement('a');
    a.href = zipUrl;
    a.download = "SplitByColumns.zip";
    a.click();
    URL.revokeObjectURL(zipUrl);

    // Release resources
    workbook.Dispose();
  };

  return (
    <div style={{ textAlign: 'center', height: '300px' }}>
      <h1>Split Excel By Column</h1>
      <button onClick={splitByColumn}>
        Generate
      </button>
    </div>
  );
}

export default App;
After splitting by column, each file contains a portion of the columns from the original worksheet

FAQ
Worksheet name shows as default (Sheet1) instead of the original name
Cause: The CopyFrom method only copies worksheet content — it does not retain the original worksheet name. The new workbook's default worksheet keeps its default name.
Solution: Manually set the worksheet name after copying using newSheet.Name = sheet.Name:
let newSheet = newWorkbook.Worksheets.get(0);
newSheet.CopyFrom(sheet);
newSheet.Name = sheet.Name;
VFS file loading fails or path is incorrect
Cause: The file path or VFS file name is incorrect, or the required font files have not been loaded into VFS, causing the workbook to fail to load.
Solution: Verify that the FetchFileToVFS parameters use the correct paths. The font file path should be /Library/Fonts/, and ensure the font file name matches exactly (e.g., arial.ttf):
await window.spire.FetchFileToVFS('arial.ttf', '/Library/Fonts/', fontSourcePath);
Get a Free License
Spire.XLS for JavaScript offers a 30-day full-featured free trial license with no functional limitations. Apply here to evaluate before purchasing.
