
Knowledgebase (2370)
Children categories
Adjusting row heights and column widths allows users to optimize the display of their data in a spreadsheet. Whether you're working with a large dataset or preparing a report, customizing these dimensions can help ensure that your information is presented clearly and concisely. Excel provides several ways to change row height and column width, including manual adjustments and automatic fitting options.
In this article, you will learn how to programmatically change row height and column width in Excel in Java using the Spire.XLS for Java library.
- Change Row Height and Column Width for a Specific Row and Column
- Change Row Height and Column Width for All Rows and Columns
- Automatically Adjust Row Height and Column Width for a Specific Row and Column
- Automatically Adjust Row Height and Column Width in a Cell Range
Install Spire.XLS for Java
First of all, you're required to add the Spire.Xls.jar file as a dependency in your Java program. The JAR file can be downloaded from this link. If you use Maven, you can easily import the JAR file in your application by adding the following code to your project's pom.xml file.
<repositories>
    <repository>
        <id>com.e-iceblue</id>
        <name>e-iceblue</name>
        <url>https://repo.e-iceblue.com/nexus/content/groups/public/</url>
    </repository>
</repositories>
<dependencies>
    <dependency>
        <groupId>e-iceblue</groupId>
        <artifactId>spire.xls</artifactId>
        <version>16.7.3</version>
    </dependency>
</dependencies>
Change Row Height and Column Width for a Specific Row and Column
Spire.XLS for Java provides the Worksheet.setRowHeight() and Worksheet.setColumnWidth() methods for adjusting the height of a specific row and the width of a specific column in a worksheet. Here are the detailed steps to accomplish this task.
- Create a Workbook object.
- Load an Excel document from a given file path.
- Get a specific worksheet from the workbook.
- Change the height of a specific row using Worksheet.setRowHeight() method.
- Change the width of a specific column using Worksheet.setColumnWidth() method.
- Save the workbook to a different Excel file.
- Java
import com.spire.xls.ExcelVersion;
import com.spire.xls.Workbook;
import com.spire.xls.Worksheet;

public class SetRowHeightAndColumnWidth {

    public static void main(String[] args) {

        // Create a Workbook object
        Workbook workbook = new Workbook();

        // Load an Excel document
        workbook.loadFromFile("C:\\Users\\Administrator\\Desktop\\Input.xlsx");

        // Get a specific worksheet
        Worksheet worksheet = workbook.getWorksheets().get(0);

        // Set the height of a selected row to 20
        worksheet.setRowHeight(1,20);

        // Set the width of a selected column to 30
        worksheet.setColumnWidth(4, 30);

        //Save to file.
        workbook.saveToFile("output/SetHeightAndWidth.xlsx", ExcelVersion.Version2016);

        // Dispose resources
        workbook.dispose();
    }
}
Change Row Height and Column Width for All Rows and Columns
To modify the row height and column width for all rows and columns in a worksheet, you can utilize the Worksheet.setDefaultRowHeight() and Worksheet.setDefaultColumnWidth() methods. The following are the detailed steps.
- Create a Workbook object.
- Load an Excel document from a given file path.
- Get a specific worksheet from the workbook.
- Change the height for all rows using Worksheet.setDefaultRowHeight() method.
- Change the width for all columns using Worksheet.setDefaultColumnWidth() method.
- Save the workbook to a different Excel file.
- Java
import com.spire.xls.ExcelVersion;
import com.spire.xls.Workbook;
import com.spire.xls.Worksheet;

public class SetRowHeightColumnWidthForAll {

    public static void main(String[] args) {

        // Create a Workbook object
        Workbook workbook = new Workbook();

        // Load an Excel document
        workbook.loadFromFile("C:\\Users\\Administrator\\Desktop\\Input.xlsx");

        // Get a specific worksheet
        Worksheet worksheet = workbook.getWorksheets().get(0);

        // Set the default row height to 18
        worksheet.setDefaultRowHeight(18);

        // Set the default column width to 15
        worksheet.setDefaultColumnWidth(15);

        //Save to file.
        workbook.saveToFile("output/SetHeightAndWidthForAll.xlsx", ExcelVersion.Version2016);

        // Dispose resources
        workbook.dispose();
    }
}
Automatically Adjust Row Height and Column Width for a Specific Row and Column
To automatically adjust the row height and column width to fit the content of a specific row and column in a worksheet, you can use the Worksheet.autoFitRow() and Worksheet.autoFitColumn() methods. The steps to autofit row height and column width are as follows.
- Create a Workbook object.
- Load an Excel document from a given file path.
- Get a specific worksheet from the workbook.
- Automatically adjust the height of a specific row using Worksheet.autoFitRow() method.
- Automatically adjust the width of a specific column using Worksheet.autoFitColumn() method.
- Save the workbook to a different Excel file.
- Java
import com.spire.xls.ExcelVersion;
import com.spire.xls.Workbook;
import com.spire.xls.Worksheet;

public class AutoFitRowHeightAndColumnWidth {

    public static void main(String[] args) {

        // Create a Workbook object
        Workbook workbook = new Workbook();

        // Load an Excel document
        workbook.loadFromFile("C:\\Users\\Administrator\\Desktop\\Input.xlsx");

        // Get a specific worksheet
        Worksheet worksheet = workbook.getWorksheets().get(0);

        // Autofit the first row
        worksheet.autoFitRow(1);

        // Autofit the second column
        worksheet.autoFitColumn(2);

        // Save the document
        workbook.saveToFile("output/AutoFit.xlsx", ExcelVersion.Version2016);

        // Dispose resources
        workbook.dispose();
    }
}
Automatically Adjust Row Height and Column Width in a Cell Range
To automatically adjust the row height and column width within a specific cell range in your worksheet, you can utilize the CellRange.autoFitRows() and CellRange.autoFitColumns() methods respectively. Below are the detailed steps.
- Create a Workbook object.
- Load an Excel document from a given file path.
- Get a specific worksheet from the workbook.
- Get a cell range using Worksheet.getCellRange() method.
- Automatically adjust the row height in the range using CellRange.autoFitRow() method.
- Automatically adjust the column width in the range using CellRange.autoFitColumn() method.
- Save the workbook to a different Excel file.
- Java
import com.spire.xls.CellRange;
import com.spire.xls.ExcelVersion;
import com.spire.xls.Workbook;
import com.spire.xls.Worksheet;

public class AutoFitInRange {

    public static void main(String[] args) {

        // Create a Workbook object
        Workbook workbook = new Workbook();

        // Load an Excel document
        workbook.loadFromFile("C:\\Users\\Administrator\\Desktop\\Input.xlsx");

        // Get a specific worksheet
        Worksheet worksheet = workbook.getWorksheets().get(0);

        // Get the used range
        CellRange cellRange = worksheet.getAllocatedRange();

        // Or, you can get a desired cell range
        // CellRange cellRange = worksheet.getCellRange(1,1,6,4)

        // Autofit rows and columns in the range
        cellRange.autoFitRows();
        cellRange.autoFitColumns();

        // Save the document
        workbook.saveToFile("output/AutoFit.xlsx", ExcelVersion.Version2016);

        // Dispose resources
        workbook.dispose();
    }
}
Apply for a Temporary License
If you'd like to remove the evaluation message from the generated documents, or to get rid of the function limitations, please request a 30-day trial license for yourself.
When working with large datasets, finding information that matches certain criteria in seconds can be quite challenging. Fortunately, MS Excel provides the AutoFilter tool to help you narrow down the search by displaying only the relevant information and hiding all other data from view. In this article, you will learn how to add or remove AutoFilter in Excel with Java using Spire.XLS for Java.
- Add AutoFilter to Excel Cells in Java
- Apply Date AutoFilter in Excel in Java
- Apply Custom AutoFilter in Excel in Java
- Remove AutoFilter in Excel in Java
Install Spire.XLS for Java
First of all, you're required to add the Spire.Xls.jar file as a dependency in your Java program. The JAR file can be downloaded from this link. If you use Maven, you can easily import the JAR file in your application by adding the following code to your project's pom.xml file.
<repositories>
    <repository>
        <id>com.e-iceblue</id>
        <name>e-iceblue</name>
        <url>https://repo.e-iceblue.com/nexus/content/groups/public/</url>
    </repository>
</repositories>
<dependencies>
    <dependency>
        <groupId>e-iceblue</groupId>
        <artifactId>spire.xls</artifactId>
        <version>16.7.3</version>
    </dependency>
</dependencies>
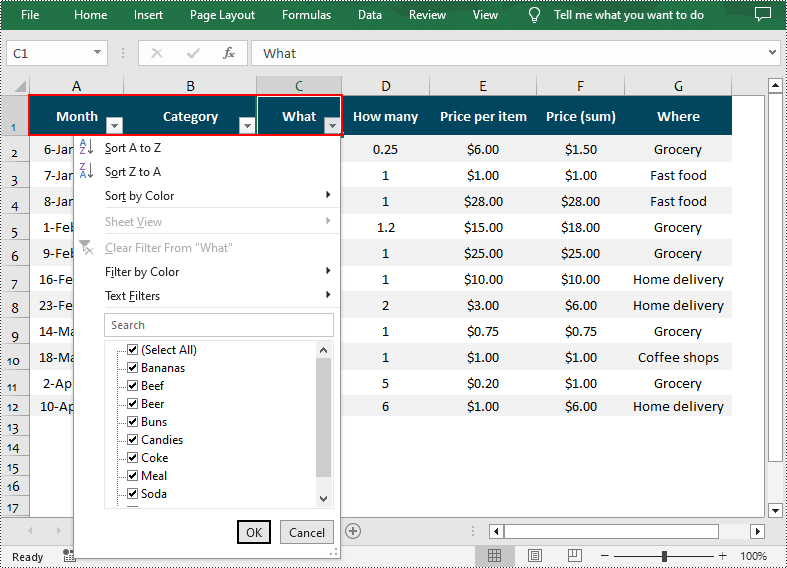
Add AutoFilter to Excel Cells in Java
Spire.XLS for Java allows you to apply AutoFilter on a specific cell range through the Worksheet.getAutoFilters().setRange() method. The following are the detailed steps:
- Create a Workbook instance.
- Load a sample Excel file using Workbook.loadFromFile() method.
- Get a specified worksheet using Workbook.getWorksheets().get() method.
- Add an AutoFilter to a specified cell range using Worksheet.getAutoFilters().setRange() method.
- Save the result file using Workbook.saveToFile() method.
- Java
import com.spire.xls.*;

public class createFilter {
    public static void main(String[] args) {

        //Create a Workbook instance
        Workbook workbook = new Workbook();

        //Load an Excel file
        workbook.loadFromFile("C:\\Users\\Administrator\\Desktop\\Data.xlsx");

        //Get the first worksheet
        Worksheet sheet = workbook.getWorksheets().get(0);

        //Create an AutoFilter in the sheet and specify the range to be filtered
        sheet.getAutoFilters().setRange(sheet.getCellRange("A1:C1"));

        //Save the result file
        workbook.saveToFile("CreateFilter.xlsx", ExcelVersion.Version2016);
    }
}
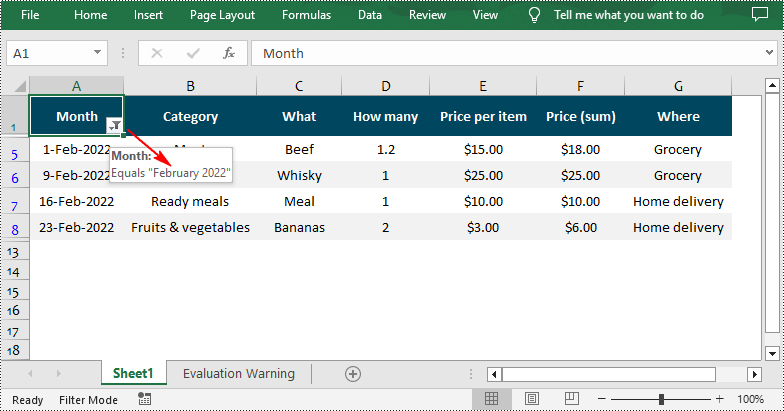
Apply Date AutoFilter in Excel in Java
If you need to explore information related to specific dates or time, you can apply a date filter to the selected range using the Workbook.getAutoFilters().addDateFilter(IAutoFilter column, DateTimeGroupingType dateTimeGroupingType, int year, int month, int day, int hour, int minute, int second) method. The following are detailed steps.
- Create a Workbook instance.
- Load a sample Excel file using Workbook.loadFromFile() method.
- Get a specified worksheet using Workbook.getWorksheets().get() method.
- Add an AutoFilter to a specified range using Workbook.getAutoFilters().setRange() method.
- Get the column to be filtered.
- Call the Workbook.getAutoFilters().addDateFilter() method to add a date filter to the column to filter data related to a specified year/month/date, etc.
- Apply the filter using Workbook.getAutoFilters().filter() method.
- Save the result file using Workbook.saveToFile() method.
- Java
import com.spire.xls.*;
import com.spire.xls.core.IAutoFilter;
import com.spire.xls.core.spreadsheet.autofilter.DateTimeGroupingType;

public class ApplyDateFilter {
    public static void main(String[] args) {

        //Create a Workbook instance
        Workbook workbook = new Workbook();

        //Load an Excel file
        workbook.loadFromFile("C:\\Users\\Administrator\\Desktop\\Data.xlsx");

        //Get the first worksheet
        Worksheet sheet = workbook.getWorksheets().get(0);

        //Create an auto filter in the sheet and specify the range to be filtered
        sheet.getAutoFilters().setRange(sheet.getCellRange("A1:A12"));

        //Get the column to be filtered
        IAutoFilter filterColumn = sheet.getAutoFilters().get(0);

        //Add a date filter to filter data related to February 2022
        sheet.getAutoFilters().addDateFilter(filterColumn, DateTimeGroupingType.Month, 2022, 2, 0, 0, 0, 0);

        //Apply the filter
        sheet.getAutoFilters().filter();

        //Save the result file
        workbook.saveToFile("ApplyDateFilter.xlsx", ExcelVersion.Version2016);
    }
}
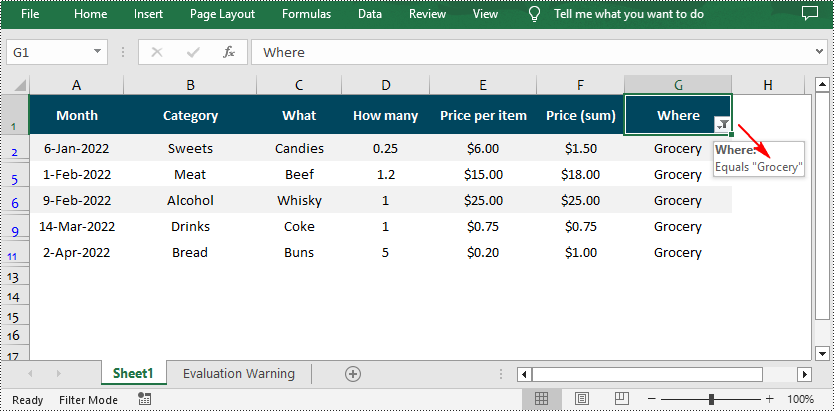
Apply Custom AutoFilter in Excel in Java
The Workbook.getAutoFilters().customFilter(FilterColumn column, FilterOperatorType operatorType, java.lang.Object criteria) method allows you to create custom filters based on certain criteria. For example, you can filter data that contains specific text. The following are detailed steps.
- Create a Workbook instance.
- Load a sample Excel file using Workbook.LoadFromFile() method.
- Get a specified worksheet using Workbook.getWorksheets().get() method.
- Add an AutoFilter to a specified range using Workbook.getAutoFilters().setRange() method.
- Get the column to be filtered.
- Add a custom filter to the column to filter data containing the specified string using Workbook.getAutoFilters().customFilter() method.
- Apply the filter using Workbook.getAutoFilters().filter() method.
- Save the result file using Workbook.saveToFile() method.
- Java
import com.spire.xls.*;
import com.spire.xls.core.spreadsheet.autofilter.FilterColumn;
import com.spire.xls.core.spreadsheet.autofilter.FilterOperatorType;

public class CustomFilter {
    public static void main(String[] args) {

        //Create a Workbook instance
        Workbook workbook = new Workbook();

        //Load an Excel file
        workbook.loadFromFile("C:\\Users\\Administrator\\Desktop\\Data.xlsx");

        //Get the first worksheet
        Worksheet sheet = workbook.getWorksheets().get(0);

        //Create an auto filter in the sheet and specify the range to be filtered
        sheet.getAutoFilters().setRange(sheet.getCellRange("G1:G12"));

        //Get the column to be filtered
        FilterColumn filterColumn = sheet.getAutoFilters().get(0);

        //Add a custom filter to filter data containing the string "Grocery"
        String strCrt = "Grocery";
        sheet.getAutoFilters().customFilter(filterColumn, FilterOperatorType.Equal, strCrt);

        //Apply the filter
        sheet.getAutoFilters().filter();

        //Save the result file
        workbook.saveToFile("ApplyCustomFilter.xlsx", ExcelVersion.Version2016);
    }
}
Remove AutoFilter in Excel in Java
In addition to adding AutoFilters in Excel files, Spire.XLS for Java also support removing or deleting the AutoFilters from Excel through the Worksheet.getAutoFilters().clear() method. The following are detailed steps.
- Create a Workbook instance.
- Load a sample Excel file using Workbook.loadFromFile() method.
- Get a specified worksheet using Workbook.getWorksheets().get() method.
- Remove AutoFilter from the worksheet using Worksheet.getAutoFilters().clear() method.
- Save the result file using Workbook.saveToFile() method.
- Java
import com.spire.xls.*;

public class removeAutoFilters {
    public static void main(String[] args) {

        //Create a Workbook instance
        Workbook workbook = new Workbook();

        //Load an Excel file
        workbook.loadFromFile("CustomAutoFilter.xlsx");

        //Get the first worksheet
        Worksheet sheet = workbook.getWorksheets().get(0);

        //Remove the auto filters
        sheet.getAutoFilters().clear();

        //Save the result file
        workbook.saveToFile("RemoveFilter.xlsx", ExcelVersion.Version2016);
    }
}
Apply for a Temporary License
If you'd like to remove the evaluation message from the generated documents, or to get rid of the function limitations, please request a 30-day trial license for yourself.
Adding document properties to an Excel file is a simple and convenient way to provide additional context and information about the file. Document properties can be either standard or custom. Standard document properties, such as author, title, and subject, offer basic information about the file and make it easier to locate and identify. Custom document properties allow users to add specific details about the file, such as project name, client name, or department owner, providing relevant information and context to the data presented in the file. In this article, we will demonstrate how to add standard document properties and custom document properties to an Excel file in Java using Spire.XLS for Java library.
- Add Standard Document Properties to an Excel File in Java
- Add Custom Document Properties to an Excel File in Java
Install Spire.XLS for Java
First of all, you're required to add the Spire.Xls.jar file as a dependency in your Java program. The JAR file can be downloaded from this link. If you use Maven, you can easily import the JAR file in your application by adding the following code to your project's pom.xml file.
<repositories>
    <repository>
        <id>com.e-iceblue</id>
        <name>e-iceblue</name>
        <url>https://repo.e-iceblue.com/nexus/content/groups/public/</url>
    </repository>
</repositories>
<dependencies>
    <dependency>
        <groupId>e-iceblue</groupId>
        <artifactId>spire.xls</artifactId>
        <version>16.7.3</version>
    </dependency>
</dependencies>
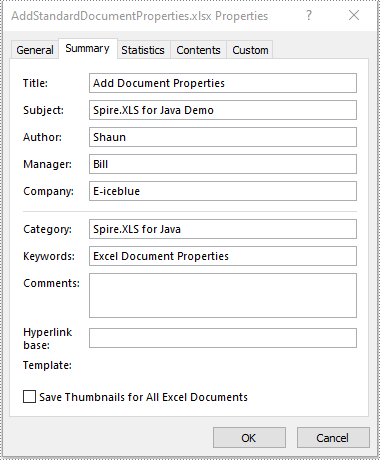
Add Standard Document Properties to an Excel File in Java
Standard document properties are pre-defined by Microsoft Excel and include fields such as Title, Subject, Author, Keywords, and Comments. The following steps demonstrate how to add standard document properties to an Excel file in Java using Spire.XLS for Java:
- Initialize an instance of the Workbook class.
- Load an Excel file using the Workbook.loadFromFile(String fileName) method.
- Add standard document properties, such as title, subject and author to the file using the Workbook.getDocumentProperties().setTitle(String value), Workbook.getDocumentProperties().setSubject(String value), Workbook.getDocumentProperties().setAuthor(String value) methods.
- Save the result file using the Workbook.saveToFile(String fileName, ExcelVersion version) method.
- Java
import com.spire.xls.ExcelVersion;
import com.spire.xls.Workbook;

public class AddStandardDocumentProperties {
    public static void main(String[] args) {
        //Initialize an instance of the Workbook class
        Workbook workbook = new Workbook();
        //Load an Excel file
        workbook.loadFromFile("Input.xlsx");

        //Add standard document properties to the file
        workbook.getDocumentProperties().setTitle("Add Document Properties");
        workbook.getDocumentProperties().setSubject("Spire.XLS for Java Demo");
        workbook.getDocumentProperties().setAuthor("Shaun");
        workbook.getDocumentProperties().setManager("Bill");
        workbook.getDocumentProperties().setCompany("E-iceblue");
        workbook.getDocumentProperties().setCategory("Spire.XLS for Java");
        workbook.getDocumentProperties().setKeywords("Excel Document Properties");

        //Save the result file
        workbook.saveToFile("AddStandardDocumentProperties.xlsx", ExcelVersion.Version2016);
        workbook.dispose();
    }
}
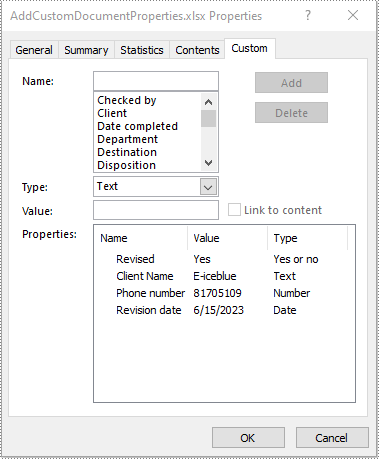
Add Custom Document Properties to an Excel File in Java
Custom document properties are user-defined and can be tailored to suit specific needs or requirements. The data type of the custom document properties can be Yes or No, Text, Number, and Date. The following steps demonstrate how to add custom document properties to an Excel file in Java using Spire.XLS for Java:
- Initialize an instance of the Workbook class.
- Load an Excel file using the Workbook.loadFromFile(String fileName) method.
- Add a custom document property of "Yes or No" type to the file using the Workbook.getCustomDocumentProperties().add(String var1, boolean var2) method.
- Add a custom document property of "Text" type to the file using the Workbook.getCustomDocumentProperties().add(String var1, String var2) method.
- Add a custom document property of "Number" type to the file using the Workbook.getCustomDocumentProperties().add(String var1, int var2) method.
- Add a custom document property of "Date" type to the file using the Workbook.getCustomDocumentProperties().add(String var1, Date var2) method.
- Save the result file using the Workbook.saveToFile(String fileName, ExcelVersion version) method.
- Java
import com.spire.xls.ExcelVersion;
import com.spire.xls.Workbook;

import java.util.Date;

public class AddCustomDocumentProperties {
    public static void main(String[] args) {
        //Initialize an instance of the Workbook class
        Workbook workbook = new Workbook();
        //Load an Excel file
        workbook.loadFromFile("Input.xlsx");

        //Add a “yes or no” custom document property
        workbook.getCustomDocumentProperties().add("Revised", true);
        //Add a “text” custom document property
        workbook.getCustomDocumentProperties().add("Client Name", "E-iceblue");
        //Add a “number” custom document property
        workbook.getCustomDocumentProperties().add("Phone number", 81705109);
        //Add a “date” custom document property
        workbook.getCustomDocumentProperties().add("Revision date", new Date());

        //Save the result file
        workbook.saveToFile("AddCustomDocumentProperties.xlsx", ExcelVersion.Version2013);
        workbook.dispose();
    }
}
Apply for a Temporary License
If you'd like to remove the evaluation message from the generated documents, or to get rid of the function limitations, please request a 30-day trial license for yourself.
