
Knowledgebase (2370)
Children categories
Java: Convert PowerPoint to Images (PNG, JPG, TIFF, SVG)
2022-10-21 07:12:00 Written by AdministratorIn comparison with PowerPoint documents, image files are easier to view because they can be opened on almost any device without the need for specific software. If you want to make your PowerPoint documents accessible on a wide range of devices, you can convert them to images. In this article, we will explain how to convert PowerPoint documents to various image formats in Java using Spire.Presentation for Java.
- Convert PowerPoint Documents to JPG or PNG Images
- Convert PowerPoint Documents to TIFF Images
- Convert PowerPoint Documents to SVG Images
Install Spire.Presentation for Java
First of all, you're required to add the Spire.Presentation.jar file as a dependency in your Java program. The JAR file can be downloaded from this link. If you use Maven, you can easily import the JAR file in your application by adding the following code to your project's pom.xml file.
<repositories>
    <repository>
        <id>com.e-iceblue</id>
        <name>e-iceblue</name>
        <url>https://repo.e-iceblue.com/nexus/content/groups/public/</url>
    </repository>
</repositories>
<dependencies>
    <dependency>
        <groupId>e-iceblue</groupId>
        <artifactId>spire.presentation</artifactId>
        <version>11.7.2</version>
    </dependency>
</dependencies>
Convert PowerPoint Documents to JPG or PNG Images in Java
The following are the steps to convert a PowerPoint document to JPG or PNG image:
- Initialize an instance of Presentation class.
- Load a PowerPoint document using Presentation.loadFromFile() method.
- Iterate through all slides in the PowerPoint document.
- Save each slide as a BufferedImage object using ISlide.saveAsImage() method.
- Save the BufferedImage object to PNG or JPG file using ImageIO.write() method.
- Java
import com.spire.presentation.ISlide;
import com.spire.presentation.Presentation;

import javax.imageio.ImageIO;
import java.awt.image.BufferedImage;
import java.io.File;

public class ConvertPowerPointToPngOrJpg {
    public static void main(String []args) throws Exception {
        //Create a Presentation instance
        Presentation presentation = new Presentation();
        //Load a PowerPoint document
        presentation.loadFromFile("Sample.pptx");

        //Iterate through all slides in the PowerPoint document
        for(int i = 0; i < presentation.getSlides().getCount(); i++)
        {
            ISlide slide = presentation.getSlides().get(i);
            //Save each slide as PNG image
            BufferedImage image = slide.saveAsImage();
            String fileName = String.format("ToImage-%1$s.png", i);
            ImageIO.write(image, "PNG",new File(fileName));
        }
    }
}

Convert PowerPoint Documents to TIFF Images in Java
The following are the steps to convert a PowerPoint document to TIFF image:
- Initialize an instance of Presentation class.
- Load a PowerPoint document using Presentation.loadFromFile() method.
- Convert the PowerPoint document to TIFF image using Presentation.saveToFile(String, FileFormat) method.
- Java
import com.spire.presentation.FileFormat;
import com.spire.presentation.Presentation;

public class ConvertPowerPointToTiff {
    public static void main(String []args) throws Exception {
        //Create a Presentation instance
        Presentation presentation = new Presentation();
        //Load a PowerPoint document
        presentation.loadFromFile("Sample.pptx");

        //Convert the PowerPoint document to TIFF image
        presentation.saveToFile("toTIFF.tiff", FileFormat.TIFF);
    }
}

Convert PowerPoint Documents to SVG Images in Java
The following are the steps to convert a PowerPoint document to SVG images:
- Initialize an instance of Presentation class.
- Load a PowerPoint document using Presentation.loadFromFile() method.
- Convert the PowerPoint document to SVG and save the results into an ArrayList of byte arrays using Presentation.saveToSVG() method.
- Iterate through the byte arrays in the ArrayList.
- Get the current byte array using ArrayList.get(int) method.
- Initialize an instance of FileOutputStream class and save the byte array to an SVG file using FileOutputStream.write() method.
- Java
import com.spire.presentation.Presentation;

import java.io.FileOutputStream;
import java.util.ArrayList;

public class ConvertPowerPointToSVG {
    public static void main(String []args) throws Exception {
        //Create a Presentation instance
        Presentation presentation = new Presentation();
        //Load a PowerPoint document
        presentation.loadFromFile("Sample.pptx");

        //Convert the PowerPoint document to SVG and save the results into an ArrayList of byte arrays
        ArrayList<byte[]> svgBytes =(ArrayList) presentation.saveToSVG();
        int len = svgBytes.size();
        //Iterate through the byte arrays in the ArrayList
        for (int i = 0; i < len; i++)
        {
            //Get the current byte array
            byte[] bytes = svgBytes.get(i);
            //Specify the output file name
            String fileName= String.format("ToSVG-%d.svg", i);
            //Create a FileOutputStream instance
            FileOutputStream stream = new FileOutputStream(fileName);
            //Save the byte array to an SVG file
            stream.write(bytes);
        }
    }
}

Apply for a Temporary License
If you'd like to remove the evaluation message from the generated documents, or to get rid of the function limitations, please request a 30-day trial license for yourself.
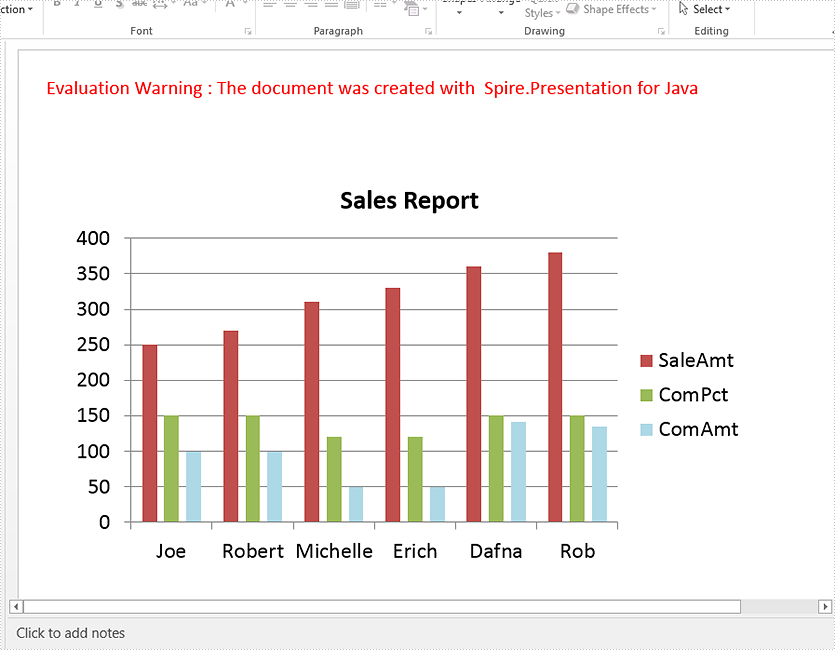
This article demonstrates how to create a chart in a PowerPoint document using Spire.Presentation for Java.
import com.spire.presentation.*;
import com.spire.pdf.tables.table.*;
import com.spire.presentation.charts.*;
import com.spire.presentation.drawing.FillFormatType;
import java.awt.geom.Rectangle2D;
import java.lang.Object;


public class CreateChart {
    public static void main(String[] args) throws Exception {

        //Create a presentation instance
        Presentation presentation = new Presentation();

        //Add a column clustered chart
        Rectangle2D.Double rect = new Rectangle2D.Double(40, 100, 550, 320);
        IChart chart = null;
        chart = presentation.getSlides().get(0).getShapes().appendChart(ChartType.COLUMN_CLUSTERED, rect);

        //Set chart title
        chart.getChartTitle().getTextProperties().setText("Sales Report");
        chart.getChartTitle().getTextProperties().isCentered(true);
        chart.getChartTitle().setHeight(30);
        chart.hasTitle(true);

        //Create a dataTable
        DataTable dataTable = new DataTable();
        dataTable.getColumns().add(new DataColumn("SalesPers", DataTypes.DATATABLE_STRING));
        dataTable.getColumns().add(new DataColumn("SaleAmt", DataTypes.DATATABLE_INT));
        dataTable.getColumns().add(new DataColumn("ComPct", DataTypes.DATATABLE_INT));
        dataTable.getColumns().add(new DataColumn("ComAmt", DataTypes.DATATABLE_INT));
        DataRow row1 = dataTable.newRow();
        row1.setString("SalesPers", "Joe");
        row1.setInt("SaleAmt", 250);
        row1.setInt("ComPct", 150);
        row1.setInt("ComAmt", 99);
        DataRow row2 = dataTable.newRow();
        row2.setString("SalesPers", "Robert");
        row2.setInt("SaleAmt", 270);
        row2.setInt("ComPct", 150);
        row2.setInt("ComAmt", 99);
        DataRow row3 = dataTable.newRow();
        row3.setString("SalesPers", "Michelle");
        row3.setInt("SaleAmt", 310);
        row3.setInt("ComPct", 120);
        row3.setInt("ComAmt", 49);
        DataRow row4 = dataTable.newRow();
        row4.setString("SalesPers", "Erich");
        row4.setInt("SaleAmt", 330);
        row4.setInt("ComPct", 120);
        row4.setInt("ComAmt", 49);
        DataRow row5 = dataTable.newRow();
        row5.setString("SalesPers", "Dafna");
        row5.setInt("SaleAmt", 360);
        row5.setInt("ComPct", 150);
        row5.setInt("ComAmt", 141);
        DataRow row6 = dataTable.newRow();
        row6.setString("SalesPers", "Rob");
        row6.setInt("SaleAmt", 380);
        row6.setInt("ComPct", 150);
        row6.setInt("ComAmt", 135);
        dataTable.getRows().add(row1);
        dataTable.getRows().add(row2);
        dataTable.getRows().add(row3);
        dataTable.getRows().add(row4);
        dataTable.getRows().add(row5);
        dataTable.getRows().add(row6);

        //Import data from dataTable to chart data
        for (int c = 0; c < dataTable.getColumns().size(); c++) {
            chart.getChartData().get(0, c).setText(dataTable.getColumns().get(c).getColumnName());
        }
        for (int r = 0; r < dataTable.getRows().size(); r++) {
            Object[] datas = dataTable.getRows().get(r).getArrayList();
            for (int c = 0; c < datas.length; c++) {
                chart.getChartData().get(r + 1, c).setValue(datas[c]);

            }
        }

        chart.getSeries().setSeriesLabel(chart.getChartData().get("B1", "D1"));
        chart.getCategories().setCategoryLabels(chart.getChartData().get("A2", "A7"));
        chart.getSeries().get(0).setValues(chart.getChartData().get("B2", "B7"));

        chart.getSeries().get(1).setValues(chart.getChartData().get("C2", "C7"));

        chart.getSeries().get(2).setValues(chart.getChartData().get("D2", "D7"));
        chart.getSeries().get(2).getFill().setFillType(FillFormatType.SOLID);
      chart.getSeries().get(2).getFill().getSolidColor().setKnownColor(KnownColors.LIGHT_BLUE);

        //Set overlap
        chart.setOverLap(-50);

        //Set gap width
        chart.setGapDepth(200);

        //Save the document
        presentation.saveToFile("output/CreateChart.pptx", FileFormat.PPTX_2010);
    }
}
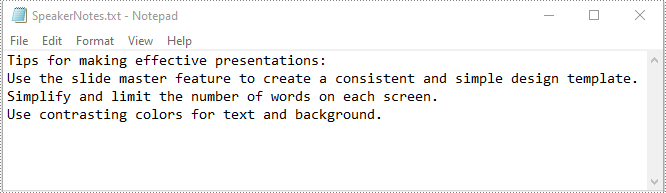
When presenting a slideshow to an audience, you probably want to explain more than what appears on the slides. Adding speaker notes to your presentation is a great way to help you remember what needs to be said during the slideshow. In this article, you will learn how to add, read or delete speaker notes in PowerPoint in Java using Spire.Presentation for Java.
Install Spire.Presentation for Java
First of all, you're required to add the Spire.Presentation.jar file as a dependency in your Java program. The JAR file can be downloaded from this link. If you use Maven, you can easily import the JAR file in your application by adding the following code to your project's pom.xml file.
<repositories>
    <repository>
        <id>com.e-iceblue</id>
        <name>e-iceblue</name>
        <url>https://repo.e-iceblue.com/nexus/content/groups/public/</url>
    </repository>
</repositories>
<dependencies>
    <dependency>
        <groupId>e-iceblue</groupId>
        <artifactId>spire.presentation</artifactId>
        <version>11.7.2</version>
    </dependency>
</dependencies>
Add Speaker Notes in PowerPoint in Java
The following are the main steps to add speaker notes to a PowerPoint document:
- Create a Presentation instance and load a PowerPoint document using Presentation.loadFromFile() method.
- Get the slide that you want to add speaker notes to using Presentation.getSlides().get(slideIndex) method.
- Add a notes slide to the slide using ISlide.addNotesSlides() method.
- Create a ParagraphEx instance.
- Set text for the paragraph through ParagraphEx.setText() method, then append the paragraph to the notes slide using NotesSlide.getNotesTextFrame().getParagraphs().append() method.
- Save the result document using Presentation.saveToFile() method.
- Java
import com.spire.presentation.*;

public class AddSpeakerNotes {
    public static void main(String []args) throws Exception {
        //Load a PowerPoint document
        Presentation ppt = new Presentation();
        ppt.loadFromFile("Sample.pptx");

        //Get the first slide
        ISlide slide = ppt.getSlides().get(0);
        //Add a notes slide
        NotesSlide notesSlide = slide.addNotesSlide();

        //Add a paragraph to the notes slide
        ParagraphEx paragraph = new ParagraphEx();
        paragraph.setText("Tips for making effective presentations:");
        notesSlide.getNotesTextFrame().getParagraphs().append(paragraph);

        //Add a paragraph to the notes slide
        paragraph = new ParagraphEx();
        paragraph.setText("Use the slide master feature to create a consistent and simple design template.");
        notesSlide.getNotesTextFrame().getParagraphs().append(paragraph);

        //Add a paragraph to the notes slide
        paragraph = new ParagraphEx();
        paragraph.setText("Simplify and limit the number of words on each screen.");
        notesSlide.getNotesTextFrame().getParagraphs().append(paragraph);

        //Add a paragraph to the notes slide
        paragraph = new ParagraphEx();
        paragraph.setText("Use contrasting colors for text and background.");
        notesSlide.getNotesTextFrame().getParagraphs().append(paragraph);

        //Set the bullet type and bullet style for specific paragraphs on the notes slide
        for (int i = 1; i < notesSlide.getNotesTextFrame().getParagraphs().getCount();i++)
        {
            notesSlide.getNotesTextFrame().getParagraphs().get(i).setBulletType(TextBulletType.NUMBERED);
            notesSlide.getNotesTextFrame().getParagraphs().get(i).setBulletStyle(NumberedBulletStyle.BULLET_ARABIC_PERIOD);
        }

        //Save the result document
        ppt.saveToFile("SpeakerNotes.pptx", FileFormat.PPTX_2013);
    }
}

Read Speaker Notes in PowerPoint in Java
The following are the steps to read the speaker notes on a PowerPoint slide:
- Create a Presentation instance and load the PowerPoint document using Presentation.loadFromFile() method.
- Get the slide that you want to read speaker notes from using Presentation.getSlides().get(slideIndex) method.
- Get the notes slide from the slide using ISlide.getNotesSlide() method.
- Get the speaker notes from the notes slide using NotesSlide.getNotesTextFrame().getText() method.
- Create a StringBuilder instance.
- Append the speaker notes to the string builder, then write them into a .txt file.
- Java
import com.spire.presentation.ISlide;
import com.spire.presentation.NotesSlide;
import com.spire.presentation.Presentation;

import java.io.FileWriter;

public class ReadSpeakerNotes {
    public static void main(String []args) throws Exception {
        //Load the PowerPoint document
        Presentation ppt = new Presentation();
        ppt.loadFromFile("SpeakerNotes.pptx");

        //Get the first slide
        ISlide slide = ppt.getSlides().get(0);

        //Get the notes slide from the first slide
        NotesSlide notesSlide = slide.getNotesSlide();
        //Get the speaker notes from the notes slide
        String notes = notesSlide.getNotesTextFrame().getText();

        //Create a StringBuilder instance
        StringBuilder sb = new StringBuilder();
        //Append the speaker notes to the string builder
        sb.append(notes + "\n");

        //Save the speaker notes to a .txt file
        FileWriter writer = new FileWriter("SpeakerNotes.txt");
        writer.write(sb.toString());
        writer.flush();
        writer.close();
    }
}
Delete Speaker Notes in PowerPoint in Java
The following are the steps to delete speaker notes from a PowerPoint slide:
- Create a Presentation instance and load the PowerPoint document using Presentation.loadFromFile() method.
- Get the slide that you want to delete speaker notes from using Presentation.getSlides().get(slideIndex) method.
- Get the notes slide from the slide using ISlide.getNotesSlide() method.
- Remove a specific speaker note from the notes slide using NotesSlide.getNotesTextFrame().getParagraphs().removeAt(paragraphIndex) method or remove all the speaker notes from the notes slide using NotesSlide.getNotesTextFrame().getParagraphs().clear() method.
- Save the result document using Presentation.saveToFile() method.
- Java
import com.spire.presentation.FileFormat;
import com.spire.presentation.ISlide;
import com.spire.presentation.NotesSlide;
import com.spire.presentation.Presentation;

public class DeleteSpeakerNotes {
    public static void main(String []args) throws Exception {
        //Load the PowerPoint document
        Presentation ppt = new Presentation();
        ppt.loadFromFile("SpeakerNotes.pptx");

        //Get the first slide
        ISlide slide = ppt.getSlides().get(0);
        //Get the notes slide from the slide
        NotesSlide notesSlide = slide.getNotesSlide();

        //Remove a specific speaker note from notes slide
        notesSlide.getNotesTextFrame().getParagraphs().removeAt(1);

        //Remove all the speaker notes from notes slide
        notesSlide.getNotesTextFrame().getParagraphs().clear();

        //Save the result document
        ppt.saveToFile("DeleteSpeakerNotes.pptx", FileFormat.PPTX_2013);
    }
}
Apply for a Temporary License
If you'd like to remove the evaluation message from the generated documents, or to get rid of the function limitations, please request a 30-day trial license for yourself.
