
Knowledgebase (2370)
Children categories
Convert PDF to Markdown in Python – Single & Batch Conversion
2025-07-17 02:36:46 Written by jie zou
PDFs are ubiquitous in digital document management, but their rigid formatting often makes them less than ideal for content that needs to be easily edited, updated, or integrated into modern workflows. Markdown (.md), on the other hand, offers a lightweight, human-readable syntax perfect for web publishing, documentation, and version control. In this guide, we'll explore how to leverage the Spire.PDF for Python library to perform single or batch conversions from PDF to Markdown in Python efficiently.
- Why Convert PDFs to Markdown?
- Python PDF Converter Library – Installation
- Convert PDF to Markdown in Python
- Batch Convert Multiple PDFs to Markdown in Python
- Frequently Asked Questions
- Conclusion
Why Convert PDFs to Markdown?
Markdown offers several advantages over PDF for content creation and management:
- Version control friendly: Easily track changes in Git
- Lightweight and readable: Plain text format with simple syntax
- Editability: Simple to modify without specialized software
- Web integration: Natively supported by platforms like GitHub, GitLab, and static site generators (e.g., Jekyll, Hugo).
Spire.PDF for Python provides a robust solution for extracting text and structure from PDFs while preserving essential formatting elements like tables, lists, and basic styling.
Python PDF Converter Library - Installation
To use Spire.PDF for Python in your projects, you need to install the library via PyPI (Python Package Index) using pip. Open your terminal/command prompt and run:
pip install Spire.PDF
To upgrade an existing installation to the latest version:
pip install --upgrade spire.pdf
Convert PDF to Markdown in Python
Here’s a basic example demonstrates how to use Python to convert a PDF file to a Markdown (.md) file.
from spire.pdf.common import *
from spire.pdf import *

# Create an instance of PdfDocument class
pdf = PdfDocument()

# Load a PDF document
pdf.LoadFromFile("TestFile.pdf")

# Convert the PDF to a Markdown file
pdf.SaveToFile("PDFToMarkdown.md", FileFormat.Markdown)
pdf.Close()
This Python script loads a PDF file and then uses the SaveToFile() method to convert it to Markdown format. The FileFormat.Markdown parameter specifies the output format.
How Conversion Works
The library extracts text, images, tables, and basic formatting from the PDF and converts them into Markdown syntax.
- Text: Preserved with paragraphs/line breaks.
- Images: Images in the PDF are converted to base64-encoded PNG format and embedded directly in the Markdown.
- Tables: Tabular data is converted to Markdown table syntax (rows/columns with pipes |).
- Styling: Basic formatting (bold, italic) is retained using Markdown syntax.
Output: 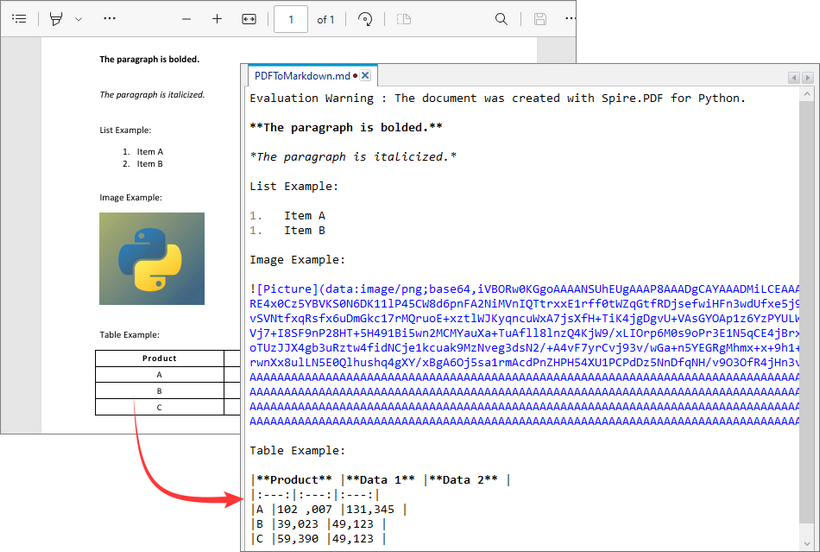
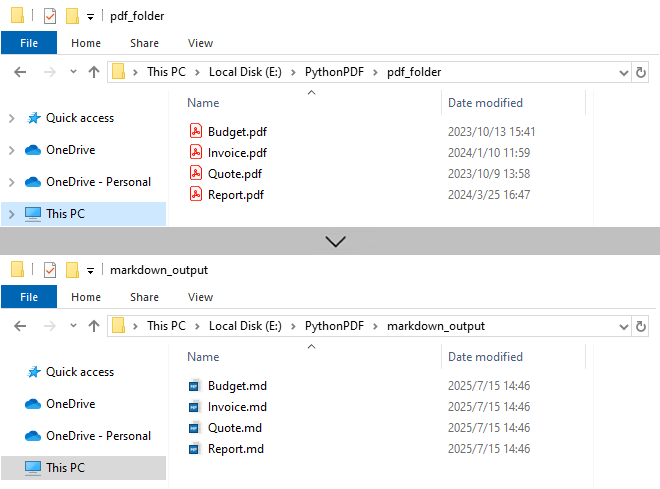
Batch Convert Multiple PDFs to Markdown in Python
This Python script uses a loop to convert all PDF files in a specified directory to Markdown format.
import os
from spire.pdf import *

# Configure paths
input_folder = "pdf_folder/"
output_folder = "markdown_output/"

# Create output directory
os.makedirs(output_folder, exist_ok=True)

# Process all PDFs in folder
for file_name in os.listdir(input_folder):
    if file_name.endswith(".pdf"):
        # Initialize document
        pdf = PdfDocument()
        pdf.LoadFromFile(os.path.join(input_folder, file_name))

        # Generate output path
        md_name = os.path.splitext(file_name)[0] + ".md"
        output_path = os.path.join(output_folder, md_name)

        # Convert to Markdown
        pdf.SaveToFile(output_path, FileFormat.Markdown)
        pdf.Close()
Key Characteristics
- Batch Processing: Automatically processes all PDFs in input folder, improving efficiency for bulk operations.
- 1:1 Conversion: Each PDF generates corresponding Markdown file.
- Sequential Execution: Files processed in alphabetical order.
- Resource Management: Each PDF is closed immediately after conversion.
Output:
Need to convert Markdown to PDF? Refer to: Convert Markdown to PDF in Python
Frequently Asked Questions (FAQs)
Q1: Is Spire.PDF for Python free?
A: Spire.PDF offers a free version with limitations (e.g., maximum 3 pages per conversion). For unlimited use, request a 30-day free trial for evaluation.
Q2: Can I convert password-protected PDFs to Markdown?
A: Yes. Use the LoadFromFile method with the password as a second parameter:
pdf.LoadFromFile("ProtectedFile.pdf", "your_password")
Q3: Can Spire.PDF convert scanned/image-based PDFs to Markdown?
A: No. The library extracts text-based content only. For scanned PDFs, use OCR tools (like Spire.OCR for Python) to create searchable PDFs first.
Conclusion
Spire.PDF for Python simplifies PDF to Markdown conversion for both single file and batch processing.
Its advantages include:
- Simple API with minimal code
- Preservation of document structure
- Batch processing capabilities
- Cross-platform compatibility
Whether you're migrating documentation, processing research papers, or building content pipelines, by following the examples in this guide, you can efficiently transform static PDF documents into flexible, editable Markdown content, streamlining workflows and improving collaboration.
Convert JSON to/from Excel in Python – Full Guide with Examples
2025-07-16 05:39:52 Written by jie zou
In many Python projects, especially those that involve APIs, data analysis, or business reporting, developers often need to convert Excel to JSON or JSON to Excel using Python code. These formats serve different but complementary roles: JSON is ideal for structured data exchange and storage, while Excel is widely used for sharing, editing, and presenting data in business environments.
This tutorial provides a complete, developer-focused guide to converting between JSON and Excel in Python. You'll learn how to handle nested data, apply Excel formatting, and resolve common conversion or encoding issues. We’ll use Python’s built-in json module to handle JSON data, and Spire.XLS for Python to read and write Excel files in .xlsx, .xls, and .csv formats — all without requiring Microsoft Excel or other third-party software.
Topics covered include:
- Install Spire.XLS for Python
- Why Choose Spire.XLS over General-Purpose Libraries?
- Convert JSON to Excel in Python
- Convert Excel to JSON in Python
- Real-World Example: Handling Nested JSON and Complex Excel Formats
- Common Errors and Fixes
- FAQ
- Conclusion
Install Spire.XLS for Python
This library is used in this tutorial to generate and parse Excel files (.xlsx, .xls, .csv) as part of the JSON–Excel conversion workflow.
To get started, install the Spire.XLS for Python package from PyPI:
pip install spire.xls
You can also choose Free Spire.XLS for Python in smaller projects:
pip install spire.xls.free
Spire.XLS for Python runs on Windows, Linux, and macOS. It does not require Microsoft Excel or any COM components to be installed.
Why Choose Spire.XLS over Open-Source Libraries?
Many open-source Python libraries are great for general Excel tasks like simple data export or basic formatting. If your use case only needs straightforward table output, these tools often get the job done quickly.
However, when your project requires rich Excel formatting, multi-sheet reports, or an independent solution without Microsoft Office, Spire.XLS for Python stands out by offering a complete Excel feature set.
| Capability | Open-Source Libraries | Spire.XLS for Python |
|---|---|---|
| Advanced Excel formatting | Basic styling | Full styling API for reports |
| No Office/COM dependency | Fully standalone | Fully standalone |
| Supports .xls, .xlsx, .csv | .xlsx and .csv mostly; .xls may need extra packages | Full support for .xls, .xlsx, .csv |
| Charts, images, shapes | Limited or none | Built-in full support |
For developer teams that need polished Excel files — with complex layouts, visuals, or business-ready styling — Spire.XLS is an efficient, all-in-one alternative.
Convert JSON to Excel in Python
In this section, we’ll walk through how to convert structured JSON data into an Excel file using Python. This is especially useful when exporting API responses or internal data into .xlsx reports for business users or analysts.
Step 1: Prepare JSON Data
We’ll start with a JSON list of employee records:
[
  {"employee_id": "E001", "name": "Jane Doe", "department": "HR"},
  {"employee_id": "E002", "name": "Michael Smith", "department": "IT"},
  {"employee_id": "E003", "name": "Sara Lin", "department": "Finance"}
]
This is a typical structure returned by APIs or stored in log files. For more complex nested structures, see the real-world example section.
Step 2: Convert JSON to Excel in Python with Spire.XLS
from spire.xls import Workbook, FileFormat
import json

# Load JSON data from file
with open("employees.json", "r", encoding="utf-8") as f:
    data = json.load(f)

# Create a new Excel workbook and access the first worksheet
workbook = Workbook()
sheet = workbook.Worksheets[0]

# Write headers to the first row
headers = list(data[0].keys())
for col, header in enumerate(headers):
    sheet.Range[1, col + 1].Text = header

# Write data rows starting from the second row
for row_idx, row in enumerate(data, start=2):
    for col_idx, key in enumerate(headers):
        sheet.Range[row_idx, col_idx + 1].Text = str(row.get(key, ""))

# Auto-fit the width of all used columns
for i in range(1, sheet.Range.ColumnCount + 1):
    sheet.AutoFitColumn(i)

# Save the Excel file and release resources
workbook.SaveToFile("output/employees.xlsx", FileFormat.Version2016)
workbook.Dispose()
Code Explanation:
- Workbook() initializes the Excel file with three default worksheets.
- workbook.Worksheets[] accesses the specified worksheet.
- sheet.Range(row, col).Text writes string data to a specific cell (1-indexed).
- The first row contains column headers based on JSON keys, and each JSON object is written to a new row beneath it.
- workbook.SaveToFile() saves the Excel workbook to disk. You can specify the format using the FileFormat enum — for example, Version97to2003 saves as .xls, Version2007 and newer save as .xlsx, and CSV saves as .csv.
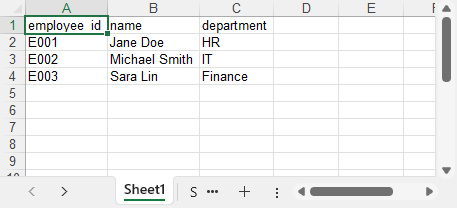
The generated Excel file (employees.xlsx) with columns employee_id, name, and department.
You can also convert the Excel worksheet to a CSV file using Spire.XLS for Python if you need a plain text output format.
Convert Excel to JSON in Python
This part explains how to convert Excel data back into structured JSON using Python. This is a common need when importing .xlsx files into web apps, APIs, or data pipelines that expect JSON input.
Step 1: Load the Excel File
First, we use Workbook.LoadFromFile() to load the Excel file, and then select the worksheet using workbook.Worksheets[0]. This gives us access to the data we want to convert into JSON format.
from spire.xls import Workbook

# Load the Excel file
workbook = Workbook()
workbook.LoadFromFile("products.xlsx")
sheet = workbook.Worksheets[0]
Step 2: Extract Excel Data and Write to JSON
import json

# Get the index of the last row and column
rows = sheet.LastRow
cols = sheet.LastColumn

# Extract headers from the first row
headers = [sheet.Range[1, i + 1].Text for i in range(cols)]
data = []

# Map each row to a dictionary using headers
for r in range(2, rows + 1):
    row_data = {}
    for c in range(cols):
        value = sheet.Range[r, c + 1].Text
        row_data[headers[c]] = value
    data.append(row_data)

# Write JSON output
with open("products_out.json", "w", encoding="utf-8") as f:
    json.dump(data, f, indent=2, ensure_ascii=False)
Code Explanation:
- sheet.LastRow and sheet.LastColumn detect actual used cell range.
- The first row is used to extract field names (headers).
- Each row is mapped to a dictionary, forming a list of JSON objects.
- sheet.Range[row, col].Text returns the cell’s displayed text, including any formatting (like date formats or currency symbols). If you need the raw numeric value or a real date object, you can use .Value, .NumberValue, or .DateTimeValue instead.
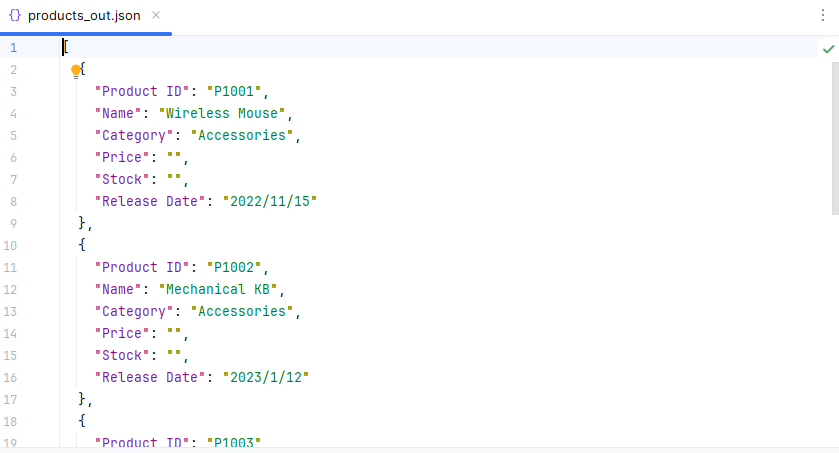
The JSON file generated from the Excel data using Python:
If you’re not yet familiar with how to read Excel files in Python, see our full guide: How to Read Excel Files in Python Using Spire.XLS.
Real-World Example: Handling Nested JSON and Formatting Excel
In real-world Python applications, JSON data often contains nested dictionaries or lists, such as contact details, configuration groups, or progress logs. At the same time, the Excel output is expected to follow a clean, readable layout suitable for business or reporting purposes.
In this section, we'll demonstrate how to flatten nested JSON data and format the resulting Excel sheet using Python and Spire.XLS. This includes merging cells, applying styles, and auto-fitting columns — all features that help present complex data in a clear tabular form.
Let’s walk through the process using a sample file: projects_nested.json.
Step 1: Flatten Nested JSON
Sample JSON file (projects_nested.json):
[
  {
    "project_id": "PRJ001",
    "title": "AI Research",
    "manager": {
      "name": "Dr. Emily Wang",
      "email": "emily@lab.org"
    },
    "phases": [
      {"phase": "Design", "status": "Completed"},
      {"phase": "Development", "status": "In Progress"}
    ]
  },
  {
    "project_id": "PRJ002",
    "title": "Cloud Migration",
    "manager": {
      "name": "Mr. John Lee",
      "email": "john@infra.net"
    },
    "phases": [
      {"phase": "Assessment", "status": "Completed"}
    ]
  }
]
We'll flatten all nested structures, including objects like manager, and summarize lists like phases into string fields. Each JSON record becomes a single flat row, with even complex nested data compactly represented in columns using readable summaries.
import json

# Helper: Flatten nested data and summarize list of dicts into strings
# e.g., [{"a":1},{"a":2}] → "a: 1; a: 2"
def flatten(data, parent_key='', sep='.'):
    items = {}
    for k, v in data.items():
        new_key = f"{parent_key}{sep}{k}" if parent_key else k
        if isinstance(v, dict):
            items.update(flatten(v, new_key, sep=sep))
        elif isinstance(v, list):
            if all(isinstance(i, dict) for i in v):
                items[new_key] = "; ".join(
                    ", ".join(f"{ik}: {iv}" for ik, iv in i.items()) for i in v
                )
            else:
                items[new_key] = ", ".join(map(str, v))
        else:
            items[new_key] = v
    return items

# Load and flatten JSON
with open("projects_nested.json", "r", encoding="utf-8") as f:
    raw_data = json.load(f)

flat_data = [flatten(record) for record in raw_data]

# Collect all unique keys from flattened data as headers
all_keys = set()
for item in flat_data:
    all_keys.update(item.keys())
headers = list(sorted(all_keys))  # Consistent, sorted column order
This version of flatten() converts lists of dictionaries into concise summary strings (e.g., "phase: Design, status: Completed; phase: Development, status: In Progress"), making complex structures more compact for Excel output.
Step 2: Format and Export Excel with Spire.XLS
Now we’ll export the flattened project data to Excel, and use formatting features in Spire.XLS for Python to improve the layout and readability. This includes setting fonts, colors, merging cells, and automatically adjusting column widths for a professional report look.
from spire.xls import Workbook, Color, FileFormat

# Create workbook and worksheet
workbook = Workbook()
sheet = workbook.Worksheets[0]
sheet.Name = "Projects"

# Title row: merge and style
col_count = len(headers)
sheet.Range[1, 1, 1, col_count].Merge()
sheet.Range[1, 1].Text = "Project Report (Flattened JSON)"
title_style = sheet.Range["A1"].Style
title_style.Font.IsBold = True
title_style.Font.Size = 14
title_style.Font.Color = Color.get_White()
title_style.Color = Color.get_DarkBlue()

# Header row from flattened keys
for col, header in enumerate(headers):
    cell = sheet.Range[2, col + 1]
    cell.BorderAround() # Add outside borders to a cell or cell range
    #cell.BorderInside() # Add inside borders to a cell range
    cell.Text = header
    style = cell.Style
    style.Font.IsBold = True
    style.Color = Color.get_LightGray()

# Data rows
for row_idx, row in enumerate(flat_data, start=3):
    for col_idx, key in enumerate(headers):
        sheet.Range[row_idx, col_idx + 1].Text = str(row.get(key, ""))

# Auto-fit columns and rows
for col in range(len(headers)):
    sheet.AutoFitColumn(col + 1)
for row in range(len(flat_data)):
    sheet.AutoFitRow(row + 1)

# Save Excel file
workbook.SaveToFile("output/projects_formatted.xlsx", FileFormat.Version2016)
workbook.Dispose()
This produces a clean, styled Excel sheet from a nested JSON file, making your output suitable for reports, stakeholders, or dashboards.
Code Explanation
- sheet.Range[].Merge(): merges a range of cells into one. Here we use it for the report title row (A1:F1).
- .Style.Font / .Style.Color: allow customizing font properties (bold, size, color) and background fill of a cell.
- .BorderAround() / .BorderInside(): add outside/inside borders to a cell range.
- AutoFitColumn(n): automatically adjusts the width of column
nto fit its content.
The Excel file generated after flattening the JSON data using Python:

Common Errors and Fixes in JSON ↔ Excel Conversion
Converting between JSON and Excel may sometimes raise formatting, encoding, or data structure issues. Here are some common problems and how to fix them:
| Error | Fix |
|---|---|
| JSONDecodeError or malformed input | Ensure valid syntax; avoid using eval(); use json.load() and flatten nested objects. |
| TypeError: Object of type ... is not JSON serializable | Use json.dump(data, f, default=str) to convert non-serializable values. |
| Excel file not loading or crashing | Ensure the file is not open in Excel; use the correct extension (.xlsx or .xls). |
| UnicodeEncodeError or corrupted characters | Set encoding="utf-8" and ensure_ascii=False in json.dump(). |
Conclusion
With Spire.XLS for Python, converting between JSON and Excel becomes a streamlined and reliable process. You can easily transform JSON data into well-formatted Excel files, complete with headers and styles, and just as smoothly convert Excel sheets back into structured JSON. The library helps you avoid common issues such as encoding errors, nested data complications, and Excel file format pitfalls.
Whether you're handling data exports, generating reports, or processing API responses, Spire.XLS provides a consistent and efficient way to work with .json and .xlsx formats in both directions.
Want to unlock all features without limitations? Request a free temporary license for full access to Spire.XLS for Python.
FAQ
Q1: How to convert JSON into Excel using Python?
You can use the json module in Python to load structured JSON data, and then use a library like Spire.XLS to export it to .xlsx. Spire.XLS allows writing headers, formatting Excel cells, and handling nested JSON via flattening. See the JSON to Excel section above for step-by-step examples.
Q2: How do I parse JSON data in Python?
Parsing JSON in Python is straightforward with the built-in json module. Use json.load() to parse JSON from a file, or json.loads() to parse a JSON string. After parsing, the result is usually a list of dictionaries, which can be iterated and exported to Excel or other formats.
Q3: Can I export Excel to JSON with Spire.XLS in Python?
Yes. Spire.XLS for Python lets you read Excel files and convert worksheet data into a list of dictionaries, which can be written to JSON using json.dump(). The process includes extracting headers, detecting used rows and columns, and optionally handling formatting. See Excel to JSON for detailed implementation.
How to Generate QR Codes in Python (Full Tutorial with Examples)
2025-07-15 02:49:34 Written by jie zou
QR codes have transformed how we bridge physical and digital experiences—from marketing campaigns to secure data sharing. For developers looking to generate QR codes in Python , Spire.Barcode for Python provides a complete toolkit for seamless QR code generation, offering both simplicity for basic needs and advanced customization for professional applications.
This step-by-step guide walks you through the entire QR code generation process in Python. You'll learn to programmatically create scannable codes, customize their appearance, embed logos, and optimize error correction - everything needed to implement robust QR code generation solutions for any business or technical requirement.
Table of Contents
- Introduction to Spire.Barcode for Python
- Setting Up the Environment
- Basic Example: Generating QR Codes in Python
- Customizing QR Code Appearance
- Generating QR Code with Logo
- Wrapping up
- FAQs
1. Introduction to Spire.Barcode for Python
Spire.Barcode for Python is a powerful library that enables developers to generate and read various barcode types, including QR codes, in Python applications. This robust solution supports multiple barcode symbologies while offering extensive customization options for appearance and functionality.
Key features of Spire.Barcode include:
- Support for QR Code generation with customizable error correction levels
- Flexible data encoding options (numeric, alphanumber, byte/binary)
- Comprehensive appearance customization (colors, sizes, fonts)
- High-resolution output capabilities
- Logo integration within QR codes
2. Setting Up the Environment
Before we dive into generating QR codes, you need to set up your Python environment. Ensure you have Python installed, and then install the Spire.Barcode library using pip:
pip install spire.barcode
For the best results, obtain a free temporary license from our website. This will allow you to create professional QR code images without evaluation messages, enhancing both user experience and quality of the generated codes.
3. Basic Example: Generating QR Codes in Python
Now that we have everything set up, let's generate our first QR code. Below is the step-by-step process:
-
Initial Setup :
- Import the Spire.Barcode library.
- Activate the library with a valid license key to remove the
-
Configure Barcode Settings :
- Create a BarcodeSettings object to control QR code properties.
- Set barcode type to QR code.
- Configure settings such as data mode and error correction level.
- Define the content to encode.
- Configure visual aspects like module width and text display options.
-
Generate Barcode Image :
- Create a BarCodeGenerator object with the configured settings.
- Convert the configured QR code into an image object in memory.
-
Save Image to File :
- Write the generated QR code image to a specified file path in PNG format.
The following code snippet demonstrates how to generate QR codes in Python:
from spire.barcode import *

# Function to write all bytes to a file
def WriteAllBytes(fname: str, data):
    with open(fname, "wb") as fp:
        fp.write(data)
    fp.close()

# Apply license key for the barcode generation library
License.SetLicenseKey("your license key")

# Create a BarcodeSettings object to configure barcode properties
barcodeSettings = BarcodeSettings()

# Set the type of barcode to QR code
barcodeSettings.Type = BarCodeType.QRCode

# Set the data mode for QR code (automatic detection of data type)
barcodeSettings.QRCodeDataMode = QRCodeDataMode.Auto

# Set the error correction level (M means medium level of error correction)
barcodeSettings.QRCodeECL = QRCodeECL.M

# Set the data that will be encoded in the QR code
barcodeSettings.Data2D = "visit us at www.e-iceblue.com"

# Set the width of each module (the square bars) in the barcode
barcodeSettings.X = 3

# Hide the text that typically accompanies the barcode
barcodeSettings.ShowText = False

# Create a BarCodeGenerator object with the specified settings
barCodeGenerator = BarCodeGenerator(barcodeSettings)

# Generate the image for the barcode based on the settings
image = barCodeGenerator.GenerateImage()

# Write the generated PNG image to disk at the specified path
WriteAllBytes("output/QRCode.png", image)
Key Concepts:
A. QRCodeDataMode (Data Encoding Scheme)
Controls how the input data is encoded in the QR code:
| Mode | Best For | Example Use Cases |
|---|---|---|
| Auto | Let library detect automatically | General purpose (default choice) |
| Numeric | Numbers only (0-9) | Product codes, phone numbers |
| AlphaNumber | A-Z, 0-9, and some symbols | URLs, simple messages |
| Byte | Binary/Unicode data | Complex text, special characters |
Why it matters:
- Different modes have different storage capacities.
- Numeric mode can store more digits than other modes.
- Auto mode is safest for mixed content.
B. QRCodeECL (Error Correction Level)
Determines how much redundancy is built into the QR code:
| Level | Recovery Capacity | Use Case |
|---|---|---|
| L (Low) | 7% damage recovery | Small codes, short URLs |
| M (Medium) | 15% damage recovery | General purpose (recommended) |
| Q (Quartile) | 25% damage recovery | Codes with logos or decorations |
| H (High) | 30% damage recovery | Critical applications |
Visual Impact:
Higher ECLs:
- Increase QR code complexity (more modules/squares).
- Make the code more scannable when damaged.
- Are essential when adding logos (use at least Q or H).
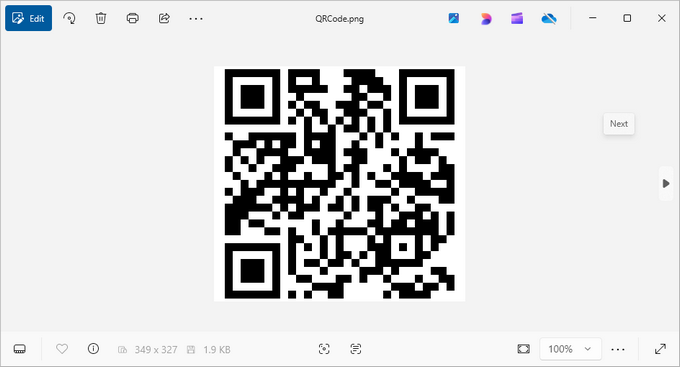
Output:
4. Customizing QR Code Appearance
Once you've generated a basic QR code, you can further customize its appearance to make it more visually appealing or to fit your brand. Here are some customization options:
4.1 Adjusting DPI Settings
The DPI (dots per inch) settings control the image quality of the QR code. Higher DPI values result in sharper images suitable for printing, while lower values (72-150) are typically sufficient for digital use.
barcodeSettings.DpiX = 150
barcodeSettings.DpiY = 150
4.2 Changing Foreground and Background Colors
You can customize your QR code’s color scheme. The ForeColor determines the color of the QR code modules (squares), while BackColor sets the background color. Ensure sufficient contrast for reliable scanning.
barcodeSettings.BackColor = Color.get_GhostWhite()
barcodeSettings.ForeColor = Color.get_Purple()
4.3 Displaying the Encoded Data
If you want users to see the encoded information without scanning, set the following properties:
barcodeSettings.ShowTextOnBottom = True
barcodeSettings.TextColor = Color.get_Purple()
barcodeSettings.SetTextFont("Arial", 13, FontStyle.Bold)
4.4 Adding Text Under QR Code
You can also add custom text under the QR code, which could be a call-to-action or instructions.
barcodeSettings.ShowBottomText = True
barcodeSettings.BottomText = "Scan Me"
barcodeSettings.SetBottomTextFont("Arial", 13, FontStyle.Bold)
barcodeSettings.BottomTextColor = Color.get_Black()
4.5 Setting Margins and Border
Defining margins and border styles enhances the presentation of the QR code. Here’s how to do it:
barcodeSettings.LeftMargin = 2
barcodeSettings.RightMargin = 2
barcodeSettings.TopMargin = 2
barcodeSettings.BottomMargin = 2

barcodeSettings.HasBorder = True
barcodeSettings.BorderWidth = 0.5
barcodeSettings.BorderColor = Color.get_Black()
5. Generating QR Code with Logo
For branding purposes, you might want to add a logo to your QR code. Spire.Barcode makes this process seamless while maintaining scannability. Here’s how:
barcodeSettings.SetQRCodeLogoImage("C:\\Users\\Administrator\\Desktop\\logo.png")
When adding a logo:
- Use a simple, high-contrast logo for best results.
- Test the scannability after adding the logo.
- The QR code's error correction (set earlier) helps compensate for the obscured area.
The logo will be centered within the QR code, and Spire.Barcode will automatically resize it to ensure the QR code remains scannable.
Output:
![]()
6. Wrapping up
Generating QR codes in Python using Spire.Barcode is a straightforward process that offers extensive customization options. From basic QR codes to branded versions with logos and custom styling, the library provides all the tools needed for professional barcode generation.
Key Benefits:
- Spire.Barcode simplifies QR code generation with a clean API.
- Extensive customization options allow for branded, visually appealing QR codes.
- Error correction ensures reliability even with added logos.
- High-resolution output supports both digital and print use cases.
Whether you're building an inventory system, creating marketing materials, or developing a mobile app integration, Spire.Barcode provides a robust solution for all your QR code generation needs in Python.
7. FAQs
Q1: What is a QR code?
A QR code (Quick Response code) is a type of matrix barcode that can store URLs and other information. It is widely used for quickly linking users to websites, apps, and digital content through mobile devices.
Q2: Can I generate QR codes without a license key?
Yes, you can generate QR codes without a license key; however, the generated barcode will display an evaluation message along with our company logo, which may detract from the user experience.
Q3: Can I generate different types of barcodes with Spire.Barcode?
Yes, Spire.Barcode supports various barcode types, not just QR codes. Detailed documentation can be found here: How to Generate Barcode in Python
Q4: How can I implement a QR code generator in Python using Spire.Barcode?
To implement a QR code generator in Python with Spire.Barcode, create a BarcodeSettings object to configure the QR code properties. Then, use the BarCodeGenerator class to generate the QR code image by calling the GenerateImage() method.
Q5: Can I scan or read QR code using Spire.Barcode?
Yes, you can scan and read QR codes using Spire.Barcode for Python. The library provides functionality for both generating and decoding QR codes. Follow this guide: How to Read Barcode Using Python
Get a Free License
To fully experience the capabilities of Spire.Barcode for Python without any evaluation limitations, you can request a free 30-day trial license.
