
Knowledgebase (2370)
Children categories

Many business applications today need the ability to scan barcodes and QR codes in ASP.NET environments. From ticket validation and payment processing to inventory management, an ASP.NET QR code scanner or barcode reading feature can greatly improve efficiency and accuracy for both web and enterprise systems.
This tutorial demonstrates how to build a complete solution to scan barcodes in ASP.NET with C# code using Spire.Barcode for .NET. We’ll create an ASP.NET Core web application that can read both QR codes and various barcode formats from uploaded images, delivering high recognition accuracy and easy integration into existing projects.
Guide Overview
- 1. Project Setup
- 2. Implementing QR Code and Barcode Scanning Feature with C# in ASP.NET
- 3. Testing and Troubleshooting
- 4. Extending to Other .NET Applications
- 5. Conclusion
1. Project Setup
Step 1: Create the Project
Create a new ASP.NET Core Razor Pages project, which will serve as the foundation for the scanning feature. Use the following command to create a new project or manually configure it in Visual Studio:
dotnet new webapp -n QrBarcodeScanner
cd QrBarcodeScanner
Step 2: Install Spire.Barcode for .NET
Install the Spire.Barcode for .NET NuGet package, which supports decoding a wide range of barcode types with a straightforward API. Search for the package in the NuGet Package Manager or use the command below to install it:
dotnet add package Spire.Barcode
Spire.Barcode for .NET offers built-in support for both QR codes and multiple barcode formats such as Code128, EAN-13, and Code39, making it suitable for ASP.NET Core integration without requiring additional image processing libraries. To find out all the supported barcode types, refer to the BarcodeType API reference.
You can also use Free Spire.Barcode for .NET for smaller projects.
2. Implementing QR Code and Barcode Scanning Feature with C# in ASP.NET
A reliable scanning feature involves two main parts:
- Backend logic that processes and decodes uploaded images.
- A simple web interface that lets users upload files for scanning.
We will first focus on the backend implementation to ensure the scanning process works correctly, then connect it to a minimal Razor Page frontend.
Backend: QR & Barcode Scanning Logic with Spire.Barcode
The backend code reads the uploaded file into memory and processes it with Spire.Barcode, using either a memory stream or a file path. The scanned result is then returned. This implementation supports QR codes and other barcode types without requiring format-specific logic.
Index.cshtml.cs
using Microsoft.AspNetCore.Mvc;
using Microsoft.AspNetCore.Mvc.RazorPages;
using Spire.Barcode;

public class IndexModel : PageModel
{
    [BindProperty]
    public IFormFile Upload { get; set; }  // Uploaded file

    public string Result { get; set; }     // Scanning result
    public string UploadedImageBase64 { get; set; } // Base64 string for preview

    public void OnPost()
    {
        if (Upload != null && Upload.Length > 0)
        {
            using (var ms = new MemoryStream())
            {
                // Read the uploaded file into memory
                Upload.CopyTo(ms);

                // Convert the image to Base64 for displaying in HTML <img>
                UploadedImageBase64 = "data:" + Upload.ContentType + ";base64," +
                                      Convert.ToBase64String(ms.ToArray());

                // Reset the stream position before scanning
                ms.Position = 0;

                // Scan the barcode or QR code from the stream
                try
                {
                    string[] scanned = BarcodeScanner.Scan(ms);
                    // Return the scanned result
                    Result = scanned != null && scanned.Length > 0
                        ? string.Join(", ", scanned)
                        : "No code detected.";
                }
                catch (Exception ex)
                {
                    Result = "Error while scanning: " + ex.Message;
                }
            }
        }
    }
}
Explanation of Key Classes and Methods
- BarcodeScanner: A static class in Spire.Barcode that decodes images containing QR codes or barcodes.
- BarcodeScanner.Scan(Stream imageStream): Scans an uploaded image directly from a memory stream and returns an array of decoded strings. This method scans all barcodes in the given image.
- Supplementary methods (optional):
- BarcodeScanner.Scan(string imagePath): Scans an image from a file path.
- BarcodeScanner.ScanInfo(string imagePath): Scans an image from a file path and returns additional barcode information such as type, location, and data.
These methods can be used in different ways, depending on the application requirements.
Frontend: QR & Barcode Upload & Scanning Result Interface
The following page design provides a simple upload form where users can submit an image containing a QR code or barcode. Once uploaded, the image is displayed along with the recognized result, which can be copied with a single click. The layout is intentionally kept minimal for fast testing, yet styled for a clear and polished presentation.
Index.cshtml
@page
@model IndexModel
@{
    ViewData["Title"] = "QR & Barcode Scanner";
}

<div style="max-width:420px;margin:40px auto;padding:20px;border:1px solid #ccc;border-radius:8px;background:#f9f9f9;">
    <h2>QR & Barcode Scanner</h2>
    <form method="post" enctype="multipart/form-data" id="uploadForm">
        <input type="file" name="upload" accept="image/*" required onchange="this.form.submit()" style="margin:10px 0;" />
    </form>

    @if (!string.IsNullOrEmpty(Model.UploadedImageBase64))
    {
        <div style="margin-top:15px;text-align:center;">
            <img src="/@Model.UploadedImageBase64" style="width:300px;height:300px;object-fit:contain;border:1px solid #ddd;background:#fff;" />
        </div>
    }

    @if (!string.IsNullOrEmpty(Model.Result))
    {
        <div style="margin-top:15px;padding:10px;background:#e8f5e9;border-radius:6px;">
            <b>Scan Result:</b>
            <p id="scanText">@Model.Result</p>
            <button type="button" onclick="navigator.clipboard.writeText(scanText.innerText)" style="background:#28a745;color:#fff;padding:6px 10px;border:none;border-radius:4px;">Copy</button>
        </div>
    }
</div>
Below is a screenshot showing the scan page after successfully recognizing both a QR code and a Code128 barcode, with the results displayed and a one-click copy button available.
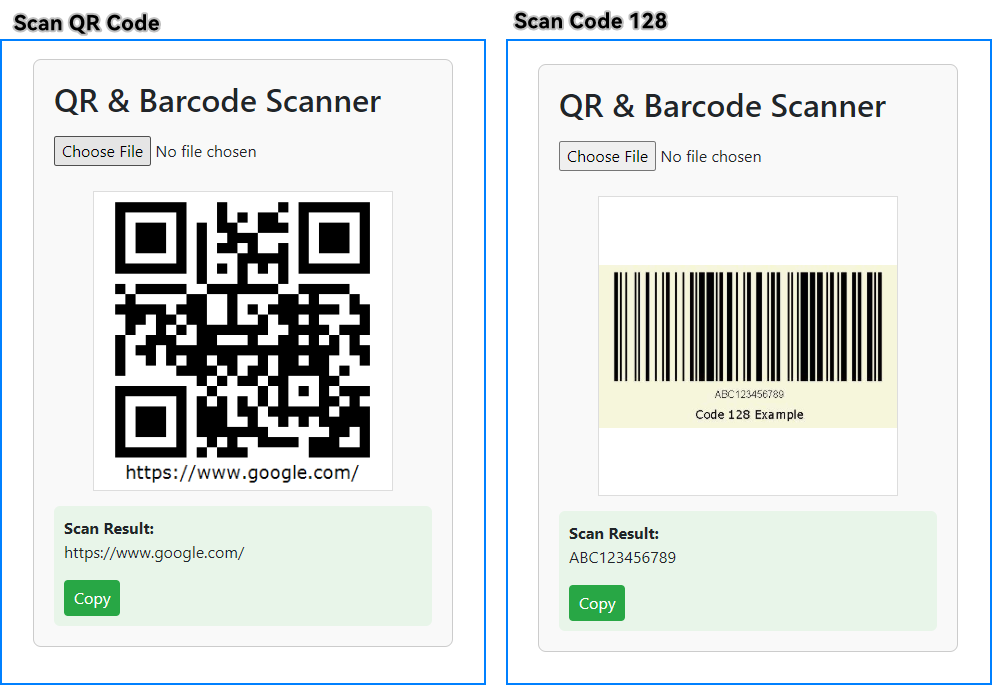
This ASP.NET Core application can scan QR codes and other barcodes from uploaded images. If you're looking to generate QR codes or barcodes, check out How to Generate QR Codes in ASP.NET Core.
3. Testing and Troubleshooting
After running the application, test the scanning feature with:
- A QR code image containing a URL or plain text.
- A barcode image such as Code128 or EAN-13.
If recognition fails:
- Ensure the image has good contrast and minimal distortion.
- Use images of reasonable resolution (not excessively large or pixelated).
- Test with different file formats such as JPG, PNG, or BMP.
- Avoid images with reflections, glare, or low lighting.
- When scanning multiple barcodes in one image, ensure each code is clearly separated to improve recognition accuracy.
A good practice is to maintain a small library of sample QR codes and barcodes to test regularly after making code changes.
4. Extending to Other .NET Applications
The barcode scanning logic in this tutorial works the same way across different .NET application types — only the way you supply the image file changes. This makes it easy to reuse the core decoding method, BarcodeScanner.Scan(), in various environments such as:
- ASP.NET Core MVC controllers or Web API endpoints
- Desktop applications like WinForms or WPF
- Console utilities for batch processing
Example: Minimal ASP.NET Core Web API Endpoint — receives an image file via HTTP POST and returns decoded results as JSON:
[ApiController]
[Route("api/[controller]")]
public class ScanController : ControllerBase
{
    [HttpPost]
    public IActionResult Scan(IFormFile file)
    {
        if (file == null) return BadRequest("No file uploaded");
        using var ms = new MemoryStream();
        file.CopyTo(ms);
        ms.Position = 0;
        string[] results = BarcodeScanner.Scan(ms);
        return Ok(results);
    }
}
Example: Console application — scans a local image file and prints the decoded text:
string[] result = BarcodeScanner.Scan(@"C:\path\to\image.png");
Console.WriteLine(string.Join(", ", result));
This flexibility makes it simple for developers to quickly add QR code and barcode scanning to new projects or extend existing .NET applications.
5. Conclusion
This tutorial has shown how to implement a complete QR code and barcode scanning solution in ASP.NET Core using Spire.Barcode for .NET. From receiving uploaded images to decoding and displaying the results, the process is straightforward and adaptable to a variety of application types. With this approach, developers can quickly integrate reliable scanning functionality into e-commerce platforms, ticketing systems, document verification tools, and other business-critical web applications.
For more advanced scenarios, Spire.Barcode for .NET provides additional features such as customizing the recognition process, handling multiple image formats and barcode types, and more. Apply for a free trial license to unlock all the advanced features.
Download Spire.Barcode for .NET today and start building your own ASP.NET barcode scanning solution.

Optical Character Recognition (OCR) technology has become essential for developers working with scanned documents and image-based PDFs. In this tutorial, you learn how to perform OCR on PDFs in C# to extract text from scanned documents or images within a PDF using the Spire.PDF for .NET and Spire.OCR for .NET libraries. By transferring scanned PDFs into editable and searchable formats, you can significantly improve your document management processes.
Table of Contents :
- Why OCR is Needed for Scanned PDFs?
- Setting Up: Installing Required Libraries
- Performing OCR on Scanned PDFs
- Extracting Text from Images within PDFs
- Wrapping Up
- FAQs
Why OCR is Needed for Scanned PDFs?
Scanned PDFs are essentially image files —they contain pictures of text rather than actual selectable and searchable text content. When you scan a paper document or receive an image-based PDF, the text exists only as pixels , making it impossible to edit, search, or extract. This creates significant limitations for businesses and individuals who need to work with these documents digitally.
OCR technology solves this problem by analyzing the shapes of letters and numbers in scanned images and converting them into machine-readable text. This process transforms static PDFs into usable, searchable, and editable documents—enabling text extraction, keyword searches, and seamless integration with databases and workflow automation tools.
In fields such as legal, healthcare, and education, where large volumes of scanned documents are common, OCR plays a crucial role in document digitization, making important data easily accessible and actionable.
Setting Up: Installing Required Libraries
Before we dive into the code, let's first set up our development environment with the necessary components: Spire.PDF and Spire.OCR . Spire.PDF handles PDF operations, while Spire.OCR performs the actual text recognition.
Step 1. Install Spire.PDF and Spire.OCR via NuGet
To begin, open the NuGet Package Manager in Visual Studio, and search for "Spire.PDF" and "Spire.OCR" to install them in your project. Alternatively, you can use the Package Manager Console :
Install-Package Spire.PDF
Install-Package Spire.OCR
Step 2. Download OCR Models:
Spire.OCR requires pre-trained language models for text recognition. Download the appropriate model files for your operating system (Windows, Linux, or MacOS) and extract them to a directory (e.g., D:\win-x64).
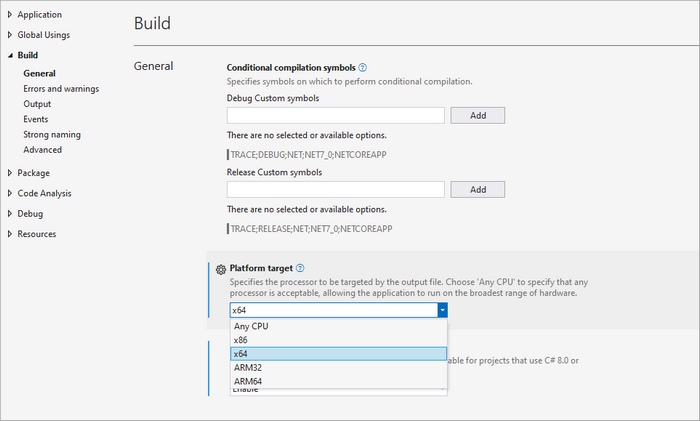
Important Note : Ensure your project targets x64 platform (Project Properties > Build > Platform target) as Spire.OCR only supports 64-bit systems.
Performing OCR on Scanned PDFs in C#
With the necessary libraries installed, we can now perform OCR on scanned PDFs. Below is a sample code snippet demonstrating this process.
using Spire.OCR;
using Spire.Pdf;
using Spire.Pdf.Graphics;
using System.Drawing;

namespace OCRPDF
{
    class Program
    {
        static void Main(string[] args)
        {
            // Create an instance of the OcrScanner class
            OcrScanner scanner = new OcrScanner();

            // Configure the scanner
            ConfigureOptions configureOptions = new ConfigureOptions
            {
                ModelPath = @"D:\win-x64", // Set model path
                Language = "English"        // Set language
            };

            // Apply the configuration options
            scanner.ConfigureDependencies(configureOptions);

            // Load a PDF document
            PdfDocument doc = new PdfDocument();
            doc.LoadFromFile(@"C:\Users\Administrator\Desktop\Input5.pdf");

            // Iterate through all pages
            for (int i = 0; i < doc.Pages.Count; i++)
            {
                // Convert page to image
                Image image = doc.SaveAsImage(i, PdfImageType.Bitmap);

                // Convert the image to a MemoryStream
                using (MemoryStream stream = new MemoryStream())
                {
                    image.Save(stream, System.Drawing.Imaging.ImageFormat.Png);
                    stream.Position = 0; // Reset the stream position

                    // Perform OCR on the image stream
                    scanner.Scan(stream, OCRImageFormat.Png);
                    string pageText = scanner.Text.ToString();

                    // Save extracted text to a separate file
                    string outputTxtPath = Path.Combine(@"C:\Users\Administrator\Desktop\Output", $"Page-{i + 1}.txt");
                    File.WriteAllText(outputTxtPath, pageText);
                }
            }

            // Close the document
            doc.Close();
        }
    }
}
Key Components Explained :
- OcrScanner Class : This class is crucial for performing OCR. It provides methods to configure and execute the scanning operation.
- ConfigureOptions Class : This class is used to set up the OCR scanner's configurations. The ModelPath property specifies the path to the OCR model files, and the Language property allows you to specify the language for text recognition.
- PdfDocument Class : This class represents the PDF document. The LoadFromFile method loads the PDF file that you want to process.
- Image Conversion : Each PDF page is converted to an image using the SaveAsImage method. This is essential because OCR works on image files.
- MemoryStream : The image is saved into a MemoryStream , allowing us to perform OCR without saving the image to disk.
- OCR Processing : The Scan method performs OCR on the image stream. The recognized text can be accessed using the Text property of the OcrScanner instance.
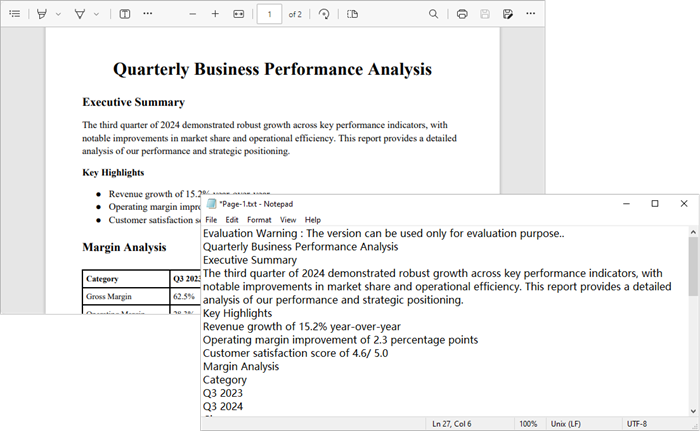
- Output : The extracted text is saved to a text file for each page.
Output :
To extract text from searchable PDFs, refer to this guide: Automate PDF Text Extraction Using C#
Extracting Text from Images within PDFs in C#
In addition to processing entire PDF pages, you can also extract text from images embedded within PDFs. Here’s how:
using Spire.OCR;
using Spire.Pdf;
using Spire.Pdf.Graphics;
using System.Drawing;

namespace OCRPDF
{
    class Program
    {
        static void Main(string[] args)
        {
            // Create an instance of the OcrScanner class
            OcrScanner scanner = new OcrScanner();

            // Configure the scanner
            ConfigureOptions configureOptions = new ConfigureOptions
            {
                ModelPath = @"D:\win-x64", // Set model path
                Language = "English"        // Set language
            };

            // Apply the configuration options
            scanner.ConfigureDependencies(configureOptions);

            // Load a PDF document
            PdfDocument doc = new PdfDocument();
            doc.LoadFromFile(@"C:\Users\Administrator\Desktop\Input5.pdf");

            // Iterate through all pages
            for (int i = 0; i < doc.Pages.Count; i++)
            {
                // Convert page to image
                Image image = doc.SaveAsImage(i, PdfImageType.Bitmap);

                // Convert the image to a MemoryStream
                using (MemoryStream stream = new MemoryStream())
                {
                    image.Save(stream, System.Drawing.Imaging.ImageFormat.Png);
                    stream.Position = 0; // Reset the stream position

                    // Perform OCR on the image stream
                    scanner.Scan(stream, OCRImageFormat.Png);
                    string pageText = scanner.Text.ToString();

                    // Save extracted text to a separate file
                    string outputTxtPath = Path.Combine(@"C:\Users\Administrator\Desktop\Output", $"Page-{i + 1}.txt");
                    File.WriteAllText(outputTxtPath, pageText);
                }
            }

            // Close the document
            doc.Close();
        }
    }
}
Key Components Explained :
- PdfImageHelper Class : This class is essential for extracting images from a PDF page. It provides methods to retrieve image information such as GetImagesInfo , which returns an array of PdfImageInfo objects.
- PdfImageInfo Class : Each PdfImageInfo object contains properties related to an image, including the actual Image object that can be processed further.
- Image Processing : Similar to the previous example, each image is saved to a MemoryStream for OCR processing.
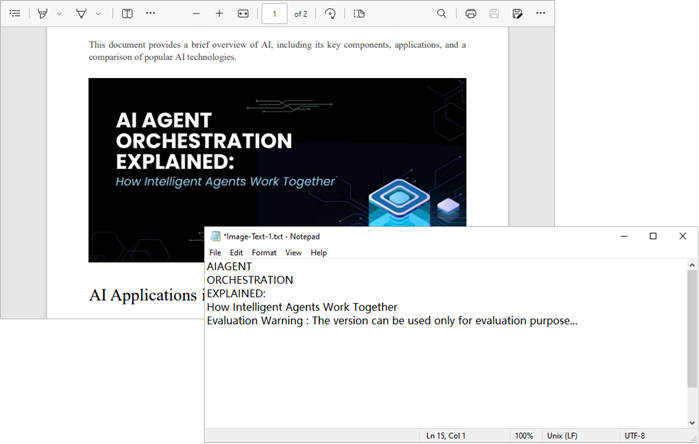
- Output : The extracted text from each image is saved to a separate text file.
Output:
Wrapping Up
By combining Spire.PDF with Spire.OCR , you can seamlessly transform scanned PDFs and image-based documents into fully searchable and editable text. Whether you need to process entire pages or extract text from specific embedded images, the approach is straightforward and flexible.
This OCR integration not only streamlines document digitization but also enhances productivity by enabling search, copy, and automated data extraction. In industries where large volumes of scanned documents are the norm, implementing OCR with C# can significantly improve accessibility, compliance, and information retrieval speed.
FAQs
Q1. Can I perform OCR on non-English PDFs?
Yes, Spire.OCR supports multiple languages. You can set the Language property in ConfigureOptions to the desired language.
Q2. What should I do if the output is garbled or incorrect?
Check the quality of the input PDF images. If the images are blurry or have low contrast, OCR may struggle to recognize text accurately. Consider enhancing the image quality before processing.
Q3. Can I extract text from images embedded within a PDF?
Yes, you can. Use a helper class to extract images from each page and then apply OCR to recognize text.
Q4. Can Spire.OCR handle handwritten text in PDFs?
Spire.OCR is primarily optimized for printed text. Handwriting recognition typically has lower accuracy.
Q5. Do I need to install additional language models for OCR?
Yes, Spire.OCR requires pre-trained language model files. Download and configure the appropriate models for your target language before performing OCR.
Get a Free License
To fully experience the capabilities of Spire.PDF for .NET and Spire.OCR for .NET without any evaluation limitations, you can request a free 30-day trial license.
Convert Excel to JSON and JSON to Excel in C# .NET – Step-by-Step Guide
2025-08-13 09:40:46 Written by alice yang
Excel files are widely used to enter, organize, and present tabular data, while JSON is commonly used by APIs and applications to exchange structured data between systems. Converting between these formats allows developers to import spreadsheet data into applications and export application data to Excel for reporting, analysis, or sharing.
In this tutorial, you’ll learn how to convert Excel to JSON and JSON to Excel in C# using Spire.XLS for .NET.
What We Will Cover:
- Why Convert Between Excel and JSON
- Prerequisites & Package Installation
- Basic Excel to JSON Conversion in C# .NET
- Advanced Excel to JSON Conversion Scenarios
- Convert JSON to Excel in C# .NET
- Tips and Best Practices
- FAQs
- Conclusion
Why Convert Between Excel and JSON?
Converting data between Excel (.xlsx or .xls) and JSON formats is a standard requirement in .NET applications for the following development tasks:
- Data Ingestion: Parses business-generated spreadsheets into standard server-side objects for backend processing.
- API Integration: Formats tabular data into standard JSON payloads required by web APIs and microservices.
- Frontend Serialization: Transforms structured server-side data into lightweight JSON format for consumption by web clients and JavaScript frameworks.
- NoSQL Storage: Prepares relational or tabular spreadsheet data for direct migration into document databases like MongoDB or Cosmos DB.
- Automated Reporting: Converts dynamic JSON application data into readable Excel reports for end users.
Prerequisites and Package Installation
Before you begin, ensure your development environment meets these specific requirements.
- Visual Studio (2019 or later recommended)
- .NET Environment: .NET Framework 4.0+, .NET Core 3.1+, or .NET 5.0+.
- NuGet Packages:
- Spire.XLS for .NET (version 15.11.3 or higher)
- Newtonsoft.Json (required for JSON serialization, deserialization and custom formatting)
Installing the Required NuGet Packages
Option 1: Using .NET Package Manager Console
Open your project in Visual Studio and run the following commands in the Package Manager Console:
Install-Package Spire.XLS
Install-Package Newtonsoft.Json
Option 2: Using .NET CLI
For cross-platform developers using terminal-based environments, execute the following commands inside the project's root folder:
dotnet add package Spire.XLS
dotnet add package Newtonsoft.Json
Basic Excel to JSON Conversion in C# .NET
Starting with Spire.XLS for .NET 15.11.3, developers can export an Excel workbook directly to JSON by calling the SaveToFile() method.
This method is suitable when you want to convert the whole workbook and do not need to customize the generated JSON structure.
Steps to Convert an Excel Workbook to JSON
- Instantiate a new
Workbookobject. - Use
LoadFromFile()to load your Excel workbook. - Call
SaveToFile()and specifyFileFormat.Jsonas the output format to export the workbook to JSON.
Complete Code Example
using System;
using Spire.Xls;

namespace ConvertExcelToJSON
{
    class Program
    {
        static void Main(string[] args)
        {
            string inputFile = @"Sample.xlsx";
            string outputFile = @"output.json";

            try
            {
                // Create a Workbook object
                using (Workbook workbook = new Workbook())
                {
                    // Load the Excel file
                    workbook.LoadFromFile(inputFile);

                    // Save the entire workbook into a single JSON file
                    // Supported in Spire.XLS 15.11.3 and later
                    workbook.SaveToFile(outputFile, FileFormat.Json);
                }
            }
            catch (Exception ex)
            {
                Console.WriteLine($"Error during conversion: {ex.Message}");
            }
        }
    }
}
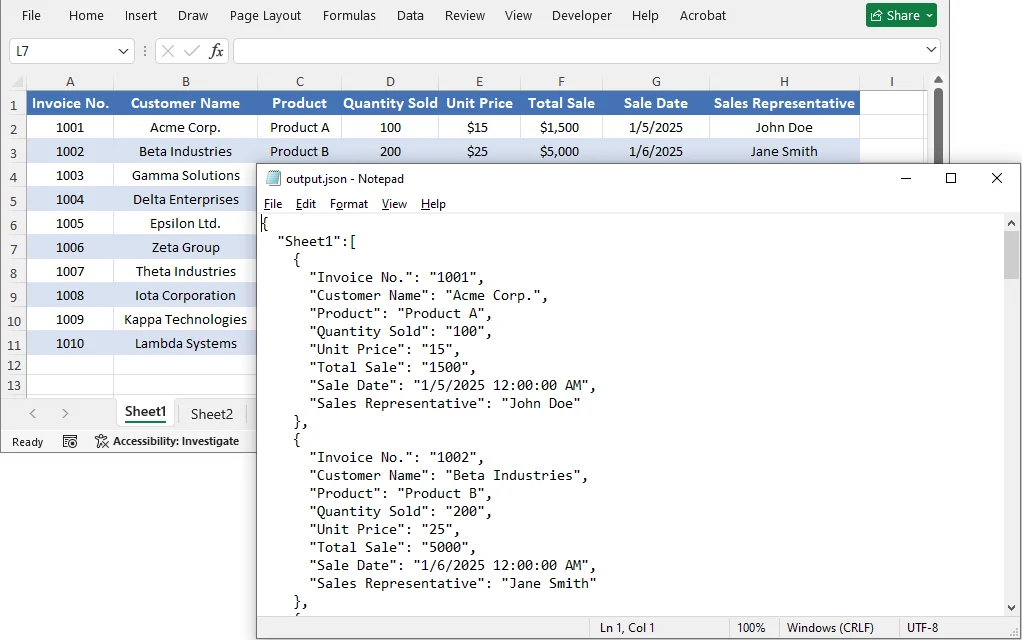
The Output JSON:
The converted JSON structure corresponds to the Excel data as follows:
- Worksheet name → Becomes a key in the outermost JSON object.
- Data in each worksheet → Becomes an array, where each object represents a single row.
- Header row values → Become the default field names for each data object.
Advanced Excel to JSON Conversion Scenarios
While saving the entire workbook to JSON is convenient, there are scenarios where you need more control—such as converting only a specific worksheet, cell range, or customizing the JSON output format. Spire.XLS provides flexible approaches to achieve these custom conversions.
Worksheet to JSON
To convert only a specific worksheet rather than the entire workbook, copy the target worksheet to a new workbook and then save that workbook as JSON.
Steps to Convert a Specific Worksheet to JSON
- Load the source workbook using
LoadFromFile(). - Get the target worksheet by its index or name.
- Create a new
Workbookobject for the output. - Use the
Worksheets.AddCopy()method to copy the target worksheet to the new workbook. - Call
SaveToFile()withFileFormat.Jsonon the new workbook.
Complete Code Example
using System;
using Spire.Xls;

namespace ConvertWorksheetToJSON
{
    class Program
    {
        static void Main(string[] args)
        {
            string inputFile = @"Sample.xlsx";
            string outputFile = @"sheet_output.json";

            try
            {
                using (Workbook sourceWorkbook = new Workbook())
                {
                    sourceWorkbook.LoadFromFile(inputFile);

                    // Access the first worksheet by index (or by name: sourceWorkbook.Worksheets["sheetName"])
                    Worksheet targetSheet = sourceWorkbook.Worksheets[0];

                    using (Workbook newWorkbook = new Workbook())
                    {
                        // Remove default worksheets from the new workbook
                        newWorkbook.Worksheets.Clear();

                        // Copy the target worksheet into the new workbook
                        newWorkbook.Worksheets.AddCopy(targetSheet);

                        // Save the single worksheet as JSON
                        newWorkbook.SaveToFile(outputFile, FileFormat.Json);
                    }
                }
            }
            catch (Exception ex)
            {
                Console.WriteLine($"Error: {ex.Message}");
            }
        }
    }
}
Cell Range to JSON
If you only need to export a portion of worksheet data—such as a specific table or range—copy the desired range to a new workbook and then save the result file as JSON.
Steps to Convert a Cell Range to JSON
- Load the source workbook.
- Get the target worksheet containing the data.
- Define the range you want to export (e.g., worksheet.Range["A1:D3"]).
- Instantiate a new
Workbookobject. - Copy the range data to a new worksheet in the new workbook with
Worksheet.Copy(). - Call
SaveToFile()with FileFormat.Json to save the new workbook as a .json file.
Complete Code Example
using System;
using Spire.Xls;

namespace ConvertExcelToJSON
{
    class Program
    {
        static void Main(string[] args)
        {
            string inputFile = @"Sample.xlsx";
            string outputFile = @"range_output.json";

            try
            {
                using (Workbook sourceWorkbook = new Workbook())
                {
                    sourceWorkbook.LoadFromFile(inputFile);
                    Worksheet sourceWorksheet = sourceWorkbook.Worksheets[0];

                    // Define the range to export (e.g., A1:D3)
                    CellRange sourceRange = sourceWorksheet.Range["A1:D3"];

                    using (Workbook targetWorkbook = new Workbook())
                    {
                        // Remove the default worksheets
                        targetWorkbook.Worksheets.Clear();

                        // Add a worksheet for the selected range
                        Worksheet targetWorksheet = targetWorkbook.Worksheets.Add("RangeData");

                        // Create a destination range with the same dimensions
                        CellRange destinationRange = targetWorksheet.Range["A1:D3"];

                        // Copy values and styles to the new workbook
                        sourceWorksheet.Copy(sourceRange, destinationRange, true);

                        // Export the isolated range to JSON
                        targetWorkbook.SaveToFile(outputFile, FileFormat.Json);
                    }
                }
            }
            catch (Exception ex)
            {
                Console.WriteLine($"Error exporting cell range: {ex.Message}");
            }
        }
    }
}
Customize JSON Output Formatting
The SaveToFile() method provides a quick conversion, but the output format is fixed. If you need greater control over the JSON output, export the worksheet data to a DataTable with ExportDataTable() and serialize it with Newtonsoft.Json. This allows you to customize property names, null handling, date formats, and indentation.
Steps for Custom JSON Output Formatting
- Load the Excel File.
- Access the worksheet and export its data to a DataTable using
ExportDataTable(). - Configure
JsonSerializerSettingsto define formatting rules (camelCase, null handling, date format, etc.). - Serialize the DataTable using
JsonConvert.SerializeObject()with the settings. - Save the JSON string to a file.
Complete Code Example
using System;
using System.Data;
using System.IO;
using Spire.Xls;
using Newtonsoft.Json;
using Newtonsoft.Json.Serialization;

namespace ConvertExcelToJSON
{
    class Program
    {
        static void Main(string[] args)
        {
            string excelFilePath = @"Sample.xlsx";
            string jsonOutputPath = "custom_output.json";

            try
            {
                using (Workbook workbook = new Workbook())
                {
                    workbook.LoadFromFile(excelFilePath);
                    Worksheet worksheet = workbook.Worksheets[0];

                    // Convert tabular data directly into an in-memory DataTable structure
                    DataTable dataTable = worksheet.ExportDataTable(worksheet.AllocatedRange, true);

                    // Define custom JSON serialization rules
                    JsonSerializerSettings settings = new JsonSerializerSettings
                    {
                        Formatting = Formatting.Indented, // Structured, readable format
                        ContractResolver = new CamelCasePropertyNamesContractResolver(), // camelCase naming conventions
                        NullValueHandling = NullValueHandling.Ignore, // Omit null fields from output string
                        DateFormatString = "yyyy-MM-dd" // Explicit date string overrides
                    };

                    // Serialize the data structure to string with settings applied
                    string jsonResult = JsonConvert.SerializeObject(dataTable, settings);

                    // Write string payload out to target destination
                    File.WriteAllText(jsonOutputPath, jsonResult);
                }
            }
            catch (Exception ex)
            {
                Console.WriteLine($"Error during custom serialization: {ex.Message}");
            }
        }
    }
}
Explanation of Customization Options
| Setting | Purpose |
|---|---|
| Formatting = Formatting.Indented | Produces human‑readable JSON with line breaks and indentation. |
| CamelCasePropertyNamesContractResolver | Applies camelCase naming to compatible column names, which is a common convention in JSON APIs. |
| NullValueHandling = NullValueHandling.Ignore | Omits values represented as null or DBNull.Value. |
| DateFormatString = "yyyy-MM-dd" | Formats values represented as DateTime or DateTimeOffset. |
Note on Column Names with Spaces:
When Excel headers contain spaces (e.g., "First Name"), the generated JSON keys will retain those spaces. Consumers must use bracket notation (obj["First Name"]) instead of dot notation. For cleaner camelCase property names, normalize the DataTable column names by iterating DataTable.Columns — e.g., remove spaces or apply a custom naming convention before serialization.
You can further customize the output by adding custom JsonConverter implementations, modifying date handling, or using different ContractResolver strategies. For more details, refer to the Newtonsoft.Json documentation.
How to Convert JSON to Excel in C# .NET
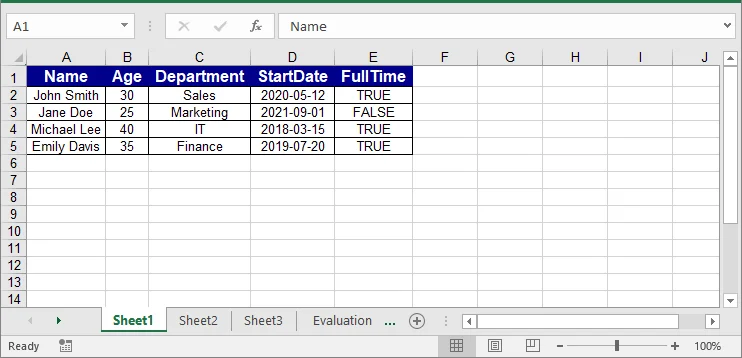
To convert JSON to Excel, deserialize the JSON data into a DataTable, then insert the table into an Excel worksheet.
Steps to Import JSON into Excel
- Load the JSON data from a file, API response, or string variable.
- Use
Newtonsoft.Json.JsonConvert.DeserializeObject<DataTable>()to convert the JSON data to a DataTable. - Instantiate a new
Workbookobject. - Use
InsertDataTable()to transfer data to a worksheet in the new workbook. - Style headers and data cells for better readability.
- Save the new workbook as an Excel file.
Complete Code Example
using System;
using System.Data;
using System.Drawing;
using Spire.Xls;
using Newtonsoft.Json;

namespace ConvertJSONToExcel
{
    class Program
    {
        static void Main(string[] args)
        {
            // Sample JSON array
            string jsonInput = @"
            [
                {""Name"":""John Smith"",""Age"":30,""Department"":""Sales"",""StartDate"":""2020-05-12"",""FullTime"":true},
                {""Name"":""Jane Doe"",""Age"":25,""Department"":""Marketing"",""StartDate"":""2021-09-01"",""FullTime"":false},
                {""Name"":""Michael Lee"",""Age"":40,""Department"":""IT"",""StartDate"":""2018-03-15"",""FullTime"":true},
                {""Name"":""Emily Davis"",""Age"":35,""Department"":""Finance"",""StartDate"":""2019-07-20"",""FullTime"":true}
            ]";

            string excelOutputPath = "output.xlsx";

            try
            {
                // Deserialize the JSON array into a DataTable
                DataTable dataTable = JsonConvert.DeserializeObject<DataTable>(jsonInput);

                using (Workbook workbook = new Workbook())
                {
                    Worksheet worksheet = workbook.Worksheets[0];

                    // Insert the data and column headers starting at cell A1
                    worksheet.InsertDataTable(dataTable, true, 1, 1);

                    // --- Define Header Styles ---
                    CellStyle headerStyle = workbook.Styles.Add("HeaderStyle");
                    headerStyle.Font.IsBold = true;
                    headerStyle.Font.Size = 12;
                    headerStyle.Font.Color = Color.White;
                    headerStyle.Color = Color.DarkBlue;
                    headerStyle.HorizontalAlignment = HorizontalAlignType.Center;
                    headerStyle.VerticalAlignment = VerticalAlignType.Center;

                    // Apply the style to the header row
                    int colCount = dataTable.Columns.Count;
                    worksheet.Range[1, 1, 1, colCount].CellStyleName = "HeaderStyle";

                    // --- Define Data Row Styles ---
                    CellStyle dataStyle = workbook.Styles.Add("DataStyle");
                    dataStyle.HorizontalAlignment = HorizontalAlignType.Center;
                    dataStyle.VerticalAlignment = VerticalAlignType.Center;
                    dataStyle.Borders[BordersLineType.EdgeLeft].LineStyle = LineStyleType.Thin;
                    dataStyle.Borders[BordersLineType.EdgeRight].LineStyle = LineStyleType.Thin;
                    dataStyle.Borders[BordersLineType.EdgeTop].LineStyle = LineStyleType.Thin;
                    dataStyle.Borders[BordersLineType.EdgeBottom].LineStyle = LineStyleType.Thin;

                    // Apply the style to data rows
                    int rowCount = dataTable.Rows.Count;
                    worksheet.Range[2, 1, rowCount + 1, colCount].CellStyleName = "DataStyle";

                    // Autofit column widths
                    worksheet.AllocatedRange.AutoFitColumns();

                    // Save the workbook as an XLSX file
                    workbook.SaveToFile(excelOutputPath, ExcelVersion.Version2016);
                }
            }
            catch (Exception ex)
            {
                Console.WriteLine($"Conversion exception thrown: {ex.Message}");
            }
        }
    }
}
Handling Wrapped or Nested JSON
The direct DataTable deserialization works best with a flat JSON array. If the records are wrapped inside a root object or contain nested objects and arrays, extract and flatten the required values before converting them to a DataTable.
For example, the following JSON string contains both a root wrapper and nested data:
string jsonInput = @"
{
  ""status"": ""success"",
  ""data"": [
    {
      ""Name"": ""John Smith"",
      ""Department"": {
        ""Id"": 10,
        ""Name"": ""Sales""
      },
      ""Skills"": [
        ""Negotiation"",
        ""CRM""
      ]
    },
    {
      ""Name"": ""Jane Doe"",
      ""Department"": {
        ""Id"": 20,
        ""Name"": ""Marketing""
      },
      ""Skills"": [
        ""Content Writing"",
        ""Analytics""
      ]
    }
  ]
}";
The following method extracts the data array, flattens the nested values, and returns a DataTable:
using System.Data;
using System.IO;
using System.Linq;
using Newtonsoft.Json;
using Newtonsoft.Json.Linq;

private static DataTable ConvertNestedJsonToDataTable(string jsonInput)
{
    // Parse either a root object or a root array.
    JToken rootToken = JToken.Parse(jsonInput);

    // Accept a root array or an array stored in the "data" property.
    JArray records = rootToken as JArray
        ?? ((rootToken as JObject)?["data"] as JArray)
        ?? throw new InvalidDataException(
            "The JSON does not contain a valid record array.");

    // Flatten nested objects and arrays into tabular fields.
    var flattenedRecords = records.Select(record => new
    {
        Name = (string)record["Name"] ?? string.Empty,

        // Convert the nested Department object into separate columns.
        DepartmentId = (int?)record["Department"]?["Id"],
        DepartmentName =
            (string)record["Department"]?["Name"] ?? string.Empty,

        // Join the Skills array into a comma-separated string.
        Skills = string.Join(
            ", ",
            record["Skills"]?.Values<string>()
                ?? Enumerable.Empty<string>())
    });

    // Convert the flattened records into a DataTable.
    string flattenedJson =
        JsonConvert.SerializeObject(flattenedRecords);

    DataTable dataTable =
        JsonConvert.DeserializeObject<DataTable>(flattenedJson);

    if (dataTable == null || dataTable.Columns.Count == 0)
        throw new InvalidDataException(
            "The JSON contains no tabular records.");

    return dataTable;
}
The returned DataTable can then be inserted into a worksheet using InsertDataTable():
DataTable nestedTable = ConvertNestedJsonToDataTable(jsonInput);
worksheet.InsertDataTable(nestedTable, true, 1, 1);
Note: This mapping is based on the structure of the sample JSON. For other JSON schemas, adjust the selected properties and output columns accordingly.
Tips and Best Practices
When converting between Excel and JSON, following these best practices will help ensure data integrity and usability:
- Validate Data Types: Ensure that data types (dates, numbers, booleans) are correctly formatted to avoid issues during conversion.
- Handle Empty Cells: Decide how to treat empty cells (convert to null, omit, or use default values) to maintain data integrity.
- Use Consistent Naming Conventions: Standardize column names in Excel for clear and consistent JSON keys.
- Test Thoroughly: Always test the conversion processes to ensure valid JSON output and accurate Excel representation.
- Include Headers: When converting JSON to Excel, always insert headers for improved readability and usability.
FAQs
Do I need Microsoft Excel installed to use these examples?
No. Spire.XLS is a standalone .NET library that reads, writes, and converts Excel files without any dependency on Microsoft Office or Excel Interop.
Can I convert older .xls (97–2003) files as well as .xlsx to JSON?
Yes. LoadFromFile() automatically detects the file format, so the same code works for both .xls and .xlsx sources.
Can I convert nested JSON to Excel?
JsonConvert.DeserializeObject<DataTable>() works with flat JSON arrays. For nested JSON, flatten the structure into a simple list of objects before calling InsertDataTable().
Does this approach work in ASP.NET Core or other cross-platform .NET apps?
Yes. Spire.XLS supports .NET Framework, .NET Core, and .NET 5–10, so the same code runs in console apps, ASP.NET Core services, and cross-platform (Linux/macOS) environments.
Conclusion
This tutorial demonstrated how to convert Excel workbooks, individual worksheets, and cell ranges to JSON, as well as how to import JSON data into Excel in C#. By combining Spire.XLS with Newtonsoft.Json, you can handle both straightforward conversions and scenarios that require custom formatting or nested data processing.
Get a Free License
To fully experience the capabilities of Spire.XLS for .NET without any evaluation limitations, you can request a free 30-day trial license.
