
Knowledgebase (2370)
Children categories
Converting HTML to RTF in C# is a key task for developers working with web content that needs to be transformed into editable, universally compatible documents. HTML excels at web display with dynamic styles and structure, while RTF is ideal for shareable, editable files in tools like Word or WordPad.
For .NET developers, using libraries like Spire.Doc can streamline the process. In this tutorial, we'll explore how to use C# to convert HTML to RTF, covering everything from basic implementations to advanced scenarios such as handling HTML images, batch conversion.
- Why Use Spire.Doc for HTML to RTF Conversion?
- Getting Started
- Convert HTML to RTF (C# Code Examples)
- Advanced Conversion Scenarios
- Final Thoughts
- Common Questions
Why Use Spire.Doc for HTML to RTF Conversion?
Spire.Doc for .NET is a lightweight, feature-rich library for creating, editing, and converting Word and RTF documents in .NET applications (supports .NET Framework, .NET Core, and .NET 5+). For HTML to rich text conversion, it offers key benefits:
- Preserves HTML formatting (fonts, colors, links, lists, tables).
- Supports loading HTML from strings or local files.
- No dependency on Microsoft Word or other third-party software.
- Intuitive API with minimal code required.
Getting Started
1. Create a C# Project
If you’re starting from scratch, create a new Console App (.NET Framework/.NET Core) project in Visual Studio. This example uses a console app for simplicity, but the code works in WinForms, WPF, or ASP.NET projects too.
2. Install Spire.Doc via NuGet
The fastest way to add Spire.Doc to your C# project is through NuGet Package Manager:
- Open your C# project in Visual Studio.
- Right-click the project in the Solution Explorer → Select Manage NuGet Packages.
- Search for Spire.Doc and click Install to add the latest version to your project.
Alternatively, use the NuGet Package Manager Console with this command:
Install-Package Spire.Doc
Convert HTML to RTF (C# Code Examples)
Spire.Doc’s Document class handles HTML loading and RTF saving. Below are two common scenarios:
Scenario 1: Convert HTML String to RTF in C#
Use this when HTML content is dynamic (e.g., from user input, APIs, or databases).
using Spire.Doc;
using Spire.Doc.Documents;

namespace HtmlToRtfConverter
{
    class Program
    {
        static void Main(string[] args)
        {
            // Create a Document object
            Document doc = new Document();

            // Define your HTML content
            string htmlString = @"
                    <html>
                        <body>
                            <h1 style='color: #00BFFF; font-family: Arial'>HTML to RTF Conversion</h1>
                            <p>This is a <b>bold paragraph</b> with a <a href='https://www.e-iceblue.com'>link</a>.</p>
                            <ul>
                                <li>Item 1 </li>
                                <li>Item 2</li>
                            </ul>
                            <table border='1' cellpadding='5'>
                                <tr><td>Name</td><td>Gender</td><td>Age</td></tr>
                                <tr><td>John</td><td>Male</td><td>30</td></tr>
                                <tr><td>Kate</td><td>Female</td><td>26</td></tr>
                            </table>
                        </body>
                    </html>";

            // Add a paragraph in Word
            Paragraph para = doc.AddSection().AddParagraph();

            // Append the HTML string to the paragraph
            para.AppendHTML(htmlString);

            // Save the document as RTF
            doc.SaveToFile("HtmlStringToRtf.rtf", FileFormat.Rtf);
            doc.Dispose();

        }
    }
}
In this code:
- Document Object: Represents an empty document.
- HTML String: You can customize this to include any valid HTML (styles, media, or dynamic content from databases/APIs).
- AppendHTML(): Parses HTML tags (e.g.,
<h1>,<table>,<a>) and inserts them into a paragraph. - SaveToFile(): Writes the converted content to an RTF file.
Output:
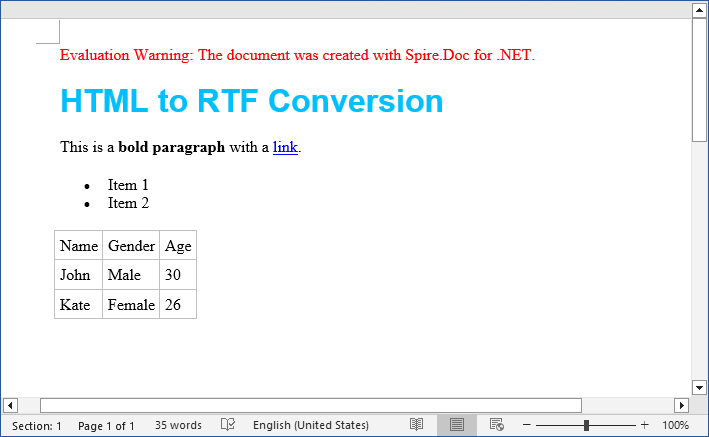
The SaveToFile method accepts different FileFormat parameters. You can change it to implement HTML to Word conversion in C#.
Scenario 2: Convert HTML File to RTF File
For static HTML files (e.g., templates or saved web pages), use LoadFromFile with parameter FileFormat.Html:
using Spire.Doc;

namespace ConvertHtmlToRTF
{
    class Program
    {
        static void Main()
        {
            // Create a Document object
            Document doc = new Document();

            // Load an HTML file
            doc.LoadFromFile("Test.html", FileFormat.Html);

            // Save the HTML file as rtf format
            doc.SaveToFile("HTMLtoRTF.rtf", FileFormat.Rtf);
            doc.Dispose();
        }
    }
}
This code simplifies HTML-to-RTF conversion into three core steps:
- Creates a Document object.
- Loads an existing HTML file using LoadFromFile() with the FileFormat.Html parameter.
- Saves the loaded HTML as an RTF format using SaveToFile() with the FileFormat.Rtf parameter.
Output:
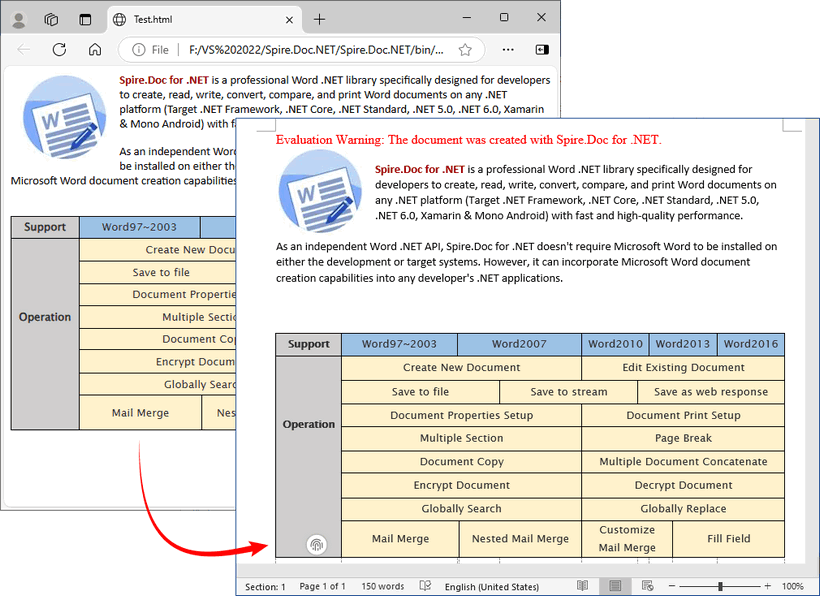
Spire.Doc supports bidirectional conversion, so you can convert the RTF file back to HTML in C# when needed.
Advanced Conversion Scenarios
1. Handling Images in HTML
Spire.Doc preserves images embedded in HTML (via <img> tags). For local images, ensure the src path is correct. For remote images (URLs), Spire.Doc automatically downloads and embeds them.
// HTML with local and remote images
string htmlWithImages = @"<html>
    <body>
        <h3>HTML with Images</h3>
        <p>Local image: <img src='https://cdn.e-iceblue.com/C:\Users\Administrator\Desktop\HelloWorld.png' alt='Sample Image' width='200'></p>
        <p>Remote image: <img src='https://www.e-iceblue.com/images/art_images/csharp-html-to-rtf.png' alt='Online Image'></p>
    </body>
    </html>";

// Append the HTML string to a paragraph
Paragraph para = doc.AddSection().AddParagraph();
para.AppendHTML(htmlWithImages);

// Save the document as RTF
doc.SaveToFile("HtmlWithImage.rtf", FileFormat.Rtf);
2. Batch Conversion of Multiple HTML Files
Process an entire directory of HTML files with a loop:
string inputDir = @"C:\Input\HtmlFiles";
string outputDir = @"C:\Output\RtfFiles";

// Create output directory if it doesn't exist
Directory.CreateDirectory(outputDir);

// Get all .html files in input directory
foreach (string htmlFile in Directory.EnumerateFiles(inputDir, "*.html"))
{
   using (Document doc = new Document())
   {
      doc.LoadFromFile(htmlFile, FileFormat.Html, XHTMLValidationType.None);

      // Use the same filename but with .rtf extension
      string fileName = Path.GetFileNameWithoutExtension(htmlFile) + ".rtf";
      string outputPath = Path.Combine(outputDir, fileName);

      doc.SaveToFile(outputPath, FileFormat.Rtf);
Final Thoughts
Converting HTML to RTF in C# is straightforward with Spire.Doc for .NET. This library eliminates the need for manual parsing and ensures consistent formatting across outputs. Whether you’re working with HTML strings or files, this article provides practical code examples to handle both scenarios.
For further exploration, refer to the Spire.Doc documentation.
Common Questions
Q1: Is Spire.Doc free to use?
A: For large-scale projects, you can request a free 30-day trial license to fully evaluate it. Alternatively, Spire.Doc offers a free community edition without any watermarks (but with certain page/functionality limits).
Q2: Does Spire.Doc preserve HTML hyperlinks, images, and tables in the RTF output?
A: Yes. Spire.Doc retains most HTML elements:
- Hyperlinks:
<a>tags are converted to clickable links in RTF. - Images: Local (
<img src="/path">) and remote (<img src="/URL">) images are embedded in the RTF. - Tables: HTML tables (with border, cellpadding, etc.) are converted to RTF tables with preserved structure.
Q3: Can I style the RTF output further after loading the HTML?
A: Absolutely. After loading the HTML content into the Document object, you can use the full Spire.Doc API to programmatically modify the document before saving it as RTF.
Q4: Can I convert HTML to other formats with Spire.Doc?
A: Yes. Apart from converting to RTF, the library also supports converting HTML to Word, HTML to XML, and HTML to images, etc.
Working with Data in C#: Exporting DataSet to Excel Made Easy
2025-09-05 09:30:38 Written by jie zou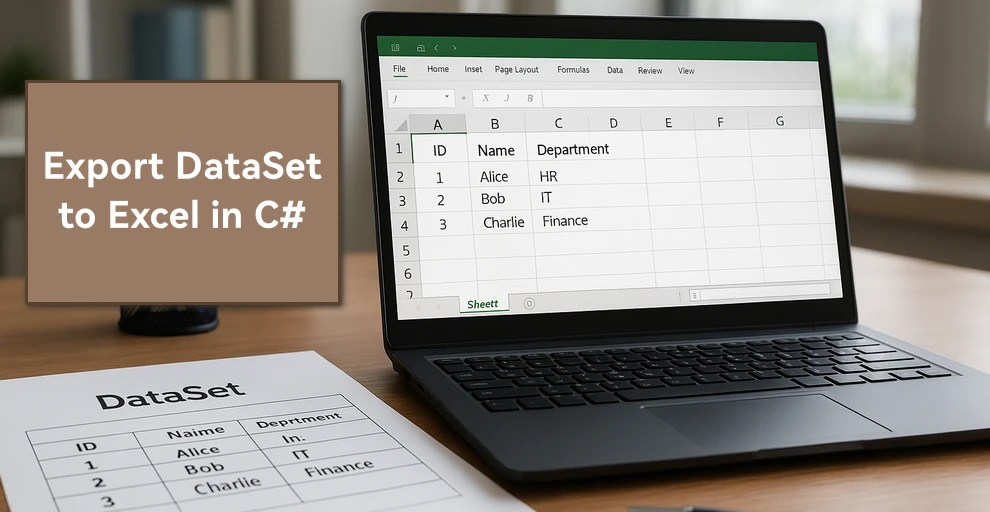
In C# development, DataSet is widely used to manage in-memory data, often as a result of database queries or integration processes. There are many scenarios where you may need to create Excel files from DataSet in C# — for example, generating reports, sharing structured data with non-developers, or archiving records for future reference.
In this guide, we’ll walk through different approaches to export DataSet to Excel in C# using Spire.XLS for .NET, including creating an Excel file, writing multiple DataTables into separate sheets, applying formatting, and handling large data volumes.
Here's what's covered in this guide:
- DataSet Basics and Environment Setup
- Creating an Excel File from DataSet in C#
- Adding Formatting to Excel Sheets Using C#
- Handling Large DataSet Exports
- Read Excel into DataSet in C#
- Conclusion
- FAQ
1. DataSet Basics and Environment Setup for Excel Export
What is a DataSet?
A DataSet in C# is an in-memory representation of structured data. It can hold multiple DataTables, including their rows, columns, and relationships, making it useful for working with relational-style data without direct database connections.
Why Export DataSet to Excel?
- Data exchange – Excel is widely supported and easy to share across teams.
- Data analysis – Analysts can manipulate Excel data directly using formulas, pivot tables, and charts.
- Archiving – Storing query results or processed data in a readable, portable format.
Compared to raw text or CSV, Excel supports rich formatting, multiple sheets, and better readability.
Environment Setup
To export a DataSet to an Excel file in C#, we will use Spire.XLS for .NET, which provides APIs for handling Excel files. Install Spire.XLS via NuGet:
Install-Package Spire.XLS
Add the required namespaces:
using Spire.Xls;
using System.Data;
using System.Drawing; // for Color
2. Creating an Excel File from DataSet in C#
Exporting a DataSet to Excel involves two key steps: preparing the data and writing it into a workbook. In practice, the DataSet may come from queries or APIs, but for clarity, we’ll demonstrate with a simple example. First, we’ll build a DataSet in memory, then show how to export it into an Excel file where each DataTable becomes its own worksheet.
2.1 Initialize a DataSet with Sample Data
First, we’ll build a DataSet using C#. The following sample DataSet contains multiple business-style tables and a variety of column types (int, string, DateTime, decimal).
using System;
using System.Data;

class Program
{
    static DataSet CreateSampleDataSet()
    {
        DataSet ds = new DataSet("CompanyData");

        // Employees
        DataTable employees = new DataTable("Employees");
        employees.Columns.Add("ID", typeof(int));
        employees.Columns.Add("Name", typeof(string));
        employees.Columns.Add("DepartmentID", typeof(int));
        employees.Columns.Add("HireDate", typeof(DateTime));
        employees.Columns.Add("Salary", typeof(decimal));

        employees.Rows.Add(1, "Alice", 101, new DateTime(2020, 5, 12), 5500.00m);
        employees.Rows.Add(2, "Bob", 102, new DateTime(2019, 3, 8), 7200.50m);
        employees.Rows.Add(3, "Charlie", 103, new DateTime(2021, 11, 20), 4800.75m);

        // Departments
        DataTable departments = new DataTable("Departments");
        departments.Columns.Add("DepartmentID", typeof(int));
        departments.Columns.Add("DepartmentName", typeof(string));
        departments.Rows.Add(101, "HR");
        departments.Rows.Add(102, "IT");
        departments.Rows.Add(103, "Finance");

        // Projects
        DataTable projects = new DataTable("Projects");
        projects.Columns.Add("ProjectID", typeof(int));
        projects.Columns.Add("ProjectName", typeof(string));
        projects.Columns.Add("OwnerID", typeof(int));
        projects.Columns.Add("StartDate", typeof(DateTime));
        projects.Rows.Add(1001, "Recruitment System", 1, new DateTime(2023, 1, 15));
        projects.Rows.Add(1002, "ERP Upgrade", 2, new DateTime(2023, 4, 10));
        projects.Rows.Add(1003, "Budget Planning", 3, new DateTime(2023, 7, 5));

        ds.Tables.Add(employees);
        ds.Tables.Add(departments);
        ds.Tables.Add(projects);

        return ds;
    }
}
2.2 Export DataSet to Excel File
With the DataSet prepared, the next step is generating the Excel file. This involves creating a Workbook, iterating through the DataTables, inserting them into worksheets, and saving the workbook to an Excel file.
using Spire.Xls;
using System.Data;

class Program
{
    static void Main()
    {
        DataSet ds = CreateSampleDataSet();

        Workbook workbook = new Workbook();

        // Export each DataTable as a separate worksheet
        for (int i = 0; i < ds.Tables.Count; i++)
        {
            Worksheet sheet = (i == 0)
                ? workbook.Worksheets[0]
                : workbook.Worksheets.Add(ds.Tables[i].TableName);

            sheet.InsertDataTable(ds.Tables[i], true, 1, 1);
            sheet.Name = ds.Tables[i].TableName; // ensure sheet is named after the table
        }

        workbook.SaveToFile("DatasetToExcel.xlsx", ExcelVersion.Version2016);
    }
}
About the Exporting Process
- Each DataTable is written into a separate worksheet.
- InsertDataTable(DataTable table, bool columnHeaders, int row, int column) inserts data starting from a specific cell.
- SaveToFile() writes the workbook to disk in the specified format.
In addition to creating separate worksheets for each DataTable, you can also insert multiple DataTables into the same worksheet by adjusting the starting row and column parameters of the InsertDataTable method.
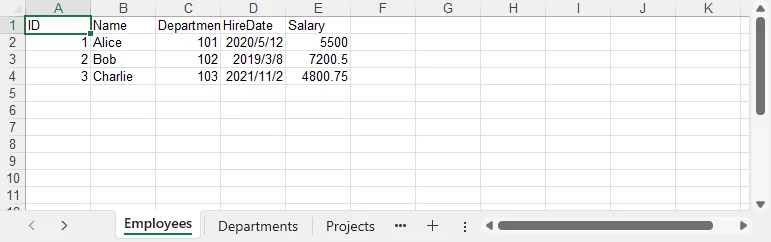
Result preview
Below is a quick preview of the output workbook showing three sheets populated from the DataSet.
For a practical example of exporting data directly from a database to Excel, see our guide on Export Database to Excel in C#.
3. Adding Formatting to Excel Sheets Using C#
Raw data often isn’t enough for reporting. Formatting improves readability and makes the Excel file more professional. With Spire.XLS, you can style fonts, apply background colors, add borders, and format numbers and dates.
using System.Drawing;
using Spire.Xls;

// Get the first sheet
Worksheet sheet1 = workbook.Worksheets["Employees"];

// 1) Header styling (A1:E1)
CellRange header = sheet1.AllocatedRange.Rows[0];
header.Style.Font.IsBold = true;
header.Style.Font.Size = 12;
header.Style.Font.Color = Color.White;
header.Style.Color = Color.SteelBlue;

// Borders around the header row
header.BorderAround(LineStyleType.Thin);

// 2) Number formats for entire columns (D: HireDate, E: Salary)
sheet1.AllocatedRange.Columns[3].Style.NumberFormat = "yyyy-mm-dd";
sheet1.AllocatedRange.Columns[4].Style.NumberFormat = "$#,##0.00";

// 3) Optional: zebra stripes for data area (A2:E4 here as example)
CellRange data = sheet1.Range["A2:E4"];
// CellRange data = sheet1.Range[2, 1, 4, 5];
data.Style.Color = Color.FromArgb(245, 247, 250);
data.BorderAround(LineStyleType.Thin);

// Auto-fit after formatting
sheet1.AllocatedRange.AutoFitColumns();
sheet1.AllocatedRange.AutoFitRows();
How Formatting Works
- Style.Font — font properties such as IsBold, Size, Color.
- Style.Color — background fill color for the selected range.
- Borders / BorderAround — draw borders on edges/around ranges with LineStyleType.
- NumberFormat — Excel-native formats (e.g., dates, currency, percentages).
- AutoFitColumns() / AutoFitRows() — adjust column widths / row heights to fit content.
For more formatting options, refer to the API reference for CellRange and CellStyle.
Formatting preview
The following image shows styled headers, borders, and proper date/currency formats applied.

4. Handling Large DataSet Exports
When exporting large datasets, performance and memory become critical. Consider:
- Split across sheets — When rows approach Excel/version limits or for logical separation.
- Batch writing — Insert data in segments (e.g., table-by-table or range-by-range).
- Lightweight formatting — Minimize heavy styling to reduce file size and processing time.
- Streaming (where applicable) — Prefer APIs that avoid loading everything into memory at once.
5. Bonus: Read Excel into DataSet in C#
In addition to exporting, the reverse workflow is equally important: reading Excel data back into a DataSet for processing or migration. This is useful when importing data from external reports, integrating spreadsheets with applications, or performing preprocessing before database insertion.
using System.Data;
using Spire.Xls;

class Program
{
    static DataSet ReadExcelIntoDataSet(string filePath)
    {
        DataSet ds = new DataSet();
        Workbook workbook = new Workbook();
        workbook.LoadFromFile(filePath);

        foreach (Worksheet sheet in workbook.Worksheets)
        {
            DataTable dt = sheet.ExportDataTable();
            dt.TableName = sheet.Name;
            ds.Tables.Add(dt);
        }

        return ds;
    }
}
The ExportDataTable method allows each worksheet to be converted into a DataTable object, preserving both the structure and the cell values. By assigning the sheet name to TableName and adding it into a DataSet, you can combine multiple sheets into a single in-memory data container that is ready for further processing.
For a complete workflow on persisting Excel data into a database, see our guide on Import Excel into Database in C#.
Conclusion
Exporting a DataSet to Excel in C# allows you to generate reports, share data, and make information easier to analyze or present. With Spire.XLS for .NET, you can create Excel files directly from DataSet objects, apply formatting, manage multiple sheets, and handle large datasets efficiently. You can also import Excel data back into a DataSet for integration with applications or databases.
To explore more advanced features, you may request a free temporary license or use Free Spire.XLS for .NET for smaller projects.
FAQ: C# DataSet and Excel Integration
Q1: How can I export multiple DataTables from a DataSet into different Excel sheets?
Loop through ds.Tables and call InsertDataTable for each one, creating a new worksheet per DataTable.
Q2: Can I export a DataSet to a specific worksheet in an existing Excel file?
Yes. Load the file using Workbook.LoadFromFile(), then choose the worksheet and use InsertDataTable.
Q3: Does exporting DataSet to Excel preserve column formatting and data types?
Values are exported with the same data types as in the DataSet. You can also apply formatting (date, currency, alignment, etc.) after inserting.
Q4: How do I handle very large DataSet exports (over 100,000 rows)?
Split into multiple sheets, use batch inserts, and reduce complex formatting to improve performance.
CSV (Comma-Separated Values) files remain one of the most widely used formats for data exchange between applications. Whether you’re processing financial data, user records, or analytics reports, efficiently reading CSV files in C# is a common task in .NET development.
In this comprehensive guide, we'll explore how to parse CSV files in C# using Spire.XLS for .NET, covering both direct reading and converting CSV to DataTable.
- Install the C# CSV File Reader Library
- Read a CSV File in C#
- Read CSV into a DataTable in C#
- When to Use Each Method
- Conclusion
- FAQs
Install the C# CSV File Reader Library
While primarily designed for Excel files, Spire.XLS can also be used as a .NET CSV reader. It provides excellent support for CSV files, offering a range of features that make CSV processing efficient and straightforward.
The first step is to install the Spire.XLS package in your project. Here's how:
- Open your project in Visual Studio
- Right-click on your project in the Solution Explorer
- Select "Manage NuGet Packages"
- In the NuGet Package Manager, search for "Spire.XLS"
- Click "Install" to add the package to your project
Alternatively, you can install it using the Package Manager Console:
PM> Install-Package Spire.XLS
This will add the necessary dependencies to your project, allowing you to use Spire.XLS classes.
Read a CSV File in C#
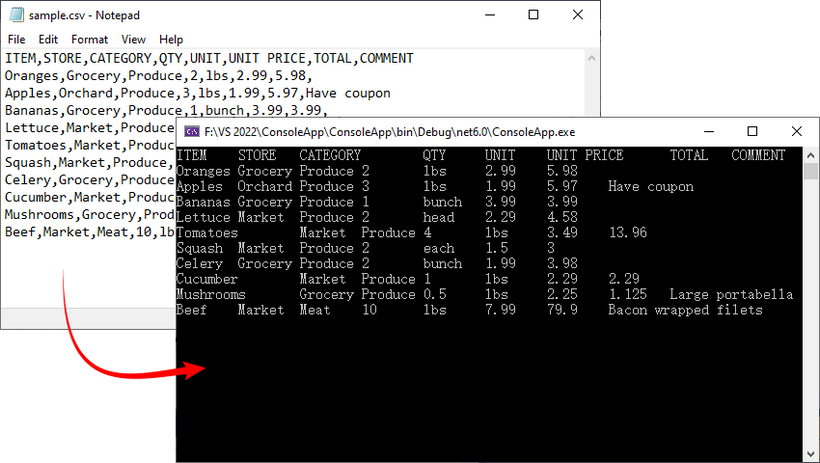
Let's start with the fundamentals: reading a simple CSV file and extracting its data. The C# code example below loads a CSV file, accesses its data, and prints the contents to the console in a tabular format.
using Spire.Xls;

namespace ReadCSV
{
    class Program
    {
        static void Main(string[] args)
        {
            // Create a workbook instance
            Workbook workbook = new Workbook();

            // Load the CSV file
            workbook.LoadFromFile("sample.csv", ",");

            // Get the first worksheet
            Worksheet sheet = workbook.Worksheets[0];

            // Get the used range
            CellRange range = sheet.AllocatedRange;

            // Iterate through rows and columns
            for (int row = 1; row <= range.RowCount; row++)
            {
                for (int col = 1; col <= range.ColumnCount; col++)
                {
                    // Get cell value
                    string cellValue = range[row, col].Value;
                    Console.Write(cellValue + "\t");
                }
                Console.WriteLine();
            }

            Console.ReadLine();
        }
    }
}
Explanation:
- Workbook class: Acts as a "container" for your CSV file in memory. Even though CSV isn’t a full Excel file, Spire.Xls treats it as a single-sheet workbook for consistency.
- Workbook.LoadFromFile(): Loads the CSV file. The parameters are:
- File path: "sample.csv".
- Delimiter: "," (comma, default for CSV).
- Worksheet.AllocatedRange: Retrieves only the cells that contain data.
- CellRange[row, col].Value: Retrieves the value of a specific cell.
Result: CSV data printed in a clean, tab-separated format.
If you need a demo for reading CSV files in VB.NET, convert the code directly using the C# to VB.NET converter.
Read CSV into a DataTable in C#
A DataTable is a versatile in-memory data structure in .NET that simplifies data manipulation (e.g., filtering, sorting, or binding to UI components). Here’s how to load CSV data into a DataTable using Spire.XLS:
using Spire.Xls;
using System.Data;

namespace ReadCSV
{
    class Program
    {
        static void Main(string[] args)
        {
            // Create a workbook instance
            Workbook workbook = new Workbook();

            // Load the CSV file
            workbook.LoadFromFile("sample.csv", ",");

            // Get the first worksheet
            Worksheet worksheet = workbook.Worksheets[0];

            // Export data from the worksheet to a DataTable
            DataTable dataTable = worksheet.ExportDataTable();

            // Get row and column count
            Console.WriteLine("\nConversion complete! DataTable information:");
            Console.WriteLine($"Number of columns: {dataTable.Columns.Count}");
            Console.WriteLine($"Number of rows: {dataTable.Rows.Count}");
            Console.WriteLine();

            // Print column names
            for (int i = 0; i < dataTable.Columns.Count; i++)
            {
                Console.Write(dataTable.Columns[i].ColumnName + "  | ");
            }
            Console.WriteLine();
            Console.WriteLine("----------------------------------------------------------");

            // Print row data
            for (int i = 0; i < dataTable.Rows.Count; i++)
            {
                for (int j = 0; j < dataTable.Columns.Count; j++)
                {
                    string value = dataTable.Rows[i][j].ToString();

                    Console.Write(value + "\t");
                }
                Console.WriteLine();
            }
        }
    }
}
Explanation:
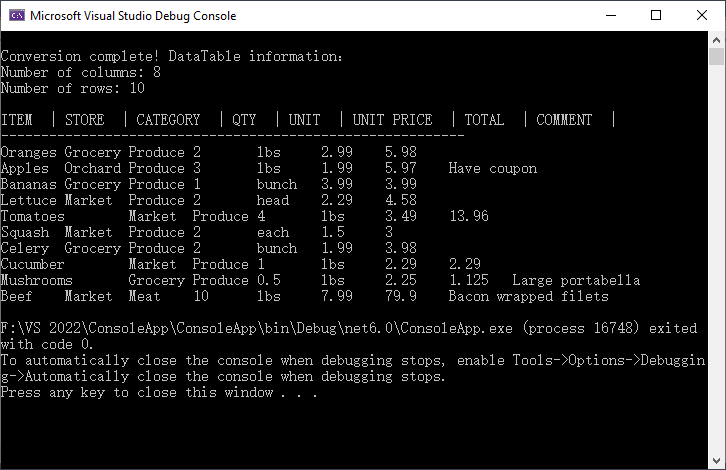
- Worksheet.ExportDataTable(): Converts the entire CSV worksheet into a DataTable.
- Metadata Access: DataTable.Columns.Count and DataTable.Rows.Count shows the size of your dataset, helping you verify that the import was successful.
- Column Headers and Data Output: Iterates through to display column names and row data.
Result: Structured output with metadata, headers, and rows:
To analyze, calculate, or format the data, you can convert CSV to Excel in C#.
When to Use Each Method
Choose the right approach based on your goal:
| Method | Best For | Use Case Example |
|---|---|---|
| Direct CSV Reading | Quick data verification | Checking if a CSV is loaded correctly. |
| Convert to DataTable | Advanced data processing | Filtering rows, sorting, or saving to SQL Server. |
Conclusion
Reading CSV files in C# is streamlined with Spire.XLS for .NET, and converting CSV data to a DataTable adds flexibility for data manipulation. Whether you’re working with small datasets or large files, Spire.XLS offers flexible options to meet your requirements.
The code examples in this guide are ready to use - just copy, paste, and adjust for your CSV file path. For more advanced features, refer to Spire.XLS’s official documentation.
FAQs (Common Questions)
Q1: Why choose Spire.XLS for CSV reading?
A: While the .NET Framework offers built-in StreamReader for CSV handling, Spire.XLS provides several distinct advantages:
- No dependencies: Doesn't require Microsoft Excel or Office to be installed
- High performance: Optimized for handling large CSV files efficiently
- Flexibility: Multiple ways to read CSV data based on your needs
- Cross-platform: Works with .NET Framework, .NET Core, .NET Standard, and Mono
Q2: Can I use a different delimiter (e.g., semicolon or tab)?
A: Yes. Replace the second parameter of LoadFromFile() method with your delimiter:
// For tab-delimited files
workbook.LoadFromFile("data.txt", "\t");

// For semicolon-delimited files
workbook.LoadFromFile("data.csv", ";");

// For pipe-delimited files
workbook.LoadFromFile("data.csv", "|");
Q3: Can I read specified rows or columns from a CSV file?
A: Yes. You can target a precise subset of your data by defining exact row and column boundaries. This is useful for extracting specific information (e.g., skipping headers, focusing on relevant columns) without processing the entire file.
For example:
// Define the specific range
int startRow = 2;   // Start from row 2 (skip header)
int endRow = 4;     // End at row 4
int startCol = 2;   // Start from column 2
int endCol = 6;     // End at column 6


// Loop through rows and columns
for (int row = startRow; row <= endRow; row++)
{
   for (int col = startCol; col <= endCol; col++)
   {
      // Get cell value
      string cellValue = worksheet.Range[row, col].Value;
      Console.Write(cellValue + "\t");
Note: Spire.Xls uses 1-based indexing (like Excel), so the first row/column is numbered 1 (not 0).
