
Knowledgebase (2370)
Children categories

CSV is one of the most common formats for exchanging tabular data because of its simplicity and wide support across platforms. However, when working with structured applications, configurations, or hierarchical data, XML often becomes the preferred choice due to its ability to represent nested relationships and enforce stricter data validation.
In this guide, we’ll explore how to convert CSV files into XML using Spire.XLS for Python. You’ll learn how to convert CSV into both Excel XML format (SpreadsheetML) and standard XML for general use. We’ll also cover how to clean and preprocess real-world CSV files—handling issues like invalid headers, missing values, special characters, and nested fields—so that your XML output is always valid and structured correctly.
Table of Contents:
- Why Convert CSV to XML
- Prerequisites
- Convert CSV to Excel XML Format
- Convert CSV to Standard XML
- Handle Real-World CSV Challenges
- Wrap Up
- FAQs
Why Convert CSV to XML
So why should developers care about converting CSV to XML? Here are some real-world use cases:
- Enterprise Data Migration: Many enterprise applications like ERP or CRM systems require XML input for bulk data import.
- Configuration & Metadata: XML is often used to store structured metadata, while raw data may come in CSV form.
- Interoperability: Some APIs, especially in finance, healthcare, and government sectors, still rely heavily on XML payloads.
- Readable Reports: XML can represent hierarchical data, making it more descriptive compared to flat CSV files.
- Validation: XML can be validated against schemas (XSD), ensuring data integrity—something CSV cannot provide out-of-the-box.
CSV is great for simplicity . XML is great for structure . By converting between them, you get the best of both worlds.
Prerequisites
Before diving into the code, let’s ensure we have the right tools:
- Python 3.7+
- Spire.XLS for Python → A professional library that provides powerful Excel manipulation capabilities.
- Standard Python Libraries → xml.etree.ElementTree, csv, and re.
You can install Spire.XLS via pip (assuming you have Python and pip installed on your system):
pip install spire.xls
Additionally, make sure you have a CSV file ready to test. A simple one might look like this:
ID,FirstName,LastName,Age,Department,Salary
1,John,Doe,30,Sales,5000
2,Jane,Smith,28,Marketing,4500
3,Mike,Johnson,35,IT,6000
4,Emily,Brown,32,HR,4800
Convert CSV to Excel XML Format in Python
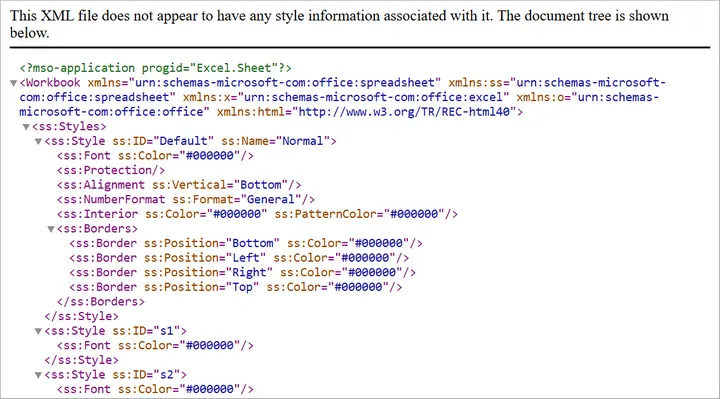
The first approach is to convert CSV into Excel-compatible XML . This format is sometimes called SpreadsheetML , introduced in Excel 2003. It allows CSV data to be transformed into a fully structured XML file that Excel can open directly.
With Spire.XLS, this process is straightforward:
from spire.xls import *

# Create a Workbook
workbook = Workbook()

# Load CSV into the first worksheet
workbook.LoadFromFile("input.csv", ",", 1, 1)

# Save as XML Spreadsheet format
workbook.SaveAsXml("output.xml")

# Dispose resources
workbook.Dispose()
How it Works
- LoadFromFile() – Reads the CSV file into the workbook.
- SaveAsXml() – Saves it as SpreadsheetML XML format.
This approach is best if your end goal is Excel compatibility rather than pure XML processing.
Output:
You may also like: Convert Excel to Excel-Compatible XML in Python
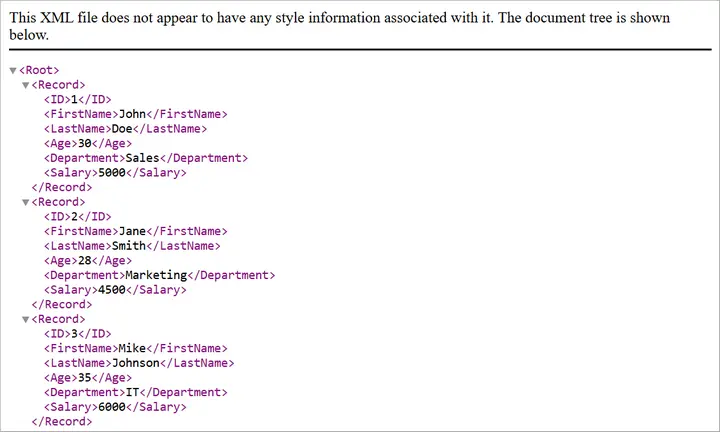
Convert CSV to Standard XML in Python
Sometimes, you need a custom XML format rather than Excel-compatible XML. For instance, you may need an XML structure like:
<Employees>
  <Employee>
    <ID>1</ID>
    <FirstName>John</FirstName>
    <LastName>Doe</LastName>
    <Department>Sales</Department>
    <Salary>5000</Salary>
  </Employee>
</Employees>
Here’s how you can achieve that:
from spire.xls import *
import xml.etree.ElementTree as ET

# Step 1: Load CSV into workbook
workbook = Workbook()
workbook.LoadFromFile("input.csv", ",", 1, 1)
sheet = workbook.Worksheets[0]

# Step 2: Create root element
root = ET.Element("Root")

# Step 3: Loop through rows and build XML
# Assume first row is header
headers = []
for col in range(1, sheet.Columns.Count + 1):
    cell_value = sheet.Range[1, col].Value
    if not cell_value:
        break
    headers.append(cell_value)

# Add data rows
for row in range(2, sheet.Rows.Count + 1):
    # Stop if row is empty
    if not sheet.Range[row, 1].Value:
        break

    record = ET.SubElement(root, "Record")
    for col, header in enumerate(headers, start=1):
        cell_value = sheet.Range[row, col].Value
        field = ET.SubElement(record, header)
        field.text = cell_value if cell_value else ""

# Step 4: Save to XML file
tree = ET.ElementTree(root)
tree.write("output.xml", encoding="utf-8", xml_declaration=True)

# Cleanup
workbook.Dispose()
Explanation
- Step 1: Load the CSV into a worksheet.
- Step 2: Create a root <Root> element for the XML tree.
- Step 3: Extract headers from the first row and use them as XML tags.
- Step 4: Loop through rows and add <Record> elements with child fields.
- Step 5: Save the XML to a file.
This approach is flexible because you can customize the XML schema however you like (e.g., change <Record> to <Employee>).
Output:
You may also like: How to Convert XML to CSV in Python
Handle Real-World CSV Challenges
Converting a “perfect” CSV to XML is easy. But real-world CSVs are rarely perfect. Let’s discuss common issues developers face and how to fix them.
-
Headers with Invalid XML Names
- Problem: CSV headers like Employee ID or 123Name are invalid XML tags since XML element names cannot have spaces, start with numbers, or include special characters.
- Fix: Clean headers by replacing spaces with underscores (_) or prefixing numeric headers with a safe string.
-
Empty or Missing Values
- Problem: Real-world CSVs often have missing cells. When converted to XML, missing cells may create malformed structures.
- Fix: Replace blanks with placeholders (NULL, Unknown, or 0).
-
Special Characters in Data
- Problem: Characters like <, >, & inside CSV values can break XML if not escaped.
- Fix: Always escape XML entities properly (<, >, &).
-
Nested / Hierarchical Data in Flat CSV
- Problem: Some CSV cells contain multiple values or hierarchical information (e.g., lists of products) within a single field. Converting directly to XML will flatten the data, losing the intended hierarchy.
Example:
OrderID,Customer,Products
1001,John,"Laptop;Mouse;Keyboard"
Flattened XML (bad):
<Products>Laptop;Mouse;Keyboard</Products>
- Fix: Detect list-like or nested values and expand them into child XML elements or multiple rows, preserving the structure in XML.
Hierarchical XML (fixed):
<Products>
  <Product>Laptop</Product>
  <Product>Mouse</Product>
  <Product>Keyboard</Product>
</Products>
Automating Fixes with clean_csv
Instead of cleaning data manually, you can automate preprocessing with the following helper function:
import csv
import re
def clean_csv(input_file, output_file, nested_columns=None, nested_delimiter=";"):
if nested_columns is None:
nested_columns = []
cleaned_rows = []
# Escape special characters for XML
def escape_xml(text):
return (text.replace("&", "&")
.replace("<", "<")
.replace(">", ">")
.replace('"', """)
.replace("'", "'"))
with open(input_file, "r", encoding="utf-8") as infile:
reader = csv.reader(infile)
headers = next(reader)
# Clean headers
cleaned_headers = []
for h in headers:
h = h.strip()
h = re.sub(r"\s+", "_", h) # Replace spaces with _
h = re.sub(r"[^a-zA-Z0-9_]", "", h) # Remove invalid chars
if re.match(r"^\d", h): # Cannot start with digit
h = "Field_" + h
cleaned_headers.append(h)
cleaned_rows.append(cleaned_headers)
# Read all rows first
raw_rows = []
for row in reader:
# Handle empty cells
row = [cell if cell.strip() != "" else "NULL" for cell in row]
raw_rows.append(row)
# Expand nested columns
if nested_columns:
expanded_rows = [cleaned_headers] # include header
for row in raw_rows:
row_variants = [row]
for col_name in nested_columns:
if col_name not in cleaned_headers:
continue
col_index = cleaned_headers.index(col_name)
temp = []
for variant in row_variants:
cell_value = variant[col_index]
# Only split on the nested delimiter, not on XML special chars
if nested_delimiter in cell_value:
items = [item.strip() for item in cell_value.split(nested_delimiter)]
for item in items:
new_variant = variant.copy()
new_variant[col_index] = item
temp.append(new_variant)
else:
temp.append(variant)
row_variants = temp
expanded_rows.extend(row_variants)
cleaned_rows = expanded_rows
else:
cleaned_rows.extend(raw_rows)
# Escape special characters after expansion
final_rows = [cleaned_rows[0]] # header
for row in cleaned_rows[1:]:
final_row = [escape_xml(cell) for cell in row]
final_rows.append(final_row)
# Write cleaned CSV
with open(output_file, "w", newline="", encoding="utf-8") as outfile:
writer = csv.writer(outfile)
writer.writerows(final_rows)
print(f"Cleaned CSV saved to {output_file}")
You can invoke the clean_csv function by passing the input CSV file path, output CSV file path, and optionally the columns to expand for nested values.
# File paths
input_file = r"C:\Users\Administrator\Desktop\input.csv"
output_file = r"C:\Users\Administrator\Desktop\cleaned_output.csv"

# Specify columns that may contain nested values
nested_columns = ["Products"]  # you can add more, e.g., ["Products", "Reviews"]

# Call the clean_csv function
clean_csv(input_file, output_file, nested_columns=nested_columns, nested_delimiter=";")
This function ensures your CSV is safe and clean before converting it to XML.
It helps:
- Clean headers (valid XML names)
- Handle empty cells
- Expand nested values in any specified column(s)
- Escape special characters for XML
- Write a clean, UTF-8 CSV ready for XML conversion
Wrap Up
Converting CSV to XML in Python with Spire.XLS is both powerful and flexible. If you only need Excel-readable XML, saving directly to SpreadsheetML is the quickest option. If you need custom XML structures for APIs, migrations, or reporting, you can build standard XML using xml.etree.ElementTree.
Real-world CSVs are messy. They may have missing values, invalid headers, special characters, or nested lists. By integrating a preprocessing step (like the clean_csv function), you ensure that your XML output is both valid and meaningful.
Whether you’re preparing data for enterprise integration, creating structured reports, or exchanging information with legacy systems, this workflow gives you the best of both worlds: the simplicity of CSV and the structure of XML.
FAQs
Q1: Can I convert very large CSV files to XML?
Yes, but for very large files, you should use a streaming approach (processing rows one by one) to avoid memory issues.
Q2: Does Spire.XLS support direct conversion to XML without custom code?
Yes. Saving as SpreadsheetML is built-in. But for custom XML, you’ll need to write Python code as shown.
Q3: How do I handle special characters automatically?
Use the escape_xml helper or Python’s built-in xml.sax.saxutils.escape().
Q4: What if my CSV has nested data in multiple columns?
You can pass multiple column names into nested_columns when calling clean_csv.
Q5: Can I validate the generated XML?
Yes. After generating XML, validate it against an XSD schema if your system requires strict formatting.
Get a Free License
To fully experience the capabilities of Spire.XLS for Python without any evaluation limitations, you can request a free 30-day trial license.
The need to efficiently parse HTML in C# is a common requirement for many development tasks, from web scraping, data extraction to content automation. While .NET offers built-in tools (e.g., HtmlAgilityPack), Spire.Doc simplifies HTML parsing in C# with its intuitive object model and seamless integration.
This guide explores how to leverage Spire.Doc for .NET to parse HTML, including loading HTML from various sources, navigating document structure, and extracting critical data.
- Setting Up Spire.Doc
- How Spire.Doc Parses HTML
- How to Load and Parse HTML Content
- Conclusion
- Common Questions
Setting Up Spire.Doc
The easiest way to integrate the C# HTML parser library into your project is via NuGet:
- Open your project in Visual Studio.
- Right-click the project in the Solution Explorer → Select Manage NuGet Packages.
- In the NuGet Package Manager, search for Spire.Doc.
- Select the latest stable version and click Install.
Alternatively, download the library directly from the E-iceblue website, extract the ZIP file, and reference Spire.Doc.dll in your project.
How Spire.Doc Parses HTML
Spire.Doc converts HTML into a structured object model, where elements like <p>, <a>, and <table> are mapped to classes you can programmatically access. Key components include:
- Document: Acts as the container for parsed HTML content.
- Section: Represents a block of content (similar to HTML’s
<body>or<div>sections). - Paragraph: Maps to HTML block elements like
<p>,<h1>, or<li>. - DocumentObject: Base class for all elements within a Paragraph (images, links, etc.).
This model ensures that HTML structures are preserved and accessible via intuitive C# properties and methods.
How to Load and Parse HTML Content
Spire.Doc supports parsing HTML from strings, local files, or even remote URLs (when combined with HTTP clients). Below are detailed examples for each scenario.
Parse an HTML String in C#
Parse an HTML string (e.g., from a web API or database) into Spire.Doc’s object model for inspection.
using Spire.Doc;
using Spire.Doc.Documents;

namespace ParseHtmlString
{
    class Program
    {
        static void Main(string[] args)
        {
            // Create a Document object
            Document doc = new Document();

            // Add a section to act as a container
            Section section = doc.AddSection();
            // Add a paragraph
            Paragraph para = section.AddParagraph();

            // Define HTML content to parse
            string htmlContent = @"
                <h2>Sample HTML String</h2>
                <p>This is a paragraph with <strong>bold text</strong> and a <a href='https://www.e-iceblue.com/'>link</a>.</p>
                <ul>
                    <li>List item 1</li>
                    <li>List item 2</li>
                </ul>
            ";

            // Parse the HTML string into the paragraph
            para.AppendHTML(htmlContent);

            // Print all paragraph text
            Console.WriteLine("Parsed HTML Content:");
            Console.WriteLine("---------------------");

            foreach (Paragraph paragraph in section.Paragraphs)
            {
                Console.WriteLine(paragraph.Text);
            }
        }
    }
}
In this code, the method AppendHTML() automatically converts HTML tags to corresponding Spire.Doc objects (e.g., <h1> → Heading1 style, <ul> → list paragraphs).
Output:

Pro Tip: You can also call the SaveToFile() method to convert the HTML string to Word in C#.
Parse an HTML File in C#
For HTML content stored in a file (e.g., downloaded web pages, static HTML reports), load it via LoadFromFile() and then analyze its structure (e.g., extracting headings, paragraphs).
using Spire.Doc;
using Spire.Doc.Documents;

namespace ParseHtmlFile
{
    class Program
    {
        static void Main(string[] args)
        {
            // Create a Document object
            Document doc = new Document();

            // Load an HTML file
            doc.LoadFromFile("sample.html", FileFormat.Html);

            // Traverse sections (HTML body blocks)
            foreach (Section section in doc.Sections)
            {
                Console.WriteLine($"Section {doc.Sections.IndexOf(section) + 1}:");
                Console.WriteLine("---------------------------------");

                // Traverse paragraphs in the section
                foreach (Paragraph para in section.Paragraphs)
                {
                    // Print paragraph text and style (e.g., heading level)
                    string styleName = para.StyleName;
                    Console.WriteLine($"[{styleName}] {para.Text}"+ "\n");
                }
                Console.WriteLine();
            }
        }
    }
}
This C# code example loads a local HTML file and then uses the Paragraph.StyleName and Paragraph.Text properties to extract content along with its styling information.
Output:

Spire.Doc’s object model allows you to interact with an HTML file just like you would with a Word document. In addition to extracting text content, you can also extract elements like links, tables from HTML.
Parse a URL in C#
To parse HTML from a web page, combine Spire.Doc with HttpClient to fetch the HTML content first, then parse it.
using Spire.Doc;
using Spire.Doc.Documents;

namespace HtmlUrlParsing
{
    class Program
    {
        // HttpClient instance for web requests
        private static readonly HttpClient httpClient = new HttpClient();

        static async Task Main(string[] args)
        {
            try
            {
                // Fetch HTML from a URL
                string url = "https://www.e-iceblue.com/privacypolicy.html";
                Console.WriteLine($"Fetching HTML from: {url}");
                string htmlContent = await FetchHtmlFromUrl(url);

                // Parse the fetched HTML
                Document doc = new Document();
                Section section = doc.AddSection();
                Paragraph paragraph = section.AddParagraph();
                paragraph.AppendHTML(htmlContent);

                // Extract key information
                Console.WriteLine("\nParsed Content Summary:");
                Console.WriteLine($"Sections: {doc.Sections.Count}");
                Console.WriteLine($"Paragraphs: {section.Paragraphs.Count}");
                Console.WriteLine("-------------------------------------------");

                // Extract all heading paragraphs
                foreach (Paragraph para in section.Paragraphs)
                {
                    if (para.StyleName.StartsWith("Heading"))
                    {
                        string headings = para.Text;
                        Console.WriteLine($"Headings: {headings}");
                    }
                }

            }
            catch (Exception ex)
            {
                Console.WriteLine($"Error: {ex.Message}");
            }
        }

        // Helper method to fetch HTML from a URL
        private static async Task<string> FetchHtmlFromUrl(string url)
        {
            // Set a user-agent to avoid being blocked by servers
            httpClient.DefaultRequestHeaders.UserAgent.ParseAdd("Mozilla/5.0 (Windows NT 10.0; Win64; x64)");

            // Send GET request and return HTML content
            HttpResponseMessage response = await httpClient.GetAsync(url);
            response.EnsureSuccessStatusCode(); // Throw on HTTP errors (4xx, 5xx)
            return await response.Content.ReadAsStringAsync();
        }
    }
}
This C# code combines web scraping (fetching HTML from a URL) with document parsing (using Spire.Doc) to extract structured information (like headings) from web content. It’s useful for scenarios like content analysis or web data extraction.
Output:

Conclusion
Spire.Doc for .NET provides a comprehensive solution for reading HTML in C# applications. Whether you're working with HTML strings, local files, or even web URLs, this library streamlines the process with intuitive APIs and reliable performance. By following the examples outlined in this guide, you can efficiently integrate HTML parsing capabilities into your .NET projects.
To fully experience the capabilities of Spire.Doc for .NET, request a free 30-day trial license here.
Common Questions
Q1: Why use Spire.Doc for HTML parsing instead of HtmlAgilityPack?
A: Spire.Doc and HtmlAgilityPack serve different primary goals, so the choice depends on your needs:
- HtmlAgilityPack: A lightweight library only for parsing and manipulating raw HTML (e.g., extracting tags, fixing invalid HTML). It does not handle document formatting or export to Word.
- Spire.Doc: Designed for document manipulation first - it parses HTML and maps it directly to structured Word elements (sections, paragraphs, styles like headings/bold). This is critical if you need to:
- Preserve HTML structure in an editable Word file.
- Extract styled content (e.g., identify "Heading 1" vs. "Normal" text).
- Export parsed HTML to RTF, TXT, PDF, etc.
Q2. How do I convert HTML to Text in C#
A: To convert an HTML file to plain text in C#, get its text content via the GetText() method and then write the result to a .txt file.
// Create a Document object
Document doc = new Document();

// Load an HTML file
doc.LoadFromFile("sample.html", FileFormat.Html);

// Get text from HTML
string text = doc.GetText();

// Write to a text file
File.WriteAllText("HTMLText.txt", text);
Q3: Can Spire.Doc handle malformed or incomplete HTML?
A: Spire.Doc has good error tolerance and can handle imperfect HTML to some extent. However, severely malformed HTML might cause parsing issues. For best results, ensure your HTML is well-formed or use HTML sanitization libraries before parsing with Spire.Doc.
Q3: Can I use Spire.Doc in ASP.NET Core applications?
A: Yes, Spire.Doc is fully compatible with ASP.NET Core applications. The installation and usage process is the same as in other .NET applications.
XML is a widely used format for storing structured data, but it’s not ideal for analysis or tabular tools like Excel. Converting XML to CSV allows you to work with the data in a simpler, flat format that’s compatible with spreadsheets and data analysis libraries. By converting XML to CSV, you can easily import data into Excel, perform calculations, or feed it into Python data analysis tools like Pandas.
This approach also helps standardize complex hierarchical data into a format that is easier to read, manipulate, and share across different applications. In this tutorial, we’ll explore how to efficiently transform XML files into CSV using Spire.XLS for Python.
Table of Contents:
- Setting Up Spire.XLS for Python
- Understanding XML Data Structures
- How XML Data Is Extracted and Converted
- Basic Example: Convert XML to CSV with Python
- Advanced Techniques
- Troubleshooting and Common Issues
- Conclusion
- FAQs
Setting Up Spire.XLS for Python
Before we can start, we need to install the Spire.XLS library. The package is available on PyPI , so installation is straightforward. Run the following command:
pip install spire.xls
Once installed, you can import the required classes:
from spire.xls import *
from spire.xls.common import *
Spire.XLS provides the Workbook and Worksheet objects for managing Excel-like files. You’ll use them to create new CSV files and populate them with your XML data.
Understanding XML Data Structures
XML files are organized in a tree-like hierarchy, where elements (or nodes) are enclosed in tags. Each element can contain text, attributes, or even other child elements.
For example, consider this Books.xml:
<catalog>
  <book isbn="9780451524935">
    <title>The Catcher in the Rye</title>
    <author>J.D. Salinger</author>
    <genre>Fiction</genre>
    <reviews>
      <review>Excellent coming-of-age story</review>
      <review>A true classic</review>
    </reviews>
  </book>
  <book isbn="9780439023528">
    <title>The Hunger Games</title>
    <author>Suzanne Collins</author>
    <genre>Adventure</genre>
  </book>
</catalog>
- Root node : <catalog> is the top-level container.
- Child nodes : Each <book> is a child of <catalog>.
- Elements : <title>, <author>, and <genre> are elements inside each <book>.
- Attributes : The isbn in <book isbn="..."> is an attribute attached to the book element.
- Nested elements : The <reviews> node contains multiple <review> sub-nodes.
Challenges when converting XML to CSV:
- Hierarchical data – XML allows nesting (e.g., <reviews> inside <book>), while CSV is flat.
- Attributes vs. elements – Data may be stored as an attribute (isbn) or as a tag (title).
- Optional fields – Not all <book> elements may contain the same tags, which can lead to missing values in the CSV.
A robust converter must be able to handle these differences and map hierarchical XML into a flat, tabular CSV format.
How XML Data Is Extracted and Converted
To load and parse an XML file in Python, you can use the built-in xml.etree.ElementTree library. This library lets you navigate the XML tree, retrieve elements, and access attributes. For example:
import xml.etree.ElementTree as ET

# Load the XML file
tree = ET.parse("Books.xml")
root = tree.getroot()

# Iterate through elements
for book in root.findall("book"):
    title = book.findtext("title", "")
    author = book.findtext("author", "")
    isbn = book.attrib.get("isbn", "")
After extracting the XML data, the next step is to map it to a tabular structure . Using Spire.XLS for Python , you can create a workbook, write the extracted values into worksheet cells, and finally export the worksheet as a CSV file for easy analysis.
General Steps to Convert XML to CSV in Python
- Use xml.etree.ElementTree to load and retrieve data from the XML file.
- Create a Workbook object using Spire.XLS.
- Add a worksheet with Workbook.Worksheets.Add() .
- Write extracted XML data into the worksheet using Worksheet.SetValue() .
- Save the worksheet to a CSV file using Worksheet.SaveToFile() .
Basic Example: Convert XML to CSV with Python
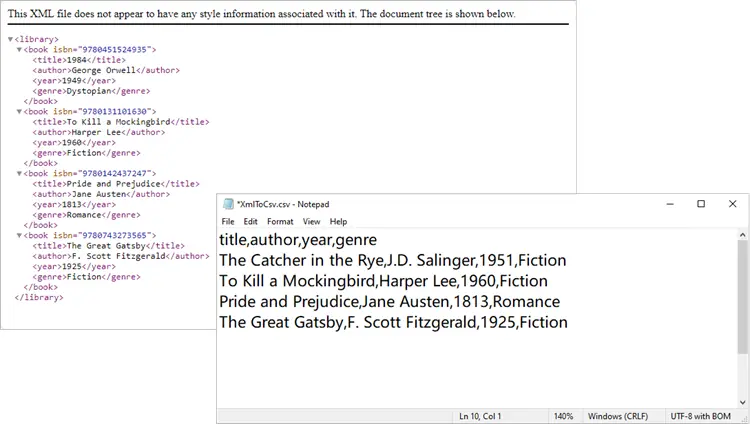
Let’s start with a basic XML-to-CSV conversion. This example automatically generates headers by inspecting the first <book> element and then exports all child nodes into CSV.
from spire.xls import *
from spire.xls.common import *
import xml.etree.ElementTree as ET

# Create a Workbook object
workbook = Workbook()

# Remove default worksheets
workbook.Worksheets.Clear()

# Add a worksheet and name it
worksheet = workbook.Worksheets.Add("Books")

# Load an XML file
xml_tree = ET.parse("C:\\Users\\Administrator\\Desktop\\Books.xml")

# Get the root element of the XML tree
xml_root = xml_tree.getroot()

# Get the first the "book" element
first_book = xml_root.find("book")

# Extract header information and convert it into a list
header = list(first_book.iter())[1:]

# Write header to Excel
for col_index, header_node in enumerate(header, start=1):
    header_text = header_node.tag
    worksheet.SetValue(1, col_index, header_text)

# Write other data to Excel by iterating over each book element and each data node within it
row_index = 2
for book in xml_root.iter("book"):
    for col_index, data_node in enumerate(list(book.iter())[1:], start=1):
        value = data_node.text
        header_text = list(header[col_index - 1].iter())[0].tag
        worksheet.SetValue(row_index, col_index, value)
    row_index += 1

# Save the document to an Excel file
worksheet.SaveToFile("output/XmlToCsv.csv", ",", Encoding.get_UTF8())

# Dispose resources
workbook.Dispose()
This script works well for simple, flat XML structures. It automatically generates headers (title, author, genre, price) and fills each row with corresponding values.
Output:
You might also be interested in: Convert XML to Excel and PDF in Python
Advanced Techniques
The basic script works in many cases, but XML often isn’t so simple. Let’s go through some advanced techniques to handle real-world scenarios.
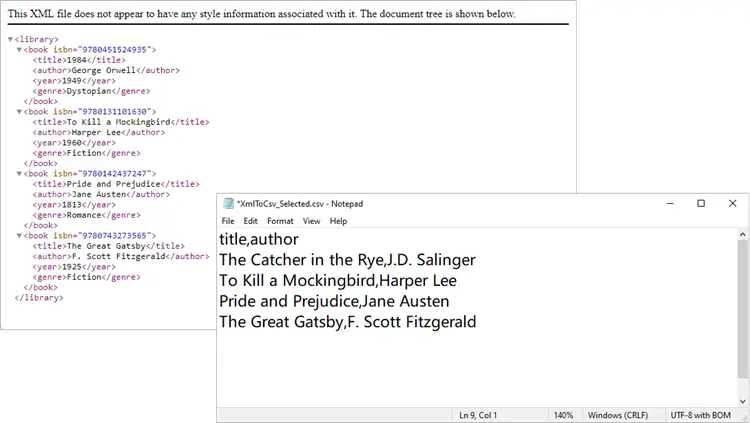
Exporting Only Specific Elements
Sometimes your XML has more data than you need. Maybe you only want to export title and author, ignoring everything else.
from spire.xls import *
from spire.xls.common import *
import xml.etree.ElementTree as ET

# Create a Workbook object
workbook = Workbook()

# Remove default worksheets
workbook.Worksheets.Clear()

# Add a worksheet and name it
worksheet = workbook.Worksheets.Add("Books")

# Load the XML file
xml_tree = ET.parse(r"C:\Users\Administrator\Desktop\Books.xml")
xml_root = xml_tree.getroot()

# Define the elements you want to export
selected_elements = ["title", "author"]

# Write header
for col_index, tag in enumerate(selected_elements, start=1):
    worksheet.SetValue(1, col_index, tag)

# Write data
row_index = 2
for book in xml_root.iter("book"):
    for col_index, tag in enumerate(selected_elements, start=1):
        # Use findtext to handle missing values safely
        worksheet.SetValue(row_index, col_index, book.findtext(tag, ""))
    row_index += 1

# Save the document to a CSV file
worksheet.SaveToFile("output/XmlToCsv_Selected.csv", ",", Encoding.get_UTF8())

# Dispose resources
workbook.Dispose()
This approach ensures your CSV only contains the columns you care about.
Output:
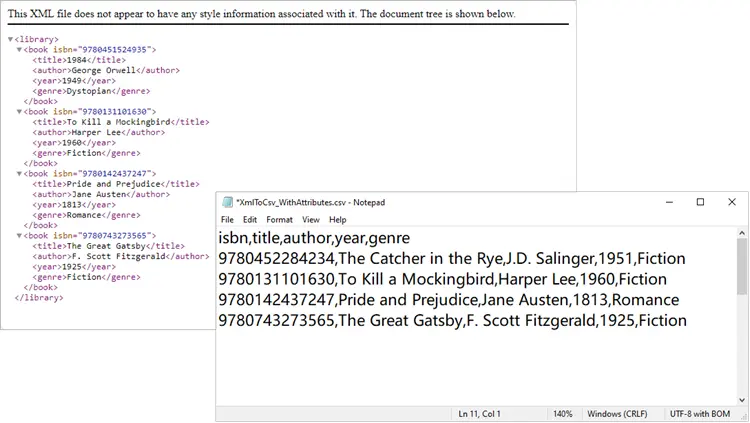
Including XML Attributes in CSV
What if your XML contains important data stored as attributes, such as isbn? You can easily include them:
from spire.xls import *
from spire.xls.common import *
import xml.etree.ElementTree as ET

# Create a Workbook object
workbook = Workbook()

# Remove default worksheets
workbook.Worksheets.Clear()

# Add a worksheet and name it
worksheet = workbook.Worksheets.Add("Books")

# Load an XML file
xml_tree = ET.parse(r"C:\Users\Administrator\Desktop\Books.xml")

# Get the root element of the XML tree
xml_root = xml_tree.getroot()

# Get the first the "book" element
first_book = xml_root.find("book")

# Extract header information (child nodes)
header = list(first_book.iter())[1:]

# Write header to Excel
worksheet.SetValue(1, 1, "isbn")   # <-- Add ISBN column first
for col_index, header_node in enumerate(header, start=2):  # start at 2 now
    header_text = header_node.tag
    worksheet.SetValue(1, col_index, header_text)

# Write data
row_index = 2
for book in xml_root.iter("book"):
    # Write isbn as text
    isbn_value = book.attrib.get("isbn", "")
    worksheet.Range[row_index, 1].Text = isbn_value

    # Then write other fields
    for col_index, data_node in enumerate(list(book.iter())[1:], start=2):
        value = data_node.text
        worksheet.SetValue(row_index, col_index, value)

    row_index += 1

# Format the whole ISBN column as text to prevent scientific notation
last_row = row_index - 1
isbn_range = f"A2:A{last_row}"
worksheet.Range[isbn_range].NumberFormat = "@"

# Save the document to an Excel file (CSV format)
worksheet.SaveToFile("output/XmlToCsv_WithAttributes.csv", ",", Encoding.get_UTF8())

# Dispose resources
workbook.Dispose()
Here we explicitly create an ISBN column, extract it from each <book>’s attributes, and format it as text to prevent Excel from displaying it in scientific notation.
Output:
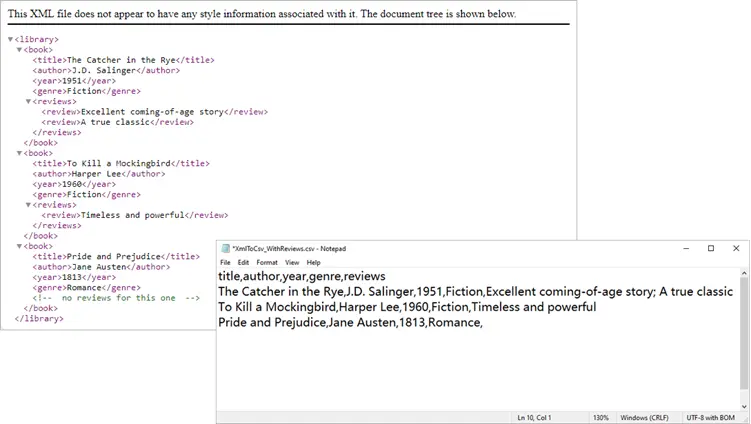
Handling Nested XML Structures
Nested nodes are common. Suppose your XML looks like this:
<catalog>
  <book>
    <title>1984</title>
    <author>George Orwell</author>
    <reviews>
      <review>Excellent read!</review>
      <review>Still relevant today.</review>
    </reviews>
  </book>
</catalog>
Here’s how to collapse multiple <review> entries into a single CSV column:
from spire.xls import *
from spire.xls.common import *
import xml.etree.ElementTree as ET

# Create a Workbook object
workbook = Workbook()

# Remove default worksheets
workbook.Worksheets.Clear()

# Add a worksheet and name it
worksheet = workbook.Worksheets.Add("Books")

# Load an XML file
xml_tree = ET.parse(r"C:\Users\Administrator\Desktop\Nested.xml")
xml_root = xml_tree.getroot()

# Get the first <book> element
first_book = xml_root.find("book")

# Collect headers (auto-detected)
header = []
for child in first_book:
    if child.tag == "reviews":
        header.append("reviews")   # collapse nested <review> into one column
    else:
        header.append(child.tag)

# Write header row
for col_index, header_text in enumerate(header, start=1):
    worksheet.SetValue(1, col_index, header_text)

# Write data rows
row_index = 2
for book in xml_root.iter("book"):
    col_index = 1
    for child in book:
        if child.tag == "reviews":
            # Join all <review> texts into a single cell
            reviews = [r.text for r in child.findall("review") if r.text]
            worksheet.SetValue(row_index, col_index, "; ".join(reviews))
        else:
            worksheet.SetValue(row_index, col_index, child.text if child.text else "")
        col_index += 1
    row_index += 1

# Save to CSV
worksheet.SaveToFile("output/XmlToCsv_WithReviews.csv", ",", Encoding.get_UTF8())

# Dispose resources
workbook.Dispose()
Output:
Spire.XLS not only supports importing data from standard XML files into Excel or CSV, but also allows converting OpenXML (Microsoft's XML-based file format) to Excel. If you're interested, check out this tutorial: How to Convert Excel to OpenXML and OpenXML to Excel in Python.
Troubleshooting and Common Issues
Even with a well-structured script, you may encounter some common issues when converting XML to CSV:
- Scientific notation in Excel
- Problem: Long numeric strings like ISBNs may appear as 9.78045E+12 instead of the full number.
- Solution: Format the column as text before saving, for example:
worksheet.Range["A2:A{last_row}"].NumberFormat = "@" -
Missing values causing errors
- Problem: Some <book> elements may lack optional fields (e.g., <genre>). Attempting to access .text directly can cause errors.
- Solution: Use findtext(tag, "") to safely provide a default empty string.
-
Incomplete or unexpected headers
- Problem: If you generate headers from only the first <book>, you might miss fields that appear later in the XML.
- Solution: Scan multiple elements (or the entire dataset) to build a complete header list before writing data.
-
Encoding issues
- Problem: Special characters (such as accents or symbols) may not display correctly in the CSV.
- Solution: Always save with UTF-8 encoding:
worksheet.SaveToFile("output.csv",",", Encoding.get_UTF8())
Conclusion
Converting XML to CSV in Python doesn’t have to be painful. With Spire.XLS for Python, you can automate much of the process, including header generation, handling attributes, and flattening nested nodes. Whether you’re exporting only a few fields, working with complex hierarchies, or cleaning up messy XML, Spire.XLS gives you the flexibility to handle it.
By integrating these approaches into your workflow, you can turn structured XML datasets into clean, analysis-ready CSV files in just a few lines of code.
FAQs
Q1: Can I export directly to Excel (.xlsx) instead of CSV?
Yes. Simply use workbook.SaveToFile("output.xlsx", ExcelVersion.Version2016).
Q2: How do I handle very large XML files?
Use Python’s iterparse() from xml.etree.ElementTree to stream large files instead of loading them fully into memory.
Q3: What if some <book> elements contain additional tags?
You can enhance the header-building step to scan all <book> nodes and collect unique tags dynamically.
Q4: Can I customize the CSV delimiter (e.g., use ; instead of ,)?
Yes. When calling SaveToFile(), replace the delimiter argument:
worksheet.SaveToFile("output.csv", ";", Encoding.get_UTF8())
Q5: How do I export nested XML structures (e.g., multiple <review> nodes)?
Flatten them into a single cell by joining values. For example:
reviews = [r.text for r in book.find("reviews").findall("review")]
worksheet.SetValue(row_index, col_index, "; ".join(reviews))
Get a Free License
To fully experience the capabilities of Spire.XLS for Python without any evaluation limitations, you can request a free 30-day trial license.
