
Knowledgebase (2370)
Children categories
Replacing image with text or image in a Word document is possible in Spire.Doc. We've already illustrated how to replace image with text, in this tutorial, we will show you how to replace a specified image with another image using Spire.Doc and C#.
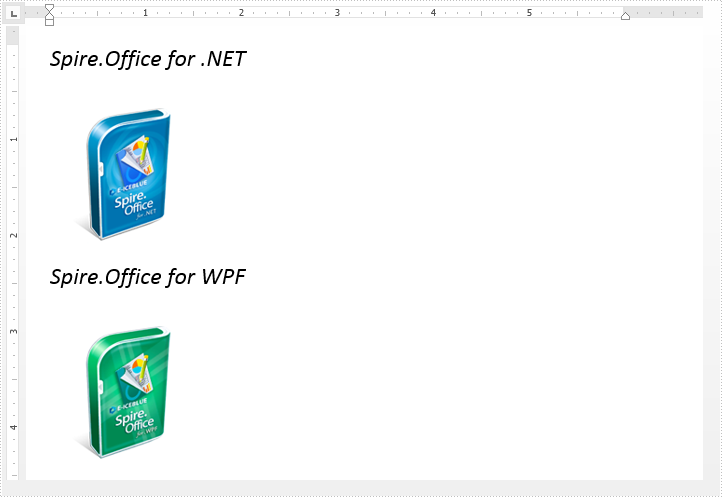
Below is the original Word document before replacing image:
Code Snippet:
Step 1: Load the Word document.
Document document = new Document("Input.docx");
Step 2: Replace the image which title is "Figure 1" with new image.
//Loop through the paragraphs of the section
foreach (Paragraph paragraph in document.Sections[0].Paragraphs)
{
    //Loop through the child elements of paragraph
    foreach (DocumentObject docObj in paragraph.ChildObjects)
    {
        if (docObj.DocumentObjectType == DocumentObjectType.Picture)
        {
            DocPicture picture = docObj as DocPicture;
            if (picture.Title == "Figure 1")
            {
                //Replace the image
                picture.LoadImage(Image.FromFile("PinkRoses.jpg"));
            }
        }
    }
}
Step 3: Save and close the document.
document.SaveToFile("ReplaceImage.docx");
document.Close();
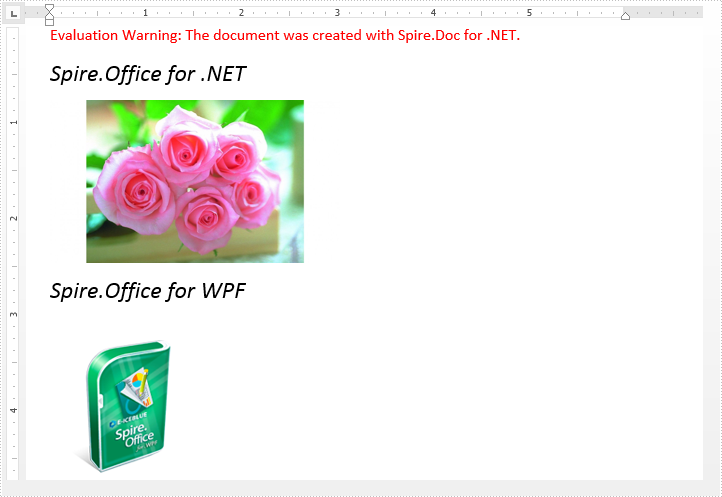
The resultant document looks as follows:
Full code:
using System.Drawing;
using Spire.Doc;
using Spire.Doc.Documents;
using Spire.Doc.Fields;

namespace Replace_Image
{
    class Program
    {
        static void Main(string[] args)
        {
            //Load the Word document
            Document document = new Document("Input.docx");

            //Loop through the paragraphs of the section
            foreach (Paragraph paragraph in document.Sections[0].Paragraphs)
            {
                //Loop through the child elements of paragraph
                foreach (DocumentObject docObj in paragraph.ChildObjects)
                {
                    if (docObj.DocumentObjectType == DocumentObjectType.Picture)
                    {
                        DocPicture picture = docObj as DocPicture;
                        if (picture.Title == "Figure 1")
                        {
                            //Replace the image
                            picture.LoadImage(Image.FromFile("PinkRoses.jpg"));
                        }
                    }
                }
            }

            //Save and close the document
            document.SaveToFile("ReplaceImage.docx");
            document.Close();
        }
    }
}
By using Spire.Presentation for .NET, developers can easily modify the texts on the presentation slides. In this topic, we are going to demonstrate how to use Spire.Presentation to replace the specific texts in a placeholder in C#.
Firstly, view the original sample document that the text "Spire.Presentation for .NET" will be replaced later.

Step 1: Create an instance of Dictionary<string,string> and add an item for the instance.
Dictionary<string, string> TagValues = new Dictionary<string, string>();
TagValues.Add("Spire.Presentation for .NET", "Spire.PPT");
Step 2: Create a presentation instance and load the document from file.
Presentation presentation = new Presentation();
presentation.LoadFromFile("Sample.pptx", FileFormat.Pptx2010);
Step 3: Call ReplaceTags event to replace all the texts on the first slide.
ReplaceTags(presentation.Slides[0], TagValues);
Step 4: Save the document to file and lance to process it.
presentation.SaveToFile("Result.pptx", FileFormat.Pptx2010);
System.Diagnostics.Process.Start("Result.pptx");
The following ReplaceTags() method shows how to replace the text on the first presentation slide:
public void ReplaceTags(Spire.Presentation.ISlide pSlide, Dictionary<string, string> TagValues)
{
    foreach (IShape curShape in pSlide.Shapes)
    {
        if (curShape is IAutoShape)
        {
            foreach (TextParagraph tp in (curShape as IAutoShape).TextFrame.Paragraphs)
            {
                foreach (var curKey in TagValues.Keys)
                {
                    if (tp.Text.Contains(curKey))
                    {
                        tp.Text = tp.Text.Replace(curKey, TagValues[curKey]);
                    }
                }
            }
        }
    }
}
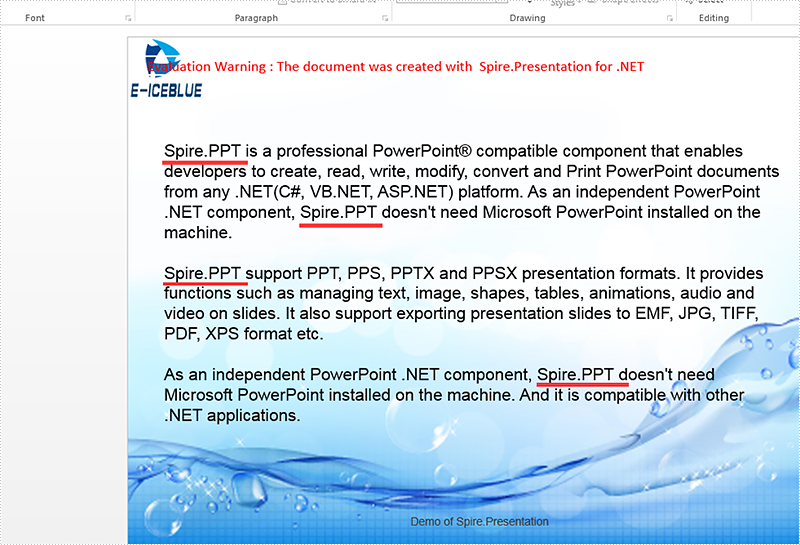
Effective screenshot after the replacing the text on the presentation slide:
Full codes of how to replace the text on the presentation slides:
public ReplaceText()
{
    {
        Dictionary<string, string> TagValues = new Dictionary<string, string>();
        TagValues.Add("Spire.Presentation for .NET", "Spire.PPT");

        Presentation presentation = new Presentation();

        presentation.LoadFromFile("Sample.pptx", FileFormat.Pptx2010);

        ReplaceTags(presentation.Slides[0], TagValues);

        presentation.SaveToFile("Result.pptx", FileFormat.Pptx2010);
        System.Diagnostics.Process.Start("Result.pptx");
    }
}
public void ReplaceTags(Spire.Presentation.ISlide pSlide, Dictionary<string, string> TagValues)
{
    foreach (IShape curShape in pSlide.Shapes)
    {
        if (curShape is IAutoShape)
        {
            foreach (TextParagraph tp in (curShape as IAutoShape).TextFrame.Paragraphs)
            {
                foreach (var curKey in TagValues.Keys)
                {
                    if (tp.Text.Contains(curKey))
                    {
                        tp.Text = tp.Text.Replace(curKey, TagValues[curKey]);
                    }
                }
            }
        }
    }
}
Adding print button to PDF document is possible in Spire.PDF, when the button is clicked, the print dialog will be opened. In this tutorial, I'm going to show you how to add a print button to an existing pdf document using Spire.PDF.
To accomplish the task, first you need to create an instance of the PdfButtonField class. This class also allows you to define the appearance of the button. For instance, you can set text, color of text, background color, border color etc. of the button. Second you need to add the print action to the button by calling the AddPrintAction() method. At last, add the button to the document and save the document to file. The following code example explains the same.
Code snippets:
Step 1: Load the PDF document and enable form creation.
PdfDocument doc = new PdfDocument("Input.pdf");
doc.AllowCreateForm = true;
Step 2: Get the first page.
PdfPageBase page = doc.Pages[0];
Step 3: Create a PdfButtonField instance and set properties for the button.
PdfButtonField button = new PdfButtonField(page, "Print");
button.Bounds = new RectangleF(280, 600, 50, 20);
button.BorderColor = new PdfRGBColor(Color.AliceBlue);
button.BorderStyle = PdfBorderStyle.Solid;
button.ForeColor = new PdfRGBColor(Color.White);
button.BackColor = new PdfRGBColor(Color.Blue);
button.ToolTip = "Print";
button.Font = new PdfFont(PdfFontFamily.Helvetica, 9f);
Step 4: Add print action to the button.
button.AddPrintAction();
Step 5: Add the button to the document.
doc.Form.Fields.Add(button);
Step 6: Save the document.
doc.SaveToFile("Output.pdf");
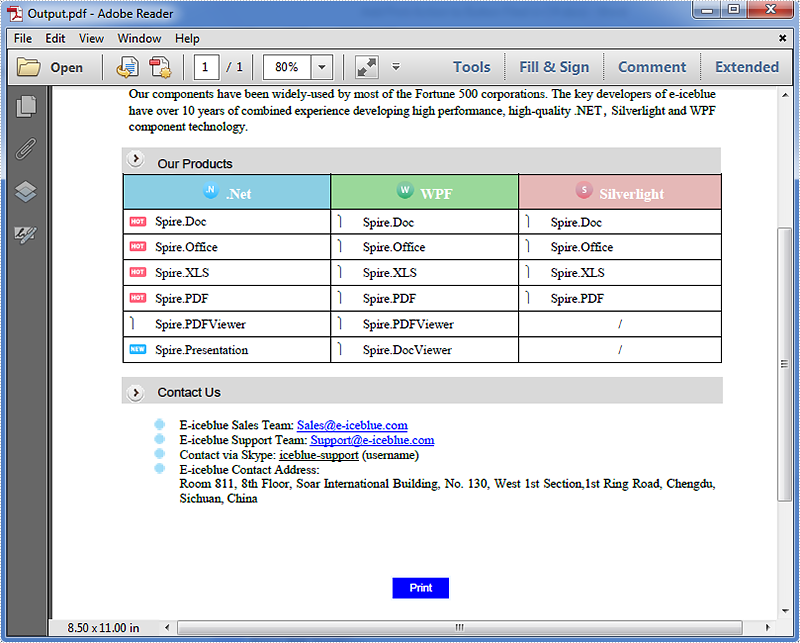
The resultant document looks as follows:
Full code:
using System.Drawing;
using Spire.Pdf;
using Spire.Pdf.Fields;
using Spire.Pdf.Graphics;

namespace Add_print_button
{
    class Program
    {
        static void Main(string[] args)
        {
            //Load the PDF document
            PdfDocument doc = new PdfDocument("Input.pdf");
            //Enable form creation
            doc.AllowCreateForm = true;
            //Get the first page
            PdfPageBase page = doc.Pages[0];

            //Create a PdfButtonField instance
            PdfButtonField button = new PdfButtonField(page, "Print");
            //Set button properties
            button.Bounds = new RectangleF(280, 600, 50, 20);
            button.BorderColor = new PdfRGBColor(Color.AliceBlue);
            button.BorderStyle = PdfBorderStyle.Solid;
            button.ForeColor = new PdfRGBColor(Color.White);
            button.BackColor = new PdfRGBColor(Color.Blue);
            button.ToolTip = "Print";
            button.Font = new PdfFont(PdfFontFamily.Helvetica, 9f);

            //Add print action to the button
            button.AddPrintAction();

            //Add the button to document
            doc.Form.Fields.Add(button);

            //Save the document
            doc.SaveToFile("Output.pdf");
        }
    }
}
