
Knowledgebase (2370)
Children categories
RTF is a document language used for encoding formatted text and graphics for easy transfer between applications. This article presents how to insert a piece of RTF encoded string to Word document using Spire.Doc.
Step 1: Initialize an instance of Document class, add a section to it.
Document doc = new Document();
Section section = doc.
Step 2: Add a paragraph to the section.
Paragraph para = section.AddParagraph();
Step 3: Declare a String variable to store the RTF string.
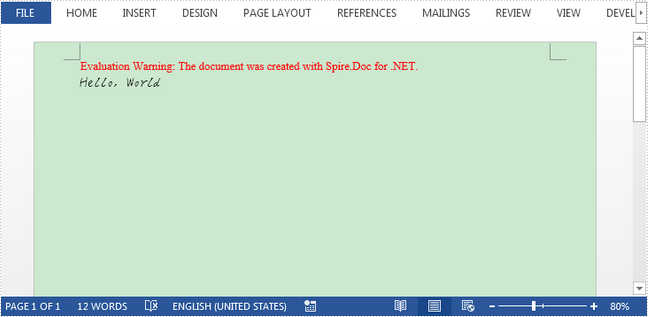
String rtfString = @"{\rtf1\ansi\deff0 {\fonttbl {\f0 hakuyoxingshu7000;}}\f0\fs28 Hello, World}";
Step 4: Append RTF string to paragraph.
para.AppendRTF(rtfString);
Step 5: Save the file.
doc.SaveToFile("Output.docx");
Output:
Full Code:
using Spire.Doc;
using Spire.Doc.Documents;
using System;
namespace InsertRTF
{
 class Program
    {

     static void Main(string[] args)
     {
         Document doc = new Document();
         Section section = doc.AddSection();
         Paragraph para = section.AddParagraph();

         String rtfString = @"{\rtf1\ansi\deff0 {\fonttbl {\f0 hakuyoxingshu7000;}}\f0\fs28 Hello, World}";
         para.AppendRTF(rtfString);

         doc.SaveToFile("Output.docx");

     }

    }
}
Imports Spire.Doc
Imports Spire.Doc.Documents
Namespace InsertRTF
	Class Program

		Private Shared Sub Main(args As String())
			Dim doc As New Document()
			Dim section As Section = doc.AddSection()
			Dim para As Paragraph = section.AddParagraph()

			Dim rtfString As [String] = "{\rtf1\ansi\deff0 {\fonttbl {\f0 hakuyoxingshu7000;}}\f0\fs28 Hello, World}"
			para.AppendRTF(rtfString)

			doc.SaveToFile("Output.docx")

		End Sub

	End Class
End Namespace
The track changes has been used to keep track of the every changes that made to the Word document. It helps to record every edit, insertion, deletion, or modification in a word document. We have demonstrated how to accept/reject the tracked changes on word document in C#. This article will show you how to enable track changes of the document.
Step 1: Create a new word document and load the document from file.
Document document = new Document();
document.LoadFromFile("Sample.docx", FileFormat.Docx2010);
Step 2: Enable the track changes.
document.TrackChanges = true;
Step 3: Save the document to file.
document.SaveToFile("Enable Trackchanges.docx", FileFormat.Docx2010);
Effective screenshot:

Full codes:
using Spire.Doc;
namespace EnableTrack
{
    class Program
    {
        static void Main(string[] args)
        {
            Document document = new Document();
            document.LoadFromFile("Sample.docx", FileFormat.Docx2010);
            document.TrackChanges = true;
         document.SaveToFile("Enable Trackchanges.docx", FileFormat.Docx2010);

        }
    }
}
Lock Specified Sections of Word Documents in C#, VB.NET
2017-03-15 08:04:50 Written by AdministratorSection protection allows users to be able to edit only the forms (if any) rather than any other content within it. When we protect a document, we can specify that the specific sections of the document be protected. This is useful in case we want to protect parts of a Word document.
Following code snippets demonstrate the same.
Step 1: Initialize an instance of Document class.
Document doc = new Document();
Step 2: Add two sections to the document.
Section s1 = doc.AddSection();
Section s2 = doc.AddSection();
Step 3: Append some text to section 1 and section 2.
s1.AddParagraph().AppendText("section 1");
s2.AddParagraph().AppendText("section 2");
Step 4: Protect the document with AllowOnlyFormFields protection type.
doc.Protect(ProtectionType.AllowOnlyFormFields, "123");
Step 5: Unprotect section 2.
s2.ProtectForm = false;
Step 6: Save the document.
doc.SaveToFile("Protect_Section.docx");
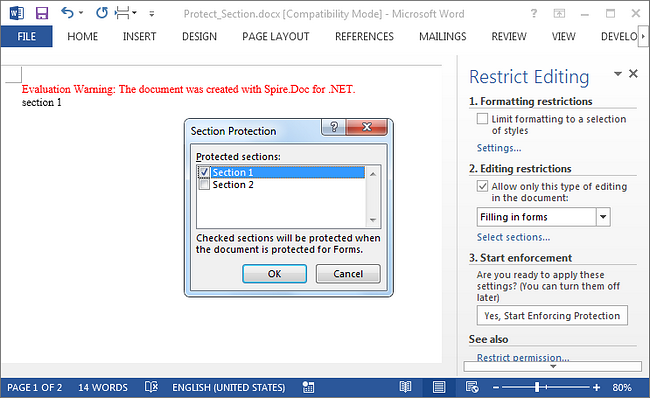
Result:
Run the program, we should get the file in which section 1 is protected to allow only editing in form fields while section 2 can be edited freely.
Full Code:
using Spire.Doc;
namespace LockSection
{
    class Program
    {
        static void Main(string[] args)
        {
            Document doc = new Document();
            Section s1 = doc.AddSection();
            Section s2 = doc.AddSection();

            s1.AddParagraph().AppendText("section 1");
            s2.AddParagraph().AppendText("section 2");

            //protect all sections
            doc.Protect(ProtectionType.AllowOnlyFormFields, "123");
            //unprotect section 2
            s2.ProtectForm = false;

            doc.SaveToFile("Protect_Section.docx");
        }
    }
}
Imports Spire.Doc
Namespace LockSection
	Class Program
		Private Shared Sub Main(args As String())
			Dim doc As New Document()
			Dim s1 As Section = doc.AddSection()
			Dim s2 As Section = doc.AddSection()

			s1.AddParagraph().AppendText("section 1")
			s2.AddParagraph().AppendText("section 2")

			'protect all sections
			doc.Protect(ProtectionType.AllowOnlyFormFields, "123")
			'unprotect section 2
			s2.ProtectForm = False

			doc.SaveToFile("Protect_Section.docx")
		End Sub
	End Class
End Namespace
