Knowledgebase (2370)
Children categories
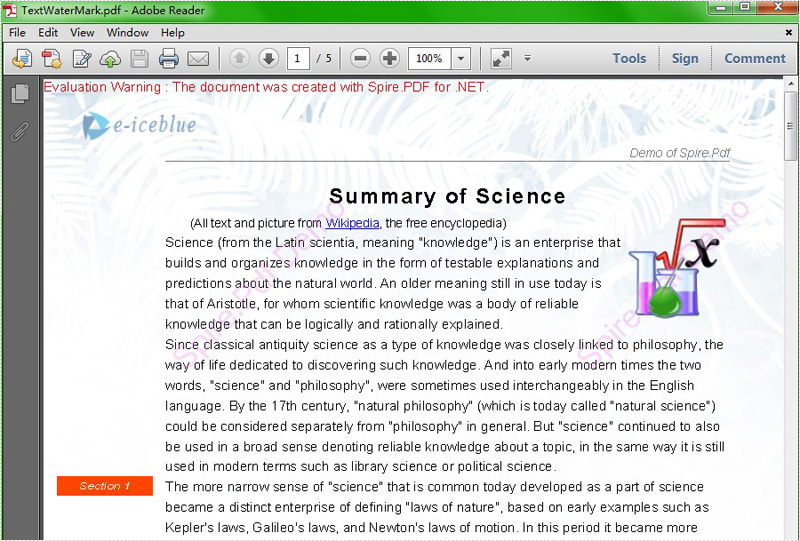
Watermark is a recognizable text or image that appears under document text. A watermark is useful in the examination of paper because it can be widely used for trademarks, locations and so on. This article aims at introducing how to add PDF text watermark for WPF through a simple WPF PDF API Spire.PDF for WPF. Also it can implement PDF watermark by image.
First we need to complete the preparatory work:
- Download the latest Spire.PDF and install it on your machine.
- Add the Spire.PDF.WPF.dll files as reference.
- Open bin folder and select the three dll files under .NET 4.0.
- Right click property and select properties in its menu.
- Set the target framework as .NET 4.
- Add Spire.PDF as namespace.
Here comes to the explanation of the code.
Step 1: Create an instance of Spire.PDF.Document
PdfDocument doc = new PdfDocument();
Step 2: Load the file base on a specified file path
doc.LoadFromFile(@"..\..\Sample1.pdf");
Step 3: Add the text watermark to the first page
PdfPageBase page = doc.Pages[0];
PdfTilingBrush brush = new PdfTilingBrush(new SizeF(page.Canvas.ClientSize.Width/2, page.Canvas.ClientSize.Height/3));
brush.Graphics.SetTransparency(0.3f);
brush.Graphics.Save();
brush.Graphics.TranslateTransform(brush.Size.Width / 2, brush.Size.Height / 2);
brush.Graphics.RotateTransform(-45);
brush.Graphics.DrawString("Spire.Pdf Demo",new PdfFont(PdfFontFamily.Helvetica, 24), PdfBrushes.Violet, 0, 0,new PdfStringFormat(PdfTextAlignment.Center));
brush.Graphics.Restore();
brush.Graphics.SetTransparency(1);
page.Canvas.DrawRectangle(brush, new RectangleF(new PointF(0, 0), page.Canvas.ClientSize));
Step 4: Save the PDF file
doc.SaveToFile("TextWaterMark.pdf");
Full code:
private void button1_Click(object sender, RoutedEventArgs e)
 {
  PdfDocument doc = new PdfDocument();
  doc.LoadFromFile(@"..\..\Sample1.pdf");
  PdfPageBase page = doc.Pages[0];
  PdfTilingBrush brush = new PdfTilingBrush(new SizeF(page.Canvas.ClientSize.Width/2, page.Canvas.ClientSize.Height/3));
  brush.Graphics.SetTransparency(0.3f);
  brush.Graphics.Save();
  brush.Graphics.TranslateTransform(brush.Size.Width / 2, brush.Size.Height / 2);
  brush.Graphics.RotateTransform(-45);
  brush.Graphics.DrawString("Spire.Pdf Demo",new PdfFont(PdfFontFamily.Helvetica, 24), PdfBrushes.Violet, 0, 0, new PdfStringFormat(PdfTextAlignment.Center));
  brush.Graphics.Restore();
  brush.Graphics.SetTransparency(1);
  page.Canvas.DrawRectangle(brush, new RectangleF(new PointF(0, 0), page.Canvas.ClientSize));
  doc.SaveToFile("TextWaterMark.pdf");
 }
Effect screenshot:
We have already demonstrated how to create form fields in PDF file. This article mainly shows you how developers fill form field in PDF in C# only with 3 simple steps by using a standalone .NET PDF component Spire.PDF.
Make sure Spire.PDF for .NET has been installed correctly and then add Spire.Pdf.dll as reference in the downloaded Bin folder though the below path: "..\Spire.Pdf\Bin\NET4.0\ Spire.Pdf.dll". Here comes to the details of how developers Fill Form Fields by using Spire.PDF:
Step 1: Open the form that needs to fill the data
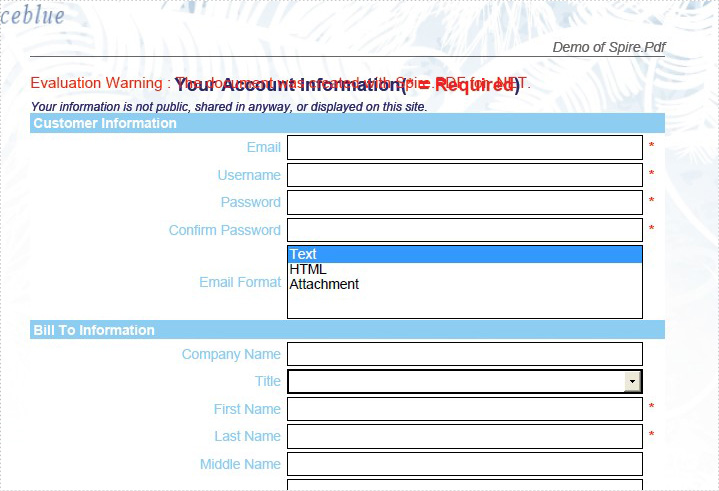
//Create a pdf document
PdfDocument doc = new PdfDocument();
//Load from file
doc.LoadFromFile(@"..\..\FormField.pdf");
Step 2: Update the data to the form
//Get form
PdfFormWidget formWidget = doc.Form as PdfFormWidget;
for (int i = 0; i < formWidget.FieldsWidget.List.Count; i++)
            {
                PdfField field = formWidget.FieldsWidget.List[i] as PdfField;


//Fill the data for textBoxField
if (field is PdfTextBoxFieldWidget)
   {
    PdfTextBoxFieldWidget textBoxField = field as PdfTextBoxFieldWidget;
    switch (textBoxField.Name)
     {

     case "email":
        textBoxField.Text = "support@e-iceblue.com";
    break;
     case "password":
        textBoxField.Password = true;
        textBoxField.Text = "e-iceblue";

//Fill the data for listBoxField
if (field is PdfListBoxWidgetFieldWidget)
  {
     PdfListBoxWidgetFieldWidget listBoxField = field as PdfListBoxWidgetFieldWidget;
     switch (listBoxField.Name)
       {

        case "email_format":
         int[] index = { 1 };
         listBoxField.SelectedIndex = index;
         break;


//Fill the data for comBoxField
if (field is PdfComboBoxWidgetFieldWidget)
  {
   PdfComboBoxWidgetFieldWidget comBoxField = field as PdfComboBoxWidgetFieldWidget;
   switch (comBoxField.Name)
    {

     case "title":
       int[] items = { 0 };
       comBoxField.SelectedIndex = items;
       break;


//Fill the data for checkBoxField
if (field is PdfCheckBoxWidgetFieldWidget)
  {
   PdfCheckBoxWidgetFieldWidget checkBoxField = field as PdfCheckBoxWidgetFieldWidget;
   switch (checkBoxField.Name)
    {

    case "agreement_of_terms":
      checkBoxField.Checked = true;
      break;
Step 3: Save and launch file
//Save the document to file in PDF format
doc.SaveToFile(@"../../FormFieldData.pdf.pdf");
//Launch the file
System.Diagnostics.Process.Start(@"../../FormFieldData.pdf.pdf");
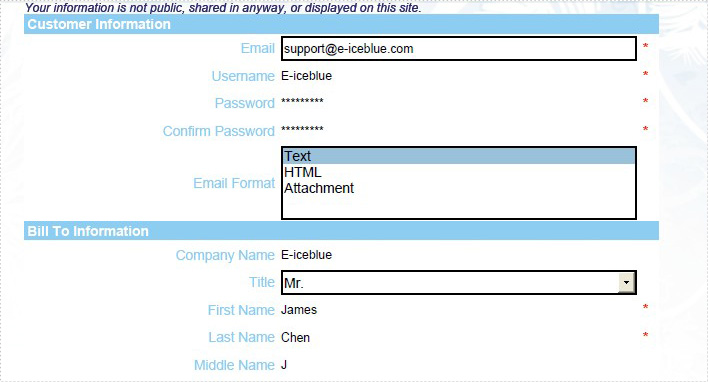
Effective Screenshot:
The original PDF with form fields:
After fill the form fields:
View the full code as below:
using Spire.Pdf;
using Spire.Pdf.Fields;
using Spire.Pdf.Widget;


namespace FillFormFields
{
    class Program
    {
        static void Main(string []args){
            PdfDocument doc = new PdfDocument();
            doc.LoadFromFile(@"..\..\FormField.pdf");
            PdfFormWidget formWidget = doc.Form as PdfFormWidget;
            for (int i = 0; i < formWidget.FieldsWidget.List.Count; i++)
            {
                PdfField field = formWidget.FieldsWidget.List[i] as PdfField;
                if (field is PdfTextBoxFieldWidget)
                {
                    PdfTextBoxFieldWidget textBoxField = field as PdfTextBoxFieldWidget;
                    switch (textBoxField.Name)
                    {
                        case "email":
                            textBoxField.Text = "support@e-iceblue.com";
                            break;
                        case "username":
                            textBoxField.Text = "E-iceblue";
                            break;
                        case "password":
                            textBoxField.Password = true;
                            textBoxField.Text = "e-iceblue";
                            break;
                        case "password2":
                            textBoxField.Password = true;
                            textBoxField.Text = "e-iceblue";
                            break;
                        case "company_name ":
                            textBoxField.Text = "E-iceblue";
                            break;
                        case "first_name":
                            textBoxField.Text = "James";
                            break;
                        case "last_name":
                            textBoxField.Text = "Chen";
                            break;
                        case "middle_name":
                            textBoxField.Text = "J";
                            break;
                        case "address1":
                            textBoxField.Text = "Chengdu";
                            break;
                        case "address2":
                            textBoxField.Text = "Beijing";
                            break;
                        case "city":
                            textBoxField.Text = "Shanghai";
                            break;
                        case "postal_code":
                            textBoxField.Text = "11111";
                            break;
                        case "state":
                            textBoxField.Text = "Shanghai";
                            break;
                        case "phone":
                            textBoxField.Text = "1234567901";
                            break;
                        case "mobile_phone":
                            textBoxField.Text = "123456789";
                            break;
                        case "fax":
                            textBoxField.Text = "12121212";
                            break;
                    }
                }
                if (field is PdfListBoxWidgetFieldWidget)
                {
                    PdfListBoxWidgetFieldWidget listBoxField = field as PdfListBoxWidgetFieldWidget;
                    switch (listBoxField.Name)
                    {
                        case "email_format":
                            int[] index = { 1 };
                            listBoxField.SelectedIndex = index;
                            break;
                    }
                }

                if (field is PdfComboBoxWidgetFieldWidget)
                {
                    PdfComboBoxWidgetFieldWidget comBoxField = field as PdfComboBoxWidgetFieldWidget;
                    switch (comBoxField.Name)
                    {
                        case "title":
                            int[] items = { 0 };
                            comBoxField.SelectedIndex = items;
                            break;
                    }
                }

                if (field is PdfRadioButtonListFieldWidget)
                {
                    PdfRadioButtonListFieldWidget radioBtnField = field as PdfRadioButtonListFieldWidget;
                    switch (radioBtnField.Name)
                    {
                        case "country":
                            radioBtnField.SelectedIndex = 1;
                            break;
                    }
                }

                if (field is PdfCheckBoxWidgetFieldWidget)
                {
                    PdfCheckBoxWidgetFieldWidget checkBoxField = field as PdfCheckBoxWidgetFieldWidget;
                    switch (checkBoxField.Name)
                    {
                        case "agreement_of_terms":
                            checkBoxField.Checked = true;
                            break;
                    }
                }
                if (field is PdfButtonWidgetFieldWidget)
                {
                    PdfButtonWidgetFieldWidget btnField = field as PdfButtonWidgetFieldWidget;
                    switch (btnField.Name)
                    {
                        case "submit":
                            btnField.Text = "Submit";
                            break;
                    }
                }
            }
            doc.SaveToFile(@"../../FormFieldData.pdf.pdf");
            System.Diagnostics.Process.Start(@"../../FormFieldData.pdf.pdf");
        }
    }
}
Imports Spire.Pdf
Imports Spire.Pdf.Fields
Imports Spire.Pdf.Widget


Namespace FillFormFields
	Class Program
		Private Shared Sub Main(args As String())
			Dim doc As New PdfDocument()
			doc.LoadFromFile("..\..\FormField.pdf")
			Dim formWidget As PdfFormWidget = TryCast(doc.Form, PdfFormWidget)
			For i As Integer = 0 To formWidget.FieldsWidget.List.Count - 1
				Dim field As PdfField = TryCast(formWidget.FieldsWidget.List(i), PdfField)
				If TypeOf field Is PdfTextBoxFieldWidget Then
					Dim textBoxField As PdfTextBoxFieldWidget = TryCast(field, PdfTextBoxFieldWidget)
					Select Case textBoxField.Name
						Case "email"
							textBoxField.Text = "support@e-iceblue.com"
							Exit Select
						Case "username"
							textBoxField.Text = "E-iceblue"
							Exit Select
						Case "password"
							textBoxField.Password = True
							textBoxField.Text = "e-iceblue"
							Exit Select
						Case "password2"
							textBoxField.Password = True
							textBoxField.Text = "e-iceblue"
							Exit Select
						Case "company_name "
							textBoxField.Text = "E-iceblue"
							Exit Select
						Case "first_name"
							textBoxField.Text = "James"
							Exit Select
						Case "last_name"
							textBoxField.Text = "Chen"
							Exit Select
						Case "middle_name"
							textBoxField.Text = "J"
							Exit Select
						Case "address1"
							textBoxField.Text = "Chengdu"
							Exit Select
						Case "address2"
							textBoxField.Text = "Beijing"
							Exit Select
						Case "city"
							textBoxField.Text = "Shanghai"
							Exit Select
						Case "postal_code"
							textBoxField.Text = "11111"
							Exit Select
						Case "state"
							textBoxField.Text = "Shanghai"
							Exit Select
						Case "phone"
							textBoxField.Text = "1234567901"
							Exit Select
						Case "mobile_phone"
							textBoxField.Text = "123456789"
							Exit Select
						Case "fax"
							textBoxField.Text = "12121212"
							Exit Select
					End Select
				End If
				If TypeOf field Is PdfListBoxWidgetFieldWidget Then
					Dim listBoxField As PdfListBoxWidgetFieldWidget = TryCast(field, PdfListBoxWidgetFieldWidget)
					Select Case listBoxField.Name
						Case "email_format"
							Dim index As Integer() = {1}
							listBoxField.SelectedIndex = index
							Exit Select
					End Select
				End If

				If TypeOf field Is PdfComboBoxWidgetFieldWidget Then
					Dim comBoxField As PdfComboBoxWidgetFieldWidget = TryCast(field, PdfComboBoxWidgetFieldWidget)
					Select Case comBoxField.Name
						Case "title"
							Dim items As Integer() = {0}
							comBoxField.SelectedIndex = items
							Exit Select
					End Select
				End If

				If TypeOf field Is PdfRadioButtonListFieldWidget Then
					Dim radioBtnField As PdfRadioButtonListFieldWidget = TryCast(field, PdfRadioButtonListFieldWidget)
					Select Case radioBtnField.Name
						Case "country"
							radioBtnField.SelectedIndex = 1
							Exit Select
					End Select
				End If

				If TypeOf field Is PdfCheckBoxWidgetFieldWidget Then
					Dim checkBoxField As PdfCheckBoxWidgetFieldWidget = TryCast(field, PdfCheckBoxWidgetFieldWidget)
					Select Case checkBoxField.Name
						Case "agreement_of_terms"
							checkBoxField.Checked = True
							Exit Select
					End Select
				End If
				If TypeOf field Is PdfButtonWidgetFieldWidget Then
					Dim btnField As PdfButtonWidgetFieldWidget = TryCast(field, PdfButtonWidgetFieldWidget)
					Select Case btnField.Name
						Case "submit"
							btnField.Text = "Submit"
							Exit Select
					End Select
				End If
			Next
			doc.SaveToFile("../../FormFieldData.pdf.pdf")
			System.Diagnostics.Process.Start("../../FormFieldData.pdf.pdf")
		End Sub
	End Class
End Namespace
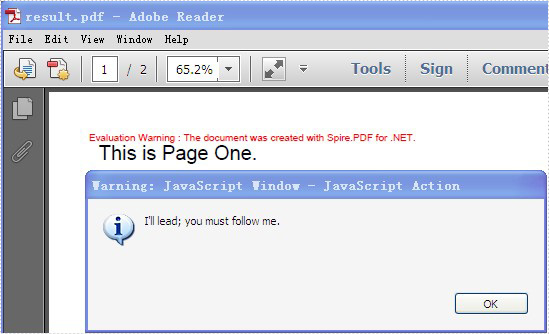
PDF supports actions. And Spire.PDF, a very powerful .NET component enables developers to add action chain to PDF file. Action chain means an action get executed automatically after another one.
In this article, a solution is introduced to add action chain to PDF file.
Step 1: Set the action that gets performed right after PDF document is opened
String script
                = "app.alert({"
                + "    cMsg: \"I'll lead; you must follow me.\","
                + "    nIcon: 3,"
                + "    cTitle: \"JavaScript Action\""
                + "});";
PdfJavaScriptAction action1 = new PdfJavaScriptAction(script);
document.AfterOpenAction = action1;
Spire.PDF provides you a class called PdfJavaScriptAction that executes JavaScript code. Create a PdfJavaScriptAction instance “action1” using JavaScript code. And set the property AfterOpenAction of “document” to action1.
Step 2: Set the action that gets performed after “action1” using the property NextAction
script
                = "app.alert({"
                + "    cMsg: \"The firt page!\","
                + "    nIcon: 3,"
                + "    cTitle: \"JavaScript Action\""
                + "});";
PdfJavaScriptAction action2 = new PdfJavaScriptAction(script);
action1.NextAction = action2;
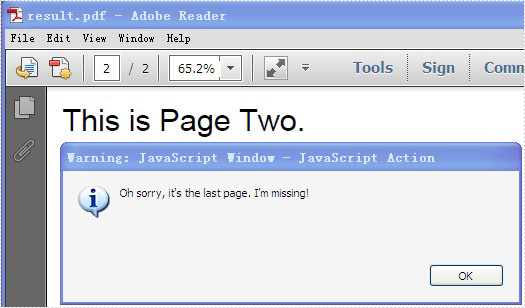
Step 3: Set the action that gets performed after “action2”
PdfDestination dest = new PdfDestination(pagetwo);
dest.Zoom = 1;
PdfGoToAction action3 = new PdfGoToAction(dest);
action2.NextAction = action3;
PdfDestination can mark a specified page or location in PDF. Create a PdfDestination instance “dest” using “pagetwo”. Then create a PdfGoToAction instance “action3” using “dest”.
Step 4: Set the action that gets performed after “action3”
script
                = "app.alert({"
                + "    cMsg: \"Oh sorry, it's the last page. I'm missing!\","
                + "    nIcon: 3,"
                + "    cTitle: \"JavaScript Action\""
                + "});";
PdfJavaScriptAction action4 = new PdfJavaScriptAction(script);
action3.NextAction = action4;
Step 5: Save the file
document.SaveToFile("result.pdf");
Full code:
using Spire.Pdf;
using Spire.Pdf.Actions;
using Spire.Pdf.General;
using Spire.Pdf.Graphics;
using System;
using System.Drawing;


namespace AddActionChain
{
    class Program
    {
        static void Main(string[] args)
        {
            PdfDocument document = new PdfDocument();

            PdfPageBase pageone = document.Pages.Add();
            pageone.Canvas.DrawString("This is Page One.",
                                   new PdfFont(PdfFontFamily.Helvetica, 20f),
                                   new PdfSolidBrush(Color.Black),
                                   10, 10);
            PdfPageBase pagetwo = document.Pages.Add();
            pagetwo.Canvas.DrawString("This is Page Two.",
                                   new PdfFont(PdfFontFamily.Helvetica, 20f),
                                   new PdfSolidBrush(Color.Black),
                                   10, 10);

            String script
                = "app.alert({"
                + "    cMsg: \"I'll lead; you must follow me.\","
                + "    nIcon: 3,"
                + "    cTitle: \"JavaScript Action\""
                + "});";
            PdfJavaScriptAction action1 = new PdfJavaScriptAction(script);
            document.AfterOpenAction = action1;

            script
                = "app.alert({"
                + "    cMsg: \"The first page!\","
                + "    nIcon: 3,"
                + "    cTitle: \"JavaScript Action\""
                + "});";
            PdfJavaScriptAction action2 = new PdfJavaScriptAction(script);
            action1.NextAction = action2;

            PdfDestination dest = new PdfDestination(pagetwo);
            dest.Zoom = 1;
            PdfGoToAction action3 = new PdfGoToAction(dest);
            action2.NextAction = action3;

            script
                = "app.alert({"
                + "    cMsg: \"Oh sorry, it's the last page. I'm missing!\","
                + "    nIcon: 3,"
                + "    cTitle: \"JavaScript Action\""
                + "});";
            PdfJavaScriptAction action4 = new PdfJavaScriptAction(script);
            action3.NextAction = action4;

            document.SaveToFile("result.pdf");

            System.Diagnostics.Process.Start("result.pdf");
        }
    }
}
Screenshot: