A finished report is often reused for a different brand or a different department, and the colours have to follow. The awkward part is that a workbook holds two kinds of colour. One is a hard-coded RGB value that belongs to the single cell it sits in. The other points at a theme slot: the title bar, the header row, the banded rows and the borders all look different, yet all of them read from the same set of slots. The first kind has to be changed cell by cell, and one missed cell gives the old palette away. The second kind repaints the entire sheet from a single slot. Spire.XLS for JavaScript does this in the browser on top of WebAssembly, managing input and output files through a virtual file system (VFS), with no backend service required.
This article covers three key features:
For installation and project setup, see Integrating Spire.XLS for JavaScript in a React Project. The examples below assume Spire.XLS is installed and the WebAssembly module has been initialised.
Replace an accent colour in the theme
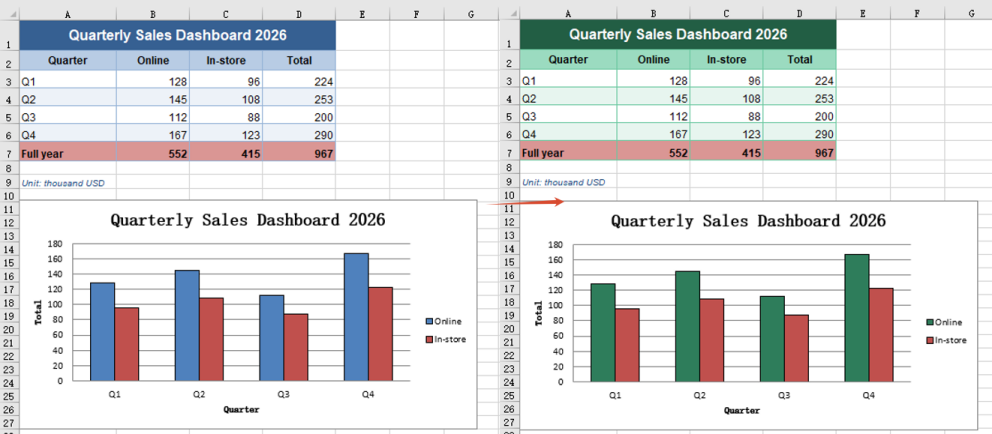
Most reports lean on a single colour: the header row is filled with it, the title bar takes a darker shade, the banded rows a lighter one, and the borders a paler one still. Those shades were not mixed by hand one at a time — they are the same slot read at different tint levels. Reskinning therefore needs no colour picking at all: replace that one slot with the new brand colour and every shade is recomputed, so the whole sheet, chart included, lands on the new palette. The steps are:
- Load the font and the test data file into the VFS.
- Load the workbook with
workbook.LoadFromFile. - Replace the
xlsModule.ThemeColorType.Accent1slot withworkbook.SetThemeColor, giving the new colour throughxlsModule.Color.FromArgb. - Save the workbook with
workbook.SaveToFile; the title bar, header row, banded rows and borders change together.
The complete code example below shows how to replace an accent colour in the theme in React:
function App() {
  const setThemeColor = async () => {
    // Get the Spire.XLS WASM module
    const xlsModule = window.wasmModule?.spirexls;

    // Check that the module is ready
    if (!xlsModule) {
      alert('Spire.Xls is not ready yet');
      return;
    }

    // Load the font and the test data into the VFS
    await window.spire.FetchFileToVFS('ARIAL.TTF', '/Library/Fonts/', `${process.env.PUBLIC_URL}/font/`);
    const inputFileName = 'ThemeSource.xlsx';
    await window.spire.FetchFileToVFS(inputFileName, '', `${process.env.PUBLIC_URL}data/`);

    // Load the workbook
    const workbook = new xlsModule.Workbook();
    workbook.LoadFromFile({ fileName: inputFileName });

    // Replace accent 1 of the theme: the title bar, the header row, the banded rows and the
    // borders all follow it
    workbook.SetThemeColor(
      xlsModule.ThemeColorType.Accent1,
      xlsModule.Color.FromArgb(255, 46, 125, 91),
    );

    // Save the workbook
    const outputFileName = "SetThemeColor.xlsx";
    workbook.SaveToFile({ fileName: outputFileName });

    // Dispose of the workbook object to release resources
    workbook.Dispose();

    // Read the result file from the VFS and trigger the download
    const fileArray = window.dotnetRuntime.Module.FS.readFile(outputFileName);
    const blob = new Blob([fileArray], { type: 'application/vnd.openxmlformats-officedocument.spreadsheetml.sheet' });
    const url = URL.createObjectURL(blob);
    const a = document.createElement('a');
    a.href = url;
    a.download = outputFileName;
    a.click();
    URL.revokeObjectURL(url);
  };

  return (
    <div style={{ textAlign: 'center', height: '300px' }}>
      <h1>Set Workbook Theme</h1>
      <button id="set-theme-color" onClick={setThemeColor}>Replace a Theme Colour</button>
    </div>
  );
}

export default App;
After running, replacing an accent colour in the theme:
Apply a custom colour scheme
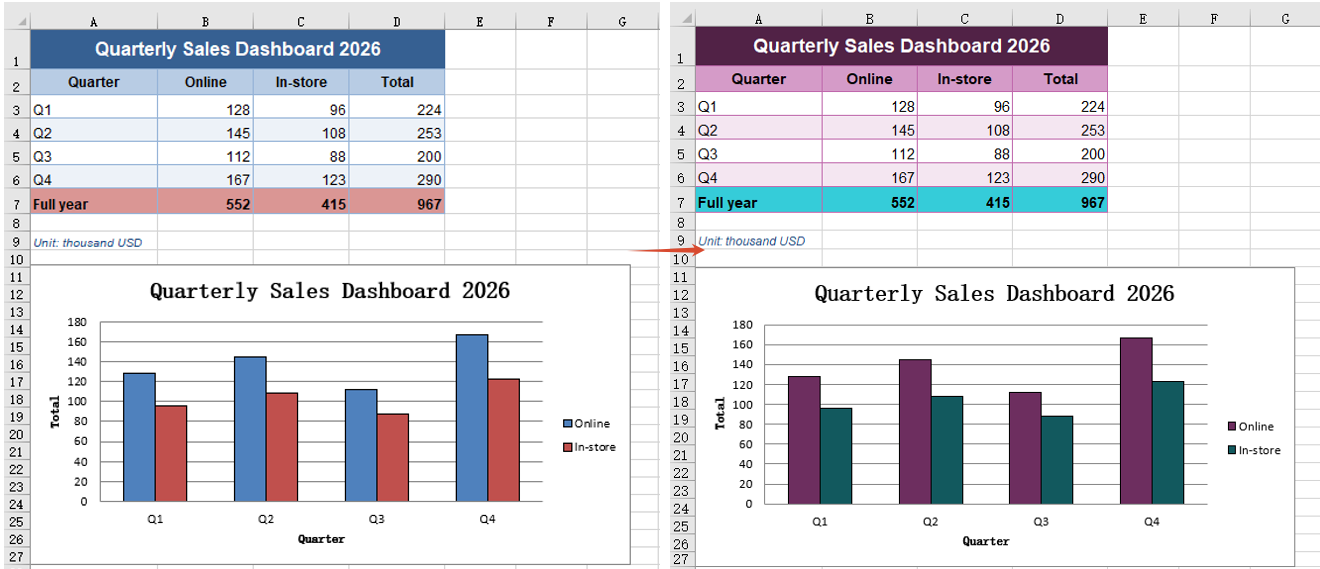
Replacing one accent colour unifies the body of the table, but the other series in the chart, the total row and any warning colour stay on the old palette — they read from other slots in the theme. To move a document onto a different scheme outright, change all six accent slots together, so every element that references the theme lands on the new colours at once instead of one changing and a string of others lagging behind. Reading the current values first leaves a baseline to check the result against. The steps are:
- Load the font and the test data file into the VFS.
- Load the workbook with
workbook.LoadFromFile, then read theR,GandBof the current accent 1 withworkbook.GetThemeColorto keep as a baseline. - Put the six slot-and-colour pairs into an array, the colours again built with
xlsModule.Color.FromArgb. - Walk the array and call
workbook.SetThemeColoron each entry, so all six accent colours change in one pass. - Save the workbook with
workbook.SaveToFile.
The complete code example below shows how to apply a custom colour scheme in React:
function App() {
  const applyThemeScheme = async () => {
    // Get the Spire.XLS WASM module
    const xlsModule = window.wasmModule?.spirexls;

    // Check that the module is ready
    if (!xlsModule) {
      alert('Spire.Xls is not ready yet');
      return;
    }

    // Load the font and the test data into the VFS
    await window.spire.FetchFileToVFS('ARIAL.TTF', '/Library/Fonts/', `${process.env.PUBLIC_URL}/font/`);
    const inputFileName = 'ThemeSource.xlsx';
    await window.spire.FetchFileToVFS(inputFileName, '', `${process.env.PUBLIC_URL}data/`);

    // Load the workbook
    const workbook = new xlsModule.Workbook();
    workbook.LoadFromFile({ fileName: inputFileName });

    // Read the current accent colour back first, so it can be compared with the new one
    const before = workbook.GetThemeColor(xlsModule.ThemeColorType.Accent1);
    console.log(`Accent 1 before the change: R=${before.R} G=${before.G} B=${before.B}`);

    // All six accent colours change in one go, so the whole scheme moves together
    const scheme = [
      [xlsModule.ThemeColorType.Accent1, xlsModule.Color.FromArgb(255, 109, 46, 95)],
      [xlsModule.ThemeColorType.Accent2, xlsModule.Color.FromArgb(255, 18, 89, 94)],
      [xlsModule.ThemeColorType.Accent3, xlsModule.Color.FromArgb(255, 138, 106, 22)],
      [xlsModule.ThemeColorType.Accent4, xlsModule.Color.FromArgb(255, 47, 93, 58)],
      [xlsModule.ThemeColorType.Accent5, xlsModule.Color.FromArgb(255, 67, 48, 122)],
      [xlsModule.ThemeColorType.Accent6, xlsModule.Color.FromArgb(255, 138, 59, 46)],
    ];
    for (const [themeColorType, color] of scheme) {
      workbook.SetThemeColor(themeColorType, color);
    }

    // Save the workbook
    const outputFileName = "ApplyThemeScheme.xlsx";
    workbook.SaveToFile({ fileName: outputFileName });

    // Dispose of the workbook object to release resources
    workbook.Dispose();

    // Read the result file from the VFS and trigger the download
    const fileArray = window.dotnetRuntime.Module.FS.readFile(outputFileName);
    const blob = new Blob([fileArray], { type: 'application/vnd.openxmlformats-officedocument.spreadsheetml.sheet' });
    const url = URL.createObjectURL(blob);
    const a = document.createElement('a');
    a.href = url;
    a.download = outputFileName;
    a.click();
    URL.revokeObjectURL(url);
  };

  return (
    <div style={{ textAlign: 'center', height: '300px' }}>
      <h1>Set Workbook Theme</h1>
      <button id="apply-theme-scheme" onClick={applyThemeScheme}>Apply a Custom Colour Scheme</button>
    </div>
  );
}

export default App;
After running, applying a custom colour scheme:
Reuse another workbook's theme
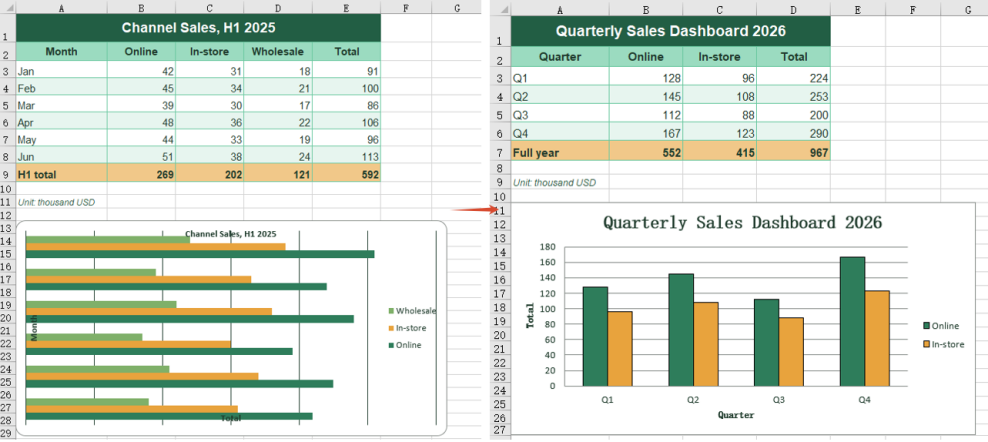
Once a colour scheme is signed off it usually already lives in a workbook — the designer's sample, last quarter's report, or the company template. Copying the hex values slot by slot is tedious and easy to get a digit wrong. The theme is itself part of the workbook, so the whole theme can be taken across, carrying both dark and light background pairs and the hyperlink colours with it, and every theme-referenced colour in the target workbook is repainted. The workbook the theme comes from need not match the target's layout at all — how many rows and columns it holds, which data sits in them and which kind of chart it draws make no difference. What crosses over is the theme; the target's own data and chart are left untouched. The steps are:
- Load the font and both workbook files into the VFS.
- Load the target workbook with
workbook.LoadFromFile, then the theme provider withthemeWorkbook.LoadFromFile. - Copy the provider's theme across in one piece with
workbook.CopyTheme(themeWorkbook). - Save the target workbook with
workbook.SaveToFile, then callDisposeon bothworkbookobjects.
The complete code example below shows how to reuse another workbook's theme in React:
function App() {
const copyWorkbookTheme = async () => {
// Get the Spire.XLS WASM module
const xlsModule = window.wasmModule?.spirexls;
// Check that the module is ready
if (!xlsModule) {
alert('Spire.Xls is not ready yet');
return;
}
// Load the font and both workbooks into the VFS
await window.spire.FetchFileToVFS('ARIAL.TTF', '/Library/Fonts/', `${process.env.PUBLIC_URL}/font/`);
const inputFileName = 'ThemeSource.xlsx';
const themeFileName = 'ThemeAlt.xlsx';
await window.spire.FetchFileToVFS(inputFileName, '', `${process.env.PUBLIC_URL}data/`);
await window.spire.FetchFileToVFS(themeFileName, '', `${process.env.PUBLIC_URL}data/`);
// Load the workbook that is to be reskinned
const workbook = new xlsModule.Workbook();
workbook.LoadFromFile({ fileName: inputFileName });
// Load the workbook the theme comes from
const themeWorkbook = new xlsModule.Workbook();
themeWorkbook.LoadFromFile({ fileName: themeFileName });
// Copy the theme of the source workbook over in one piece
workbook.CopyTheme(themeWorkbook);
// Save the workbook
const outputFileName = "CopyWorkbookTheme.xlsx";
workbook.SaveToFile({ fileName: outputFileName });
// Dispose of both workbook objects to release resources
workbook.Dispose();
themeWorkbook.Dispose();
// Read the result file from the VFS and trigger the download
const fileArray = window.dotnetRuntime.Module.FS.readFile(outputFileName);
const blob = new Blob([fileArray], { type: 'application/vnd.openxmlformats-officedocument.spreadsheetml.sheet' });
const url = URL.createObjectURL(blob);
const a = document.createElement('a');
a.href = url;
a.download = outputFileName;
a.click();
URL.revokeObjectURL(url);
};
return (
<div style={{ textAlign: 'center', height: '300px' }}>
<h1>Set Workbook Theme</h1>
<button id="copy-workbook-theme" onClick={copyWorkbookTheme}>Reuse Another Workbook's Theme</button>
</div>
);
}
export default App;
After running, reusing another workbook's theme:
FAQ
Which colours change with the theme, and which do not
Cause: Colours fall into two kinds. A colour taken from Theme Colors in Excel changes together with the theme; a colour taken from Standard Colors is a fixed value and stays as it is.
Solution: To have a colour change with the theme, select the cell in Excel and pick it from Theme Colors. Colours written in code are all fixed values and do not change with the theme:
const cell = sheet.Range.get('A1');

// A fixed colour: it does not change with the theme
cell.Style.Interior.Color = xlsModule.Color.FromArgb(255, 192, 0, 0);
Can the chart alone be restyled, leaving the table untouched?
Cause: The theme belongs to the whole workbook and makes no distinction between the table and the chart. When the theme changes, every object that takes its colour from the theme changes with it, and the chart is one of them. A chart series holds no colour of its own — it takes the colour from the theme at draw time — so the chart always follows, and one side cannot change on its own.
Solution: To restyle only the chart, leave the theme alone and set the colour on the series directly. That writes a fixed colour into the chart, which the theme does not affect:
const chart = sheet.Charts.get(0);
const serie = chart.Series.get(0);

serie.Format.Fill.FillType = xlsModule.ShapeFillType.SolidColor;
serie.Format.Fill.ForeColor = xlsModule.Color.FromArgb(255, 46, 125, 91);
Get a Free License
Spire.XLS for JavaScript offers a 30-day full-featured free trial license with no functional limitations. Apply here to evaluate before purchasing.
